June 2011 Archives
Thu Jun 30 22:36:51 EEST 2011
St. Maximus The Confessor Holy Relics (incorruptable right hand) is for veneration in Varna

Today by God's gracy I was blessed to go to Varna's Cathedral Church on a small pilgrimage trip to venerate the Holy Relics of Saint Maximus the Confessor.
As one can read in the saint biography, he is one of the biggest Orthodox Christian martyr saint from the time before the great Schizm (he lived in the 7th Century).
St. Maximus the Confessor was a Christian monk and a great Church scholar. He became a monk choosing willingly to abandon his great richness and political life because of Christ.
The Saint's title The Confessor is given because of his great suffering for Christian faith.
Because of the saint's firm staying in faith during an icon fighting heresy emperor Hiraclious (Iraklii) slandered the saint and he was send to a trial where he was immediately vilified as a state traitor.
A severe beating was ordered to be done on the saint and the whole ground was sprinkled with his blood, the saint's torturers also cut his tongue and his right hand was chopped off.
The heretical torturers were ordered to slay down his right hand and his tongue in order to prevent the saint to confess/preach and write down about the Orthodox Christian faith.
The descpile of the saint Anasthasius has also faced the same faith. After the butchery the two saints were walked around the city streets to mock them publicly behind the shocked crowds eyes.
Even though the sadistic torments by God's providence saint Maximus the Confessor did not died immediately but was sent to exile in today's Dobrudja (Dobrich) region in Bulgaria.
Saint Maximus has died in his old age, aged 82 in August 680 A.D. Even though being a disabled because of the martyrdom, during his exile the saint was able to write a lot of treatise books against heresies and especially against Monotheistic Christian heresy, and a lot of other writting concerning the proper spiritual christian life. The saint's major works are titled, Ambigua An exploration of difficult passages in the work of Pseudo-Dionysius and Gregory of Nazianzus, focusing on Christological issues and Mystagogy - A commentary and reasoning on the Eucharistic liturgy.
According to Church tradition after the saint's tongue was cut in order to prevent him to preach the Christian faith correctly, God did a miracle where even without a tongue he preached the Gospel to the masses and he heretical emperor who ordered his suffering and the saint tormentors were publicly disgraced.
Saint Maximus the Confessor is considered a saint also in the Roman Catholic Church.
The saint was canonized officially about 22 years after his death on the oecumenical Church saints assembly in year 682.
After Saint Maximus's death on his tomb many healing miracles occured.
On the place where he was buried three bright lights looking like candlesticks could be seen burning (a clear miracle atteting of the Holy Trinity) as the thrurthful one God.
God's great omen on his tomb is also a clear sign that Maximus the Confessor has been accepted in the eternal paradise with God with all the rightous.
Let God always strenthen us and help us, to all us who does venerate the saint. Let God by his Holy prayers deliver us from all heresies and grant us grace to stay firm in the true Orthodox Christian faith now and forever.
Amen!
Wed Jun 29 16:09:36 EEST 2011
How to make a mysql root user to login interactive with mysql cli passwordless
I'm using access to the mysql servers via localhost with mysql cli on daily basis.
With time I've figured out that it's pretty unahandy to always login with my root mysql password, I mean each time to enter it, e.g.:
root@mysql-server:~# mysql -u root

Enter password:

...
Thus to make my life a way easier I decided to store my mysql root password in order to allow my root admin user to be able to login to my mysql server without asking for password. This saves time and nerves, as I'm not supposed to look up for the password file I store my server mysql root pass.
To allow my mysql cli interface, to login passwordless to the SQL server I had to create the file /root/.my.cnf readable only for my root user and store my MySQL username and password there.
Here is a sample /root/.my.cnf file:
root@mysql-server:~# cat /root/.my.cnf

[client]

user="root"

pass="mysecretMySQLPasswordgoeshere"
Now next time I use the mysql console interface to access my mysql server I don't have to supply the password, here is how easier is the mysql login afterwards:
root@mysql-server:~# mysql -u root

Welcome to the MySQL monitor.  Commands end with ; or \g.

Your MySQL connection id is 3520

Server version: 5.0.77 Source distribution


Type 'help;' or '\h' for help. Type '\c' to clear the buffer.


mysql>
The only downside of using .my.cnf to store permanently the mysql server root and password is from security standpoint.
If for instance somebody roots my servers, where I have stored my root user/pwds in .my.cnf , he will be able immediately to get access to the MySQL server.
Another possible security flaw with using the mysql passwordless login "trick" is if somebody forgets to set proper file permissions to, .my.cnf
Once again the file should possess the permissons of:
root@mysql-server:~# ls -al /root/.my.cnf

-rw------- 1 root root 90 Apr  2 00:05 /root/.my.cnf
Any other permissons might allow non-privileged users to read the file and gain unathorized admin access to the SQL server.
Tue Jun 28 15:59:59 EEST 2011
How to check if newly installed SSL certificate for IMAP and IMAPS is properly installed
Did you have to regenerate your SSL certificate for your mail server's IMAP and IMAP SSL service?
Did you have to find out if the newly installed certificates are fine after install?
Here is how:
The output returned by this two commands will be the imap and imaps configured certificates as well as extensive info concerning the installed SSL, the last chunk of info to be spit is most crucial to know if certificate is fine.
It should be something like:
Did you have to find out if the newly installed certificates are fine after install?
Here is how:
root@server-hosting [/usr/local ]# openssl s_client -connect imap.example.com:993

root@server-hosting [/usr/local ]# openssl s_client -connect imap.example.com:143 -starttls imap
The output returned by this two commands will be the imap and imaps configured certificates as well as extensive info concerning the installed SSL, the last chunk of info to be spit is most crucial to know if certificate is fine.
It should be something like:
...

New, TLSv1/SSLv3, Cipher is AES256-SHA

Server public key is 1024 bit

Secure Renegotiation IS supported

Compression: NONE

Expansion: NONE

SSL-Session:

    Protocol  : TLSv1

    Cipher    : AES256-SHA

    Session-ID: 0B69E91022CB56D64F56CFA08405944D9C4C0069EE4097890B98F1406CF084D5

    Session-ID-ctx:

    Master-Key: 13745B94E0C5A0604EB7529E7409251961DFD5F4134F3A8FA1082F536A1B5157C86BAA7CC01140528AA729439E3F2E89

    Key-Arg   : None

    Start Time: 1309265383

    Timeout   : 300 (sec)

    Verify return code: 18 (self signed certificate)

---

. OK CAPABILITY completed

closed
Tue Jun 28 11:57:02 EEST 2011
How to fix "Could not verify this certificate for unknown reasons" SSL certificate lighttpd troubles
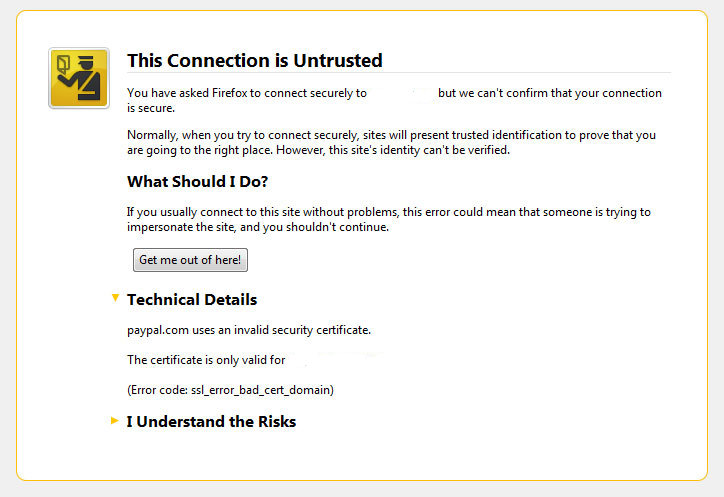 I've been issuing new wildcard multiple SSL certificate to renew an expiring ones. After I completed the new certificate setup manually on the server (a CentOS 5.5 Final running SoluSVM Pro - Virtual Private Manager), I launched Firefox to give a try if the certificate is properly configured.
Instead of my expectations that the browser would just accept the certificate without spitting any error messages and all will be fine, insetad I got error with the just installed certificate and thus the browser failed to report the SSL cert is properly authenticated.
The company used to issue the SSL certificate is GlobeSSL - http://globessl.com , it was quite "hassle", with the tech support as the first certficate generated by globessl was generation based on SSL key file with 4096 key encryption.
As the first issued Authenticated certificate generated by GlobeSSL was not good further on about a week time was necessery to complete the required certificate reissuing ....
It wasn't just GlobeSSL's failure, as there were some spam filters on my side that was preventing some of GlobeSSL emails to enter normally, however what was partially their fault as they haven't made their notification and confirmation emails to pass by a mid-level strong anti-spam filter...
Anyways my overall experience with GlobeSSL certificate reissue and especially their technical support is terrible.
To make a parallel, issuing certificates with GoDaddy is a way more easier and straight forward.
Now let me come back to the main certificate error I got in Firefox ...
A bit of further investigation with the cert failure, has led me to the error message which tracked back to the newly installed SSL certificate issues.
In order to find the exact cause of the SSL certificate failure in Firefox I followed to the menus:
Tools -> Page Info -> Security -> View Certificate
Doing so in the General browser tab, there was the following error:
Could not verify this certificate for unknown reasons
The information on Could not verify this certificate for unknown reasons on the internet was very mixed and many people online suggested many possible causes of the issue, so I was about to loose myself.
Everything with the certificate seemed to be configured just fine in lighttpd, all the GlobeSSL issued .cer and .key file as well as the ca bundle were configured to be read used in lighttpd in it's configuration file:
/etc/lighttpd/lighttpd.conf
Here is a section taken from lighttpd.conf file which did the SSL certificate cert and key file configuration:
$SERVER["socket"] == "0.0.0.0:443" {

ssl.engine = "enable"

ssl.pemfile = "/etc/lighttpd/ssl/wildcard.mydomain.bundle"

}
The file /etc/lighttpd/ssl/wildcard.mydomain.bundle was containing the content of both the .key (generated on my server with openssl) and the .cer file (issued by GlobeSSL) as well as the CA bundle (by GlobeSSL).
Even though all seemed to be configured well the SSL error Could not verify this certificate for unknown reasons was still present in the browser.
GlobeSSL tech support suggested that I try their Web key matcher interface - https://confirm.globessl.com/key-matcher.html to verify that everything is fine with my certificate and the cert key. Thanks to this interface I figured out all seemed to be fine with the certificate and something else should be causing the SSL oddities.
I was further referred by GlobeSSL tech support for another web interface to debug errors with newly installed SSL certificates.
These interface is called Verify and Validate Installed SSL Certificate and is found here
Even though this SSL domain installation error report and debug tool did some helpful suggestions, it wasn't it that helped me solve the issues.
What helped was First the suggestion made by one of the many tech support guy in GlobeSSL who suggested something is wrong with the CA Bundle and on a first place the documentation on SolusVM's wiki - http://wiki.solusvm.com/index.php/Installing_an_SSL_Certificate .
Cccording to SolusVM's documentation lighttpd.conf's file had to have one extra line pointing to a seperate file containing the issued CA bundle (which is a combined version of the issued SSL authority company SSL key and certificate).
The line I was missing in lighttpd.conf (described in dox), looked like so:
ssl.ca-file = "/usr/local/solusvm/ssl/gd_bundle.crt"
Thus to include the directive I changed my previous lighttpd.conf to look like so:
$SERVER["socket"] == "0.0.0.0:443" {

ssl.engine = "enable"

ssl.pemfile = "/etc/lighttpd/ssl/wildcard.mydomain.bundle"

ssl.ca-file = "/etc/lighttpd/ssl/server.bundle.crt"

}
Where server.bundle.crt contains an exact paste from the certificate (CA Bundle) mailed by GlobeSSL.
There was a couple of other ports on which an SSL was configured so I had to include these configuration directive everywhere in my conf I had anything related to SSL.
Finally to make the new settings take place I did a lighttpd server restart.
[root@centos ssl]# /etc/init.d/lighttpd restart

Stopping lighttpd:                                         [  OK  ]

Starting lighttpd:                                         [  OK  ]
After lighttpd reinitiated the error was gone! Cheers !

Sun Jun 26 21:05:02 EEST 2011
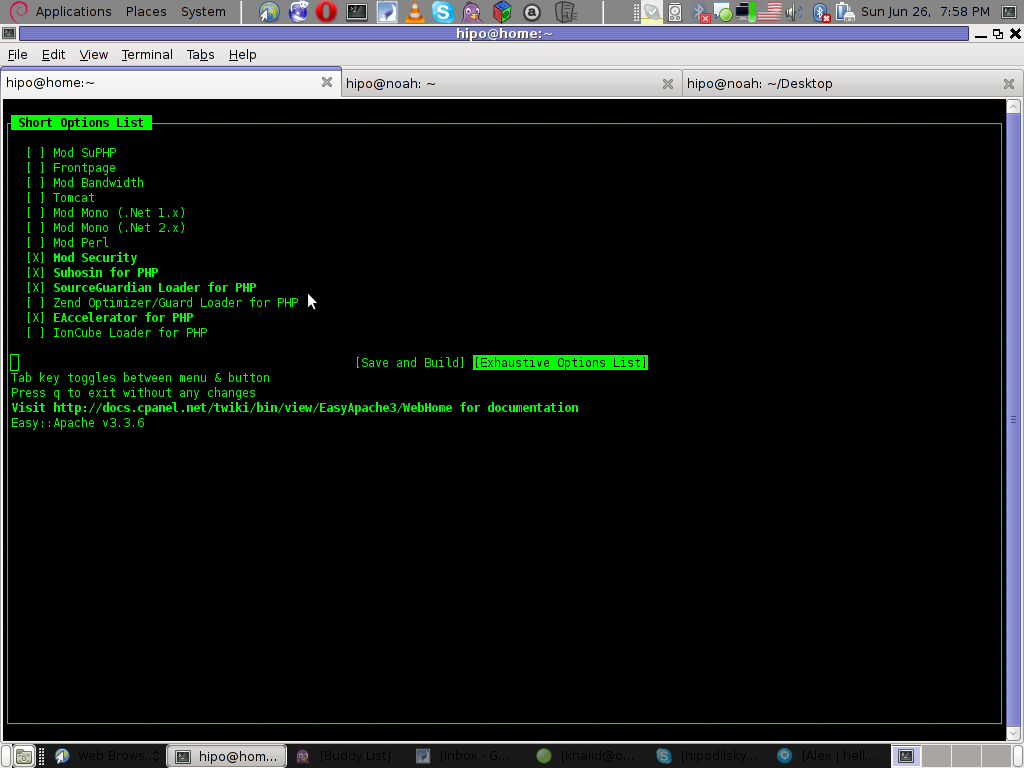
How to install mysqli php support in Cpanel on (CloudLinux Server 5.6) with easyapache

One of the Cpanel servers I manager running on CloudLinux Server release 5.6 was missing mysqli support in php .
A client complain was issued to fix it up, e.g. install mysqli module support in the php
The server running PHP version is 5.3.6, I did quite an extensive investigation on how this can be achieved and since I found not a good way to install the mysqli through CPANEL's web management interface, I started looking ways to precompile php directly logging via ssh on the server.
After quick look on the server I've found a bunch of management scripts in server root's /scripts/ directory.
The scripts directory contains 626 really handy administration scripts which really aids and easifies many of the system administration tasks one has to do on Cpanel powered server.
Among the scripts list I've noticed the /scripts/easyapache which could be used to update the libPHP running version on the server to the latest release as well as precompile and update the Apache from source code to the latest issued Apache release on httpd.apache.org .
easyapache proofed to be dead easy, to add up the mysqli php extension to server included php, I had to:
Execute /scripts/easyapache
root@hosting-server1 [~]# /scripts/easyapache
First message which "greeted" me after I launched the easyapache script was:
There were errors registered during the last build. Would you like to review them before proceeding? ;)
I just ignored the message and pressed Yes
Next an ncurses screen appears explaining what exactly the last time compile issue that emerged was, once again I just ignored the msg.
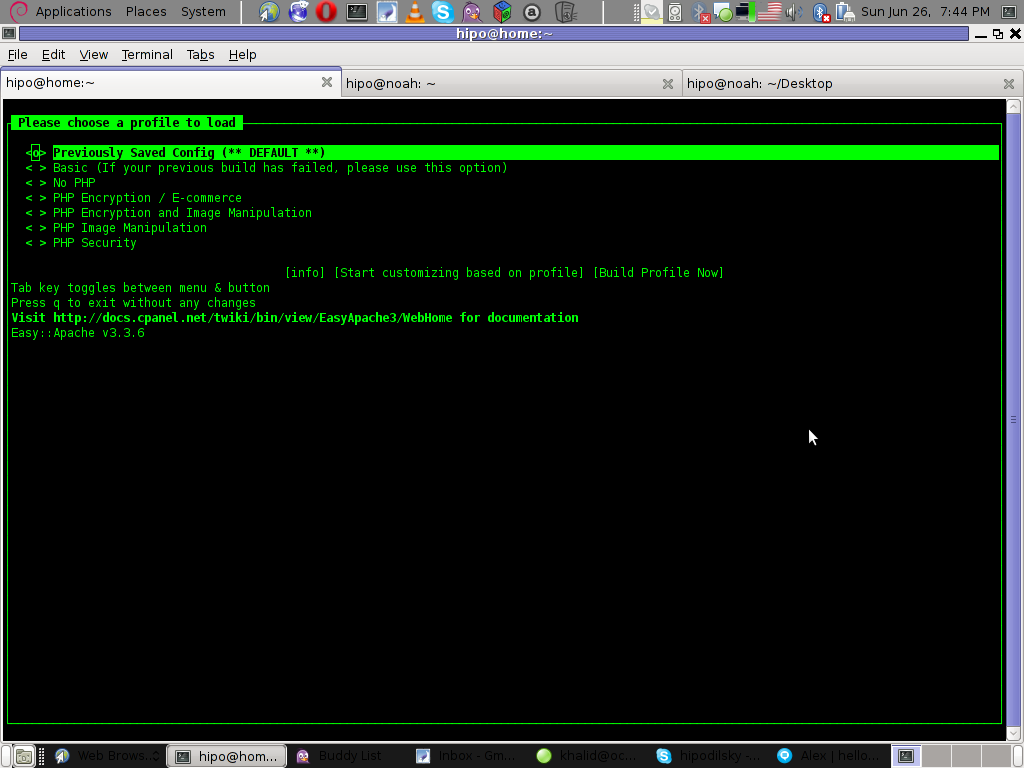
Next it's necessery to be selected the exact easyapache configuration profile to be used for the further source compile, here I used:
Previously Saved Config (** DEFAULT **)
Next an Apache version to be used by easyapache during compile needs to be choosen I choose Apache 2.2 as this is the Apache version which I would like to be compiled by the script.
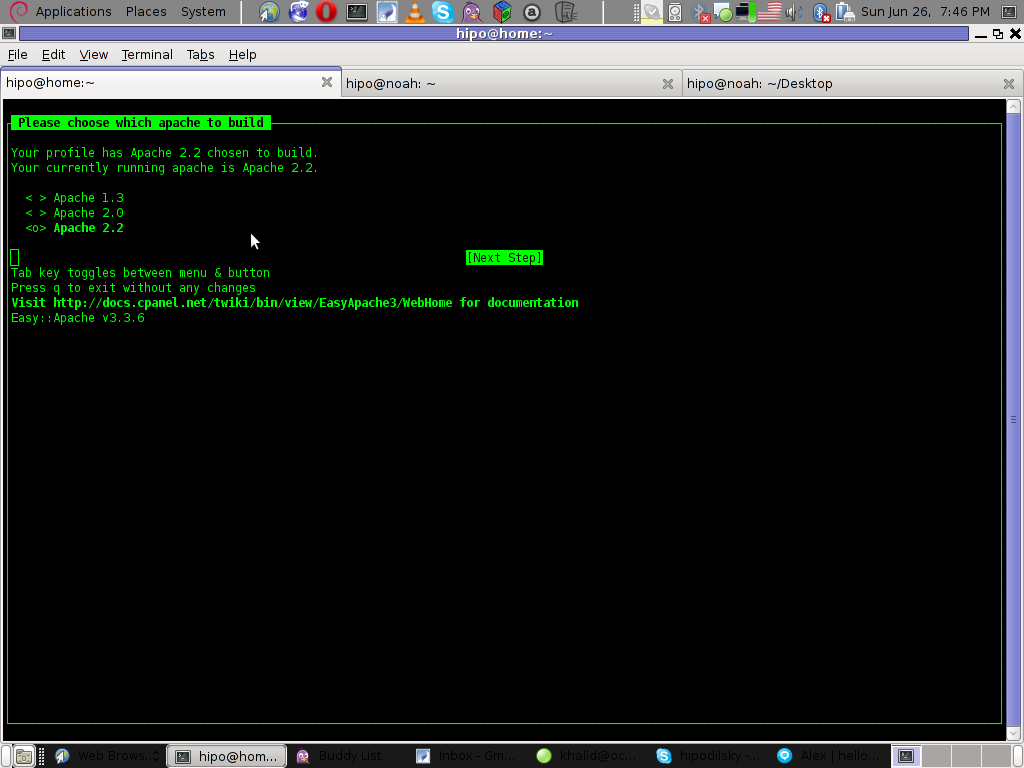
Further on I pressed the [Next Step] here.
Two other screens appears asking if one PHP4 or PHP5 needs to be compiled, in my case that was php5, next I choose the latest php version which appeared as a possible option that's php 5.3.6
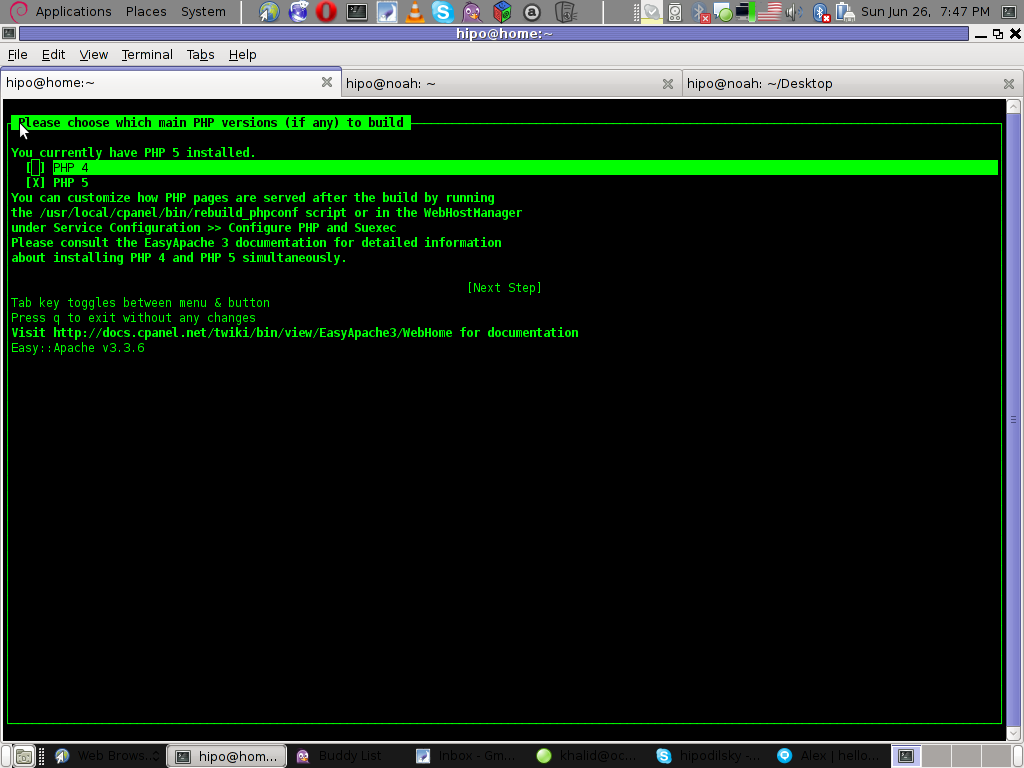
After this selection, the Short Options List screen appears, to select Mysqli module one needs to select on the [Exhaustive Options List] and from the list that is displayed to choose Mysql Improved Extension
Fri Jun 24 18:02:39 EEST 2011
Black Cat, White Cat - An awesome gipsy's movie by Emil Kosturica ;)

Black Cat, White Cat is truly an awesome movie from Emil Kostutirca it really presents the wildness and ridiculousness of being a citizen of the farest places of Eastern Europe the Balkans.
The movie is a story of a Gipsy hamlet, located nearby the Danube. The movie is a drama, commedy, action and even more ;)
If you're looking for some movie to cheer up in about 2 hours of watching oddities and unexpected turn outs this is surely the movie for you.
The movie is one of the best movies ever made by a Slavonic origin film director.
My only objection to the movie, is towards the part presenting one Bulgarian who is being presented as a hardcore swindler and later on brutally killed and mocked.
This part is a bit too much insulting towards our Bulgarian nation and it also shows the decade hostility between our bordered nations ...
I'll skip the explanations on the movie plot and give you a small crazy scene to give you an idea on what to expect from the movie:
:)
Fri Jun 24 14:40:50 EEST 2011
An Idea - How to put your old CRT Monitors in use ;)

Wonder what to do with these old monitors in the basement ?
Here is an idea ;)
Thu Jun 23 14:25:53 EEST 2011
40 Days since our beloved brother in Christ (ipodeacon Georgi Nedev) has presented himself in God

Today it's the 40th day since our brother in Christ (ipodeacon) Georgi Nedev has presented his humble soul to our Saviour Jesus.
His living was as himble as his departure from this life and his passing I believe in the eternal life with God.
Georgi had the severe desire to become a monk in Holy Mount Athos and has multiple friends in there which loved him and often prayed for him.
Now on this 40 day in our Bulgarian monastery in Holy Mount Athos, Saint George - The GloryBringer (Zographus) monks will be serving a requiem service (Panihida - as we say in Slavonic)
His departure was striking and sudden for of us in the Church community here in Dobrich's Holy Trinity Church, as well as not less shocking for the Holy Mount Athos Zographus monks Christian community who loved our brother sincerely.
Some short biographic facts about our brother ipodeacon Georgi Nedev are here
Unfortunately the bio-facts I know about Georgi are very little, as I only knew him for a couple of years. Even though the short time I used to know him, I can say I was blessed through him and I'm exteremely grateful to him, it was through him I've learned a bit more about Holy Mount Athos and our Bulgarian monk community that is in Zographus, as well as some very minor details concerning the spiritual Church life that I've never thought about.
It was thanks to him I was being encouraged on numerous times in terrible times of desparation and loss of faith and track in life.
Thanks to him I was being explained for a first time, how one can go for a pilgrimage journey to Holy Mount Athos and how one can get the pilgrim's permit documentation related to going there called in greek diamontirium
He also told me about numerous miracles about Holy Mount Athos, and explained me one needs to pray to the Holy Theotokos Virgin Mary and ask her that is being allowed to enter this holy place.
This last lent, even though his sickness Georgi was regularly visiting the evening services in the Church and was dilegent in his spiritual life.
I remember him expressing his enormous joy the last time I was on a Holy Liturgy he took the communion. I asked him how is he and he answered; I'm not feeling well, but praise be to God! for I was able to take the Holy Communion
Many times when I asked him what are his future plans, he used to answer I don't know anything, it's all in the God's will (hands) for me.
You can see yourself how great his dedicated for God was by his own words.
As our priest, who used to be his confessor said, "Georgi was a righteous man and God took him early on".
Let eternal be your Memory beloved brother Georgi now and Forver and Ever! Amen!
Thu Jun 23 00:36:08 EEST 2011
Howto create a self-signed (wildcard / multiple) SSL certificate

It's the first time I'm creating a wildcard ssl certificate. It appeared there is no fundamental difference between generating a normal SSL certificate and generating a wildcard certificate.
The procedure for generating a wildcard SSL certificate is as follows:
1. Generate an SSL key file
server:~# /usr/bin/openssl genrsa -des3 -out domain.com.key 2048
Enter pass phrase for domain.com.key:
Fill in any passphrase you like, the 2048 specifies the encryption level, 2048 is good enough and is the most commonly used as of today.
I've saw there is also an option to use 4096 bits encryption but I never tried that myself, I would be glad if somebody can share if he has succesfully established an SSL certificate with 4096 encryption.
2. Generate the certificate request file
server:~# /usr/bin/openssl req -new -key /home/hipo/domain.com.key -out /home/hipo/domain.com.csr
Further on it's necessery to fill in some info concerning the newly generated webserver SSL, e.g.:
Enter pass phrase for /home/hipo/domain.com.key:

You are about to be asked to enter information that will be incorporated

into your certificate request.

What you are about to enter is what is called a Distinguished Name or a DN.

There are quite a few fields but you can leave some blank

For some fields there will be a default value,

If you enter '.', the field will be left blank.

-----

Country Name (2 letter code) [AU]:

State or Province Name (full name) [Some-State]:

Locality Name (eg, city) []:

Organization Name (eg, company) [Internet Widgits Pty Ltd]:

Organizational Unit Name (eg, section) []:

Common Name (eg, YOUR name) []:

Email Address []:

Please enter the following 'extra' attributes

to be sent with your certificate request

A challenge password []:

An optional company name []:
Fill all the values according to your requirements, the only vital thing here is to fill in a proper Common Name (eg, YOUR name) []:
The Common Name should always be equal to *.domain.com , if something else is typed in the SSL certificate won't be considered a valid one when placed on the multiple subdomains.
The newly generated domain.com.csr file should be looking something similar to:
server:~# less < domain.com.csr

-----BEGIN CERTIFICATE REQUEST-----

MIIC2jCCAcICAQAwgZQxCzAJBgNVBAYTAkdCMQ8wDQYDVQQIEwZMb25kb24xDzAN

BgNVBAcTBkxvbmRvbjEQMA4GA1UEChMHU2FudHJleDEWMBQGA1UECwwNKi5zYW50

cmV4Lm5ldDEWMBQGA1UEAwwNKi5zYW50cmV4Lm5ldDEhMB8GCSqGSIb3DQEJARYS

bWFzcmF3eXpAeWFob28uY29tMIIBIjANBgkqhkiG9w0BAQEFAAOCAQ8AMIIBCgKC

AQEAlm9NwcQiA+AAVuVIjg8nCCn5nN14C3rSdcRNuE6oFo9E5uhl9yz8YDIg7wNx

FNQsmw0AwMzkao5Qv9yrmHqbht8qqPfG7YpcTiAoAuSaN6Nm25/zYrSu1uRsnc4C

9lINS8Va+n0Jt+CCQmomTKSarJqNfgo3j1ZU/HuOKcCEktIe0eKigMWxFKCM8wLh

CIdj6AwburckW1/ubOGlu2XKdcY5CbFe4cNGyME3rg33ft8b6v/ORWLSBMrt3QGP

bj42uZP6NoLaZCpsquJLeziLkT4rxdArUApdaTaEFrNMnwzGmUK10qmfx8SQodUl

QXmyd+PpQtaglymjIKN0L8Y36QIDAQABoAAwDQYJKoZIhvcNAQEFBQADggEBAIKe

UTXUt7XvaqVOesTmGCuVmv+Lz/GtGOEw+lfCNM4UFB950H975hHKo63YQr9Vqqqn

WlqZ0nXuwbZdfIh3xhTxzUqF/4m00OFQTbM9hwt6dyqLkmcc4J0rnTsvqjPkUsW5

U7iAIB/UIyDYUcAEky3gnokq3MLH42zXBViPM2+g/fkmJA4jaeoHGINbYMuxFh6Z

r2fIgAfGjms+hNaJvINDoBN5y6YUQbeJc+RoXMrG9clrDsUIGfmkTKCkG0BRJ2ki

Sdbm4IZMtQKU/C4a8vxZkFdleGqWeWL1SBtjjAnTtpb0uF+QmOPLcCoKnBwtEUU9

dPJlEzI+TCgAmKhZoXo=

-----END CERTIFICATE REQUEST-----
Next on this BEGIN CERTIFICATE REQUEST will have to be filled in to the certificate issuer website, whether it's requested, let's say in GlobeSSL.
Based on the certificate request a valid SSL certificate will be issued by the SSL provider.
Here one important note to make is that if your domain contians some prohibited keywords like, let's say bank, finance, poker etc., a keywords which might be considered a fraud or forgery then probably the SSL certificate won't be issued by the SSL issuer and you will have to further contact the SSL cert provider and send them some more information related to the type of business the new website is going to run.
This kind of domain keyword filter, that is implemented by SSL certificate issuer companies is made to protect internet users from possible frauds or scam websites as well as reduce the level of potential dangerous pyramid like businesses that are so modern on the net these days.
Last step before the certificate will be visible in a browser is to set it for a domain name or virtualhost in Apache, lighttpd or whatever webser is used.
As I'm personally using it with Apache webserver, below I'll describe how to set it in Apache version 2.x.
3. Configure the newly configured SSL certificate to run on Apache virtualhost
Open up the virtualhost file which coresponds to the domain name to be secured with SSL, for example /etc/apache/sites-available/www.domain.com
Within the <Virtualhost> directives place in a code similar to:
SSLEngine on

# domain.com.crt cointains the wildcard SSL certificate generated and obtained by you from RapidSSL

SSLCertificateFile /etc/apache2/ssl/domain.com.pem
Here the file /etc/apache2/ssl/domain.com.pem should contain both the:
----BEGIN RSA PRIVATE KEY----- issued earlier in step one with openssl command, as well as:
-----BEGIN CERTIFICATE----- which will be issued by the SSL certificate reseller.
Finally it's necessery that Apache is restarted to load the new configured certificate:
server:~# /etc/init.d/apache2 restart
The above described steps need to be repeated for all the wildcard subdomains which will use the multiple SSL generated certificate and hopefully if all is well tuned, the certificates should start appearing to all the web domain subdomains immediately.
Wed Jun 22 16:36:55 EEST 2011
Don't msg and Drive! ;)

Do you message when you drive? Do you know are messaging to ? ;)
Tue Jun 21 19:18:32 EEST 2011
Runing sudo command simultaneously on multiple servers with SSHSUDO
The tool is called sshsudo and the project is hosted on http://code.google.com/p/sshsudo/.
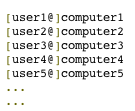
Let's say you're responsible for 10 servers with the same operating system let's say; CentOS 4 and you want to install tcpdump and vnstat on all of them without logging one by one to each of the nodes.
This task is really simple with using sshsudo.
A typical use of sshsudo is:
[root@centos root]# sshsudo -u root \

comp1,comp2,comp3,comp4,comp5,comp6,comp7,comp8,comp9,comp10 yum install tcpdump vnstat
Consequently a password prompt will appear on the screen;
Please enter your password:
If all the servers are configured to have the same administrator root password then just typing one the root password will be enough and the command will get issued on all the servers.
The program can also be used to run a custom admin script by automatically populating the script (upload the script), to all the servers and issuing it next on.
One typical use to run a custom bash shell script on ten servers would be:
[root@centos root]# sshsudo -r -u root \

comp1,comp2,comp3,comp4,comp5,comp6,comp7,comp8,comp9,comp10 /pathtoscript/script.sh
I'm glad I found this handy tool ;)Tue Jun 21 10:43:02 EEST 2011
Fix "Fatal error: Class 'SimpleXMLElement' not found" and "Fatal error: Class 'JLoader' not found" on FreeBSD
One of the contact forms running on a FreeBSD server configured to work on top of Apache+MySQL suddenly stopped working.
The errors that appeared on the webpage during a page request to the form url was:
As you see in the output the website which was causing the issues was running a Joomla version 1.5.23 Stable configured with RSForm!ver 1.5.x (as a contact form solution) and Google Maps version 2.13b plugins.
The Google Map from Google Maps plugin and the RSform were configured to appear on one physical configured article in Joomla and seemed to work just until now. However yesterday suddenly the error messages:
Fatal error: Class 'SimpleXMLElement' not found
Fatal error: Class 'JLoader' not found
came out of nothing, it's really strange as I don't remember doing any changes to either Joomla or the PHP installation on this server.
There is one more guy who has access to the Joomla installation which I suspect might have changed something in the Joomla, but this scenario is not very likely.
Anyways as the problem was there I had to fix it up. Obviously as the error message Fatal error: Class 'SimpleXMLElement' not found reported the server php simplexml was missing!
Just to assure myself the php simplexml extension is not present on the server I used the classical method of setting up a php file with phpinfo(); in it to check all the installed php extensions on the server.
Finally to solve the issue I had to install the module from ports php5-simplexml , e.g.:
Afterwards to make the new settings take place I did restart of my Apache server:
Now my Joomla contact form is back to normal ;)
The errors that appeared on the webpage during a page request to the form url was:
Fatal error: Class 'SimpleXMLElement' not found in /var/www/joomla/plugins/system/plugin_googlemap2_helper.php on line 2176
Fatal error: Class 'JLoader' not found in /var/www/joomla/plugins/libraries/loader.php on line 161
As you see in the output the website which was causing the issues was running a Joomla version 1.5.23 Stable configured with RSForm!ver 1.5.x (as a contact form solution) and Google Maps version 2.13b plugins.
The Google Map from Google Maps plugin and the RSform were configured to appear on one physical configured article in Joomla and seemed to work just until now. However yesterday suddenly the error messages:
Fatal error: Class 'SimpleXMLElement' not found
Fatal error: Class 'JLoader' not found
came out of nothing, it's really strange as I don't remember doing any changes to either Joomla or the PHP installation on this server.
There is one more guy who has access to the Joomla installation which I suspect might have changed something in the Joomla, but this scenario is not very likely.
Anyways as the problem was there I had to fix it up. Obviously as the error message Fatal error: Class 'SimpleXMLElement' not found reported the server php simplexml was missing!
Just to assure myself the php simplexml extension is not present on the server I used the classical method of setting up a php file with phpinfo(); in it to check all the installed php extensions on the server.
Finally to solve the issue I had to install the module from ports php5-simplexml , e.g.:
freebsd# cd /usr/ports/textproc/php5-simplexml
Afterwards to make the new settings take place I did restart of my Apache server:
freebsd# /usr/local/etc/rc.d/apache2 restart

Syntax OK

Stopping apache2.

Waiting for PIDS: 63883.

Performing sanity check on apache2 configuration:

Syntax OK

Starting apache2.
Now my Joomla contact form is back to normal ;)
Mon Jun 20 16:41:09 EEST 2011
Reboot Safely a frozen (hanged up) Linux Server with Magic SysRQ Key combination

Being a remote system administrator for many years from now, I've experienced many times sudden Linux crashes, mostly caused by system hardware overloads.
This is a common thing especially on busy Web Servers with (Apache/MySQL). Situations like this are really messy and many times in order to bringt the server back online, one has to either physically go to the Data Center or contact the Technical support to request a server reboot.
In this terrible times, data loss might occur if the Server reset button is used to cold reboot it.
Happily in 99% of the cases the data loss which might occur could be prevented with Linux's kernel capability to support the Magic SysRQ key !
Having the Magic SysRQ key functionality being supported in Linux in past times wasn't that common, thanksfully these days this has changed andlmost every Linux distrubution supports this handy feature.
Now you might wonder what is the magic with those Magic SysRQ key ?
Let me explain, Magic SysRQ is a kernel level functionality which supports even completely crashed Linux systems with the horrifying:
Kernel Panic
message to be properly shutdown.
Using Magic SysRQ instead of the mostly used indiced cold reboots is really advantageous, as all the opened files by programs on the crashed server which hanged will be properly saved and closed and thus possible data loss caused by the sudden server crash will be minimized.
One other good thing about the Magic SysRQ Key keyboard combination is that initiating the Magic SysRQ could be made blindly (no need for server monitor or display to present any error messages on the failed server).
Now to check if the magic sysrq is enabled on a server one should issue the command:
Here are some Magic SysRQ keyboard combinations one can use in case of server failure:
ALT+SYSRQ+M to dump memory info;

ALT+SYSRQ+P to dump processes states;

ALT+SYSRQ+S to sync disks;

ALT+SYSRQ+U to unmount all mounted filesystems;

ALT+SYSRQ+E to terminate processes;

ALT+SYSRQ+I to kill all processes

ALT+SYSRQ+U to try to unmount once again;

ALT+SYSRQ+B to reboot.
I would skip to explain what each of the keyboard combinations will do as I believe the above description explains it well.
One classics of combinations one might want to issue on a failed Linux server supporting the Magic SysRQ would be:
ALT+SYSRQ+R

ALT+SYSRQ+E

ALT+SYSRQ+I

ALT+SYSRQ+S

ALT+SYSRQ+U

ALT+SYSRQ+B
The ALT+SYSRQ+REISUB key combination is very popular among system administrators.
Also Magic SysRQ is heavily used by kernel developers as it includes many handy debugging options.
If you try the Magic SysRQ key on older servers and you realize it doesn't react you will have to recompile the linux kernel and enable the CONFIG_MAGIC_SYSRQ kernel time compilation option.
The Magic SysRQ can also be initiated remotely on a properly running server
by initiating:
server:~# echo b > /proc/sysrq-trigger
This command would be useful if you want to just have fun and test that magic sysrq works on your system for sure ;)
To sum it up using the Magic SysRQ will guarantee your locked up, server a Safe Reboot and will hopefully save you a lot of time for backu ps recovery.
Mon Jun 20 11:04:07 EEST 2011
How to Update / Change payment Credit Card information in Godaddy
After my Debit VISA card has been declined by my Bank (had to issue a new one), which of course had a new card number and a new secret code.
Therefore to continue be able paying for domains in Godaddy I had to Update my Credit Card information in Godaddy's website.
Here is how I updated my Credit card details:
1. Login to Godaddy
2. Click on Update Payment Options
Here is a screenshot with pointers of where one should go to change the payment method or update number and type of his Debit/Credit card:
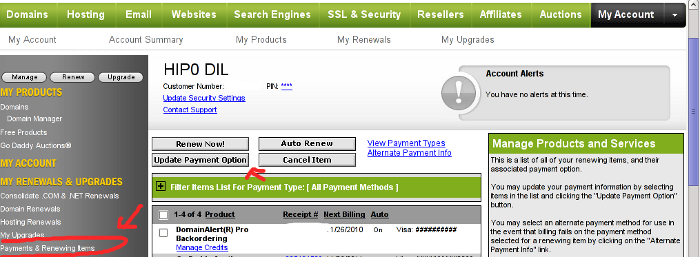
After clicking on Update Payment Options, on the right side a window pane will appear titled Change Payment Type
For a newly issued bank card, to update the recent input bank card credentials, one should click on the:
Add New Payment Type:.

Change Payment Type Godaddy Menu
Further on in my case I had to select Credit Card , even though I'm using a VISA Debit card, as see in above's screenshot, there is no option of Debit card visa :).
Filling in the data and saving the changes with Save Changes completes the new bank card inclusion, I can now use my new valid card with Godaddy once again.
Therefore to continue be able paying for domains in Godaddy I had to Update my Credit Card information in Godaddy's website.
Here is how I updated my Credit card details:
1. Login to Godaddy
My Account -> Payments and Renewing Items
2. Click on Update Payment Options
Here is a screenshot with pointers of where one should go to change the payment method or update number and type of his Debit/Credit card:
After clicking on Update Payment Options, on the right side a window pane will appear titled Change Payment Type
For a newly issued bank card, to update the recent input bank card credentials, one should click on the:
Add New Payment Type:.
Change Payment Type Godaddy Menu
Further on in my case I had to select Credit Card , even though I'm using a VISA Debit card, as see in above's screenshot, there is no option of Debit card visa :).
Filling in the data and saving the changes with Save Changes completes the new bank card inclusion, I can now use my new valid card with Godaddy once again.
Sun Jun 19 20:22:46 EEST 2011
Arizona Dream (1993) - Movie Review
Just completed Arizona Dream by the famous Serbian director Emil Kosturica. The movie is starring Johny Depp an movie actor I'm not too big fan of.
The movie's plot is too cracky. It all starts and ends with scenes of some Eskimos, where it progresses and depicts later on an ordinary life of an american fisher.
As movie progresses parts of the life of a successful car sells man comes in place. Axel (Johny Depp) is the main actor. The movie revolves around the sexist element.
Some of the scenes and movie delopment looks quite unexpected. Axel starts living in a place with two beautiful woman (a mother in law and a daguther in law).
The mother in law is famous for her passion to attract and sleep with new young man. Axel fells in love and together they follow a dream of building an airplane which is supposed to be used later on as a mean to kill themselves together and according to Eskimos belief bind together their souls for eternity.
The spiritual concepts of the movie are completely messed up and clearly the movie contains references to multitude of anti-christian ideas.
The movie is generally a bit depressing as the atmosphere one can feel is a jail like. Initially Axel fells in love with the mother in law Ellaine, later on near the movie denouement, he losts his passion for Ellain which is a bit older for his age and fells in love with Grace (which is a way younger and even more attractive).
Grace has a severe problems with feeling of unvalueness and suffers with chronic depression and thus things constantly to kill her self.
Near the end of the movie Axel explains himself in love with Grace (which seems to also be in love with him).
However the ending scenes are too sad as Grace decides finally to kill herself and commits suicide with a gun ...
Honestly I expected a way more from the movie and I wouldn't recommend it as a piece of classics or a movie with some significant value.
The rest of the movies directed by Emil Kosturica seems to be a far more superior and positive than this one.
If you want to save yourself from some insanity just stay away from this cranky movie!
Sat Jun 18 07:49:35 EEST 2011
How to fix "Fatal error: Call to undefined function: curl_init()" on FreeBSD and Debian
After installing the Tweet Old Post wordpress plugin and giving it, I've been returned an error of my PHP code interpreter:
As I've consulted with uncle Google's indexed forums discussing the issues, I've found out the whole issues are caused by a missing php curl module
My current PHP installation is installed from the port tree on FreeBSD 7.2. Thus in order to include support for php curl it was necessery to install the port /usr/ports/ftp/php5-curl (note that I'm using the php5 port and it's surrounding modules).
Fixing the Call to undefined function: curl_init() on Linux hosts I suppose should follow the same logic, e.g. one will have to install php5-curl to resolve the issue.
Fixing the missing curl_init() function support on Debian for example will be as easy as using apt to install the php5-curl package, like so:
Now my tweet-old-post curl requirement is matched and the error is gone, hooray ;)
Call to undefined function: curl_init()
As I've consulted with uncle Google's indexed forums
discussing the issues, I've found out the whole issues are caused by a missing php curl module My current PHP installation is installed from the port tree on FreeBSD 7.2. Thus in order to include support for php curl it was necessery to install the port /usr/ports/ftp/php5-curl (note that I'm using the php5 port and it's surrounding modules).
Fixing the Call to undefined function: curl_init() on Linux hosts I suppose should follow the same logic, e.g. one will have to install php5-curl to resolve the issue.
Fixing the missing curl_init() function support on Debian for example will be as easy as using apt to install the php5-curl package, like so:
debian:~# apt-get install php5-curl

...
Now my tweet-old-post curl requirement is matched and the error is gone, hooray ;)
Fri Jun 17 14:14:33 EEST 2011
The no-ego deadly body and soul philosophy a trend in modern Business

These days it's ultra modern in Business Communities, that the way business is made or business possibilities are discussed are directly influenced by altered understanding of Buddhistic world views.
Today less and less people realize that the modern day Western and Eastern Christian countries are rapidly loosing their Christian mark.
It was Christianity and Christian philosophy, thanks to which Christian countries has advanced to the material goodness level, architectural greatness, science improvements and most of our civilization achievements that we the Europeans and other Western societies like Americans enjoy.
The world is constantly becoming more and more Anti-Christian. And from the times when Christianity was officially wide-spread and accepted and being a Christian was a sign for personal qualities and goodness, it's now considered to be almost a crime or being insane if you have faith in Jesus Christ as God's Son and a Saviour of mankind.
Business ethics practices from the past, which were often based on Christian ethics has also seriously changed these days.
It was due to Christianity and the Christian civillizaed society due to which we had a dozens of genuine musician like: J. S. Bach, Beethoven, Verdi, Brahms, Tschaikovsky etc. the list of great people and musicians goes innumerous here.
The Roman Catholic and Easter Orthodox Christians thanks to which works, science has advanced is also innumerous, just to name a few for instance:
Nicolaus Copernicus, Galileo Galilei, Max Planck, Marie Curie, Theodosius Dobzhansky, Isaac Newton, James Clerk Maxwell, Johannes Kepler
again this is just a small chunk of all the great Christian people who by their talents has revolutionized the world for good.
However nowdays education is changed seriously and as many people should have noticed Christianity and historic relation between science and Christianity is trying to be covered.
Moreover the historic importance of Christian faith and it's surrounding philosophy is forgotten, not to mention that officially the history of the world until the 18 century is mostly, a history of Christianity and it's influence on society.
In these days of Christian apostacy, many of the business people in their look up for ways to become superior and rule over the masses has turned into various long forgotten sects and heresies which were publicly announced by ancient Christian Church as body and soul destroying dangerous teachings.
It's trendy today that the confucionism or hindu influenced beliefs about the world and the way stuff works, are preached and used in businesses and business organizations.
It's classics nowdays that people run a business, after building a group of people, over which hierarchical manipulation based leadership is exercised.
Most oftenly people who enter into a new business field, try build a groups of people who are introduced without having conscious idea to veiled alterated buddhistic philosophy to match certain people's idea or beliefs about the world.
These groups usually consist of people ranging from hundereds to thousands. Usually each of these business groups created, has a leader who is both leader in terms of (being the group boss / executive) and also a spiritual leader.
Interaction between the group members are purely based on manipulation. People are teached they have some special sensitivity for the surrounding environment which they can develop.
They're teached they must always be positive, the group leaders (teachers) does try to suggest to the group what the group members understanding of positive should be.
In those business groups, people are taught by the leaders to be positive, while the leaders themselves are not positive (one cannot be positive without God!). People are constantly told "be positive", "be positive", while the people who teach them this are not positive at all and evil often cruel!
In other words group members are being re-taught the basics of how they perceive themselves and how they should perceive the world around them in a light that fits well with the business organization they're membering in.
Consequently people are taught to loose their ego. This is one of the most essential parts of this modern day business false teachings. In reality loosing the ego is loosing one's standing ground and through that the person in the group becomes easily manipulated by other group members.
When people loose their ego basicly they loose their protection against being easily manipulated, they loose their idea about what is good and what is bad, what is right and what is wrong and who in reality they're.
Being exposed to this "business" approaches in that poor state one start easily accepting suggestions from the group leaders or other group members and could end up in a state where he is totally manipulated.
After time passes the group members are so much bounded together that they have to constantly meet each other and discuss things, (often senseless things), which give them the feeling of great importance or life meaning.
Consequently, when the new business group entity is tight enough, the group is instructed by the leaders about what kind of business moves will be best for each of the group individuals and the overall business the group belongs to.
At this state each of the members should obey wholeheartedly, if somebody tries to question the leadership decisions, the leader does incite the whole group members against the disobeying member and usually the members gets destroyed.
These business group building philophy is also influenced by antrophology and observence of animal behaviour's let's say coyottes or wolves.
In animal world usually each pack of wolves had their leader and the pack only attacks if the leader hits and if the whole group is together.
Same kind of thing comes to business built entities based on this loose your ego / no-ego philosophies.
A lot of pseudo beliefs about para-psychology and experimental western psychology is also involved and preached to the group members.
Loosing the ego philosophy in Business is directly influenced by buddhistic idea about Nirvana and spilling the self in the ultimate worldly reality (e.g. becoming one with the whole nature).
This kind of belief is seriously anti-christian and against the spiritual goal in christianity which is not the emptiness like in buddhism and the other eastern religions, but the goal is fullness in God.
We the Christians are striving to fill ourselves with God's Spirit - The Holy Spirit, whether buddhists are trying to empty themselves by everything that's binding them to reality (obviously they also try to empty themselves by God who has initially created man as his vessel).
Also in business, I've noticed in my experience that it's common people who are taught business in universities or are introduced to business are taught philosophies which are very typical for western buddhist teachings.
Just like in buddhism people are taught there is no absolute good or evil and there is no good and bad and everything one does is good, if he sees it as good (we're the one who define our lifes and realities)!!
Think for a while and see for yourself how insane this kind of philosophy is, let's say I kill a man who I hate, that's fine according to this philo because I believe this man's existence was not good in my view and his unexistence will make the world a better place, since I believe it's that way then it's that way DOT!!! As a Christian I must confess this is ULTIMATE INSANITY, AN ULTIMATE LIE obviously inspired by the evil which is an enemy to us the Christians as the Holy Bible teaches.
This kind of "no good and bad" philosophy is a hidden assault against our Christian roots society, faith and civillization. In Christianity we're clearly taught there is ultimate good an ultimate evil and there is no in between!
We are also taught one can become part of the ultimate good or ultimate evil by his daily choice, e.g. (get closer to God and his Holy Angels or distance himself from God and come near the devil and his fallen angels).
Mixing spirituality and business concepts has become a sad reality of our age, I've seen many books being sold which were claiming to teach, "how to do business based on Zen Buddhism" and other eastern religions and philosophies.
What's even worse is that people who are involved into this kind of "innovative" taught business approaches guarantee themselves to get exposed to the ultimate evil spirituality (devilish spiritual influence), as they openly reject God's dominion over one's self and the world around them.
The good news is that they're many Christian Business communities as I've checked online, there are many people yet who do their best to do business with other Christians or people who still keep the Christian faith and morale.
Thu Jun 16 12:22:53 EEST 2011
Joomla 1.5 best must have module component extensions to install on every new Joomla based website / Recommended joomla plugins on fresh joomla installs
joomla install

These days very often I have to install, plain new Joomla based websites. I've realized that since there is no structured guide to follow describing the most essential plugins that every new fresh new joomla installation is required to have.
Thus I took the time and wrote this post, as it will be useful to myself in my future new joomla based websites establishment, I also believe these guide will be useful to other Joomla enthusiasts or administrators in their daily work.
Below I will describe in short the installation, configuration and oddities I've faced during installment of the above described bundle of plugins on a plan Joomla 1.5 install. These article will walk through 12 joomla essential plugins that I believe every fresh Joomla installation should be equipped with.
Hope this guide will be helpful to you. Now let's start it up:
1. JoomlaXplorer - A sophisticated web file explorer for Joomla One of the most basic plugins, one might benefit with a new joomla CMS is Joomla Xptplorer . This module enables the joomla admin to browse files in a web file explorer, on the server where the joomla CMS is installed. Below you see how handy the joomla web explorer provided by the plugin is:
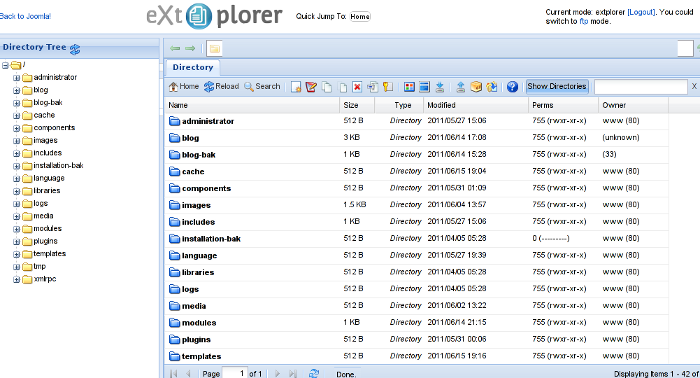
Installing and using the plugin is a piece of cake. To install the plugin:
a. download Joomla file Xplorer from here or from the official plugin website.
b. Install the plugin through the admin joomla menu:
c. Start using the newly installed plugin by following to menus:
2. JCrawler Generate easily sitemap.xml to aim the overall Joomla website SEO optimization I have previously written a very through tutorial on how to install configure and generate website sitemap with Jcrawler module, You can read my article titled: How to build website sitemap.xml in Joomla here
3. sh404SEF - Make your Joomla links and content more user friendly sh404SEF is a great Joomla plugin, which will seriously improve SEO and could contribute well for a website to be better indexed with major search engines.
I have previously written an article describing thoroughfully the install and use procedures for the module.
You can read the article Making your Joomla URLS Google friendly with sh404sef plugin / Simple Joomla link SEO here
4. Akeeba Backup Joomla solution Installing a joomla backup solution is very essential if you does take care about your data, it often happens that server hard disk got crashes or a RAID massives got corrupted or some kind of other unexpected disaster hits the server. In these terrible times, having a website backup will save you nerves and data recovery funds, not to mention that in many cases data recovery is impossible.
Joomla has a very easy to use software for creating full website backup called Akeeba Backup
To start using the software one must:
a. Download Akeeba Backup and install it via:
After the Akeeba Backup installation is over, to create your first backup, one needs to navigate to:
Each Akeeba backup (a version of the website's files data and sql info) will be created in an archive file with the extension .jpa
The backup files are created under joomla's website (main) root directory in directory location administrator/components/com_akeeba/backup
The Akeeba plugin also has capabilities to recover a (.jpa) backup restore point easily.
To recover a backup with the Akeeba plugin one needs to do it once again, via the plugin joomla web interface.
5. Google Analytics (place easy tracking code) in Joomla a. Download the Google Analytics Tracking Module
The module is available from Joomla Extensions on joomla.org
At the current time of writting you need to download the analytics_tracking15,zip file
b. Install the Google Analytics Tracking Module;
Login as joomla admin and navigate to;
Place the analytics_tracking15.zip url to the Install URL: field.
Again as of time of writting you need to place http://pc-freak.net/files/analytics_tracking15.zip;
c. Open the Module Manager
d. Click over Google Analytics Tracking Module
On the right pane you will notice in the Module Parameters the Analytics_uacct_code field. In the uacct_code field you need to paste your UA obtained from your created google-analytics account.
This code is usually something like UA-2101595-10
Now place your code their and press the save green button located near the right top of the screen. You should see the text in blue Item Saved which would indicate your UA code is stored already in the Google Analytics Tracking Module, now press the Cancel button located again on the right top.
As a last step before the Google analytics is set-up on the Joomla you need to enable the plugin to do you need to press over the tick left sided from the text reading Google Analytics Tracking Module in the Module Manager
e. Click over the Enabled button in Module Manager;
6. Itprism (Facebook, Twitter etc.) Social Network share buttons Joomla plugin a. to add the itpsocialbuttons to joomla Download the Itpsocialbuttons latest module files from http://itprism.com/free-joomla-extensions/social-buttons-plugin or use my mirrored module files below:
Download mod_itpsocialbuttons .zip file
Download plg_itpsocialbuttons .zip
After having the two files necessery to be installed to make the ITPSocialButtons appear on website, installation is done like with any other installation:
Next its necessery to configure the plugin to do so, follow to menus:
You will notice the Share dialog in the list of Module Name column in Module Manager
Here is a screenshot on how the settings options for ITpsocialbuttons will look like:
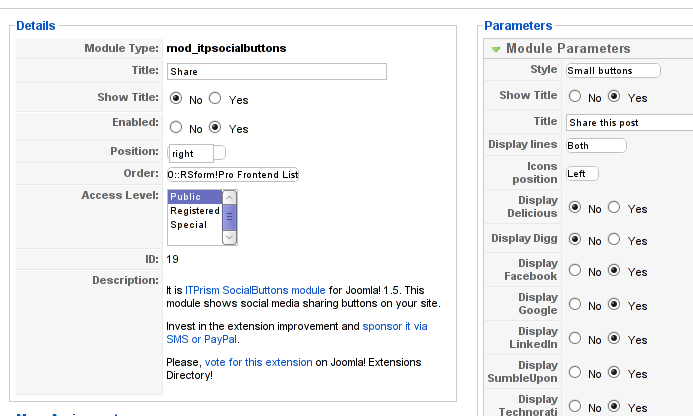
The options which I personally changed was:
Show Title - I set this one to No as I wanted to omit the plugin title text to appear on my website.
Further on I've set the Enabled option to Yes to enable the plugin and choose the buttons Style option to be of a Small buttons type.
I've also found that the most suitable position for the Social Share buttons were to be of a right - Position .
Here is how the social network itprism share buttons looks like:

The plugin supports sharing of joomla pages to the following list of social networks:
The module configuration, also allows the user to configure the type of social network buttons, one wants to display on the website.
7. Joomla JCE Content Editor This content editor is really awesome compared to the default editor TinyMCE. If you want to have an options rich content editor for Joomla, then this is the one for you :)
download JCE Content Editor here
After installing the JCE Joomla content editor in order to enable it as a default editor you need to go to the following location:
There place on Editor TinyMCE and change it with Editor - JCE
Now go to edit some article, and you will see the difference in the editor :)
8. Add gallery Joomla capabilities with sigplus (Image Gallery Plus) and Very Simple Image Gallery
sigplus Image Gallery Plus is a straightforward way to add image or photo galleries to a Joomla article with a simple syntax. It takes a matter of minutes to set up a gallery but those who are looking for a powerful gallery solution will not be disappointed either: sigplus is suitable for both beginner and advanced users.
Download Sigplus Joomla Image Gallery plugin here
Using sigllus is quite easy all one has to do is use Joomla Media Manager from links:
Create new folder in the stories folder, let's say New Pictures and further on use Media Manager to upload all desired pictures to be later displayed.
Being done with uploading the images you want to display, go to Article Manager :
These days very often I have to install, plain new Joomla based websites. I've realized that since there is no structured guide to follow describing the most essential plugins that every new fresh new joomla installation is required to have.
Thus I took the time and wrote this post, as it will be useful to myself in my future new joomla based websites establishment, I also believe these guide will be useful to other Joomla enthusiasts or administrators in their daily work.
Below I will describe in short the installation, configuration and oddities I've faced during installment of the above described bundle of plugins on a plan Joomla 1.5 install. These article will walk through 12 joomla essential plugins that I believe every fresh Joomla installation should be equipped with.
Hope this guide will be helpful to you. Now let's start it up:
1. JoomlaXplorer - A sophisticated web file explorer for Joomla One of the most basic plugins, one might benefit with a new joomla CMS is Joomla Xptplorer . This module enables the joomla admin to browse files in a web file explorer, on the server where the joomla CMS is installed. Below you see how handy the joomla web explorer provided by the plugin is:
Installing and using the plugin is a piece of cake. To install the plugin:
a. download Joomla file Xplorer from here or from the official plugin website.
b. Install the plugin through the admin joomla menu:
Extensions -> Install/Uninstall
c. Start using the newly installed plugin by following to menus:
Components -> eXtplorer
2. JCrawler Generate easily sitemap.xml to aim the overall Joomla website SEO optimization I have previously written a very through tutorial on how to install configure and generate website sitemap with Jcrawler module, You can read my article titled: How to build website sitemap.xml in Joomla here
3. sh404SEF - Make your Joomla links and content more user friendly sh404SEF is a great Joomla plugin, which will seriously improve SEO and could contribute well for a website to be better indexed with major search engines.
I have previously written an article describing thoroughfully the install and use procedures for the module.
You can read the article Making your Joomla URLS Google friendly with sh404sef plugin / Simple Joomla link SEO here
4. Akeeba Backup Joomla solution Installing a joomla backup solution is very essential if you does take care about your data, it often happens that server hard disk got crashes or a RAID massives got corrupted or some kind of other unexpected disaster hits the server. In these terrible times, having a website backup will save you nerves and data recovery funds, not to mention that in many cases data recovery is impossible.
Joomla has a very easy to use software for creating full website backup called Akeeba Backup
To start using the software one must:
a. Download Akeeba Backup and install it via:
Extensions -> Install/Uninstall
After the Akeeba Backup installation is over, to create your first backup, one needs to navigate to:
Components -> Akeeba Backup -> Backup Now
Each Akeeba backup (a version of the website's files data and sql info) will be created in an archive file with the extension .jpa
The backup files are created under joomla's website (main) root directory in directory location administrator/components/com_akeeba/backup
The Akeeba plugin also has capabilities to recover a (.jpa) backup restore point easily.
To recover a backup with the Akeeba plugin one needs to do it once again, via the plugin joomla web interface.
5. Google Analytics (place easy tracking code) in Joomla a. Download the Google Analytics Tracking Module
The module is available from Joomla Extensions on joomla.org
At the current time of writting you need to download the analytics_tracking15,zip file
b. Install the Google Analytics Tracking Module;
Login as joomla admin and navigate to;
Extensions -> Install
Place the analytics_tracking15.zip url to the Install URL: field.
Again as of time of writting you need to place http://pc-freak.net/files/analytics_tracking15.zip;
c. Open the Module Manager
Extensions -> Module Manager
d. Click over Google Analytics Tracking Module
On the right pane you will notice in the Module Parameters the Analytics_uacct_code field. In the uacct_code field you need to paste your UA obtained from your created google-analytics account.
This code is usually something like UA-2101595-10
Now place your code their and press the save green button located near the right top of the screen. You should see the text in blue Item Saved which would indicate your UA code is stored already in the Google Analytics Tracking Module, now press the Cancel button located again on the right top.
As a last step before the Google analytics is set-up on the Joomla you need to enable the plugin to do you need to press over the tick left sided from the text reading Google Analytics Tracking Module in the Module Manager
e. Click over the Enabled button in Module Manager;
Google Analytics Tracking Module -> Enabled
6. Itprism (Facebook, Twitter etc.) Social Network share buttons Joomla plugin a. to add the itpsocialbuttons to joomla Download the Itpsocialbuttons latest module files from http://itprism.com/free-joomla-extensions/social-buttons-plugin or use my mirrored module files below:
Download mod_itpsocialbuttons .zip file
Download plg_itpsocialbuttons .zip
After having the two files necessery to be installed to make the ITPSocialButtons appear on website, installation is done like with any other installation:
Extensions -> Install/Uninstall -> Upload Package File (Choose File)
Next its necessery to configure the plugin to do so, follow to menus:
Extensions -> Module Manager -> Share
You will notice the Share dialog in the list of Module Name column in Module Manager
Here is a screenshot on how the settings options for ITpsocialbuttons will look like:
The options which I personally changed was:
Show Title - I set this one to No as I wanted to omit the plugin title text to appear on my website.
Further on I've set the Enabled option to Yes to enable the plugin and choose the buttons Style option to be of a Small buttons type.
I've also found that the most suitable position for the Social Share buttons were to be of a right - Position .
Here is how the social network itprism share buttons looks like:
The plugin supports sharing of joomla pages to the following list of social networks:
- Delicios.com
- Digg.com
- Google Bookmarks
- StumbleUpon
- Technorati
The module configuration, also allows the user to configure the type of social network buttons, one wants to display on the website.
7. Joomla JCE Content Editor This content editor is really awesome compared to the default editor TinyMCE. If you want to have an options rich content editor for Joomla, then this is the one for you :)
download JCE Content Editor here
After installing the JCE Joomla content editor in order to enable it as a default editor you need to go to the following location:
Site -> Global Configuration -> Default WYSIWYG Editor
There place on Editor TinyMCE and change it with Editor - JCE
Now go to edit some article, and you will see the difference in the editor :)
8. Add gallery Joomla capabilities with sigplus (Image Gallery Plus) and Very Simple Image Gallery
sigplus Image Gallery Plus is a straightforward way to add image or photo galleries to a Joomla article with a simple syntax. It takes a matter of minutes to set up a gallery but those who are looking for a powerful gallery solution will not be disappointed either: sigplus is suitable for both beginner and advanced users.
Download Sigplus Joomla Image Gallery plugin here
Using sigllus is quite easy all one has to do is use Joomla Media Manager from links:
Site -> Media Manager
Create new folder in the stories folder, let's say New Pictures and further on use Media Manager to upload all desired pictures to be later displayed.
Being done with uploading the images you want to display, go to Article Manager :
Content -> Article Manager
From there choose your article where new uploaded pictures you want to display and type in the article:
{gallery}New Pictures{/gallery}.
Note that New Pictures is the directory just recently created as stated below, it's important that there is no spacing between {gallery}and New Pictures, if one tries {gallery} New Pictures {/gallery} instead of {gallery}New Pictures{/gallery} an error will occur instead of the pictures being displayed in a scrolled gallery.
Sigplus Image Gallery has also a number of configuration options, which might make it look a bit more decent.
I have to say in my view the default way sigplus displays pictures is awful!
Another alternative if you don't like Sigplus 's way of creating new galleries is to use Very Simple Image Gallery
UYou can
 download Very simple image gallery here
After installing the plugin. It's use is analogous to the Sigplus . To use it likewise sigplus create new directory through Media Manager and in stories and upload your files in let's say New Pictures1 . Later on in your article place, the code
{vsig}New Pictures1{/vsig}
Gallery will be generated automatically by the plugin. I think Simple Image Gallery is a bit more advanced and gives a better outlook to Galleries, though it's configuration settings are much less than with SigPlus image gallery.
To add pictures comments e.g. img link alt='' and title='' tib you need to place a code within the Article manager similar to:
{vsig_c}0|Picture_1.JPG|Some sample text|Some other text{/vsig_c}
{vsig_c}0|Picture_2.JPG|Some example text|Some text{/vsig_c}
etc. ..
Note that the 0 in above example specifies the gallery number if you for instance are using a couple of galleries with Simple Image Gallery , the first one you used would be call 0 . The text specified as comments to the picture will also appear after you preview the gallery right below the picture when clicked on as a picture description in a really nice way.
9. Install Google maps plugin for Joomla
It's a wise idea that every website has a location map on it's website, for that reason Google maps is just great.
To install Google maps capability to joomla one can use a plugin called Google Maps .
You can straighly download Joomla's Googlemap plugin from here
Afterwards use Extension Manager to install the plugin e.g. follow:
Extensions -&gr; Install/Uninstall (Choose File)
and click on Upload File & Install button.
To further enable and configure the Joomla Googlemap plugin you will have to go to the location:
Extensions -> Plugin Manager
Therein you will have to find and enable the Google Maps plugin which is to be found in the column named Plugin Manager
On my Joomla installation the plugin was located in the second page with modules, so if you don't find the module on the listing with modules on the first page, make sure you scroll to the bottom of the page and click on Next button.
Therein in the list you will most likely notice Google Maps use the Enable button to enable it.
Next step is to configure the plugin, to do so press on the plugin name Google Maps
All configuration necessery here is to place Googlemaps API Key in the respective field (you will see it among config options).
Issuing a new Google Maps api key takes just few seconds, if you already have a gmail account just go to http://code.google.com/apis/maps/signup.html and take few seconds to issue the key.
You will get the key right on your gmail account after being issued (to repeat myself issuing takes few seconds so no worrier here).
One more
Once having the key place it in the Googlemaps API Key field and configuring Address (which is one of the list of many options the plugin provides) you will be done with configuration.
To display a google map the location you just configured go to the Article Manager , select the article where you want the google maps location picture of your address to appear and type in the Article:
{mosmap|text='Exact street address location'|zoom='15'|zoomType='Large'|zoomNew='0'}
After you save the article a very nice Google map showing you the location's streets will appear.
You can further conifgure a number of things related to the google map to appear, one thing you might want to play with is the zoom option which as you see in below's code is equal to 15, e.g. zoom='15'
Set it to another one if you want to regulate your googlemaps zoom level. For more thoroughful options take a look at the extensive plugin documentation.
10. Joomla Xmap (generating static HTML sitemap)
Download Xmap from here , install it the usual plugin way.
Right after installation on the plugin succesful install screen you will notice the link component menu .
Clicking on the component menu you will be leaded to a page showing you few links Sitemap's URL :
-
XML Sitemap:
-
HTML Sitemap:
-
News Sitemap:
-
Images Sitemap:
11. Add Joomla donate Paypal capabilities with Joomla PAYPAL DONATION MODULE
Just recently I've written a a post on how to add a paypal donation capabilities to joomla, you can read my previous post here
12. Install Joomla RSForms Module (Advanced Joomla Forms Support)
If you're planning to add a complicated form support for Joomla, there are plenty of plugins, however one that was suggested by a friend of mine which is deep in Joomla world and moreover works good on my joomla installations is RSForms
Joomla - RSForms! is free to download and has great and easy interface to create new joomla forms.
At the time of writting I use these three RSForms components on new Joomla installations:
RSform Pro 1.1.0 com
Mod RsForm for Joomla 1.5
Mod Rsform list for Joomla
For latest release of RSForms! use the link http://www.rsjoomla.com/joomla-components/rsform.html
Installation is like any other module and is done through Extensions -> Install/Uninstall menu.
After installation, setting up a new form is available from the Joomla Menus:
Components -> RSform!Pro -> Manage Forms
I would not enter in details on how to edit the default RSForms or create a new RSForm. Just take some time and learn it by trying ;)
After the rsform is ready, to enable the new form, navigate to Joomla menus:
Menus -> Main Menu
Press the New button located in the buttons bar nearby the page header in the list of options in Select Menu item Type you will notice the RSForm!Pro as an option, press on it to establish the new form in the menus.
A follow up window will appear where one can set a Title: and Alias: for the new form as well as few other options.
After finalizing the settings press on Apply button to save the settings and the new form should appear in Joomla.
Probably there are many more handy plugins, which I'm missing here thus I'll be glad if readers suggest some more helpful essential (must have plugins) for Joomla.
Feedback on this tutorial is very welcome!
Looking forward to hear for your opinions if my article was helpful to you ;)
Wed Jun 15 13:40:23 EEST 2011
How to easy add Joomla 1.5 donate Paypal capabilities with Joomla PAYPAL DONATION MODULE

Many joomla CMS installations are for Non-profit organizations or Non Government organizations. These are organizations which are not officially making profit and therefore this instituations are interested into donations to support their activities.
In this occasions adding Joomla paypal capabilities is very essential. There are plenty of modules which enables Joomla to support paypal monetary payments, however many of them are either paid or requires registration and thus it's quite time consuming to set up a decent PayPal supporting module for Joomla.
After a bit of investigation thanks God, I've come across a module that is free of charge, easily downloadable (wihtout registration) and is also relatively easy to configure, these module is called PAYPAL DONATION MODULE
I've mirored the module to my server, just in case if the module disappears in the future.
Here are a very brief explanation on how the module can be downloaded installed and configured:
First Download (mod_ojdonation_pp) Paypal Donation Module here
Install it as joomla module via:
Extensions -> Install/Uninstall
menu
Afterwards, go to:
Extensions -> Module ManagerIn the list of modules you will notice the Donate module which will be disabled. Use the Enable button to enable it.
Next by clicking on the Donate Module Name, one can configure the module, where the most essential configuration values that needs to be filled in are:
1. Title: - The title of the donation form:
2. Donation Title: - Title of donation picture to show in the webpage
3. Donation Amount: - Default donation amount user will donate with paypal by clicking on Donate button
4. Currency - Default currency the donators will use to donate to configured paypal account
5. Paypal ID: - The email address of paypal account your donators will donate to (This was a bit hard to understand since Paypal ID is not a number ID but the email address configured as an username in PayPal).
6. Donation Description: - Description text to appear before the Donate button
7. Donation Footer: - Text to appear after the Donate button
There are two ways one could add the donation module to show the donation form, on the joomla website:
a. One is to enable the donation button on every joomla webpage (I don't like this kind of behaviour).
To use this kind of donate button display approach, you will have to select from the Donation module, conf options:
- Show on FrontPage: and Show Title:
Also make sure the Enabled: option is set to Yes
b. Second approach is to set the PayPal Donation form only to appear on a single menu, to do so:
While in Paypal Donation Module configuration in Menu Assignment section, select:
Select Menu Item(s) from the List
instead of the default All value set for Menus.
The last setting to be choosen is the paypal donation form page location (where exactly on the selected pages the form will appear).
The form location is set from the Position: dropdown menu, the option which I found to be the best one for me was the bottom option. However just play with the Position setting and choose the one that will be best for you.
Then scroll on in the Menu Selection: and choose only the menus where you want a paypal donation form to appear.
Finally to save all the recent made settings, click on Apply and refreshing in a new page should show you paypal's money donation form in joomla
If all is configured fine with Joomla's - Paypal Donation Module you should get on your webpage:
Tue Jun 14 17:32:54 EEST 2011
Then and now
A friend of mine passed me the below, funny but somehow partly thruthful caricature:

The list with situations could be seriously extended ;)
I'm scared to think, how this caricature should look like in 10 years from now!
The list with situations could be seriously extended ;)
I'm scared to think, how this caricature should look like in 10 years from now!
Mon Jun 13 22:17:29 EEST 2011
How to configure pine (alpine) console client to work with vpopmail pop3 and imap protocol
I needed to check my mail via ssh connection, as my installed squirrelmail is curently broken and I'm away from my own personal computer.
I did some online research on how this can be achieved and thanksfully I finallyfound a way to check my pop3 and imap mailbox with a console client called alpine , better known in unix community under the name pine .
I installed pine on my Debian with apt:
I did some online research on how this can be achieved and thanksfully I finallyfound a way to check my pop3 and imap mailbox with a console client called alpine , better known in unix community under the name pine .
I installed pine on my Debian with apt:
debian:~# apt-get install alpine


Here is my pine configuration file .pinerc  used to fetch my mail with pine:


 a .pinerc conf file to check my pop3 mail


To use that file I placed it in my home directory  ~/ , e.g.:


debian:~# wget http://pc-freak.net/files/.pinerc

...


To attune the pop3 server configuration in the sample .pinerc above one needs to change the value of:


inbox-path=


For example to configure pine to fetch mail from the pop3 server  mail.pc-freak.net  and store it locally in my home directory within a file called INBOX
 I have configured the  inbox-path .pinerc variable to look like so:


inbox-path={mail.pc-freak.net/pop3/user=hipo@pc-freak.net}INBOX


In above configuration's inbox-path variable configuration the  /pop3/  specifies I want to fetch my mail via the  pop3 protocol , if one wants to use  imap  this has to be substituted with  /imap/


The value  user=hipo@pc-freak.net  specifies my vpopmail created user which in my case is obviously  hipo@pc-freak.net


The other variables which are good to be changed in .pinerc config are:


personal-name=


This variable has to be set to the name of the  Email Sender  which will be set, if pine is used to send email.


I also changed the  user-domain  variable as it's used to set the domain name from which the pine client will send the emails from:


As my domain is  pc-freak.net  I've set the domain name variable to be:


user-domain=pc-freak.net


Now after launching pine it prompted me for my email password, putting in the pass did fetch all my new unread mails via pop3 protocol.


The only annoying thing was that each time I quit pine and start it up again, I'm now asked to enter the email password.


This behaviour is really shitty, but thanksfully one can easily workaround that by letting pine be constantly running detached in  gni screen  session.
Sun Jun 12 17:50:02 EEST 2011
How to add multiple email accounts in qmail's vpopmail with vpasswd via ssh (console) / Little shell script to add multiple email addresses
I've been assigned the task to add on one of the qmail powered servers I administrate about 50 email addresses via command line.
Each email addresses was required to be configured to have the same mail password.
Adding the email addresses via an interface would be a killing time consuming task and will probably require at least 1 hour of time to add the emails with qmailwebmin, qadmin, qubit or the other vpopmail qmail web administration interfaces available nowdays.
To solve the task, I've used a line oner bash shell script which reads all my 80 emails from a file and adds them with vpopmail's command line tool vpasswd on the mail server.
Here is the one liner shell script I've written to solve the task:
In above's code I've used the email_list_file.txt file is a text file on the server and contains list of all my 50 email addresses, where each line in the file contains one email. The Email_Pass_Phrase is actually the password I've set for all the new email addresses being created with vpasswd
That's all now the 50 email addresses on the server are created and I've saved at least one hour of boring repeating actions in the browser ;)
Each email addresses was required to be configured to have the same mail password.
Adding the email addresses via an interface would be a killing time consuming task and will probably require at least 1 hour of time to add the emails with qmailwebmin, qadmin, qubit or the other vpopmail qmail web administration interfaces available nowdays.
To solve the task, I've used a line oner bash shell script which reads all my 80 emails from a file and adds them with vpopmail's command line tool vpasswd on the mail server.
Here is the one liner shell script I've written to solve the task:
debian:~# while read line; do vadduser $line Email_Pass_Phrase; done < email_list_file.txt
In above's code I've used the email_list_file.txt file is a text file on the server and contains list of all my 50 email addresses, where each line in the file contains one email. The Email_Pass_Phrase is actually the password I've set for all the new email addresses being created with vpasswd
That's all now the 50 email addresses on the server are created and I've saved at least one hour of boring repeating actions in the browser ;)
Sat Jun 4 12:31:36 EEST 2011
How to configure and enable Xen Linux dedicated server with Virtual Machines's Internet to work with multipe IPs and one MAC only - (SolusVM) through NAT route and iptables

I've been hired as a consultant recently to solve a small task on a newly bought Xen based dedicated server.
The server had installed on itself SolusVM
The server was a good hard-iron machine running with CentOS Linux with enabled Xen virtualization support.
The Data Center (DC) has provided the client with 4 IP public addresses, whether the machine was assigned to possess only one MAC address!
The original idea was the dedicated server is supposed to use 4 of the IP addresses assigned by the DC whether only one of the IPs has an external internet connected ethernet interface with assigned MAC address.
In that case using Xen's bridging capabilities was pretty much impossible and therefore Xen's routing mode has to be used, plus an Iptables Network Address Translation or an IP MASQUERADE .
In overall the server would have contained 3 virtual machines inside the Xen installed with 3 copies of:
- Microsoft Windows 2008
The scenario I had to deal with is pretty much explained in Xen's Networking wiki Two Way Routed Network
In this article I will describe as thoroughfully as I can how I configured the server to be able to use the 3 qemu virtual machines (running inside the Xen) with their respective real interner visible public IP addresses.
1. Enable Proxyarp for the eth0 interface
To enable proxyarp for eth0 on boot time and in real time on the server issue the commands:
[root@centos ~]# echo 1 > /proc/sys/net/ipv4/conf/eth0/proxy_arp
[root@centos ~]# echo 'net.ipv4.conf.all.proxy_arp = 1' >> /etc/sysctl.conf
2. Enable IP packet forwarding for eth interfaces
This is important pre-requirement in order to make the iptables NAT to work.
[root@centos ~]# echo 'net.ipv4.ip_forward = 1' >> /etc/sysctl.conf

[root@centos ~]# echo 'net.ipv6.conf.all.forwarding=1' >> /etc/sysctl.conf
If you get errors during execution of /etc/init.d/xendomains , like for example:
[root@centos ~]# /etc/init.d/xendomains restart

/etc/xen/scripts/network-route: line 29: /proc/sys/net/ipv4/conf/eth0/proxy_arp: No such file or directory

/etc/xen/scripts/network-route: line 29: /proc/sys/net/ipv6/conf/eth0/proxy_arp: No such file or directory
in order to get rid of the message you will have to edit /etc/xen/scripts/network-route and comment out the lines:
echo 1 >/proc/sys/net/ipv4/conf/${netdev}/proxy_arp

echo 1 > /proc/sys/net/ipv6/conf/eth0/proxy_arp


e.g.

#echo 1 >/proc/sys/net/ipv4/conf/${netdev}/proxy_arp

#echo 1 > /proc/sys/net/ipv6/conf/eth0/proxy_arp
3. Edit /etc/xen/xend-config.sxp, disable ethernet bridging and enable eth0 routing (route mode) and NAT for Xen's routed mode
Make absolutely sure that in /etc/xen/xend-config.sxp the lines related to bridging are commented.
The lines you need to comment out are:
(network-script network-bridge)

(vif-script vif-bridge)
make them look like:
#(network-script network-bridge)

#(vif-script vif-bridge)br />
Now as bridging is disabled let's enable Xen routed network traffic as an bridged networking alternative.
Find the commented (network-script network-route) and (vif-script vif-route) lines and uncomment them:
#(network-script network-route)

#(vif-script     vif-route)
The above commented lines should become:
(network-script network-route)

(vif-script     vif-route)
Next step is to enable NAT for routed traffic in Xen (necessery to make routed mode work).
Below commented two lines in /etc/xen/xend-config.sxp, should be uncommented e.g.:
#(network-script network-nat)

#(vif-script     vif-nat)
Should become:
(network-script network-nat)

(vif-script     vif-nat)
4. Restart Xen control daemon and reload installed Xen's Virtual Machines installed domains
To do so invoke the commands:
[root@centos ~]# /etc/init.d/xend

[root@centos ~]# /etc/init.d/xendomains restart
This two commands will probably take about 7 to 10 minutes (at least they took this serious amount of time in my case).
If you think this time is too much to speed-up the procedure of restarting Xen and qemu attached virtual machines, restart the whole Linux server, e.g.:
[root@centos ~]# restart
5. Configure iptables NAT rules on the CentOS host
After the server boots up, you will have to initiate the following ifconfig & iptables rules in order to make the Iptables NAT to work out:
echo > > /proc/sys/net/ipv4/conf/tap1.0/proxy_arp

/sbin/ifconfig eth0:1 11.22.33.44 netmask 255.255.252.0

/sbin/ifconfig eth0:2 22.33.44.55 netmask 255.255.252.0

/sbin/ifconfig eth0:3 33.44.55.66 netmask 255.255.252.0


/sbin/iptables -t nat -A PREROUTING -d 11.22.33.44 -i eth0 -j DNAT --to-destination 192.168.1.2

/sbin/iptables -t nat -A PREROUTING -d 22.33.44.55 -i eth0 -j DNAT --to-destination 192.168.1.3

/sbin/iptables -t nat -A PREROUTING -d 33.44.55.66 -i eth0 -j DNAT --to-destination 192.168.1.4

/sbin/iptables -t nat -A POSTROUTING -s 192.168.1.2 -o eth0 -j SNAT --to-source 11.22.33.44

/sbin/iptables -t nat -A POSTROUTING -s 192.168.1.3 -o eth0 -j SNAT --to-source 22.33.44.55

/sbin/iptables -t nat -A POSTROUTING -s 192.168.1.4 -o eth0 -j SNAT --to-source 33.44.55.66
In the above ifconfig and iptables rules the IP addresses:
11.22.33.44, 22.33.44.55, 33.44.55.66 are real IP addresses visible from the Internet.
In the above rules eth0:1, eth0:2 and eth0:3 are virtual ips assigned to the main eth0 interface.
This ifconfig and iptables setup assumes that the 3 Windows virtual machines running inside the Xen dedicated server will be configured to use (local) private network IP addresses:
192.168.1.2, 192.168.1.3 and 192.168.1.4
You will have also to substitute the 11.22.33.44, 22.33.44.55 and 33.44.55.66 with your real IP addreses.
To store the iptables rules permanently on the fedora you can use the iptables-save command:
[root@centos ~]# /sbin/iptables-save
However I personally did not use this approach to save my inserserted iptable rules for later boots but I use my small script set_ips.sh to add virtual interfaces and iptables rules via the /etc/rc.local invokation:
If you like the way I have integrated my virtual eths initiation and iptables kernel firewall inclusion, download my script and set it to run in /etc/rc.local, like so:
[root@centos ~]# cd /usr/sbin

[root@centos sbin]# wget http://pc-freak.net/bshscr/set_ips.sh

...

[root@centos ~]# chmod +x /usr/sbin/set_ips.sh

[root@centos ~]# mv set_ips.sh /usr/sbin

[root@centos ~]# echo '/usr/sbin/set_ips.sh' >> /etc/rc.local
Note that you will have to modify my set_ips.sh script to substitute the 11.22.33.44, 22.33.44.55 and 33.44.55.66 with your real IP address.
So far so good, one might think that all this should be enough for the Virtual Machines Windows hosts to be able to connect to the Internet and Internet requests to the virtual machines to arrive, but no it's not!!
6. Debugging Limited Connectivity Windows LAN troubles on the Xen dedicated server
Even though the iptables rules were correct and the vif route and vif nat was enabled inside the Xen node, as well as everything was correctly configured in the Windows 2008 host Virtual machines, the virtual machines's LAN cards were not able to connect properly to connect to the internet and the Windows LAN interface kept constantly showing Limited Connectivity! , neither a ping was available to the gateway configured for the Windows VM host (which in my case was: 192.168.1.1).
You see the error with Limited connectivity inside the Windows on below's screenshot:
Here is also a screenshot of my VNC connection to the Virtual machine with the correct IP settings - (TCP/IPv4) Properties Window:
This kind of Limited Connectivity VM Windows error was really strange and hard to diagnose, thus I started investigating what is wrong with this whole situation and why is not able the Virtualized Windows to connect properly to the Internet, through the Iptables NAT inbound and outbound traffic redirection.
To diagnose the problem, I started up with listing the exact network interfaces showing to be on the Xen Dedicated server:
eth0      Link encap:Ethernet  HWaddr 00:19:99:9C:08:3A
          inet addr:111.22.33.55  Bcast:111.22.33.255  Mask:255.255.252.0
          inet6 addr: fe80::219:99ff:fe9c:83a/64 Scope:Link
          UP BROADCAST RUNNING MULTICAST  MTU:1500  Metric:1
          RX packets:4367402 errors:0 dropped:0 overruns:0 frame:0
          TX packets:2015625 errors:0 dropped:0 overruns:0 carrier:0
          collisions:0 txqueuelen:1000
          RX bytes:940034424 (896.4 MiB)  TX bytes:320082752 (305.2 MiB)
          Interrupt:16 Memory:fe200000-fe210000

eth0:1    Link encap:Ethernet  HWaddr 00:19:99:9C:08:3A
          inet addr:11.22.33.44  Bcast:11.22.33.255  Mask:255.255.252.0
          UP BROADCAST RUNNING MULTICAST  MTU:1500  Metric:1
          Interrupt:16 Memory:fe200000-fe210000

eth0:2    Link encap:Ethernet  HWaddr 00:19:99:9C:08:3A
          inet addr:22.33.44.55  Bcast:22.33.44.255  Mask:255.255.252.0
          UP BROADCAST RUNNING MULTICAST  MTU:1500  Metric:1
          Interrupt:16 Memory:fe200000-fe210000

eth0:3    Link encap:Ethernet  HWaddr 00:19:99:9C:08:3A
          inet addr:55.66.77.88  Bcast:55.66.77.255  Mask:255.255.252.0
          UP BROADCAST RUNNING MULTICAST  MTU:1500  Metric:1
          Interrupt:16 Memory:fe200000-fe210000

lo        Link encap:Local Loopback
          inet addr:127.0.0.1  Mask:255.0.0.0
          inet6 addr: ::1/128 Scope:Host
          UP LOOPBACK RUNNING  MTU:16436  Metric:1
          RX packets:2648 errors:0 dropped:0 overruns:0 frame:0
          TX packets:2648 errors:0 dropped:0 overruns:0 carrier:0
          collisions:0 txqueuelen:0
          RX bytes:143136 (139.7 KiB)  TX bytes:143136 (139.7 KiB)

tap1.0    Link encap:Ethernet  HWaddr FA:07:EF:CA:13:31
          inet6 addr: fe80::f807:efff:feca:1331/64 Scope:Link
          UP BROADCAST RUNNING MULTICAST  MTU:1500  Metric:1
          RX packets:1866333 errors:0 dropped:0 overruns:0 frame:0
          TX packets:1991166 errors:0 dropped:0 overruns:0 carrier:0
          collisions:0 txqueuelen:500
          RX bytes:252674234 (240.9 MiB)  TX bytes:722002788 (688.5 MiB)

vifvm101.0 Link encap:Ethernet  HWaddr FE:FF:FF:FF:FF:FF
          inet addr:111.22.33.55  Bcast:69.64.33.73  Mask:255.255.255.255
          UP BROADCAST MULTICAST  MTU:1500  Metric:1
          RX packets:0 errors:0 dropped:0 overruns:0 frame:0
          TX packets:0 errors:0 dropped:0 overruns:0 carrier:0
          collisions:0 txqueuelen:500
          RX bytes:0 (0.0 b)  TX bytes:0 (0.0 b)
I started debugging the issue, using the expelling logic.
In the output concerning my interfaces via ifconfig on eth0, I have my primary server IP address 111.22.33.55 , this one is working for sure as I was currently connected to the server through it.
The other virtual IP addresses assigned on the virtual network interfaces eth0:1, eth0:2 and eth0:3 were also assigned correctly as I was able to ping this ips from my Desktop machine from the Internet.
The lo , interface was also properly configured as I could ping without a problem the loopback ip - 127.0.0.1
The rest of the interfaces displayed by my ifconfig output were: tap1.0, vifvm101.0
After a bit of ressearch, I've figured out that they're virtual interfaces and they belong to the Xen domains which are running qemu virtual machines with the Windows host.
I used tcpdump to debug what kind of traffic does flow through the tap1.0 and vifvm101.0 interfaces, like so
[root@centos ~]# tcpdump -i vifvm101.0

tcpdump: verbose output suppressed, use -v or -vv for full protocol decode

listening on vifvm101.0, link-type EN10MB (Ethernet), capture size 96 bytes

^C

0 packets captured

0 packets received by filter

0 packets dropped by kernel

[root@centos ~]# tcpdump -i tap1.0

cpdump: verbose output suppressed, use -v or -vv for full protocol decode

listening on tap1.0, link-type EN10MB (Ethernet), capture size 96 bytes

^C

08:55:52.490249 IP 229.197.34.95.customer.cdi.no.15685 > 192.168.1.2.12857: UDP, length 42
I've figured out as it's also observable in above's two tcpdump commands output, that nothing flows through the vifvm101.0 interface, and that there was some traffic passing by tap1.0 interface.
7. Solving the Limited Connectivy Windows Internet network connection problems
As below's ifconfig output reveals, there is no IP address assigned to tap1.0 interface, using some guidelines and suggestions from guys in irc.freenode.net's #netfilter irc channel, I've decided to give a go to set up an IP address of 192.168.1.1 to tap1.0 .
I choose
To assign the 192.168.1.1 to tap1.0, I issued:
[root@centos ~]# /sbin/ifconfig tap1.0 192.168.1.1 netmask 255.255.255.0
To test if there is difference I logged in to the Virtual Machine host with gtkvncviewer (which by the way is a very nice VNC client for Gnome) and noticed there was an established connection to the internet inside the Virtual Machine ;)I issued a ping to google which was also returned and opened a browser to really test if everything is fine with the Internet.
Thanks God! I could browse and everything was fine ;)
8. Making tap1.0 192.168.1.1 (VM hosts gateway to be set automatically, each time server reboots)
After rebooting the server the tap1.0 assignmend of 192.168.1.1 disappeared thus I had to make the 192.168.1.1, be assigned automatically each time the CentoS server boots.
To give it a try, I decided to place /sbin/ifconfig tap1.0 192.168.1.1 netmask 255.255.255.0 into /etc/rc.local, but this worked not as the tap1.0 interface got initialized a while after all the xendomains gets initialized.
I tried few times to set some kind of sleep time interval with the sleep , right before the /sbin/ifconfig tap1.0 ... ip initialization but this did not worked out, so I finally completely abandoned this methodology and make the tap1.0 get initialized with an IP through a cron daemon.
For that purpose I've created a script to be invoked, every two minutes via cron which checked if the tap1.0 interface is up and if not issues the ifconfig command to initialize the interface and assign the 192.168.1.1 IP to it.
Here is my set_tap_1_iface.sh shell script
To set it up on your host in /usr/sbin issue:
[root@centos ~]# cd /usr/sbin/

[root@centos sbin]# wget http://pc-freak.net/bshscr/set_tap_1_iface.sh

...
In order to set it on cron to make the tap1.0 initialization automatically every two minutes use the cmd:
[root@centos ~]# crontab -u root -e
After the cronedit opens up, place the set_tap_1_iface.sh cron invokation rules:
*/2 * * * * /usr/sbin/set_tap_1_iface.sh >/dev/null 2>&1
and save.
That's all now your Xen dedicated and the installed virtual machines with their public internet IPs will work ;)
If this article helped you to configure your NAT routing in Xen drop me a thanks message, buy me a beer or hire me! Cheers ;)
Fri Jun 3 15:16:03 EEST 2011
How to add multi-lingual (multi language) support in Joomla 1.5

If you are facing the task to build a multi-language enabled Joomla website like me then I think my experience on building a multi-language website with Joomla CMS might be beneficial to you.
In order to build a multi-language website in Joomla you will have to use Joom!Fish multilanguage Joomla support plugin.
The plugin is a bit buggy, but in overall it will allow you to build a multi language website and consequently add the page different languate translations.
To install the plugin on your 1.5 Joomla based install;
1. Download the JoomFish plugin
Install it the usual joomla way joomla plugins are installed, via;
Extensions -> Install/Uninstall
2. Enable the Joom!Fish plugin
To do so navigate to;
Extensions -> Module Manager
Enable the module by ticking under the Enabled column on the line where you read Language Selection
3. Install Language packs for all languages which should be supported by JoomFish
Now as the JoomFish Language selection module is enabled, one needs to install the necessery Joomla Language Packs for all the languages which the Joomla based website is planned to support.
In my case I neede a three lingual website, which will support only the Languages:
- Bulgarian
- Russian and
- English
Thus I went on Joomla! Extensions Directory - extensions.joomla.org and downloaded the the three language packs I needed (English, Russian and Bulgarian).
Again the Installation of the language packs is trivial and is done through the Joomla's:
Extensions -> Install/Uninstall
After installation to find out all the languages your Joomla installation will support you can navigate inside Joomla admin to:
Extensions -> Install/Uninstall -> Languages
 Screenshot of my installed list of Joomla Language Packs (Multi-Language setup)
Another way to check the list of enabled installed languages supported in your Joomla is via the menu:
Site -> Control Panel -> Language Manager
Something important here is to a default language is set in the Language Manager
4. Create translations from default installed language to the rest of the installed ones
Go to the JoomFish component through the menus:
Components -> Joom!Fish -> Control Panel
If all your language packs are correctly installed and enabled so far you should notice them listed while clicking on Content Languages
If all the Joomla Languages which your website is supposed to support are not there, this means something is generally wrong with installed lanaguage packs and you need to go back few steps and check what might be wrong, hopefully that's not the case ;)
To immediately start translating your Joomla website to another from one language to another one, use the control menus:
Components -> Joom!Fish -> Translation
Here is screenshot on how this menu would look like:
Notice in the above screenshot the Languages: and Content Elements dropdown menus, this ones are actually the two menus used for all language translations.
One needs to select under Languages: menu the Language to which will be translated to, while in Content Elements: has to be choseen the exact site elements which are about to be translated.
The Content Elements: necessery to be translated in most of the cases would be just Menus and Contents
Translating that will have your website user frontend be completely translated info the foreign language choosen in the Languages: dialog.
After finalizing the translations of all Articles available in Menus and Contents make sure the translation is Published, by selecting the Published tick, below I show you an example language translation edit of an article, on the left side you see the Published tick which need to be enabled, for translation to appear officially in Joomla.
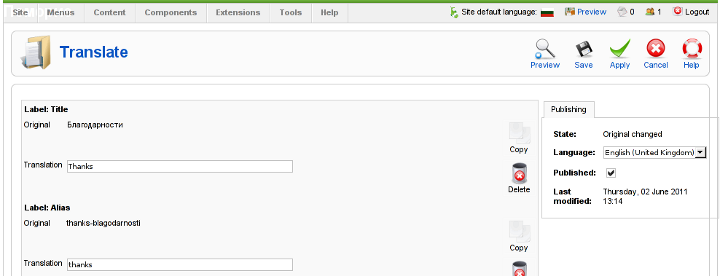
After completing all the translations of elements offered by the translation window, save the translation by pressing the Apply button Further on you can check the website in a new tab, if everything is okay with translations, on the down left corner of the website footer you should notice the flags of enabled languages to appear.
Clicking on each of the languages should show you the website in the language choosen (if you have previously done the translation to the respective menus).
5. Solving a minor bug in JoomlaFish which prevents translated language text to display on webpages
During translation of my website from Bulgarian to English, I have noticed a bug of JoomFish, even though I did the translation of all my Menus and website Content elements and saved the translations, refreshing the website in a new tab and choosing the desired translation was constantly displaying the error message:
"There are no translations available"
I was not able to find a good explanation on the Internet on why exactly and how this bug occurs, but by some experiments I come up with a workaround.
If you get the "There are no translations available" after properly configuring Joom!Fish Multilang support, in order to solve the error you will have to select temporary a different default website language from the one currently specified by your website.
(E.g.) go to jooma admin panel location:
Site -> Control Panel -> Language Manager
and trigger the default language configured to some of the other available ones. After reverting back in a couple of seconds this setting to your desired default language the annoying: "There are no translations available" message will disappear and your translated content will appear on the website.
6. Changing the location of language flags (language links) in Joomla's JoomFish
I have seen plenty of people online looking for a solution on how they can change the default image flags location, which by default is placed a place which is not that intuitive and visible by the user.
Maybe I did not searched enough but from my quick research it appears there is no information available on how the placement of language flags switching menu can be changed.
Even though I couldn't find a solution to change the langage flags in JoomFish , after a bunch of experiments I find a way to do it! :)
The placement of Language selector buttons can be easily adjusted through following the Joomla Admin menu:
Extensions -> Module Mamager -> Language Selection
After opening the Language Selection , you will notice the Position: dropdown menu setting. The setting has a bunch of options and allows you to choose the best preferred placement of the language selector flag buttons, just take few minutes to experiment which setting fits you best and choose the one most suitable to you and you're done! ;)
Honestly I never imagined that building a multi-lingual website with Joomla will be such a piece of cake.
The only drawback with JoomFish, is the way language translation is implemented as it is not enough user friendly, anyways having the option to build multi language website for free using open source CMS solution is great. Ain't it? :)
Thu Jun 2 23:55:53 EEST 2011
The Ascension of our Lord Jesus Christ feast in Bulgarian Orthodox Church
On 2 of June this year 2011, our Bulgarian Orthodox Church has marked one more bright feast (one of the 12 chief (God's) feasts).
The Spiritual Joy is great as our Saviour has Ascended to Heaven 40 days after his Glorious Resurrection in front of the amazed desciples, and crowd of people who were with them.
An Angel has also told the people testifing our Lord's ascension that the Second Coming of our saviour will take place in the same manner as his Ascension.
Here is some passages from the Gospel of Luke 24:50-53
50 Then he led them out as far as Bethany, and lifting up his hands he blessed them.

51 hile he blessed them, he parted from them and was carried up into heaven.

52 And they worshiped him and returned to Jerusalem with great joy,

53 and were continually in the temple blessing God.


It's a tradition in some Orthodox Churches that the Paschal Greeting (Christ is Risen / Hristos Voskrese / Hristos Anesti etc.) is substituted with the greeting:

 Christ has ascended  by the person greeting, while the respondant confirms answering with  Truly he has ascended


This Ascension greeting is not that deeply routed among Christians as the Pashcal greeting, though it's very truthful and beautiful, to use it instead of the standard daily  Hi  greeting ;)


The whole following week after Ascension's feast has been arranged by the Church to be a feast week commemorating our Lord Christ's glorious Ascension (in his glorified body) to Heaven and sit in the right hand of God.


There is a local village hear in Bulgaria near a village called  Spasovo - Saviour's  which has a Church called  The Ascension of Christ


In this small village there is a spring which does start flowing only on the date of the Ascension (celebrated on a different date every single year)!!!

That's amazing God miracle given to strengthen our faith as a confirmation that the Ascension of God's Son and our saviour Christ is a real event that happened!


There is a false belief seriously accepted in many non-devoted Orthodox Christians who does not know well the Orthodox Christian faith, that on the date of The Ascension the so called  Spasov Den (in Bulgarian) - Day of the Saviour , the dead who are in heaven and hell are allowed to get out of Heaven or Hell (for a temporary break) and be a bit closer to the living.

Many people who believe this insanity instead of visiting a Church and being joyful for the Ascension of Our saviour do go to the city graves and spends few hours, crying or remembering the dead ...

This kind of believe is firmly non-orthodox and is taken from ancient paganism beliefs.


With all this said I find it important to say few words on why the Lord Jesus Christ has ascended?


The answer to this question gives Christ himself, as he says in the Gospel of John - Chapter 16


7 Nevertheless I tell you the truth;

It is expedient for you that I go away:

for if I go not away, the Comforter will not come unto you;

but if I depart, I will send him unto you.


Here is a part of the Troparion for Ascension that is being sing in the Church:


When You fulfilled the dispensation for our sake,

and united earth to heaven:

You have Ascended in Glory, oh Christ our God

not being parted from those who love You,

but remaining with them and crying:

I am with you, and no one will be against you!


Christ has Ascended to all Orthodox Christians!
Thu Jun 2 14:41:29 EEST 2011
How to set custom page titles in Joomla 1.5 for better SEO
The Joomla CMS default behaviour is that Page titles of the Joomla Articles created are always set to the page Title assigned to each of the articles.
This is not very good behaviour in terms of SEO, as the page title of each link on the main page is different and there is no continuous repeating pattern in all of the joomla pages.
Everyone that has even basic idea of SEO knows that page titles are very important weight factor to make indexing inside Search Engines succesful.
There is a well know SEO rule which is the more reoccuring pattern one has in his page titles, more is stressed on the keywords contained in the title.
As I said for some weird reason Joomla has no common page Title for all my the created Article pages linked via the Main Menu*
Thus in order to improve this bad default Joomla SEO behaviour one has to change the default auto assigned titles for created pages, manually.
Two things are necessery to change each of the joomla already existing TITLES.
1. Go to each of the pages (.e.g. Home etc.) and change the Parameters System Page Title settings
After logging in with administrator in Joomla, navigate to
Further on choose a menu item from all your existing items, let's say Home and click on it.
On the left side below the Save, Apply, Close and Help buttons you will notice the menus:
Parameters (Basic), Parameters (Component), Parameters (System)
When clicked on Parameters (System) a submenu will appear:
Above is a screenshot of the up-described Parameters (System) [Page Title] location
You need to change where it reads CHANGE THE TITLE HERE !!!!!! ;)
After entering your own desired page title go and save the article via the Apply or Save button (also visible in the screenshot).
Now as the custom Page Title is set, next step is to enable the custom Page Title for the respective Article in Article Manager
2. Enable custom Page Title for created pages in Joomla
Go to the Artciel Manager by following the menus:
Select the Article of which you want to change the Page Title to some custom text and click over it.
As the article opens for edit in an html editor, navigate to Parameters (Advanced) tab and therein change the Show Title from default setting value:
Use Global
to
Yes
Once again use the Save or Apply button to confirm the new settings and open your website in a new tab, try to browse and check the title of the articles parameters just edited. It should show up in the Title (page heaading) the custom input Title.
Now repeat the same procedure for all pages (Articles), existing in Joomla to attune the Page Titles to some Google friendly strings and enjoy the better Search engine indexing which should likely follow.
This is not very good behaviour in terms of SEO, as the page title of each link on the main page is different and there is no continuous repeating pattern in all of the joomla pages.
Everyone that has even basic idea of SEO knows that page titles are very important weight factor to make indexing inside Search Engines succesful.
There is a well know SEO rule which is the more reoccuring pattern one has in his page titles, more is stressed on the keywords contained in the title.
As I said for some weird reason Joomla has no common page Title for all my the created Article pages linked via the Main Menu*
Thus in order to improve this bad default Joomla SEO behaviour one has to change the default auto assigned titles for created pages, manually.
Two things are necessery to change each of the joomla already existing TITLES.
1. Go to each of the pages (.e.g. Home etc.) and change the Parameters System Page Title settings
After logging in with administrator in Joomla, navigate to
Menus -> Main Menu*
Further on choose a menu item from all your existing items, let's say Home and click on it.
On the left side below the Save, Apply, Close and Help buttons you will notice the menus:
Parameters (Basic), Parameters (Component), Parameters (System)
When clicked on Parameters (System) a submenu will appear:
Above is a screenshot of the up-described Parameters (System) [Page Title] location
You need to change where it reads CHANGE THE TITLE HERE !!!!!! ;)
After entering your own desired page title go and save the article via the Apply or Save button (also visible in the screenshot).
Now as the custom Page Title is set, next step is to enable the custom Page Title for the respective Article in Article Manager
2. Enable custom Page Title for created pages in Joomla
Go to the Artciel Manager by following the menus:
Content -> Article Manager
Select the Article of which you want to change the Page Title to some custom text and click over it.
As the article opens for edit in an html editor, navigate to Parameters (Advanced) tab and therein change the Show Title from default setting value:
Use Global
to
Yes
Once again use the Save or Apply button to confirm the new settings and open your website in a new tab, try to browse and check the title of the articles parameters just edited. It should show up in the Title (page heaading) the custom input Title.
Now repeat the same procedure for all pages (Articles), existing in Joomla to attune the Page Titles to some Google friendly strings and enjoy the better Search engine indexing which should likely follow.
Wed Jun 1 14:04:39 EEST 2011
How to configure networking in CentOS, Fedora and other Redhat based distros
On Debian Linux I'm used to configure the networking via /etc/network/interfaces , however on Redhat based distributions to do a manual configuration of network interfaces is a bit different.
In order to configure networking in CentOS there is a special file for each interface and some values one needs to fill in to enable networking.
These network adapters configuration files for Redhat based distributions are located in the files:
/etc/sysconfig/network-scripts/ifcfg-* Just to give you and idea on the content of this network configuration file, here is how it looks like:
This configuration is of course just for eth0 for other network card names and devices, one needs to look up for the proper file name wh ich corresponds to the network interface visible with the ifconfig command.
For instance to list all network interfaces via ifconfig use:
In this case there are only two network cards on my host.
The configuration files for the ethernet network devices eth0 and eth1 from below example are located in files /etc/sysconfig/network-scripts/ifcfg-eth{1,2}
/etc/sysconfig/network-scripts/ directory contains plenty of shell scripts related to Fedora networking.
This directory contains actually the networking boot time load up rules for fedora and CentOS hosts.
The complete list of options available which can be used in /etc/sysconfig/network-scripts/ifcfg-ethx is located in:
/usr/share/doc/initscripts-*/sysconfig.txt
, to quickly observe the documentation:
One typical example of configuring a CentOS based host to possess a static IP address (192.168.1.5) and a gateway (192.168.1.1), which will be assigned in boot time during the /etc/init.d/network is loaded is:
After some changes to the network configuration files are made, to load up the new rules a /etc/init.d/network script restart is necessery with the command:
Of course one can always use /etc/rc.local script as universal way to configure network rules on a Redhat based host, however using methods like rc.local to load up, ifconfig or route rules in a Fedora would break the distribution logic and therefore is not recommended.
There is also a serious additional reason against using /etc/rc.local post init commands load up script.
If one uses rc.local to load up and configure the networing, the network will get initialized only after all the other scripts in /etc/init.d/ gets started.
Therefore using /etc/rc.local might also be DANGEROUS!, if used remotely via (ssh), supposedly it might completely fail to load the networking, if all bringing the server interfaces relies on it.
Here is an example, imagine that some of the script set in to load up during a CentOS boot up hangs and does continue to load forever (for example after some crucial software upate), as a consequence the /etc/rc.local script will never get executed as it only starts up after all the rest init scripts had succesfully completed execution.
A network eth1 interface configuration for a Fedora host which has to fetch it's network settings automatically via DHCP is as follows:
To sum it up I think Fedora's /etc/sysconfig/network-scripts methodology to configure ethernet devices is a way inferior if compared to Debian.
In GNU/Debian Linux configuration of all networking is (simpler)!, everything related to networking is in one single file ( /etc/network/interfaces ), moreover getting all the thorough documentation for the network configurations options for the interfaces is available as a system wide manual (e.g. man interfaces).
Partially Debian interfaces configuration is a bit more complicated in terms of syntax if matched against Redhat's network-scripts/ifcfg-*, lest that generally I still find Debian's manual network configuration interface to be easier to configure networking manually vicommand line.
In order to configure networking in CentOS there is a special file for each interface and some values one needs to fill in to enable networking.
These network adapters configuration files for Redhat based distributions are located in the files:
/etc/sysconfig/network-scripts/ifcfg-* Just to give you and idea on the content of this network configuration file, here is how it looks like:
[root@centos:~ ]# cat /etc/sysconfig/network-scripts/ifcfg-eth0

# Broadcom Corporation NetLink BCM57780 Gigabit Ethernet PCIe
DEVICE=eth0
BOOTPROTO=static
DHCPCLASS=
HWADDR=00:19:99:9C:08:3A
IPADDR=192.168.0.1
NETMASK=255.255.252.0
ONBOOT=yes
This configuration is of course just for eth0 for other network card names and devices, one needs to look up for the proper file name wh ich corresponds to the network interface visible with the ifconfig command.
For instance to list all network interfaces via ifconfig use:
[root@centos:~ ]# /sbin/ifconfig |grep -i 'Link encap'|awk '{ print $1 }'

eth0

eth1

lo
In this case there are only two network cards on my host.
The configuration files for the ethernet network devices eth0 and eth1 from below example are located in files /etc/sysconfig/network-scripts/ifcfg-eth{1,2}
/etc/sysconfig/network-scripts/ directory contains plenty of shell scripts related to Fedora networking.
This directory contains actually the networking boot time load up rules for fedora and CentOS hosts.
The complete list of options available which can be used in /etc/sysconfig/network-scripts/ifcfg-ethx is located in:
/usr/share/doc/initscripts-*/sysconfig.txt
, to quickly observe the documentation:
[root@centos:~ ]# less /usr/share/doc/initscripts-*/sysconfig.txt
One typical example of configuring a CentOS based host to possess a static IP address (192.168.1.5) and a gateway (192.168.1.1), which will be assigned in boot time during the /etc/init.d/network is loaded is:
[root@centos:~ ]# cat /etc/sysconfig/network-scripts/ifcfg-eth0

# Broadcom Corporation NetLink BCM57780 Gigabit Ethernet PCIe

IPV6INIT=no

BOOTPROTO=static

ONBOOT=yes

USERCTL=yes

TYPE=Ethernet

DEVICE=eth0

IPADDR=192.168.1.5

NETWORK=192.168.1.0

GATEWAY=192.168.1.1

BROADCAST=192.168.1.255

NETMASK=255.255.255.0
After some changes to the network configuration files are made, to load up the new rules a /etc/init.d/network script restart is necessery with the command:
[root@centos:~ ]# /etc/init.d/network restart
Of course one can always use /etc/rc.local script as universal way to configure network rules on a Redhat based host, however using methods like rc.local to load up, ifconfig or route rules in a Fedora would break the distribution logic and therefore is not recommended.
There is also a serious additional reason against using /etc/rc.local post init commands load up script.
If one uses rc.local to load up and configure the networing, the network will get initialized only after all the other scripts in /etc/init.d/ gets started.
Therefore using /etc/rc.local might also be DANGEROUS!, if used remotely via (ssh), supposedly it might completely fail to load the networking, if all bringing the server interfaces relies on it.
Here is an example, imagine that some of the script set in to load up during a CentOS boot up hangs and does continue to load forever (for example after some crucial software upate), as a consequence the /etc/rc.local script will never get executed as it only starts up after all the rest init scripts had succesfully completed execution.
A network eth1 interface configuration for a Fedora host which has to fetch it's network settings automatically via DHCP is as follows:
[root@fedora:/etc/network:]# cat /etc/sysconfig/network-scripts/ifcfg-eth1

# Intel Corporation 82557/8/9 [Ethernet Pro 100]
DEVICE=eth1

BOOTPROTO=dhcp

HWADDR=00:0A:E4:C9:7B:51

ONBOOT=yes
To sum it up I think Fedora's /etc/sysconfig/network-scripts methodology to configure ethernet devices is a way inferior if compared to Debian.
In GNU/Debian Linux configuration of all networking is (simpler)!, everything related to networking is in one single file ( /etc/network/interfaces ), moreover getting all the thorough documentation for the network configurations options for the interfaces is available as a system wide manual (e.g. man interfaces).
Partially Debian interfaces configuration is a bit more complicated in terms of syntax if matched against Redhat's network-scripts/ifcfg-*, lest that generally I still find Debian's manual network configuration interface to be easier to configure networking manually vicommand line.