I'm just coming from being a guest to dear friends. They're having a bit old hardware PC running Windows XP and some old ATI Radeon model video card. A video was played in youtube so I noticed the video is displaying very slow. The PC hardware was good enough to play videos with no delays and image chops, so I give it a check. My guess was something is wrong with Video driver and to make driver is installed okay I take a look in: Control Panel -> System -> Hardware -> Device Manager
For my surprise there all was fine, so my next guess-es were:
Mozilla Firefox Browser is out of date
Computer resolution is set to too high for the old video adapter hardware
Something is wrong with Adobe Flash Player
Computer has Viruses or Spyware loading CPU creating the video lags
I check Mozilla Firefox and it was latest version; Help -> About Firefox As of time of writting Firefox 18.0.1 The computer Monitor was a huge 21 inch LCD HP display and Windows was configured to display on a very high resolution ;
– 1280×1024 (32 bit Colors)
I've earlier, seen old Computer hardware creating similar video delays and chop issues with Played videos thus to see if this will solve the issue lowered down video resolution 1024×768 with 16 bit color depth. Video continued to be showing slowly in every few seconds and display "choppy", so I excluded it as cause.
To make sure something is not wrong with Flash Player, I check in browser about installed plugins by typing in URL Address bar;
about:plugins
Very surprisingly the Flash Player was not installed! I hurried and install – googling, "install flash player" and following the trivial install procedure.
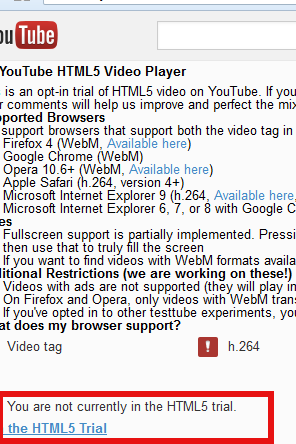
Then I give Firefox a restart and tested video with Alexander Nevsky Russian Movie (which btw is an interesting one to see for people who value art and history). The movie chops continued, I checked Flash version clicking on the video again just to determine, weirdly still Youtube was displaying videos usiong HTML5 (WebM) format!
I check once again if flash player is properly installed in about:plugins and weirdly all seemed fine I had on the PC properly working installed Adobe Flash 11.x.x. Now this was weird ?
For a first time I had a situation, where even though I installed Flash Player, Youtube continued to show videos using HTML5 WebM (open source video format). Now I should say I'm a big fan of HTML5 and open technologies, so HTML5 is great, the only problem is it still not production ready so for ordinary user Flash Player is still better – Flash's video buffering is much better, its compression is better, it is less buggy etc. etc.
It took me a bit of pondering Why Youtube was showing videos in HTML5 instead of using the Installed and working Flash Player?? After about 5 minutes of googling, I came to conclusion the person who fixed their Software, some months before had on purpose choose Youtube to be displayed with Experimetnal HTML5. I was not sure how to check if HTML5 is set as a default player in Youtube, so looked on the net, The page to change it is found by googling for "youtube html trial".
The URL to tune this as of time of writting is on;
https://www.youtube.com/html5
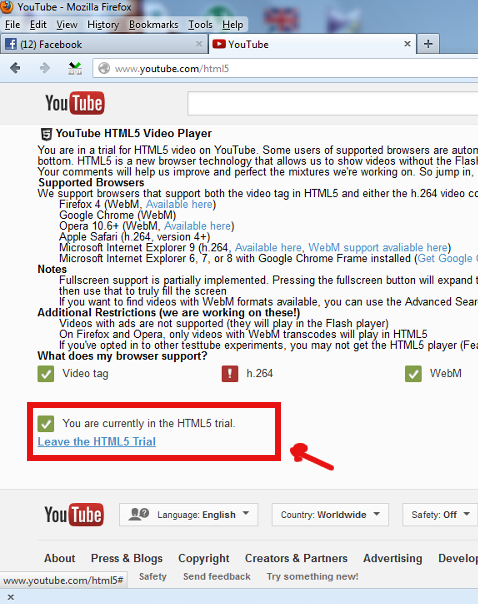
I had to click on;
Leave the HTML5 Trial – to stop using experimental Youtube HTML5 support
After a FF restart and lowered resolution to 1024×768 in 32 bit color depth, video started playing nice & smoothly 😉
One of the companies, where I'm doing a part time job, as an IT Consultant, System Administrator and Web developer, a e-marketing specialist and business consultant (the list goes on ;)) … planned to integrate a Newsletter support in their WordPress based websites.
As this fits my "job description" ,I took the task and implemented a simple but functional Newsletter support to their 4 WP based sites. In this article I will in short describe, my experience with placing the Newsletter subscription.:
Earlier I've done something similar as, I've added a subscipriotion (form) box to WordPress to use Google Feedburner RSS . What I needed this time, however was a bit different. The company required the newsletter to be a separate one and don't relay on Google Feedburner (RSS) to deal with the subscriptions .
It took me a while until I came with a working version of a Newsletter and I actually tested all in all 4 newsletter wordpress plugins before, I had a well working one. Here in short, In this article I will shortly take a look at the 4 WP newsletter plugins:
1. A wordpress plugin called simply Newsletter
As of time of writting this is the most popular wordpress plugin, when I looked through:
http://wordpress.org/extend/plugins/
Wordpress Newsletter plugin can be obtained via http://wordpress.org/extend/plugins/newsletter/ Its really Advanced, probably the best free newsletter for WP available as of time of writting. The plugin supports email subscriber user confirmation (double opt-in), as well as can be accustomized to work with single opt-in. For all those who don't know Double Opt-In is the technical term for a once requested user email (single opt-in), for subscription which is later confirmed by following an email box sent link pointing to confirmation URL.
Double Opt-In is almost a standard and "must" as otherwise, many spam bots will fill in randomly email addresses and your subscribers list will be mostly containing spammer email addresses.
1. Install WordPress Newsletter Plugin To install Newsletter plugin;
a) download and put into wp-content/plugins/ and unzip
server:~# cd /var/www/blog/wp-content/plugins

server:/var/www/blog/wp-content/plugins# wget -q http://downloads.wordpress.org/plugin/newsletter.zip

server:/var/www/blog/wp-content/plugins# unzip newsletter.zip
b) Enable in Plugins:
Plugins -> Newsletter (Activate)
c) Configure Newsletter
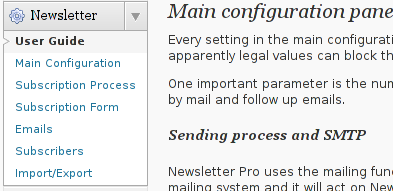
A new menu will appear in the left WP control panel, like you see in below screenshot:
Newsletter plugin is very configurable but it takes a bit of longer time until it is confingured to work well. So be patient with it.
d) Make Newsletter field appear on a wordpress home page.
In order to enable just configure Newsletter plugin (text and subscription form) to appear on the wordpress pages, you need to add the plugin as a widget. To do so go to:
Appearance -> Widgets
Drag and drop the Newsletter plugin widget to the widget right pane. Put it on the exact place you would like it to appear.
Once the widget is placed, you will see it appear to the respective location on WP pages, you should have something like:
I've experienced, this caching problems and it was quite a riddle, until I found out that the Newsletter plugin is not appearing on the WP pages because of the old cache. I've checked bacicly everything (error.log , apache php_error.log) etc.. Therein, there was no error or anything, so after a long 1 hour or so poundering I figured out this kind of caching done by W3 Cache.
My guess is, the same newsletter "not working" issue is probably observable also on WP installs with other caching plugins like WP Hyper Cache or WP Db Cache
2. ALO EasyMail Newsletter WordPress plugin
I don't know, why but this plugin didn't work properly on the wordpress install, I've tested it. Its true the wordpress version where I give it a try was not running, the latest stable wordpress so I assume this might be the reason for the empty pages returned when I enabled the plugin.
According to wordpress's plugin – http://wordpress.org/extend/plugins/alo-easymail/, the plugin is marked as Works, however in my case it didn't.
3. Adding WordPress Newsletter through Email newsletter
This plugin was a real piece of cake, compared to all of the rest, tested this one was the easiest one to install and configure on WordPress. Just like with Newsletter and ALO EasyMail Newsletter once the user is subscribed, from the admin there is possibility to sent crafted messages to all subscribers. The plugin is a great, choice for anyone who is looking for quick install of Newsletter on WordPress without extra "config" complications. Below is a quote describing email newsletter, taken from the plugin author webpage;
Advantage of this plugin
Simple no coding required.
Easy installation .
Using this plug-in we can send email to all registered folks.
Using this plug-in we can send email to all comment posted folks.
Email subscribe box for front end
Check box option available to select/unselect emails from the send mail list.
Integrated the email newsletter plugin & simple contact form plugin
– Enabling the plugin is done via admin menus:
Plugins -> Inactive -> Email Newsletter (enable)
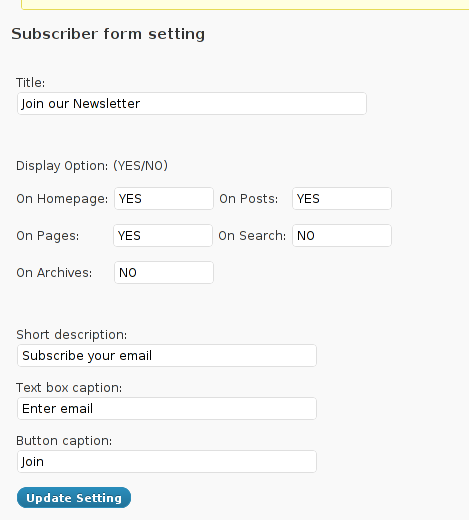
Afterwards, the plugin requires a quick configuration from wp-admin:
Email Newsletter -> Subscriber form setting
You see in the screenshot, the config where to place the plugin is trivial.
To make Email Newsletter appear on the pages, you will have to add the Email Newsletter widget from:
Appearance -> Widgets
The widget looks like the one in below screenshot:
Drag and drop the widget to the widgets pane. Onwards on the wordpress pages, should appear an email subsciption box: Though Email Newsletter is great, it has one serious drawback, as it doesn't support Double Opt-In. Therefore people subscribing through it are not mailed with a request to confirm their email subscription request. As a result, its very likely many spam-bots submit fake emails in the newsletter subscribe form and in 1 year time your newsletter email list might get full with tens of thousands unexistent emails. If you end up with this bad scenario, once newsletter emails are sent to (regular) exitent subscribers, many of the bulk emails in the list will never reach their senders, but will just fill-up the mail server queue and take up server resources for nothing for one week or so (depending on the email configuration keep undelivered mail setting). Anyways, since the basis of this plugin works fine, I'm sure if the author modifies it to include a simple Captcha instead of double-opt functionality, the plugin can become top plugin.
I'm currently learning some basic graphic design – reading GIMP's documentation etc. While reading http://docs.gimp.org, I saw a reference to Gthumb and GQView picture viewing apps, so I thought of installing them on my Debian LinuxGQView has a lot of santimental value to me as it reminds me of the the old times when I used gqview as a default picture viewing program on a old machine running Debian Woody Linux with Window Maker as desktop environment.
I wanted to see how GQView looks nowdays so installed it:
noah:~# apt-get --yes install gqview
And onwards launch it:
hipo@noah:~/Desktop$ gqview

This is a compatibility alias for Geeqie!

Please use /usr/bin/geeqie instead!

Creating Geeqie dir:/home/hipo/.config/geeqie

Creating Geeqie dir:/home/hipo/.local/share/geeqie/collections

Creating Geeqie dir:/home/hipo/.cache/geeqie/thumbnails

Creating Geeqie dir:/home/hipo/.local/share/geeqie/metadata
Fedora, CentOS users will have to build geekie from its source, as of time of writting there is no available rpm package.
It was new to me Gqview is no longer developed, its dev is forked (because its head developer is not reachable any more). Hence QGView continues to live on nowdays under the hood of Geekie As you can see from the prior screenshot Geeqie has very similar interface to GQView. Going through the interface, I've found it has much more features than GQView. You see one of the many new nice features is the support for drawing Image Histograms. There are few type of Histograms to display in Geekiq, available by navigating to:
View -> Image Overlay
Even if you're not familiar with Image histograms, probably you have seen them appear on a digital camera while browsing in menus. Its likely you didn't know what you saw a digital camera display is a histogram. Anyways being not familiar with histograms is perfectly fine as for most of us (regular) users image historograms doesn't make much sense.
BTW Histograms are very useful for pro Photographers. Photographers can use them as an aid to show the distribution of picture "tones" captured, and whether image detail has been lost to blown-out highlights or blacked-out shadows. Interesting fact concerning "reading" and understanding Histograms is on a Histogram for a very dark image the majority of data points are on the left side and center of the graph, whether histogram for a very bright image with few dark areas and/or shadows will have most of its data points located on the right side and center of the graph. With this said in mind, you can see, the above Geeqie picture visibile histogram obviously has most of its data concentrated on the right and the center so this means the histogram belongs to a bright pic. Well, Actually you can see this without a histogram too 😉 Though Image Histograms might seem pretty useles they're very much needed in Professional Graphic Manipulation. For instance for correction of image color gamma or manually adjusting the brightness for each picture pixel brightness. So Enough with histograms, I will switch now to a short review of Gthumb
Since I haven't used/seen Gthumb "for ages", I was also curious how the program looks nowdays. I did not needed to install gthumb, as I had it installed already on my notebook. I assume gthumb package was installed as some package dependency or I did it install some very long time ago and I forgot.
For people who didn't have it install do:
noah:~# apt-get --yes install gthumb

...
This installs a Gthumb version 2.12.2. The current latest stable Gthumb release is way ahead from the existing deb stable package, the latest available version on sourceforge is 2.7.4
Ubuntu gthumb latest packages would probably be newer than my debian installed one, so Ubuntu users can have the joy to use a newer version of gthumb…
gthumb is also installable for Fedora and CentOS users by default from default assigned package repos:
To install on RPM based Linux distro:
[root@centos:~ ]# yum -y install gthumb

...
Once installed, I ran it via a gnome run application shortcut ALT+F2 and typed:
gthumb
If you're more of a gui user than me you can run it also through GNOME menus:
Applications -> Graphics -> Gthumb Image Viewer
You see gthumb appears, quite similar in "look&feel" to Geeqie. I went through the program options just for the sake to compare with Geeqie. Based on the fact Geeqie seems to have more functionality it is probably superior and better choice for people looking for professional image vieweing / editting.However there are some other aspects I've noticed, where it lacks behind Gthumb. Gthumb has few great functionality which unfortunately as of time of writting are missing or hardly achievable in Geeqie
1. Bookmarking pictures.
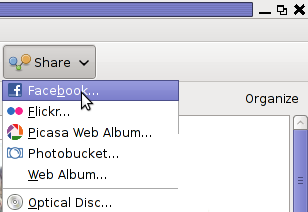
This allows for your favourite pictures to be bookmarked in the same way as bookmarks work in a browser, really neat feature. 2. Share functionality
Share button is located on the rightest upper corner and makes sharing with major web storage places easy. Through the Share button, you can export (share) your pictures directly in Picasa, Facebook,Flickr and Photobucket.
Through this share button it is also possible to "share your photos on a CD or DVD", – burn them on a CD/DVD directly from gthumb. This is doable via:
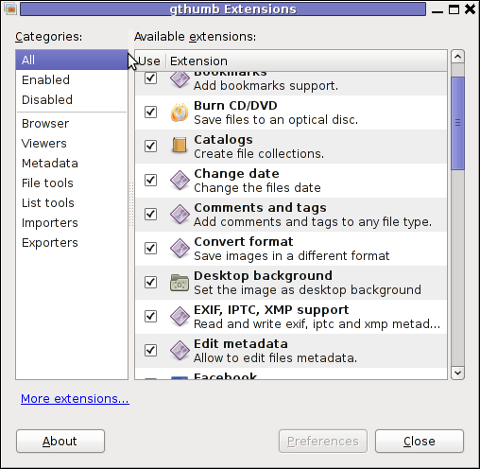
One other Gthumb advantagle is its extensibility. It has a powerful plugin system. Many of the features it has are already there thanks to its enabled extensions.
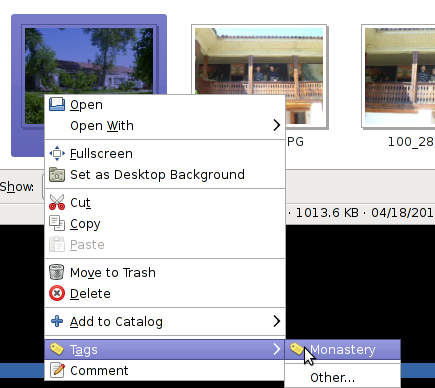
3. Photo Tagging
Nowdays tagging, photos has become so popular with the boom of facebook tagging. Gthumb has a relatively easy to use image tagging integrated. tagging a picture is done by simply going through the picture and selecting it with the (rightest located mouse button).
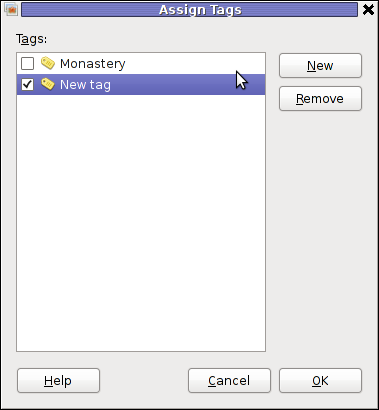
There is a list of few already predefined tags, which can be used to tag images.Assigning more tags is done via menu:
Tags -> Other
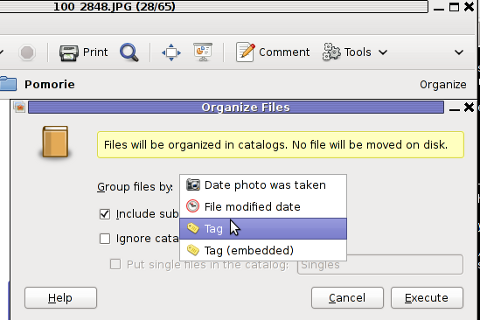
4. Organizing pictures
Through the Organize button located right below the Share button, one can easily organize his picture collections, based on few criterias.
The organize easy feature is not so important for not people, who are not in depth in photographing but for professional photographers this is an absolute necessity. For people who are image freaks and store tens of thousands of pictures organizing pictures for easy later retrieval is really nice. To sum it, up Geeqie and Gthumb are richer in functionality if compared to GNOME's default pic viewer (eye of the gnome) – eog.
Geeqie, as the name suggests is more for geek oriented and has a lot of great options which can serve well for advanced computer users. For an ordinary desktop user however it will probably be not easy to "digest". Gthumb on the other hand is ideal for anyone who prefers gui convenience. Gthumb is a good option for anyone looking for some similar to Picasafree software program that is feature rich and easy to use.For people who has to review a dozens of pictures daily, associating one of the two as a default picture viewer will probably be useful.
The last few days went smoothly in general No drastic problems in work which was a great blessing for me. Praise the Lord Oh My Soul :] We lost two afternoons with Narf writting (actually translating) a text for a presentation we have in Business Communication scheduled for Tuesday with Mrs. Svetla Stoyanova (a vice rector) in the college. It became like a tradition the eating of rise with vegatables in the new chineese restaurant. I used to watch two very intriguing films about the Quantum Physics/Mechanics which is on a way of prooving the spiritually exist. On a low level the Universe is even more magnificient than on the surface. I also watched very interesting film about “The Secret of the Water” which was based on a scientifically researched fact that water is “alive” and have memory just like a computer RAM. Yesterday Night we went out just for 20 or 30 minutes and Met a friend of Nomen who offered us to drink beer. He told us a very interesting fact that in Dubai Arabian men who are usually close relatives walk over the streets holding their hands Like gays (For their traditions this is something like great honor), even in the pubs this close relatives used to sit one in other :]]. After that we were just on our way home when we met Paco we walked for some time and speak about our Faith in Christ. Paco said he didn’t feel spiritually okay the last days so I tried to confort him about some truths that flowed out of my heart. Today I was on a coffee with Lily and She got depressed again (I really hate this thing). I heard a great Christian Industrial band on http://christianindustrial.net/ (Dead Turns Alive), what I personally like in the band is the old school sounding they were able to put in their music, actually they played EBM here is a link to their video you can enjoy http://www.deadturnsalive.com/video/influence.avi .I was in my grandmother this evening I really feel bad about this old sweet granny. She is so good hearted and like a model for what we the believers should be sadly she has real problems with her Ears and Seeing the Diabet is making her suffer badly… I hope she’ll be better. I prayed The Lord to help at least a little with, Laying her hands. During the day and in the mornings and the Evenings for a group of ppl and the World in general. There is also a good news. I speak with Slavcho (A brother in Christ), a month ago he suffered an amputation of his right leg. Slavcho is in a really terrible material/financial state. Every month he is living on the edge. Living with 120 lv. per month where 40 lv. from the sum he has to give for the rent of the apartment they live with his aunt. But God knows our needs and did a glorious thing for him. Slavcho told me his testimony today. He was in two protestant Churches in Plovdvid where he is currently for examination of his health state after the amputation. He told his story how he grown as an orphan how he believed/received Christ and how hard his life was. One of the Churches member decided they’ll collect tithe will donate him the money. Yes Praise be to the Lord Shabbaoth The Lord of Hosts.. HalleluYah . Seems like there are some real servents the world has. Whilst the Devil is taking inch after inch after inch of the earth leading so many blind ppl to his Satanic Kingdom. I looked at http://adsx.com. The probable technology matching the Prophecies for which we can read in The Book of Revelation. The technology now serves 500 Big Hospitals in the USA. Only for 5 or 6 months they put it in a new 200 Hospitals … But I guess this is just the beginning of the integration of the “Number of the Beast” Into the World Economy/Trade/HealthCare/Structure …END—–
The last 3 days in the college we used to have a guest from the Arnhem Business Scholl: Job Thinke.He is a teacher in HRQM (Human Resource and Quality Management). We played a simulator. We choose abusiness to be in. Job, Bozhidar, and two graduating students from Arnhem ( one black girl and one guy from South Africa )were the teachers. We choose an industry (our group was some Open cars producing company). Every peson of the teamhad to participate in taking decisions and writting down the decisions in a decision forms every form was aboutmoney we would invest in things which would lead to accomplish a specific goals we had setted in the beginning of the game,things like hiring more employees promoting some of them etc. etc. were our work. The game was played 3 days and it waslike if we had run a 2 years long business. Our group mistake was that we always thought about things in short terms.In the end of the 2nd year of the game we had a discussion meetings with our higher level employees and it turns outthat we are the poorest team because we always thought about the company in short term instead of long term.During this 3 days there was also some funny games for developing concentration and thinking and improvingcommunication skills. In general I think the whole think was a great loss of time, but I’m a strange person …Most of the ppl liked involved from IBMS and Hotel Management liked the game very much.END—–
There are four major plugins as of writting of this that can be used to reduce significantly the amount of registration spam in Elgg 1.8.x <= (1.8.3) Probably there are other plugins to protect against spam in elgg, however I personally tried just this ones to work with elgg 1.8.3..
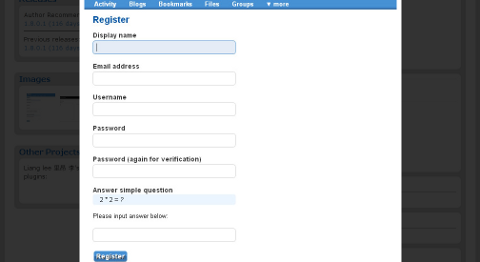
1. Elgg Anti bot spam registartions with Text Captcha
As you can see in the picture this plugin requires, skills in maths 😉 For serious websites it also looks a bit ridiculous, besides that is actually an easy one to handle by spam bots, probably plenty of the nowdays spam bots crawling the net could trespass it.
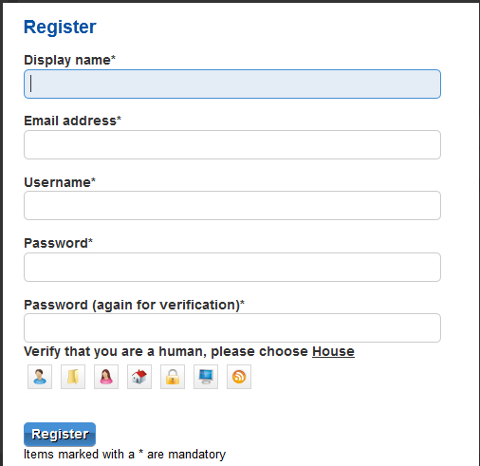
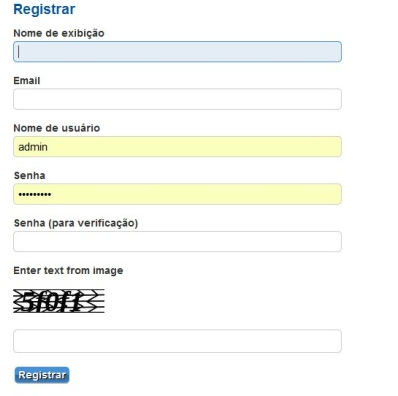
2. Protecting elgg registration formw tih Image Capcha
One note to make here is the 4 Captchas did not work together if enabled from elgg administration panel. You will have to use one at a piece. I haven't tested to I don't know which one is the most efficient. Anyhow I really think Image Captcha is looking best from all of them and more intuitive to the user. I'm quite happy Image Captcha is available and works fine in 1.8.3 in prior version 1.6.x generation, I couldn't find any decent plugin to filter login spam and my experimental social network based on elgg, got quickly filled with Spam. Now will wait and see if the Image Captcha will stop the drones.
By the way, I haven't used slackware for a long time so in the mean time since Slackware 13, the default slackware packages format .tgz is now substituted with the newer .txz (better compressed .txz). The old .tgz was simply a tar archive with DEFLATE gzip. The newer .txz packages bundled with newer slackware releases are using the LZMA2 (XZ) chain algorithm for compression. LZMA implies higher compression than even bzip2 and this is the reason why Patrick Volkerding – the one man army man behind Slackware decided to use it. The reason Vollerding choose using .txz is slackware network distribution will load up less the networks and will take less time for downloading extra slackware packages via the internet. The .txz also reduces slackware main CD size so more packages can be contained in the same 700MB sized slack install CD.
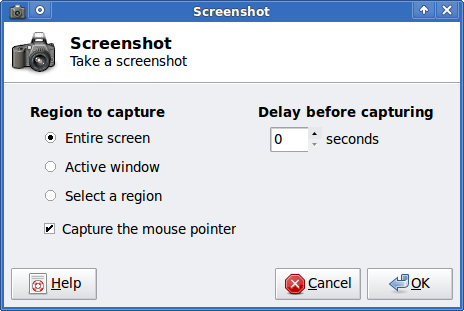
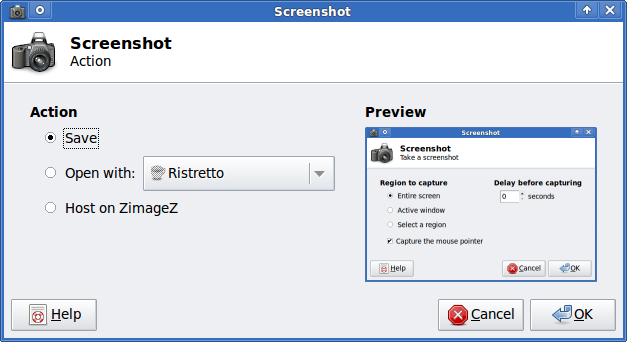
Anyways now back to the installation of xfce-screenshooter.
Once installed to runit use the Xfce menus:
Xfce Menu -> Accesories -> Screenshot
Next you will see the xfce-screenshooter program to pop-up:
2. Install the Google Analytics Tracking Module; Login as joomla admin and navigate to;
Extensions -> Install
Place the analytics_tracking15.zip url to the Install URL: field. Again as of time of writting you need to place https://www.pc-freak.net/files/analytics_tracking15.zip;
3. Open the Module Manager
Extensions -> Module Manager
4. Click over Google Analytics Tracking Module On the right pane you will notice in the Module Parameters the Analytics_uacct_code field. In the uacct_code field you need to paste your UA obtained from your created google-analytics account. This code is usually something like UA-2101595-10 Now place your code their and press the save green button located near the right top of the screen. You should see the text in blue Item Saved which would indicate your UA code is stored already in the Google Analytics Tracking Module, now press the Cancel button located again on the right top. As a last step before the Google analytics is set-up on the Joomla you need to enable the plugin to do you need to press over the tick left sided from the text reading Google Analytics Tracking Module in theModule Manager 5. Click over the Enabled button in Module Manager; Google Analytics Tracking Module -> Enabled
Cheers! Now, your Joomla website visitors count will start logging to Google Analytics.
By the default wordpress does not have support for changing the exact font, therefore copying and pasting a text made in Open Office or MS Word often places in the Post or Page wp edit fonts different from the default one set for articles. Hence some articles after being published on a wordpress blog show up with improper font and the only way to fix that is to change the font first in Open Office and then copy back to wordpress instead of simply being able to change the font from within the wordpress article.
To get around this problem, there is a nice plugin fckeditor-for-wordpress-plugin which aids wordpress with an awesome Word like edit functionalities. , downhload location for FCKEdit for WordPress is here
Here is a screenshot of the extra nice functionality the FCKEditor for wordpress providces.
Installing the plugin is like installing any other wordpress plugin and comes easily to:
debian:/~# cd /var/www/blog/wp-content/plugins

debian:/plugins# wget http://downloads.wordpress.org/plugin/fckeditor-for-wordpress-plugin.3.3.1.zip

...

debian:/plugins# unzip fckeditor-for-wordpress-plugin.3.3.1.zip

...

debian:/plugins# cd fckeditor-for-wordpress-plugin/
And further enabling the plugin from:
Plugins -> Inactive -> (Dean's FCKEditor For WordPress) Enable
fckeditor for wordpress will replace the default wordpress editor TinyMCE straight after being enabled. I’ve done also a mirror of the current version as of time of writting of this article, one can download the fckeditor for wordpress mirrored here Now really file editting inside wordpress admin panel is way easier and convenient 😉 Cheers
I've recently decided to add Comment as OpenID functionality to my wordpress blog. The reasons to do that is that I myself have today created an OpenID account. Already million of people have OpenID account without even knowing. Most major search engines and social websites like Google, Yahoo, Live Journal, Hyves, Blogger, Flicker, MySpace automatically creates an OpenID account for newly registered users. It is up to the user to check with each of the aforementioned providers what is the URL of their OpenID account.
Even though OpenID popularity is steadly rising, I'm sure there are still plenty of users who did not heard, used or noticed OpenID yet.
So What the heck is OpenID? For all those who still haven't heard about it, OpenID is a universal web site login system With just one "unified" OpenID account the user can login to multiple websites with no need to create multiple accounts across each and every different website on the internet. The only requirement for the user to be able to use OpenID is that the website in question to have (support) for OpenID credential and the user to have existing OpenID account.
Therefore using one single OpenID you can sign in as a certain user to multiple websites on the internet with no need for annoying registration process to each and every new website you encounter. Another benefit OpenID gives to the user is that you don't have to memorize or keep notes of a tens or thousands of different login accounts across the many different websites on the net. Using OpenID also saves the user from troubles with forgotten password or username as just one OpenID login is used to login you everywhere.
For WordPress blogging platform the Russian Igor Korolev, has written a wordpress plugin – comments-to-wordpress . This plugin adds support for OpenID authentication in WordPress comments.
Here is how to OpenID to WordPress:
1. Download the comments-with-wordpress plugin and unzipAs of writting of this article latest comments-to-wordpress plugin is ver. 1.4. Download the plugin to blog path directory lets say, /var/www/blog/wp-content/plugins/ and unzip:
Next the plugin has to be Enabled, just like any other wordpress plugin via admin menus:
Plugins -> Inactive -> Comments with OpenID (enable)
Once the plugin is enaabled it is necessery to add some code with a text editor in file /var/www/blog/wp-content/themes/default/comments.php
Small noet to make here: If you're not using the default WordPress theme (like I do), you will have to edit the /themes/your-theme-name/comments.php instead.
Save the comments.php file and you Identification for new comments with OpenID will appear in your wordpress Comments form.
The OpenID plugin will add a number of service OpenIDs to choose between like you can see in my blog's plugin section or the screenshot below:
The URL https://www.google.com/accounts/o8/id is just a sample and showed because I clicked on the Google icon. If you have a Google profile you can check the exact ID and use it as URL there. Simply if your browser is logged in Gmail and you have Google profile. OpenID should work. As you can see the plugin supports a number of services which already support OpenID auth, the list of services can be easily extended by adding minor changes in …/plugins/comments-with-openid/comments-with-openid.php
There is also another wordpress plugin with the openid name – http://wordpress.org/extend/plugins/openid/
Downloading and enabling the other openid plugin also adds support for OpenID login in your http://your-url.com/wp-admin/ login page.
Installing the OpenID plugin is needed especially if you're a blogger blogging on 5 or 10 different topic oriented blogs, once downloading and installing the OpenID plugin will allow you to login across the blog ring without loosing time or bothering to remember different passwords across all the blogs. Here is a screenshot of the /wp-admin wordpress login page with the OpenID wp plugin enabled:
As of time of writting according to http://openid.net/get-an-openid/what-is-openid/'s website there are over 50000 major websites on the net already accepting OpenID login. Of course as every technlogy OpenID is not perfect and along with its convenience in some cases it could impose security hole. OpenID opponents claim under some circumstances OpenID is prone to forgery, XSS (cross site scripting) and XSFR attacks. Everyone who is about to use OpenID should be also aware of the great security risk it impose if one OpenID account gets stolen through sniffing, this could mean multiple websites can be accesses with the one single OpenID by the malicious user and a lot of confidential data owned by the user can be revealed or deleted … With this said I think OpenID is not a recommended login technology for Windows users, as windows is famous for being vulnerable to so many Viruses and Spyware/Malware etc.. With non-free software OSes like MS Windows, the user never cannot for sure if the system is infected, hence using OpenID to transfer credentials over the internet or store an OpenID SSL/(TLS) certificate to identify in websites is TOO DANGEROUS! Hope this article was helpful. Cya
And the king said unto her, Be not afraid: for what sawest thou? And the woman said unto Saul, I saw gods ascending out of the earth. -- 1 Samuel 28:13


How to add OpenID functionality to WordPress Comments / What is OpenID?
Tuesday, February 14th, 2012I've recently decided to add Comment as OpenID functionality to my wordpress blog. The reasons to do that is that I myself have today created an OpenID account. Already million of people have OpenID account without even knowing. Most major search engines and social websites like Google, Yahoo, Live Journal, Hyves, Blogger, Flicker, MySpace automatically creates an OpenID account for newly registered users.
It is up to the user to check with each of the aforementioned providers what is the URL of their OpenID account.
Even though OpenID popularity is steadly rising, I'm sure there are still plenty of users who did not heard, used or noticed OpenID yet.
So What the heck is OpenID?
For all those who still haven't heard about it, OpenID is a universal web site login system With just one "unified" OpenID account the user can login to multiple websites with no need to create multiple accounts across each and every different website on the internet.
The only requirement for the user to be able to use OpenID is that the website in question to have (support) for OpenID credential and the user to have existing OpenID account.
Therefore using one single OpenID you can sign in as a certain user to multiple websites on the internet with no need for annoying registration process to each and every new website you encounter. Another benefit OpenID gives to the user is that you don't have to memorize or keep notes of a tens or thousands of different login accounts across the many different websites on the net.
Using OpenID also saves the user from troubles with forgotten password or username as just one OpenID login is used to login you everywhere.
For WordPress blogging platform the Russian Igor Korolev, has written a wordpress plugin – comments-to-wordpress . This plugin adds support for OpenID authentication in WordPress comments.
Here is how to OpenID to WordPress:
1. Download the comments-with-wordpress plugin and unzipAs of writting of this article latest comments-to-wordpress plugin is ver. 1.4.
Download the plugin to blog path directory lets say, /var/www/blog/wp-content/plugins/ and unzip:
# cd /var/www/blog/wp-content/plugins

# wget http://downloads.wordpress.org/plugin/comments-with-openid.zip

...

# unzip comments-with-openid.zip

...
I've also done a mirror for download of comments-with-openid 1.4 here
2. Enable Comments with OpenID wp plugin
Next the plugin has to be Enabled, just like any other wordpress plugin via admin menus:
Plugins -> Inactive -> Comments with OpenID (enable)
Once the plugin is enaabled it is necessery to add some code with a text editor in file /var/www/blog/wp-content/themes/default/comments.php
Small noet to make here: If you're not using the default WordPress theme (like I do), you will have to edit the /themes/your-theme-name/comments.php instead.
Inside the file look for the form input fields:
<p> <input type="text" name="author" ....

...

<p> <input type="text" name="email" id="email" ....

...

<p> <input type="text" name="url" id="url" ....

...
Before the html tags code:
Paste the following code:
<?php comments_with_openid(); ?>
Save the comments.php file and you Identification for new comments with OpenID will appear in your wordpress Comments form.
The OpenID plugin will add a number of service OpenIDs to choose between like you can see in my blog's plugin section or the screenshot below:
The URL https://www.google.com/accounts/o8/id is just a sample and showed because I clicked on the Google icon. If you have a Google profile you can check the exact ID and use it as URL there. Simply if your browser is logged in Gmail and you have Google profile. OpenID should work. As you can see the plugin supports a number of services which already support OpenID auth, the list of services can be easily extended by adding minor changes in …/plugins/comments-with-openid/comments-with-openid.php
There is also another wordpress plugin with the openid name – http://wordpress.org/extend/plugins/openid/
Downloading and enabling the other openid plugin also adds support for OpenID login in your http://your-url.com/wp-admin/ login page.
Installing the OpenID plugin is needed especially if you're a blogger blogging on 5 or 10 different topic oriented blogs, once downloading and installing the OpenID plugin will allow you to login across the blog ring without loosing time or bothering to remember different passwords across all the blogs. Here is a screenshot of the /wp-admin wordpress login page with the OpenID wp plugin enabled:
As of time of writting according to http://openid.net/get-an-openid/what-is-openid/'s website there are over 50000 major websites on the net already accepting OpenID login.
Of course as every technlogy OpenID is not perfect and along with its convenience in some cases it could impose security hole. OpenID opponents claim under some circumstances OpenID is prone to forgery, XSS (cross site scripting) and XSFR attacks. Everyone who is about to use OpenID should be also aware of the great security risk it impose if one OpenID account gets stolen through sniffing, this could mean multiple websites can be accesses with the one single OpenID by the malicious user and a lot of confidential data owned by the user can be revealed or deleted …
With this said I think OpenID is not a recommended login technology for Windows users, as windows is famous for being vulnerable to so many Viruses and Spyware/Malware etc..
With non-free software OSes like MS Windows, the user never cannot for sure if the system is infected, hence using OpenID to transfer credentials over the internet or store an OpenID SSL/(TLS) certificate to identify in websites is TOO DANGEROUS!
Hope this article was helpful. Cya
Tags: authentication, Auto, benefit, code, Comment, Draft, file, functionality, google, hyves, igor korolev, Journal, login, login accounts, major search engines, need, openid, password, php, platform, plugin, popularity, quot, Russian, Search, support, tens, text, type, universal web, url, username, wget, what the heck, Wordpress, writting, Yahoo
Posted in System Administration, Web and CMS, Wordpress | 2 Comments »