Install Zabbix Proxy configure and connect to Zabbix server on CentOS Linux
1. Why use Zabbix-Proxy hidden advantages of using Zabbix-Proxy ?
Proxy can be used for many purposes and can provide many hidden benefits, just to name few of them:
- Offload Zabbix Server when monitoring thousands of devices
- Monitor remote locations
- Monitor locations having unreliable communications
- Simplify maintenance of distributed monitoring
- Improved Security (Zabbix server can be restricted to be connectable only by the set of connected Zabbix Proxy / Proxies
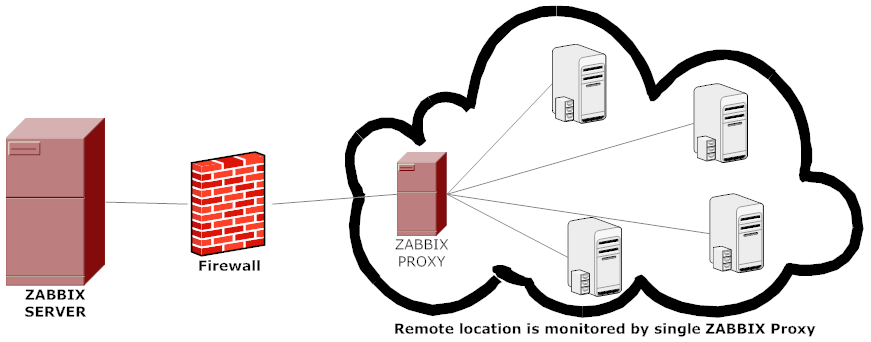
A Zabbix proxy is the ideal solution if you have numerous hosts with multiple slow items that are affecting the performance of the server simply because processes are spending most of the time simply waiting for a response. A proxy can collect information from all hosts using its internal processes and then send raw historical data to the server. The time needed to connect and receive the host response will be on the proxy site, and the server performance will not be affected at all. A proxy just sends raw values to the server, and the server itself does not have to connect to the host to get the data.
2. Install zabbix-proxy-sqlite3 rpm package from Zabbix Official Repositories download page
Zabbix repository provides choice of 3 packages named as follows:
zabbix-proxy-mysql
zabbix-proxy-pgsql
zabbix-proxy-sqlite3
where the last value of the name (after zabbix-proxy) represents database type of the package — MySQL, PostgreSQL and SQLite respectively.
To not bother installing MySQL / PostgreSQL separate database servers, a lightweight choice is to use the sqlite3 db version.
As I prefer zabbix-proxy data to be stored inside a flat database, thus I choose to use zabbix-proxy-sqlite3.
[root@sysadminshelp:/root ]# yum info zabbix-proxy-sqlite3-5.0.31-1.el7.x86_64
Заредени плъгини: fastestmirror
Loading mirror speeds from cached hostfile
* base: mirrors.netix.net
* epel: fedora.ipacct.com
* extras: mirrors.netix.net
* remi: remi.mirror.karneval.cz
* remi-php74: remi.mirror.karneval.cz
* remi-safe: remi.mirror.karneval.cz
* updates: mirrors.netix.net
Инсталирани пакети
Име : zabbix-proxy-sqlite3
Архитект. : x86_64
Версия : 5.0.31
Издание : 1.el7
Обем : 4.4 M
Хранилище : installed
Обобщение : Zabbix proxy for SQLite3 database
URL : http://www.zabbix.com/
Лиценз : GPLv2+
Описание : Zabbix proxy with SQLite3 database support.
My experience to try to install thethe default CentOS RPM package for zabbix-proxy-sqlite3 provided by default
RPM package that came with CentOS did not work as expected and trying to install / configure and use it via
[root@sysadminshelp:/root ]# yum install zabbix-proxy-sqlite3.x86_64 -y
[root@sysadminshelp:/root ]# vi /etc/zabbix/zabbix_proxy.conf
Led me to a nasty errors seen in /var/log/zabbixsrv/zabbix_proxy.log like:
May 1st 2023, 08:42:45.020 zabbix_server cannot set list of PSK ciphersuites: file ssl_lib.c line 1314: error:1410D0B9:SSL routines:SSL_CTX_set_cipher_list:no cipher match
May 1st 2023, 08:42:45.018 zabbix_server cannot set list of PSK ciphersuites: file ssl_lib.c line 1314: error:1410D0B9:SSL routines:SSL_CTX_set_cipher_list:no cipher match
May 1st 2023, 08:42:45.013 zabbix_server cannot set list of PSK ciphersuites: file ssl_lib.c line 1314: error:1410D0B9:SSL routines:SSL_CTX_set_cipher_list:no cipher match
May 1st 2023, 08:42:45.013 zabbix_server cannot set list of PSK ciphersuites: file ssl_lib.c line 1314: error:1410D0B9:SSL routines:SSL_CTX_set_cipher_list:no cipher match
May 1st 2023, 08:42:45.011 zabbix_server cannot set list of PSK ciphersuites: file ssl_lib.c line 1314: error:1410D0B9:SSL routines:SSL_CTX_set_cipher_list:no cipher match
After some googling and reading some threads came upon this one https://support.zabbix.com/browse/ZBXNEXT-3604, there is exmplaed errors preventing the configured zabbix-proxy
to start are caused by the zabbix-proxy-sqlite3 package provided by Redhat (due to openssl incompitability bug or something ).
As one of people in the discussion pointed out the quickest workaround suggested is simply to use the official Zabbix Repository packages for zabbix-proxy-sqlite3, in order to not waste anymore time on this
trivial stuff to install it, simply run:
[root@sysadminshelp:/root ]# rpm -Uvh \
https://repo.zabbix.com/zabbix/5.0/rhel/7/x86_64/zabbix-proxy-sqlite3-5.0.31-1.el7.x86_64.rpm
Alternative way if you seem to not have the machine connected to the internet is simply download the package with wget / lynx / curl / w3m from another machine
that can reach the Internet upload the package via the local LAN or VPN and install it:
# wget https://repo.zabbix.com/zabbix/5.0/rhel/7/x86_64/zabbix-proxy-sqlite3-5.0.31-1.el7.x86_64.rpm …
[root@sysadminshelp:/root ]# rpm -ivh zabbix-proxy-sqlite3-5.0.31-1.el7.x86_64.rpm
NOTE ! Before you install proxy, keep in mind that your proxy version must match the Zabbix server version !
3. Generate a PSK random secret key and set proper permissions for zabbix-proxy directories
[root@sysadminshelp:/root ]# cd /etc/zabbix/
[root@sysadminshelp:/root ]# openssl rand -hex 32 >> /etc/zabbix/zabbix_proxy.psk
[root@sysadminshelp:/root ]# chown root:zabbix zabbix_proxy.psk [root@sysadminshelp:/root ]# vi /etc/zabbix/zabbix_proxy.conf [root@sysadminshelp:/root ]# mkdir -p /var/lib/zabbix-proxy/sqlite3db
[root@sysadminshelp:/root ]# chown -R zabbix:zabbix /var/lib/zabbix-proxy
[root@sysadminshelp:/var/lib/zabbixsrv/sqlite3db]# sqlite3 zabbix_proxy
SQLite version 3.7.17 2013-05-20 00:56:22
Enter ".help" for instructions
Enter SQL statements terminated with a ";"
sqlite> .databases
seq name file
— ————— ———————————————————-
0 main /var/lib/zabbixsrv/sqlite3db/zabbix_proxy
sqlite> [root@sysadminshelp:/root ]# vi /etc/zabbix_proxy.conf
#DBName=zabbix_proxy
DBName=/var/lib/zabbixsrv/sqlite3db/zabbix_proxy
4. Configure zabbix proxy to be able to connect to Zabbix Server
[root@sysadminshelp:/root ]# vi /etc/zabbix/zabbix_proxy.conf ############ GENERAL PARAMETERS #################
ProxyMode=0
Server=192.168.1.28
ServerPort=10051
Hostname=zabbix-proxy
ListenPort=10051
SourceIP=10.168.1.55
LogFile=/var/log/zabbix/zabbix_proxy.log
LogFileSize=1
DebugLevel=2
PidFile=/var/run/zabbix/zabbix_proxy.pid
DBName=/var/lib/zabbix-proxy/sqlite3db/zabbix_proxy.db
DBUser=zabbix
######### PROXY SPECIFIC PARAMETERS #############
ProxyOfflineBuffer=24
HeartbeatFrequency=60
ConfigFrequency=120
############ ADVANCED PARAMETERS ################
StartPollersUnreachable=3
StartHTTPPollers=3
JavaGateway=127.0.0.1
JavaGatewayPort=10052
StartJavaPollers=5
SNMPTrapperFile=/var/log/snmptrap/snmptrap.log
StartSNMPTrapper=1
CacheSize=32M
Timeout=4
ExternalScripts=/usr/lib/zabbix/externalscripts
LogSlowQueries=3000
####### TLS-RELATED PARAMETERS #######
TLSConnect=psk
TLSAccept=psk
TLSPSKIdentity=PSK zabbix-proxy-fqdn-hostname
TLSPSKFile=/etc/zabbix/zabbix_proxy.psk
5. Check and make sure the installed zabbix proxy as well as the zabbix_proxy server zabbix_agentd client and zabbix_server are at the same major version release
a) Check zabbix proxy version
[root@sysadminshelp:/etc/zabbix]# zabbix_proxy -V
zabbix_proxy (Zabbix) 5.0.31
Revision f64a07aefca 30 January 2023, compilation time: Jan 30 2023 09:55:10Copyright (C) 2023 Zabbix SIA
License GPLv2+: GNU GPL version 2 or later <https://www.gnu.org/licenses/>.
This is free software: you are free to change and redistribute it according to
the license. There is NO WARRANTY, to the extent permitted by law.This product includes software developed by the OpenSSL Project
for use in the OpenSSL Toolkit (http://www.openssl.org/).Compiled with OpenSSL 1.0.1e-fips 11 Feb 2013
Running with OpenSSL 1.0.1e-fips 11 Feb 2013
[root@sysadminshelp:/etc/zabbix]#
b) check zabbix_agentd version
[root@sysadminshelp:/etc/zabbix]# zabbix_agentd -V
zabbix_agentd (daemon) (Zabbix) 5.0.30
Revision 2c96c38fb4b 28 November 2022, compilation time: Nov 28 2022 11:27:43Copyright (C) 2022 Zabbix SIA
License GPLv2+: GNU GPL version 2 or later <https://www.gnu.org/licenses/>.
This is free software: you are free to change and redistribute it according to
the license. There is NO WARRANTY, to the extent permitted by law.This product includes software developed by the OpenSSL Project
for use in the OpenSSL Toolkit (http://www.openssl.org/).Compiled with OpenSSL 1.0.1e-fips 11 Feb 2013
Running with OpenSSL 1.0.1e-fips 11 Feb 2013
c) Check zabbix server version
[root@zabbix:~]# zabbix_server -V
zabbix_server (Zabbix) 5.0.30
Revision 2c96c38fb4b 28 November 2022, compilation time: Nov 28 2022 09:19:03Copyright (C) 2022 Zabbix SIA
License GPLv2+: GNU GPL version 2 or later <https://www.gnu.org/licenses/>.
This is free software: you are free to change and redistribute it according to
the license. There is NO WARRANTY, to the extent permitted by law.This product includes software developed by the OpenSSL Project
for use in the OpenSSL Toolkit (http://www.openssl.org/).Compiled with OpenSSL 1.1.1d 10 Sep 2019
Running with OpenSSL 1.1.1n 15 Mar 2022
6. Starting the zabbix-proxy for a first time
Before beginning with installation make sure selinux is disabled, as it might cause some issues with Zabbix
[root@sysadminshelp:/etc/zabbix]# sestatus
SELinux status: disabled
If you need to have the selinux enabled you will have to allow the zabbix-proxy into selinux as well:
# cd /tmp
# grep zabbix_proxy /var/log/audit/audit.log | grep denied | audit2allow -m zabbix_proxy > zabbix_proxy.te
# grep zabbix_proxy /var/log/audit/audit.log | grep denied | audit2allow -M zabbix_proxy
# semodule -i zabbix_proxy.pp
[root@sysadminshelp:/etc/zabbix]# systemctl start zabbix-proxy
Also lets enable zabbix-proxy to automatically start it on next server reboot / boot.
root@sysadminshelp:/etc/zabbix]# systemctl enable zabbix-proxy
Normally running zabbix-proxy should provide a status messages like:
[root@sysadminshelp:/etc/zabbix]# systemctl status zabbix-proxy
● zabbix-proxy.service – Zabbix Proxy
Loaded: loaded (/usr/lib/systemd/system/zabbix-proxy.service; disabled; vendor preset: disabled)
Active: active (running) since чт 2023-05-04 14:58:36 CEST; 2h 59min ago
Process: 8500 ExecStop=/bin/kill -SIGTERM $MAINPID (code=exited, status=0/SUCCESS)
Process: 8504 ExecStart=/usr/sbin/zabbix_proxy -c $CONFFILE (code=exited, status=0/SUCCESS)
Main PID: 8506 (zabbix_proxy)
CGroup: /system.slice/zabbix-proxy.service
├─8506 /usr/sbin/zabbix_proxy -c /etc/zabbix/zabbix_proxy.conf
├─8507 /usr/sbin/zabbix_proxy: configuration syncer [synced config 40521 bytes in 0.0…
├─8508 /usr/sbin/zabbix_proxy: trapper #1 [processed data in 0.000808 sec, waiting fo…
├─8509 /usr/sbin/zabbix_proxy: trapper #2 [processed data in 0.005028 sec, waiting fo…
├─8510 /usr/sbin/zabbix_proxy: trapper #3 [processed data in 0.001240 sec, waiting fo…
├─8511 /usr/sbin/zabbix_proxy: trapper #4 [processed data in 0.004378 sec, waiting fo…
├─8512 /usr/sbin/zabbix_proxy: trapper #5 [processed data in 0.004991 sec, waiting fo…
├─8513 /usr/sbin/zabbix_proxy: preprocessing manager #1 [queued 0, processed 3 values…
├─8514 /usr/sbin/zabbix_proxy: preprocessing worker #1 started
├─8515 /usr/sbin/zabbix_proxy: preprocessing worker #2 started
├─8516 /usr/sbin/zabbix_proxy: preprocessing worker #3 started
├─8517 /usr/sbin/zabbix_proxy: heartbeat sender [sending heartbeat message success in…
├─8518 /usr/sbin/zabbix_proxy: data sender [sent 0 values in 0.005241 sec, idle 1 sec…
├─8519 /usr/sbin/zabbix_proxy: housekeeper [deleted 4501 records in 0.011462 sec, idl…
├─8520 /usr/sbin/zabbix_proxy: http poller #1 [got 0 values in 0.000248 sec, idle 5 s…
├─8521 /usr/sbin/zabbix_proxy: http poller #2 [got 0 values in 0.000239 sec, idle 5 s…
├─8522 /usr/sbin/zabbix_proxy: http poller #3 [got 0 values in 0.000328 sec, idle 5 s…
├─8523 /usr/sbin/zabbix_proxy: discoverer #1 [processed 0 rules in 0.000261 sec, idle…
├─8524 /usr/sbin/zabbix_proxy: history syncer #1 [processed 0 values in 0.000009 sec,…
├─8525 /usr/sbin/zabbix_proxy: history syncer #2 [processed 0 values in 0.000007 sec,…
├─8526 /usr/sbin/zabbix_proxy: history syncer #3 [processed 0 values in 0.000014 sec,…
├─8527 /usr/sbin/zabbix_proxy: history syncer #4 [processed 0 values in 0.000021 sec,…
├─8528 /usr/sbin/zabbix_proxy: java poller #1 [got 0 values in 0.000017 sec, idle 5 s…
├─8529 /usr/sbin/zabbix_proxy: java poller #2 [got 0 values in 0.000019 sec, idle 5 s…
├─8530 /usr/sbin/zabbix_proxy: java poller #3 [got 0 values in 0.000019 sec, idle 5 s…
├─8531 /usr/sbin/zabbix_proxy: java poller #4 [got 0 values in 0.000018 sec, idle 5 s…
├─8532 /usr/sbin/zabbix_proxy: java poller #5 [got 0 values in 0.000013 sec, idle 5 s…
├─8533 /usr/sbin/zabbix_proxy: snmp trapper [processed data in 0.000026 sec, idle 1 s…
├─8534 /usr/sbin/zabbix_proxy: self-monitoring [processed data in 0.000034 sec, idle …
├─8535 /usr/sbin/zabbix_proxy: task manager [processed 0 task(s) in 0.000169 sec, idl…
├─8536 /usr/sbin/zabbix_proxy: poller #1 [got 0 values in 0.000012 sec, idle 5 sec]
├─8537 /usr/sbin/zabbix_proxy: poller #2 [got 0 values in 0.000021 sec, idle 5 sec]
├─8538 /usr/sbin/zabbix_proxy: poller #3 [got 0 values in 0.000039 sec, idle 5 sec]
├─8539 /usr/sbin/zabbix_proxy: poller #4 [got 0 values in 0.000024 sec, idle 5 sec]
├─8540 /usr/sbin/zabbix_proxy: poller #5 [got 0 values in 0.000019 sec, idle 5 sec]
├─8541 /usr/sbin/zabbix_proxy: unreachable poller #1 [got 0 values in 0.000011 sec, i…
├─8542 /usr/sbin/zabbix_proxy: unreachable poller #2 [got 0 values in 0.000018 sec, i…
├─8543 /usr/sbin/zabbix_proxy: unreachable poller #3 [got 0 values in 0.000041 sec, i…
└─8544 /usr/sbin/zabbix_proxy: icmp pinger #1 [got 0 values in 0.000022 sec, idle 5 s…май 04 14:58:36 sysadminshelp systemd[1]: Stopped Zabbix Proxy.
май 04 14:58:36 sysadminshelp systemd[1]: Starting Zabbix Proxy…
май 04 14:58:36 sysadminshelp systemd[1]: Started Zabbix Proxy.
7. Configure zabbix-agentd to use your just new brand new zabbix-proxy
Here is my sample configuration file:
[root@sysadminshelp:/etc/zabbix]# grep -v \# /etc/zabbix/zabbix_agentd.conf | sed '/^$/d'
PidFile=/var/run/zabbix/zabbix_agentd.pid
LogFile=/var/log/zabbix/zabbix_agentd.log
LogFileSize=0
Server=zabbix-proxy
ServerActive=zabbix-proxy:10051
ListenIP
Hostname=sysadminshelp
BufferSend=30
BufferSize=100
Include=/etc/zabbix/zabbix_agentd.d/*.conf
Note that the ServerActive given "zabbix-proxy" should be resolvable from the host, or even better you might want to put the IP of the Proxy if
you don't have at least a pseudo Hostname already configured inside /etc/hosts or actual DNS 'A' Active record configured inside a properly resolving
DNS server configured on the host via /etc/resolv.conf.
8. Create and Configure new proxy into the Zabbix-server host
Go to the zabbix server web interface URL into menus:
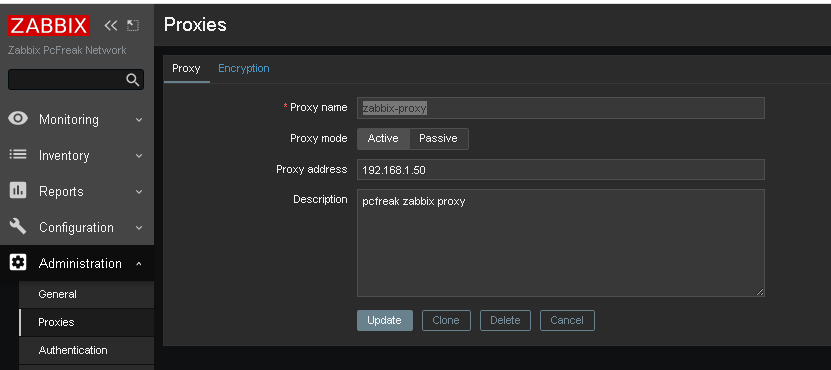
Administration -> Proxies (Proxy)
Click on ;
Create Proxy button (uppper right corner)
*Proxy name: usually-your-host-pingable-fqdn
Proxy mode: Active
Proxy address: 192.168.1.50
Description: pcfreak zabbix proxy
Administration -> Proxies -> Encryption
From "Connection to proxy"
Untick "No encryption"
and
Tick "PSK"
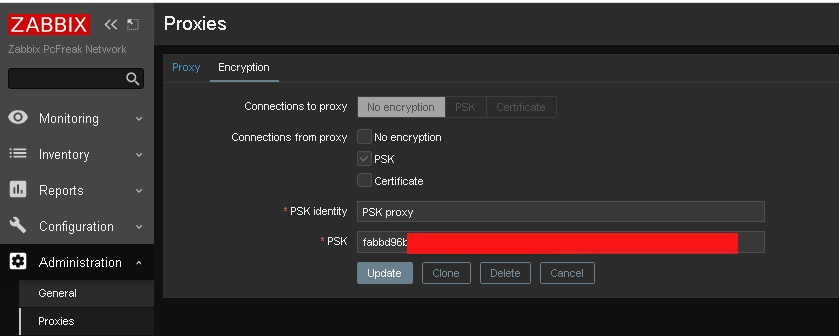
*PSK Identity: PSK proxy
*PSK: Put the key here (copy from /etc/zabbix/zabbix_proxy.psk generated steps earlier with openssl)
[root@sysadminshelp:/etc/zabbix]# cat zabbix_proxy.psk
faddbd96be00ac42c892fda5201634df25d51f3ndbbbf6cee9d354b2817092a28
Press the "Update" Button

and go again to Proxies and check the zabbix-proxy is connected to the server and hosts configured to use the zabbix proxy reporting frequently.
To make sure that the configured new hosts to use the Zabbix Proxy instead of direct connection to Zabbix Server, go to Latest Data and check whether the configured Hostnames to connect to the Zabbix-Proxy continues to sent Data still.
9. Debugging problems with zabix-proxy and zabbix-agentd connectivity to proxy
In case of troubles check out what is going on inside the Zabbix Proxy / Agent and Server log files
[root@sysadminshelp:/etc/zabbix]# tail -n 50 /var/log/zabbix/zabbix_proxy.log
6832:20230504:134032.281 Starting Zabbix Proxy (active) [zabbix-proxy]. Zabbix 5.0.31 (revision f
64a07aefca).
6832:20230504:134032.281 **** Enabled features ****
6832:20230504:134032.281 SNMP monitoring: YES
6832:20230504:134032.281 IPMI monitoring: YES
6832:20230504:134032.281 Web monitoring: YES
6832:20230504:134032.281 VMware monitoring: YES
6832:20230504:134032.281 ODBC: YES
6832:20230504:134032.281 SSH support: YES
6832:20230504:134032.281 IPv6 support: YES
6832:20230504:134032.281 TLS support: YES
6832:20230504:134032.281 **************************
6832:20230504:134032.281 using configuration file: /etc/zabbix/zabbix_proxy.conf
6832:20230504:134032.291 current database version (mandatory/optional): 05000000/05000005
6832:20230504:134032.291 required mandatory version: 05000000
6832:20230504:134032.292 proxy #0 started [main process]
6833:20230504:134032.292 proxy #1 started [configuration syncer #1]
6833:20230504:134032.329 received configuration data from server at "192.168.1.28", datalen 40521
6834:20230504:134032.392 proxy #2 started [trapper #1]
6835:20230504:134032.401 proxy #3 started [trapper #2]
6836:20230504:134032.402 proxy #4 started [trapper #3]
6838:20230504:134032.405 proxy #6 started [trapper #5]
6837:20230504:134032.409 proxy #5 started [trapper #4]
6843:20230504:134032.409 proxy #11 started [heartbeat sender #1]
6845:20230504:134032.412 proxy #13 started [housekeeper #1]
6847:20230504:134032.412 proxy #15 started [discoverer #1]
8526:20230504:145836.512 proxy #20 started [history syncer #3]
8517:20230504:145836.512 proxy #11 started [heartbeat sender #1]
8530:20230504:145836.515 proxy #24 started [java poller #3]
8531:20230504:145836.517 proxy #25 started [java poller #4]
8532:20230504:145836.520 proxy #26 started [java poller #5]
8536:20230504:145836.522 proxy #30 started [poller #1]
8527:20230504:145836.525 proxy #21 started [history syncer #4]
8535:20230504:145836.525 proxy #29 started [task manager #1]
8533:20230504:145836.528 proxy #27 started [snmp trapper #1]
8539:20230504:145836.528 proxy #33 started [poller #4]
8538:20230504:145836.529 proxy #32 started [poller #3]
8534:20230504:145836.532 proxy #28 started [self-monitoring #1]
8544:20230504:145836.532 proxy #38 started [icmp pinger #1]
8543:20230504:145836.532 proxy #37 started [unreachable poller #3]
8542:20230504:145836.535 proxy #36 started [unreachable poller #2]
8541:20230504:145836.537 proxy #35 started [unreachable poller #1]
8540:20230504:145836.540 proxy #34 started [poller #5]
8507:20230504:150036.453 received configuration data from server at "192.168.1.28", datalen 40521
8507:20230504:150236.503 received configuration data from server at "192.168.1.28", datalen 40521
8507:20230504:150436.556 received configuration data from server at "192.168.1.28", datalen 40521
8507:20230504:150636.608 received configuration data from server at "192.168.1.28", datalen 40521
8507:20230504:150836.662 received configuration data from server at "192.168.1.28", datalen 40521
…
[root@sysadminshelp:/etc/zabbix]# tail -n 10 /var/log/zabbix-agent/zabbix_agentd.log
3096166:20230504:182840.461 agent #1 started [collector]
3096167:20230504:182840.462 agent #2 started [listener #1]
3096168:20230504:182840.463 agent #3 started [listener #2]
3096169:20230504:182840.464 agent #4 started [listener #3]
3096170:20230504:182840.464 agent #5 started [active checks #1]
If necessery to Debug further and track some strange errors, you might want to increase the DebugLevel to lets say DebugLevel=5
5 – extended debugging (produces even more information)
If checking both zabbix_agentd.log and zabbix_proxy.log cannot give you enough of a hint on what might be the issues you face with your userparameter scripts or missing Monitored data etc. and hopefully you have access to the zabbix-server machine, check out the zabbix server log as well
[root@zabbix:~]# tail -n 100 /var/log/zabbix/zabbix_server.log
3145027:20230504:182641.556 sending configuration data to proxy "zabbix-proxy" at "192.168.1.50", datalen 40521, bytes 6120 with compression ratio 6.6
3145029:20230504:182716.529 cannot send list of active checks to "192.168.1.30": host [pcfrxenweb] not found
3145028:20230504:182731.959 cannot send list of active checks to "192.168.1.30": host [pcfrxenweb] not found
3145029:20230504:182756.634 cannot send list of active checks to "192.168.1.30": host [pcfrxenweb] not found
Wrapping it up
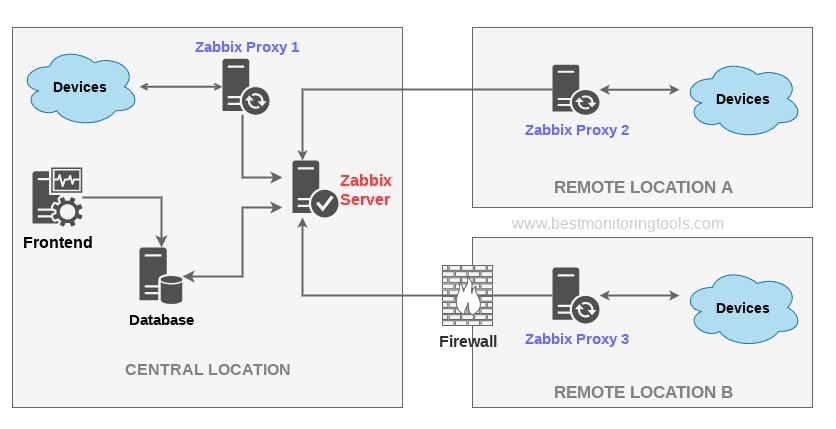
In this article, we have learned how to install and configure a zabbix-proxy server and prepare a PSK encryption secret key for it.
We learned also how to connect this server to the central zabbix monitoring host machine in Active mode, so both Zabbix proxy and server can communicate in a secure crypted form,
as well as how to set zabbix_agentd clients to connect to the zabbix proxy
which will from itself send its data to the Central Zabbix server host as well as how to Debug and hopefully solve issues with communication between Zabbix client -> Zabbix Proxy -> Zabbix server.
I know this article, does not say anything revolutionary and there is plenty of posts online talking about how to run yourself a zabbix proxy and make in your home or corporate network,
but I thought to write it down as by writting it and reading a bit more on the topic of Zabbix Server / Proxy / Agent, that give myself a better overview on how this technologies work and such an article will give myself an easier step by step guide to follow,
in future when I have to configure Zabbix Environments for personal hobby or professionally for customers.
Hope you enjoyed. Cheers ! 🙂


