Posts Tagged ‘Start’

Make QMAIL with vpopmail vchkpw, courier-authlib and courier-imap auth work without MySQL on Debian Linux qmailrocks Thibs install

Friday, September 28th, 2012

How to make qmail vpopmail vchkpw courier-authlib and courier-imap work storing mails on hard disk with qmailrocks Thibs install

Recently installed a new QMAIL, following mostly Thibs Qmailrocks install guide. I didn’t followed literally Thibs good guide, cause in his guide in few of the sections like Install Vpopmail he recommends using MySQL as a Backend to store Vpopmail email data and passwords; I prefer storing all vpopmail data on the file system as I believe it is much better especially for tiny QMAIL mail servers with less than 500 mail box accounts.

In this little article I will explain, how I made Vpopmail courier-authlib and courier-imap play nice together without storing data in SQL backend.

1. Compile vpopmail with file system data storage support

So here is how I managed to make vpopmail + courier-authlib + courier-imap, work well together:

First its necessery to compile Vpopmailin store all its users data and mail data on file system. For this in Thibs Vpopmail Intsall step compiled Vpopmail without support for MySQL, e.g. instead of using his pointed compile time ./configure, arguments I used:


# cd /downloads/vpopmail-5.4.33
# ./configure \
--enable-qmaildir=/var/qmail/ \
--enable-qmail-newu=/var/qmail/bin/qmail-newu \
--enable-qmail-inject=/var/qmail/bin/qmail-inject \
--enable-qmail-newmrh=/var/qmail/bin/qmail-newmrh \
--enable-tcprules-prog=/usr/bin/tcprules \
--enable-tcpserver-file=/etc/tcp.smtp \
--enable-clear-passwd \
--enable-many-domains \
--enable-qmail-ext \
--enable-logging=y \
--enable-auth-logging \
--enable-libdir=/usr/lib/ \
--disable-roaming-users \
--disable-passwd \
--enable-domainquotas \
--enable-roaming-users
....
....
# make && make install-strip
# cat > ~vpopmail/etc/vusagec.conf < < __EOF__
Server:
Disable = True;
__EOF__
echo 'export PATH=$PATH:/var/qmail/bin/:/home/vpopmail/bin/' > /etc/profile.d/extrapath.sh
chmod +x /etc/profile.d/extrapath.sh
source /etc/profile

A tiny shell script with all above options to compile (qmail) vpopmail without MySQL / PostgreSQL support is here

For other steps concerning creation of vpopmail/vchkpw – user/group just follow as Thibs suggests.

2. Compile and install courier-authlib-0.59.1

I’ve made mirror of courier-authlib.0.59.1.tar.gz cause this version includes support for vchkpw without mysql, its a pity newer versions of courier-authlib not any more have support for vpopmail to store its data directly on the hard disk.

Then on downlaod, compile && install courier-authlib:

Download authlib courier-authlib.0.59.1.tar.gz – (I made mirror of courier-authlib.0.59.1.tar.gz you can use my mirror or download it somewhere else from the net):


# cd /usr/local/src
# wget -q https://www.pc-freak.net/files/courier-authlib.0.59.1.tar.gz
# tar -zxvvf courier-authlib.0.59.1.tar.gz

Compile courier-authlib

# ./configure --prefix=/usr/local --exec-prefix=/usr/local --with-authvchkpw --without-authldap --without-authmysql --disable-root-check --with-ssl --with-authchangepwdir=/usr/local/libexec/authlib
....
# make && make install && make install-strip && make install-configure
....

On Debian Squeeze, this version of courier-authlib compiles fine, on Debian Lenny I use it too and there it is okay.

Unless above commands returns a compile error authlib will be installed inside /usr/local/libexec. If you get any errors it is most likely due to some missing header files. The error should be self explanatory enough, but just in case you have troubles to find what deb is necessery to install, please check here the complete list of installed packages I have on the host . In case of problems the quickest way (if on Debian Squeeze) is to install same packages, type:


# wget -q https://www.pc-freak.net/files/list_of_all_deb_necessery_installed_packages_for_authlib.txt
# for i in $(cat list_of_all_deb_necessery_installed_packages_for_authlib.txt |awk '{ print $2 }'); do
apt-get install --yes $i;
done

This is for the lazy ones though it might install you some packs you don’t like to have on your host, so just install it in case you know what you’re doing 🙂

Next step is to set proper configuration for courier-authdaemon.

3. Configure courier-authlib in /usr/local/etc/authlib

Again for the lazy ones I have prepared a good config which is working 100% with vpopmail configured to store mails on the file system, to install the “good” configs, fetch mine and put them in proper location, e.g.:


# cd /usr/local/etc
# wget -q https://www.pc-freak.net/files/authlib-config-for-qmail-with-hdd-directory-stored-userdata.tar.gz
# tar -zxvvf authlib-config-for-qmail-with-hdd-directory-stored-userdata.tar.gz
....

For those who prefer not to use my configuration as pointed above, here is what you will need to change manually in configs:

Edit /usr/local/etc/authlib/authdaemonrc and make sure there variable authmodulelist and authmodulelist and daemons=5
equals to:


authmodulelist="authvchkpw"


authmodulelistorig="authuserdb authpgsql authldap authmysql authcustom authvchkpw authpipe"


daemons=10

Bear in mind here the setting daemons, will set how many maximum parallel connections should be possible to authdaemond on new IMAP fetch mail user requests. Setting it to 10 will allow your mail server to support up to 10 users to paralelly check your mail for a tiny mail server this setting is okay if you expect higher number of parallel mail users raise the setting to some setting fitting your needs.

P.S. On some qmail installations this value has created weird problems and took me hours to debug the whole mess is caused by this setting, make sure you plan it now unless you don’t to loose some time in future.

4. Stop debian courier-authdaemon and start custom compiled one

Now all is ready and authdaemond can be started, but before that if you have installed courier-authlib as a debian package you need to stop it via init script and only when completely sure old default Debian courier-authdaemon is stopped launch the new installed one:


# /etc/init.d/courier-authdaemon stop
# s ax |grep -i authdaemond |grep -v grep
#
# /usr/local/sbin/authdaemond start
#

To make the newly custom source installed courier-authdaemon to load itself on system boot instead of the debian installed package


# dpkg -l |grep -i courier-authdaemon
ii courier-authdaemon 0.63.0-3 Courier authentication daemon

open /etc/init.d/courier-authdaemond, after line:


. /lib/lsb/init-functions

add


/usr/local/sbin/authdaemond start
exit 0

This will make the script exit once launches cmd /usr/local/sbin/authdaemond start

5. Compile and Install courier-imap

You will also have to install from courier-imap archive source, I have tested it and know Qmail + Vpopmail + Courier-Imap works for sure with version courier-imap-4.1.2.tar.bz2

As of time of writing this post courier-imap-4.11.0.tar.bz2 is the latest available for download from Courier-imap download site unfortunately this version requires higher version of >= courier-authlib-0.63

In order install courier-imap-4.1.2.tar.bz2


# cd /usr/local/src
# wget -q https://www.pc-freak.net/files/courier-imap-4.1.2.tar.bz2
# tar -jxvvf courier-imap-4.1.2.tar.bz2
...
# chown -R hipo:hipo courier-imap-4.1.2
# su hipo
$ cd courier-imap-4.1.2/
$ export CFLAGS="-DHAVE_OPEN_SMTP_RELAY -DHAVE_VLOGAUTH"
$ export COURIERAUTHCONFIG=/usr/local/bin/courierauthconfig
$ export CPPFLAGS=-I/usr/local/courier-authlib/include
$ ./configure --prefix=/usr/local/courier-imap --disable-root-check
...
$ exit
# make
...
# make install
...
# make install configure

It is recommended courier-imap to be compiled with non root username. In above code I use my username hipo, other people have to use any non-root user.

6. Set proper configuration and new init script for courier-imap

In /usr/lib/courier-imap, download following working configs (for convenience I’ve made tar with my configs):


# cd /usr/lib/courier-imap
# rm -rf etc
# wget -q https://www.pc-freak.net/files/courier-imap-config-etc.tar.gz

Then you will have to overwrite default courier-imap init script in /etc/init.d/courier-imap with another one to start the custom compiled one instead of debian default installed courier-imap


# mv /etc/init.d/courier-imap /root
# cd /etc/init.d
# wget -q https://www.pc-freak.net/files/debian-courier-imap
# mv debian-courier-imap courier-imap
# chmod +x courier-imap

This init script is written use /var/lock/subsys/courier-imap, so you will have to also create /var/lock/subsys/


# mkdir -p /var/lock/subsys

7. Start custom installed courier-imap

The start/stop init script of newly installed courier-imap is /usr/lib/courier-imap/libexec/imapd.rc


/usr/lib/courier-imap/libexec/imapd.rc start

Since a new /etc/init.dcourier-imap is installed too, it can be also used to control courier-imap start/stop.

Well thats should be enough for Courier-authlib and Courier-Authlib to communicate fine between each other and be able to connect and fetch e-mail stored in file system by vpopmail.

8. Test if Qmail IMAP proto finally works


# telnet localhost 143
Trying 127.0.0.1...
Connected to localhost.
Escape character is '^]'.
* OK [CAPABILITY IMAP4rev1 UIDPLUS CHILDREN NAMESPACE THREAD=ORDEREDSUBJECT THREAD=REFERENCES SORT QUOTA IDLE AUTH=CRAM-MD5 ACL ACL2=UNION STARTTLS] Courier-IMAP ready. Copyright 1998-2011 Double Precision, Inc. See COPYING for distribution information.
a login username@mail-domain.com my-username-password
a OK LOGIN Ok.
a LIST "" "*"
* LIST (\HasNoChildren) "." "INBOX.Sent"
* LIST (\Marked \HasChildren) "." "INBOX"
* LIST (\HasNoChildren) "." "INBOX.Drafts"
* LIST (\HasNoChildren) "." "INBOX.Trash"
a OK LIST completed
a EXAMINE Inbox
* FLAGS (\Draft \Answered \Flagged \Deleted \Seen \Recent)
* OK [PERMANENTFLAGS ()] No permanent flags permitted
* 6683 EXISTS
* 471 RECENT
* OK [UIDVALIDITY 1272460837] Ok
* OK [MYRIGHTS "acdilrsw"] ACL
a OK [READ-ONLY] Ok
* 1 FETCH (BODY[] {2619}
Return-Path:
Delivered-To: hipo@my-domain-name.com
Received: (qmail 22304 invoked by uid 1048); 24 Apr 2012 14:49:49 -0000
Received: from unknown (HELO localhost) (127.0.0.1)
by mail.my-domain-name.com with SMTP; 24 Apr 2012 14:49:49 -0000
Delivered-To: hipo@my-domain-name.com
Received: from localhost [127.0.0.1]
......
......

That’s all it works. Enjoy 🙂

Install TorrentFlux Bit Torrent Web management interface on Debian / Ubuntu Linux

Tuesday, July 15th, 2014

torrent flux logo
Torrentflux
is web based, feature-rich BitTorrent download manager.
Torrentflux is a must have installed server software for anyone who does regular torrent downloads and want to access the downloads from anywhere on the internet.

TorrentFlux is a PHP based BitTorrent controller that runs on a web
 server. It can manage all of your BitTorrent downloads from anywhere
 through a convenient and easy-to-use web interface.
 .
 TorrentFlux uses a MySQL database to manage the downloads.

 TorrentFlux enables you to run BitTorrent downloads unattended on a monitor-less or remote server 24 hours a day, while still maintaining complete control from any web browser. Now you can control your  downloading on your firewall, or keep up with downloads while on  vacation. It uses the BitTornado client to download files, and also  requires a web server with PHP.
 
 Some of the Torrentflux features:

   * Upload Torrents via URL or File Upload
   * Start, Stop, and Delete Torrents with ease
   * Advanced Torrent start options (ports, speeds, etc.)
   * Multi-user interface
   * RSS Feeds, download Torrents files with a click
   * Run several torrents at once
   * View Download Progress of all torrents at a glance
   * View drive space at a glance
   * View Torrent file meta information
   * Built-in User management and Security
   * Private Messaging
   * Themes (selectable per user)
   * Upload History


Before installing Bittorrent you will need to have a running version of Debian, Ubuntu or any other debian derivative (though it can easily be run on any Linux distro). To install AMP (Apache MySQL Server, PHP) you can follow first part of my previous article Installing Usual PHP Apache MySQL for new Debian GNU / Linux installs.

So what for is TorrentFlux Useful?
Torrenflux is precious and must have if you have to access filtered torrent from outside of your homecountry and you have a running server already in your home country in that I was using TorrentFlux to access Bulgarian Zamunda.Net Torrent Tracker from Holland and was downloading first movies from the Bulgarian Torrent Tracker to my Fluxbox installed on my Dobrich home router and then used FTP to transfer movies to the Netherlands. Talking about many people choose to also install VSFTP and use it together with Torrentflux …

1. Install TorrentFlux and its dependencies (BitTornado, Bittorrent, Zip, Unzip, Bzip etc.) the "Debian Way"


On my Debian 7 Wheezy home machine  I run

apt-get install –yes bzip2 php5-gd php5-cli unrar-free grep python net-tools mawk wget unzip cksfv vlc-nox uudeview python-crypto libxml-simple-perl libxml-dom-perl libdbd-mysql-perl bittorrent bittornado


a) Install TorrentFlux the Debian Way

apt-get install –yes torrentflux


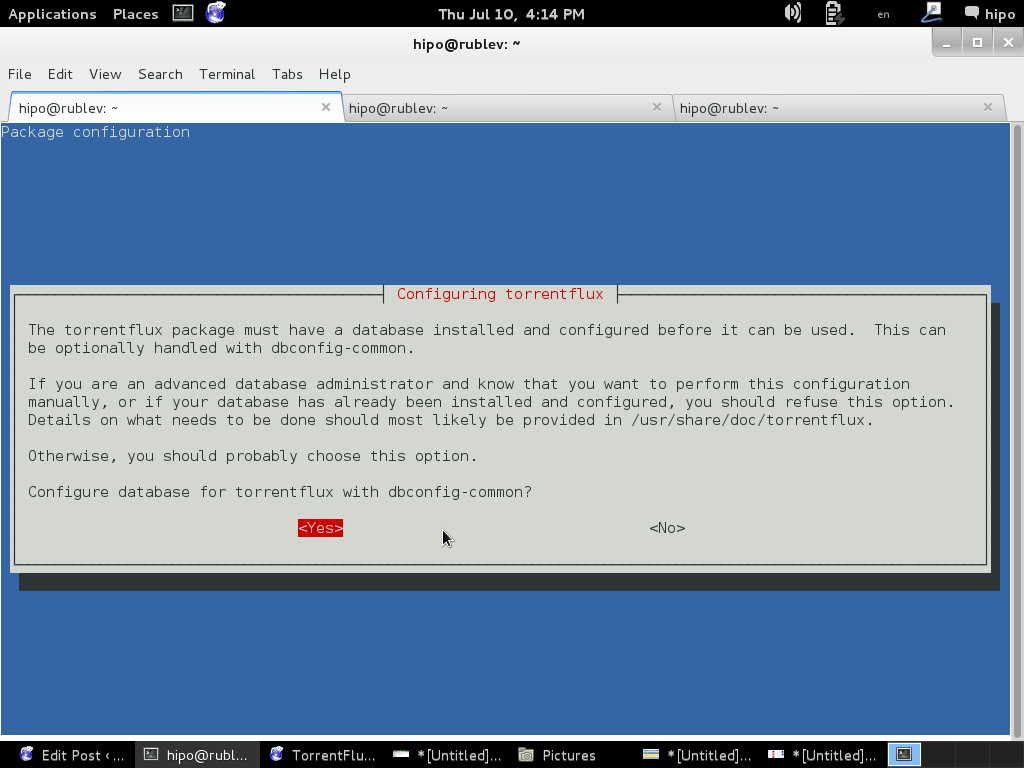
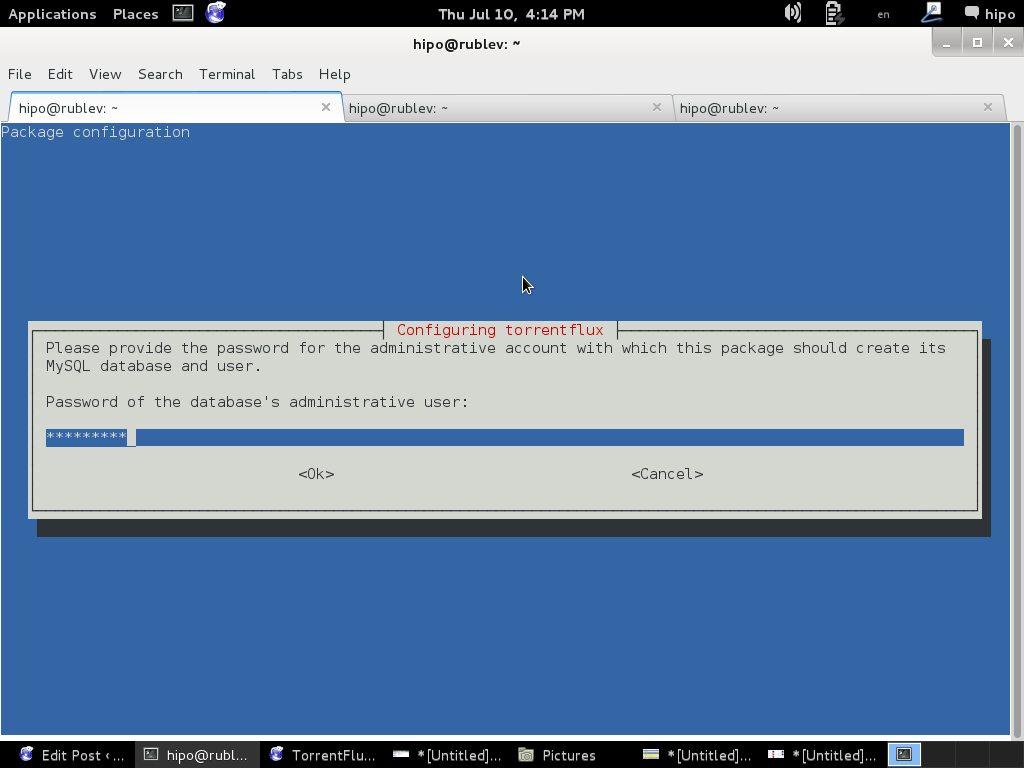
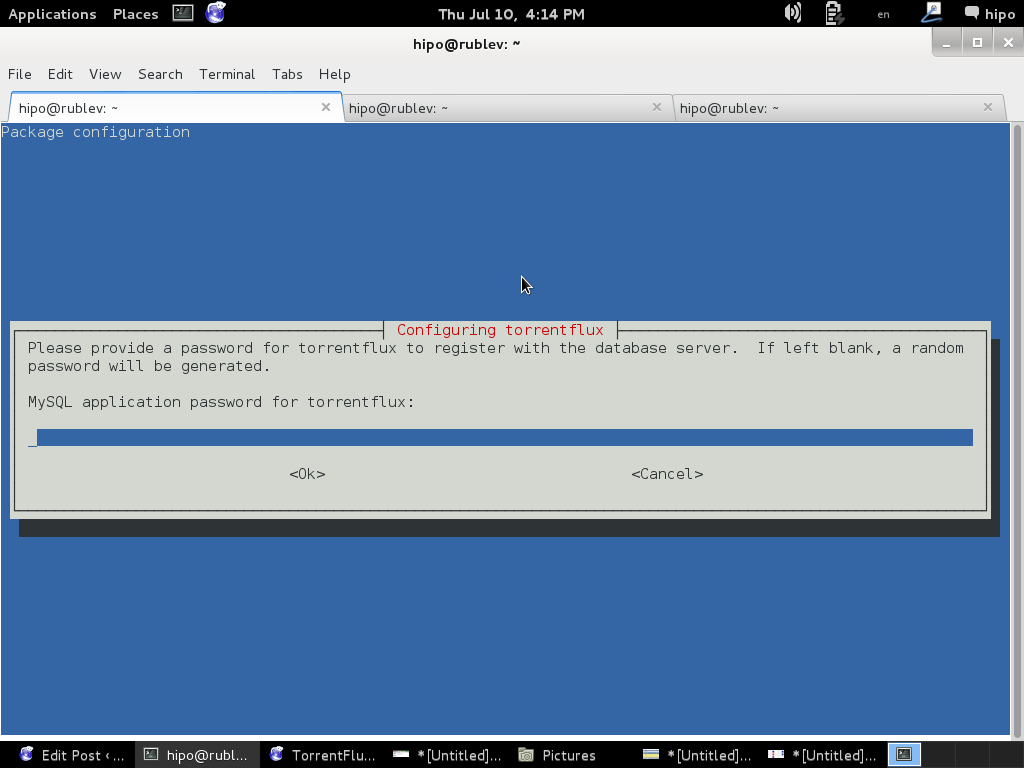
You will be prompted with a coule of screens, to set a new MySQL database user and password and SQL database, as well as offered to restart Apache to make Torrentflux accessible like as on below screenshots.

configuring-torrentflux-debian-linux-screenshot-2


configuring-torrentflux-debian-linux-screenshot 3

configuring-torrentflux-debian-linux-screenshot-4

To make new installed torrentflux accessible from web you will either have to configure it via some new Apache VirtualHost or make a symbolic link to /usr/share/torrentflux/www :
 

cd /var/www/
ln -sf /usr/share/torrentflux/www/ torrentflux


That's all you're all done to access torrentflux either access it via your default configured webserver domain name or via localhost if you're logged in to same pc where installing.

http://www.your-domain.com/torrentflux

or

http://127.0.0.1/torrentflux

configuring-torrentflux-after-first-login-in-web-debian-linux

2. Install latest Torrentflux version from source

Alternatively if you want to have the latest version (because the Debian version is part of the stable distribution is a little bit outdated you will have to fetch Torrentflux-b4rt and unarchive it:

cd /tmp/
wget http://download.berlios.de/tf-b4rt/torrentflux-b4rt_1.0-beta2.tar.bz2

tar -xjf torrentflux-b4rt_1.0-beta2.tar.bz2

mv torrentflux-b4rt_1.0-beta2 /opt/torrentflux

Then to make torrentflux visible from web server I had to create a symbolic link to installation directory:
 

ln -sf /opt/torrentflux/html /var/www/torrentflux

For further initial configuration its necessery to make Torrentflux config writtable by www-data (the user with which Apache is running on Debian).


chown -R www-data:www-data /var/www/torrentflux/inc/config/


Next it its required to create somewhere download folder where TorrentFlux will keep downloaded Torrents

mkdir /var/lib/torrentflux


Apache HTTP server will have to have write ther:

chown -R www-data:www-data /var/lib/torrentflux


If you already haven't restarted Apache earlier in installing TorrentFlux pre-requirements, you will have to do it now:


/etc/init.d/apache2 restart


As TorrentFlux depends on its MySQL backend, we need to also create manually TorrentFlux database username and a password
 

export SQL_DB='torrentflux';
TFLUXSQL_USERNAME='torrentflux';
TFLUX_SQL_PWD='any-secret-password';

echo "CREATE DATABASE IF NOT EXISTS $SQL_DB DEFAULT CHARACTER SET utf8 DEFAULT COLLATE utf8_unicode_ci"
| mysql –user=root –password

echo "GRANT ALL PRIVILEGES ON $SQL_DB.*
TO $TFLUXSQL_USERNAME@localhost
IDENTIFIED BY $TFLUX_SQL_PWD;" | mysql –user=root –password


Substitute with your Database, Username and Password above shell variables – $SQL_DB, $TFLUX_USERNAME, $TFLUX_SQL_PWD

To configure TorrentFlux access it in browser:

http://your-domain.com/torrentflux
 

By accessing it for a first time, you will redirected to setup.php, in case something goes wrong and yuo're not redirected (probably some mod_rewrite issues add setup.php to url – e.g., acess –

http://your-domain.com/torrentflux/setup.php

I will not enter details, about Web config, because everything there is pretty clear.

Just in short – you will have to now choose:

Choose Database
Choose Database Information of database (put in the exact name of TorrentFlux databse previously created)
Uncheck the box for "Create new database"
Choose as a download location upper created directory – /var/lib/torrentflux

If you get an error on software dependencies screen for missing unrar – just install it
VLC may show an error as well, that's not a problem because VLC is probably not to be used.
Finally after completion of all, you will get an error that setup.php cannot be deleted.
 

To prevent, someone to re-configure it through http://your-domain/torrentflux/setup.php URL remove setup.php


rm /var/www/torrentflux/setup.php

To prevent someone rewrite anything in config file from web we have to revert back config/ folder not to be writable by Apache


chown -R root:root /var/www/torrentflux/inc/config/

Now in browser to access torrentflux type:


http://ipofyourbox/torrentflux

/torrentflux should redirect you to login.php if for some reason it doesn't type it manually in URL.

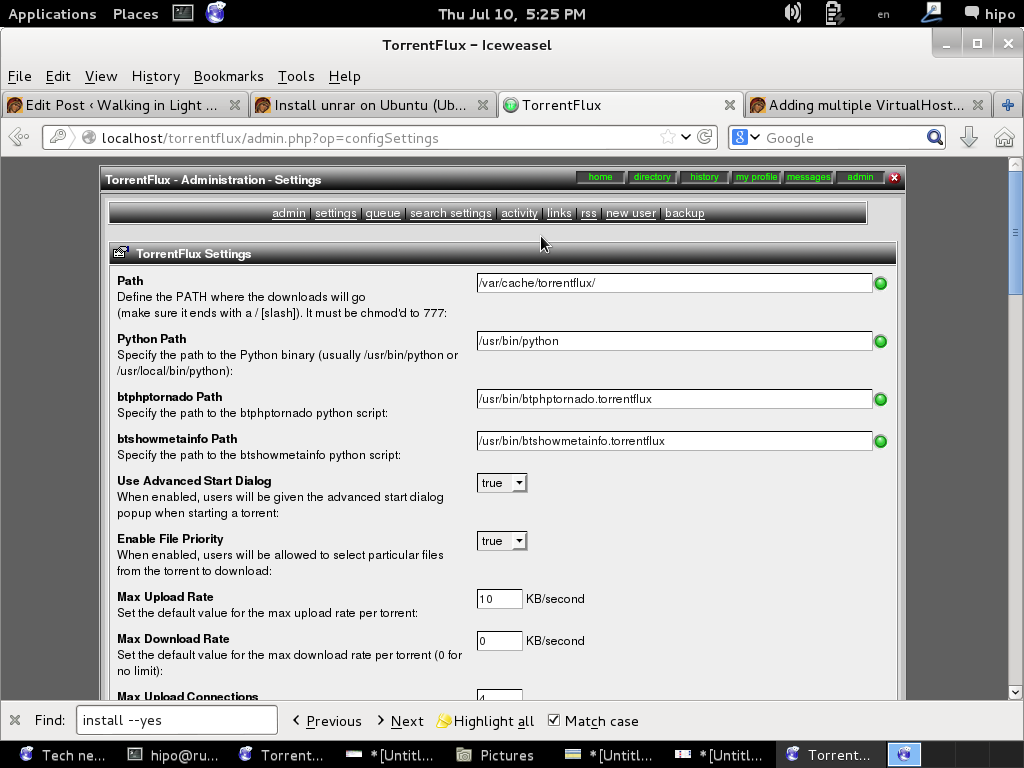
First account you will login is the super user account, you can allow multiple users to use it by adding multiple accounts.

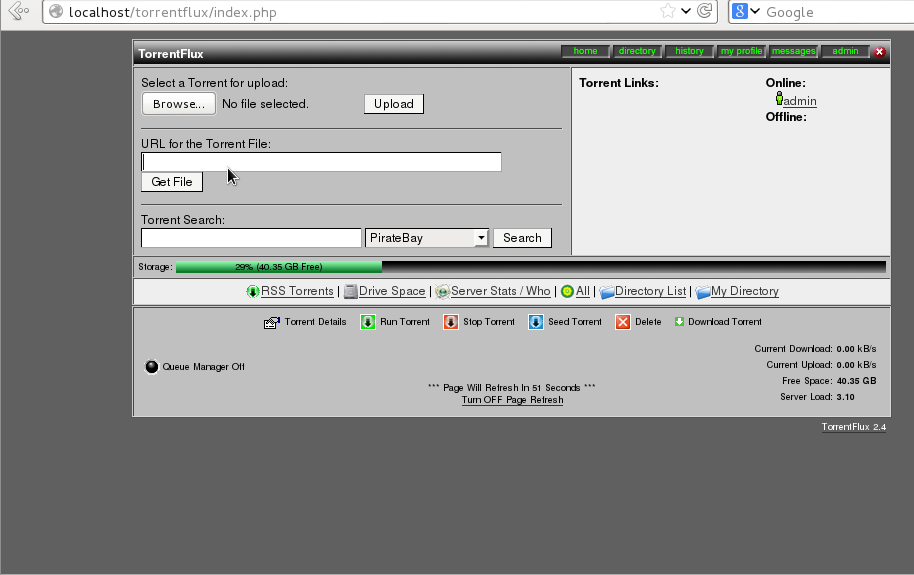
torrentflux-install-on-debian-ubuntu-gnu-linux-web-management-torrent-interface

As you will see there is plety of configuration options to play with.

You will definitely want to look in Server Page, some very important page to look is the Transfer Page – from there you can adjust the bandwidth of your connection on 100Mbit network this would be 12500 – to use the maximum possible connection provided by your ISP set the max bandwidth to 0. You have the option to also set a default bittorrent client, by default this will be bittornado.


If you have troubles downloading from TorrentTrackers make sure your router is configured to forward port 49160 to 49300

Now if you have a lot of storage create accounts also for your friends and enjoy torrentflux 🙂


Windows key Shortcuts and Commands List every Win admin / support must know

Tuesday, November 25th, 2014

windows-XP-vista-7-8-server-2003-rc2-2012--full-complete-keyboard-shortcuts-list
If you're a system administrator of Windows Servers or or just a PC support in a small company and you have to fix PCs running Microsoft Windows XP / 7 / 8  daily, sooner or later you will be interested into how to optimize your windows maintainance work to be able to do more adminsitration work for less time.

M$ Windows OS has evolved a lot over the past 10+ years and many of the features available GUI are now either possibile to be done via a standard commands and the GUI interfaces. Various adminsitration and common daily work simplification goodies are now accessible through quick access shortcuts and commands.

Virtually all Windows operating system environment could be now customized by using such shortcuts, this reduces the multitude of annoying double clicks which are truely pissing off sysadmins and tech-supports involved in  Windows Ticket solving.

Win Shortcuts and Commands helps to:

  • Quickly invoke almost all System Settings available from Windows Control Panel
  • Access all admins tools GUIs throguh command
  • Speed up Opening Video, Pictures, Documents, Downloads folders start Windows Update, Configure Printers / Fax / Add Sharings

etc..

A lot of the commands were new to me thus I decided to try out all of the commands in command prompt (cmd). Many of the tools down-mentioned were news to me and let me understand better on Windows Internals, so if you time try them out.
 

Function Comand
Open Documents Folder Start menu -> Search (Type documents)
Open Videos folder Start -> Search (Type videos)
Open Downloads Folder Start -> Search (Type downloads)
Open Favorites Folder favorites
View Recent messages of your PC Start menu -> Search (Type recent)
Open Recent Folder N/A
Open Pictures Folder Start menu -> Search (Type pictures)
Windows Sideshow control.exe /name Microsoft.WindowsSideshow
Windows CardSpace (Windows ID Manager) control.exe /name Microsoft.cardspace
Windows Anytime Upgrade Start menu -> Search dialog (Type WindowsUpdate)
Taskbar and Start Menu control.exe /name Microsoft.TaskbarandStartMenu
Troubleshooting control.exe /name Microsoft.Troubleshooting
User Accounts (Run user accounts Interface) control.exe /name Microsoft.UserAccounts
Adding a new Device devicepairingwizard
Add Hardware Wizard hdwwiz
Advanced User Accounts Management netplwiz
Advanced User Accounts (Authorization Mgr) azman.msc
Windows Backup and Restore sdclt
Bluetooth File Transfer fsquirt
Calculator calc
Certificates Manager certmgr.msc
Change Computer Performance Settings systempropertiesperformance (Remove visual effects)
Change Data Execution Prevention Settings systempropertiesdataexecutionprevention
Change Data Execution Prevention Settings printui
Character Map charmap
ClearType Tuner cttune (Make text onscreen more readable)
Color Management colorcpl
Command Prompt cmd
Component Services comexp.msc
Component Services dcomcnfg
Computer Management Interface compmgmt.msc
Computer Management Interface compmgmtlauncher
Connect to Network Project via Network netproj
Connect to a Projector displayswitch (Alias for Fn key + F4)
Run Control Panel command control
Create A Shared Folder Wizard shrpubw
Create a System Repair Disc recdisc
Credential Backup and Restore Wizard credwiz
Data Execution Prevention systempropertiesdataexecutionprevention
Date and Time timedate.cpl
Default Location locationnotifications
Device Manager devmgmt.msc
Device Manager hdwwiz.cpl
Device Pairing Wizard devicepairingwizard
Diagnostics Troubleshooting Wizard msdt
Digitizer Calibration Tool tabcal
DirectX Diagnostic Tool dxdiag
Disk Cleanup cleanmgr
Disk Defragmenter dfrgui
Disk Management diskmgmt.msc
Display (Change font size of text onscreen) dpiscaling
Display Color Calibration dccw
Display Switch displayswitch
DPAPI Key Migration Wizard dpapimig
Driver Verifier Manager verifier
Ease of Access Center utilman
EFS Wizard rekeywiz
Event Viewer eventvwr.msc
Fax Cover Page Editor fxscover
File Signature Verification sigverif
Font Viewer fontview
Game Controllers joy.cpl
Windows Getting Started Iface gettingstarted
IExpress Wizard iexpress
Another alias for Getting Started irprops.cpl
Install or Uninstall Display Languages lusrmgr
Internet Explorer iexplore
Run Internet Explorer Internet Options inetcpl.cpl
iSCSI Initiator Configuration Tool iscsicpl
Language Pack Installer lpksetup
Local Group Policy Editor gpedit.msc
Local Security Policy secpol.msc
Local Users and Groups lusrmgr.msc
Location Activity locationnotifications
Magnifier magnify
Malicious Software Removal Tool mrt (Might be not existent on some Windows versions)
Manage Your File Encryption Certificates rekeywiz
Math Input Panel mip
Microsoft Management Console mmc
Microsoft Support Diagnostic Tool msdt
Mouse main.cpl
NAP Client Configuration napclcfg.msc
Narrator narrator
Network Connections ncpa.cpl
New Scan Wizard wiaacmgr
Notepad notepad
ODBC Data Source Administrator odbcad32
ODBC Driver Configuration odbcconf
On-Screen Keyboard osk
Paint mspaint
Pen and Touch tabletpc.cpl
People Near Me collab.cpl
Performance Monitor perfmon.msc
Performance Options systempropertiesperformance
Phone and Modem telephon.cpl
Phone Dialer dialer
Power Options powercfg.cpl
Presentation Settings presentationsettings
Print Management printmanagement.msc
Printer Migration printbrmui
Printer User Interface printui
Private Character Editor eudcedit
Problem Steps Recorder psr
Programs and Features (Install / Uninstall) appwiz.cpl
Protected Content Migration dpapimig
Region and Language intl.cpl
Registry Editor regedit
Registry Editor 32 regedt32
Remote Access Phonebook rasphone
Remote Desktop Connection mstsc
Resource Monitor resmon
Resultant Set of Policy rsop.msc
SAM Lock Tool syskey
Screen Resolution desk.cpl
Securing the Windows Account Database syskey
Services services.msc
Set Program Access and Computer Defaults computerdefaults
Share Creation Wizard shrpubw
Shared Folders fsmgmt.msc
Snipping Tool snippingtool
Sound mmsys.cpl
Sound recorder soundrecorder
SQL Server Client Network Utility cliconfg
Sticky Notes stikynot
Stored User Names and Passwords credwiz
Sync Center mobsync
System Configuration msconfig
System Configuration Editor sysedit
System Information msinfo32
System Properties sysdm.cpl
System Properties (Advanced Tab) systempropertiesadvanced
System Properties (Computer Name Tab) systempropertiescomputername
System Properties (Hardware Tab) systempropertieshardware
System Properties (Remote Tab) systempropertiesremote
System Properties (System Protection Tab) systempropertiesprotection
System Restore rstrui
Task Manager taskmgr
Task Scheduler taskschd.msc
Trusted Platform Module (TPM) Management tpm.msc
User Account Control Settings useraccountcontrolsettings
Utility Manager utilman
Version Reporter Applet winver
Volume Mixer sndvol
Windows Action Center wscui.cpl
Windows Activation Client slui (Runs on Windows license activation time)
Windows Anytime Upgrade Results windowsanytimeupgraderesults
Windows CardSpace infocardcpl.cpl
Windows Disc Image Burning Tool isoburn (Command line tool to burn images)
Windows DVD Maker dvdmaker (N/A on Windows 7, 8)
Windows Easy Transfer migwiz (N/A on many Windows versions)
Run Windows Explorer explorer
Windows Fax and Scan wfs
Windows Features optionalfeatures
Windows Firewall firewall.cpl
Windows Firewall with Advanced Security wf.msc
Windows Journal journal (N/A on Windows 7)
Windows Media Player wmplayer (N/A on many Windows releases)
Windows Memory Diagnostic Scheduler mdsched (Check your PC memory on next boot)
Windows Mobility Center (Stats) mblctr
Windows Picture Acquisition Wizard wiaacmgr
Windows PowerShell powershell
Windows PowerShell ISE powershell_ise
Windows Remote Assistance msra
Windows Repair Disc recdisc
Windows Script Host wscript
Windows Update wuapp
Windows Update Standalone Installer wusa
Show Windows Version winver
WMI Management wmimgmt.msc
WordPad write
XPS Viewer xpsrchvw


Most of above commands works fine with Windows XP, Vista and Windows 7 / 8, Windows 2003 / 2012, however some cmds are missing across some win versions.

Here is list of other useful Windows shortcut keys:
 

General keyboard shortcuts

  • Ctrl+C (Copy)
  • Ctrl+X (Delete selected item and save a copy to the clipboard)
  • Ctrl+V (Paste)
  • Ctrl+Z (Undo)
  • Delete (Delete) 
  • Shift+Delete (Delete the selected item permanently without moving the item to the Recycle Bin) 
  • Ctrl while dragging an item (Copy the selected item)
  • Ctrl+Shift while dragging an item (Create a shortcut to the selected item)
  • F2 key (Rename the selected item)
  • Ctrl+Right Arrow (Move the cursor to the beginning of the next word) 
  • Ctrl+Left Arrow (Move the cursor to the beginning of the previous word) 
  • Ctrl+Down Arrow (Move the cursor to the beginning of the next paragraph) 
  • Ctrl+Up Arrow (Move the cursor to the beginning of the previous paragraph) 
  • Ctrl+Shift with any arrow key (Highlight a block of text) 
  • Shift with any arrow key (Select more than one item in a window or on the desktop, or select text in a document) 
  • Ctrl+A (Select all) 
  • F3 key (Search for a file or a folder)
  • Alt+Enter (View the properties for the selected item) 
  • Alt+F4 (Close the active item, or exit the active program) 
  • Alt+Enter (Display the properties of the selected object) 
  • Alt+Spacebar (Open the shortcut menu for the active window) 
  • Ctrl+F4 (Close the active document in programs that enable multiple documents to be open at the same time) 
  • Alt+Tab (Switch between the open items) 
  • Alt+Esc (Cycle through items in the order in which they were opened) 
  • F6 key (Cycle through the screen elements in a window or on the desktop)
  • F4 key (Display the Address bar list in My Computer or in Windows Explorer) 
  • Shift+F10 (Display the shortcut menu for the selected item)
  • Alt+Spacebar (Display the System menu for the active window) 
  • Ctrl+Esc (Display the Start menu) 
  • Alt+Underlined letter in a menu name (Display the corresponding menu)
  • Underlined letter in a command name on an open menu (Perform the corresponding command)
  • F10 key (Activate the menu bar in the active program)
  • Right Arrow  (Open the next menu to the right, or open a submenu)
  • Left Arrow  (Open the next menu to the left, or close a submenu)
  • F5 key (Update the active window)
  • Backspace (View the folder one level up in My Computer or Windows Explorer) 
  • Esc (Cancel the current task)
  • Shift when you insert a CD into the CD drive (Prevent the CD from automatically playing)
  • Ctrl+Shift+Esc (Open Task Manager) 

Dialog box keyboard shortcuts

  • Ctrl+Tab (Move forward through the tabs)
  • Ctrl+Shift+Tab (Move backward through the tabs)
  • Tab (Move forward through the options)
  • Shift+Tab (Move backward through the options)
  • Alt+Underlined letter (Perform the corresponding command, or select the corresponding option)
  • Enter (Perform the command for the active option or button)
  • Spacebar (Select or clear the check box if the active option is a check box)
  • Arrow keys (Select a button if the active option is a group of option buttons)
  • F1 key (Display Help)
  • F4 key (Display the items in the active list)
  • Backspace (Open a folder one level up if a folder is selected in the Save As or Open dialog box)

Microsoft natural keyboard shortcuts

  • Windows Logo (Display or hide the Start menu)
  • Windows Logo+Break (Display the System Properties dialog box)
  • Windows Logo+D (Display the desktop)
  • Windows Logo+M (Minimize all the windows)
  • Windows Logo+Shift+M (Restore the minimized windows)
  • Windows Logo+E (Open My Computer)
  • Windows Logo+F (Search for a file or a folder)
  • Ctrl+Windows Logo+F (Search for computers)
  • Windows Logo+F1 (Display Windows Help)
  • Windows Logo+ L (Lock the keyboard)
  • Windows Logo+R (Open the Run dialog box)
  • Windows Logo+U (Open Utility Manager)

Accessibility keyboard shortcuts

  • Right Shift for eight seconds (Switch FilterKeys on or off)
  • Left Alt+left Shift+Print Screen (Switch High Contrast on or off)
  • Left Alt+left Shift+Num Lock (Switch the MouseKeys on or off)
  • Shift five times (Switch the StickyKeys on or off)
  • Num Lock for five seconds (Switch the ToggleKeys on or off)
  • Windows Logo +U (Open Utility Manager)

Windows Explorer keyboard shortcuts


  • End (Display the bottom of the active window)
  • Home (Display the top of the active window)
  • Num Lock+Asterisk sign (*) (Display all the subfolders that are under the selected folder)
  • Num Lock+Plus sign (+) (Display the contents of the selected folder)
  • Num Lock+Minus sign (-) (Collapse the selected folder)
  • Left Arrow  (Collapse the current selection if it is expanded, or select the parent folder)
  • Right Arrow  (Display the current selection if it is collapsed, or select the first subfolder) 

Keyboard Shortcuts for Character Map


After you double-click a character on the grid of characters, you can move through the grid by using the keyboard shortcuts:

  • Right Arrow  (Move to the right or to the beginning of the next line)
  • Left Arrow  (Move to the left or to the end of the previous line) 
  • Up Arrow (Move up one row)
  • Down Arrow (Move down one row)
  • Page Up  (Move up one screen at a time)
  • Page Down (Move down one screen at a time)
  • Home (Move to the beginning of the line)
  • End (Move to the end of the line)
  • Ctrl+Home (Move to the first character)
  • Ctrl+End (Move to the last character)
  • Spacebar (Switch between Enlarged and Normal mode when a character is selected) 

Microsoft Management Console (MMC) main window keyboard shortcuts


  • Ctrl+O (Open a saved console)
  • Ctrl+N (Open a new console)
  • Ctrl+S (Save the open console)
  • Ctrl+M (Add or remove a console item)
  • Ctrl+W (Open a new window)
  • F5 key (Update the content of all console windows)
  • Alt+Spacebar (Display the MMC window menu)
  • Alt+F4 (Close the console)
  • Alt+A (Display the Action menu)
  • Alt+V (Display the View menu)
  • Alt+F (Display the File menu)
  • Alt+O (Display the Favorites menu) 

Microsoft Management Console (MMC) window keyboard shortcuts

  • Ctrl+P (Print the current page or active pane)
  • Alt+Minus sign (-) (Display the window menu for the active console window)
  • Shift+F10 (Display the Action shortcut menu for the selected item)
  • F1 key (Open the Help topic, if any, for the selected item)
  • F5 key (Update the content of all console windows)
  • Ctrl+F10 (Maximize the active console window)
  • Ctrl+F5 (Restore the active console window)
  • Alt+Enter (Display the Properties dialog box, if any, for the selected item)
  • F2 key (Rename the selected item)
  • Ctrl+F4 (Close the active console window. When a console has only one console window, this shortcut closes the console)

Remote desktop connection navigation


  • Ctrl+Alt+End (Open the Microsoft Windows NT Security dialog box)
  • Alt+Page Up (Switch between programs from left to right)
  • Alt+Page Down (Switch between programs from right to left)
  • Alt+Insert (Cycle through the programs in most recently used order)
  • Alt+Home (Display the Start menu)
  • Ctrl+Alt+Break (Switch the client computer between a window and a full-screen display)
  • Alt+Delete (Display the Windows menu)
  • Ctrl+Alt+Minus sign (-) (Put a snapshot of the complete client window area on the Terminal server clipboard and provide the same functionality as pressing Alt+Print Screen on a local computer)
  • Ctrl+Alt+Plus sign (+) (Put a snapshot of the active window in the client on the Terminal server clipboard and provide the same functionality as pressing Print Screen on a local computer.) 

Microsoft Internet Explorer navigation


  • Ctrl+B (Open the Organize Favorites dialog box)
  • Ctrl+E (Open the Search bar)
  • Ctrl+F (Start the Find utility)
  • Ctrl+H (Open the History bar)
  • Ctrl+I (Open the Favorites bar)
  • Ctrl+L (Open the Open dialog box)
  • CtrlL+N (Start another instance of the browser with the same web address)
  • Ctrl+O (Open the Open dialog box, the same as CTRL+L)
  • Ctrl+P (Open the Print dialog box)
  • Ctrl+R (Update the current webpage)
  • Ctrl+W (Close the current window) 

Complete list of Windows Keyboard Shorcuts is on Microsoft website

How to manually disable Windows Genuine Advantage on Windows XP SP2

Wednesday, May 25th, 2011

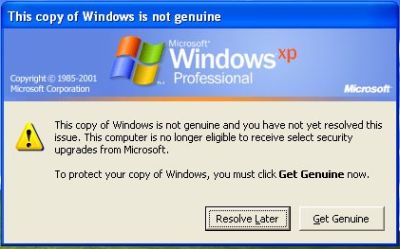
WGA Notification message popup message

I have a pirate version of Windows XP Pro 2 installer CD which does automatically turn on Windows Genuine Advantage

This is kind of annoying as the computer gets really slow and the hard disk drive activite gets intensive as well as an annoying popup message that the Windows XP copy is not genuine does appear periodically

In order to get rid of the message I had to do the following steps:

1. Get into Windows Safe Mode without Networking

As most of the people knows this is achieved by pressing F8 keyboard key right before the Windows bootup screen appears.

After in Safe mode it’s necessery to,

2. Run Windows Command Line (cmd.exe)

To do so follow, the menus:

Windows (Start Menu) -> Run -> cmd.exe

3. In the command prompt window issue the commands:

C:Documents and SettingsUser> cd WindowsSystem32
C:WindowsSystem32> taskkill -IM wgatray.exe
C:WindowsSystem32> del wgatray.exe
C:WindowsSystem32> move wgalogon.dll wgalogon.dll.old
C:WindowsSystem32> del wgalogon.dll.old

Something to mention is you have to be really quick, with deleting wgalogon.dll, cause wgatray.exe is scheduled to run every 1 / 2 seconds 🙂 It is a bit of situation of type “be quick or be dead” as Maiden used to sing 🙂
A Windows system restart and Hooray the Windows Genuine message is gone 🙂

How to configure manually static IP address on Debian GNU/Linux / How to fix eth0 interface not brought up with error (networking restart is deprecated)

Friday, July 29th, 2011

I’ve recently had to manually assign a static IP address on one of the servers I manage, here is how I did it:             

debian:~# vim /etc/network/interfaces

Inside the file I placed:

# The primary network interface
allow-hotplug eth0
auto eth0
iface eth0 inet static address 192.168.0.2 netmask 255.255.255.0 broadcast 192.168.0.0 gateway 192.168.0.1 dns-nameservers 8.8.8.8 8.8.4.4 208.67.222.222 208.67.220.220

The broadcast and gateway configuration lines are not obligitory.
dns-nameservers would re-create /etc/resolv.conf file with the nameserver values specified which in these case are Google Public DNS servers and OpenDNS servers.

Very important variable is allow-hotplug eth0
If these variable with eth0 lan interface is omitted or missing (due to some some weird reason), the result would be the output you see from the command below:

debian:~# /etc/init.d/networking restart
Running /etc/init.d/networking restart is deprecated because it may not enable again some interfaces ... (warning).
Reconfiguring network interfaces...

Besides the /etc/init.d/networking restart is deprecated because it may not enable again some interfaces … (warning). , if the allow-hotplug eth0 variable is omitted the eth0 interface would not be brough up on next server boot or via the networking start/stop/restart init script.

My first reaction when I saw the message was that probably I’ll have to use invoke-rc.d, e.g.:
debian:~# invoke-rc.d networking restart
Running invoke-rc.d networking restart is deprecated because it may not enable again some interfaces ... (warning).

However as you see from above’s command output, running invoke-rc.d helped neither.

I was quite surprised with the inability to bring my network up for a while with the networking init script.
Interestingly using the command:

debian:~# ifup eth0

was able to succesfully bring up the network interface, whether still invoke-rc.d networking start failed.

After some wondering I finally figured out that the eth0 was not brought up by networking init script, because auto eth0 or allow-hotplug eth0 (which by the way are completely interchangable variables) were missing.

I added allow-hotplug eth0 and afterwards the networking script worked like a charm 😉

How to make GNOME 3 Desktop icons to work as in GNOME 2 on Debian GNU / Linux

Saturday, February 4th, 2012

If you're using Debian GNU/Linux wheezy/sid, you have already figured out GNOME3 settings to start GNOME in Classic mode (like in GNOME 2), starts gnome in a mode where the desktop is not showing the usual Computer, Home, Trash etc.

Besides that in that strange back-compitability Classic GNOME mode its impossible to add any program as a link in desktop like in the good old GNOME 2.

Thanksfully this abusive behaviour of the backwards compitability mode is easily fixable by two simple steps, here they are:

1. Install gnome-tweak-tool – (Tool to adjust advanced configuration settings for GNOME

root@debian:~# apt-get install gnome-tweak-tool

2. Start gnome-tweak tool

Press ALT+F2 and run gnome-tweak-tool or run it via xterm / gnome-terminal:

moonman@Moon:~$ gnome-tweak-tool

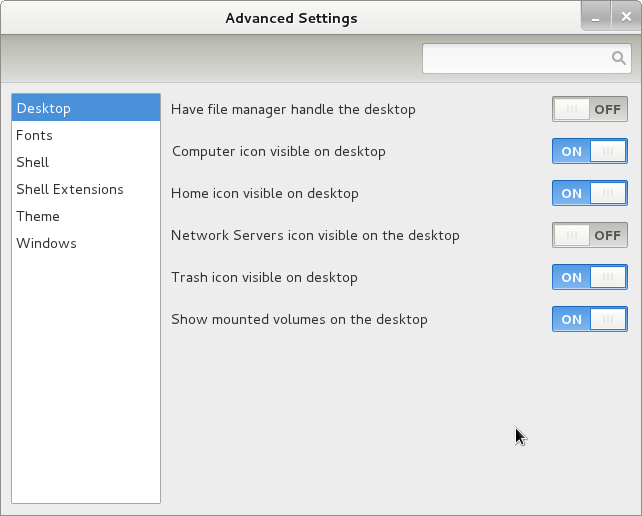
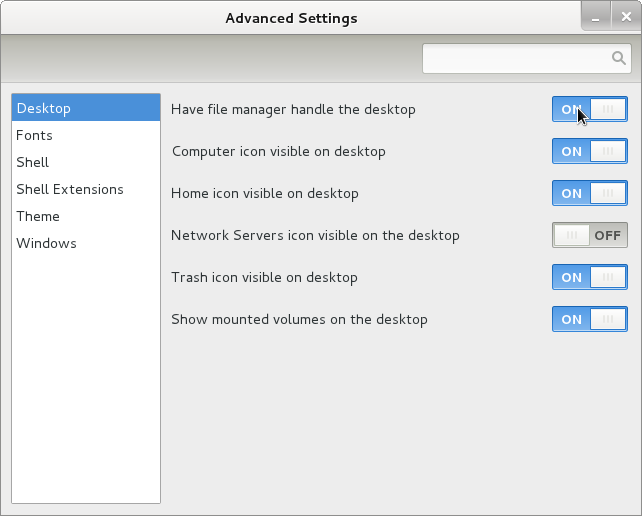
Change in Desktop, Have file manager handle the desktop the settings to ON

gnome-tweek-tool Debian GNU Linux wheezy sid screenshot

gnome-tweak-tool Debian wheezy/Sid GNU Linux screenshot handle desktop on

Once the Screenshot Handle Desktop is set to ON, further drag and dropping any application to the Desktop will be working.
Something really irritating is that launching applications in GNOME 3 does not work properly if you just press ALT+F2 and type in lets say gnome-terminal , to work around this weirdity you will have to install gnome-shell package.

How to build website sitemap (sitemap.xml) in Joomla

Monday, December 20th, 2010

A joomla installation I’m managing needed to have created a sitemap.xml

From a SEO perspective sitemap.xml and sitemap.xml.gz are absolutely necessary for a website to bewell indexed in google.

After some investigation I’ve found out a perfect program that makes generation of sitemap.xml in joomla a piece of cake.

All necessary to be done for the sitemap.xml to be created comes to download and install of JCrawler

What makes JCrawler even better is that it’s open source program.

To install Jcrawler go in the joomla administrator panel:

Extensiosn -> Install/Uninstall

You will see the Install from URL on the bottom, there place the link to the com_jcrawler.zip installation archive, for instance you can place the link of the downloaded copy of com_jcrawler.zip I’ve mirrored on www.pc-freak.net ,by placing it on https://www.pc-freak.net/files/com_jcrawler.zip

The installation will be done in a few seconds and you will hopefully be greated with a Installation Success message.

Last thing to do in order to have the sitemap.xml in your joomla based website generated is to navigate to:

Components -> JCrawler

There a screen will appear where you can customize certain things related to the sitemap.xml generation, I myself used the default options and continued straight to the Start button.

Further on a screen will appear asking you to Submit the newly generated sitemap to; Google, MSN, Ask.com, Moreover and Yahoo , so press the Submit button.
That’s all now your joomla website will be equipped with sitemap.xml, enjoy!

Apache Warn NameVirtualHost *:80 Has No VirtualHosts Error on Start

Tuesday, February 16th, 2010

This is annoying error which occurs when you try to start, restart or
check apache configuration.
This error is caused by duplicate NameVirtualHost entries. In my case in Debian.
I had to comment it in /etc/apache2/ports.conf . Apparently,

NameVirtualHost *:80

was mentioned twice in my overall Apache configuration files.
I should note that this is just a warning so Apache will be working just fine, even when the error appears on Apache start-up.

How to properly Start Compiz in Gnome

Tuesday, September 8th, 2009

Since I’ve upgraded to Debian Sid / Squeeze e.g., Debian unstable I’m using compiz and the default patched debian metacity to support it. Thus until today I’ve it setupped to start up with
1. compiz –replace on each and every login session on my account. Today I had my doubts that this is correct since I’ve noticed that compiz terminates after some of the OpenGL games I have started. After some Googling I found a blog post which was discussing the issue. Here is the post how to properly start compiz in gnome . As you could read in the blog post it is wrong to start compiz with compiz –replace cause in that case metacity starts for a couple of seconds during gdm login screen as well as it has to replace metacity afterwards. It is explained that the proper way to start compiz is via the .gnomerc . BTW I was not aware that gnome had that handy .gnomerc file which pretty much like the good old .bashrc. So back to the proper way of running compiz.
Edit ~/.gnomerc in and put export WINDOW_MANAGER=/usr/bin/compiz Congrats now you should have compiz to run properly.END—–