Posts Tagged ‘shell scripting’

Building a self-healing WordPress Monitoring shell Script using Systemd, Apache, MariaDB simple automation for Linux server Auto Recovery

Friday, May 22nd, 2026

linux-self-healing-wordpress-script-automation-how-to-auto-recovery-broken-apache-mysql-mariadb-wordpress-server-tux-logo

Running a WordPress website in production is not only about publishing content  it is also about keeping the server healthy 24 / 7 to have a good yearly Website Uptime and if needed fit an SLA.

Even on stable Linux systems, services occasional failures are common for a reasons like:

  • Apache Crash / stop responding (due to bug or whatever)
  • MariaDB Database server acts unstable after heavy load (or server overheat)
  • WordPress platform auto updates leaves the site stuck in maintenance mode (until manually fixed)
  • Network outage (or a DHCP server malfunction, IP / MAC conflics can disrupt network).

There is plenty of other things that can go wrong, but generally usually a website infrastructure running on a Linux server that counts for proper productivity on basically a web server (apache) / mariadb / postgresql (or whatever other service) and WordPress based website has a set of common issues faced. That require a sysadmin to partake simple steps to resolve it.
Temporary outages can become kind of permanent without proper monitoring and introduction of automatic recovery procedures.

Within the age of clouds and automation reducing outages is key to success!

To reduce downtime and avoid manual intervention, there is a lot of things a sysadmin can do but a lot of traditional options are mostly neglected or uknown by the the new and knowledgable SREs (Site Reliability Engineers), most of whom seem to be a Gen-Z 🙂

Thus an alternative approach to the new ways of working is to keep up to the old standards and use lightweight self-healing Bash monitoring script for my WordPress based site / blog. I use such script myself as a do have a self-hosted infrastructure, so decided to share it with hope someone can benefit of it.

The server-health-check-restore-wp-apache-mariadb.sh script continuously checks:

  • Apache health state
  • MariaDB availability
  • HTTP response code status equals 200 ( OK )
  • WordPress maintenance mode (is not disabled

As an auto healing steps It then partakes:

  • Restarts of found failed services
  • Cleans stuck . maintenance wordpress files
  • Reboots the entire server after repeated database failures

This approach provides a simple but highly effective watchdog mechanism without needing complex monitoring software.

1. The server-health-check-restore-wp-apache-mariadb.sh
automation self-healing Script


$ cat /usr/local/bin/server-health-check-restore-wp-apache-mariadb.sh

#!/bin/bash

URL="https://www.pc-freak.net/blog/"
MAINT_FILE="/var/www/blog/.maintenance"
KEYWORD="Briefly unavailable for scheduled maintenance"

APACHE_SERVICE="apache2"
MARIADB_SERVICE="mariadb"

MAX_DB_RESTARTS=5
RESTART_COUNT_FILE="/var/run/mariadb_restart_count"

log() {
    echo "$(date): $1"
}

# —- Apache check —-
if ! systemctl is-active –quiet "$APACHE_SERVICE"; then
    log "Apache is not running. Restarting…"
    systemctl restart "$APACHE_SERVICE"
    sleep 5
fi

# —- MariaDB check —-
if ! systemctl is-active –quiet "$MARIADB_SERVICE"; then
    log "MariaDB is not running."

    # Read restart count
    if [ -f “$RESTART_COUNT_FILE” ]; then
        RESTART_COUNT=$(cat "$RESTART_COUNT_FILE")
    else
        RESTART_COUNT=0
    fi

    RESTART_COUNT=$((RESTART_COUNT + 1))
    echo "$RESTART_COUNT" > "$RESTART_COUNT_FILE"

    log "Restart attempt $RESTART_COUNT of $MAX_DB_RESTARTS"
    systemctl restart "$MARIADB_SERVICE"
    sleep 10

    # Re-check MariaDB
    if ! systemctl is-active –quiet "$MARIADB_SERVICE"; then
        log "MariaDB still unhealthy after restart."

        if [ “$RESTART_COUNT” -ge “$MAX_DB_RESTARTS” ]; then
            log "MariaDB failed $MAX_DB_RESTARTS times. Rebooting server!"
            rm -f "$RESTART_COUNT_FILE"
            /sbin/reboot
            exit 0
        fi

        exit 0
    fi
else
    # MariaDB healthy → reset counter
    if [ -f “$RESTART_COUNT_FILE” ]; then
        log "MariaDB is healthy again. Resetting restart counter."
        rm -f "$RESTART_COUNT_FILE"
    fi
fi

# —- HTTP sanity check —-
HTTP_CODE=$(curl -L –max-redirs 5 -s -o /dev/null -w "%{http_code}" –max-time 10 "$URL")

if [[ “$HTTP_CODE” != “200” ]]; then
    log "Site returned HTTP $HTTP_CODE. Skipping WordPress maintenance cleanup."
    exit 0
fi

# —- WordPress maintenance check —-
PAGE_CONTENT=$(curl -L –max-redirs 5 -s –max-time 10 "$URL")

if echo "$PAGE_CONTENT" | grep -qi "$KEYWORD"; then
    if [ -f “$MAINT_FILE” ]; then
        rm -f "$MAINT_FILE"
        log "WordPress maintenance file removed."
    else
        log "Maintenance message detected, but .maintenance file not found."
    fi
else
    log "Site healthy. No maintenance mode detected."
fi

1.1. Make script executable

Store the script somewhere under /usr/local/bin/ and make it executable:

# chmod +x /usr/local/bin/server-health-check-restore-wp-apache-mariadb.sh

1.2. Schedule it to run via Cron job

Run the script lets say every 5 minutes with cron and make it log to a log file:

# crontab -u root -e

*/5 * * * * /usr/sbin/server-health-check-restore-wp-apache-mariadb.sh >> /var/log/wp_healthcheck.log 2>&1

2. What This Script Actually Does

The script acts like a mini watchdog daemon.

Instead of relying on heavyweight enterprise monitoring systems, it uses:

systemctl , curl , grep combined with simple scripting  logic.

The simplicity of solution advantage is for maintenance it is easy it is transparent and highly portable as it will run on virtually ever Linux server / VPS without the need to install anything additional.

2.1 Apache Health Checks

The first section checks whether Apache is running:

# systemctl is-active –quiet apache2

If Apache is down, the script automatically restarts it:

# systemctl restart apache2

This solves temporary crashes caused by:

  • memory exhaustion
  • bad PHP workers
  • failed reloads
  • temporary kernel pressure

A short sleep delay gives Apache time to recover before additional checks continue.

2.2. MariaDB Recovery Script Logic

The database layer is more critical than Apache.

A web server can recover instantly, but repeated MariaDB crashes often indicate:

  • corrupted tables
  • exhausted RAM
  • deadlocks
  • disk problems
  • InnoDB failures

Because of that, the script implements a restart counter.

2.3. Restart Counter Logic

The counter is stored in file:

/var/run/mariadb_restart_count

Every failed startup increments the counter:

RESTART_COUNT=$((RESTART_COUNT + 1))

If MariaDB recovers successfully, the counter is deleted.

This prevents accidental reboot loops.

2.4. Automatic Server Reboot if too many auto recovery attempts

If MariaDB fails too many times:

MAX_DB_RESTARTS=5

the script escalates to a full system reboot:

/sbin/reboot

2.5. Why use reboot at continuous services failure?

Well reboot might not always work and under some cases it can make things better, but in case if you have a multiple servers running the same set of service with Apache and Mysql  with Haproxy or other Load balancer in front this set of logic is just perfect:

  • kernel resources are exhausted
  • filesystem locks remain stuck
  • memory fragmentation becomes severe
  • hardware drivers misbehave

A clean reboot can recover the machine faster than manual debugging during production outages !

This kind of script can be especially useful on:

  • Rarely mainteinaed Linux / VPS servers
  • unattended cloud instances
  • remote hosting environments

2.6. HTTP Sanity Check

After validating services, the script checks whether the website actually responds correctly.

$ curl -L –max-redirs 5

The script expects as normal a return code of:

HTTP 200

Anything else:

  • 500 errors
  • redirect loops
  • gateway failures
  • CDN problems

will stop the maintenance cleanup logic.

This prevents accidental removal of WordPress maintenance files during unrelated outages.

2.7. Automatic WordPress Maintenance Mode Recovery

One of the most annoying WordPress problems happens during failed updates.

WordPress creates under its install directory say /var/www/ a file:

.maintenance

If the update crashes, the file remains forever and the site displays:

“Briefly unavailable for scheduled maintenance.”

The script detects this message directly from the webpage content with grep:

$ grep -qi "$KEYWORD"

If detected, it removes the stale file automatically:

rm -f "$MAINT_FILE"

This instantly restores the site without requiring manual SSH intervention.

3. Why Simple script approach Works well and is good idea

This setup has several advantages, among key one is It is Extremely Lightweight.

No additional complications of use of trendy stuff like:

  • Docker stack
  • Zabbix
  • Kubernetes
  • Prometheus
  • external monitoring agents etc.

Everything is handled with simple native well known Linux tools.

3.1. It is Easy to Debug

Everything is plain Bash.

No hidden automation layers.

Every action is visible and understandable.

3.2. Production Friendly

The script tolerates:

  • temporary outages
  • service crashes
  • failed WordPress upgrades

without requiring administrator interaction.

4. Possible future script Improvements

There are many ways to extend script setup further, here is few ideas.

4.1. Add Email Notifications

Send alerts when:

  • services restart
  • reboot occurs
  • maintenance mode is detected

4.2. Add Disk Space Monitoring

Automatically detect:

  • full disks
  • inode exhaustion
  • backup growth

4.3. Add simple MySQL Query Health Checks

Instead of only checking the service state:

mysqladmin ping

could validate actual database responsiveness.

4.4. Introduce systemd Integration

Instead of cron-based execution, you might want to make the script could be made native if you use :

  • systemd timer
  • systemd service

Close up Summary

In many cases, simple Linux automation still beats overengineered solutions.

Today overcomplication of monitoring is a trend especially for big companies however for home brew small projects on little budget, sometimes the best server automation is the simplest one.
 A few lines of Bash can improve as shown above could improve uptime and reduce operational headaches.

For small-to-medium WordPress / Website deployments, this kind of self-healing “watchdog “ guarantees you reliability , simplicity , transparency , relatively quick fast recovery in case of crashes without brining a any  unnecessary infrastructure complexity, plus this setup works with zero human interaction and if combined with a simple Slack / Discord monitoring python script you can sleep better.


How to install BASH and use shell scripting on Windows ?

Thursday, June 26th, 2025

install-bash-on-windows-run-and-use-shellscripting-on-windows-howto

Bash (Bourne Again SHell) is definitely a technology that will stay for years to come its simplicity and multi-platoformness is a factor that will definitely continue for many years thus even though it is mostly used on Linux / BSD / Unix, its application on Windows OS-es nowadays is perhaps increasing. Hence since so many people use Winodws nowdays (for work) it is really useful to have Bash set-up on Windows host machine.
In this article, I'll shortly explain how this is done, the article will not have anything too much interesting for the advanced admin or dev ops guy, but I hope people who are entering the business of system administration and high level computing and still orienting might benefit from it.

To install and use Bash shell terminal in Windows there are at least 3 ways:

  • Use Git Bash (Download and install it directly precompiled on WIndows)
  • Use Windows WSL emulation (install some Linux distro)
  • Use Virtualbox / Vagrant / VMware / Hyper-V emulation and install VM from public ISO image.

As a Free Software Lover, I would recommend and  always prefer to use the Free Software alternative if that is possible and thanksfully usually I use and install Git Bash or completely install Cygwin (Full set of Linux tools to run like native on Windows together with  Mobaxterm) together.


1. Installing Git Bash on Windows (uses MinGW Minimalist GNU for Windows)

Some might prefer to not use Microsoft for managing their bash especially the more freedom in mind people who like GNU and Free software and people.

MinGW is well known among free and open source enthusiasts.
It includes a port of the GNU Compiler Collection (GCC), GNU Binutils for Windows (assembler, linker, archive manager), a set of freely distributable Windows specific header files and static import libraries which enable the use of the Windows API, a Windows native build of the GNU Project's GNU Debugger, and miscellaneous utilities.

MinGW does not rely on third-party C runtime dynamic-link library (DLL) files, and because the runtime libraries are not distributed using the GNU General Public License (GPL), it is not necessary to distribute the source code with the programs produced, unless a GPL library is used elsewhere in the program.


MinGW can be run either on the native Microsoft Windows platform, cross-hosted on Linux (or other Unix), or "cross-native" on Cygwin.


To install Bash via Git, you can use Git for Windows, which includes Git Bash — a lightweight Bash emulator.


Steps to Install Git Bash on Windows
 

a. Download Git for Windows

Go to the official Git website:

https://git-scm.com/download/win

The download should start automatically.

b. Run the Installer

  • Open the downloaded .exe file
  • Follow the installation prompts

Recommended Settings:

  • Select components: Keep default
  • Editor: Choose your preferred text editor (e.g., Notepad++ or Vim)
  • Adjust PATH environment: Choose “Git from the command line and also from 3rd-party software”
  • Choose SSH executable: Use Built-in OpenSSH
  • Choose HTTPS transport backend: Use the default (OpenSSL)
  • Configure line endings: Select “Checkout Windows-style, commit Unix-style line endings”
  • Terminal emulator: Choose “Use MinTTY (the default terminal)”

Click Next through the remaining steps and then Install.

c. Launch Git Bash

After installation:

  • Press Windows key, type "Git Bash"
  • Click to launch the terminal

Now you're using a Bash shell on Windows.

Perhaps most common way is to use Windows Subsystem for Linux (WSL), people follow. WSL is a technology which is native Windows but gives MS Windows the opportunity to act in a way similar to docker containers. WSL lets you run a full Linux environment (including Bash) directly on Windows without using a virtual machine and is really fast and easy on Machine system resources. 


 2. Installing WSL bash easy from Windows 10 / 11 using  Win GUI menus


Steps to install WSL on Windows 10 / 11

Microsoft has since only continued to improve its Windows Subsystem for Linux, and an update in a Windows 10 preview build back in mid-2020 made it easier to install Bash.

That method also works the same as on Win 10 as well as on Win 11.
To install Bash shell emulation, hence open Windows Terminal as an admin user. You can do this by right-clicking the Windows icon and selecting “Windows Terminal (Admin)” from the power user menu.

(If you’re on Windows 10, you should see it listed as “Windows Powershell (Admin)” in the menu.)


windows-run-powershell-from-start-menu-screenshot


To complete WSL install with Virtualized Ubuntu OS

In Windows Terminal, run this command:

PS C:\Users\MyUser> wsl –install

Once everything is downloaded needed to run WSL emulation and Ubuntu Linux distribution,  Restart the PC.

Once your PC rebooted, installation will continue automatically.

After Ubuntu installed successfully, you’ll next be prompted to create a username and password and Ubuntu will fire up, and you will have your bash in Windows


Install-WSL-linux-subsystem-for-windows-from-powershell-prompt-screenshot


a. Enabling and Intalling BASH via command line (if WSL Linux subsystem for Windows is not enabled on Windows


It might be your Windows has no configured Windows Subsystem for Linux, hence if that is the case you will need to enable it following below few steps.

b. Enable WSL via dism.exe cmd

Open PowerShell as Administrator and run:

Powershell

PS C:\Users\MyUser> wsl –install

This installs WSL 2 and a default Linux distribution (like Ubuntu).

If you're on Windows 10 or on a PC where whoever installed the OS has not installed the Win Subsystem for Linux, you may need to manually enable WSL:

Launch Powershell

PS C:\Users\MyUser> dism.exe /online /enable-feature /featurename:Microsoft-Windows-Subsystem-Linux /all /norestart

PS C:\Users\MyUser> dism.exe /online /enable-feature /featurename:VirtualMachinePlatform /all /norestart

Then restart your computer and run:

from the Windows Magnifier run Powershell and type in PS1 prompt:

PS C:\Users\MyUser> wsl –set-default-version 2

c. Installing other Linux Distribution (different from Ubuntu)

If not already installed during wsl –install, open the Microsoft Store and search for:

  • Ubuntu
  • Debian
  • Kali Linux
  • etc.

Click Install on the one you want.

d. Launching WSL / Bash terminal

Once installed:

  • Open Start Menu
  • Search for your Linux distro you just installed (e.g., “Ubuntu”)
  • Launch it

This opens a Bash shell where you can run Linux commands, like in regular Linux but on your Microsoft Windows OS.
 

Sum it up

What we learned is how to install bash via Bash Git and start using it to have more hybrid environment Windows / Linux. The article explained the two main methods using GIt Bash and using embedded Windows emulator WSL with an emulated Linux distro.

Enjoy ! 🙂


Linux: Generating Web statistics from Old Apache logs with Webalizer

Thursday, July 25th, 2013

Webalizer generate and visualize in web page statistics of old websites howto webalizer static html google analytics like statistics on linux logo

Often it happens, that some old hosted websites were created in a way so no Web Statistics are available. Almost all modern created websites nowadays are already set to use Google AnalyticsAnyhow every now and then I stumble on hosting clients whose websites creator didn't thought on how to track how many hits or unique visitors site gets in a month / year etc.
 Thanksfully this is solvable by good "uncle" admin with help with of Webalizer (with custom configuration) and a little bit of shell scripting.

The idea is simple, we take the old website logs located in lets say 
/var/log/apache2/www.website-access.log*,
move files to some custom created new directory lets say /root/www.website-access-logs/ and then configure webalizer to read and generate statistics based on log in there.

For the purpose, we have to have webalizer installed on Linux system. In my case this is Debian GNU / Linux.

For those who hear of Webalizer for first time here is short package description:

debian:~# apt-cache show webalizer|grep -i description -A 2

Description-en: web server log analysis program
The Webalizer was designed to scan web server log files in various formats
and produce usage statistics in HTML format for viewing through a browser.

 If webalizer is not installed still install it with:

debian:~# apt-get install --yes webalizer
...
.....

Then make backup copy of original / default webalizer.conf (very important step especially if server is already processing Apache log files with some custom webalizer configuration:

debian:~# cp -rpf /etc/webalizer/webalizer.conf /etc/webalizer/webalizer.conf.orig

Next step is to copy webalizer.conf with a name reminding of website of which logs will be processed, e.g.:

debian:~# cp -rpf /etc/webalizer/webalizer.conf /etc/webalizer/www.website-webalizer.conf

In www.website-webalizer.conf config file its necessary to edit at least 4 variables:

LogFile /var/log/apache2/access.log
OutputDir /var/www
#Incremental no
ReportTitle Usage statistics for

 Make sure after modifying 3 vars read something like:  
LogFile /root/www.website/access_log_merged_1.log
OutputDir /var/www/www.website
Incremental yes
ReportTitle Usage statistics for Your-Website-Host-Name.com

Next create /root/www.website and /var/www/www.website, then copy all files you need to process from /var/log/apache2/www.website* to /root/www.website:

debian:~# mkdir -p /root/www.website
debian:~# cp -rpf /var/log/apache2/www.website* /root/www.website

On Debian Apache uses logrotate to archive old log files, so all logs except www.website-access.log and wwww.website-access.log.1 are gzipped:

debian:~#  cd /root/www.website
debian:~# ls 
www.website-access.log.10.gz
www.website-access.log.11.gz
www.website-access.log.12.gz
www.website-access.log.13.gz
www.website-access.log.14.gz
www.website-access.log.15.gz
www.website-access.log.16.gz
www.website-access.log.17.gz
www.website-access.log.18.gz
www.website-access.log.19.gz
www.website-access.log.20.gz
...
 

Then we have to un-gzip zipped logs and create one merged file from all of them ready to be red later by Webalizer. To do so I use a tiny shell script like so:

for n in {52..1}; do gzip -d www.dobrudzhatour.net-access.log.$n.gz; done
for n in {52..1}; do cat www.dobrudzhatour.net-access.log.$n >> access_log_merged_1.log;
done

First look de-gzips and second one does create a merged file from all with name access_merged_1.log The range of log files in my case is from www.website-access.log.1 to www.website-access.log.52, thus I have in loop back number counting from 52 to 1.

Once access_log_merged_1.log is ready we can run webalizer to process file (Incremental) and generate all time statistics for www.website:

debian:~# webalizer -c /etc/webalizer/webalizer-www.website-webalizer.conf

Webalizer V2.01-10 (Linux 2.6.32-27-server) locale: en_US.UTF-8
Using logfile /root/www.website/access_log_merged_1.log (clf)
Using default GeoIP database Creating output in /var/www/webalizer-www.website
Hostname for reports is 'debian'
Reading history file… webalizer.hist
Reading previous run data.. webalizer.current
333474 records (333474 ignored) in 37.50 seconds, 8892/sec

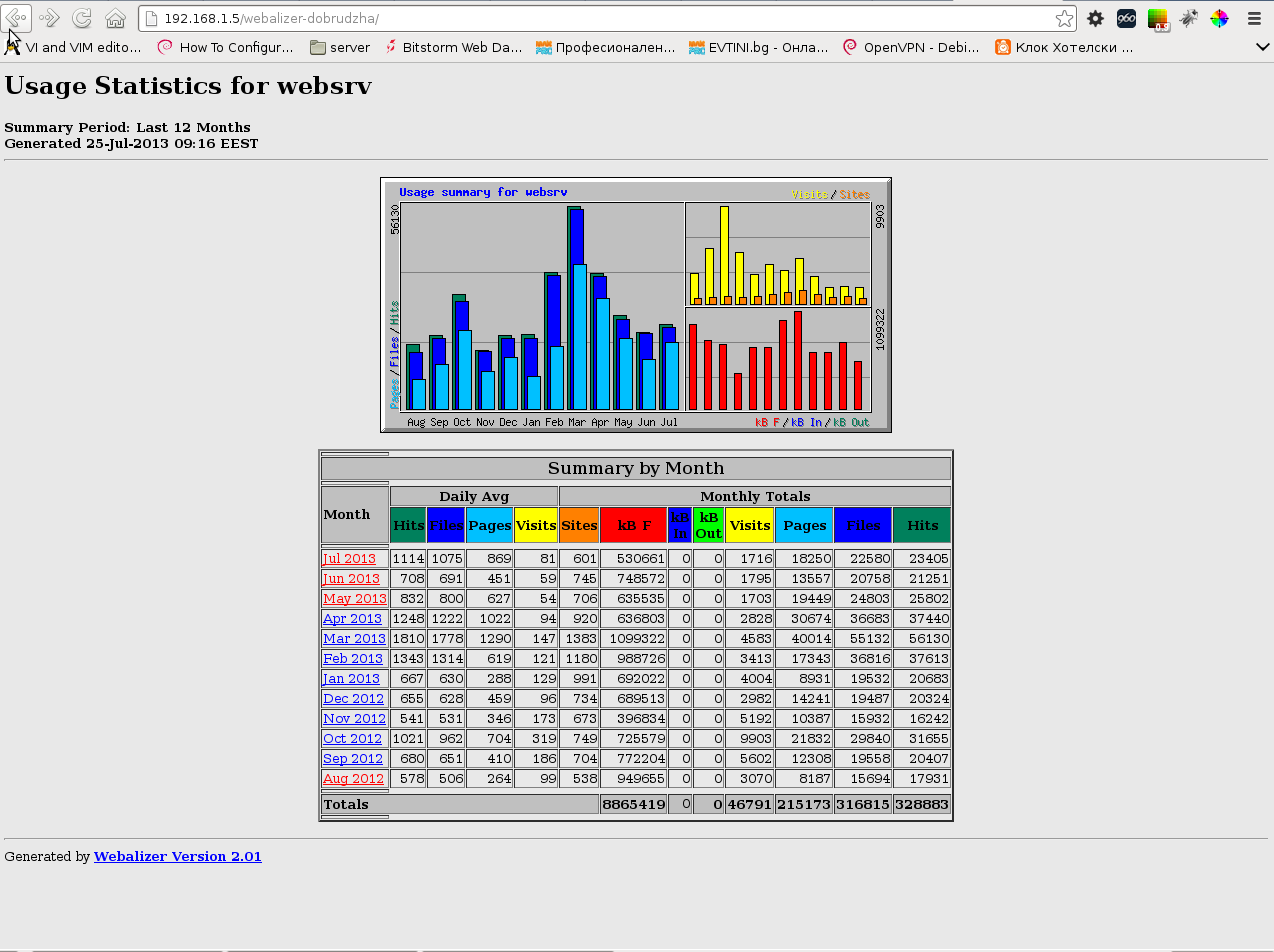
To check out just generated statistics open in browser:

http://yourserverhost/webalizer-www.website/

or

http://IP_Address/webalizer-www.website

 You should see statistics pop-up, below is screenshot with my currently generated stats:

Webalizer website access statistics screenshot Debian GNU Linux

Make daily Linux MySQL database backups with shell script

Thursday, May 23rd, 2013

Creating database backup with MySQL with mysqlbackupper and mysqlback shell scripts easy create mysql backups

Some time ago, I've written a tiny shell script which does dumps of Complete (SQL Script) MySQL databases. There are plenty of ways to backup MySQL database and plenty of scripts on the net but I like doing it my own way. I have few backup scripts. I prefer script database over keeping binary logs, or using some un-traditional backup methods like backing all binary data in /var/lib/mysql.

One was intended to backup with mysqldump whole database and later upload to a central server running tsh (shell). Using tsh maybe not the best method to upload, but the script can easily be modified to use ssh passwordless authentication as a method to upload.

I'm not a pro shell scripter, but MySQLBackupper script can be used as useful for learning some simple bash  shell scripting.

To use the script as intended you will have to build tsh from source. Tsh is in very early development stage (ver 0.2) but as far as I tested it before some years it does great what it is intended for. You can  MySQLBackupper.sh script from here.
Earlier, I used MysqlBackupper.sh to upload all SQL dumps to /backups directory on central backup storage server, thus I had written secondary script to classify uploaded backups based on backup archive name. Script used is mysqldumps-classify.sh and can be viewed here. Though this way of making backups, needs a bit of custom work for managing backups up to 10 / 20 servers it worked well.

I have written also another mysqlbackup script which is much more simplistic and only dumps with mysqldump and stores copies on hard disk in tar.gz archive. You can download my other simple mysqkbackup.sh here.

Only inconvenient thing about above scripts is they dump all SQL databases. Hence whether necessary to get content for single database from (complete) All database SQL (script backup), I use SED (stream editor) one liner script.

It is interesting to hear how others prepare their MySQL db backups.