Posts Tagged ‘Remote’

Howto convert KVM QCOW2 format Virtual Machine to Vmdk to migrate to VMware ESXi

Thursday, November 17th, 2022

qcow2-to-vmdkvk-convert-to-complete-linux-kvm-to-vmware-esxi-migration

Why you would want to convert qcow2 to vmdk?

When managing the heterogeneous virtual environment or changing the virtualization solutions that become so common nowadays, you might need to migrate qcow2 from a Linux based KVM virtualization solution to VMWare's proprietary  vmdk – the file format in which a VMWare does keep stored it's VMs, especially if you have a small business or work in a small start-up company where you cannot afford to buy something professional as VMware vCenter Converter Standalone or Microsoft virtual machine converter (MVMC)- usually used to to migrate VMware hosts to Hyper-V hosts, but also capable to migrate .qcow2 to .vmdk. The reason is that your old datacenter based on Linux OS custom KVM virtual machines might be moved to VMWare ESX to guarantee better and more systemized management (which though is very questionable, since most of my experiences with VMWare was that though the software was a great one, the people who manage it was not very much specialists in managing it).

Another common reason is that running a separate Linux virtual machine, costs you more than a well organized VMWare farm because you need more qualified Linux specialists to manage the KVMs thus KVM to VMWare management as in most big corporations nowadays’s main target is to cut the costs.
Even with successful migrations like that, though you might often expect a drop in the quality of the service when your VM ends in the VMWare farm.

Nomatter what’s the reason to migrate qcow2 to VMDK So lets proceed with how the .QCOW2 to .VMDK can be easily done.


1. Get information about the VM you would like to migrate to VMDK

In QEMU-KVM environment, the popular image format is qcow2, which outperforms the first generation of qcow format and raw format. You can find the files of virtual disks by checking the information of virtual machine by virsh command:

[root@hypervisor-machine ~]# virsh dominfo virtual-machine-name

INFO
ID: {e59ae416-9314-4e4b-af07-21c31d91b3fb}
EnvID: 1704649750
Name: CentOS7minimal
Description:
Type: VM
State: stopped
OS: centos7
Template: no
Uptime: 00:00:00 (since 2019-04-25 13:04:11)
Home: /vz/vmprivate/e39ae416-9314-4e4b-af05-21c31d91b3fb/
Owner: root@.
GuestTools: state=not_installed
GuestTools autoupdate: on
Autostart: off
Autostop: shutdown
Autocompact: off
Boot order: hdd0 cdrom0
EFI boot: off
Allow select boot device: off
External boot device:
On guest crash: restart
Remote display: mode=manual port=6903 address=0.0.0.0
Remote display state: stopped
Hardware:
  cpu sockets=1 cpus=2 cores=2 VT-x accl=high mode=64 ioprio=4 iolimit='0'
  memory 2048Mb
  video 32Mb 3d acceleration=off vertical sync=yes
  memory_guarantee auto
  hdd0 (+) scsi:0 image='/vz/vmprivate/e59ae415-9314-4e4b-af05-21c31d91b3fb/harddisk.hdd' type='expanded' 5120Mb subtype=virtio-scsi
  cdrom0 (+) scsi:1 image='/home/CentOS-7-x86_64-Minimal-1611.iso' state=disconnected subtype=virtio-scsi
  usb (+)
  net0 (+) dev='vme42bef5f3' network='Bridged' mac=001C42BEF5F3 card=virtio ips='10.50.50.27/255.255.255.192 ' gw='10.50.50.1'
SmartMount: (-)
Disabled Windows logo: on
Nested virtualization: off
Offline management: (-)
Hostname: kvmhost.fqdn.com


2. Convert the harddrive to VMDK

[root@hypervisor-machine e59ae415-9314-4e4b-af05-21c31d91b3fb]# ls -lsah

1.3G -rw-r—– 1 root root 1.3G Apr 25 14:43 harddisk.hdd

a. Converstion with qemu:

You can use qemu-img tool that is installable via cmds:

yum install quemu-img / apt install qemu-img / zipper install qemu-img (depending on the distribution RedHat / Debian / SuSE Linux)

-f: format of the source image

-O: format of the target image

[root@hypervisor-machine ~]# qemu-img convert -f qcow2 -O vmdk \-o adapter_type=lsilogic,subformat=streamOptimized,compat6 harddisk.hdd harddisklsilogic.vmdk


[root@ hypervisor-machine e59ae415-9314-4e4b-af05-21c31d91b3fb]# ls -lsah

1.3G -rw-r—– 1 root root 1.3G Apr 25 14:43 harddisk.hdd

536M -rw-r–r– 1 root root 536M Apr 26 14:52 harddisklsilogic.vmdk

3. Upload the new harddrive to the ESXi Hypervisor and adapt it to ESX

This vmdk might not be able to used on ESXi, but you can use it on VMware Workstation. To let it work on ESXi, you need to use vmkfstools to convert it again.


a. Adapt the filesystem to ESXi

[root@hypervisor-machine ~]# vmkfstools -i harddisklsilogic.vmdk  -d thin harddisk.vmdk


4. Create a VM and add the converted harddrive to the machine. 

Futher

Recreate the initramfs

But of course this won’t work directly as it often happens with Linux 🙂 !!. 
We need to make adjustments to the virtual machine as well with few manual interventions:

1. Start the machine from the VMWare interface

2. Grub CentOS Linux rescue will appear from the prompt

3. Run command

dracut –regenerate-all –force


to Recreate the initramfs.
 

Note that You might also have to edit your network configuration since your network device usually get’s a different name.
 

Finally reboot the host:

[root@hypervisor-machine ~]# reboot


And voila you’re ready to play the VM inside the ESX after some testing, you might switch off the KVM Hypervisor hosted VM and reroute the network to point to the ESX Cluster.

 

How to do Diff (compare files) over SSH between local and remote servers on Linux

Monday, December 16th, 2019

how-to-diff-files-between-remote-servers-and-local-machines-on-linux

In system administration often we need to compare files located on a different servers, copying the files from Server A to Server B is easy to do but is time consuming as you have use some console ftp or sftp client scp or sftp to copy the files from server A to server B and then use diff command on one of the both systems.

Thanksfully there are other ways to do so by using simply one liner of diff + ssh or rsync + ssh and even for the vim lovers there is vimdiff.
In this short article I'll give few examples on quick ways to compare files between 2 Servers via SSH Protocol.


1.  Compare files for differences on 2 Linux servers via SSH protocol


Assuming you're logged on first server where certain config is located and you want to compare with a remote server via ssh.


 diff local-file <(ssh myServer 'cat remote-file')


If you're on a server and you want to compare file configurations between 2 remote servers both running ssh, generally you need something like:


diff <(ssh myServer1 'cat /etc/ssh/sshd_config') <(ssh myServer2 'cat /etc/ssh/sshd_config')​


To compare multiple files in directories with diff
 

diff <(/usr/bin/ssh user1@192.168.122.1 'ls /opt/lib/') <(/usr/bin/ssh user2@192.168.122.1 'ls /tmp/') | grep -i ">" | sed 's/> //g'


2. Interactively check 2 or more config files and show differences in a vim text editor style


vimdiff package is not installed across all Linux distributions so on paranoid Security tightened Linux environments, but on most servers should be either there or could be installed with apt / yum whatever package manager. You will need vimdiff installed only on one of the Nth servers you want to check config.

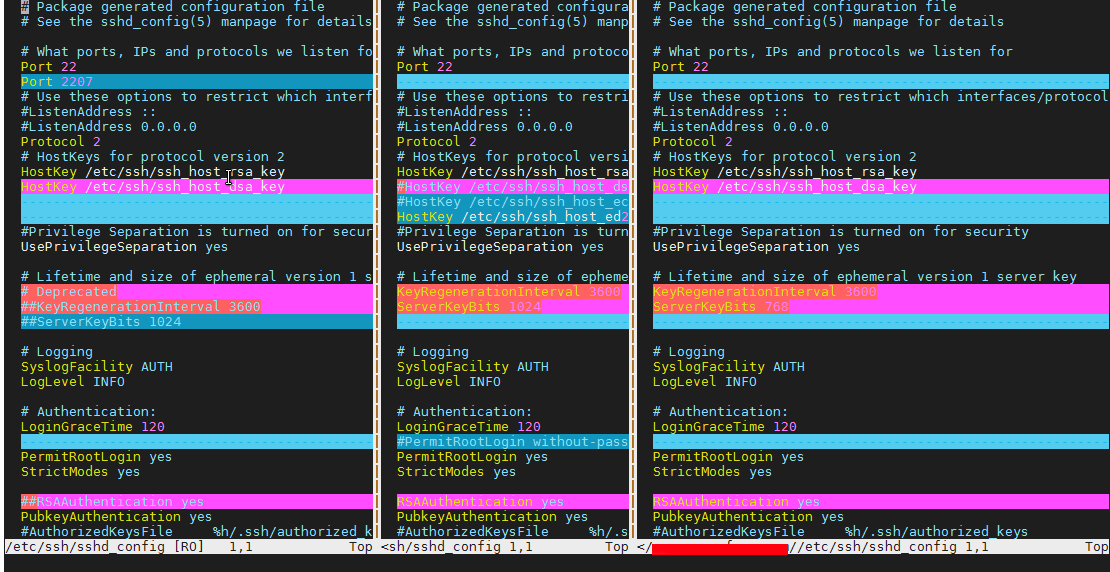
Here is how to compare 3 Linux servers, running OpenSSHD services existing files in vimdiff

vimdiff /path/to/file scp://remotehost//path/to/file scp://remotehost2//path/to/file


vimdiff-with-3-servers-comparing-sshd-config-file

Note here that the double slash – // syntax is mandatory without it vimdiff will return files. Also be aware that the files you want to check should be present on each of the server directory locations, otherwise you will end up with weird errors.

vimdiff is the Mercedes of comparison especially for VIM UNIX addicts and due to its nice coloring makes reading, the difference between server files very easy.

3. File comparison with diff or vimdiff via SSHFS mount

mkdir remote_path
sshfs user@hostname:/dir/ remote_path
diff -r local_path/file remote_path/file

4. Comparing files with diff by printing local and remote server files with diff

Most servers doesn't have sshfs by default and for servers following PCI High Security standards, there are other means to compare files on both or more hosts in a minimalistic way, here is idea how:
 

diff <(ssh remote-host-server find /var/www -printf '"%8s %P\n"') \
     <(find /var/www -printf '%8s %P\n')

5. Comparing files content on local and remote server directory with rsync

The best UNIX tool to compare mutliple files and directory across Local remote servers and a mixture of both is our lovely rsync 
together wtih SSH, ssh compes with the –-dry-run (-n) – test what rsync will do option.

To compare files over SSH protocol with rsync on local and remote server

rsync -rvnc root@10.10.10.50:/var/www/html/phpcode /var/www/html/phpcode


To compare 2 remote hosts:

rsync -rvnc root@187.50.200.73:/var/www/html/phpcode/ root@192.168.5.50:/var/www/html/phpcode 


To compare more hosts even a mixture of local and remote servers do.

rsync -rvnc root@187.50.200.73:/var/www/html/phpcode/  \
root@192.168.5.50:/var/www/html/phpcode  \
root@192.168.5.70:/var/www/html/phpcode \
./var/www/html/phpcode

The rsync options given are as so:

r=recursive,
v=verbose,
n= dry-run,
c=checksum

How rescue unbootable Windows PC, Windows files through files Network copy to remote server shared Folder using Hirens Boot CD

Saturday, November 12th, 2011

hirens-boot-cd-logo-how-to-rescue-unbootable-pc-with-hirens-bootcd
I'm rescuing some files from one unbootable Windows XP using a livecd with Hirens Boot CD 13

In order to rescue the three NTFS Windows partitions files, I mounted them after booting a Mini Linux from Hirens Boot CD.

Mounting NTFS using Hirens BootCD went quite smoothly to mount the 3 partitions I used cmds:

# mount /dev/sda1 /mnt/sda1
# mount /dev/sda2 /mnt/sda2
# mount /dev/sdb1 /mnt/sdb1

After the three NTFS file partitions are mounted I used smbclient to list all the available Network Shares on the remote Network Samba Shares Server which by the way possessed the NETBIOS name of SERVER 😉

# smbclient -L //SERVER/
Enter root's password:
Domain=[SERVER] OS=[Windows 7 Ultimate 7600] Server=[Windows 7 Ultimate 6.1]

Sharename Type Comment
——— —- ——-
!!!MUSIC Disk
ADMIN$ Disk Remote Admin
C$ Disk Default share
Canon Inkjet S9000 (Copy 2) Printer Canon Inkjet S9000 (Copy 2)
D$ Disk Default share
Domain=[SERVER] OS=[Windows 7 Ultimate 7600] Server=[Windows 7 Ultimate 6.1]
Server Comment
——— ——-
Workgroup Master
——— ——-

Further on to mount the //SERVER/D network samba drive – (the location where I wanted to transfer the files from the above 3 mounted partitions):

# mkdir /mnt/D
# mount //192.168.0.100/D /mnt/D
#

Where the IP 192.168.0.100 is actually the local network IP address of the //SERVER win smb machine.

Afterwards I used mc to copy all the files I needed to rescue from all the 3 above mentioned win partitions to the mounted //SERVER/D
 

How to Secure Apache on FreeBSD and CentOS against Range: header DoS attack (affecting Apache 1.3/2.x)

Thursday, June 30th, 2011

How to Secure Apache webserver on FreeBSD and CentOS against Range: header Denial of Service attack

Recently has become publicly known for the serious hole found in all Apache webserver versions 1.3.x and 2.0.x and 2.2.x. The info is to be found inside the security CVE-2011-3192 https://issues.apache.org/bugzilla/show_bug.cgi?id=51714

Apache remote denial of service is already publicly cirtuculating, since about a week and is probably to be used even more heavily in the 3 months to come. The exploit can be obtained from exploit-db.com a mirror copy of #Apache httpd Remote Denial of Service (memory exhaustion) is for download here

The DoS script is known in the wild under the name killapache.pl
killapache.pl PoC depends on perl ForkManager and thus in order to be properly run on FreeBSD, its necessery to install p5-Parallel-ForkManager bsd port :

freebsd# cd /usr/ports/devel/p5-Parallel-ForkManager
freebsd# make install && make install clean
...

Here is an example of the exploit running against an Apache webserver host.

freebsd# perl httpd_dos.pl www.targethost.com 50
host seems vuln
ATTACKING www.targethost.com [using 50 forks]
:pPpPpppPpPPppPpppPp
ATTACKING www.targethost.com [using 50 forks]
:pPpPpppPpPPppPpppPp
...

In about 30 seconds to 1 minute time the DoS attack with only 50 simultaneous connections is capable of overloading any vulnerable Apache server.

It causes the webserver to consume all the machine memory and memory swap and consequently makes the server to crash in most cases.
During the Denial of Service attack is in action access the websites hosted on the webserver becomes either hell slow or completely absent.

The DoS attack is quite a shock as it is based on an Apache range problem which started in year 2007.

Today, Debian has issued a new versions of Apache deb package for Debian 5 Lenny and Debian 6, the new packages are said to have fixed the issue.

I assume that Ubuntu and most of the rest Debian distrubtions will have the apache's range header DoS patched versions either today or in the coming few days.
Therefore work around the issue on debian based servers can easily be done with the usual apt-get update && apt-get upgrade

On other Linux systems as well as FreeBSD there are work arounds pointed out, which can be implemented to close temporary the Apache DoS hole.

1. Limiting large number of range requests

The first suggested solution is to limit the lenght of range header requests Apache can serve. To implement this work raround its necessery to put at the end of httpd.conf config:

# Drop the Range header when more than 5 ranges.
# CVE-2011-3192
SetEnvIf Range (?:,.*?){5,5} bad-range=1
RequestHeader unset Range env=bad-range
# We always drop Request-Range; as this is a legacy
# dating back to MSIE3 and Netscape 2 and 3.
RequestHeader unset Request-Range
# optional logging.
CustomLog logs/range-CVE-2011-3192.log common env=bad-range
CustomLog logs/range-CVE-2011-3192.log common env=bad-req-range

2. Reject Range requests for more than 5 ranges in Range: header

Once again to implement this work around paste in Apache config file:

This DoS solution is not recommended (in my view), as it uses mod_rewrite to implement th efix and might be additionally another open window for DoS attack as mod_rewrite is generally CPU consuming.

# Reject request when more than 5 ranges in the Range: header.
# CVE-2011-3192
#
RewriteEngine on
RewriteCond %{HTTP:range} !(bytes=[^,]+(,[^,]+){0,4}$|^$)
# RewriteCond %{HTTP:request-range} !(bytes=[^,]+(?:,[^,]+){0,4}$|^$)
RewriteRule .* - [F]

# We always drop Request-Range; as this is a legacy
# dating back to MSIE3 and Netscape 2 and 3.
RequestHeader unset Request-Range

3. Limit the size of Range request fields to few hundreds
To do so put in httpd.conf:

LimitRequestFieldSize 200

4. Dis-allow completely Range headers: via mod_headers Apache module

In httpd.conf put:

RequestHeader unset Range
RequestHeader unset Request-Range

This work around could create problems on some websites, which are made in a way that the Request-Range is used.

5. Deploy a tiny Apache module to count the number of Range Requests and drop connections in case of high number of Range: requests

This solution in my view is the best one, I've tested it and I can confirm on FreeBSD works like a charm.
To secure FreeBSD host Apache, against the Range Request: DoS using mod_rangecnt, one can literally follow the methodology explained in mod_rangecnt.c header:

freebsd# wget http://people.apache.org/~dirkx/mod_rangecnt.c
..
# compile the mod_rangecnt modulefreebsd# /usr/local/sbin/apxs -c mod_rangecnt.c
...
# install mod_rangecnt module to Apachefreebsd# /usr/local/sbin/apxs -i -a mod_rangecnt.la
...

Finally to load the newly installed mod_rangecnt, Apache restart is required:

freebsd# /usr/local/etc/rc.d/apache2 restart
...

I've tested the module on i386 FreeBSD install, so I can't confirm this steps works fine on 64 bit FreeBSD install, I would be glad if I can hear from someone if mod_rangecnt is properly compiled and installed fine also on 6 bit BSD arch.

Deploying the mod_rangecnt.c Range: Header to prevent against the Apache DoS on 64 bit x86_amd64 CentOS 5.6 Final is also done without any pitfalls.

[root@centos ~]# uname -a;
Linux centos 2.6.18-194.11.3.el5 #1 SMP Mon Aug 30 16:19:16 EDT 2010 x86_64 x86_64 x86_64 GNU/Linux
[root@centos ~]# /usr/sbin/apxs -c mod_rangecnt.c
...
/usr/lib64/apr-1/build/libtool --silent --mode=link gcc -o mod_rangecnt.la -rpath /usr/lib64/httpd/modules -module -avoid-version mod_rangecnt.lo
[root@centos ~]# /usr/sbin/apxs -i -a mod_rangecnt.la
...
Libraries have been installed in: /usr/lib64/httpd/modules
...
[root@centos ~]# /etc/init.d/httpd configtest
Syntax OK
[root@centos ~]# /etc/init.d/httpd restart
Stopping httpd: [ OK ]
Starting httpd: [ OK ]

After applying the mod_rangecnt patch if all is fine the memory exhaustion perl DoS script's output should be like so:

freebsd# perl httpd_dos.pl www.patched-apache-host.com 50
Host does not seem vulnerable

All of the above pointed work-arounds are only a temporary solution to these Grave Apache DoS byterange vulnerability , a few days after the original vulnerability emerged and some of the up-pointed work arounds were pointed. There was information, that still, there are ways that the vulnerability can be exploited.
Hopefully in the coming few weeks Apache dev team should be ready with rock solid work around to the severe problem.

In 2 years duration these is the second serious Apache Denial of Service vulnerability after before a one and a half year the so called Slowloris Denial of Service attack was capable to DoS most of the Apache installations on the Net.

Slowloris, has never received the publicity of the Range Header DoS as it was not that critical as the mod_range, however this is a good indicator that the code quality of Apache is slowly decreasing and might need a serious security evaluation.
 

Fix 503 AUTH first (#5.5.1) mail receive errors in Qmail

Friday, September 2nd, 2011

I have one qmail rocks install based on Thibbs Qmalrocks tutorial

I had to do some changes, to:
/etc/service/qmail-smtpd/run and /etc/service/qmail-smtpdssl/run init scripts.

After a qmail restart suddenly qmail stopped receiving any mail messages and my sent messages was returned with an error:

Connected to xx.xxx.xx.xx but sender was rejected.
Remote host said: 503 AUTH first (#5.5.1)

After investigating the issue I finally found, that one value I’ve changed in /etc/service/qmail-smtpd/run and /etc/service/qmail-smtpdssl was causing the whole mess:

The problematic variable was:

REQUIRE_AUTH=1

To solve the issue I had to disable the value which it seems, I have enabled by mistake.

Below is a quote from http://qmail.jms1.net which explains what REQUIRE_AUTH shell variable does:

Setting REQUIRE_AUTH=1 will make the service not accept ANY mail unless the client has sent a valid AUTH command. This also prevents incoming mail from being accepted for your own domains, so do not use this setting if the service is accepting “normal” mail from the outside world.
Restarting via qmailctl restart and qmail started receiving messages normal 😉

John McCarthy Creator and Father of Modern Artificial Intelligence and Lisp programming language creator passed away at 84

Wednesday, October 26th, 2011

John McCarthy Creator of Lisp programming language and Invetor of modern Artificial Intelligence

Yesterday night, one more Computer Genius – John McCarthy has passed away at the age of 84.
John McCarthy is mostly famous for the creation of Lisp Programming language, which was probably the most used programming language in the short past. There are plenty of corporate old iron hardwares which still run programs written in Lisp. Lisp is the language in which Richard Stallman has created his so famous EMACS text editor for GNU.

Computer Technology students, should have studied certainly Lisp in the form of Lisp Scheme.
Lisp is the the second oldest high level programming language only to be predeceded by Fortran .
Lisp gave birth to the so called Macro programming languages
and was invented by McCarthy in 1958, while he was in Massachusetts MIT university.
What is so important about Lisp is that it is de-facto the first language in the world which was written to be suitable for AI (Artificial Intelligence) researches. There is plenty of interesting information about Lisp as well as a number of forks and variations circulating for almost all the existing major operating systems nowdays.

Besides LISP creation McCarthy was in the first team who did a the first Remote Computer Chess game. The game played was among USSR and US scientists, where the moves were transferred by telegraph.
In 1972 MCCarthy was awarded with the Turing Award – (Today probably the most prestigious award for incredible technology achievements in the world).
McCarth’s home website had a lot of great papers on programming languages, mathematical theory of computation and most importantly philosophical words and notes on Artificial Intelligence
His site has a lot of his essays as well as his personal views on the world and predictions (foreseen probabilities by him) on the world future.
McCarthy had even written a short Sci-Fi story (The Robot and The Baby), the story aim was to explore the question, whether robots should have simulated emotions.John McCarthy AI later days life picture

John McCarthy is among the brightest computer genius who ever live on this planet as well as a true “icon” for a computer hacker. The news for his death is quite shocking especially after the sudden death of the creator of C programming Language and UNIX Denis Ritchie , and a week earlier the pass of Steve Jobs
It seems like no coincidence, that the brightest computer minds are departuring this life, probably God is taking them one by one just like he gave them the gifts to invent and revolutionize the technology we use today.
Surely McCarthy has left a huge landmark on technology and his name will be in the books for the generations to come.

How to Secure Apache on FreeBSD against Range header DoS vulnerability (affecting Apache 1.3/2.x)

Tuesday, August 30th, 2011

How to Secure Apache webserver on FreeBSD and CentOS against Range: header Denial of Service attack

Recently has become publicly known for the serious hole found in all Apache webserver versions 1.3.x and 2.0.x and 2.2.x. The info is to be found inside the security CVE-2011-3192 https://issues.apache.org/bugzilla/show_bug.cgi?id=51714

Apache remote denial of service is already publicly cirtuculating, since about a week and is probably to be used even more heavily in the 3 months to come. The exploit can be obtained from exploit-db.com a mirror copy of #Apache httpd Remote Denial of Service (memory exhaustion) is for download here

The DoS script is known in the wild under the name killapache.pl
killapache.pl PoC depends on perl ForkManager and thus in order to be properly run on FreeBSD, its necessery to install p5-Parallel-ForkManager bsd port :


freebsd# cd /usr/ports/devel/p5-Parallel-ForkManager
freebsd# make install && make install clean
...

Here is an example of the exploit running against an Apache webserver host.


freebsd# perl httpd_dos.pl www.targethost.com 50
host seems vuln
ATTACKING www.targethost.com [using 50 forks]
:pPpPpppPpPPppPpppPp
ATTACKING www.targethost.com [using 50 forks]
:pPpPpppPpPPppPpppPp
...

In about 30 seconds to 1 minute time the DoS attack with only 50 simultaneous connections is capable of overloading any vulnerable Apache server.

It causes the webserver to consume all the machine memory and memory swap and consequently makes the server to crash in most cases.
During the Denial of Service attack is in action access the websites hosted on the webserver becomes either hell slow or completely absent.

The DoS attack is quite a shock as it is based on an Apache range problem which started in year 2007.

Today, Debian has issued a new versions of Apache deb package for Debian 5 Lenny and Debian 6, the new packages are said to have fixed the issue.

I assume that Ubuntu and most of the rest Debian distrubtions will have the apache’s range header DoS patched versions either today or in the coming few days.
Therefore work around the issue on debian based servers can easily be done with the usual apt-get update && apt-get upgrade

On other Linux systems as well as FreeBSD there are work arounds pointed out, which can be implemented to close temporary the Apache DoS hole.

1. Limiting large number of range requests

The first suggested solution is to limit the lenght of range header requests Apache can serve. To implement this work raround its necessery to put at the end of httpd.conf config:


# Drop the Range header when more than 5 ranges.
# CVE-2011-3192
SetEnvIf Range (?:,.*?){5,5} bad-range=1
RequestHeader unset Range env=bad-range
# We always drop Request-Range; as this is a legacy
# dating back to MSIE3 and Netscape 2 and 3.
RequestHeader unset Request-Range
# optional logging.
CustomLog logs/range-CVE-2011-3192.log common env=bad-range
CustomLog logs/range-CVE-2011-3192.log common env=bad-req-range

2. Reject Range requests for more than 5 ranges in Range: header

Once again to implement this work around paste in Apache config file:

This DoS solution is not recommended (in my view), as it uses mod_rewrite to implement th efix and might be additionally another open window for DoS attack as mod_rewrite is generally CPU consuming.


# Reject request when more than 5 ranges in the Range: header.
# CVE-2011-3192
#
RewriteEngine on
RewriteCond %{HTTP:range} !(bytes=[^,]+(,[^,]+){0,4}$|^$)
# RewriteCond %{HTTP:request-range} !(bytes=[^,]+(?:,[^,]+){0,4}$|^$)
RewriteRule .* - [F]

# We always drop Request-Range; as this is a legacy
# dating back to MSIE3 and Netscape 2 and 3.
RequestHeader unset Request-Range

3. Limit the size of Range request fields to few hundreds
To do so put in httpd.conf:


LimitRequestFieldSize 200

4. Dis-allow completely Range headers: via mod_headers Apache module

In httpd.conf put:


RequestHeader unset Range
RequestHeader unset Request-Range

This work around could create problems on some websites, which are made in a way that the Request-Range is used.

5. Deploy a tiny Apache module to count the number of Range Requests and drop connections in case of high number of Range: requests

This solution in my view is the best one, I’ve tested it and I can confirm on FreeBSD works like a charm.
To secure FreeBSD host Apache, against the Range Request: DoS using mod_rangecnt, one can literally follow the methodology explained in mod_rangecnt.c header:


freebsd# wget http://people.apache.org/~dirkx/mod_rangecnt.c
..
# compile the mod_rangecnt module
freebsd# /usr/local/sbin/apxs -c mod_rangecnt.c
...
# install mod_rangecnt module to Apache
freebsd# /usr/local/sbin/apxs -i -a mod_rangecnt.la
...

Finally to load the newly installed mod_rangecnt, Apache restart is required:


freebsd# /usr/local/etc/rc.d/apache2 restart
...

I’ve tested the module on i386 FreeBSD install, so I can’t confirm this steps works fine on 64 bit FreeBSD install, I would be glad if I can hear from someone if mod_rangecnt is properly compiled and installed fine also on 6 bit BSD arch.

Deploying the mod_rangecnt.c Range: Header to prevent against the Apache DoS on 64 bit x86_amd64 CentOS 5.6 Final is also done without any pitfalls.


[root@centos ~]# uname -a;
Linux centos 2.6.18-194.11.3.el5 #1 SMP Mon Aug 30 16:19:16 EDT 2010 x86_64 x86_64 x86_64 GNU/Linux
[root@centos ~]# /usr/sbin/apxs -c mod_rangecnt.c
...
/usr/lib64/apr-1/build/libtool --silent --mode=link gcc -o mod_rangecnt.la -rpath /usr/lib64/httpd/modules -module -avoid-version mod_rangecnt.lo
[root@centos ~]# /usr/sbin/apxs -i -a mod_rangecnt.la
...
Libraries have been installed in:
/usr/lib64/httpd/modules
...
[root@centos ~]# /etc/init.d/httpd configtest
Syntax OK
[root@centos ~]# /etc/init.d/httpd restart
Stopping httpd: [ OK ]
Starting httpd: [ OK ]

After applying the mod_rangecnt patch if all is fine the memory exhaustion perl DoS script‘s output should be like so:


freebsd# perl httpd_dos.pl www.patched-apache-host.com 50
Host does not seem vulnerable

All of the above pointed work-arounds are only a temporary solution to these Grave Apache DoS byterange vulnerability , a few days after the original vulnerability emerged and some of the up-pointed work arounds were pointed. There was information, that still, there are ways that the vulnerability can be exploited.
Hopefully in the coming few weeks Apache dev team should be ready with rock solid work around to the severe problem.

In 2 years duration these is the second serious Apache Denial of Service vulnerability after before a one and a half year the so called Slowloris Denial of Service attack was capable to DoS most of the Apache installations on the Net.

Slowloris, has never received the publicity of the Range Header DoS as it was not that critical as the mod_range, however this is a good indicator that the code quality of Apache is slowly decreasing and might need a serious security evaluation.

How to fix “delivery 1: deferral: Sorry,_message_has_wrong_owner._(#4.3.5)/” qmail mail delivery failure message

Friday, May 20th, 2011

After a failed attempt to enable some wrapper scripts to enable domain keys support in a qmail powered mail server my qmail server suddenly stopped being able to normally send mail.

The exact error message which was logged in /var/log/qmail/current was:

@400000004dd66fcc16a088ac delivery 1: deferral: Sorry,_message_has_wrong_owner._(#4.3.5)/

This qmail messed happened after I substituted /var/qmail/bin/qmail-queue and /var/qmail/bin/qmail-remote with two respective wrapper shell scripts which were calling for the original qmail-queue and qmail-remote binaries under the names qmail-queue.orig and qmail-queue.orig

Restoring back qmail-queue.orig to /var/qmail/bin/qmail-queue and qmail-remote.orig to /var/qmain/bin/qmail-remote and restarting the mail server broke my qmail install.

After a bunch of nerves trying to isolate what is causing the error I found out that by mistake I forgot to copy the qmail-queue and qmail-remote permissions and ownership.

Thus I had to check another qmail working installation’s permissions for both binaries and fix the permissions to be equivalent to the permissions:

debian:~# ls -al /var/qmail/bin/qmail-remote
-rwx–x–x 1 root qmail 50464 2011-05-20 12:56 /var/qmail/bin/qmail-remote*
debian:~# ls -al /var/qmail/bin/qmail-queue
-rws–x–x 1 qmailq qmail 20392 2011-05-20 12:56 /var/qmail/bin/qmail-queue*

The exact chmod and chmod commands I issued to solve the shitty issues were as follows:

First I fixed the qmail-queue and qmail-remote ownership:

debian:~# chown qmailq:qmail /var/qmail/bin/qmail-queue
debian:~# chown root:qmail /var/qmail/bin/qmail-remote

Second I set the proper file permissions:

# make the qmail-queue binary suid
debian:~# chmod u+s /var/qmail/bin/qmail-queue
debian:~# chmod 611 /var/qmail/bin/qmail-queue
debian:~# chmod 611 /var/qmail/bin/qmail-remote

Third and last I did a restart of the qmail server and tested it sends properly

debian:~# /usr/bin/qmailctl stop
Stopping qmail...
qmail-send
qmail-smtpd
debian:~# /usr/bin/qmailctl start
Starting qmail

Finally to test that the qmail server qmail-queue was queing and sending with qmail-remote I used the system mail command like so:

debian:~# mail -s "test email" testuser@www.pc-freak.net
asdfafdsdf
.
Cc:

Afterwards the mail was properly received on my mail account testuser@www.pc-freak.net immediately.

In my /var/log/qmail/current log file all seemed fine:

@400000004dd6702a2eb2b064 starting delivery 1: msg 85281596 to remote testuser@www.pc-freak.net
@400000004dd6702a2eb2b834 status: local 0/20 remote 1/20
@400000004dd6702b34cc809c delivery 1: success: 83.228.93.76_accepted_message./Remote_host_said:_250_ok_
1305899099_qp_65293/
@400000004dd6702b34cc886c status: local 0/20 remote 0/20
@400000004dd6702b34cc8c54 end msg 85281596

The test mail was properly received on my mail account testuser@www.pc-freak.net immediately.

It took me like half an hour to figure out what exactly is wrong with the permissions in situations like this I really wanted to change all my qmail installs with postfix and forget forever I ever used qmail …