Posts Tagged ‘php’

How to remove the meta generator Content (Joomla! – Copyright) in Joomla 1.5

Thursday, December 30th, 2010

Joomla-remove-meta-generator-content-to-hide-joomla-site-install
Do you wonder How to change <meta name="Generator" content="Joomla! – Copyright (C) 2005 – 2007 Open Source Matters. All rights reserved." /> in Joomla 1.5

If yes, Here is how I've just found to remove the:


in my Joomla installation.

I need to remove that as a part of making my website not to leak out that it runs on top of Joomla.

So here is how:

1. Go to your Joomla website main root directory
2. Edit /libraries/joomla/document/html/renderer/head.php
Look for line: 83 in the /libraries/joomla/document/html/renderer/head.php
There you will notice the code:

$strHtml .= $tab.'<meta name="generator" content="'.$document->getGenerator().'" />'.$lnEnd;

In order to remove the <meta name="generator" content="Joomla …." /> change the above code to something like:

$strHtml .= $tab.'<meta name="generator" content="My Custom Web site Generator name" />'.$lnEnd;

That's all now next time you refresh your website the content="Joomla! – Copyright (C) 2005 – 2009 Open Source Matters. All rights reserved." will be no more.
Cheers! 🙂

Speeding up Apache through apache2-mpm-worker and php5-cgi on Debian / How to improve Apache performance and decrease server memory consumption

Friday, March 18th, 2011

speeding up apache through apache2-mpm-worker and php5-cgi on Debian Linux / how to improve apache performance and decrease server responce time
By default most Apache running Linux servers on the Internet are configured to use with the mpm prefork apache module
Historically prefork apache module is the predecessor of the worker module therefore it's believed to be a way more tested and reliable, if you need a critical reliable webserver configuration.

However from my experience by so far with the Apache MPM Worker I can boldly say that many of the rumors concerning the unreliabity of apache2-mpm-worker are just myths.

The old way Apache handles connections e.g. the mod prefork is the well known way that high amount of the daemons on Linux and BSD are still realying on.
When prefork is a used by Apache, every new TCP/IP connection arriving at your Linux server on the Apache configured port let's say on port 80 is being served by Apache in a way that the Apache process (mother process) parent does fork a new Apache parent copy in order to serve the new request.
Thus by using the prefork Apache needs to fork new process (if it doesn't have already an empty forked one waiting for connections) and serve the HTTP request of the new client, after the request of the client is completed the newly forked Apache usually dies (even though it again depends on the way the Apache server is configured via the Apache configuration – apache2.conf / httpd.conf etc.).

Now you can imagine how slow and memory consuming it is that all the time the parent Apache process spawns new processes, kills old ones etc. in order to fulfill the client requests.

Now just to compare the Apace mpm prefork does not use the old forking way, but relies on a few Apache processes which handles all the requests without constantly being destroyed and recreated like with the prefork module.
This saves operations and system resources, threaded programming has already been proven to be more efficient way to handle tasks and is heavily adopted in GUI programming for instance in Microsoft Windows, Mac OS X, Linux Gnome, KDE etc.

There is plenty of information and statistical data which compares Apache running with prefork and respectively worker modules online.
As the goal of this article is not to went in depths with this kind of information I would not say more on it but let you explore online a bit more about them in case if you're interested.

The purpose of this article is to explain in short how to substitute the Apache2-MPM-Prefork and how your server performance could benefit out of the use of Apache2-MPM-Worker.
On Debian the default Apache process serving module in Apache 1.3x,Apache 2.0x and 2.2x is prefork thus the installation of apache2-mpm-worker is not "a standard way" to install Apache

Deciding to swith from the default Debian apache-mpm-prefork to apache-mpm-worker is quite a serious and responsible decision and in some cases might cause troubles, if you have decided to follow my article be sure to consider all the possible negative consequences of switching to the apache worker !

Now after having said a bunch of info which might be not necessary with the experienced system admin I'll continue on with the steps to install the apache2-mpm-worker.

1. Install the apache2-mpm-worker

debian:~# apt-get install apache2-mpm-worker php5-cgi
Reading state information... Done
The following packages were automatically installed and are no longer required:
The following packages will be REMOVED apache2-mpm-prefork libapache2-mod-php5
The following NEW packages will be installed apache2-mpm-worker
0 upgraded, 1 newly installed, 2 to remove and 46 not upgraded.
Need to get 0B/259kB of archives.After this operation, 6193kB disk space will be freed.

As you can notice in below's text confirmation which will appear you will have to remove the apache2-mpm-prefork and the apache2-mpm-worker modules before you can proceed to install the apache2-mpm-prefork.

You might ask yourself if I remove my installed libphp how would I be able to use my Apache with my PHP based websites? And why does the apt package manager requires the libapache2-mod-php5 to get removed.
The explanation is simple apache2-mpm-worker is not thread safe, in other words scripts which does use the php fork(); function would not work correctly with the Apache worker module and will probably be leading to PHP and Apache crashes.
Therefore in order to install the apache mod worker it's necessary that no libapache2-mod-php5 is existent on the system.
In order to have a PHP installed on the server again you will have to use the php5-cgi deb package, this is the reason in the above apt-get command I'm also requesting apt to install the php5-cgi package next to apache2-mpm-worker.

2. Enable the cgi and cgid apache modules

debian:~# a2enmod cgi
debian:~# a2enmod cgid

3. Activate the mod_actions apache modules

debian:~# cd /etc/apache2/mods-enabled
debian:~# ln -sf ../mods-available/actions.load
debian:~# ln -sf ../mods-available/actions.conf

4. Add configuration options in order to enable mod worker to use the newly installed php5-cgi

Edit /etc/apache2/mods-available/actions.conf vim, mcedit or nano (e.g. your editor of choice and add inside:

&ltIfModule mod_actions.c>
Action application/x-httpd-php /cgi-bin/php5
</IfModule>

After completing all the above instructions, you might also need to edit your /etc/apache2/apache2.conf to tune up, how your Apache mpm worker will serve client requests.
Configuring the <IfModule mpm_worker_module> in apache2.conf is necessary to optimize your newly installed mpm_worker module for performance.

5. Configure the mod_worker_module in apache2.conf One example configuration for the mod worker is:

<IfModule mpm_worker_module>
StartServers 2
MaxClients 150
MinSpareThreads 25
MaxSpareThreads 75
ThreadsPerChild 25
MaxRequestsPerChild 0
</IfModule>

Consider the fact that this configuration is just a sample and it's in no means configured for serving Apache requests for high load Apache servers and you need to further play with the values to have a good results on your server.

6. Check that all is fine with your Apache configurations and no syntax errors are encountered

debian:~# /usr/sbin/apache2ctl -t
Syntax OK

If you get something different from Syntax OK track the error and fix it before you're ready to restart the Apache server.

7. Now restart the Apache server

debian:~# /etc/init.d/apache2 restart

All should run fine and hopefully your PHP scripts should be interpreted just fine through the php5-cgi instead of the libapache2-mod-php5.
Using the /usr/bin/php5-cgi will increase with some percentage your server CPU load but on other hand will drasticly decrease the Webserver memory consumption.
That's quite logical because the libapache2-mod-hp5 is loaded once during apache server whether a new instance of /usr/bin/php5-cgi is invoked during each of Apache requests via the mod worker.

There is one serious security flow coming with php5-cgi, DoS against a server processing scripts through php5-cgi is much easier to be achieved.
An example for a denial attack which could affect a website running with mod worker and php5-cgi, could be simulated from a simple user with a web browser which holds up the f5 or ctrl + r browser page refresh buttons.
In that case whenever php5-cgi is used the CPU load would rise drastic, one possible solution to this denial of service issues is by installing and using libapache2-mod-evasive like so:

8. Install libapache2-mod-evasive

debian:~# apt-get install libapache2-mod-evasive
The Apache mod evasive module is a nice apache module to minimize HTTP DoS and brute force attacks.
Now with mod worker through the php5-cgi, your apache should start serving requests more efficiently than before.
For some performance reasons some might even want to try out the fastcgi with the worker to boost the Apache performance but as I have never tried that I can't say how reliable a a mod worker with a fastcgi would be.

N.B. ! If you have some specific php configurations within /etc/php5/apache2/php.ini you will have to set them also in /etc/php5/cgi/php.ini before you proceed with the above instructions to install Apache otherwise your PHP scripts might not work as expected.

Mod worker is also capable to work with the standard mod php5 Apache module, but if you decide to go this route you will have to recompile your PHP lib manually from source as in Debian this option is not possible with the default php library.
This installation worked fine on Debian Lenny but suppose the same installation should work fine on Debian Squeeze as well as Debian testing/unstable.
Feedback on the afore-described mod worker installation is very welcome!

Auto restart Apache on High server load (bash shell script) – Fixing Apache server temporal overload issues

Saturday, March 24th, 2012

auto-restart-apache-on-high-load-bash-shell-script-fixing-apache-temporal-overload-issues

I've written a tiny script to check and restart, Apache if the server encounters, extremely high load avarage like for instance more than (>25). Below is an example of a server reaching a very high load avarage:;

server~:# uptime
13:46:59 up 2 days, 18:54, 1 user, load average: 58.09, 59.08, 60.05
load average: 0.09, 0.08, 0.08

Sometimes high load avarage is not a problem, as the server might have a very powerful hardware. A high load numbers is not always an indicator for a serious problems. Some 16 CPU dual core (2.18 Ghz) machine with 16GB of ram could probably work normally with a high load avarage like in the example. Anyhow as most servers are not so powerful having such a high load avarage, makes the machine hardly do its job routine.

In my specific, case one of our Debian Linux servers is periodically reaching to a very high load level numbers. When this happens the Apache webserver is often incapable to serve its incoming requests and starts lagging for clients. The only work-around is to stop the Apache server for a couple of seconds (10 or 20 seconds) and then start it again once the load avarage has dropped to less than "3".

If this temporary fix is not applied on time, the server load gets increased exponentially until all the server services (ssh, ftp … whatever) stop responding normally to requests and the server completely hangs …

Often this server overloads, are occuring at night time so I'm not logged in on the server and one such unexpected overload makes the server unreachable for hours.
To get around the sudden high periodic load avarage server increase, I've written a tiny bash script to monitor, the server load avarage and initiate an Apache server stop and start with a few seconds delay in between.

#!/bin/sh
# script to check server for extremely high load and restart Apache if the condition is matched
check=`cat /proc/loadavg | sed 's/\./ /' | awk '{print $1}'`
# define max load avarage when script is triggered
max_load='25'
# log file
high_load_log='/var/log/apache_high_load_restart.log';
# location of inidex.php to overwrite with temporary message
index_php_loc='/home/site/www/index.php';
# location to Apache init script
apache_init='/etc/init.d/apache2';
#
site_maintenance_msg="Site Maintenance in progress - We will be back online in a minute";
if [ $check -gt "$max_load" ]; then>
#25 is load average on 5 minutes
cp -rpf $index_php_loc $index_php_loc.bak_ap
echo "$site_maintenance_msg" > $index_php_loc
sleep 15;
if [ $check -gt "$max_load" ]; then
$apache_init stop
sleep 5;
$apache_init restart
echo "$(date) : Apache Restart due to excessive load | $check |" >> $high_load_log;
cp -rpf $index_php_loc.bak_ap $index_php_loc
fi
fi

The idea of the script is partially based on a forum thread – Auto Restart Apache on High Loadhttp://www.webhostingtalk.com/showthread.php?t=971304Here is a link to my restart_apache_on_high_load.sh script

The script is written in a way that it makes two "if" condition check ups, to assure 100% there is a constant high load avarage and not just a temporal 5 seconds load avarage jump. Once the first if is matched, the script first tries to reduce the server load by overwritting a the index.php, index.html script of the website with a one stating the server is ongoing a maintenance operations.
Temporary stopping the index page, often reduces the load in 10 seconds of time, so the second if case is not necessery at all. Sometimes, however this first "if" condition cannot decrease enough the load and the server load continues to stay too high, then the script second if comes to play and makes apache to be completely stopped via Apache init script do 2 secs delay and launch the apache server again.

The script also logs about, the load avarage encountered, while the server was overloaded and Apache webserver was restarted, so later I can check what time the server overload occured.
To make the script periodically run, I've scheduled the script to launch every 5 minutes as a cron job with the following cron:

# restart Apache if load is higher than 25
*/5 * * * * /usr/sbin/restart_apache_on_high_load.sh >/dev/null 2>&1

I have also another system which is running FreeBSD 7_2, which is having the same overload server problems as with the Linux host.
Copying the auto restart apache on high load script on FreeBSD didn't work out of the box. So I rewrote a little chunk of the script to make it running on the FreeBSD host. Hence, if you would like to auto restart Apache or any other service on FreeBSD server get /usr/sbin/restart_apache_on_high_load_freebsd.sh my script and set it on cron on your BSD.

This script is just a temporary work around, however as its obvious that the frequency of the high overload will be rising with time and we will need to buy new server hardware to solve permanently the issues, anyways, until this happens the script does a great job 🙂

I'm aware there is also alternative way to auto restart Apache webserver on high server loads through using monit utility for monitoring services on a Unix system. However as I didn't wanted to bother to run extra services in the background I decided to rather use the up presented script.

Interesting info to know is Apache module mod_overload exists – which can be used for checking load average. Using this module once load avarage is over a certain number apache can stop in its preforked processes current serving request, I've never tested it myself so I don't know how usable it is. As of time of writting it is in early stage version 0.2.2
If someone, have tried it and is happy with it on a busy hosting servers, please share with me if it is stable enough?

Adding Comments & Google search plugins to nanoblogger

Thursday, July 30th, 2009

Ever wondered how you can add comments option to nanoblogger just like any normal blogging software like wordpress do support? Cause I did, Today I wandered around in google a bit until I can make it.In order to make all this workable I choose the nbcom nanoblogger plugin.Here’s what led me to success.First prepare yourself to loose a couple of hours! It’s more complicated or at least it was more complicated than I expected to add a simple plugin as this.Second, You’ll need the following nbcom 1.1 archive .
Right after that you’ll need to untar it and rename hdrs.tmpl and consts.tmpl to *.php, edit them and remove all the unneeded “/” back slashes. Copy the content of nbcom-1.1 dir to the document root of your nanoblogger. Make sure to edit blog.conf and have all the necessary like BLOG_URL, BLOG_ADMIN=”session”, DB_PASS=”password_of_sql_user_session”, yes I forgot to mention that you’ll need to read the INSTALL file contained in the nbcom archive and follow the instructions for creation of user and database that nbcom would use in the future. There are described like 7+ files more you need to edit and if you’re lucky like I was you’ll have nanoblogger+comments support up and running! Hooray! Wish you Good luck.
Secondly probably you have wondered how to make nanoblogger has a normal search field just like any normal php based blogger software out there. It took me like an hour before I came to the enlightenment. First I had downloaded the google.sh script mirrored for you to make your life easier here .
Next copy the file to your nanoblogger plugins directory.
And last you have to edit the templates/main_index.htm file and add the content that is as commented in the google.sh file. If you’re lucky again you’ll have nanoblogger with this two valuable plugins working. EnjoyEND—–

Remove URL from comments in WordPress Blogs and Websites to mitigate comment spam URLs in pages

Friday, February 20th, 2015

remove-comment-spam-url-field-wordpress-website-or-blog-working-how-to
If you're running a WordPress blog or Website where you have enabled comments for a page and your article or page is well indexing in Google (receives a lot of visit / reads ) daily, your site posts (comments) section is surely to quickly fill in with a lot of "Thank you" and non-sense Spam comments containing an ugly link to an external SPAM or Phishing website.

Such URL links with non-sense message is a favourite way for SPAMmers to raise their website incoming (other website) "InLinks" and through that increase current Search Engine position. 

We all know a lot of comments SPAM is generally handled well by Akismet but unfortunately still many of such spam comments fail to be identified as Spam  because spam Bots (text-generator algorithms) becomes more and more sophisticated with time, also you can never stop paid a real-persons Marketers to spam you with a smart crafted messages to increase their site's SEO ).
In all those cases Akismet WP (Anti-Spam) plugin – which btw is among the first "must have"  WP extensions to install on a new blog / website will be not enough ..

To fight with worsening SEO because of spam URLs and to keep your site's SEO better (having a lot of links pointing to reported spam sites will reduce your overall SEO Index Rate) many WordPress based bloggers, choose to not use default WordPress Comments capabilities – e.g. use exnternal commenting systems such as Disqus – (Web Community of Communities), IntenseDebate, LiveFyre, Vicomi

However as Disqus and other 3rd party commenting systems are proprietary software (you don't have access to comments data as comments are kept on proprietary platform and shown from there), I don't personally recommend (or use) those ones, yes Disqus, Google+, Facebook and other comment external sources can have a positive impact on your SEO but that's temporary event and on the long run I think it is more advantageous to have comments with yourself.
A small note for people using Disqos and Facebook as comment platforms – (just imagine if Disqos or Facebook bankrupts in future, where your comments will be? 🙂 )

So assuming that you're a novice blogger and I succeeded convincing you to stick to standard (embedded) WordPress Comment System once your site becomes famous you will start getting severe amount of comment spam. There is plenty of articles already written on how to remove URL comment form spam in WordPress but many of the guides online are old or obsolete so in this article I will do a short evaluation on few things I tried to remove comment spam and how I finally managed to disable URL link spam to appear on site.
 

1. Hide Comment Author Link (Hide-wp-comment-author-link)

This plugin is the best one I found and I started using it since yesterday, I warmly recommend this plugin because its very easy, Download, Unzip, Activate and there you're anything typed in URL field will no longer appear in Posts (note that the URL field will stay so if you want to keep track on person's input URL you can get still see it in Wp-Admin). I'm using default WordPress WRC (Kubrick), but I guess in most newer wordpress plugins is supposed to work. If you test it on another theme please drop a comment to inform whether works for you.  Hide Comment Author Link works on current latest Wordpress 4.1 websites.

A similar plugin to hide-wp-author-link that works and you can use is  Hide-n-Disable-comment-url-field, I tested this one but for some reason I couldn't make it work.

wordpress-remove-delete-hide-n-disable-url-comment-without-deleting-the-form-url-field-screenshot-reduce-comment-spam
Whatever I type in Website field in above form, this is wiped out of comment once submitted 🙂
 

2. Disable hide Comment URL (disable-hide-comment-url)

I've seen reports disable-hide-comment-url works on WordPress 3.9.1, but it didn't worked for me, also the plugin is old and seems no longer maintaned (its last update was 3.5 years ago), if it works for you please please drop in comment your WP version, on WP 4.1 it is not working.

disable-hide-comment-url-screenshot-plugin-to-disable-comment-url-spam-in-wordpress-sites


3. WordPress Anti-Spam plugin

WordPress Anti-Spam plugin is a very useful addition plugin to install next to Akismet. The plugin is great if you don't want to remove commenter URL to show in the post but want to cut a lot of the annoying Spam Robots crawling ur site.
 

Anti-spam plugin blocks spam in comments automatically, invisibly for users and for admins.

  • no captcha, because spam is not users' problem
  • no moderation queues, because spam is not administrators' problem
  • no options, because it is great to forget about spam completely

Plugin is easy to use: just install it and it just works.

Anti bot works fine on WP 4.1

4. Stop Spam Comments

Stop Spam Comments is:

  • Dead simple: no setup required, just activate it and enjoy your spam-free website.
  • Lightweight: no additional database queries, it doesn't add script files or other assets in your theme. This means your website performance will not be affected and your server will thank you.
  • Invisible by design: no captchas, no tricky questions or any other user interaction required at all.
     

Stop Spam Comments works fine on WP 4.1.

I've mentioned few of the plugins which can help you solve the problem, but as there are a lot of anti-spam URL plugins available for WP its up to you to test and see what fits you best. If you know or use some other method to protect yourself from Comment Url Spam to share it please.

Import thing to note is it usually a bad idea to mix up different anti-spam plugins so don't enable both Stop Spam Comments and WordPress Anti Spam plugin.

5. Comment Form Remove Url field Manually 

This (Liberian) South) African blog describes a way how to remove URL field URL manually

In short to Remove Url Comment Field manually either edit function.php (if you have Shell SSH access) or if not do it via Wp-Admin web interface:
 

WordPress admin page –> Appearance –> Editor


Paste at the end of file following PHP code:


add_filter('comment_form_default_fields', 'remove_url');
 function remove_url($fields)
 {
 if(isset($fields[‘url’]))
 unset($fields[‘url’]);
 return $fields;
 }


Now to make changes effect, Restart Apache / Nginx Webserver and clean any cache if you're using a plugin like W3 Total Cache plugin etc.

Other good posts describing some manual and embedded WordPress ways to reduce / stop comment spam is here and here, however as it comes to my blog, none of the described manual (code hack) ways I found worked on WordPress v. 4.1.
Thus I personally stuck to using Hide and Disable Comment URL plugin  to get rid of comment website URL.

How to get a list and Backup (Save Enabled Plugins) / Restore Enabled (Active) plugins in WordPress site with SQL query

Wednesday, January 14th, 2015

get-list-and-backup-restore-enabled-active-plugins-only-in-wordpress-with-sql-mysql-query

Getting a snapshot of all active plugins and keeping it for future in case if you install some broken plugin and you have to renable all enabled plugins from scratch is precious thing in WordPress.

… It is really annoying when you decide to try to enable few new plugins and out of a sudden your WordPress site / blog starts hanging (when accessed in browser)…

To fix it you have to Disable All Plugins and Re-enable all that used to work. However if you don't keep a copy of the plugins which were previously working and you're like me and have 109 plugins installed of which only 50 are in (Active) state / used. It could take you a day or two until you come up with a similar list to the ones you previously used … Thanksfully there is some prevention you can take by dumping a list of all plugins that are currently active and in later time only enable those in the list.


# mysql -u root -p
Enter password:

mysql> USE blog_db;

Here is the output I get in the moment:
 

mysql> DESCRIBE wp_options;
+————–+———————+——+—–+———+—————-+
| Field        | Type                | Null | Key | Default | Extra          |
+————–+———————+——+—–+———+—————-+
| option_id    | bigint(20) unsigned | NO   | PRI | NULL    | auto_increment |
| option_name  | varchar(64)         | NO   | UNI |         |                |
| option_value | longtext            | NO   |     | NULL    |                |
| autoload     | varchar(20)         | NO   |     | yes     |                |
+————–+———————+——+—–+———+—————-+


mysql> SELECT * FROM wp_options WHERE option_name = 'active_plugins';

|        38 | active_plugins | a:50:{i:0;s:45:"add-to-any-subscribe/add-to-any-subscribe.php";i:1;s:19:"akismet/akismet.php";i:2;s:43:"all-in-one-seo-pack/all_in_one_seo_pack.php";i:3;s:66:"ambrosite-nextprevious-post-link-plus/ambrosite-post-link-plus.php";i:4;s:49:"automatic-tag-selector/automatic-tag-selector.php";i:5;s:27:"autoptimize/autoptimize.php";i:6;s:35:"bm-custom-login/bm-custom-login.php";i:7;s:45:"ckeditor-for-wordpress/ckeditor_wordpress.php";i:8;s:47:"comment-info-detector/comment-info-detector.php";i:9;s:27:"comments-statistics/dcs.php";i:10;s:31:"cyr2lat-slugs/cyr2lat-slugs.php";i:11;s:49:"delete-duplicate-posts/delete-duplicate-posts.php";i:12;s:45:"ewww-image-optimizer/ewww-image-optimizer.php";i:13;s:34:"feedburner-plugin/fdfeedburner.php";i:14;s:39:"feedburner-widget/widget-feedburner.php";i:15;s:63:"feedburner_feedsmith_plugin_2.3/FeedBurner_FeedSmith_Plugin.php";i:16;s:21:"feedlist/feedlist.php";i:17;s:39:"force-publish-schedule/forcepublish.php";i:18;s:50:"google-analytics-for-wordpress/googleanalytics.php";i:19;s:81:"google-sitemap-generator-ultimate-tag-warrior-tags-addon/UTWgoogleSitemaps2_1.php";i:20;s:36:"google-sitemap-generator/sitemap.php";i:21;s:24:"headspace2/headspace.php";i:22;s:29:"my-link-order/mylinkorder.php";i:23;s:27:"php-code-widget/execphp.php";i:24;s:43:"post-plugin-library/post-plugin-library.php";i:25;s:35:"post-to-twitter/post-to-twitter.php";i:26;s:28:"profile-pics/profile-pic.php";i:27;s:27:"redirection/redirection.php";i:28;s:42:"scripts-to-footerphp/scripts-to-footer.php";i:29;s:29:"sem-dofollow/sem-dofollow.php";i:30;s:33:"seo-automatic-links/seo-links.php";i:31;s:23:"seo-slugs/seo-slugs.php";i:32;s:41:"seo-super-comments/seo-super-comments.php";i:33;s:31:"similar-posts/similar-posts.php";i:34;s:21:"sociable/sociable.php";i:35;s:44:"strictly-autotags/strictlyautotags.class.php";i:36;s:16:"text-control.php";i:37;s:19:"tidy-up/tidy_up.php";i:38;s:37:"tinymce-advanced/tinymce-advanced.php";i:39;s:33:"tweet-old-post/tweet-old-post.php";i:40;s:33:"w3-total-cache/w3-total-cache.php";i:41;s:44:"widget-settings-importexport/widget-data.php";i:42;s:54:"wordpress-23-related-posts-plugin/wp_related_posts.php";i:43;s:23:"wp-minify/wp-minify.php";i:44;s:27:"wp-optimize/wp-optimize.php";i:45;s:33:"wp-post-to-pdf/wp-post-to-pdf.php";i:46;s:29:"wp-postviews/wp-postviews.php";i:47;s:55:"wp-simple-paypal-donation/wp-simple-paypal-donation.php";i:48;s:46:"wp-social-seo-booster/wpsocial-seo-booster.php";i:49;s:31:"wptouch-pro-3/wptouch-pro-3.php";} | yes      |

Copy and paste this CVS format data to a text file or a Word document for later reference ..

To restore back to normal only active WordPress plugins, first launch following SQL query to disable all enabled wordpress plugins:

UPDATE wp_options SET option_value = 'a:0:{}' WHERE option_name = 'active_plugins';

To restore above "backupped" list of active WP plugins you have to copy paste the saved content and paste it into above UPDATE query substituting option_value=' ' with the backupped string.

P.S. – This query should work on WordPress 3.x on older wordpress ver 2.x use instead:

UPDATE wp_options SET option_value = ' ' WHERE option_name = 'active_plugins';

Because pasting the backupped Active plugins list CSV is a messy and unreadable from command line it is recommended for clarity to use PHPMyAdmin frontend (whenever it is available) on server. This little hint is a real time-saver and saves a lot of headaches. Before proceeding to any Db UPDATE SQL queries always backup your Blog database, with time structure of WordPress data changes!, so in future releases this method might not be working, however if it helped you and works on your version please drop a comment with WordPress version on which this helped you.

Enjoy! 🙂


WordPress Plugins to monitor and debug WP enabled plugins – Find Errors / Warnings and Remove WP problematic plugins slowing down your Website (blog) database

Thursday, February 19th, 2015

plugins-to-monitor-debug-wordpress-enabled-plugins-how-to-track-find-errors-and-warnings-and-remove-problematic-wp-extensions-that-slow-down-your-website

Recent days, I'm spending a lot of time again trying to optimize my wordpress blog. Optimizing WP for better efficiency is becoming harder and harder task day by day as the website file content data is growing along with SQL databases. Moreover situation gets even worse because the number of plugins enabled on my blog is incrementally growing with time because, there is more and more goodies I'd like to add.
Optimizing WordPress to run for Speed on a server is a whole a lot of art and its a small universe in itself, because as of time of writting this post the count (number) of WordPress available PLUGINS is 36,197 ! 

1. Manually Tracking WordPress  Plugins causing Slow SQL Queries (MySQL bottleneck) issues directly using console / SSH

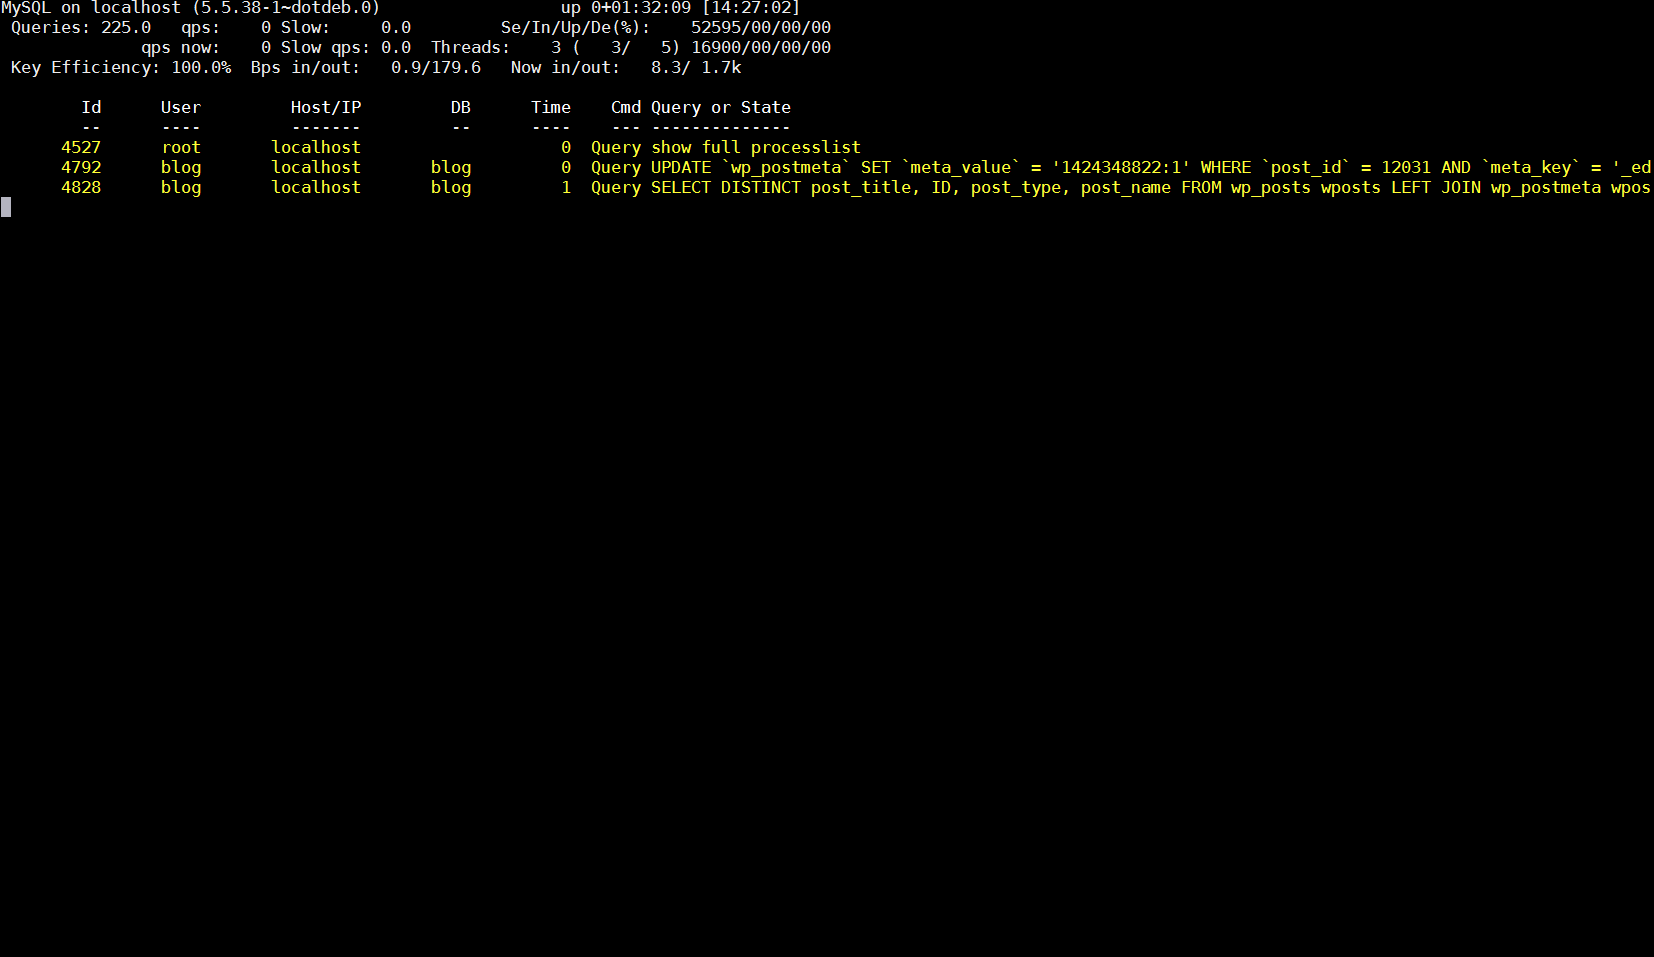
Because of its open source development and its nice modular design wordpress has turned into a standard for building small, middle sized and large websites (some WordPress based blogs and sites have from 50 000 to 100 000 unique pages!). My blog is still a small WordPress site with only 1676 posts, so I still haven't reached the high volume traffic optimization requirements but still even though I have a relatively good server hardware  8GB RAM / (2×2.70 Ghz Intel CPU) / 500 GB (7400 RPM HDD) at times I see Apache Webservers is unable to properly serve coming requests because of MySQL database (LEFT JOIN) requests being slow to serve (taking up to few seconds to complete) and creating a MySQL table lock, putting all the rest SQL queries to stay in a long unserved queues line, I've realized about this performance issue by using a a mysql cli (command) client and few commands and console command (tool) called mytop (also known as mtop). MyTop refreshes every 3 seconds, so the slow query will immediately stay on screen to view moer info about it press "f" and type the  in query ID.

mysql-top-running-on-gnu-linux-server-tracking-sql-queries-in-console-screenshot.png

mysql-top-running-on-gnu-linux-server-tracking-sql-queries-in-console-screenshot2

Finally it is very useful to run  for a while MySQL server logging to /var/log/mysql/slow-query.log:
Slow query is enabled (on my Debian 7 Wheezy host) by adding to /etc/mysql/my.cnf
after conf section


vim /etc/mysql/my.cnf
#
# * Logging and Replication
#
# Both location gets rotated by the cronjob.
# Be aware that this log type is a performance killer.
# As of 5.1 you can enable the log at runtime!
#general_log_file        = /var/log/mysql/mysql.log
#general_log             = 1
#
# Error logging goes to syslog due to /etc/mysql/conf.d/mysqld_safe_syslog.cnf.
#
# Here you can see queries with especially long duration


Paste:


slow_query_log = 1
slow_query_log_file = /var/log/mysql/slow-query.log
long_query_time = 2
log-queries-not-using-indexes


And then to make new mysql configuration load restarted mysql server:


debian-server:~# /etc/init.d/mysql restart
Stopping MySQL database server: mysqld.
Starting MySQL database server: mysqld ..
Checking for tables which need an upgrade, are corrupt or were
not closed cleanly..


Leaving mysql-slow.log to be enabled for 30 minutes to an 1 hrs is a good time to track most problematic slow queries and based on this queries, I took parts of  SQL UPDATE / SELECT / INSERT etc. Db queries which was problematic and grepped throughout /var/www/blog/wp-content/plugin files in order to determine which WordPress Plugin is triggering the slow query, causing blog to hang when too many clients try to see it in browser.

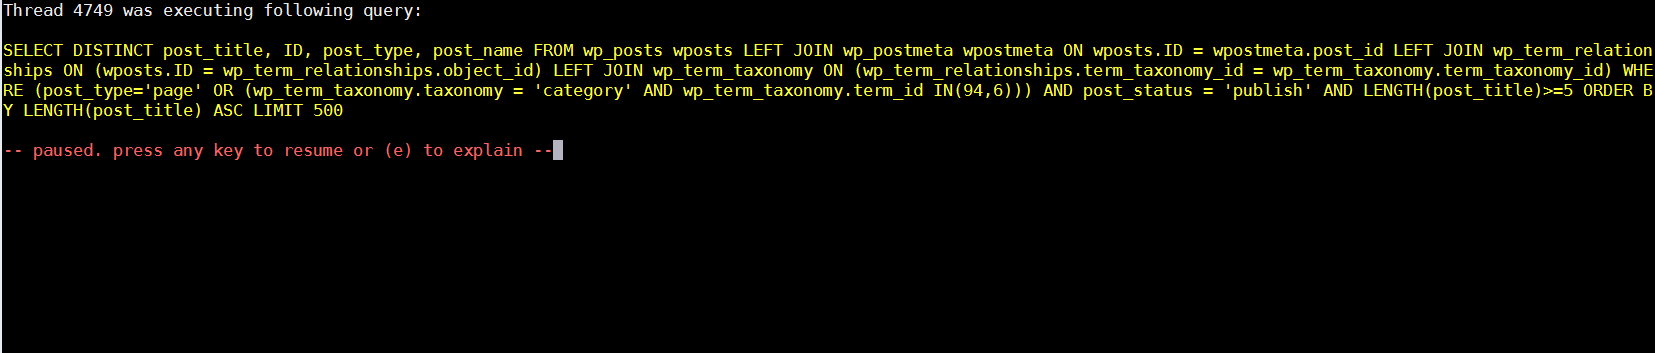
My main problematic SQL query having long execution time  (about 2 to 3 seconds!!!) most commonly occuring in slow-query.log was:


SELECT DISTINCT post_title, ID, post_type, post_name FROM wp_posts wposts LEFT JOIN wp_postmeta wpostmeta ON wposts.ID = wpostmeta.post_id LEFT JOIN wp_term_relationships ON (wposts.ID = wp_term_relationships.object_id) LEFT JOIN wp_term_taxonomy ON (wp_term_relationships.term_taxonomy_id = wp_term_taxonomy.term_taxonomy_id) WHERE (post_type='page' OR (wp_term_taxonomy.taxonomy = 'category' AND wp_term_taxonomy.term_id IN(11))) AND post_status = 'publish' AND LENGTH(post_title)>=5 ORDER BY LENGTH(post_title) ASC LIMIT 500

Because above query uses SQL Column names and Tables which are not hard coded in PHP code, to find out which plugins is most probably to launch this complex LEFT JOIN query, I used a quick bash one-liner:


# cd /var/www/blog/wp-content/plugins


# for i in $(grep -rli 'SELECT DISTINCT' *); do grep -rli 'LEFT JOIN' $i; done 
./seo-automatic-links/seo-links.php
./wp-postviews/wp-postviews.php
./yet-another-related-posts-plugin/classes/YARPP_Cache_Tables.php


I wanted to put less load on CPU during grep so looked for string only in .PHP extensioned files with:


 # for i in $(find . -iname '*.php' -exec grep -rli 'SELECT DISTINCT' '{}' \;); do grep -rli 'LEFT JOIN' $i; done
./seo-automatic-links/seo-links.php
./wp-postviews/wp-postviews.php
./yet-another-related-posts-plugin/classes/YARPP_Cache_Tables.php


As you can see the complex query is being called from PHP file belonging to one of 3 plugins

  • SEO Automatic Links – this is SEO Smart Links WP plugin (Does internal bliog interlinking in order to boast SEA)
  • WP PostViews – WordPress Post Views plugin (Which allows me to show how many times an article was read in WP Widget menu)
  • Yet Another Related Posts – Which is WP plugin I installed / enabled to show Related posts down on each blog post


2. Basic way to optimize MySQL slow queries (EXPLAIN / SHOW CREATE TABLE)

Now as I have a basic clue on plugins locking my Database, I disabled them one by one while keeping enabled mysql slow query log and viewing queries in mytop and I figure out that actually all of the plugins were causing a short time overheat (lock) on server Database because of LEFT JOINs. Though I really like what this plugins are doing, as they boast SEO and attract prefer to disable them for now and have my blog all the time responsible light fast instead of having a little bit better Search Engine Optimization (Ranking) and loosing many of my visitors because they're annoyed to wait until my articles open

Before disabling I tried to optimize the queries using MySQL EXPLAIN command + SHOW CREATE TABLE (2 commands often used to debug slow SQL queries and find out whether a Column needs to have added INDEX-ing to boast MySQL query).

Just in case if you decide to give them a try here is example on how they're used to debug problematic SQL query:
 

  1. mysql> explain SELECT DISTINCT post_title, ID, post_type, post_name
  2.     -> FROM wp_posts wposts LEFT JOIN wp_postmeta wpostmeta
  3.     -> ON wposts.ID = wpostmeta.post_id LEFT JOIN wp_term_relationships
  4.     -> ON (wposts.ID = wp_term_relationships.object_id) LEFT JOIN wp_term_taxonomy
  5.     -> ON (wp_term_relationships.term_taxonomy_id = wp_term_taxonomy.term_taxonomy_id)
  6.     -> WHERE (post_type='page'
  7.     -> OR (wp_term_taxonomy.taxonomy = 'category'
  8.     -> AND wp_term_taxonomy.term_id IN(11,15,17)))
  9.     -> AND post_status = 'publish'
  10.     -> AND LENGTH(post_title)>=5
  11.     -> ORDER BY LENGTH(post_title) ASC
  12.     -> LIMIT 500;
  13. +—-+————-+———————–+——–+——————+———+———+———————————————+——+———————————————-+
  14. | id | select_type | table                 | type   | possible_keys    | key     | key_len | ref                                         | rows | Extra                                        |
  15. +—-+————-+———————–+——–+——————+———+———+———————————————+——+———————————————-+
  16. |  1 | SIMPLE      | wposts                | ALL    | type_status_date | NULL    | NULL    | NULL                                        | 1715 | Using where; Using temporary; Using filesort |
  17. |  1 | SIMPLE      | wpostmeta             | ref    | post_id          | post_id | 8       | blog.wposts.ID                              |   11 | Using index; Distinct                        |
  18. |  1 | SIMPLE      | wp_term_relationships | ref    | PRIMARY          | PRIMARY | 8       | blog.wposts.ID                              |   19 | Using index; Distinct                        |
  19. |  1 | SIMPLE      | wp_term_taxonomy      | eq_ref | PRIMARY          | PRIMARY | 8       | blog.wp_term_relationships.term_taxonomy_id |    1 | Using where; Distinct                        |
  20. +—-+————-+———————–+——–+——————+———+———+———————————————+——+———————————————-+
  21. 4 rows in set (0.02 sec)
  22.  
  23. mysql>
  24.  


  1. mysql> show create table wp_posts;
  2. +———-+————————–+
  3. | Table    | Create Table                                                                                                                                                                                                                                                                                                                                                                                                                                 |
  4. +———-+————————–+
  5. | wp_posts | CREATE TABLE `wp_posts` (
  6.   `ID` bigint(20) unsigned NOT NULL AUTO_INCREMENT,
  7.   `post_author` bigint(20) unsigned NOT NULL DEFAULT '0',
  8.   `post_date` datetime NOT NULL DEFAULT '0000-00-00 00:00:00',
  9.   `post_date_gmt` datetime NOT NULL DEFAULT '0000-00-00 00:00:00',
  10.   `post_content` longtext NOT NULL,
  11.   `post_title` text NOT NULL,
  12.   `post_excerpt` text NOT NULL,
  13.   `post_status` varchar(20) NOT NULL DEFAULT 'publish',
  14.   `comment_status` varchar(20) NOT NULL DEFAULT 'open',
  15.   `ping_status` varchar(20) NOT NULL DEFAULT 'open',
  16.   `post_password` varchar(20) NOT NULL DEFAULT '',
  17.   `post_name` varchar(200) NOT NULL DEFAULT '',
  18.   `to_ping` text NOT NULL,
  19.   `pinged` text NOT NULL,
  20.   `post_modified` datetime NOT NULL DEFAULT '0000-00-00 00:00:00',
  21.   `post_modified_gmt` datetime NOT NULL DEFAULT '0000-00-00 00:00:00',
  22.   `post_content_filtered` longtext NOT NULL,
  23.   `post_parent` bigint(20) unsigned NOT NULL DEFAULT '0',
  24.   `guid` varchar(255) NOT NULL DEFAULT '',
  25.   `menu_order` int(11) NOT NULL DEFAULT '0',
  26.   `post_type` varchar(20) NOT NULL DEFAULT 'post',
  27.   `post_mime_type` varchar(100) NOT NULL DEFAULT '',
  28.   `comment_count` bigint(20) NOT NULL DEFAULT '0',
  29.   PRIMARY KEY (`ID`),
  30.   KEY `post_name` (`post_name`),
  31.   KEY `type_status_date` (`post_type`,`post_status`,`post_date`,`ID`),
  32.   KEY `post_parent` (`post_parent`),
  33.   KEY `post_author` (`post_author`),
  34.   FULLTEXT KEY `post_related` (`post_title`,`post_content`)
  35. ) ENGINE=MyISAM AUTO_INCREMENT=12033 DEFAULT CHARSET=utf8 |
  36. +———-+———————-+
  37. 1 row in set (0.00 sec)
  38.  
  39. mysql>
  40.  


By the way above output is a paste from the the new PasteBin Open Source (Stikked powered) service I started on www.pc-freak.net – paste.www.pc-freak.net (p.www.pc-freak.net) 🙂

Before I took final decision to disable slow WP plugins, I've experimented a bit trying to add INDEX to Table Column (wposts) in hope that this would speed up SQL queries with:


mysql> ALTER TABLE TABLE_NAME ADD INDEX (wposts);


But this didn't improve query speed even on the contrary it make execution time worse.

3. Tracking WordPress Plugin PHP Code Execution time and Plugins causing Slow SQL Queries (MySQL bottleneck) issues through WP itself

Well fine, I'm running my own hosted Blog and WordPress sites, but for people who have wordpress sites on shared hosting, there is usually no SSH (Terminal) Access to server, those people will be happy to hear there are 2 Free easy installable WordPress plugins which can be used to Debug Slow WordPress Plugins SQL Queries as well as plugin to Track which plugin takes most time to execute, this are:


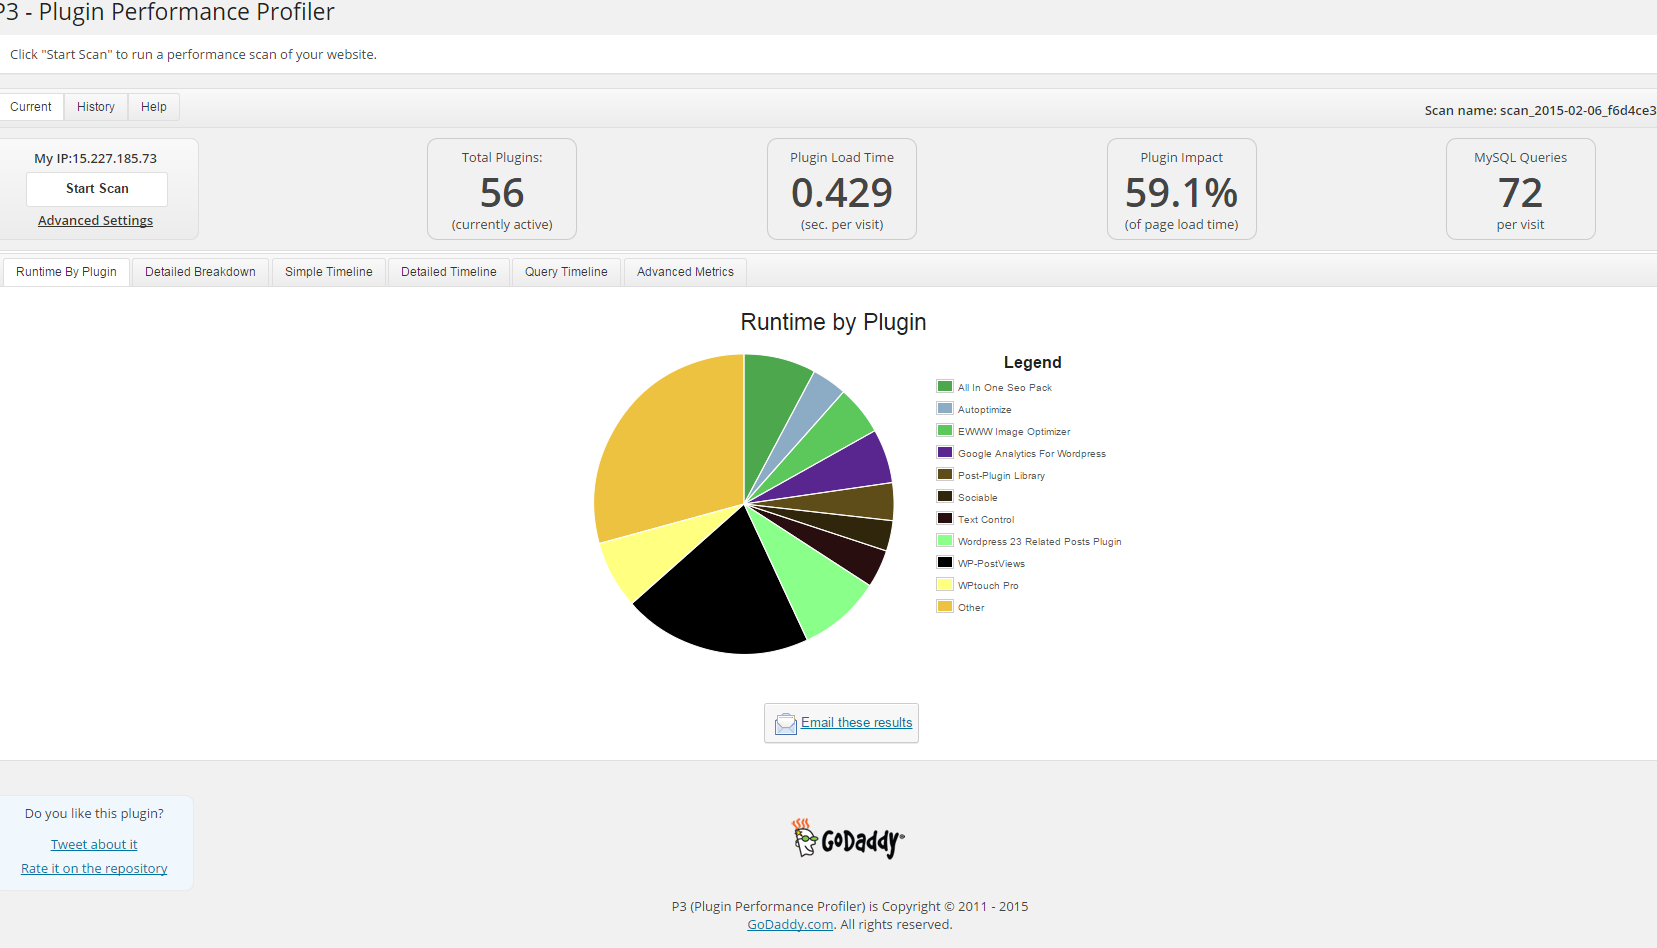
a) P3 Plugin Performance Profiler  

runs a scan over your site to determine what resources your plugins are using, and when, during a standard page request. P3 PPP Can even create reports in a beatiful Excel like Pie chart sheet.

p3-plugin-performance-profiler-godaddy-screenshot-debian-gnu-linux-wordpress-website

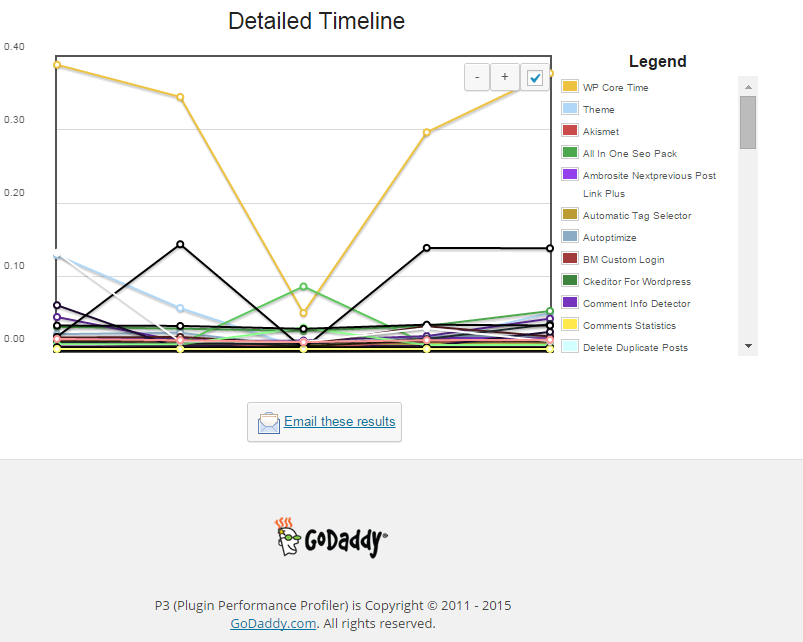
Another useful thing to see with P3 PPP is Detailed Timeline it shows when the plugins are being loaded during new page request so you can see if there is a certain sequence in time when a plugin slows down the website.

detailed_timeline-wordpress-p3-performance-plugin-on-website-screenshot

The pictures says it all as P3 PPP is Godaddy's work, congrats to GoDaddy, they've done great job.


b) WordPress memory Viewer WP plugins

Is useful to check how much memory each of WordPress plugin is taking on user (visitor) request.
Memory Viewer is allows you to view WordPress’ memory utilization at several hooks during WordPress’ execution. It also shows a summary of MySQL Queries that have ran as well as CPU time.
To use it download it to plugins/ folder as usual enable it from:

Installed Plugins -> (Inactive) -> Memory Viewer (Enable)

To see statistics from Memory Viewer open any post from your blog website and scroll down to the bottom you will notice the statistics, showing up there, like on below screenshot.

wordpress-memory-viewer-plugin-debian-gnu-linux-hosted-website-show-which-plugin-component-eats-most-memory-in-wordprses-blog
 

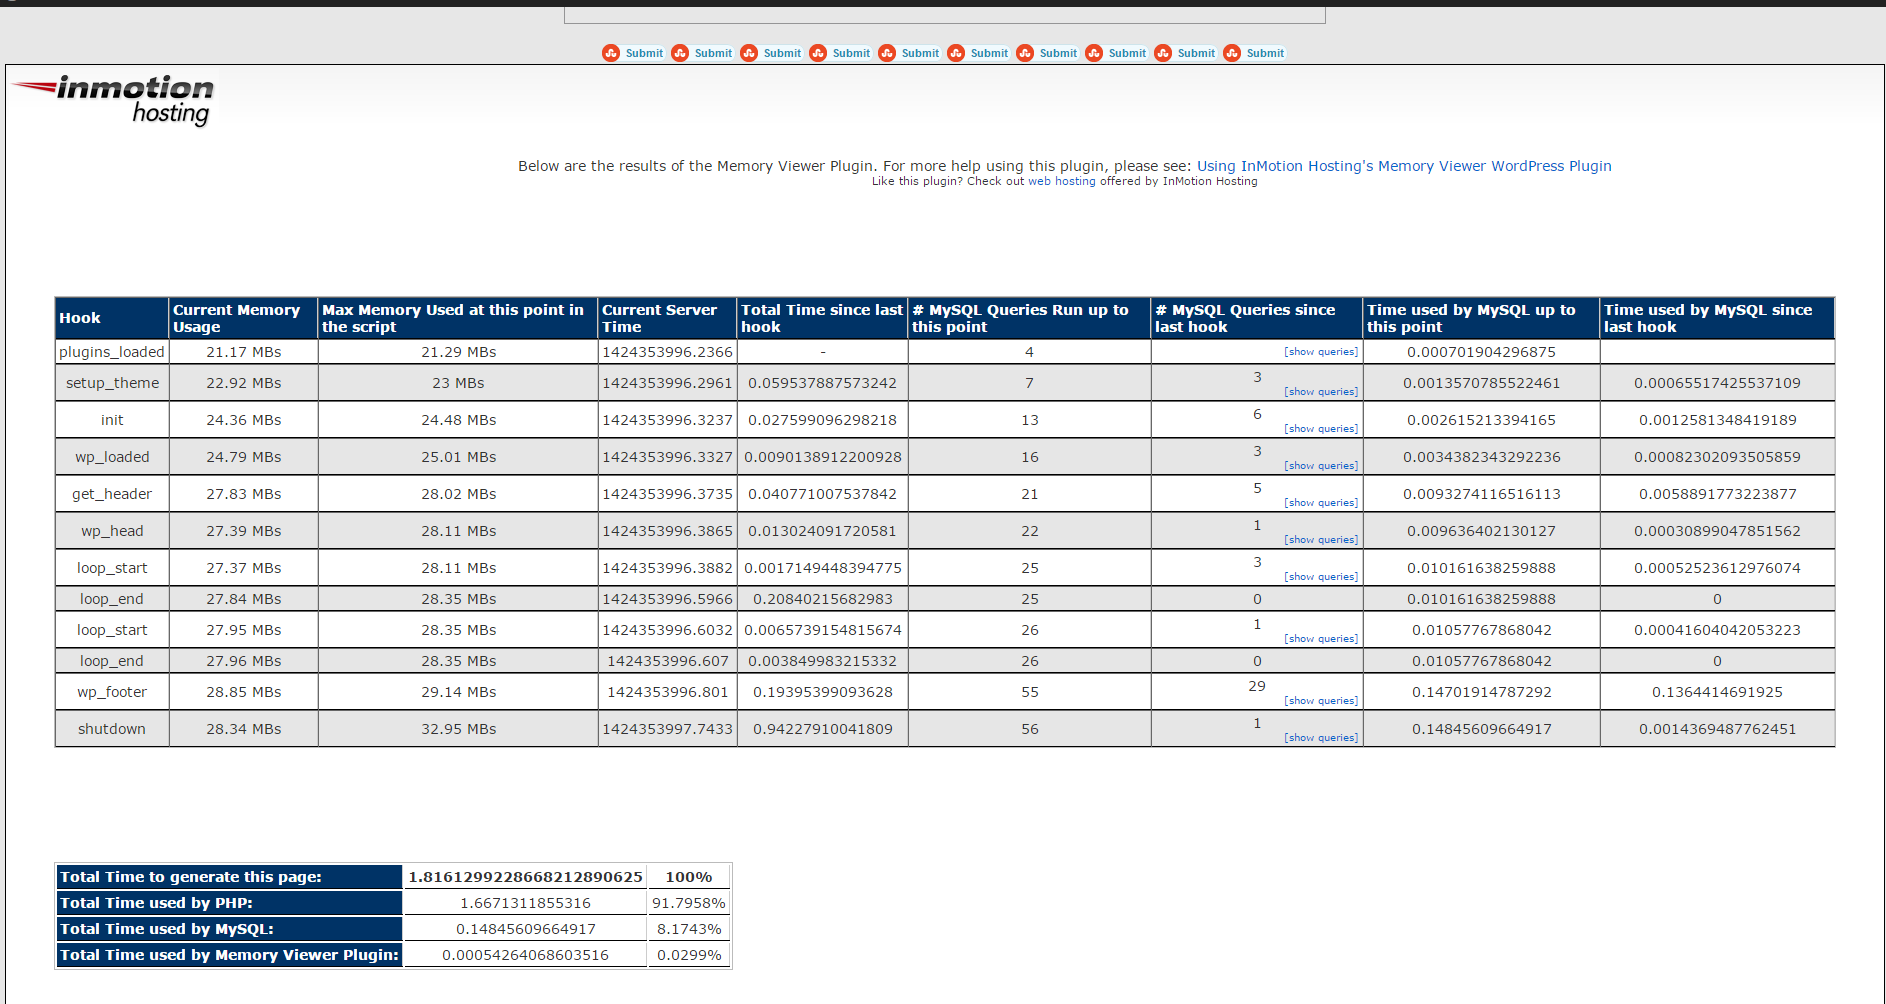
Though WP Memory Viewer is said to work only up to WP version 3.2.1, I've tested it and it works fine on my latest stable WordPress 4.1 based blog.

c) WordPress Query Monitor

wordpress-query-monitor-plugin-to-monitor-track-and-optimize-problems-with-sql-caused-by-wp-plugins.png
 

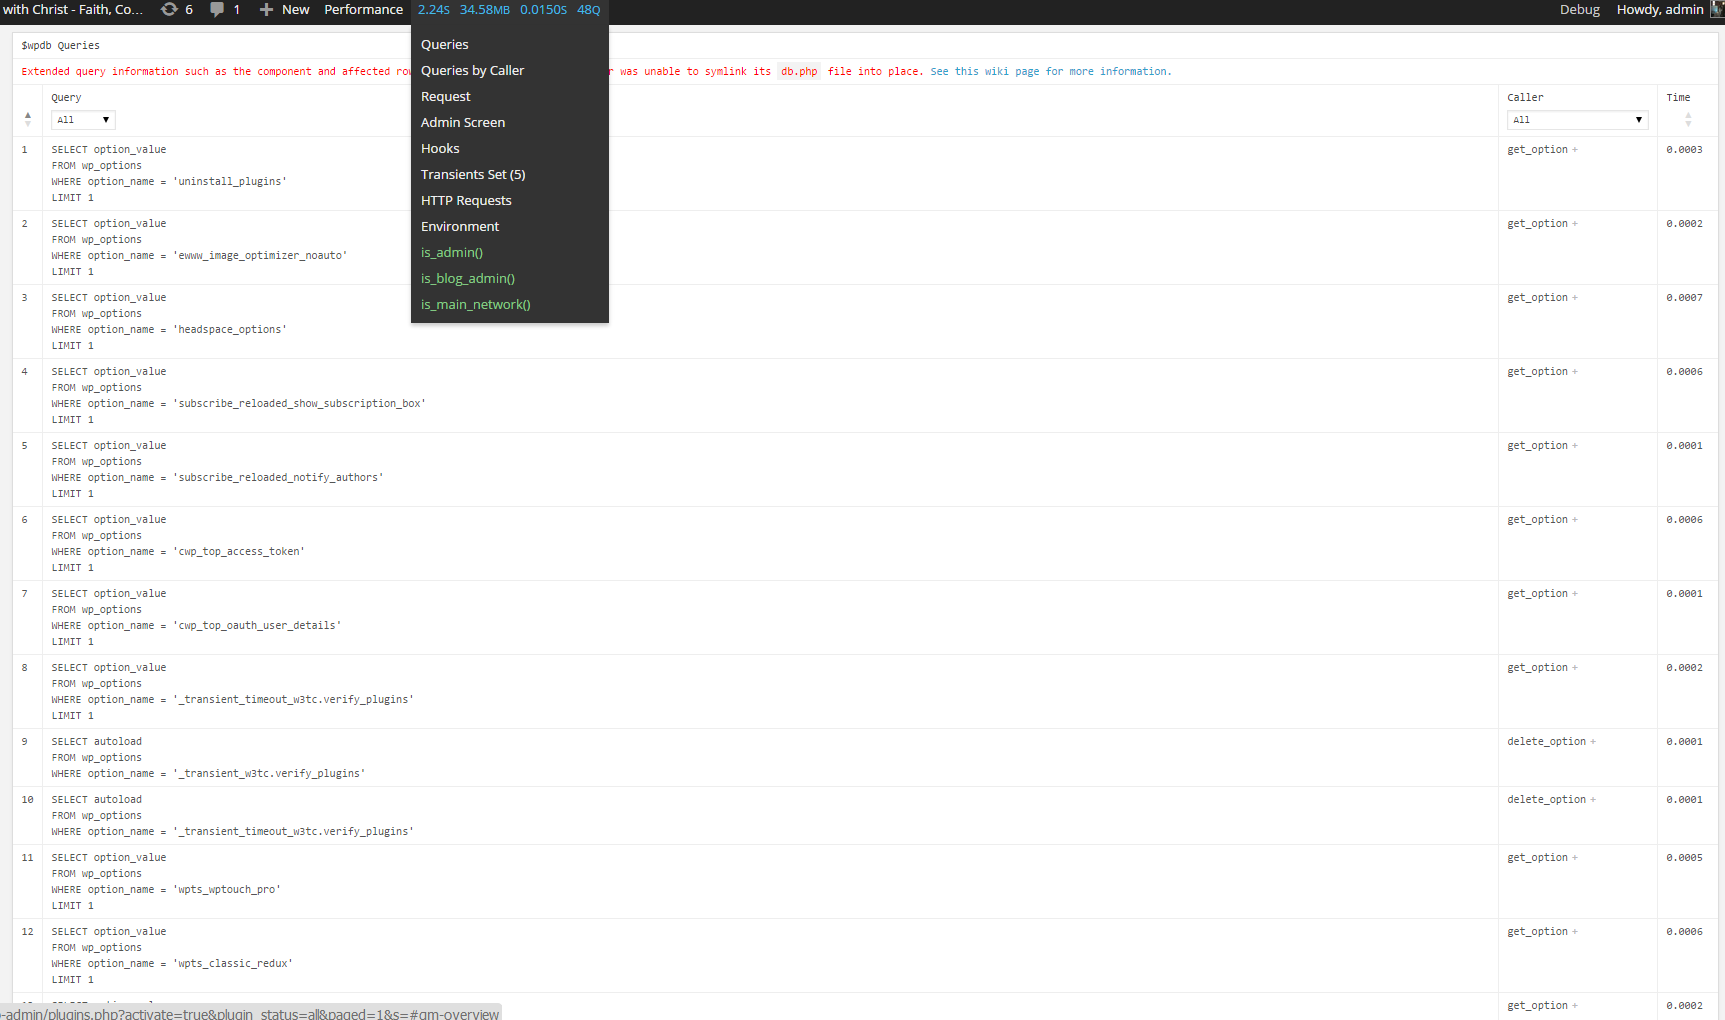
Query Monitor is a debugging plugin for anyone developing with WordPress but also very helpful for anyone who want to track issues with plugins who use the database unefficient.
It has some advanced features not available in other debugging plugins, including automatic AJAX debugging and the ability to narrow down things by plugin or theme.
You can view plenty of precious statistics on how enabled plugins query the database server, here is a short overview on its Database Queries capabilities:

  • Shows all database queries performed on the current page
  • Shows affected rows and time for all queries
  • Show notifications for slow queries and queries with errors
  • Filter queries by query type (SELECT, UPDATE, DELETE, etc)
  • Filter queries by component (WordPress core, Plugin X, Plugin Y, theme)
  • Filter queries by calling function
  • View aggregate query information grouped by component, calling function, and type
  • Super advanced: Supports multiple instances of wpdb on one page
  • Once enabled from Plugins you will see it appear as a new menu on bottom Admin raw.

An important note to make here is latest Query Monitor extension fails when loaded on current latest Wordpress 4.1, to use it you will have to download and useolder Query Monitor plugin version 2.6.8 you can download it from here
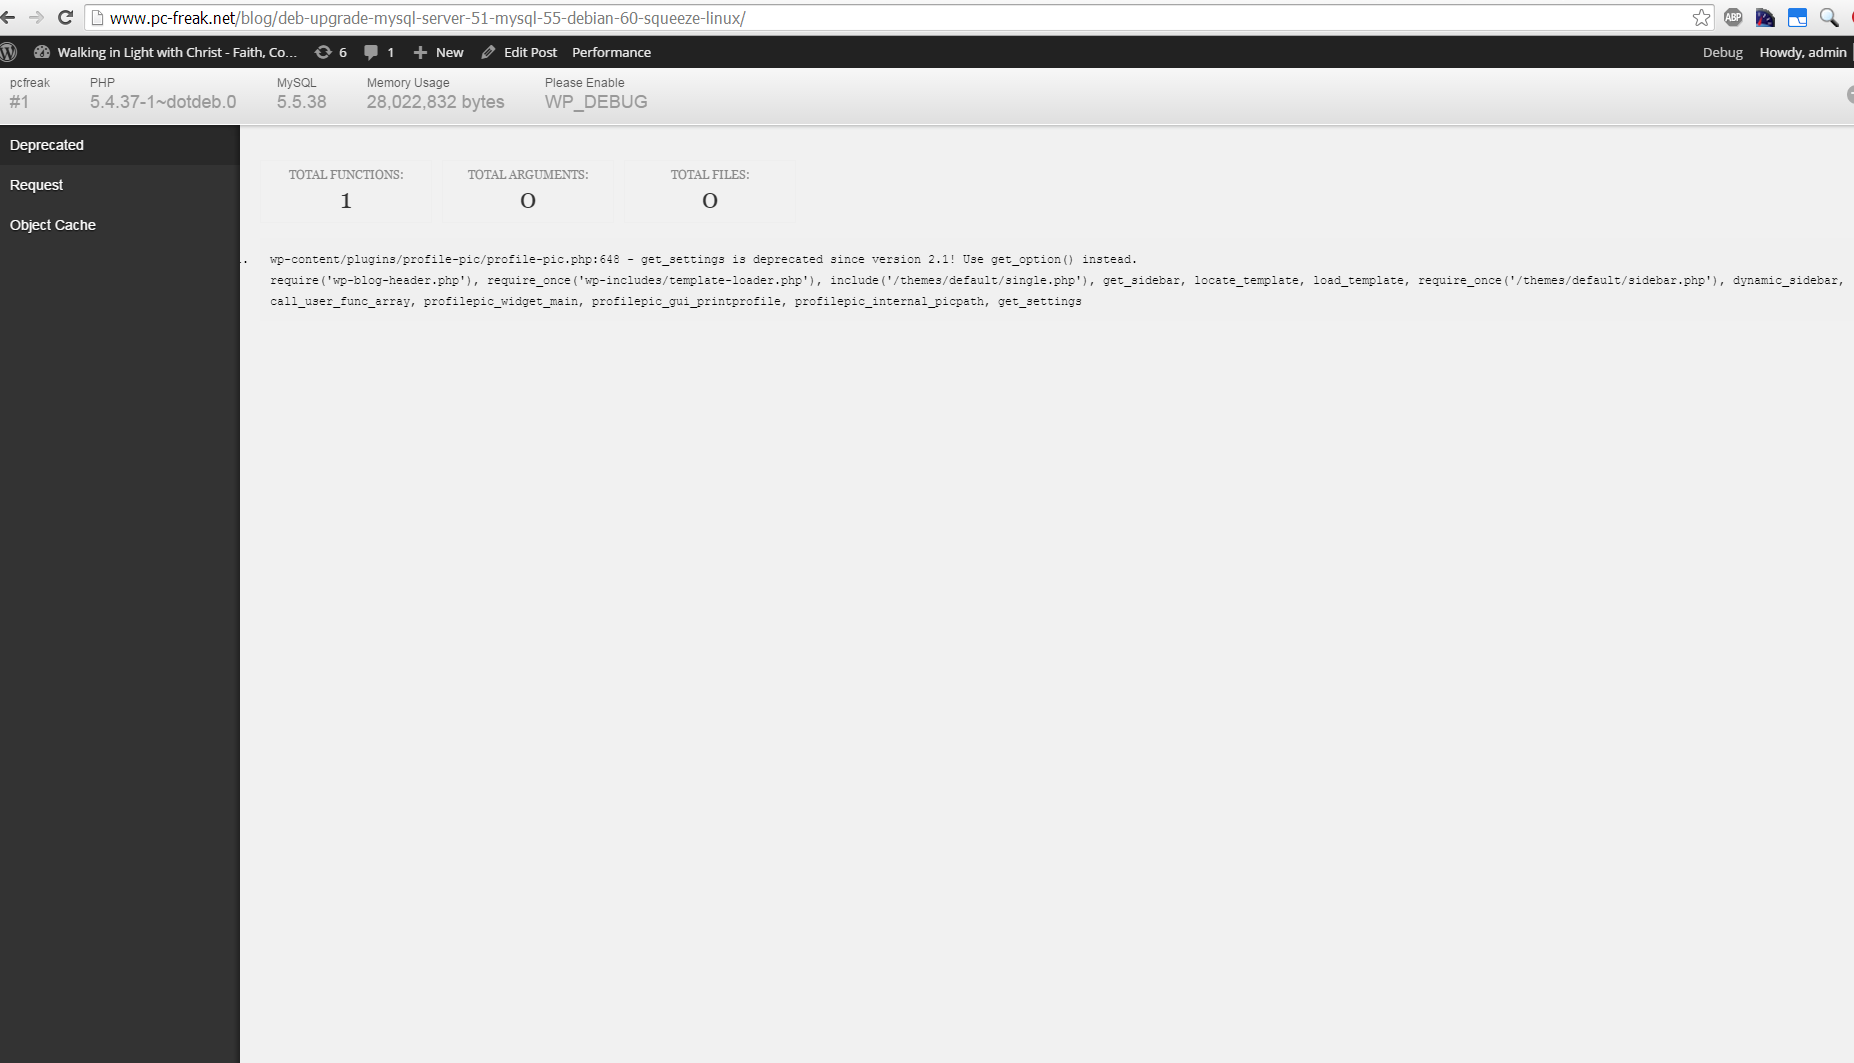
d) Debug Bar

If you want you want a Memory Viewer like plugin for more complex used components memory debugging, reporting if (WP_DEBUG is set in wp-config.php) also check out Debug Bar .
For me Debug Bar was very useful because it show me depreciated functions some plugins used, so I substituted the obsoleted function with new one.


debug-bar-debug-wordpress-plugins-memory-use-screenshot-website


4. Server Hardware hungry (slow) WordPress plugins that you better not use

While spending time to Google for some fixes to WP slow query plugins – I've stumbled upon this post giving a good list with WordPress Plugins better off not to use because they will slow down your site
This is a publicly well known list of WP plugins every WordPress based site adminstrator should avoid, but until today I didn't know so my assumption is you don't know either ..

Below plugins are extremely database intensive mentioned in article that we should better (in all cases!) avoid:

  • Dynamic Related Posts
  • SEO Auto Links & Related Posts
  • Yet Another Related Posts Plugin
  • Similar Posts
  • Contextual Related Posts
  • Broken Link Checker — Overwhelms even our robust caching layer with an inordinate amount of HTTP requests.
  • MyReviewPlugin — Slams the database with a fairly significant amount of writes.
  • LinkMan — Much like the MyReviewPlugin above, LinkMan utilizes an unscalable amount of database writes.
  • Fuzzy SEO Booster — Causes MySQL issues as a site becomes more popular.
  • WP PostViews — Inefficiently writes to the database on every page load. To track traffic in a more scalable manner, both the stats module in Automattic’s Jetpack plugin and Google Analytics work wonderfully.
  • Tweet Blender — Does not play nicely with our caching layer and can cause increased server load.


A good Complete list of known WordPress slow plugins that will hammer down your wordpress performance is here

There are few alternatives to this plugins and when I have some free time I will download and test their alternatives but for now I plan the plugins to stay disabled.
 

For the absolute WP Performance Optimization Freaks, its good to check out the native way to Debug a wordpress installation through using few embedded
variables


define('WP_DEBUG', true);
define('WP_DEBUG', false);
define('WP_DEBUG_LOG', true);
define('WP_DEBUG_DISPLAY', false);
define('SAVEQUERIES', true);


An article describing how you can use native WP debug variables is here


Happy Optimizing  ! 🙂

Linux: List last 10 (newest) and 10 oldest modified files in a directory with ls

Tuesday, April 8th, 2014

An useful thing on GNU / Linux sometimes is to list last or oldest modified files in directory.

Lets say you want to list last 10 modified files with ls from today / yesterday. Here is how:
 

ls -1t | head -10
my.cnf
wordperss_enabled_plugins.txt
newcerts/
mysql-hipo_pcfreakbiz.dump
NewArchive-Jan-10-15.zip
hipo_pcfreakbiz-mysqldb-any-out-1389361234.tgz
Tisho_Snimki/
wordpress/
wp-cron.php?doing_wp_cron=1.1
wp-cron.php


To list 10 oldest modified files on Linux:


ls -1t | tail -10
    my.cnf
    pcfreak_sql-15_10_05_2012
    mysql-tuning-primer*
    tuning-primer.sh*
    system-administration-services.html
    blog_backup_15_07_2012.tar.gz
    www-files/
    dump.sql
    courier-imap*
    djbdns-1.05.tar.gz


Cheers 😉

Finding spam sending php scripts on multiple sites servers – Tracing and stopping spammer PHP scripts

Monday, April 14th, 2014

stop_php_mail-spam-find-spammer-and-stop-php-spammer-websites
Spam has become a severe issue for administrators, not only for mail server admins but also for webshosting adms. Even the most secure spam protected mail server can get affected by spam due to fact it is configured to relay mail from other servers acting as web hosting sites.

Webhosting companies almost always suffer seriously from spam issues and often their mail servers gets blocked (enter spam blacklists), because of their irresponsible clients uploading lets say old vulnerable Joomla, WordPress without Akismet or proper spam handling plugin,a CMS which is not frequently supported / updated or custom client insecure php code.

What I mean is Shared server A is often configured to sent mail via (mail) server B. And often some of the many websites / scripts hosted on server A gets hacked and a spam form is uploaded and tons of spam start being shipped via mail server B.

Of course on mail server level it is possible to configure delay between mail sent and adopt a couple of policies to reduce spam, but the spam protection issue can't be completely solved thus admin of such server is forced to periodically keep an eye on what mail is sent from hosting server to mail server.


If you happen to be one of those Linux (Unix) webhosting admins who find few thousand of spammer emails into mail server logs or your eMail server queue and you can't seem to find what is causing it, cause there are multiple websites shared hosting using mainly PHP + SQL and you can't identify what php script is spamming by reviewing  Apache log / PHP files. What you can do is get use of:

PHP mail.log directive

Precious tool in tracking spam issues is a PHP Mail.log parameter, mail log paramater is available since PHP version >= 5.3.0 and above.
PHP Mail.log parameter records all calls to the PHP mail() function including exact PHP headers, line numbers and path to script initiating mail sent.

Here is how it is used:
 

1. Create empty PHP Mail.log file

touch /var/log/phpmail.log

File has to be writtable to same user with which Apache is running in case of Apache with SuPHP running file has to be writtable by all users.

On Debian, Ubunut Linux:

chown www:data:www-data /var/log/phpmail.log

On CentOS, RHEL, SuSE phpmail.log has to be owned by httpd:

chown httpd:httpd /var/log/phpmail.log

On some other distros it might be chown nobody:nobody etc. depending on the user with which Apache server is running.


2. Add to php.ini configuration following lines

mail.add_x_header = On
mail.log = /var/log/phpmail.log

PHP directive instructs PHP to log complete outbund Mail header sent by mail() function, containing the UID of the web server or PHP process and the name of the script that sent the email;
 

(X-PHP-Originating-Script: 33:mailer.php)


i.e. it will make php start logging to phpmail.log stuff like:


mail() on [/var/www/pomoriemonasteryorg/components/com_xmap/2ktdz2.php:1]: To: info@globalremarketing.com.au — Headers: From: "Priority Mail" <status_93@pomoriemon
astery.org> X-Mailer: MailMagic2.0 Reply-To: "Priority Mail" <status_93@pomoriemonastery.com> Mime-Version: 1.0 Content-Type: multipart/alternative;boundary="——
—-13972215105347E886BADB5"
mail() on [/var/www/pomoriemonasteryorg/components/com_xmap/2ktdz2.php:1]: To: demil7167@yahoo.com — Headers: From: "One Day Shipping" <status_44@pomoriemonastery.
org> X-Mailer: CSMTPConnectionv1.3 Reply-To: "One Day Shipping" <status_44@pomoriemonastery.com> Mime-Version: 1.0 Content-Type: multipart/alternative;boundary="—
——-13972215105347E886BD344"
mail() on [/var/www/pomoriemonasteryorg/components/com_xmap/2ktdz2.php:1]: To: domainmanager@nadenranshepovser.biz — Headers: From: "Logistics Services" <customer.
id86@pomoriemonastery.com> X-Mailer: TheBat!(v3.99.27)UNREG Reply-To: "Logistics Services" <customer.id86@pomoriemonastery.com> Mime-Version: 1.0 Content-Type: mult
ipart/alternative;boundary="———-13972215105347E886BF43E"
mail() on [/var/www/pomoriemonasteryorg/components/com_xmap/2ktdz2.php:1]: To: bluesapphire89@yahoo.com — Headers: From: "Priority Mail" <status_73@pomoriemonaster
y.org> X-Mailer: FastMailer/Webmail(versionSM/1.2.6) Reply-To: "Priority Mail" <status_73@pomoriemonastery.com> Mime-Version: 1.0 Content-Type: multipart/alternativ
e;boundary="———-13972215105347E886C13F2"


On Debian / Ubuntu Linux to enable this logging, exec:

echo 'mail.add_x_header = On' >> /etc/php5/apache2/php.ini
echo 'mail.log = /var/log/phpmail.log' >> /etc/php5/apache2/php.ini


I find it useful to symlink /etc/php5/apache2/php.ini to /etc/php.ini its much easier to remember php location plus it is a standard location for many RPM based distros.

ln -sf /etc/php5/apache2/php.ini /etc/php.ini

Or another "Debian recommended way" to enable mail.add_x_header logging on Debian is via:

echo 'mail.add_x_header = On' >> /etc/php5/conf.d/mail.ini
echo 'mail.log = /var/log/phpmail.log' >> /etc/php5/conf.d/mail.ini

On Redhats (RHEL, CentOS, SuSE) Linux issue:

echo 'mail.add_x_header = On' >> /etc/php.ini
echo 'mail.log = /var/log/phpmail.log' >> /etc/php.ini

3. Restart Apache

On Debian / Ubuntu based linuces:

/etc/init.d/apache2 restart

P.S. Normally to restart Apache without interrupting client connections graceful option can be used, i.e. instead of restarting do:

/etc/init.d/apache2 graceful

On RPM baed CentOS, Fedora etc.:

/sbin/service httpd restart

or

apachectl graceful
 

4. Reading the log

To review in real time exact PHP scripts sending tons of spam tail it:

tail -f /var/log/phpmail.log


mail() on [/var/www/remote-admin/wp-includes/class-phpmailer.php:489]: To: theosfp813@hotmail.com — Headers: Date: Mon, 14 Apr 2014 03:27:23 +0000 Return-Path: wordpress@remotesystemadministration.com From: WordPress Message-ID: X-Priority: 3 X-Mailer: PHPMailer (phpmailer.sourceforge.net) [version 2.0.4] MIME-Version: 1.0 Content-Transfer-Encoding: 8bit Content-Type: text/plain; charset="UTF-8"
mail() on [/var/www/pomoriemonasteryorg/media/rsinstall_4de38d919da01/admin/js/tiny_mce/plugins/inlinepopups/skins/.3a1a1c.php:1]: To: 2070ccrabb@kiakom.net — Headers: From: "Manager Elijah Castillo" <elijah_castillo32@pomoriemonastery.com> X-Mailer: Mozilla/5.0 (Windows; U; Windows NT 5.0; es-ES; rv:1.9.1.7) Gecko/20100111 Thunderbird/3.0.1 Reply-To: "Manager Elijah Castillo" <elijah_castillo32@pomoriemonastery.com> Mime-Version: 1.0 Content-Type: multipart/alternative;boundary="———-1397463670534B9A76017CC"
mail() on [/var/www/pomoriemonasteryorg/media/rsinstall_4de38d919da01/admin/js/tiny_mce/plugins/inlinepopups/skins/.3a1a1c.php:1]: To: 20wmwebinfo@schools.bedfordshire.gov.uk — Headers: From: "Manager Justin Murphy" <justin_murphy16@pomoriemonastery.com> X-Mailer: Opera Mail/10.62 (Win32) Reply-To: "Manager Justin Murphy" <justin_murphy16@pomoriemonastery.com> Mime-Version: 1.0 Content-Type: multipart/alternative;boundary="———-1397463670534B9A7603ED6"
mail() on [/var/www/pomoriemonasteryorg/media/rsinstall_4de38d919da01/admin/js/tiny_mce/plugins/inlinepopups/skins/.3a1a1c.php:1]: To: tynyrilak@yahoo.com — Headers: From: "Manager Elijah Castillo" <elijah_castillo83@pomoriemonastery.com> X-Mailer: Mozilla/5.0 (Macintosh; U; Intel Mac OS X 10.5; pl; rv:1.9.1.9) Gecko/20100317 Thunderbird/3.0.4 Reply-To: "Manager Elijah Castillo" <elijah_castillo83@pomoriemonastery.com> Mime-Version: 1.0 Content-Type: multipart/alternative;boundary="———-1397463670534B9A7606308"
mail() on [/var/www/pomoriemonasteryorg/media/rsinstall_4de38d919da01/admin/js/tiny_mce/plugins/inlinepopups/skins/.3a1a1c.php:1]: To: 2112macdo1@armymail.mod.uk — Headers: From: "Manager Justin Murphy" <justin_murphy41@pomoriemonastery.com> X-Mailer: Mozilla/5.0 (Macintosh; U; Intel Mac OS X 10.5; pl; rv:1.9.1.9) Gecko/20100317 Thunderbird/3.0.4 Reply-To: "Manager Justin Murphy" <justin_murphy41@pomoriemonastery.com> Mime-Version: 1.0 Content-Type: multipart/alternative;boundary="———-1397463670534B9A76086D1"


As you can see there is a junky spam mails sent via some spammer script uploaded under name .3a1a1c.php, so to stop the dirty bastard, deleted the script:

rm -f /var/www/pomoriemonasteryorg/media/rsinstall_4de38d919da01/admin/js/tiny_mce/plugins/inlinepopups/skins/.3a1a1c.php

It is generally useful to also check (search) for all hidden .php files inside directoring storing multiple virtualhost websites, as often a weirdly named hidden .php is sure indicator of either a PHP Shell script kiddie tool or a spammer form.

Here is how to Find all Hidden Perl / PHP scripts inside /var/www:

find . -iname '.*.php'
./blog/wp-content/plugins/fckeditor-for-wordpress-plugin/ckeditor/plugins/selection/.0b1910.php
./blog/wp-content/plugins/fckeditor-for-wordpress-plugin/filemanager/browser/default/.497a0c.php
./blog/wp-content/plugins/__MACOSX/feedburner_feedsmith_plugin_2.3/._FeedBurner_FeedSmith_Plugin.php

find . -iname '.*.pl*'

….

Reviewing complete list of all hidden files is also often useful to determine shitty cracker stuff

 find . -iname ".*"

Debugging via  /var/log/phpmail.log enablement is useful but is more recommended on development and staging (QA) environments. Having it enable on productive server with high amounts of mail sent via PHP scripts or just on dedicated shared site server could cause both performance issues, hard disk could quickly get and most importantly could be a severe security hole as information from PHP scripts could be potentially exposed to external parties.

How to Turn Off, Suppress PHP Notices and Warnings – PHP error handling levels via php.ini and PHP source code

Friday, April 25th, 2014

php-logo-disable-warnings-and-notices-in-php-through-htaccess-php-ini-and-php-code

PHP Notices are common to occur after PHP version upgrades or where an obsolete PHP code is moved from Old version PHP to new version. This is common error in web software using Frameworks which have been abandoned by developers.

Having PHP Notices to appear on a webpage is pretty ugly and give a lot of information which might be used by malicious crackers to try to break your site thus it is always a good idea to disable PHP Notices. There are plenty of ways to disable PHP Notices

The easiest way to disable it is globally in all Webserver PHP library via php.ini (/etc/php.ini) open it and make sure display_errors is disabled:

display_errors = 0

or

display_errors = Off

Note that that some claim in PHP 5.3 setting display_errors to Off will not work as expected. Anyways to make sure where your loaded PHP Version display_errors is ON or OFF use phpinfo();

It is also possible to disable PHP Notices and error reporting straight from PHP code you need code like:


<?php
// Turn off all error reporting
error_reporting(0);
?>


or through code:


ini_set('display_errors',0);


PHP has different levels of error reporting, here is complete list of possible error handling variables:


<?php
// Report simple running errors

error_reporting(E_ERROR | E_WARNING | E_PARSE);

// Reporting E_NOTICE can be good too (to report uninitialized
// variables or catch variable name misspellings …)

error_reporting(E_ERROR | E_WARNING | E_PARSE | E_NOTICE);

// Report all errors except E_NOTICE
// This is the default value set in php.ini

error_reporting(E_ALL ^ E_NOTICE);
// Report all PHP errors (see changelog)

error_reporting(E_ALL);
// Report all PHP errors error_reporting(-1);
// Same as error_reporting(E_ALL);

ini_set('error_reporting', E_ALL); ?>

The level of logging could be tuned on Debian Linux via /etc/php5/apache2/php.ini or if necessary to set PHP log level in PHP CLI through /etc/php5/cli/php.ini with:

error_reporting = E_ALL & ~E_NOTICE


If you need to remove to remove exact warning or notices from PHP without changing the way  PHPLib behaves is to set @ infront of variable or function that is causing NOTICES or WARNING:
For example:
 

@yourFunctionHere();
@var = …;


Its also possible to Disable PHP Notices and Warnings using .htaccess file (useful in shared hosting where you don't have access to global php.ini), here is how:

# PHP error handling for development servers
php_flag display_startup_errors off
php_flag display_errors off
php_flag html_errors off
php_flag log_errors on
php_flag ignore_repeated_errors off
php_flag ignore_repeated_source off
php_flag report_memleaks on
php_flag track_errors on
php_value docref_root 0
php_value docref_ext 0
php_value error_log /home/path/public_html/domain/php_errors.log
php_value error_reporting -1
php_value log_errors_max_len 0

This way though PHP Notices and Warnings will be suppressed errors will get logged into php_error.log