Posts Tagged ‘panel’
Tuesday, January 21st, 2014 If you haven't worked for a while with Windows (since the days when XP was standard modern OS) you might be amazed that Windows like me. You might feel pretty unconfortable to work with Windows 7's "dock style" taskbar – showing application icons instead of buttons.

People who are traditionalist like me would definitely prefer to change this stupid behavior to "Windows Classic". Here is how to do it:
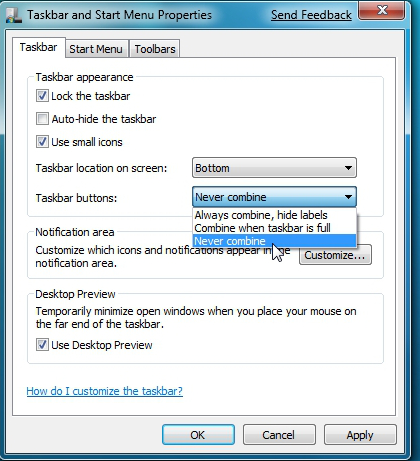
1. Right click on any open area on taskbar and choose Properties

2. From Taskbar -> Taskbar Buttons choose (Never Combine).
Never Combine – option makes every new Window to show as a separate one instead of Grouping the Windows by application.
In some cases choosing (Combine when TaskBar) is full is nice new option, so you might want to check it out for a while and see if you can get used to it.
3. Make Windows Start menu panel look like Windows 2000 (clear up unnecessary mambo-jumbo design)
I very much like simplicity thus I don't like Microsoft's choise to make Start Menu panel look like a Christmas Tree. To revert back:
On any empty space on the Desktop press Right Mouse button (Choose Personalize); Scroll down and choose (Windows Classic theme)
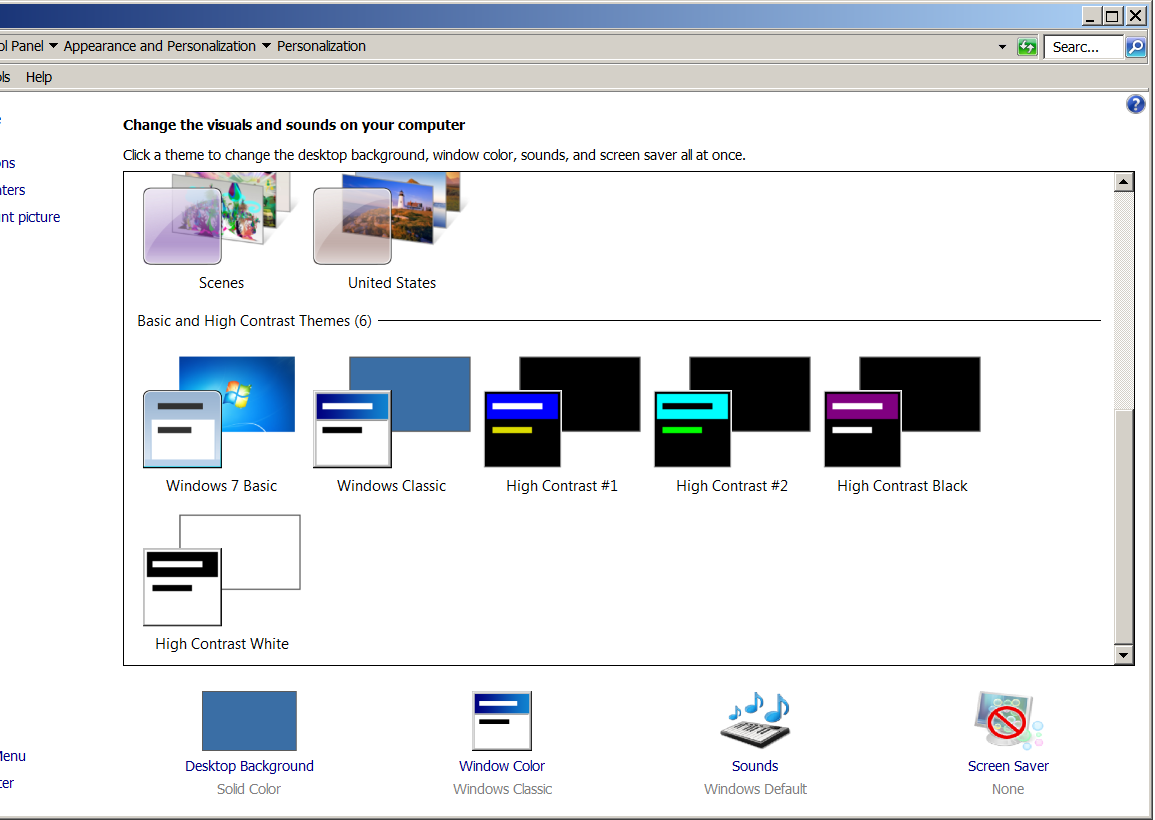
That will change Windows to look normal again 🙂

Cheers 🙂
Tags: application, change, change windows, com, look, make, Make Windows Start, panel, Right Mouse, Windows, Windows Classic, windows xp, work, www, XP
Posted in Everyday Life, Various, Windows | 2 Comments »
Thursday, September 27th, 2012 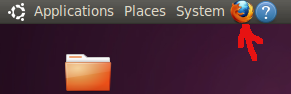
Mistakenly I added one icon near Places in (Ubuntu) ver. 12 GNOME 3 (upper) panel. To remove it following instructions given in Ubuntu Answers
Maybe the great criticism recently arisen concerning GNOME 3, new taken wrong path of development had a good standbase. Even a simple task as even for a simple operation as removing icon from the panel is now complicated….
In short to remove the icon I had to hold Win+Alt keys and then click with right (last) mouse button over the icon and choose Remove.
Cheers 😉
Tags: applications, gnome3, panel, remove
Posted in Linux and FreeBSD Desktop, Various | No Comments »
Friday, March 2nd, 2012 There are four major plugins as of writting of this that can be used to reduce significantly the amount of registration spam in Elgg 1.8.x <= (1.8.3)
Probably there are other plugins to protect against spam in elgg, however I personally tried just this ones to work with elgg 1.8.3..
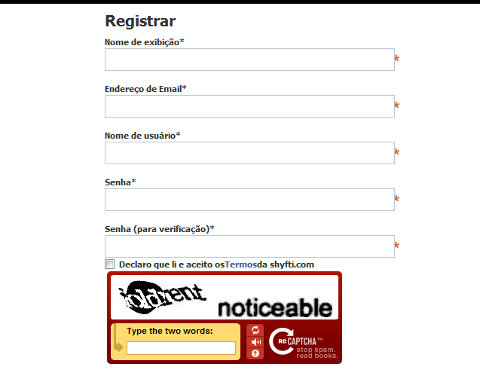
1. Elgg Anti bot spam registartions with Text Captcha
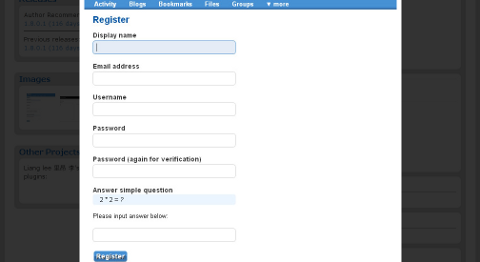
As you can see in the picture this plugin requires, skills in maths 😉 For serious websites it also looks a bit ridiculous, besides that is actually an easy one to handle by spam bots, probably plenty of the nowdays spam bots crawling the net could trespass it.
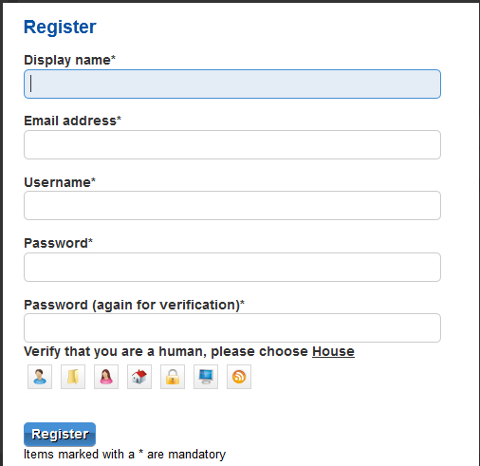
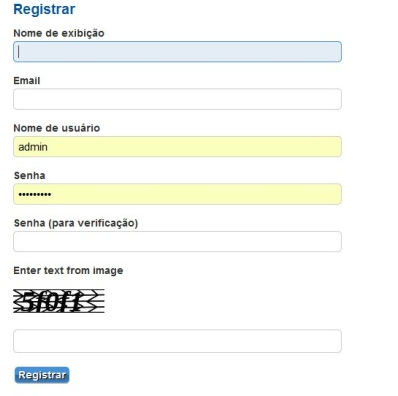
2. Protecting elgg registration formw tih Image Capcha
3. Elgg anti registration spam with Google Captcha
4. Just a Captcha for Elgg 1.8
- Check and Download Elgg Just a Captcha for Elgg here
One note to make here is the 4 Captchas did not work together if enabled from elgg administration panel. You will have to use one at a piece.
I haven't tested to I don't know which one is the most efficient. Anyhow I really think Image Captcha is looking best from all of them and more intuitive to the user.
I'm quite happy Image Captcha is available and works fine in 1.8.3 in prior version 1.6.x generation, I couldn't find any decent plugin to filter login spam and my experimental social network based on elgg, got quickly filled with Spam. Now will wait and see if the Image Captcha will stop the drones.
Tags: administration panel, amount, Anyhow, Auto, Capcha, Captcha, Captchas, Draft, drones, elgg, fine, formw, generation, google, Image, login, lt 1, Math, math text, maths, nbsp, network, network platform, page, panel, platform, plenty, plugin, Protecting, registration, Social, spam, tih, trespass, version, writting, x generation
Posted in Everyday Life, Various, Web and CMS | 3 Comments »
Sunday, January 22nd, 2012 Accidently I've removed the Gnome Volume Control while trying to remove an applet nearby from the GNOME main menu panel. Unfortunately in GNOME 2, I couldn't find a way to to return back (restore) Gnome Volume Control to the main panel. After a bit of pondering, I've managed to find a way.
Here is how I managed to restore it back:
1. Navigate to:
System > Preference > Startup Applications
2. Click on Add, then add and type the following:
 Name: Volume control

Command: gnome-volume-control-applet

Comment: Launch volume control applet
Adding the gnome-volume-control-applet will launch it every time a new gnome session (with the same user) is initiated. On next gnome login you will see the icon to appear again in the notification area. Cheers 😉
Tags: applet, area, Auto, Cheers, Click, command, Comment, control, Draft, Gnome, gnu linux, icon, launch, Linux, login, menu, menu panel, Navigate, notification, notification area, panel, preference, startup, startup applications, system, time, type, volume control, way
Posted in FreeBSD, Gnome, Linux, Linux and FreeBSD Desktop | No Comments »
Tuesday, November 2nd, 2010 You need to simply follow this 3 easy steps:
1. Login with your joomla administrator
Point in your browser to http://yoursite.com/joomla/administrator/ or to url wherever your admin panel is located
2. Go to Menu Manager
Menus -> Menu Manager
3. Click the new button located on the right top side of the joomla admin panel
Next the Select Menu Item Type dialog will appear:
There you will need to select the External Link option
Now fill in your desired url that you desire your Menu link to point to and choose among the few possible options on how do you want the new external website to appear after clicked on the menus link.
And that's it now you will have it. Easy 🙂
Tags: admin, admin panel, administrator, browser, Button, Click, dialog, Easy, External, How to add Joomla Menu link to point to external URL address, Item, Joomla, link, link option, login, menu, menu link, menu manager, menus, new button, panel, right, Select, side, type, type dialog, url, url address, website
Posted in Joomla, Linux, Various | 4 Comments »
Monday, December 20th, 2010 A joomla installation I’m managing needed to have created a sitemap.xml
From a SEO perspective sitemap.xml and sitemap.xml.gz are absolutely necessary for a website to bewell indexed in google.
After some investigation I’ve found out a perfect program that makes generation of sitemap.xml in joomla a piece of cake.
All necessary to be done for the sitemap.xml to be created comes to download and install of JCrawler
What makes JCrawler even better is that it’s open source program.
To install Jcrawler go in the joomla administrator panel:
Extensiosn -> Install/Uninstall
You will see the Install from URL on the bottom, there place the link to the com_jcrawler.zip installation archive, for instance you can place the link of the downloaded copy of com_jcrawler.zip I’ve mirrored on www.pc-freak.net ,by placing it on https://www.pc-freak.net/files/com_jcrawler.zip
The installation will be done in a few seconds and you will hopefully be greated with a Installation Success message.
Last thing to do in order to have the sitemap.xml in your joomla based website generated is to navigate to:
Components -> JCrawler
There a screen will appear where you can customize certain things related to the sitemap.xml generation, I myself used the default options and continued straight to the Start button.
Further on a screen will appear asking you to Submit the newly generated sitemap to; Google, MSN, Ask.com, Moreover and Yahoo , so press the Submit button.
That’s all now your joomla website will be equipped with sitemap.xml, enjoy!
Tags: bewell, Button, com, customize, default options, download, downloaded copy, Extensiosn, freak, google, gz, How to build website sitemap (sitemap.xml) in Joomla, Install, installation, installation archive, installation success, investigation, JCrawler, link, MSN, open source program, order, panel, perspective, piece of cake, Press, Start, start button, success message, Uninstall, xml, Yahoo, zip installation
Posted in Joomla, Linux, SEO, Various | 7 Comments »
Friday, September 16th, 2011 By the default wordpress does not have support for changing the exact font, therefore copying and pasting a text made in Open Office or MS Word often places in the Post or Page wp edit fonts different from the default one set for articles.
Hence some articles after being published on a wordpress blog show up with improper font and the only way to fix that is to change the font first in Open Office and then copy back to wordpress instead of simply being able to change the font from within the wordpress article.
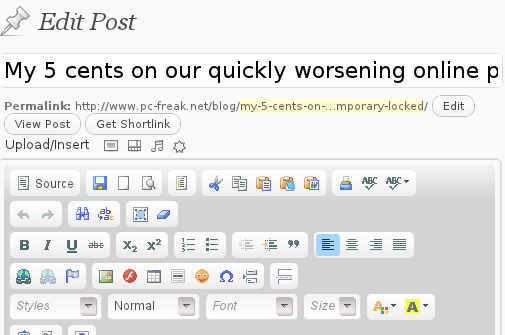
To get around this problem, there is a nice plugin fckeditor-for-wordpress-plugin which aids wordpress with an awesome Word like edit functionalities.
, downhload location for FCKEdit for WordPress is here
Here is a screenshot of the extra nice functionality the FCKEditor for wordpress providces.
Installing the plugin is like installing any other wordpress plugin and comes easily to:
debian:/~# cd /var/www/blog/wp-content/plugins

debian:/plugins# wget http://downloads.wordpress.org/plugin/fckeditor-for-wordpress-plugin.3.3.1.zip

...

debian:/plugins# unzip fckeditor-for-wordpress-plugin.3.3.1.zip

...

debian:/plugins# cd fckeditor-for-wordpress-plugin/
And further enabling the plugin from:
Plugins -> Inactive -> (Dean's FCKEditor For WordPress) Enable
fckeditor for wordpress will replace the default wordpress editor TinyMCE straight after being enabled.
I’ve done also a mirror of the current version as of time of writting of this article, one can download the fckeditor for wordpress mirrored here
Now really file editting inside wordpress admin panel is way easier and convenient 😉 Cheers
Tags: admin panel, aids, blog, Cheers, current version, dean, download, exact font, FCKEdit, FCKEditor, freak, functionality, hereHere, Inactive, Installing, location, lt, Microsoft, microsoft word, mirror, ms word, Open, open office, page, panel, plugin, post, quot, screenshot, show, time, unzip, var, version, way, wget, Word, Wordpress, wp, writting, www
Posted in Everyday Life, Various, Web and CMS, Wordpress | 2 Comments »
Friday, September 23rd, 2011 
In my recent question of looking for best ways to optimize my wordpress blog, as well as other wordpress based websites, I’m managing I’ve come across a great plugin called W3 Total Cache or W3TC as it’s widely known among wordpress geeks.
The full caching wordpress solution in face of W3TC is already actively deployed among many major wordpress powered websites, to name a few:
stevesouders.com, mattcutts.com, mashable.com
I gave a try W3 Total Cache and was amazed about the rich caching functionality it provides. Having the W3TC plugin installed adds a whole menu on the left wordpress admin panel reading Performance , clicking on it shows a menu with thorough choices on numerous things which deal with the running of wordpress on the server.
Here is a screenshot on the menus W3 Total Cache provides:
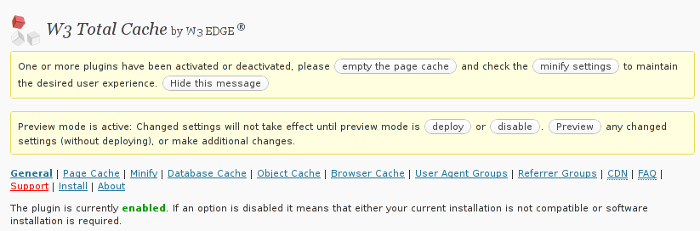
The plugin has support for html caching, sql caching, CDN, CSS and Javascript compress & minify etc.
To test the plugin adequately I disabled HyperCache and Db Cache . My observations is that with W3TC wordpress renders php and the overall user experience and download times in wordpress are better. Therefore I’ll probably use only W3 Total Cache as a cacher for wordpress installs.
Besides that I had some issues on some wordpress based websites with the Db Cache SQL caching.
On these websites after enabling Db Cache, suddenly page edditing of the created existing pages started returning empty pages. This could be due to the fact that these wordpress based websites was customly tailered and many code was wiped out, however it could also be a Db Cache bug. So to conclude W3TC is the perfect solution for wordpress caching 😉
Tags: amp, blog, cacher, CDN, choices, com, comI, download, experience, face, geeks, Javascript, left, mashable, menus, minify, page, panel, perfect solution, performance, php, plugin, question, reading, reading performance, running, screenshot, solution, use, user experience, Wordpress
Posted in SEO, Various, Web and CMS, Wordpress | 2 Comments »
Thursday, August 11th, 2011 I’ve completed a qmail installation few days ago on a fresh installed Debian Squeeze 64 bit server. All is configured and works fine, except qmailadmin and vqadmin.
As the mail server was missing any kind of web mail administration panel, I needed to make at least one of the two above to make with qmail.
I decided to concentrate on qmailadmin and took the time to make it work. I used the following command lines and got the compile failure during make compilation:
debian:/usr/local/src/qmailadmin-1.2.15# ./configure --enable-cgibindir=/usr/lib/cgi-bin --enable-htmldir=/var/www/qmailadmin/ --enable-modify-quota

...

debian:/usr/local/src/qmailadmin-1.2.15# make

...
The source make failed with the following error:
In file included from template.c:45:

qmailadmin.h:37:1: warning: "MAX_FILE_NAME" redefined

In file included from template.c:28:

/home/vpopmail/include/vpopmail.h:146:1: warning: this is the location of the previous definition

template.c: In function "send_template_now":

template.c:505: error: "VERSION" undeclared (first use in this function)

template.c:505: error: (Each undeclared identifier is reported only once

template.c:505: error: for each function it appears in.)

make[1]: *** [template.o] Error 1

make[1]: Leaving directory `/usr/local/src/qmailadmin-1.2.15'

make: *** [all] Error 2
To workaround these compile issues, I’ve had to modify the C source file belonging to qmailadmin ( template.c ), e.g.:
debian:/usr/local/src/qmailadmin-1.2.15# vim template.c
In the file I had to add besides the line:
#include "util.h"
The code:
#define VERSION ""
Aterwards qmailadmin’s compile and install via make && make install-strip succeeded and now works perfectly fine 😉
Tags: Administration, administration panel, amp, bit, c source, code, compilation, configure, configured, failure, few days, file, function, identifier, installation, lib, Linux, location, mail administration, mail server, make, name, oncetemplate, panel, qmail installation, qmailadmin, quot, Quota, source file, squeeze, template, template c, time, undeclared identifier, util, version, vim, vqadmin
Posted in Linux, Qmail, System Administration, Web and CMS | 13 Comments »


How to restore accidently removed Gnome volume control in GNOME in GNU / Linux
Sunday, January 22nd, 2012Accidently I've removed the Gnome Volume Control while trying to remove an applet nearby from the GNOME main menu panel. Unfortunately in GNOME 2, I couldn't find a way to to return back (restore) Gnome Volume Control to the main panel. After a bit of pondering, I've managed to find a way.
Here is how I managed to restore it back:
1. Navigate to:
System > Preference > Startup Applications
2. Click on Add, then add and type the following:Name: Volume control
Command: gnome-volume-control-applet
Comment: Launch volume control applet
Adding the gnome-volume-control-applet will launch it every time a new gnome session (with the same user) is initiated. On next gnome login you will see the icon to appear again in the notification area. Cheers 😉
Tags: applet, area, Auto, Cheers, Click, command, Comment, control, Draft, Gnome, gnu linux, icon, launch, Linux, login, menu, menu panel, Navigate, notification, notification area, panel, preference, startup, startup applications, system, time, type, volume control, way
Posted in FreeBSD, Gnome, Linux, Linux and FreeBSD Desktop | No Comments »