Posts Tagged ‘package’

Install grsecurity kernel security from binary package (without kernel recompile) on Debian and Ubuntu

Monday, July 26th, 2010

GRsecurity is since long time known that it is a next generation armouring agains 0 day local kernel exploits as well as variousof other cracker attacks.
Grsecurity is an innovative approach to security utilizing a multi-layered detection, prevention, and containment model. It is licensed under the GNU GPL.
GRSecurity is linux kernel patch which has to be applied to the kernel before compile time. However we’ve been lucky and somebody has taken the time and care to prepare linux image binary deb packages for Debian and Ubuntu .

Some of the key grsecurity features are :

  • An intelligent and robust Role-Based Access Control (RBAC) system that can generate least privilege policies for your entire system with no configuration
  • Change root (chroot) hardening
  • /tmp race prevention
  • Prevention of arbitrary code execution, regardless of the technique used (stack smashing, heap corruption, etc)
  • Prevention of arbitrary code execution in the kernel
  • Reduction of the risk of sensitive information being leaked by arbitrary-read kernel bugs
  • A restriction that allows a user to only view his/her processes
  • Security alerts and audits that contain the IP address of the person causing the alert

To install from the http://debian.cr0.org/ grsecurity patched kernel image repository use the following steps:

1. Include in your /etc/apt/sources.list

deb http://ubuntu.cr0.org/repo/ kernel-security/
deb http://debian.cr0.org/repo/ kernel-security/

Directly from the bash command line execute:

debian:~# echo "deb http://ubuntu.cr0.org/repo/ kernel-security/" >> /etc/apt/sources.list
debian:~# echo "deb http://debian.cr0.org/repo/ kernel-security/" >> /etc/apt/sources.list

2. Add the debian.cr0.org repository gpg key to the trusted repositories key ring

Download the repository’s gpg key , check it (it has been signed with the repository owner GPG key )

Thence from to include the gpg key to the trusted repos key issue:

debian:~# apt-key add kernel-security.asc

3. Install the linux-image-grsec package itself

Currently to install on my x86_amd64 Debian Squeeze/Sid and possibly on Debian Lenny I’ve issued:


debian:~# apt-get update
debian:~# apt-get install linux-image-2.6.32.15-1-grsec

Now simply restarting your system and choosing the Linux kernel patched with the GRsecurity kernel patch from Grub should enable you to start using the grsecurity patched kernel.
Though this tutorial is targetting Debian it’s very likely that the grsecurity hardened kernel installation on Debian will be analogous.

How to fix wicd 1.7.0+ds1-5 Connection Failed: Bad Password on Ubuntu 10.10 (Maverick Merkaaat)

Tuesday, May 3rd, 2011

I’ve been struggling with fixing a nasty error with wicd network manager for about 2 hours.
The exact error message I faced was:

Connection Failed: Bad Password

The issue occured after some suggested updates from the Ubuntu graphical update tool.
The wireless network to which it was connected was a WPA-PSK (WPA2) Passphrase authentication.
The network key was properly typed in and was working well on another system so the error Connection Failed: Bad Password made no sense.

There was nothing unusual in /var/log/wicd/wicd.log , that made me even more curious about what might be causing the error.After a lot of try outs and a lot of readings and tests I finally got the cause of the weird Bad Password errors produced by wicd

Weirdly enought, somehow the Ubuntu package update tool has installed the default gnome network-manager package.
The installed network-manager package has mismatched somehow the way wicd connects to wireless networks and as a cause the wpa_supplicant binary was not properly invoked.

As a consequence of the network-manager being present on the system the wpa_supplicant process which made the exact connection to the wireless network was not launching in, the exact wpa_supplicant invocation missing was:

wpa_supplicant -B -i wlan0 -c /var/lib/wicd/configurations/0022b0aa424a -D wext

Luckily the solution to the notebook wireless device unable to connect to the Wireless network was simple.

All I had to do is completely remove all occurance of network-manager packages installed on the Ubuntu system, by issuing the commands:

ubuntu:~# apt-get remove --yes network-manager
ubuntu:~# dpkg --purge network-manager-pptp-gnome network-manager-pptp network-manager

The reason for issuing the a dpkg –purge command was my desire to completely get rid of all kind of network-manager related configurations.

Now after re-connecting with wicd wireless manager, it worked fine 😉

New critical Adobe Flash Player security flaw allows a malicious attacker to get access to Windows, Linux, Mac OS and BSD

Wednesday, April 20th, 2011

Flash swf Player artistic logo exploit

A new zero-day exploit for the Adobe Flash Player has been published on http://exploit-db.com .
The exploit published is targetting Windows 7 systems.
Even though the published version of the exploit is said to affect Windows 7 installations, the shellcode with this proof of concept exploit (PoC) could surely be changed to a one that would also take effect in Linux.
Most likely Linux exploitation will be a harder task to achieve, however thesecurity advisory issued http://www.adobe.com/support/security/advisories/apsa11-02.html recommends an immediate update of the flash player.

According to some rumors the 0 day adobe flash vulnerability has been exploited since a long time to get access to confidential U.S. governmental documents.

A classical ways said that malicious hackers uses is by sending a flash (.swf) containing email, by simply opening the email attachment the victim gets exploited.

Adobe officially has reported, there are no official information if attacks has targetted other company software like Adobe Acrobat Reader which supports embedded flashes.
According to Adobe Adobe Reader is not vulnerable to this kind of attacks as it uses a protected mode which would mitigate the attack (though I hardly doubt this claim).

The affected versions of Adobe’s Flash player are:

  • Flash Player 10.2.153.1 for Windows
  • Flash Player 10.2.153.1 for Apple Macintosh
  • Flash Player 10.2.153.1 for Linux and Solaris
  • Flash Player 10.2.156.12 for Android Mobile platform

as well as the Authplay.dll library used by Adobe’s Acrobat Reader

Earlier versions of Flash player are also affected by the critical security vulnerability.
There are already rumors that the exploit is exploited using a crafted (.swf) files embedded into Microsoft Word .doc files.

This new critical vulnerability is another example clearly showing how insecure a user who has flash enabled in their browser is.

According to preliminary information, exploitation of this critical security flaw can be sucessfully achived in most (if not all) browsers …

By so far browsing on Linux was always considered to be a way more secure than on Windows, with this issue rising up this kind of believe is questioned.
Surely many Linux distributions and FreeBSD and BSD derivatives used as Desktops will probably not package timely newer version of the adobe flash (flashplugin-nonfree) package on time

Today the flash player is a de-facto standard and is wide spread among most modern internet connected operating system obviously it’s unificated use, creates unified problems.

The example with this flash security issue is a good example against why non-free technologies should not be set as standards.
If the flash player and standard was free and everybody could create and distribute flash players for free. Such a vulnerability affecting so many operating systems and so many browsers would never come true

To sum it up, this issue will surely create a lot of problems and opens a serious security hole for us the Linux users.

Therefore be sure to update your flash player before someone has exploited you through the web.

Best software available today for Linux video Desktop capturing on Debian

Tuesday, April 19th, 2011

I’ve been experimenting since some time in order to understand better what is the current situation with Video Desktop Capturing Software available today for Linux and FreeBSD.

My previous investigations has led me to write an article about xvidcap called How to make Video from your Linux Desktop with xvidcap

Though xvidcap works pretty well, it is currently uncapable of capturing the audio stream of a Linux Desktop env and hence part of the interactivity of the videos is missing when used.

A bit of further investigation on the topic has pointed me to 3 free software programs which are capable to record Desktop environment on Linux with sound embedded

The interesting screen video capturing Desktop tools I’ve found are:

1. recordMyDesktop
2. Istanbul
and
3. vnc2swf

Installing them on a Debian based distribution is pleasable, as there are installable debian packages of each one which I installed easily with apt:

debian:~# apt-get install istanbul recordmydesktop gtk-recordmydesktop vnc2swf

RecordMyDesktop‘s package contains a command line little tool which when started directly starts capturing video and audio of the Linux Desktop. After a Ctrl+C is pressed the program quits, saves and encodes the video in ogg-encapsulated theora-vorbis file format.

Here is the output I got in saving a sample file by launching recordmydesktop without any arguments:

hipo@debian:~/Desktop$ recordmydesktop
Initial recording window is set to:
X:0 Y:0 Width:1024 Height:768
Adjusted recording window is set to:
X:0 Y:0 Width:1024 Height:768
Your window manager appears to be Metacity

Initializing…
Buffer size adjusted to 4096 from 4096 frames.
Opened PCM device hw:0,0
Recording on device hw:0,0 is set to:
2 channels at 22050Hz
Capturing!
Broken pipe: Overrun occurred.
^C
*********************************************

Cached 5 MB, from 207 MB that were received.
Average cache compression ratio: 97.3 %

*********************************************
Saved 69 frames in a total of 69 requests
Shutting down..Broken pipe: Overrun occurred.

STATE:ENCODING
Encoding started!
This may take several minutes.
Pressing Ctrl-C will cancel the procedure (resuming will not be possible, but
any portion of the video, which is already encoded won’t be deleted).
Please wait…
Output file: out.ogv
[100%]
Encoding finished!
Wait a moment please…

Done.
Written 692529 bytes
(635547 of which were video data and 56982 audio data)

Cleanning up cache…
Done!!!
Goodbye!

The captured file as I you see in the above output is saved in file out.ogv

RecordMyDesktop has also a GUI interface (written in Python) called gtk-recordmydesktop

Below you see a screenshot of the GUI gtk-recordmydesktop:

RecordMyDesktop GTK interface entry screen

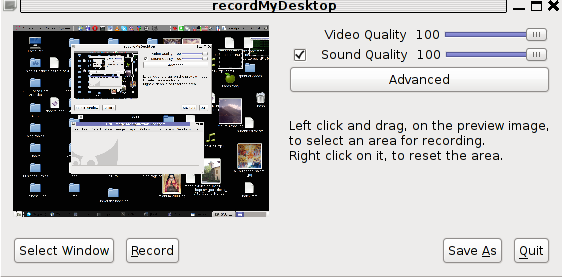
gtk-recordmydesktop is a super-easy to use as you already see in the picture, you can either configure it with Advanced button or use Save As button to select where you want the Desktop captured video and audio to be stored.

In Debian Squeeze 6.0, the Advanced GUI button interface button is not working but that’s not such an issue, as the rest of the buttons works fine.
After the recordmydesktop‘s Record button is pressed it will start capturing from your Desktop and the window seen in the above screenshot will disappear/hide in the system tray:

recordmydesktop recording minimized in system tray
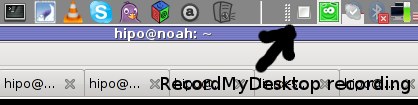
When you press over the white little square in the system tray the screen capturing will be interrupted and a window will pop-up informing you that the captured video and audio is being encoded, here is another screenshot of recordmydesktop encoding a saved Desktop video stream:

recordmydesktop saving captured desktop video

After the final .ogv file is encoded and saved to further transfer it into (.flv) I used ffmpeg;

debian:~# ffmpeg -i test.ogv test.flv
...

Now let’s evaluate a bit on the the final results, the produced test.ogv‘s synchronization between sound and video was not good as the sound was starting earlier than the video and therefore even though recordmydesktop used to be highly praised on the net, the proggie developers still needs to do some bug fixing
Further on, I continued and (gave the other Desktop screen capturer) Istanbul a try hoping that at least with it the video and audio of my Linux desktop will be properly captured. But guess what, the results with Istanbul was even more unsatisfactory as the produced videos and sounds, were slow and a lot of frames from the screens were missing completely.
Moreover the sound which was supposed to accompany the video was completely 🙁

Thus I will skip on talking about Istanbul as in my view, this piece of software is far away from being production ready.

I also tested vnc2swf , launched it by: pressing alt+f2 and typing in vnc2swf in GNOME’s run application prompt, just to be surprised by an error …:

vnc2swf error no 111 Connection refused

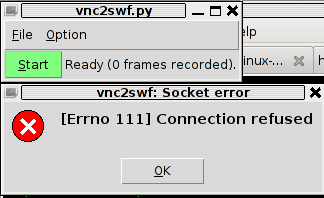
The reason for this error is caused by the xserver (Xorg) port 5900 is being closed by default on Debian

However this error is easily solvable, by making the Xserver to listen to a the port 5900, to make the Xorg server on Debian to listen on this port you need to edit the file:

/etc/X11/xinit/xserverrc

and change inside it:

exec /usr/bin/X -nolisten tcp "$@"

with:

exec /usr/bin/X "$@"

and either reboot your Linux or restart only the Xorg server by pressing Ctrl+Alt+BackSpace

Now let me conclude, the results from my desktop video screen capturing experiments prooved that vnc2swf is superior (as it is capable of properly saving a movie with sound and video from a Linux Desktop). It appears this soft is actually the best one you can use to make a video of your Linux desktop.

Sadly my testing has proven that Linux is still lacking behind Windows and Mac in even doing the most simple tasks …
Let’s hope that situation will get better soon and Gnome or KDE developers will soon provide us with better software capable to save properly a video and audio captured from the Linux Desktop.

How to edit, convert, join, split and re-time movie subtitle files on Linux (Fix Subtitles bad timing) / Install subtitle manipulation console tools for Linux

Tuesday, April 19th, 2011

As a Linux user I sometimes face difficulties with watching subtitled, movies. I mostly use Mplayer, Totem or VLC to watch the common video files.
The most common problems I face with subtitles are caused by bad timing, many times the solution to the bad timing issues is very simpleand comes up to changing the default movie player I use MPlayer to VLC or Totem.

However at many occasions trying to watch the movie with different kind of movie player does not help.
In this dark moments I get seriously irritated I am not a regular Windows user, where such kind of problems are almost none as many of the Windows movie player problems does fix bad timing issues automatically.

Luckily there is a work-around to this subtitles timing issues and other mishaps caused by guys who created a Movie subtitle files with a Windows subtitle editor program, subtitles timing, the Linux work-around takes a few more minutes to install a package called Subtitles

The Subtitles text utility is written in Perl and contains two executables subplay and subs .

Subtitles is the Linux subtitle Swiss Army Knife as it is capable of convert, join, split, and re-time of subtitles files

Installing Subtitles tools on Linux is a trivial job and it comes to download and installation of the 2 perl executables.
Here is how:

1. Download Subtitles.tar.gz toolsI have mirrored Linux Subtitles (Subtitles.tar.gz) here originally the binaries are to be found on URL address: http://karasik.eu.org/software/ , issue the commands:

linux:~# cd /usr/local/src
linux:/usr/local/src# wget https://www.pc-freak.net/files/Subtitles.tar.gz
...
2. Unarchive it

linux:/usr/local/src# tar -zxvvf tar -zxvvf Subtitles.tar.gz...
linux:/usr/local/src# cd Subtitles-1.0

3. Compile and install Subtitles system widePitily the Subtitles tools are not currently available as a packages in the repositories of Debian and Ubuntu Linux and thus easy installation without compilation via apt-get is unfortunately not available.

Here is the commands with which to compile and install Subtitles:

linux:/usr/local/src/Subtitles-1.0# perl Makefile.PL
...
linux:/usr/local/src/Subtitles-1.0# make
...
linux:/usr/local/src/Subtitles-1.0# make test
...

All tests successful.Files=1, Tests=17, 1 wallclock secs ( 0.05 usr 0.00 sys + 0.06 cusr 0.01 csys = 0.12 CPU)Result: PASS

linux:/usr/local/src/Subtitles-1.0# make install

Installing /usr/local/share/perl/5.10.1/Subtitles.pm
Installing /usr/local/man/man1/subplay.1p
Installing /usr/local/man/man1/subs.1p
Installing /usr/local/man/man3/Subtitles.3pm
Installing /usr/local/bin/subplay
Installing /usr/local/bin/subs
Appending installation info to /usr/local/lib/perl/5.10.1/perllocal.pod

Now as we have the subs executable installed, Let’s say your movie subtitles displays 5 seconds earlier before the movie scenes (bad timing), all you need to do to adjust your subtitles to show up in correct movie scenes is issue:

hipo@linux:/home/hipo/Movies$ subs -i -b 5 your_movie_subtitle_file_name.sub

now check out the subtitle files once again with your favourite player and the early subtitles display on your movie should be fixed.
Let’s have another scenario, say that your movie file is encoded to display 24 frames per seconds (fps) but the subtitle file is created to display the subtitles for a 25 fps, to solve this situation issue:

hipo@linux:~# subs -i -a 24/25 your_movie_subtitle_file.sub

Another possible scenario where subs command will be a precious asset is if you for example want to merge two subtitle files into one.Let’s say you have subtitles for a movie which are split over in 2 parts and the corresponding subtitles are in 2 different files, but eventually you find a better quality of the movie (DVD quality) in a single file and therefore you need the movie subtitles to be stored in one single file.
In that case to merge the subtitle files from let’s say the files movie_subtitle_file1.sub and movie_subtitle_file2.sub use the command:

subs -z movie_subtitle_file1.sub movie_subtitle_file2.sub

Some few other helpful things you can do with subs on Linux, are for example: splitting a file after a determined period of time, separating overlapped lines, and joining files into a single subtitle.

If you want to remove all the comments of gestures, facial expressions loud laughing etc. which displays usually the annoying (‘[Sneezing]’ or ‘[Music playing]) during the movie screen play, issue:

subs -e 's/[s-]*[.*]s*n*//gs' movie_subtitle_file.sub

Also other interesting Linux tool which is useful if you want to make conversions between subtitle in a (.sub) format to (.srt) format is called sub2srt perl script:

sub2srt’s home page is located on the URL address: http://www.robelix.com/sub2srt/, just to ensure it won’t just disappear with time I have created sub2srt mirror here

The most basic usage of sub2srt linux converting tool is by simply passing input sub and output srt file names like so:

linux:~# ./sub2srt 5rFF-pop.sub 5rFF-pop.srt

sub2srt supports changing of fps rate per second during conversion with the -f option as well as creationg of converted files in dos like end of file (CR+LF) with the –dos option.

Hope this article makes sense. If you find it useful, please drop me a thanks comment 😉

How to make Video from your Linux Desktop with xvidcap / Capture desktop output in a video on Linux

Wednesday, April 6th, 2011

If you have wondered on how to create videos aiming at manuals on how you do certain stuff on Linux, let’s say related to programming or system administration.
Then you should definitely check out

xvidcap

Below is the package description as taken from apt-cache show xvidcap

A screen capture enabling you to capture videos off your X-Window desktop
for illustration or documentation purposes. It is intended to be a
standards-based alternative to tools like Lotus ScreenCam.

On Debian based Linux systems (e.g. Debian Ubuntu) xvidcap is available straight from the package repositories. To install and test it you can straight issue:

linux:~# apt-get install xvidcap
...

To start using xvidcap, either by starting it with alt+f2 in gnome or straight launch it from the applications menu via:

Applications -> Sound & Video -> xvidcap

Here is how the xvidcap program looks like right after you start it;
xvidcap screenshot main menu

As you see in the screenshot xvidcap’s menu interface is extraordinary simple.

As you see it only has a stop, pause, rec, back and forward buttons, a capture selector and movie editor.
Pitily xvidcap does not support music capturing, but at least for me that’s not such an issue.

If you click over the field test-0000.mpeg[0000] with your last mouse button, you will notice a drop down menu with an option for preferences of xvidcap.

Take the time to play with the preferences, since there are quite a few of them.

The most important preference that you might like to straightly adjust in my view is in the:

Preferences -> Multi-Frame tab -> File Name:

The default file that xvidcap uses to store it’s content files as you will see in the preferences is utest-%04d.mpeg

If you want to change the type of the output file format to let’s say flv change the File Name: value to utest-%04d.flv
Next time you record with xvidcap, you will have the file stored in flv format.

The red lines which you see in the above screenshot is the capture area, you will have to also tune the screen capture area before you can proceed with recording a video from your desktop.

The way to capture your Desktop in fullscreen is a bit unusual, you first need to mark up all your visible Desktop and before that you will have to select from xvidcap’s preferences from:

Preferences -> General -> Minimize to System Tray

By selecting this option each time you press the xvidcap’s record button the xvidcap’s controller interface will be minimized to tray and capturing the video of the region previously selected with the capture selector will start up.

Replicate package selection from one Ubuntu install to another clean one

Saturday, September 19th, 2009

To replicate your packages selection on another machine (or restore it if re-installing),
You can type:
$ aptitude –display-format ‘%p’ search ‘?installed!?automatic’ >~/my-packages Move the file “my-packages” to the other machine, and there type:$ sudo xargs aptitude –schedule-only install < my-packages ; sudo aptitude installIt might be interesting for you to always check the automate commandEND—–