Posts Tagged ‘package’
Wednesday, September 28th, 2011 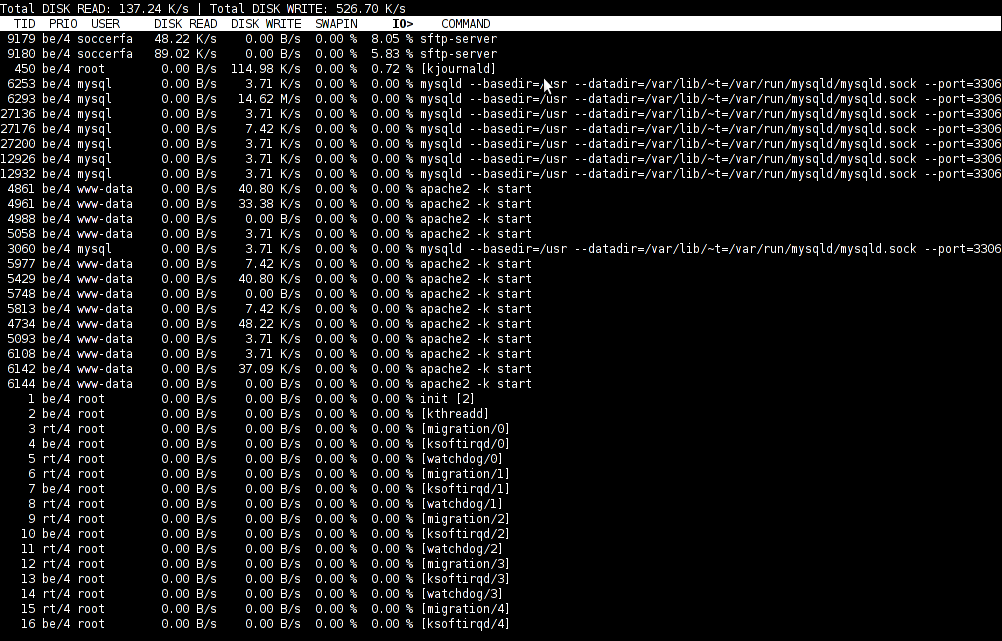
To find out which programs are causing the most read/write overhead on a Linux server one can use iotop
Here is the description of iotop – simple top-like I/O monitor, taken from its manpage.
iotop does precisely the same as the classic linux top but for hard disk IN/OUT operations.
To check the overhead caused by some daemon on the system or some random processes launching iotop without any arguments is enough;
debian:~# iotop
The main overview of iostat statistics, are the:
Total DISK READ: xx.xx MB/s | Total DISK WRITE: xx.xx K/s
If launching iotop, shows a huge numbers and the server is facing performance drop downs, its a symptom for hdd i/o overheads.
iotop is available for Debian and Ubuntu as a standard package part of the distros repositories. On RHEL based Linuxes unfortunately, its not available as RPM.
While talking about keeping an eye on hard disk utilization and disk i/o’s as bottleneck and a possible pitfall to cause a server performance down, it’s worthy to mention about another really great tool, which I use on every single server I administrate. For all those unfamiliar I’m talking about dstat
dstat is a – versatile tool for generating system resource statistics as the description on top of the manual states. dstat is great for people who want to have iostat, vmstat and ifstat in one single program.
dstat is nowdays available on most Linux distributions ready to be installed from the respective distro package manager. I’ve used it and I can confirm tt is installable via a deb/rpm package on Fedora, CentOS, Debian and Ubuntu linuces.
Here is how the tool in action looks like:
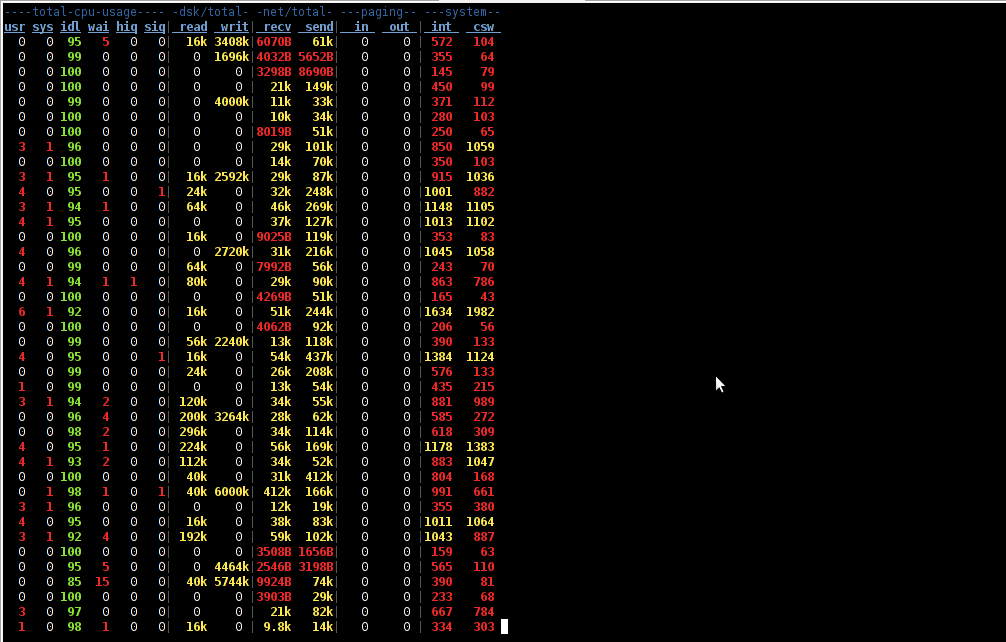
The most interesting things from all the dstat cmd output are read, writ and recv, send , they give a good general overview on hard drive performance and if tracked can reveal if the hdd disk/writes are a bottleneck to create server performance issues.
Another handy tool in tracking hdd i/o problems is iostat its a tool however more suitable for the hard core admins as the tool statistics output is not easily readable.
In case if you need to periodically grasp data about disks read/write operations you will definitely want to look at collectl i/o benchmarking tool .Unfortunately collect is not included as a packaget for most linux distributions except in Fedora. Besides its capabilities to report on servers disk usage, collect is also capable to show brief stats on cpu, network.
Collectl looks really promosing and even seems to be in active development the latest tool release is from May 2011. It even supports NVidia’s GPU monitoring 😉 In short what collectl does is very similar to sysstat which by the way also has some possibilities to track disk reads in time. collectl’s website praises the tool, much and says that in most machines the extra load the tool would add to a system to generate reports on cpu, disk and disk io is < 0.1%. I couldn’t find any data online on how much sysstat (sar) extra loads a system. It will be interesting if some of someone concluded some testing and can tell which of the two puts less load on a system.
Tags: action, bottleneck, CentOS, cmd, description, Disk, disk utilization, drive, drive performance, drop, eye, generating system, GNU, gnu linux, handy tool, interesting things, Linux, linux server, linux top, linuxes, manager, manual states, most linux distributions, overhead, package, performance drop, performance issues, pitfall, program, random processes, recv, repositories, resource statistics, server performance, sIf, system, system resource, tool, Ubuntu, versatile, versatile tool, vmstat
Posted in Linux, System Administration, Various | 5 Comments »
Monday, September 26th, 2011 
While checking my sister’s notebook running Ubuntu GNU/Linux. I decided to check the gui package installer for some new Linux games that entered Ubuntu 11.04. A quick view over the games and I come across awesome game called PixBros
The game is combining three great arcade games from my young years Bubble Bobble, Snow Bros and Tumple Pop . The game really brought some joy to my boring lifeand here it comes I’ve written a small article to share my little joy.
In the game you can select one of three characters and play a remake version of Bubble Bobble on your Linux Desktop. Besides that the music is absolutely awesome like it is with most of the classic arcade games 😉
The game characters graphics is also trendy, like you can see in the screen below:

The game history is also intriuging and in the old-school arcade games spirit.

The game is published under GPL v2, so its one more great game in the family of free software games 😉
PixBros has also port (binary installer) for Windows, Nintendo Wii and few other platforms. As a multi-platform game its very suitable for little Children to develop their reflexes and intellect. Therefore for parents who wants to use free software to grow up their kids mind, PixBros will fit well with other games likeTux Math, Tux Paint, Tux Typing which are stimulating the kid to learn
The game is also great for big kids like me and other arcade maniacs as well 😉
I have only one small note about the game just like with many other Linux games, by default the game starts in minimized screen and trying to play it in fullscreen is only possible by using the menus available from within the game itself.
This kind of behaviour reduces some of the initial game enjoyment and maybe in the future releases of the game let’s say when it reaches stable version 1.0 it will be nice the game to start in fullscreen by default.
The creator team of PixBros – Pix Juegos has 4 other games created, all of which are primary developed for GNU/Linux and downloadable from PixJuegos game dev crew official website . Unfortunately the crew official website does not English translation.
The other games from PixJuegos one can enjoy are; A Remake of the classic Atari frog game again for Linux (available for install via a deb package on latest Ubuntu 11.04):

A Super Pang modern remake – Pix Pang , below is a screenshot for all those that can’t remember Pang 😉

Super Pang
Here is also a screenshot of PixJuegos’s PixPang running on Linux:

PixGuegos game development team has also two other games in their site portfolio; this are Garnatron and PixDash . Here are screenshots:


Congrats to the guys of PixJuegos for their great Linux games! I wish them a lot of success and a lot of productive years in Linux game development 😉
Tags: arcade game, arcade maniacs, bubble bobble, classic arcade games, Desktop, family, free software games, fullscreen, game, game characters, game history, GNU, gnu linux, great game, GUI, gui package, initial game, intellect, kid, lifeand, Linux, linux desktop, linux games, little joy, Math, Nintendo, nintendo wii, package, Pang, Pix, platform game, screen, screenshot, small article, snow bros, software, stable version, team, Ubuntu, wii
Posted in Entertainment, Games Linux, Linux and FreeBSD Desktop, Linux Audio & Video | No Comments »
Wednesday, August 24th, 2011 While I was deploying a new Nagios install to Monitor some Windows hosts I’ve came across the following error in Nagios’s web interface:
Sorry, but Nagios is currently not checking for external commands, so your command will not be committed!

Read the documentation for information on how to enable external commands...
This error is caused by an option configuration for /etc/nagios/nrpe.cfg (part of the nrpe-nagios-server Debian package.
The config variable in nrpe.cfg causing the error is check_external_command=0 , the fix comes to changing the variable to:
check_external_command=1
As well as restart the /etc/init.d/nagios-nrpe-server and /etc/init.d/nagios3 services:
debian:~# /etc/init.d/nagios3 restart

...

debian:~# /etc/init.d/nagios-nrpe-server

...
This changes has work out the error Sorry, but Nagios is currently not checking for external commands, so your command will not be committed! , however immediately after another kind of error appared in Nagios web interface when I tried to use the send Nagios commands button. The error was:
Error: Could not stat() command file '/var/lib/nagios3/rw/nagios.cmd'!
This error is due to a deb package, which seems to be affecting the current deb versions of Nagios shipped with Debian 6 Squeeze stable, as well as the Latest Ubuntu release 11.04.
Thanksfully there is a work around to the problem I found online, to fix it up I had to execute the commands:
debian:~# /etc/init.d/nagios3 stop debian:~# dpkg-statoverride --update --add nagios www-data 2710 /var/lib/nagios3/rw

debian:~# dpkg-statoverride --update --add nagios nagios 751 /var/lib/nagios3

debian:~# /etc/init.d/nagios3 start
And hooray Thanks God the error is gone 😉
Tags: Button, check, checking, command, config, deb, deb package, dpkg, ERROR, file, god, hooray, information, kind, lib, monitor, nagios, online, option, package, squeeze, Stable, stat, Thanksfully, Ubuntu, var, web interface, work, www data
Posted in Linux, System Administration | 8 Comments »
Monday, April 19th, 2010 1. First it’s necessery to have the mrtg debian package installed.
If it’s not installed then we have to install it:
debian-server:~# apt-get install mrtg
2. Second download the qmailmrtg source binary
To download the latest current source release of qmailmrtg execute:
debian-server:~# wget http://www.inter7.com/qmailmrtg7/qmailmrtg7-4.2.tar.gz
It’s a pity qmailmrtg is not available for download via debian repositories.
3. Third download the qmail.mrtg.cfg configuration file
debian-server~# wget https://www.pc-freak.net/files/qmail.mrtg.cfg
Now you have to put the file somewhere, usually it’s best to put it in the /etc/ directory.
Make sure the file is existing in /etc/qmail.mrtg.cfg
4. Untar compile and install qmailmrtg binary
debian-server:~# tar -xzvvf qmailmrtg7-4.2.tar.gz

...

debian-server:~# make && make install
strip qmailmrtg7
cp qmailmrtg7 /usr/local/bin
rm -rf *.o qmailmrtg7 checkq core
cc checkq.c -o checkq
./checkq
cc -s -O qmailmrtg7.c -o qmailmrtg7
qmailmrtg7.c: In function ‘main’:
qmailmrtg7.c:69: warning: incompatible implicit declaration of
built-in function ‘exit’
qmailmrtg7.c:93: warning: incompatible implicit declaration of
built-in function ‘exit’
qmailmrtg7.c:131: warning: incompatible implicit declaration of
built-in function ‘exit’
qmailmrtg7.c:137: warning: incompatible implicit declaration of
built-in function ‘exit’
5. Set proper file permissions according to the user you indent to execute qmailmrtg as
I personally execute it as root user, if you intend to do so as well set a permissions to
/etc/qmail.mrtg.cfg of 700.
In order to do that issue the command:
debian-server:~# chmod 700 /etc/qmail.mrtg.cfg
6. You will now need to modify the qmail.mrtg.cfg according to your needs
There you have to set a proper location where the qmailmrtg shall generate it’s html data files.
I use the /var/www/qmailmrtg qmailmrtg log file location. If you will do so as wellyou have to create the directory.
7. Create qmailmrtg html log files directory
debian-server:~# mkdir /var/log/qmailmrtg
8. Now all left is to set a proper cron line to periodically invoke qmailmrtg in order to generate qmail activity statistics.
Before we add the desired root’s crontab instructions we have to open the crontab for edit, using the command.
debian-server:~# crontab -u root -e
I personally use and recommend the following line as a line to be added to root’s crontab.
0-55/5 * * * * env LANG=C /usr/bin/mrtg /etc/qmail.mrtg.cfg > /dev/null
9. Copy index.html from qmailmrtg source directory to /var/log/qmailmrtg
debian-server:/usr/local/src/qmailmrtg7-4.2# cp -rpf index.html /var/log/qmailmrtg
10. Last step is to make sure Apache’s configuration contains lines that will enable you to access the qmail activity statistics.
The quickest way to do that in Debian running Apache 2.2 is to edit /etc/apache2/apache2.conf and add a directory Alias as follows
Alias /qmailmrtg/ "/var/www/qmailmrtg/"
Now after Apache restart
/etc/init.d/apache2 restart
You should be now able to access the qmail mrtg qmail log statistics through your Apache’s default configured host.
For instance, assuming your default configured Apache host is domain.com. You’ll be able to reach the qmailmrtg statistics through an url like:
http://domain.com/qmailmrtg/
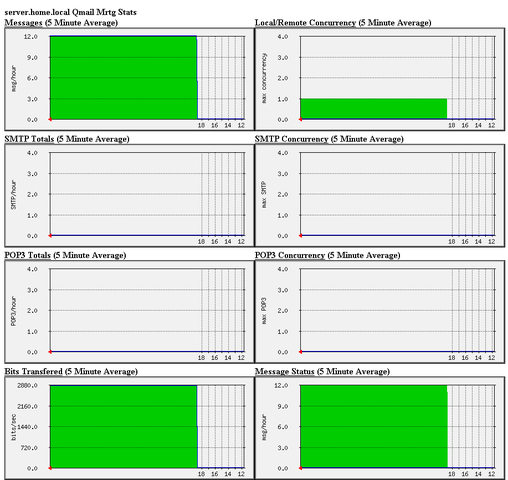
After I verified and ensured myself qmail mrtg is working correctly after all the above explained steps partook I wasn’t happy with some headlines in the index.html and the html tile of qmailmrtg,
so as a last step I manually edited the /var/www/qmailmrtg/index.html to attune it to my likings.
Here is a screenshot of the qmailmrtg web statistics in action.
Tags: amp, checkq, configuration file, cron, current source, debian package, debian repositories, declaration, default, download, exit, file, file permissions, freak, function, graph, host, html data, implicit declaration, indent, index, Installing qmailmrtg (qmail graph statistics on qmail activity) on Debian Lenny, loc, location, log, mrtg, necessery, package, proper location, rf, root, root user, Set, source release, statistics, strip, untar, wget
Posted in System Administration | 6 Comments »
Tuesday, August 2nd, 2011 I needed to install support for mbstring, as it was required by a client hosted on one of the servers running on CentOS 5.5.
Installation is quite straight forward as php-mbstring rpm package is available, here is how to install mbstring:
[root@centos [~]#yum install php-mbstring

...
Further on a restart of Apache or Litespeed and the mbstring support is loaded in php.
On some OpenVZ CentOS virtual servers enabling the php-mbstring might require also a complete php recompile if php is not build with the –enable-mbstring
If thus the mbstring has to be enabled on an OpenVZ server with php precompile, this can be easily done with cpeeasyapache , like so
server: ~# cd /home/cpeasyapache/src/php-5.2.9

server: php-5.2.9# cat config.nice |head -n $(($(cat config.nice |wc -l) - 1)) >> config.nice.new;

server: php-5.2.9# echo "'--enable-mbstring' \" >> config.nice.new; echo '"$@"' >> config.nice.new

server: php-5.2.9# mv config.nice config.nice.orig; mv config.nice.new config.nice
After that follow the normal way with make, make install and make install modules , e.g.:
server: php-5.2.9# make && make install && make install modules
Next the php-mbstring is enabled enjoy 😉
Tags: amp, apache, CentOS, client, config, installation, litespeed, Module, modulesNext, mv, newserver, openvz, orig, package, php, root, rpm, server, server php, support, virtual servers, way, yum
Posted in Linux, System Administration | 4 Comments »
Sunday, July 31st, 2011 
Did you have the need to sometimes split an SQL extra large files to few pieces in order to be able to later upload it via phpmyadmin?
Did you needed an extra large video or data file to be cut in few pieces in order to transfer it in few pieces over an USB stick?
Or just to give you an another scenario where I sometimes need to have an enormous file let’s say 3G split in few pieces, in order to later read it in vim or mcedit .
I sometimes need to achieve this on FreeBSD and Linux hosts thus I thought it will be helpful to somebody to give a very quick tutorial on the way large files can be cut in pieces on Linux and BSD hosts.
GNU/Linux and FreeBSD are equipped with the split command. The purpose of this command is exactly the cutting of a file to a number of pieces.
On Linux the split command comes by default install to the system with the coreutils package on most Debian (deb) based and Redhat based (rpm) distributions, theerefore Linux’s version of split is GNU/split since it’s part of the GNU Coreutils package. An interesting fact about Linux split is that one of the two programmers who has coded it is Richard Stallman 😉
On BSD Unix split is the AT&T UNIX (BSD) split
In the past splitting files in pieces was much more needed than today, as people used floppy drives to transfer data, though today with the bloom of Internet and the improve of the data carriers transferring even an extra large files from one place to another is a way more trivial task still at many occasions splitting it in pieces is needed.
Even though today splitting file is very rarely required, still there are times when being able to split a file in X number of parts is very much needed.
Maybe the most common use of splitting a file today is necessery when a large SQL file dumps, like let’s say 200 MBytes of info database needs to be moved from ane hosting provider to another one.
Many hosting providers does disallow direct access with standard mySQL client programs to the database directly and only allow a user to connect only via phpMyAdmin or some other web interface like Cpanel to improve data into the SQL or PostgreSQL server.
In such times, having knowledge on the Unix split command is a priceless asset.
Even though on Linux and BSD the code for the split command is not identical and GNU/split and BSD/split has some basic differences, the use of split on both of these Unices is identical.
The way to split a file in few pieces using on both Linux and BSD OSes is being done with one and the same command, here is how:
1. Splitting file in size of 40 mb On Linux
linux:~# split -b 40m SQL-Backup-Data.sql SQL-Backup-Data_split
2. Splitting file in size of 40mb on BSD (FreeBSD, OpenBSD, NetBSD)
freebsd# split -b 40m SQL-Backup-Data.sql SQL-Backup-Data_split
The Second argument the split command takes is actually called a prefix, the prefix is used as a basis name for the creation of the newly generated files cut in pieces file based on SQL-Backup-Data.sql.
As I said identical command will split the SQL-Backup-Data.sql files in a couple of parts which of it will be sized 40 megas.
These command will generate few files output like:
freebsd# ls -1 SQL-Backup-Dat*SQL-Backup-Data.sql

SQL-Backup-Dataa

SQL-Backup-Dataab

SQL-Backup-Dataac

SQL-Backup-Dataad

SQL-Backup-Dataae
As you see the SQL-Backup-Data.sql with size 200MB is being split in four files each of which is sized 40mbytes.
After the files are transfered to another Linux or BSD host, they can easily be again united in the original file with the command:
linux:~# for i in $(ls -1 SQL-Backup-Data_split*); echo $i >> SQL-Backup-Data.sql
Alternatively in most Unices also using cat should be enough to collect back the pieces into the original file, like so:
freebsd# cat SQL-Backup-Data_split* >> SQL-Backup-Data.sql
Enjoy splitting
Tags: ane, bloom, BSD, bsd unix, Coreutils, data carriers, deb, direct access, disallow, distributions, dumps, file, floppy drives, gnu linux, info, interesting fact, linux freebsd, linux hosts, mbytes, mcedit, mysql client, necessery, need, NetBSD, OpenBSD, package, phpmyadmin, place, richard stallman, rpm, splitting, SQL, trivial task, tutorial, usb stick, video, vim
Posted in FreeBSD, Linux, System Administration | No Comments »
Wednesday, July 27th, 2011 I just had some fun as, my work day is over. I was curious if I can send message directly to a logged in Gnome user on Ubuntu / Debian environment.
After quick investigation I’ve found gxmessage which is available as deb package for both Debian and Ubuntu.
I installed it and use in the following way:
root@linux:~# apt-get install gxmessage
hipo@linux:~$ ssh root@remotehost.com
hipo@remote-desktop:~$ DISPLAY=:0; XAUTHORITY=~owner_of:0/.Xauthority; export DISPLAY XAUTHORITY
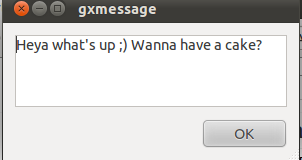
hipo@remote-desktop:~$ gxmessage 'Heya what's up ;) Wanna have a cake?"
Below you see what pops up on the screen on the remote-desktop Gnome Desktop 😉
Tags: cake, deb, deb package, Desktop, export, export display, Gnome, gnome desktop, gnome user, gxmessage, gxmessagehipo, investigation, Linux, package, remote desktop, remotehost, root, root linux, screen, ssh, terminal, terminal session, Ubuntu, use, way, work, Xauthority, XAUTHORITYhipo
Posted in Linux, Linux and FreeBSD Desktop, Linux Audio & Video | No Comments »
Monday, July 25th, 2011 
If you have to use Skype as a mean to call your employers and you do some important talks related work via Skype it might be a good idea to keep a voice logs of Skype peer to peer calls or the conferent ones.
On Windows it’s pretty easy to achieve voice skype calls recording as there is a plenty of software. However on Linux I can find only one application called skype-call-recorder
As I’m running Debian Squeeze/Wheeze (testing unstable) on my notebook, I decided to give skype-call-recorder a try:
I’m using a 64 bit release of Debian, so first I tried installing the only available version for Debian which is natively prepared to run on a i386 Debian, however I hoped it will run out as I have emulation support for i386 applications.
Thus I proceeded further downloadded and installed with the force-all dpkg optionskype-call-recorder-debian_0.8_i386.deb
root@noah:~# wget https://www.pc-freak.net/files/skype-call-recorder-debian_0.8_i386.deb

root@noah:~# dpkg -i --force-all skype-call-recorder-debian_0.8_i386.deb

...
However installing the debian i386 version of skyp-call-recorder seemed to not be starting due to problems with missing /usr/lib/libmp3lame.so.0 and /usr/lib/libaudid3tag.so libraries.
Thus I decided to give a try to the skype-call-recorder amd65 version which is natively aimed to be installed on Ubuntu release 8/9.
root@noah:~# wget https://www.pc-freak.net/files/skype-call-recorder-ubuntu_0.8_amd64.deb

root@noah:~# dpkg -i skype-call-recorder-ubuntu_0.8_amd64.deb
Installation of skype-call-recorder with this package went smoothly on Debian, the only issue I had with it is that I couldn’t easily find/launch the program via Gnome Application menu.
To work around this I immediately edited /usr/local/share/applications/skype-call-recorder.desktop e.g.:
root@noah:~# vim /usr/local/share/applications/skype-call-recorder.desktop
In skype-call-recorder.desktop I substituted the line:
Categories=Utility;TelephonyTools;Recorder;InstantMessaging;Qt;
with
Categories=Application;AudioVideo;Audio;
A consequent quick Gnome logout and login again and now I have the program launchable via the menus:
Application -> Sound and Video -> Skype Call Recorder
The only thing I dislike about Skype Call Recorder is that the program current interface is build based on QT KDE library and thus when I launch it, the program launches a number of KDE related daemones like DCOP which eat my system an extra memory, still I’m happy even though the bit high load I can record the skype voice sessions on my Debian GNU/Linux.
Tags: amd65, application menu, AudioVideo, call recorder, deb, debInstallation, Desktop, dpkg, freak, Gnome, gnome application, Install, InstantMessaging, lib, libaudid, libraries, Linux, login, logs, noah, notebook, package, recording, root, share applications, Skype, software, Sound, squeeze, tag, Ubuntu, vim, wget, work
Posted in Linux, Linux and FreeBSD Desktop, Linux Audio & Video, Skype on Linux | No Comments »
Friday, July 22nd, 2011 
Lately, I’m basicly using htop‘s nice colourful advanced Linux top command frontend in almost every server I manage, therefore I’ve almost abondoned top usage these days and in that reason I wanted to have htop installed on few of the OpenVZ CentOS 5.5 Linux servers at work.
I looked online but unfortunately I couldn’t find any rpm pre-built binary packages. The source rpm package I tried to build from dag wieers repository failed as well, so finally I went further and decided to install htop from source
Here is how I did it:
1. Install gcc and glibc-devel prerequired rpm packages
[root@centos ~]# yum install gcc glibc-devel
2. Download htop and compile from source
[root@centos src]# cd /usr/local/src

[root@centos src]# wget "http://sourceforge.net/projects/htop/files/htop/0.9/htop-0.9.tar.gz/download"

Connecting to heanet.dl.sourceforge.net|193.1.193.66|:80... connected.

HTTP request sent, awaiting response... 200 OK

Length: 418767 (409K) [application/x-gzip]

Saving to: "download"
100%[======================================>] 418,767 417K/s in 1.0s
2011-07-22 13:30:28 (417 KB/s) – “download” saved [418767/418767]
[root@centos src]# mv download htop.tar.gz
[root@centos src]# tar -zxf htop.tar.gz
[root@centos src]# cd htop-0.9
[root@centos htop-0.9]# ./configure && make && make install
make install should install htop to /usr/local/bin/htop
That’s all folks! , now my OpenVZ CentOS server is equipped with the nifty htop tool 😉
Tags: amp, CentOS, colourful, command, dag wieers, devel, frontend, heanet, htop, HTTP, Install, Installing, Linux, linux servers, mv, OKLength, online, openvz, package, reason, repository, request, response, root, rpm, src, tar gz, tar zxf, tool, wget, yum, zxf
Posted in Linux, System Administration | No Comments »
Sunday, July 17th, 2011 It seems Skype has troubles installing on 64 bit Ubuntu via Ubuntu’s Graphical Package Install manager which in Ubuntu 11.04 is called (Ubuntu Software Center)
During my attempt to take advantage of the nice GUI apt frontend, I encontered the error:
Wrong Architecture amd64
And Skype install failed, as you see in below’s picture (which you might be unable to read since it’s stating the error in Bulgarian 😉
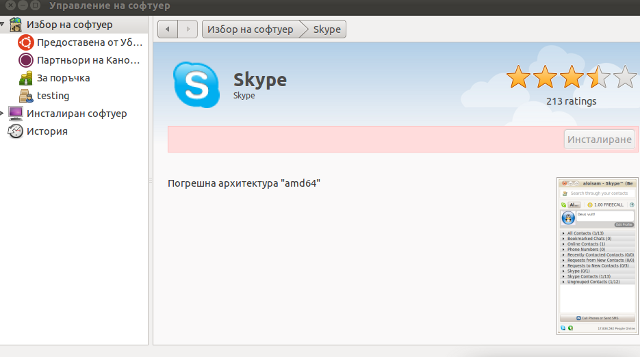
The error is quite understandable, since the Skype deb package which tried to install was built for the i386 architecture.
Since the Software Center was not intelligent enough to work around the issue, I finally fixed it myself using the good old apt-get in terminal, like so:
root@ubuntu:~# apt-get install skype

...
apt did not even complain that the package had a different architecture for i386 and installed skype without any errors as well Skype worked immediately even though the arthictural difference.
This is probably because even though it’s a amd64 Ubuntu it has a kernel module loaded to support i386 binaries 😉
Now my sister can enjoy her skype on the shiny Ubuntu 😉
Tags: amd, apt frontend, architecture, arthictural, attempt, binaries, center, deb, deb package, ERROR, frontend, Graphical, graphical package, Install, issue, kernel, manager, Module, package, root, sister, Skype, software, software center, terminal, Ubuntu
Posted in Linux and FreeBSD Desktop, Linux Audio & Video, Skype on Linux | No Comments »


