Posts Tagged ‘option’
Tuesday, April 12th, 2011 
From my previous two articles How to install nginx webserver from source on Debian Linux / Install Latest Nginx on Debian and How to enable output compression (gzipfile content compression) in nginx webserver , I have explained how the Nginx server can be installed and configured easily.
As I’m continuing my nginx adventures this days, by trying to take the best out of the installed nginx server, I’ve found few configuration options, which does improve nginx’s server performance and thought it might be nice to share it here in hope that some other nginx novice might benefit out if them.
To setup and start using the options you will have of course to place the conf directives in /usr/local/nginx/conf/nginx.conf or wherever your nginx.conf is located.
The configuration options should be placed in nginx’s conf section which starts up with:
http {
Here are the configuration options useful in hastening my nginx’s performance:
1. General options nginx settings
## General Options

ignore_invalid_headers on;

keepalive_requests 2000;

recursive_error_pages on;

server_name_in_redirect off;

server_tokens off;
2. Connection timeout nginx settings
## Timeouts

client_body_timeout 60;

client_header_timeout 60;

keepalive_timeout 60 60;

send_timeout 60;

expires 24h;
3. server options for better nginx tcp/ip performance
## TCP options

tcp_nodelay on;

tcp_nopush on;
4. Increase the number of nginx worker processes
Somewhere near the beginning of nginx.conf file you should have the directive option:
worker_processes 1;
Make sure you change this option to:
worker_processes 4;
This will increase the number of spawned nginx worker processes in a way that more spawned threaded servers will await for client connections:
Being done with all the above settings, as a next step you have to restart the nginx server, in my case via the init script:
debian:~# /etc/init.d/nginx restart

Restarting nginx: nginx.
Now to check everything is fine with nginx and more specific that the worker_processes 4 options has taken place issue the command:
debian:~# ps axu |grep -i nginx|grep -v grep

root 20456 0.0 0.0 25280 816 ? Ss 10:35 0:00 nginx: master process /usr/local/nginx/sbin/nginx

nobody 20457 0.0 0.0 25844 1820 ? S 10:35 0:00 nginx: worker process

nobody 20458 0.0 0.0 25624 1376 ? S 10:35 0:00 nginx: worker process

nobody 20459 0.0 0.0 25624 1376 ? S 10:35 0:00 nginx: worker process

nobody 20460 0.0 0.0 25624 1368 ? S 10:35 0:00 nginx: worker process
Above you notice the 4 nginx processes running with user nobody, they’re the same configured worker_processes I just pointed out above.
Tags: body, client, client connections, compression, configuration options, connection timeout, content, course, directive, everything, file, gzipfile, header, init, init script, Install, keepalive, Linux, nginx, nobody, nopush, novice, number, option, output compression, place, script, server name, server options, server performance, servers, Timeouts, tokens, worker processes
Posted in Linux, System Administration | 2 Comments »
Monday, April 11th, 2011 
If you’re experiencing problems with maximising flash (let’s say youtube) videos on your Debian or Ubuntu or any other debian derivative.
You’re not the only one! I myself has often experienced the same annoying issue.
The flash fullscreen failures or slownesses are caused by flash player’s attempts to use directly your machine hardware, as Linux kernel is rather different than Windows and the guys from Macromedia are creating always a way more buggy port of flash for unix than it’s windows versions, it’s quite normal that the flash player is unable to properly address the computer hardware on Linux.
As i’m not programmer and I couldn’t exactly explain the cause for the fullscreen flash player mishaps, I’ll skip this and right give you the two command lines solution:
debian:~# mkdir /etc/adobe

debian:~# echo "OverrideGPUValidation = 1" >> /etc/adobe/mms.cfg
This should fix it for, you now just restart your Icedove (Firefox), Epiphany Opera or whatever browser you’re used to and launch some random video in youtube to test the solution, hopefully it should be okay 😉 But you never know with flash let’s just hope that very soon the open flash alternative gnash will be production ready and at last we the free software users will be freed from the evil “slavery” of adobe’s non-free flash player!
Though this tip is tested on Debian based Linux distributions it should most likely work same in all kind of other Linuxes.
The tip should also probably have effect in FreeBSD, though the location of the adobe directory and mms.cfg should probably be /usr/local/etc/adobe, I’ll be glad to hear from some FreeBSD user if including the OverrideGPUValidation = 1 flash option to mms.cfg like below:
# mkdir /usr/local/etc/adobe

# echo "OverrideGPUValidation = 1" >> /usr/local/etc/adobe/mms.cfg
would have an impact on any flash player fullscreen issues on FreeBSD and other BSD direvative OSes that run the linux-flash port.
Tags: Adobe, adobe flash, adobedebian, browser, BSD, buggy, cause, cfg, command, Computer, computer hardware, derivative, Flash, flash fullscreen, flash issues, flash option, free flash player, free software users, freebsd user, fullscreen flash, gnash, hardware, Icedove, impact, issue, kernel, linux distributions, linux flash, linuxes, location, machine hardware, macromedia, mms, option, oses, player, port, production, programmer, Resolving, right, slavery, software, solution, sudo, tip, Ubuntu, video, way, windows versions, work, youtube, youtube videos
Posted in Linux, Linux and FreeBSD Desktop, Linux Audio & Video | No Comments »
Wednesday, April 6th, 2011 If you have wondered on how to create videos aiming at manuals on how you do certain stuff on Linux, let’s say related to programming or system administration.
Then you should definitely check out
xvidcap
Below is the package description as taken from apt-cache show xvidcap
A screen capture enabling you to capture videos off your X-Window desktop

for illustration or documentation purposes. It is intended to be a

standards-based alternative to tools like Lotus ScreenCam.
On Debian based Linux systems (e.g. Debian Ubuntu) xvidcap is available straight from the package repositories. To install and test it you can straight issue:
linux:~# apt-get install xvidcap

...
To start using xvidcap, either by starting it with alt+f2 in gnome or straight launch it from the applications menu via:
Applications -> Sound & Video -> xvidcap
Here is how the xvidcap program looks like right after you start it;
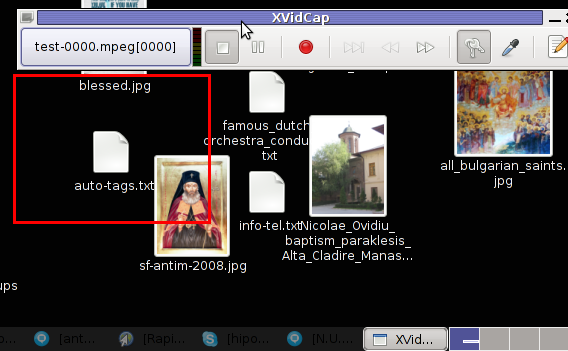
As you see in the screenshot xvidcap’s menu interface is extraordinary simple.
As you see it only has a stop, pause, rec, back and forward buttons, a capture selector and movie editor.
Pitily xvidcap does not support music capturing, but at least for me that’s not such an issue.
If you click over the field test-0000.mpeg[0000] with your last mouse button, you will notice a drop down menu with an option for preferences of xvidcap.
Take the time to play with the preferences, since there are quite a few of them.
The most important preference that you might like to straightly adjust in my view is in the:
Preferences -> Multi-Frame tab -> File Name:
The default file that xvidcap uses to store it’s content files as you will see in the preferences is utest-%04d.mpeg
If you want to change the type of the output file format to let’s say flv change the File Name: value to utest-%04d.flv
Next time you record with xvidcap, you will have the file stored in flv format.
The red lines which you see in the above screenshot is the capture area, you will have to also tune the screen capture area before you can proceed with recording a video from your desktop.
The way to capture your Desktop in fullscreen is a bit unusual, you first need to mark up all your visible Desktop and before that you will have to select from xvidcap’s preferences from:
Preferences -> General -> Minimize to System Tray
By selecting this option each time you press the xvidcap’s record button the xvidcap’s controller interface will be minimized to tray and capturing the video of the region previously selected with the capture selector will start up.
Tags: Button, Capture, capture desktop, content files, description, Desktop, documentation purposes, drop down menu, f2, field test, file, file format, Gnome, illustration, linux desktop, linux systems, lotus screencam, menu interface, mouse button, mpeg, option, package, package description, pause, repositories, right, screen, screen capture, screenshot, selector, show, Sound, system administration, test, time, Ubuntu, x window, xvidcap, xvidcapHere
Posted in Linux, Linux and FreeBSD Desktop, Linux Audio & Video | 7 Comments »
Monday, March 28th, 2011 
If you’re employed into an IT branch an IT hobbyist or a tech, geek you should have certainly heard about the latest trend in Internet and Networking technologies the so called Cloud Computing
Most of the articles available in newspapers and online have seriously praised and put the hopes for a better future through cloud computing.
But is really the cloud computing as good as promised? I seriously doubt that.
Let’s think about it what is a cloud? It’s a cluster of computers which are connected to work as one.
No person can precisely say where exactly on the cluster cloud a stored information is located (even the administrator!)
The data stored on the cluster is a property of a few single organizations let’s say microsoft, amazon etc., so we as users no longer have a physical possession of our data (in case if we use the cloud).
On the other hand the number of system administrators that are needed for an administration of a huge cluster is dramatically decreased, the every day system administrator, who needs to check a few webservers and a mail server on daily basis, cache web data with a squid proxy cache or just restart a server will be no longer necessary.
Therefore about few million of peoples would have to loose their jobs, the people necessary to administrate a cluster will be probably no more than few thousands as the clouds are so high that no more than few clouds will exist on the net.
The idea behind the cluster is that we the users store retrieve our desktops and boot our operating system from the cluster.
Even loading a simple webpage will have to retrieve it’s data from the cluster.
Therefore it looks like in the future the cloud computing and the internet are about to become one and the same thing. The internet might become a single super cluster where all users would connect with their user ids and do have full access to the information inside.
Technologies like OpenID are trying to make the user identification uniform, I assume a similar uniform user identication will be used in the future in a super cloud where everybody, where entering inside will have access to his/her data and will have the option to access any other data online.
The desire of humans and business for transperancy would probably end up in one day, where people will want to share every single bit of information.
Even though it looks very cool for a sci-fi movie, it’s seriously scary!
Cloud computing expenses as they’re really high would be affordable only for a multi-national corporations like Google and Microsoft
Therefore small and middle IT business (network building, expanding, network and server system integration etc.) would gradually collapse and die.
This are only a few small tiny bit of concerns but in reality the problems that cloud computing might create are a way more severe.
We the people should think seriously and try to oppose cloud computing, while we still can! It might be even a good idea if a special legislation that is aming at limiting cloud computing can be integrated and used only inside the boundary of a prescribed limitations.
Institutions like the European Parliament should be more concerned about the issues which the use of cloud computing will bring, EU legislation should very soon be voted and bounding contracts stop clouds from expanding and taking over the middle size IT business.
Tags: amazon, basis, better future, bit, cache web, Cloud, clouds, daily basis, desktops, employment, everybody, future, geek, hobbyist, identication, information, mail server, Microsoft, networking technologies, newspapers, number, openid, operating system, option, person, physical possession, Privacy, property, proxy cache, squid, system, system administrator, system administrators, think, threat, trend, web data, webpage, webservers
Posted in Everyday Life, Various | 2 Comments »
Monday, April 4th, 2011 There are plenty of articles, on how to increase search engine ranking in wordpress and I’m sure this article might be not that interesting but still I thought it might be nice to mention about this 3 wordpress plugins Auto-Tags, SEO Slugs and Platinium SEO Pack which will help you increase your traffic.
Let me say a few words for each of the 3 plugins:
1. Auto-tags
Below is the description of the plugin directly taken from the plugin website http://wordpress.org/extend/plugins/auto-tag/
This plugin uses the Yahoo.com and tagthe.net APIs to find the most relevant keywords

from the content of your post, and then adds them as tags.

New for version 0.2: an options page allows to choose how many tags are

retrieved from each service The tag adding is fully automatic,

so if you're using a plugin like feedwordpress to display RSS feeds

on your blog as posts, everything will get done as the feed

posts are published. No user intervention necessary!
Here are the installation instructions for auto-tags:
debian:~# cd /var/www/blog/wp-content/plugins

debian:/var/www/wp-content/plugins:# wget https://www.pc-freak.net/files/auto-tag.0.4.6.zip

100%[================================>] 14,325 45.3K/s in 0.3s
2011-04-04 12:30:17 (45.3 KB/s) – `auto-tag.0.4.6.zip’ saved [14325/14325]
debian:/var/www/wp-content/plugins:# unzip auto-tag.0.4.6.zip
…
In the above example my wordpress installation is in /var/www/blog/ , if your wordpress is installed in another directory location change to the respective directory.
To activate the Plugin go to:
Plugins -> Auto Tags

Press over Activate to activate the plugin.
To configure the Auto-tags plugin navigate to:
Settings -> Auto tags plugin
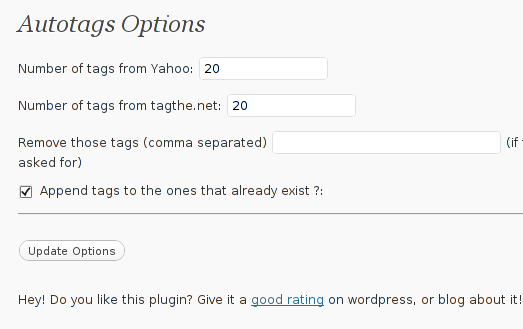
Therein you can configure the number of post tags to be retrieved from Yahoo, tagthe.net. The settings also allows you to disable certain tags you don’t want to appear in your post tags from the field, Remove those tags (comma separated)
The plugin also has an option called Append tags to the ones that already exist which on my wordpress 3.1 installation doesn’t work
After ending up your desired configuration simply press the Update Options button.
Now each time you type a new post in your wordpress blog, a tags related to the post will automatically be included.
Based on this tags Search engines will easily find content that relates to your blog tags and thus your page indexing will get better.
Tags: apis, Auto, auto tag, Auto-tags, change, com, comma, comman, configure, description, directory location, everything, feedwordpress, few words, freak, installation, location, location change, number, option, Pack, page, plugin, Search, search engine ranking, Slugs, tag, tagthe, traffic, wget, wordpress plugins, Yahoo
Posted in SEO, Web and CMS | 4 Comments »


