Posts Tagged ‘option’
Wednesday, August 24th, 2011 While I was deploying a new Nagios install to Monitor some Windows hosts I’ve came across the following error in Nagios’s web interface:
Sorry, but Nagios is currently not checking for external commands, so your command will not be committed!

Read the documentation for information on how to enable external commands...
This error is caused by an option configuration for /etc/nagios/nrpe.cfg (part of the nrpe-nagios-server Debian package.
The config variable in nrpe.cfg causing the error is check_external_command=0 , the fix comes to changing the variable to:
check_external_command=1
As well as restart the /etc/init.d/nagios-nrpe-server and /etc/init.d/nagios3 services:
debian:~# /etc/init.d/nagios3 restart

...

debian:~# /etc/init.d/nagios-nrpe-server

...
This changes has work out the error Sorry, but Nagios is currently not checking for external commands, so your command will not be committed! , however immediately after another kind of error appared in Nagios web interface when I tried to use the send Nagios commands button. The error was:
Error: Could not stat() command file '/var/lib/nagios3/rw/nagios.cmd'!
This error is due to a deb package, which seems to be affecting the current deb versions of Nagios shipped with Debian 6 Squeeze stable, as well as the Latest Ubuntu release 11.04.
Thanksfully there is a work around to the problem I found online, to fix it up I had to execute the commands:
debian:~# /etc/init.d/nagios3 stop debian:~# dpkg-statoverride --update --add nagios www-data 2710 /var/lib/nagios3/rw

debian:~# dpkg-statoverride --update --add nagios nagios 751 /var/lib/nagios3

debian:~# /etc/init.d/nagios3 start
And hooray Thanks God the error is gone 😉
Tags: Button, check, checking, command, config, deb, deb package, dpkg, ERROR, file, god, hooray, information, kind, lib, monitor, nagios, online, option, package, squeeze, Stable, stat, Thanksfully, Ubuntu, var, web interface, work, www data
Posted in Linux, System Administration | 8 Comments »
Wednesday, August 24th, 2011 I’ve been playing with configuring a new nagios running on a Linux host which’s aim is to monitor few Windows servers.
The Linux host’s exim is configured to act as relay host to another SMTP server, so all email ending up in the Linux localhost on port 25 is forwarded to the remote SMTP.
The remote smtp only allows the Linux to send email only in case if a real existing username@theserverhostname.com is passed it, otherwise it rejects mail and does not sent properly the email.
As the newly configured Nagios installatio is supposed to do e-mail notification, I was looking for a way to change the default user with which Nagios sends mails, which is inherited directly after the username with which /usr/sbin/nagios3 and /usr/sbin/nrpe are running (on Debian this is nagios@theserverhostname.com).
Thanksfully, there is a work around, I’ve red some forum threads explaning that the username with whch nagios sends mail can be easily changed from /etc/nagios3/commands.cfg by passing the -a “From: custom_user@myserverhostname.com” to all occurance of /usr/bin/mail -s , its preferrable that the -a custom_user@myserverhostname.com is inserted before the -s “” subject option. Hence the occurance of mail command should be changed from:
| /usr/bin/mail -s "** $NOTIFICATIONTYPE$
To:
| /usr/bin/mail -a "From: custom_user@theserverhostname.com" -s "** $NOTIFICATIONTYPE$
Now to read it’s new configurations nagios requirs restart:
debian:~# /etc/init.d/nagios3 restart

...
Now in case of failed services or Hosts Down nagios will send it’s mail from the custom user custom_user@theserverhostname.com and nagios can can send mail properly via the remote relay SMTP host 😉
Tags: aim, com, command, custom, debian gnu, default user, e mail notification, email, exim, forum, forum threads, gnu linux, hosts, Linux, linux host, localhost, mail command, myserverhostname, nagios, notification, NOTIFICATIONTYPE, occurance, option, port, preferrable, relay, smtp server, Thanksfully, theserverhostname, username, usr, way, whch, windows servers, work
Posted in FreeBSD, Linux, System Administration | No Comments »
Saturday, July 16th, 2011 
It was necessery to clean up some squid cache for some proxy users on a Debian host. Until now I’ve used to run only custom build Squid server on Slackware Linux.
Thus I was curious if Debian guys were smart enough to implement a proxy cache cleaning option as an option to be passed on to squid’s init script.
Honestly I was quite suprised squid clear cache option is not there;
squid-cache:~# /etc/init.d/squid3

Usage: /etc/init.d/squid3 {start|stop|reload|force-reload|restart}

squid-cache:/#
As it was not embedded into init script I still hoped, there might be some Debian way to do the proxy cache clearing, so I spend some 10 minutes checking online as well as checked in squid3‘s manual just to find there is no specific command or Debian accepted way to clean squid’s cache.
Since I couldn’t find any Debian specific, way I did it the old fashioned way 😉 (deleted directory/file structures in /var/spool/squid3/* and used squid’s -z option, to recreate the swap directories.
Here is how:
squid-cache:~# /etc/init.d/squid3 stop;

squid-cache:~# rm -Rf /var/spool/squid3/*;

squid-cache:~# squid3 -z; /etc/init.d/squid3 start
Finally I was quite amazed to realize, there was not even a crontab script to periodically clear and re-create proxy cache.
My previous experience with maintaning an office Squid proxy cache has prooved, that periodic cache clean ups are very helpful, especially to resolve issues with cached unreslovable DNS entries in the server.
Clearing up squid cache every week or something, guarantees that failure to resolve certain hosts at certain times would not stay unresolvable like forever 😉
In that manner of thougths, I decided to put the following crontab which will twice a month clear up proxy’s cache, to possibly solve some failed squid DNS issues.
squid-cache:~# crontab -u root -l > file;

echo '00 04 12,26 * * /etc/init.d/squid3 stop; rm -Rf /var/spool/squid3/*; squid3 -z; /etc/init.d/squid3 start >/dev/null 2>&1'

>> file; crontab file
By the way, implementing the squid clear cache in Debian and Ubuntu ‘s init scripts and putting a periodic proxy clear up cron, seems like a feature worthy to be proposed to the distro developers and hopefully be embbed in some of the upcoming distro releases 😉
Tags: amp, cache option, clear cache, clearing, command, cron, crontab script, dev, DNS, dns entries, experience, failure, feature, fi, fil, file, file structures, guarantees, Honestly, hosts, init script, Linux, necessery, online, option, proxy, proxy cache, proxy users, rf, root, something, specific, spool, squid, squid cache, Stop, thougths, Ubuntu, ups, Usage, var, way
Posted in Linux, System Administration | No Comments »
Wednesday, July 13th, 2011 One server with a broken Raid array was having troubles with it’s software raid.
I tried to scan the raid array via a rescue cd like so:
server:~# mdadm --assemble --scan /dev/md1
just to be suprised by the message:
mdadm: /dev/md1 assembled from 2 drives – not enough to start the array.
In /proc/mdstat respectively the raid was showing inactive, e.g.:
server:~# cat /proc/mdstat

Personalities : [raid10] [raid1]

md1 : inactive sda2[0] sdc2[2] sdb2[1]

12024384 blocks
Respectively trying to activate the software Linux raid array with:
server:~# mdadm -A -s
Couldn’t be completed because of the same annoying error:
/dev/md1 assembled from 2 drives – not enough to start the array.
Thanksfully finally thanks to some Russian, who posted having same issues reported to be able to active his software RAID with mdadm’s –force option.
Thus enabling the problematic RAID 5 array was possible with:
server:~# mdadm -A -s --force
This solution of course is temporary and will have to further check what’s wrong with the array, however at least now I can chroot to the server’s / directory. 😉
Tags: annoying error, cat, check, course, dev, drive, ERROR, force option, Linux, md1, mdstat, option, Personalities, proc, Raid, raid 5 array, raid array, rescue, rescue cd, sCould, sda, sdb, sdc, software, software linux, software raid, solution, Thanksfully, way
Posted in Linux, System Administration | 1 Comment »
Tuesday, July 12th, 2011 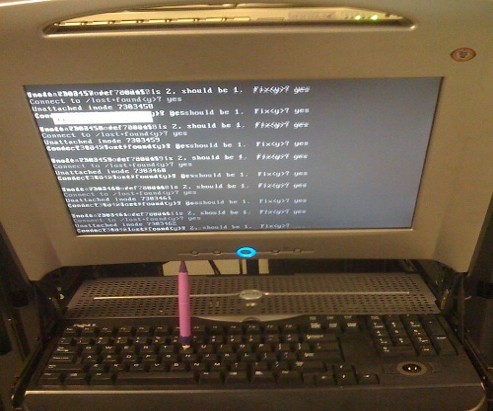
Are you an administrator of servers and it happens a server is DOWN.
You request the Data Center to reboot, however suddenly the server fails to boot properly and you have to request for IPKVM or some web java interface to directly access the server physical terminal …
This is a very normal admin scenario and many people who have worked in the field of remote system administrators (like me), should have experienced that bad times multiple times.
Sadly enough only a insignifant number of administrators try to do their best to reduce this down times to resolve client stuff downtime but prefer spending time playing the ztype! game or watching some porn website 😉
Anyways there are plenty of things like Server Auto Reboot on Crash with software Watchdog etc., that we as sysadmins can do to reduce server downtimes and most of the manual human interactions on server boot time.
In that manner of thougts a very common thing when setting up a new Linux server that many server admins forget or don’t know is to enable all the server partition filesystems to be auto fscked during server boot time.
By not enabling the auto filesystem check options in Linux the server filesystems did not automatically scan and fix hard drive partitions for fs innode inconsistencies.
Even though the filesystems are tuned to automatically get checked on every 38 system reboots, still if some kind of filesystem errors are found that require a manual confirmation the boot process is interrupted and the admin ends up with a server which is not reachable remotely via ssh !
For the remote system administrator, this times are a terrible times of waitings, prayers and hopes that the server hardware is fine 😉 as well as being on hold to get a KVM to get into the server manually and enter the necessery input to fsck prompt.
Many of this bad times can be completely avoided with a very simple fix through /etc/fstab by enabling all server partitions containing any filesystem to be automatically checked and fixed in case if inconsistencies or errors are found by fsck.ext3, fsck.ext4, fsck.reiserfs etc. commands.
A very typical default /etc/fstab file you will find on many servers should look something like:
/dev/sda8 / ext3 errors=remount-ro 0 1

tmpfs /dev/shm tmpfs defaults 0 0

devpts /dev/pts devpts gid=5,mode=620 0 0

sysfs /sys sysfs defaults 0 0

proc /proc proc defaults 0 0

/dev/sda1 /home ext3 defaults 0 0
Notice the line:
/dev/sda1 /home ext3 defaults 0 0
The first column in the example contains the device name, the second one its mount point, third its filesystem type, fourth the mount options, fifth (a number) dump options, and sixth (another number) filesystem check options. Let’s take a closer look at this stuff.
The ones which are interesting to enable auto fsck checking and error resolving is provided usually by the last sixth variable (filesystem check option) which in the above example equals 0 .
When the filesystem check option equals 0 this means the auto fsck and repair for the respective filesystem is disabled.
Some time in the past the dump backup option (5th option in the example) was also used but as far as I can understand today it’s not that important in modern GNU/Linux distributions.
Now having the above sample crontab in order to enable the fsck file checking on Linux boot for /dev/sda1 , we will need to modify the above line’s filesystem check option be 2, e.g. the line would afterwards look like:
/dev/sda1 /home ext3 defaults 0 2
Setting the 2 as an option for filesystem check is necessery for every filesystem which is not mounted as a root filesystem /
In above example /etc/fstab you already see that auto filesystem fsck is enabled for root partition:
/dev/sda8 / ext3 errors=remount-ro 0 1
(notice the 1 in the end of the line)
Finally a modified version of the default sample /etc/fstab which will check the extra /dev/sda1 /home partition would look like so:
/dev/sda8 / ext3 errors=remount-ro 0 1

tmpfs /dev/shm tmpfs defaults 0 0

devpts /dev/pts devpts gid=5,mode=620 0 0

sysfs /sys sysfs defaults 0 0

proc /proc proc defaults 0 0

/dev/sda1 /home ext3 defaults 0 2
Making sure all Linux server partitions has the auto filesystem check option enabled is something absoultely necessery!
Enabling the auto fsck on servers always makes me sleep calmer 😉
Hope it helps your too. 🙂
Tags: auto reboot, boot process, boot time, center, client, crash, data, ext, file, filesystem errors, hard drive partitions, human interactions, inconsistencies, java interface, linux server, multiple times, necessery, number, option, partition, physical terminal, porn website, reiserfs, root, sda, server boot, server downtimes, server hardware, shm, software, something, spending, spending time, system administrators, terminal, terrible times, time, Watchdog, web java, ztype
Posted in Linux, System Administration | 2 Comments »
Friday, July 1st, 2011 My sister’s newly bought laptop is Acer Aspire 5736Z . By the default this notebook comes with some kind of Linux distribution Linpus .
Even though this Linpus (crafted Linux especially for Acer notebooks) looked really nice, it prooved to be a piece of shit linux distro.
Linplus was unable to even establish a simple Wireless WPA2 protected connection with my wireless router, not to mention that the physical Linux consoles (CTRL+ALT+F1) were disabled …
This LinPlus was so bad that I couldn’t even launch any type of terminal on it (I was stuck!) so I decided to kill it and make a decent latest Ubuntu 11.04 Install on it.
I was surprised to find out that trying to boot up the Ubuntu 11.04 installer led me to a black screen (black screen of death).
The v Aspire’s 5736Z monitor kept completely blank, where the hard drive was continuously reading (indicating that the Ubuntu installer has properly booted but it couldn’t light up the notebook screen).
A bit of investigation on any issues with this Acer notebook model has led me to a thread in fedora forums:
http://forums.fedoraforum.org/showthread.php?t=263794
On this forum the same kind of Linux install problem was described to also occur with ASPIREs 5736Z during a Fedora install.
I just tried the suggested fix and it works like a charm.
The fix goes like this:
1. Invoke the Ubuntu settings parameter Install pre install screen
Just press any button while the Ubuntu installer CD is reading and after few secs the Install options screen should appear, like you see it in below’s screenshot:
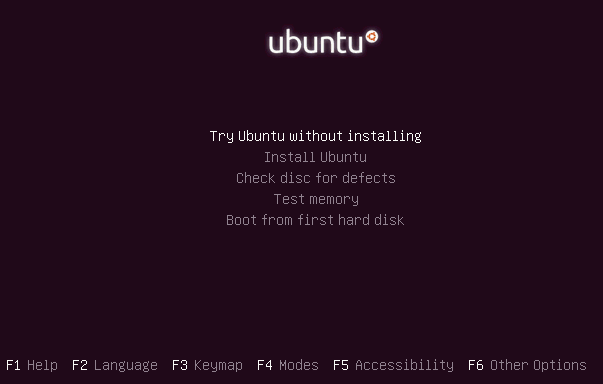
2. Select the nomodetest Boot CD Ubuntu option
You see in the above screenshot the F6 Other Options . I had toto press F6 and choose the nomodetest boot option to make the Ubuntu be able to further boot up.
After selecting the nomodetest option and pressing on the Install Ubuntu menu option the graphic installer launched succesfully 😉
Hope this small tip to be helpful to some Ubuntu or other Linux user who is trying to install Linux on his Acer Aspire 5736Z
Cheers 😉
Tags: acer notebook, acer notebooks, ASPIRE, ASPIREs, boot cd, boot option, Button, drive, f1, fedora, hard drive, Hope, how to install ubuntu linux, Install, installer cd, investigation, laptop, Linplus, linux consoles, menu option, nomodetest, notebook model, option, options screen, piece, piece of shit, reading, screen, secs, showthread, terminal, thread, tip, toto, type, Ubuntu, wireless router, wpa2
Posted in Linux, Various | 20 Comments »
Thursday, June 23rd, 2011 
It’s the first time I’m creating a wildcard ssl certificate. It appeared there is no fundamental difference between generating a normal SSL certificate and generating a wildcard certificate.
The procedure for generating a wildcard SSL certificate is as follows:
1. Generate an SSL key file
server:~# /usr/bin/openssl genrsa -des3 -out domain.com.key 2048
Enter pass phrase for domain.com.key:
Fill in any passphrase you like, the 2048 specifies the encryption level, 2048 is good enough and is the most commonly used as of today.
I’ve saw there is also an option to use 4096 bits encryption but I never tried that myself, I would be glad if somebody can share if he has succesfully established an SSL certificate with 4096 encryption.
2. Generate the certificate request file
server:~# /usr/bin/openssl req -new -key /home/hipo/domain.com.key -out /home/hipo/domain.com.csr
Further on it’s necessery to fill in some info concerning the newly generated webserver SSL, e.g.:
Enter pass phrase for /home/hipo/domain.com.key:

You are about to be asked to enter information that will be incorporated

into your certificate request.

What you are about to enter is what is called a Distinguished Name or a DN.

There are quite a few fields but you can leave some blank

For some fields there will be a default value,

If you enter '.', the field will be left blank.

-----

Country Name (2 letter code) [AU]:

State or Province Name (full name) [Some-State]:

Locality Name (eg, city) []:

Organization Name (eg, company) [Internet Widgits Pty Ltd]:

Organizational Unit Name (eg, section) []:

Common Name (eg, YOUR name) []:

Email Address []:

Please enter the following 'extra' attributes

to be sent with your certificate request

A challenge password []:

An optional company name []:
Fill all the values according to your requirements, the only vital thing here is to fill in a proper Common Name (eg, YOUR name) []:
The Common Name should always be equal to *.domain.com , if something else is typed in the SSL certificate won’t be considered a valid one when placed on the multiple subdomains.
The newly generated domain.com.csr file should be looking something similar to:
server:~# less < domain.com.csr

-----BEGIN CERTIFICATE REQUEST-----

MIIC2jCCAcICAQAwgZQxCzAJBgNVBAYTAkdCMQ8wDQYDVQQIEwZMb25kb24xDzAN

BgNVBAcTBkxvbmRvbjEQMA4GA1UEChMHU2FudHJleDEWMBQGA1UECwwNKi5zYW50

cmV4Lm5ldDEWMBQGA1UEAwwNKi5zYW50cmV4Lm5ldDEhMB8GCSqGSIb3DQEJARYS

bWFzcmF3eXpAeWFob28uY29tMIIBIjANBgkqhkiG9w0BAQEFAAOCAQ8AMIIBCgKC

AQEAlm9NwcQiA+AAVuVIjg8nCCn5nN14C3rSdcRNuE6oFo9E5uhl9yz8YDIg7wNx

FNQsmw0AwMzkao5Qv9yrmHqbht8qqPfG7YpcTiAoAuSaN6Nm25/zYrSu1uRsnc4C

9lINS8Va+n0Jt+CCQmomTKSarJqNfgo3j1ZU/HuOKcCEktIe0eKigMWxFKCM8wLh

CIdj6AwburckW1/ubOGlu2XKdcY5CbFe4cNGyME3rg33ft8b6v/ORWLSBMrt3QGP

bj42uZP6NoLaZCpsquJLeziLkT4rxdArUApdaTaEFrNMnwzGmUK10qmfx8SQodUl

QXmyd+PpQtaglymjIKN0L8Y36QIDAQABoAAwDQYJKoZIhvcNAQEFBQADggEBAIKe

UTXUt7XvaqVOesTmGCuVmv+Lz/GtGOEw+lfCNM4UFB950H975hHKo63YQr9Vqqqn

WlqZ0nXuwbZdfIh3xhTxzUqF/4m00OFQTbM9hwt6dyqLkmcc4J0rnTsvqjPkUsW5

U7iAIB/UIyDYUcAEky3gnokq3MLH42zXBViPM2+g/fkmJA4jaeoHGINbYMuxFh6Z

r2fIgAfGjms+hNaJvINDoBN5y6YUQbeJc+RoXMrG9clrDsUIGfmkTKCkG0BRJ2ki

Sdbm4IZMtQKU/C4a8vxZkFdleGqWeWL1SBtjjAnTtpb0uF+QmOPLcCoKnBwtEUU9

dPJlEzI+TCgAmKhZoXo=

-----END CERTIFICATE REQUEST-----
Next on this BEGIN CERTIFICATE REQUEST will have to be filled in to the certificate issuer website, whether it’s requested, let’s say in GlobeSSL.
Based on the certificate request a valid SSL certificate will be issued by the SSL provider.
Here one important note to make is that if your domain contians some prohibited keywords like, let’s say bank, finance, poker etc., a keywords which might be considered a fraud or forgery then probably the SSL certificate won’t be issued by the SSL issuer and you will have to further contact the SSL cert provider and send them some more information related to the type of business the new website is going to run.
This kind of domain keyword filter, that is implemented by SSL certificate issuer companies is made to protect internet users from possible frauds or scam websites as well as reduce the level of potential dangerous pyramid like businesses that are so modern on the net these days.
Last step before the certificate will be visible in a browser is to set it for a domain name or virtualhost in Apache, lighttpd or whatever webser is used.
As I’m personally using it with Apache webserver, below I’ll describe how to set it in Apache version 2.x.
3. Configure the newly configured SSL certificate to run on Apache virtualhost
Open up the virtualhost file which coresponds to the domain name to be secured with SSL, for example /etc/apache/sites-available/www.domain.com
Within the <Virtualhost> directives place in a code similar to:
SSLEngine on

# domain.com.crt cointains the wildcard SSL certificate generated and obtained by you from RapidSSL

SSLCertificateFile /etc/apache2/ssl/domain.com.pem
Here the file /etc/apache2/ssl/domain.com.pem should contain both the:
—-BEGIN RSA PRIVATE KEY—– issued earlier in step one with openssl command, as well as:
—–BEGIN CERTIFICATE—– which will be issued by the SSL certificate reseller.
Finally it’s necessery that Apache is restarted to load the new configured certificate:
server:~# /etc/init.d/apache2 restart
The above described steps need to be repeated for all the wildcard subdomains which will use the multiple SSL generated certificate and hopefully if all is well tuned, the certificates should start appearing to all the web domain subdomains immediately.
Tags: blankFor, certificate, certificate request, city organization, com, company internet, des3, Distinguished, distinguished name, dn, encryption, encryption level, file, file server, fundamental difference, genrsa, info, information, key file, letter, level, locality name, necessery, option, organization name, passphrase, phrase, province name, pty ltd, request, Some, something, ssl certificate, time, value, widgits
Posted in Linux, System Administration | 2 Comments »
Monday, June 20th, 2011 After my Debit VISA card has been declined by my Bank (had to issue a new one), which of course had a new card number and a new secret code.
Therefore to continue be able paying for domains in Godaddy I had to Update my Credit Card information in Godaddy‘s website.
Here is how I updated my Credit card details:
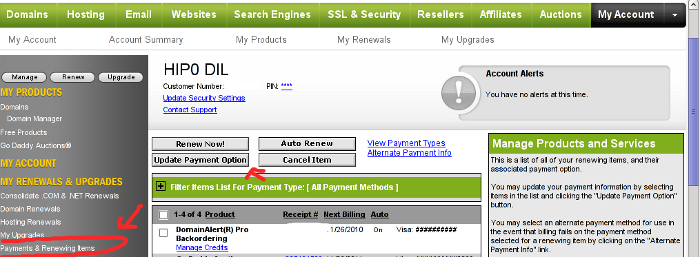
1. Login to Godaddy
My Account -> Payments and Renewing Items
2. Click on Update Payment Options
Here is a screenshot with pointers of where one should go to change the payment method or update number and type of his Debit/Credit card:
After clicking on Update Payment Options, on the right side a window pane will appear titled Change Payment Type
For a newly issued bank card, to update the recent input bank card credentials, one should click on the:
Add New Payment Type:.
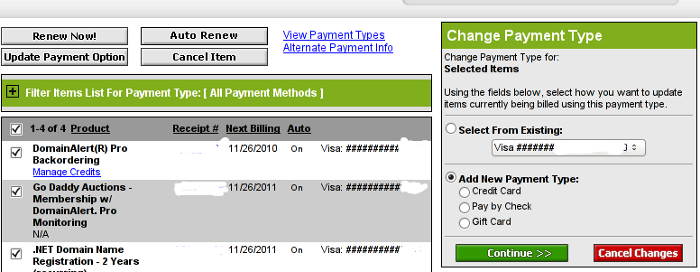
Change Payment Type Godaddy Menu
Further on in my case I had to select Credit Card , even though I’m using a VISA Debit card, as see in above’s screenshot, there is no option of Debit card visa :).
Filling in the data and saving the changes with Save Changes completes the new bank card inclusion, I can now use my new valid card with Godaddy once again.
Tags: Account, Bank, card visa, change, Click, course, credentials, Credit, credit card details, credit card information, debit credit card, debit visa card, godaddy, inclusion, information, login, menu, New, number, option, payment, payment options, pointers, Renewing, screenshot, side, type, update, VISA, visa debit card, website, window pane
Posted in Various | 1 Comment »
Monday, May 2nd, 2011 On each and every newly installed Linux or FreeBSD server. I’m always very cautious about three configuration directives for the ssh server.
This are X11Forwarding , Protocol and PermitRootLogin
One needs to be very watchful about this three ones, as tuning the right values surely prevents the server from many of the security issues that might rise up with the SSH server.
Many Linuxes like Debian and Ubuntu comes with X11Forwarding yes e.g. (X11Forwarding) enabled by default, this is an useless option in most of the cases as the servers I do administrate does not run a X environment.
Some older Linux distributions I have dealt with has the ssh Protocol 1 enabled by default and therefore, whether I do inherit an old server I have to start administrating the first thing I do is to check if the /etc/ssh/sshd_config‘s Protocol 1 option is enabled and if it is enabled I disable it.
PermitRootLogin is also an option which I often turn off as logging in via remote ssh is potentially dangerous as root password might get sniffed.
In overall the 3 sshd option’s I do check out in /etc/sshd/sshd_config on each newly installed Linux server are:
X11Forwarding yes

PermitRootLogin yes

Protocol 1
I always change this three options in my /etc/sshd/sshd_config
to:
X11Forwarding no

PermitRootLogin no

Protocol 2
One other options sshd server options which is good to be tuned is:
LoginGraceTime 120
Decreasing it to:
LoginGraceTime 60
is generally a good idea.
Of course after the changes I do restart the ssh daemon in order for the new configuration to take place:
linux:~# /etc/init.d/sshd restart

...
Tags: administrate, config, configuration directives, course, Debian, Forwarding, freebsd, idea, init, Linux, linux distributions, linuxes, noProtocol, old server, option, order, password, PermitRootLogin, PermitRootLoginOne, place, Protocol, root, root password, security, security issues, security tips, server options, server security, servers, ssh, ssh daemon, ssh protocol, ssh server, sshd server, Ubuntu, yesPermitRootLogin
Posted in FreeBSD, Linux, System Administration | No Comments »
Thursday, April 21st, 2011 As I’m manually configuring a Xserver via xorg.conf I have noticed a block of code in:
Section "Monitor"

Identified "Generic Monitor"

Option "DPMS"

EndSection
That triggered my curiousity to research further what is DPMS . A very quick google search revealed that DPMS’s purpose is to communicate to communicate between the monitor and the computer, to make the computer turn off the (CRT or LED) based monitor if the computer is not used
Thus in short to rephrase DPMS is a power saving handy Xorg feature. I many custom configured xorg.conf like the mine I’m building right now does not include DPMS as many people doesn’t have idea what DPMS is and how to enable it.
DPMS is also an interface to the Energy start power-saving capability if not all, most of the modern day monitor screens.
DPMS enables the Xserver to control automatically the computer screen and thus reduces the overall computer power consumption.
To enable the use of DPMS on my Linux, all I had to do is place a couple of configuration directives in my xorg.conf .:
Here is how I enabled DPMS in my Xorg server:
1. Edit with a text editor /etc/X11/xorg.conf
2. Find the Monitor Section , e.g.:
Section "Monitor"

....

EndSection
3. Add inside the Monitor Section
Options "DPMS" "true"
4. Lookup for the ServeryLayout section , e.g.:
Section "ServerLayout"

...

EndSection
5. Place inside the ServerLayout section For instance the following options:
Option "StandbyTime" "20"

Option "SuspendTime" "10"

Option "OffTime "25"
You might like to change the options StandbyTime, SuspendTIme or OffTime to match your likings.
6. As a last step restart the Xorg server.
Press Ctrl+Alt+BackSpace or by issuing:
host:~# pkill -HUP X
Test that DPMS is loaded properly by reviewing /var/log/Xorg.0.log for example:
host:~# grep -i /var/log/Xorg.0.log

(II) Loading extensions DPMS
Tags: Alt, backspace, capability, computer power consumption, computer screen, configuration directives, consumption, CRT, curiousity, custom, dpms, feature, google, instance, interface, likings, Linux, OffTime, option, place, power, Press, rephrase, screen, screens, Search, server press, StandbyTime, text, turn, Xorg, xserver, xtest
Posted in Linux, Linux and FreeBSD Desktop, Linux Audio & Video | No Comments »


