Posts Tagged ‘option’
Saturday, January 14th, 2012 Mounting ISO files in Linux is easy with mount cmd, however remembering the exact command one has to issue is a hard task because mounting ISO files is not a common task.
Mounting ISO files directly by clicking on the ISO file is very nice, especially for lazy people uninitiated with the command line 😉
Besides that I'm sure many Windows users are curious if there is an equivallent program to DaemonTools for Linux / BSD*?
The answer to this question is YES!
There are two major programs which can be used as a DaemonTools substitute on Linux:
These are FuriousISOMount and AcetoneISO
AcetoneISO is more known and I've used it some long time ago and if I'm correct it used to be one of the first ISO Mount GUI programs for Linux. There is a project called GMount-ISO / (GMountISO) which of the time of writting this article seems to be dead (at least I couldn't find the source code).
Luckily FuriousISOMount and AcetoneISO are pretty easy to install and either one of the two is nowdays existing in most Linux distributions.
Probably the programs can also be easily run on BSD platform also quite easily using bsd linux emulation.
If someone has tried something to mount GUIs in Free/Net/OpenBSD, I'll be interesting to hear how?
1. Mount ISO files GUI in GNOME with Furius ISO Mount
FuriousISOMount is a simple Gtk+ interface to mount -t iso9660 -o loop command.
To start using the program on Debian / Ubuntu install with apt;
debian:~# apt-get install furiusisomount

The following extra packages will be installed:

fuseiso fuseiso9660 libumlib0

The following NEW packages will be installed:

furiusisomount fuseiso fuseiso9660 libumlib0
…
To access the program in GNOME after install use;
Applications -> Accessories -> Furious ISO Mount
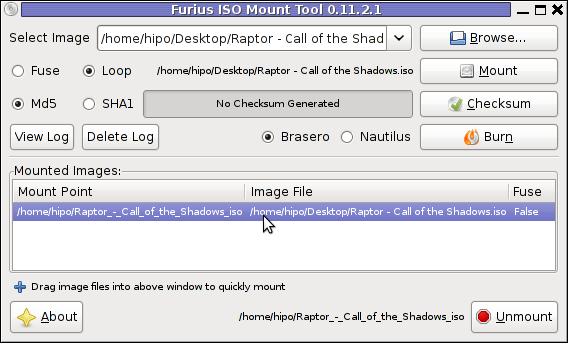
When mounting it is important to choose Loop option to mount the iso instead of Fuse
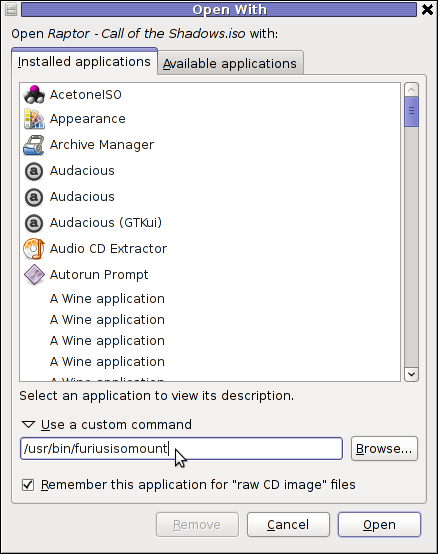
After the program is installed to associate the (.iso) ISO files, to permanently be opened with furiusisomount roll over the .iso file and choose Open With -> Other Application -> (Use a custom command) -> furiusisomount
2. Mount ISO Files in KDE Graphical Environment with AcetoneISO
AcetoneISO is build on top of KDE's QT library and isway more feature rich than furiousisomount.
Installing AcetoneISO Ubuntu and Debian is done with:
debian:~# apt-get install acetoneiso

The following NEW packages will be installed:

acetoneiso gnupg-agent gnupg2 libksba8 pinentry-gtk2 pinentry-qt4

0 upgraded, 6 newly installed, 0 to remove and 35 not upgraded.

Need to get 3,963 kB of archives.

After this operation, 8,974 kB of additional disk space will be used.

...
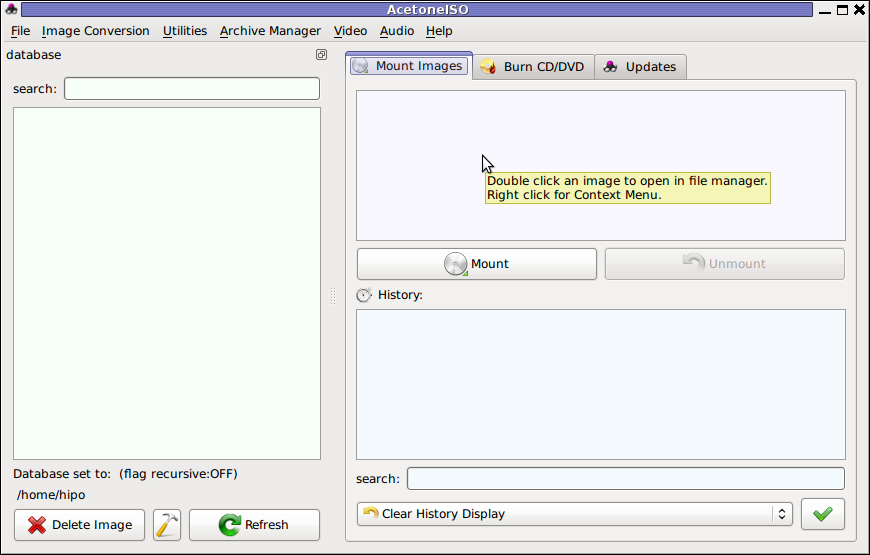
AcetoneISO supports:
- conversion between different ISO formats
- burn images to disc
- split ISO image volumes
- encrypt images
- extract password protected files
Complete list of the rich functionality AcetoneISO offers is to be found on http://www.acetoneteam.org/viewpage.php?page_id=6
To start the program via the GNOME menus use;
Applications -> Accessories -> Sound & Video -> AcetoneISO
I personally don't like AcetoneISO as I'm not a KDE user and I see the functionality this program offers as to rich and mostly unnecessery for the simple purpose of mounting an ISO.
3. Mount ISO image files using the mount command
If you're a console guy and still prefer mounting ISO with the mount command instead of using fancy gui stuff use:
# mount -t iso9660 -o loop /home/binary/someiso.iso /home/username/Iso_Directory_Name
Tags: AcetoneISO, Auto, BSD, cmd, custom, debian gnu, Draft, emulation, exact command, file, Files, Free, GMount-ISO, Gnome, graphical environment, gtk interface, guis, image files, ISO, iso file, iso files, iso9660, libumlib, long time, loop command, most linux distributions, nbsp, Open, OpenBSD, option, platform, roll, someone, something, source code, substitute, time, Ubuntu, windows users, YES
Posted in Gnome, Linux, Linux and FreeBSD Desktop, Linux Audio & Video | No Comments »
Friday, May 27th, 2011 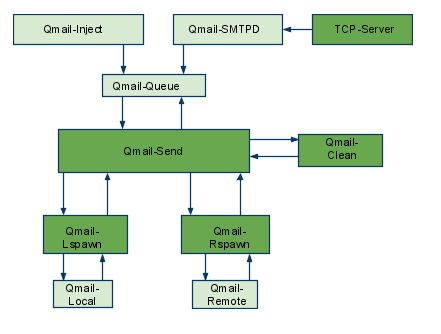
The aim of this small post is to give just a brief idea of how I fix my qmail server after breaking it or in case it is broken after mail bomb attacks, etc.
Most common cases when I break my qmail queue myself, are after I’m implementing some new patches and reinstall parts of the qmail server with a patched version of default qmail binaries.
On other occasions, I simply used the qmailctl to start or stop the server as a part of some routine tasks necessery for the administration of the qmail server.
Everybody who has already experience with qmail should have experienced, that qmail is very fragile and could break even with a simple changes, though if it works once it’s rock solid piece of mail servant.
Below I explain few ways I used through my days as a qmail sys admin to deal with broken or messed queues.
1. Fixing a broken qmail queue using automatic tools There are few handy tools which in most cases are able to solve issues with the queue, one very popular one isqueue-repair – check http://pyropus.ca/software/queue-repair/.
Installation of qmail-repair is dead easy, but it needs to be installed from source as no official debian package is available:
linux:/usr/local/src# wget http://pyropus.ca/software/queue-repair/queue-repair-0.9.0.tar.gz

linux:/usr/local/src# tar -xzvvf queue-repair-0.9.0.tar.gzdrwxr-xr-x charlesc/qcc 0 2003-10-22 16:54 queue-repair-0.9.0/

-rw-r--r-- charlesc/qcc 268 2003-10-22 16:54 queue-repair-0.9.0/TODO

-rw-r--r-- charlesc/qcc 1700 2003-10-22 16:54 queue-repair-0.9.0/CHANGELOG

-rw-r--r-- charlesc/qcc 18007 2003-10-22 16:54 queue-repair-0.9.0/COPYING

-rw-r--r-- charlesc/qcc 1098 2003-10-22 16:54 queue-repair-0.9.0/BLURB

-rwxr-xr-x charlesc/qcc 26286 2003-10-22 16:54 queue-repair-0.9.0/queue_repair.py
To check if there are issues fixable within the qmail queue it’s as easy as:
linux:/usr/local/src# cd queue-repair-0.9.0

linux:/usr/local/src/queue-repair-0.9.0# ./queue-repair -t

...

checking files...

checking queue/mess files...

checking split locations...
The tool will walk through the mail sub-directories containing mail queued files in /var/qmail/queue and will list any issues found.
It’s recommended that the qmail server is stopped before any queue modify operations are issued on the server:
linux:/usr/local/src# qmailctl stop

...
Further on in order to solve any found issues with the queue, there is the “-r”/repair option:
linux:/usr/local/src/queue-repair-0.9.0# ./queue-repair -r

...
Another tool which comes handy whether a repair of a messed qmail queue is needed is qmhandle – http://sourceforge.net/projects/qmhandle/
The use of qmhandle is also pretty easy, all one has to do is to follow the usual classical steps of a download the source & compile:
linux:/usr/local/src# wget https://www.pc-freak.net/files/qmhandle-1.3.2.tar.gz

linux:/usr/local/src# tar -zxvvf qmhandle-1.3.2

...

linux:/usr/local/src# cd qmhandle-1.3.2
Once again it’s necessery that the qmail server is stopped via its init script before qmHandle tool is used, e.g.:
linux:~# qmailctl stop

...
There is a difference between qmail queue repair tool and qmail handle , while qmail queue-repair tool is used to fix improper permissions of queued files with the qmail queue, qmhandle ‘s application is to completely delete the stored mail contents of a broken queue.
Deleting all the qmail queue content is in some cases the only option to fix the queue.
Often such a drastic measure is required after a heavy mail server overload, let’s say a result of spammers or caused by virus infected mail users which send a massive amounts of spam mails.
Thus at many cases when queue-repair was unable to solve a queue mess, I use qmhandble and sacrifice all the queued emails by completely wiping them out like so:
linux:/usr/local/src/qmhandle-1.3.2# ./qmhandle -D

...
Above command would eradicate all queued emails. Hopefully after the qmail server gets launched again with qmailctl start all the mail server operations should be back to normal.
Note that the use of qmhandle’s queue delete capabilities is pretty dangerous, if you forgot to stop the qmail server before issuing the above command!
Note that in order to use both qmHandle and queue-repair tools you will need to install python interpreter as both of the tools are written in python.
To check what is currently in the queue in Qmail, there are also native tools available, as you should probably know if you have dealt with qmail, e.g.:
debian:~# qmail-qstat

debian:~# qmail-qstat

messages in queue: 2

messages in queue but not yet preprocessed: 0
Often when there are problems with Qmail and more specificly with qmail server queue the qmail-qstat command does show messages in queue, however when an attempt to check what kind of messages are in the queue with qmail-qread no messages are shown, for instance below you see an example of that, even though qmail-qstat claims 2 messages are in the queue, qmail-qread is unable to list the messages:
debian:~# qmail-qread

debian:~#
If all is fine with qmail queue above’s qmail-qread command should have returned something similar to:
debian:~# qmail-qread

26 May 2011 07:46:47 GMT #659982 3517 <hipo@www.pc-freak.net>

remote somemail@gmail.nl

26 May 2011 07:46:47 GMT #659983 3517 <hipo@www.pc-freak.net>
2. Fixing qmail queue manually This is very dangerous initiative, so before you try anything, make sure that you know what you’re doing, the possibility that you make the situation worst if you attempt to tamper manually the qmail queue is quite high 🙂
However if you’re still convinced to try fixing it manually, take a look at /var/qmail/queue it’s very likely that there are permission issues with some of the queued files, in order to fix the situation it’s necessery that the following directories:
/var/qmail/queue/mess/

/var/qmail/queue/remote/

/var/qmail/queue/bounce

/var/qmail/queue/info
gets explored with midnight commander / mc or some kind of convenient file explorer.
If there are queued files owned by users different from qmailq and user group qmail , for instance if owned by the root user, a simple chown qmailq:qmail to the wrong permissions file, should be able to resolve the issues.
Apart from all I explain above, there are many other ways suggested online on howto clean a qmail queue, one very popular one is using James’s qfixq shell script.
This script as of this very date is not working on Debian based systems, the script is dedicated initially to run on Fedora and Redhat based Linuces
Moreover myy experience with qfixq was never successful.
One very important note which is often a cause of many problems, is always make sure you stop and start the qmail server with an interval of at least of 10 seconds.
I’ve managed many servers which after an immediate (undelayed) qmailctl stop and qmailctl start was unable to run the whole engine of the qmail server (and either email sending or email receiving was not properly working) afterwards.
In that cases many weird behaviours are common, consider this seriously if you deal with the qmail-queue, it might happen that even if you have fixed your qmail queue, after a restart the qmail might breaks up.
I’ve experienced this kind of oddities numerous times, thus when I do changes to qmail I always make sure I restart the server a couple of times (at least 5 times 😉 ) always with a good delay between the HUPs.
And as always with qmail prayer is always needed, this server is complex, you never know what will happen next 🙂
Tags: aim, automatic tools, binaries, BLURB-rwxr-xr-x, ca software, COPYING-rw-r--r-, debian package, default, download, everybody, handy tools, init, Linux, mail bomb, mess, necessery, new patches, occasions, option, package, piece, python, qcc, qmailctl, queue, queues, quot, repair, rock, routine tasks, script, servant, simple changes, software queue, tar gz, tool, wget, zxvvf
Posted in Linux, Qmail, System Administration | 3 Comments »
Friday, February 3rd, 2012

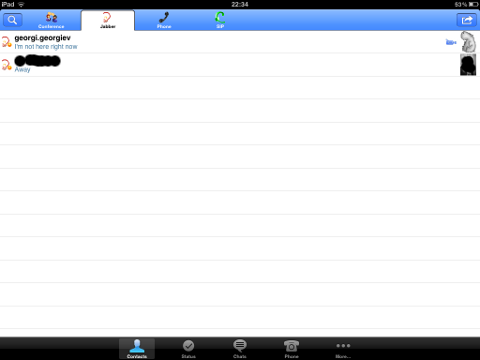
I've installed Jabber as a platform for internal company communication for a company. It was a requirement for this jabber server to be accessed from a different type of computers / devices different in size, hardware and OS e.g. (Mac OS X, Windows, Linux, Ipad, mobile phones etc.)
Happily there is plenty of free software programs which allows access to jabber for free. On the major operating systems GNU / Linux, Mac OS X and Windows the client jabber accounts are working fine with the wonderful free software Pidgin – The Universal Chat Client
One of the jabber clients, however was primary had to be used on Apple's proprietary IPad / IBad as Richard Stallman likes to call it 😉
The person who had to have the Jabber protocol working on IPad program was not a proficient user and therefore I had the task to find a program to be able to talk to the Jabber protocol for him.
A quick search in Google for jabber ipad client led me to few programs said to support Jabber on Ipad :
Jabba was looking quite, nice but unfortunately costs $1.99 and should be purchased in Apple's App Store and it was preferrable not to spend money on a trivial thing as a Jabber client.
I gave BeejiveIM a try but it required some very complex registration, as well as again required to be purchased (if I remember correctly), so it wasn't an option either.
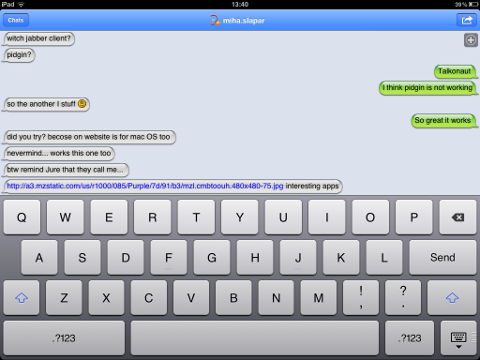
Then thanksfully, I found TalknOut which is free and it is a perfect jabber client for Apple Ipad
Talkonaut is a program also supporting both Jabber (XMPP) and GTalk2VoIP, hence supporting Google Talk and MSN/Live Messanger.
It is written Java and therefore works on any device that has Java installed. Talkonaut supports the following mobile architectures:
- Apple's IPhone and Ipad
- Google Android Phones
- Many of the Nokia Symbian's S60 3rd and 5th edition "smart" phones
- Windows Mobile 5.x and 6.x
- Java J2ME based phones
Installing TalkonAut is a piece of cake from Ipod's Safari you click on the Install link and it gets installed. I will not get into details on how it is configured as this also is pretty easy.
Here is how it looks like on Ipad after configured and the user is logged in Jabber:
Something really unique and nice for the program is the way the chat dialogs gets ordered, the idea to place one person's sending on the left side and the replying one on right is innovative and something I've not seen in another chat client 😉
 Talkonaut should also support VoIP (voice conversations), between mobile users, I'm curious if somebody used the program for VoIP and can share feedback?
Tags: apple ipad, Auto, Chat, chat client, client, company communication, Draft, edition, Free, free software programs, gnu linux, google, IPhone, jabba jabba, Jabber, jabber client, jabber clients, jabber server, Java, java j2me, linux mac, mac os x, Mobile, MSN, nbsp, nokia symbian, option, person, pidgin, platform, primary, proficient user, program, quot, richard stallman, Search, software, something, TalknOut, talkonaut, type, type of computers, Universal, xmpp
Posted in Everyday Life, Various | 3 Comments »
Tuesday, January 24th, 2012 I needed a G/Linux distribution that will work fine on an old PC with hardware configuration:
guest@xubuntu-desktop:~$ grep -i cpu /proc/cpuinfo; free -m; df -h

cpu family : 6

cpu MHz : 797.613cpuid level : 2

total used free shared buffers cachedMem: 497 470 26 0 35 259-/+ buffers/cache: 176 321Swap: 1454 10 1444File System Size Used Free % Mounted on

/dev/sda1 37G 4,3G 31G 13% /
I've read a lot on the internet and come to the conclusion I have basicly two popular Linux distros as option to install on archaic x86 hardware:
 1. Puppy Linux

 2. Xubuntu Linux
I first give Puppy Linux a try. It worked quite nice, but the interface was too old school and the desktop felt like a bit out-dated.
Besides that many of the Puppy Linux shipped programs were not a mainstream programs available across most of the other Linux distributions.
Many of the programs shipped with Puppy are great, but more suitable for a computer geek than for a Windows accustomed GUI user.
My opinion on Puppy (from what I've seen) is that its great distro for old school hardcore Linux users.
Anyways its not suitable for absolutely "uniniated" users who encounter Linux for a first time.
Secondly I installed Xubuntu. Most of the archaic hardware on the PC was detected during install time (a pleasently surprise).
Xubunto works fast and Xfce menus opens "light fast" as on the old 800Mhz pc with 512 mem of ram. Generally the GUI worked quick and responsive.
To conclude I liked Xubuntu a lot and I strongly recommend it to anyone who want to quickly roll on Linux on an old PC.
What impressed me most is the minimalistic look & feel and simplicity.
I'm sure Debian will be working great on old hardware as well, however configuring it will be hell a lot of work. Thus I think Xubuntu is a good choice for people who want save some time in obscure configurations and easily have a neat Linux ready for desktop use.
Tags: Auto, bit, buffers, computer geek, CPU, cpu family, cpu mhz, cpuid, Desktop, distribution, distro, Draft, family, Free, geek, hardcore, hardware 1, hardware configuration, hardware pc, installing linux, level, Linux, linux distribution, linux distributions, linux distros, mainstream, mainstream programs, menus, Mounted, old hardware, old school, opinion, option, puppy linux, quot, school hardcore, sda, simplicity, size, thoughs, time, work, x86 hardware
Posted in Linux, Linux and FreeBSD Desktop, Linux Audio & Video | No Comments »
Friday, January 20th, 2012 Today I had a task to change an old CRT Monitor to LCD BENQ Model FP61E on a computer running Microsoft Windows XP SP3.
Changing phyiscally the monitors and restarting the computer to load with the new BENQ monitor ended up with the LCD Monitor showing a blank screen with error:
Out of Range
making the computer completely unusable.
Thanksfully in Windows Safe Mode the monitor was able to display the screen properly, so I had an option to operate somehow on the pc
My guess was that the Out of Range monitor problems were caused by an incorrect (monitor unsupported resolution).
Therefore what I tried as a fix to make it work was:
1. Enter Windows Safe Mode and change (lower the resolution) to 640×480, and restart the PC.
Unfortunately using this classical way to fix such issues failed… so I thought of some options.
2. Disable the video card NVIDIA Riva TNT2 Model 64 driver and check if this will make any difference.
I come up with the idea the Out of Range LCD issues might be caused by the Video card driver cause I've noticed in safe mode a standard VESA like VGA Driver shipped with Windows worked just fine.
To Disable the currently loaded NVIDIA Riva TNT2 Model 64/ Model 64Pro I used:
System -> Device Manager -> Hardware (Tab) -> Display Adapters
Clicking on Display Adapters the NVIDIA Riva TNT2 Model 64 appears using the option menu on it one can choose to disable the driver.
Further on restart Windows, to test if the XP will load properly with disabled NVidia video drivers.
Onwards it was clear the whole Out of Range issues were caused by some kind of conflict between the LCD BENQ FP61E Monitor and the NVIDIA Riva TNT2 Model 64
Often latest video drivers solves hardware incompitability issues and fix many bugs, upgrading the driver to latest is always a good idea.
3. Therefore I Upgraded the NVIDIA Riva TNT2 64 driver (using Safe Mode) to the latest available from Nvidia's official site.
Weirdly Upgrading NVidia Riva TNT2 drivers to the latest did not fix the Out of Range blank screen error.
After a bit of thinking on what to do to make the Monitor work fine with the Nvidia driver, I thought of completely uninstalling the Nvidia drivers and installing them again might be a fix.
In my previous experience with Windows at many occasions, uninstalling a driver failing to properly work and installing it again with a working version was a good fix.
4. Uninstall the NVIDIA Riva TNT2 Model and Install the latest driver.
Uninstalling and Installing the Video driver had to be done in Windows Safe Mode again, in normal mode the windows was not displaying anything.
After The driver installation program completes the installation it requires a restart. After the restart the Video driver gets loaded fine and Windows loaded up in Normal mode as usual 😉
Tags: Auto, blank screen, card, cause, change, CRT, device manager, Display, display adapters, Draft, hardware tab, Install, installation, manager gt, menu, microsoft windows, Model, monitor problems, nvidia, nvidia riva tnt2 64, nvidia riva tnt2 64 driver, nvidia riva tnt2 model 64, nvidia video drivers, Onwards, option, option menu, range resolution, resolution problems, riva tnt2 model 64, Safe, screen, tnt2 model 64 driver, Uninstalling, Upgraded, vesa, VGA, vga driver, video card driver, Weirdly, windows safe mode, work
Posted in Everyday Life, Windows | No Comments »
Monday, January 16th, 2012 My sister, experience some programs running with wine (Windows Emulator) to crash on her Ubuntu 11.10.
As she is quite new with Linux, she has no idea about the existence of CTRL ALT BACKSPACE key combination to restart a hanged GNOME, KDE by directly killing the Xorg server.
I felt obliged to explain her it is better to use CTRL ALT BACKSPACE X kill switch instead of restarting the whole Linux kernel (which basiclly is working) and that it is just the display keeping blacnk.
Pressing the would kill Xorg and therefore all applicatins previously running on top of it will die. In Ubuntu Xorg is configured to run via gdm, so once killed it will automatically reload the GDM (Gnome Display Manager).
I was about to explain her that its better she use CTRL+ALT+BACKSPACE instead of restarting the whole system but suddenly I realized this is not working.
In UBUNTU 11.10 and I guess in all UBUNTU's after 9.04 CTRL ALT BACKSPACE is substituted with the key switch combination ALT PRINTSCREEN K, I've explained her about that.
This change is actually a change implied by most Linux distributions nowdas and is some kind of change in Xorg newer versions…
To enable back the CTRL + ALT + BACKSPACE , I've issued cmd:
stanimira@ubuntu~:$ echo' setxkbmap -option terminate:ctrl_alt_bksp' >> ~/.xinitrc
An alternative way to set setxkbmap -option terminate:ctrl_alt_bksp to run on Ubuntu user login is by setting it as a startup application using;
stanimira@ubuntu:~$ gnome-session-properties
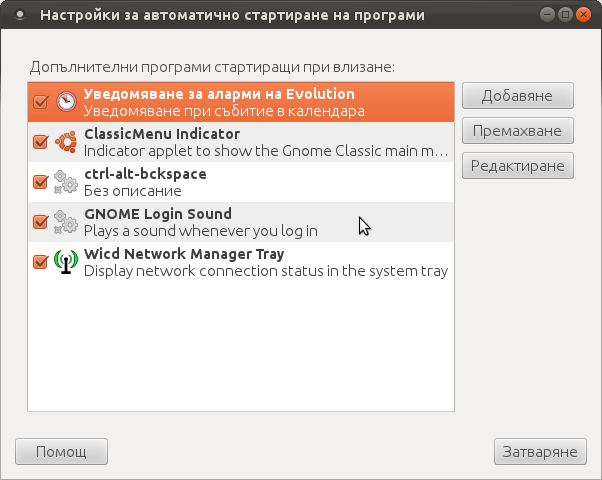
Press the Add button and type in the box to appear;
Name: setxkbmap

Command: setxkbmap -option terminate:ctrl_alt_bksp

Comment: setxkbmap
Reverting the Xserver kill switch back to the classical Ctrl+Alt+Backspace should also be running fine on older Ubuntu Linuces – 11.04, 10.10, 10.04 etc.
Tags: add button, Alt, Auto, backspace, Button, change, Comment, Ctrl, Display, Draft, existence, GDM, Gnome, kde, key switch, kill, kill switch, Linux, linux kernel, login, most linux distributions, ocelot, option, Press, printscreen, Reverting, session properties, setxkbmapCommand, startup, startup application, switch combination, type, Ubuntu, wine, wine windows, xinitrcAn, Xorg, xserver
Posted in Linux, Linux and FreeBSD Desktop | No Comments »
Monday, January 9th, 2012 I've recently had to set up a backup system to synchronize backup archive files between two remote servers and as I do usually with this situation I just set up a crontab job to periodically execute rsync to copy data from source server to the destination server . Copying SRC to DEST is the default behaviour rsync uses, however in this case I had to copy from the destination server to the source server host (in other words sync files the reversely.
The usual way to copy with rsync via SSH (from SRC to DEST) is using a cmd line like:
debian:~$ /usr/bin/rsync -avz -e ssh backup-user@xxx.xxx.xxx.xxx:/home/backup-user/my-directory .
Where the xxx.xxx.xxx.xxx is my remote server IP with which files are synched.
According to rsync manual, the proposed docs SYNOPSIS is in the format;
Local: rsync [OPTION…] SRC… [DEST
Obviusly the default way to use rsync is to copy source to destination which I used until now, but in this case I had to the other way around and copy files from a destination host to the source server. It was logical that swapping the SRC and DEST would complete my required task. Anyways I consulted with some rsync gurus in irc.freenode.net , just to make sure it is proper to just swap the SRC, DEST arguments.
I was told this is possible, so I swapped args;
debian:~$ /usr/bin/rsync -avz -e ssh . backup-user@xxx.xxx.xxx.xxx:/home/backup-user/my-directory

...
Surprisingly this worked 😉 Anyways I was adviced by by a good guy nick named scheel , that putting -e ssh to command line is generally unnecessery except if there is no some uncommon used SSH port over which the data is transferred. An example case in which -e 'ssh is necessery would be if transferring via lets say SSH port 1234;
rsync -avz -e 'ssh -p1234' /source user@host:/dest
In all other cases omitting '-e ssh' is better as '-e ssh' is rsync default. Therefore my final swapped line I put in cron to copy from a destinatio to source host with rsync looked like so:
05 03 2 * * /usr/bin/ionice -c 3 /usr/bin/rsync -avz my-directory backup-user@xxx.xxx.xxx.xxx:/home/backup-user/ >/dev/null 2>&1
Tags: archive files, Auto, avz, backup system, case, cmd, cmd line, copy, copying, cron, default, default behaviour, destIn, destinatio, destination, destination host, destination server, docs, Draft, example, example case, few words, format, gurus, host, job, nbsp, necessery, nick, option, port 1234, remote server, rsync, scheel, server host, server ip, source host, source server, ssh port, sync files, system, usr bin
Posted in FreeBSD, Linux, System Administration | No Comments »
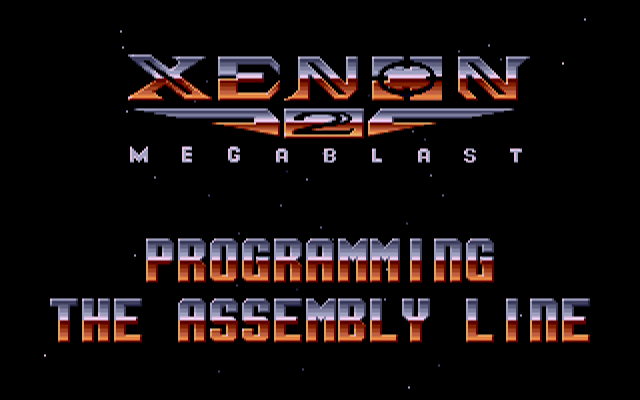
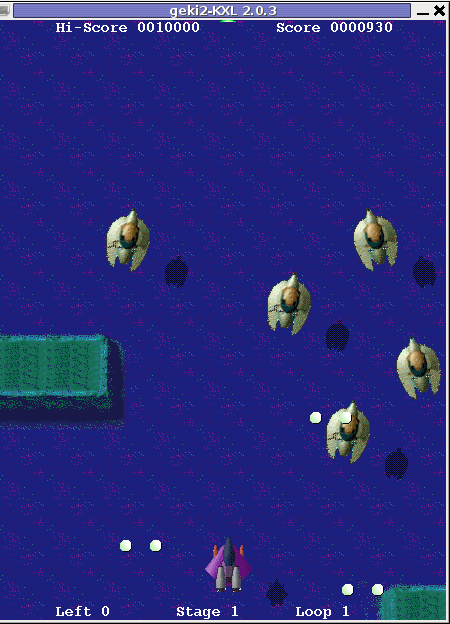
Thursday, December 22nd, 2011 Do you remember the old arcade spaceship shooter Xenon 2 Megablast? I do 😉 For all those who are too young to remember, here are two screenshots:
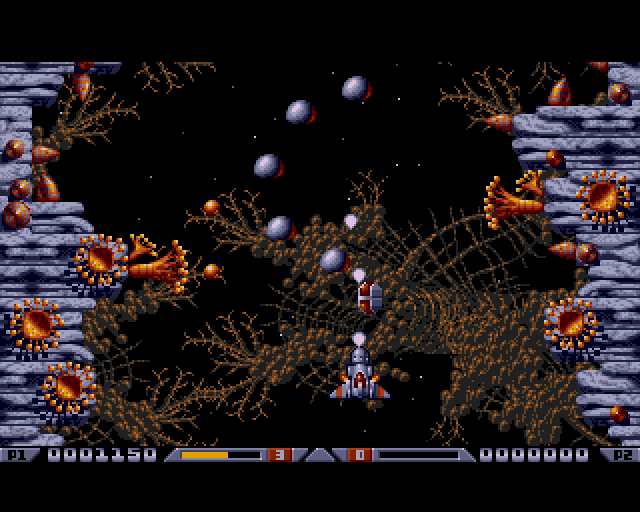
Even though Xenon 2 Megablast original can now be played using dosbox DOS emulator. Its interesting to mention I've found two Linux games that more or less can be qualitified to resemble Xenon 2.
The games are Native Free Software games and existing in package repositories of most Linux distributions and *BSD port trees.
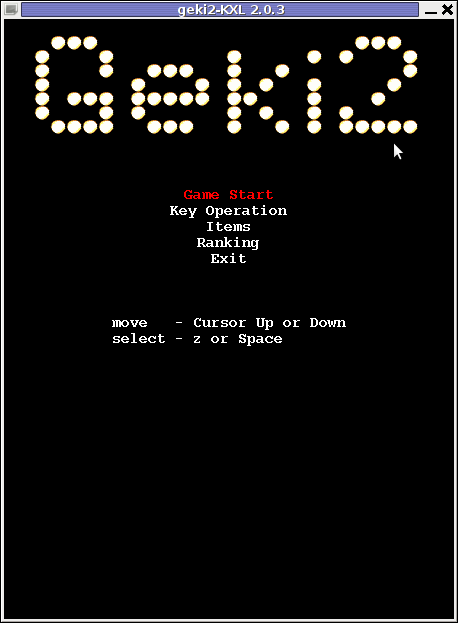
Geki 2 and Geki 3 are of a less quality to Xenon but still, the game experience is nice and is among the Arcade shooter games to bring you fun in the boring days if you're on GNU / Linux or FreeBSD Free OS platforms.
Installing Geki2 and Geki3 on Debian and Ubuntu Linux is standard with apt:
debian:~# apt-get install geki2 geki3

...
On Debian GNU / Linux , after installed the games would not create GNOME Applications -> Games -> game startup shortcuts, however the game startups will get added in GNOME Applications Menu under:
Applications -> Debian -> Games -> Action -> Geki 2

and

Applications -> Debian -> Games -> Action -> Geki 3
The games can be launched also manually with commands:
geki2
or
geki3
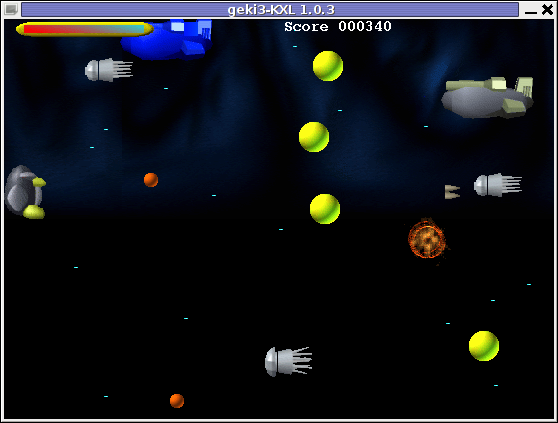
Geki 2 is a way closer to Xenon 2 as it has similar look and feel and the same vertical direction the spaceship is navigated.
In Geki 3 still the shoot 'em' up spaceship like arcade is present, however instead of penguin you have to fly a flying penguin, as well as the spaceship move direction is horizontal.
Both the games have the same sound and music effects. The game music and effects are not of top quality but are not bad. In general the games surely gives some of the arcade atmosphere.
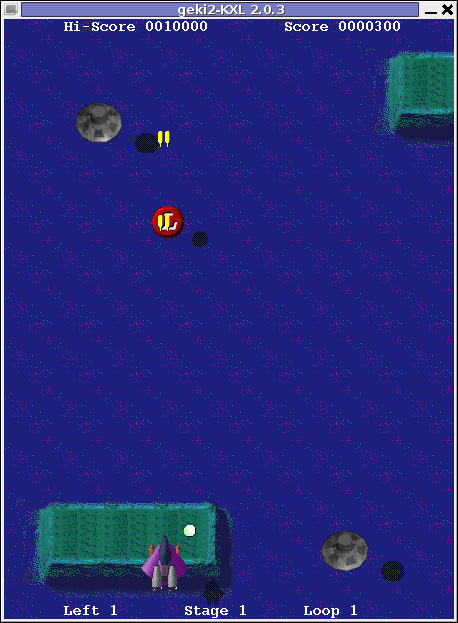
Geki 2 Xenon 2 Megablast like on Debian Linux
In the tradition of the arcade games at the end of each level in both games you face the Level Boss Enemy, you should destroy.
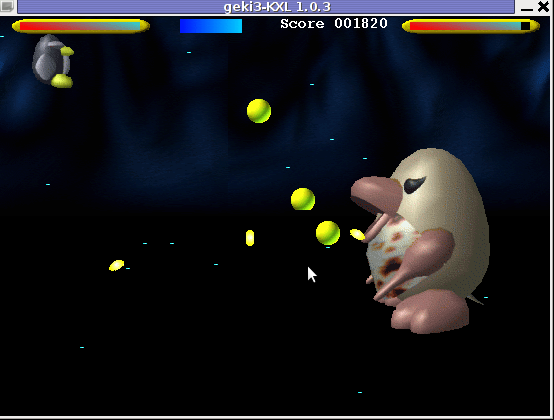
As you can see in below's screenshot the overall graphics of GEKI 3 is poorer while compared to GEKI 2
still GEKI 2 gampley is fun and addictive and I would say not less enjoyable than GEKI 2.
At times I even think that Geki 3 is more fun because it is more dynamic.
Maybe other reason, why I enjoyed more Geki 3 is also the fact that Geki 2 is a way harder to play. Dying only 3 times in the game you get GAME OVER and the next game you're started from the beginning of the same level you died in …
Something really annoying that affects both the games; there is no option to play them in Fullscreen mode! ARGH!
Game controls for Geki2 and Geki3 are identical as follows:
Up - Arrow up key

Down - Down arrow key

Right - Right arrow key

left - Left arrow key

Shoot - z or Space

Pause - s
Geki2 and Geki3 are fun and can kill some time, but definitely aren't that (professional) as other spaceship shoot'em'up arcades for Linux and BSD. Games like Starfighter , Critical Mass or powermanga .
Lest that they are two worthy to install and play on your Free Software OS.
Tags: action gt, arcade shooter, atmosphere, boring days, BSD, debian gnu, Dying, Free, free software games, fun, game experience, game music, game startup, Geki, Gnome, gnome applications, gnu linux, gt games, key, level, linux games, megablast, menu, most linux distributions, move, music effects, nbsp, option, os platforms, package, penguin, reason, screenshot, shooter, shooter games, software, something, Space, spaceship, startup, time, Ubuntu, ubuntu linux, vertical direction, xenon 2
Posted in Entertainment, Games Linux, Linux, Linux and FreeBSD Desktop | 1 Comment »
Monday, November 14th, 2011 
These days more and more people start to forget the g* / Linux old times when we used to copy CDs from console using dd in conjunction with mkisofs .
Therefore to bring some good memories back of the glorious console times I decided to come up with this little post.
To copy a CD or DVD the first thing one should do is to make an image copy of the present inserted CD into the CD-drive with dd :
1. Make copy of the CD/DVD image using dd
# dd if=/dev/cdrom of=/tmp/mycd.iso bs=2048 conv=notrunc
/dev/cdrom is the location of the cdrom device, on many Linuces including (Debian) /dev/cdrom is just a link to the /dev/ which corresponds to the CD drive. Note on FreeBSD the location for the CD Drive is /dev/acd0
/tmp/mycd.iso instructs dd CD image creation to be placed in /tmp/ directory.
bs argument instructs it about the byte size portions by which the content of the CD-Drive inserted CD will be read. bs value of 2048 is actually only 2KB per dd read, increasing this value will decrease the time required for the CD image to be extracted.
2. Prepare CD image file to be ready for burning
After dd completes the image copy operation, next to prepare the extracted image / ISO to be ready for burning mkisofs is used:
# mkisofs -J -L -r -V TITLE -o /tmp/imagefile.iso /tmp/mycd.iso
The -J option makes the CD compatible for Pcs running Microsoft Windows. The -V TITLE option should be changed to whatever title the new CD should have, -r will add up status bar for the mkisofs operation.
-r is passed to create specific file permissions on the newly created CD, -o specifies the location where mkisofs will produce its file based on the CD image /tmp/mycd.iso .
3. Burning the mkisofs image file to a CD/DVD on GNU / Linux
linux:~# cdrecord -scanbus

linux:~# cdrecord dev=1,0,0 /tmp/imagefile.iso
If all wents okay with cdrecord operation, after a while the CD should be ready.
4. Burning the mkisofs image file to CD on FreeBSD
freebsd# burncd -f /dev/acd0 data /tmp/imagefile.iso fixate
Tags: argument, byte, byte size, cd image, CD-drive, cdrom, conv, copy, dd cd, drive, file, file permissions, freeb, gnu linux, Image, image copy, image creation, image file, image iso, imagefile, ISO, isoIf, linux cdrecord, linux linux, location, Microsoft, mkisofs, mycd, new cd, notrunc, operation, option, size, size portions, status, terminal, time, title option, tmp, value
Posted in Linux, Linux and FreeBSD Desktop, System Administration, Various | 1 Comment »
Friday, October 7th, 2011 
RarCrack is able to crack rar and 7z archive files protected by password on Linux.
The program is currently at release version 0.2, so its far from perfection, but at least it can break rars.
RarCrack is currently installable on most Linux distributions only from source, to install on a random Linux distro, download and make && make install . RarCrack’s official site is here, I’ve mirrored the current version of RarCrack for download here . To install rarcrack from source using the mirrored version:
linux:~# wget https://www.pc-freak.net/files/rarcrack-0.2.tar.bz2

...

linux:~# tar -jxvvf rarcrack-0.2.tar.bz2

linux:~# cd rarcrack-0.2

linux:~/rarcrack-0.2# make

...

linux:~/rarcrack-0.2# make install

...
On FreeBSD, rarcrack is available and installable via the ports tree, to install on FreeBSD:
freebsd# cd /usr/ports/security/rarcrack

freebsd# make && make install

...
To use RarCrack to crack rar, zip or 7z archive file:
freebsd% rarcrack rar_file_protected_with_password.rar --type rar
The argument –type rar is optional, in most archives RarCrack should detect the archive automatically. The –type option could also take the arguments of rar and 7z .
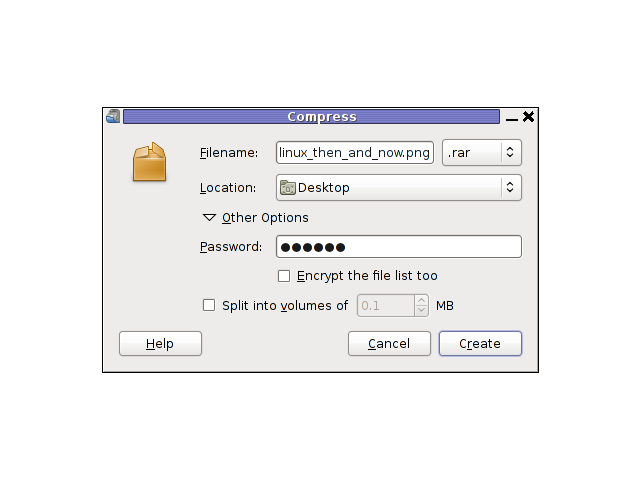
I’ve created a sample rar file protected with password linux_then_and_now.png.rar . The archive linux_then_and_now.png contains a graphic file illustrating the linux growth in use in computers, mobiles and servers. linux_then_and_now.png.rar is protected with the sample password parola
RarCrack also supports threads (a simultaneous instance spawned copies of the program). Using threads speeds up the process of cracking and thus using the –threads is generally a good idea. Hence a good way to use rarcrack with the –threads option is:
freebsd% rarcrack linux_then_and_now.png.rar --threads 8 --type rar

RarCrack! 0.2 by David Zoltan Kedves (kedazo@gmail.com)

INFO: the specified archive type: rar

INFO: cracking linux_then_and_now.png.rar, status file: linux_then_and_now.png.rar.xml

Probing: '0i' [24 pwds/sec]

Probing: '1v' [25 pwds/sec]
RarCrack‘s source archive also comes with three sample archive files (rar, 7z and zip) protected with passwords for the sake of testing the tool.
One downside of RarCrack is its extremely slow in breaking the passwords on my Lenovo notebook – dual core 1.8ghz with 2g ram it was able to brute force only 20-25 passwords per second.
This means cracking a normal password of 6 symbols will take at least 5 hours.
RarCrack is also said to support cracking zip passwords, but my tests to crack password protected zip file did not bring good results and even one of the tests ended with a segmentation fault.
To test how rarcrack performs with password protected zip files and hence compare if it is superior or inferior to fcrackzip, I used the fcrackzip’s sample pass protected zip noradi.zip
hipo@noah:~$ rarcrack --threads 8 noradi.zip --type zip

2 by David Zoltan Kedves (kedazo@gmail.com)

INFO: the specified archive type: zip

INFO: cracking noradi.zip, status file: noradi.zip.xml

Probing: 'hP' [386 pwds/sec]

Probing: 'At' [385 pwds/sec]

Probing: 'ST' [380 pwds/sec]
As you can see in above’s command output, the zip password cracking rate of approximately 380 passwords per second is a bit quicker, but still slower than fcrackzip.
RarCrack seg faults if cracking a pass protected zip is passed on without specifying the –type zip command arguments:
linux:~$ rarcrack --threads 8 noradi.zip

RarCrack! 0.2 by David Zoltan Kedves (kedazo@gmail.com)

Segmentation fault
While talking about cracking protected rar and zip archives with password, its worthy to mention creating a password protected archive with Gnome Desktop on Linux and FreeBSD is very easy.
To create the password protected archive in Gnome graphic environment:
a. Point the cursor to the file you want to archive with password
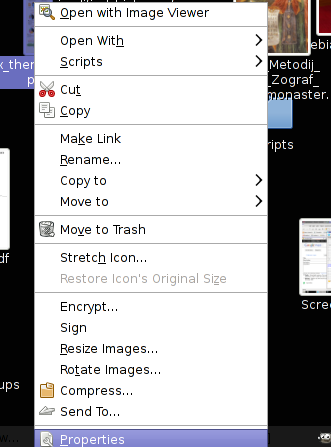
b. Press on Other Options and fill in the password in the pwd dialog
I think as of time of writting, no GUI frontend interface for neither RarCrack or FcrackZip is available. Lets hope some good guy from the community will take the time to write extension for Gnome to allow us to crack rar and zip from a nice GUI interface.
Tags: amp, archive type, argument, argument type, bz2 linux, com, current version, download, fcrackzip, file, freak, Gmail, Gnome, gnu linux, instance, Linux, linux cd, linux growth, linux tar, most linux distributions, option, password, png, ports, random linux, rar, rarcrackfreebsd, rarINFO, second, segmentation, status, tar bz2, time, tool, tree, type, type option, usr, version linux, wget, xml, zoltan
Posted in Computer Security, System Administration, Various | 3 Comments »


How to enable Ctrl+Alt+Backspace in Ubuntu 11.10 (Oneiric Ocelot) Linux
Monday, January 16th, 2012My sister, experience some programs running with wine (Windows Emulator) to crash on her Ubuntu 11.10.
As she is quite new with Linux, she has no idea about the existence of CTRL ALT BACKSPACE key combination to restart a hanged GNOME, KDE by directly killing the Xorg server.
I felt obliged to explain her it is better to use CTRL ALT BACKSPACE X kill switch instead of restarting the whole Linux kernel (which basiclly is working) and that it is just the display keeping blacnk.
Pressing the would kill Xorg and therefore all applicatins previously running on top of it will die. In Ubuntu Xorg is configured to run via gdm, so once killed it will automatically reload the GDM (Gnome Display Manager).
I was about to explain her that its better she use CTRL+ALT+BACKSPACE instead of restarting the whole system but suddenly I realized this is not working.
In UBUNTU 11.10 and I guess in all UBUNTU's after 9.04 CTRL ALT BACKSPACE is substituted with the key switch combination ALT PRINTSCREEN K, I've explained her about that.
This change is actually a change implied by most Linux distributions nowdas and is some kind of change in Xorg newer versions…
To enable back the CTRL + ALT + BACKSPACE , I've issued cmd:
stanimira@ubuntu~:$ echo' setxkbmap -option terminate:ctrl_alt_bksp' >> ~/.xinitrc
An alternative way to set setxkbmap -option terminate:ctrl_alt_bksp to run on Ubuntu user login is by setting it as a startup application using;
stanimira@ubuntu:~$ gnome-session-properties
Press the Add button and type in the box to appear;
Name: setxkbmap
Command: setxkbmap -option terminate:ctrl_alt_bksp
Comment: setxkbmap
Reverting the Xserver kill switch back to the classical Ctrl+Alt+Backspace should also be running fine on older Ubuntu Linuces – 11.04, 10.10, 10.04 etc.
Tags: add button, Alt, Auto, backspace, Button, change, Comment, Ctrl, Display, Draft, existence, GDM, Gnome, kde, key switch, kill, kill switch, Linux, linux kernel, login, most linux distributions, ocelot, option, Press, printscreen, Reverting, session properties, setxkbmapCommand, startup, startup application, switch combination, type, Ubuntu, wine, wine windows, xinitrcAn, Xorg, xserver
Posted in Linux, Linux and FreeBSD Desktop | No Comments »