Posts Tagged ‘necessery’
Tuesday, August 23rd, 2011 I’ve been working on a servers running Windows 2003 and Windows 2008 these days.
As I wanted to be more flexible on what I can do from the command line I decided to install GNUwin (provides port of GNU tools), most of which are common part of any Linux distribution).
Having most of the command line flexibility on a Windows server is a great thing, so I would strongly recommend GNUWin to any Windows server adminsitrator out there.
Actually it’s a wonderful thing that most of the popular Linux tools can easily be installed and used on Windows for more check GnuWin32 on sourceforge
One of the reasons I installed Gnuwin was my intention to use the good old Linux tail command to keep an eye interactive on the IIS server access log files, which by the way for IIS webserver are stored by default in C:WindowsSystem32LogFilesW3SVC1*.log
I’ve managed to install the GNUWin following the install instructions, not with too much difficulties. The install takes a bit of time, cause many packs containing different parts of the GNUWin has to be fetched.
To install I downloaded the GNUWin installer available from GNUWin32’s website and instructed to extracted the files into C:Program FilesGnuwin
Then I followed the install instructions suggestions, e.g.:
C:> cd c:Program FilesGnuWin

C:Program FilesGnuWin> download.bat

...

C:Program FilesGnuWin> install c:gnuwin32

...
After the installation was succesfully completed on the two Windows machines, both of which by the way are running 64 bit Windows, it was necessery to add the newly installed GNU .exe files to my regular cmd.exe PATH variable in order to be able to access the sed, tail and the rest of the gnuwin32 command line tools.
In order to add C:GnuWin32bin directory to the windows defined Command line Path , I had to do the following:
a. Select (Properties) for My Computer
Start (button) -> My Computer (choose properties)
b. Select the My Computer Advanced (tab)
Then, from the My Computer pane press on Advanced tab
c. Next press on Environment Variables
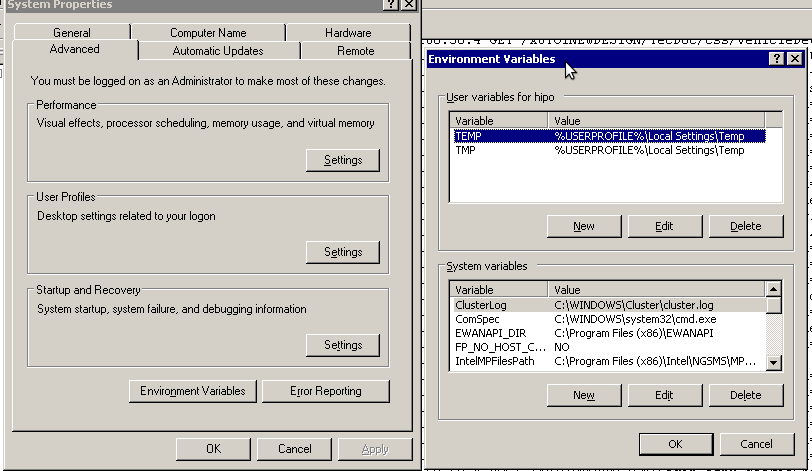
You see in above’s screenshot the Environment Variables config dialog, to add the new path location in System Variables sectiom, between the list I had to add the c:GNUwin32bin path locatiion. To find I pressed on Edit button scrolled down to find the Variable and hence added at the end of the long list defined paths.
After adding in GNUwin, the Windows path looks like this:
C:Program Files (x86)EWANAPI;C:WINDOWSsystem32;C:WINDOWS;C:WINDOWSSystem32Wbem;C:Program Files (x86)IntelNGSMSMPFiles;C:Program Files (x86)Microsoft SQL Server100ToolsBinn;C:Program FilesMicrosoft SQL Server100ToolsBinn;C:Program FilesMicrosoft SQL Server100DTSBinn;C:Program Files (x86)Microsoft SQL Server100ToolsBinnVSShellCommon7IDE;C:Program Files (x86)Microsoft Visual Studio 9.0Common7IDEPrivateAssemblies;C:Program Files (x86)Microsoft SQL Server100DTSBinn;C:WINDOWSsystem32WindowsPowerShellv1.0;C:gnuwin32bin
Further on, I launched the tail command to intercatively take an eye on who is accessing the IIS webserver.
Sadly this worked not, trying to use tail with the IIS ex10116.log log;
C:WindowsSystem32LogfilesW3SVC1> tail -f ex10116.log
Spit an error tail: ex10116.log: Bad file descriptor
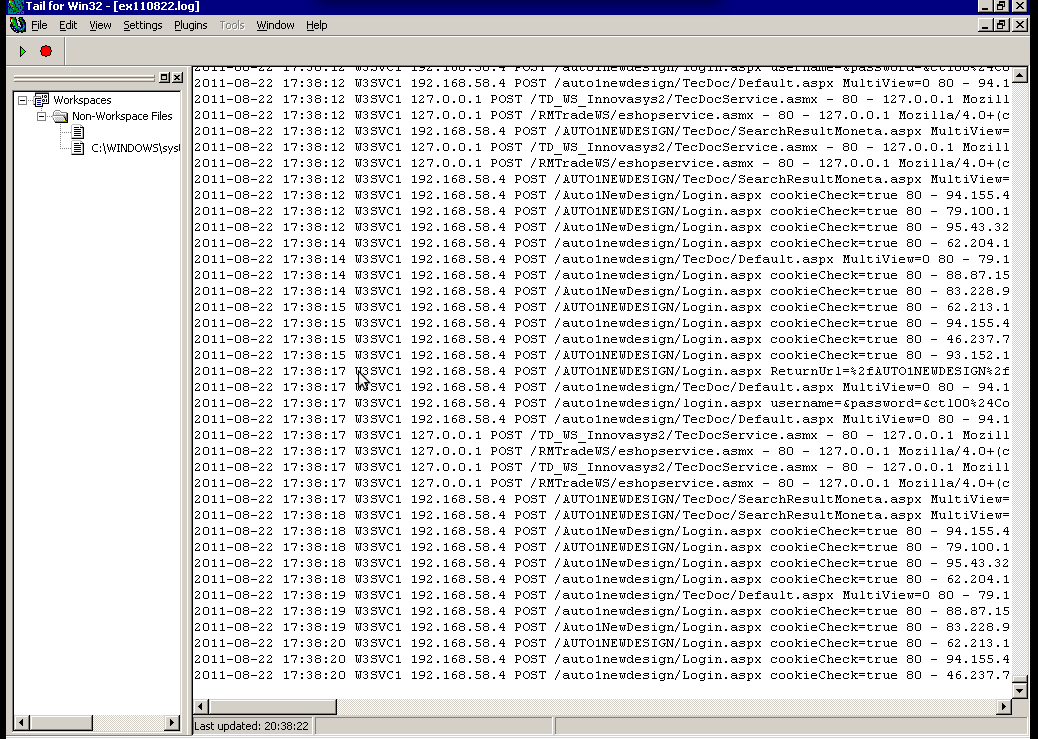
Since I couldn’t use tail -f I looked for alternative and a quick search led me to Tail 4 Win32 . Lest the name suggests it is supposed to work on 32 bit arch Windows the version on tailforwin32’s website is working perfectly fine on 64 bit Windows as well.
What it does is to simulate a normal tail -f command inside a very simplistic window interface. You see it in action with opened IIS log on below’s screenshot:
Finally my goal is achieved and I can take an eye interactively on IIS logs. End of the article, hope it wasn’t too boring 😉
Tags: bin directory, binary files, Button, c program, command line tools, Computer, distribution, download, exe files, eye, Files, flexibility, gnu tools, gnuwin, gnuwin32, IDE, IIS, installation, line path, linux distribution, linux tools, log, Microsoft, necessery, Path, program, screenshot, select properties, sourceforgeOne, SQL, start button, tail, time, time cause, two windows, windows machines, windows server, wonderful thing
Posted in System Administration, Windows | 1 Comment »
Monday, April 19th, 2010 1. First it’s necessery to have the mrtg debian package installed.
If it’s not installed then we have to install it:
debian-server:~# apt-get install mrtg
2. Second download the qmailmrtg source binary
To download the latest current source release of qmailmrtg execute:
debian-server:~# wget http://www.inter7.com/qmailmrtg7/qmailmrtg7-4.2.tar.gz
It’s a pity qmailmrtg is not available for download via debian repositories.
3. Third download the qmail.mrtg.cfg configuration file
debian-server~# wget https://www.pc-freak.net/files/qmail.mrtg.cfg
Now you have to put the file somewhere, usually it’s best to put it in the /etc/ directory.
Make sure the file is existing in /etc/qmail.mrtg.cfg
4. Untar compile and install qmailmrtg binary
debian-server:~# tar -xzvvf qmailmrtg7-4.2.tar.gz

...

debian-server:~# make && make install
strip qmailmrtg7
cp qmailmrtg7 /usr/local/bin
rm -rf *.o qmailmrtg7 checkq core
cc checkq.c -o checkq
./checkq
cc -s -O qmailmrtg7.c -o qmailmrtg7
qmailmrtg7.c: In function ‘main’:
qmailmrtg7.c:69: warning: incompatible implicit declaration of
built-in function ‘exit’
qmailmrtg7.c:93: warning: incompatible implicit declaration of
built-in function ‘exit’
qmailmrtg7.c:131: warning: incompatible implicit declaration of
built-in function ‘exit’
qmailmrtg7.c:137: warning: incompatible implicit declaration of
built-in function ‘exit’
5. Set proper file permissions according to the user you indent to execute qmailmrtg as
I personally execute it as root user, if you intend to do so as well set a permissions to
/etc/qmail.mrtg.cfg of 700.
In order to do that issue the command:
debian-server:~# chmod 700 /etc/qmail.mrtg.cfg
6. You will now need to modify the qmail.mrtg.cfg according to your needs
There you have to set a proper location where the qmailmrtg shall generate it’s html data files.
I use the /var/www/qmailmrtg qmailmrtg log file location. If you will do so as wellyou have to create the directory.
7. Create qmailmrtg html log files directory
debian-server:~# mkdir /var/log/qmailmrtg
8. Now all left is to set a proper cron line to periodically invoke qmailmrtg in order to generate qmail activity statistics.
Before we add the desired root’s crontab instructions we have to open the crontab for edit, using the command.
debian-server:~# crontab -u root -e
I personally use and recommend the following line as a line to be added to root’s crontab.
0-55/5 * * * * env LANG=C /usr/bin/mrtg /etc/qmail.mrtg.cfg > /dev/null
9. Copy index.html from qmailmrtg source directory to /var/log/qmailmrtg
debian-server:/usr/local/src/qmailmrtg7-4.2# cp -rpf index.html /var/log/qmailmrtg
10. Last step is to make sure Apache’s configuration contains lines that will enable you to access the qmail activity statistics.
The quickest way to do that in Debian running Apache 2.2 is to edit /etc/apache2/apache2.conf and add a directory Alias as follows
Alias /qmailmrtg/ "/var/www/qmailmrtg/"
Now after Apache restart
/etc/init.d/apache2 restart
You should be now able to access the qmail mrtg qmail log statistics through your Apache’s default configured host.
For instance, assuming your default configured Apache host is domain.com. You’ll be able to reach the qmailmrtg statistics through an url like:
http://domain.com/qmailmrtg/
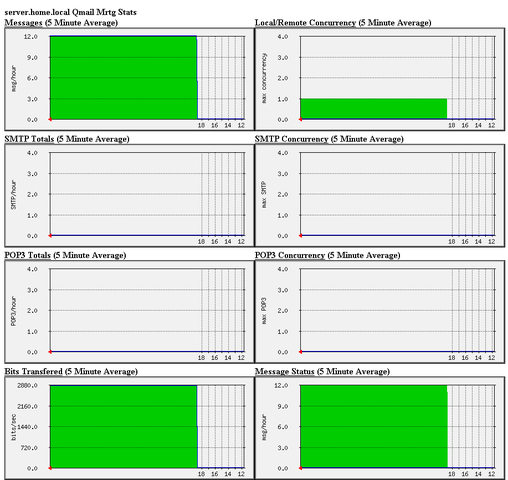
After I verified and ensured myself qmail mrtg is working correctly after all the above explained steps partook I wasn’t happy with some headlines in the index.html and the html tile of qmailmrtg,
so as a last step I manually edited the /var/www/qmailmrtg/index.html to attune it to my likings.
Here is a screenshot of the qmailmrtg web statistics in action.
Tags: amp, checkq, configuration file, cron, current source, debian package, debian repositories, declaration, default, download, exit, file, file permissions, freak, function, graph, host, html data, implicit declaration, indent, index, Installing qmailmrtg (qmail graph statistics on qmail activity) on Debian Lenny, loc, location, log, mrtg, necessery, package, proper location, rf, root, root user, Set, source release, statistics, strip, untar, wget
Posted in System Administration | 6 Comments »
Wednesday, August 10th, 2011 
I’m in charge of dozen of Linux servers these days and therefore am required to restart many of the servers with a support ticket (because many of the Data Centers where the servers are co-located does not have a web interface or IPKVM connected to the server for that purpose). Therefore the server restart requests in case of crash sometimes gets processed in few hours or in best case in at least half an hour.
I’m aware of the existence of Hardware Watchdog devices, which are capable to detect if a server is hanged and auto-restart it, however the servers I administrate does not have Hardware support for Watchdog timer.
Thanksfully there is a free software project called Watchdog which is easily configured and mitigates the terrible downtimes caused every now and then by a server crash and respective delays by tech support in Data Centers.
I’ve recently blogged on the topic of Debian Linux auto-restart in case of kernel panic , however now i had to conifgure watchdog on some dozen of CentOS Linux servers.
It appeared installation & configuration of Watchdog on CentOS is a piece of cake and comes to simply following few easy steps, which I’ll explain quickly in this post:
1. Install with yum watchdog to CentOS
[root@centos:/etc/init.d ]# yum install watchdog

...
2. Add to configuration a log file to log watchdog activities and location of the watchdog device
The quickest way to add this two is to use echo to append it in /etc/watchdog.conf:
[root@centos:/etc/init.d ]# echo 'file = /var/log/messages' >> /etc/watchdog.conf

echo 'watchdog-device = /dev/watchdog' >> /etc/watchdog.conf
3. Load the softdog kernel module to initialize the software watchdog via /dev/watchdog
[root@centos:/etc/init.d ]# /sbin/modprobe softdog
Initialization of softdog should be indicated by a line in dmesg kernel log like the one above:
[root@centos:/etc/init.d ]# dmesg |grep -i watchdog

Software Watchdog Timer: 0.07 initialized. soft_noboot=0 soft_margin=60 sec (nowayout= 0)
4. Include the softdog kernel module to load on CentOS boot up
This is necessery, because otherwise after reboot the softdog would not be auto initialized and without it being initialized, the watchdog daemon service could not function as it does automatically auto reboots the server if the /dev/watchdog disappears.
It’s better that the softdog module is not loaded via /etc/rc.local but the default CentOS methodology to load module from /etc/rc.module is used:
[root@centos:/etc/init.d ]# echo modprobe softdog >> /etc/rc.modules

[root@centos:/etc/init.d ]# chmod +x /etc/rc.modules
5. Start the watchdog daemon service
The succesful intialization of softdog in step 4, should have provided the system with /dev/watchdog, before proceeding with starting up the watchdog daemon it’s wise to first check if /dev/watchdog is existent on the system. Here is how:
[root@centos:/etc/init.d ]# ls -al /dev/watchdogcrw------- 1 root root 10, 130 Aug 10 14:03 /dev/watchdog
Being sure, that /dev/watchdog is there, I’ll start the watchdog service.
[root@centos:/etc/init.d ]# service watchdog restart

...
Very important note to make here is that you should never ever configure watchdog service to run on boot time with chkconfig. In other words the status from chkconfig for watchdog boot on all levels should be off like so:
[root@centos:/etc/init.d ]# chkconfig --list |grep -i watchdog

watchdog 0:off 1:off 2:off 3:off 4:off 5:off 6:off
Enabling the watchdog from the chkconfig will cause watchdog to automatically restart the system as it will probably start the watchdog daemon before the softdog module is initialized. As watchdog will be unable to read the /dev/watchdog it will though the system has hanged even though the system might be in a boot process. Therefore it will end up in an endless loops of reboots which can only be fixed in a linux single user mode!!! Once again BEWARE, never ever activate watchdog via chkconfig!
Next step to be absolutely sure that watchdog device is running it can be checked with normal ps command:
[root@centos:/etc/init.d ]# ps aux|grep -i watchdog

root@hosting1-fr [~]# ps axu|grep -i watch|grep -v greproot 18692 0.0 0.0 1816 1812 ? SNLs 14:03 0:00 /usr/sbin/watchdog

root 25225 0.0 0.0 0 0 ? ZN 17:25 0:00 [watchdog] <defunct>
You have probably noticed the defunct state of watchdog, consider that as absolutely normal, above output indicates that now watchdog is properly running on the host and waiting to auto reboot in case of sudden /dev/watchdog disappearance.
As a last step before, after being sure its initialized properly, it’s necessery to add watchdog to run on boot time via /etc/rc.local post init script, like so:
[root@centos:/etc/init.d ]# echo 'echo /sbin/service watchdog start' >> /etc/rc.local
Now enjoy, watchdog is up and running and will automatically restart the CentOS host 😉
Tags: CentOS, crash, data, dmesg, existence, file, free software project, half an hour, hardware support, host, init, installation, installation configuration, kernel panic, Linux, linux server, linux servers, log, log messages, modprobe, necessery, piece of cake, root, server crash, server downtime, software, support, support ticket, tech support, ticket, time, topic, Watchdog, watchdog timer, web interface, yum
Posted in Linux, System Administration | 1 Comment »
Wednesday, August 3rd, 2011 I’m trying to compile vqadmin on x86_amd64 (64 bit Debian) and I got error during ./configure . The error I got is as follows:
debian:~/vqadmin-2.3.7# ./configure --enable-cgibindir=/var/www/mail/cgi-bin -enable-htmldir=/var/www/mail/ --enable-isoqlog=y

checking for a BSD-compatible install... /usr/bin/install -c

checking whether build environment is sane... yes

/downloads/vqadmin-2.3.7/missing: Unknown `--run' option

Try `/downloads/vqadmin-2.3.7/missing --help' for more information

configure: WARNING: `missing' script is too old or missing

checking for gawk... gawk

checking whether make sets $(MAKE)... yes

checking build system type... Invalid configuration `x86_64-unknown-linux': machine `x86_64-unknown' not recognized
So my compile failed with:
checking build system type… Invalid configuration `x86_64-unknown-linux’: machine `x86_64-unknown’ not recognized
Thanksfully, there is a tiny script which originally is part of the CVS project. I’ve modified a bit the script to remove few lines of code which are not necessery. The `x86_64-unknown-linux’: machine `x86_64-unknown’ not recognized fix script fix_x86_64-unknown-linux-gnu.sh is here
To fix up the broken configure all required is:
debian:~/vqadmin-2.3.7# sh fix_x86_64-unknown-linux-gnu.sh
Next on I could compile normally again vqadmin just fine.
Tags: amd, BSD-compatible, checking, configure, ERROR, fine, gawk, GNU, hereTo, Invalid, invalid configuration, Linux, linux machine, mail, mail cgi, necessery, recognizedSo, sane, shNext, Thanksfully, type, usr, var, vqadmin, www
Posted in Linux, System Administration | 11 Comments »
Sunday, July 31st, 2011 
Did you have the need to sometimes split an SQL extra large files to few pieces in order to be able to later upload it via phpmyadmin?
Did you needed an extra large video or data file to be cut in few pieces in order to transfer it in few pieces over an USB stick?
Or just to give you an another scenario where I sometimes need to have an enormous file let’s say 3G split in few pieces, in order to later read it in vim or mcedit .
I sometimes need to achieve this on FreeBSD and Linux hosts thus I thought it will be helpful to somebody to give a very quick tutorial on the way large files can be cut in pieces on Linux and BSD hosts.
GNU/Linux and FreeBSD are equipped with the split command. The purpose of this command is exactly the cutting of a file to a number of pieces.
On Linux the split command comes by default install to the system with the coreutils package on most Debian (deb) based and Redhat based (rpm) distributions, theerefore Linux’s version of split is GNU/split since it’s part of the GNU Coreutils package. An interesting fact about Linux split is that one of the two programmers who has coded it is Richard Stallman 😉
On BSD Unix split is the AT&T UNIX (BSD) split
In the past splitting files in pieces was much more needed than today, as people used floppy drives to transfer data, though today with the bloom of Internet and the improve of the data carriers transferring even an extra large files from one place to another is a way more trivial task still at many occasions splitting it in pieces is needed.
Even though today splitting file is very rarely required, still there are times when being able to split a file in X number of parts is very much needed.
Maybe the most common use of splitting a file today is necessery when a large SQL file dumps, like let’s say 200 MBytes of info database needs to be moved from ane hosting provider to another one.
Many hosting providers does disallow direct access with standard mySQL client programs to the database directly and only allow a user to connect only via phpMyAdmin or some other web interface like Cpanel to improve data into the SQL or PostgreSQL server.
In such times, having knowledge on the Unix split command is a priceless asset.
Even though on Linux and BSD the code for the split command is not identical and GNU/split and BSD/split has some basic differences, the use of split on both of these Unices is identical.
The way to split a file in few pieces using on both Linux and BSD OSes is being done with one and the same command, here is how:
1. Splitting file in size of 40 mb On Linux
linux:~# split -b 40m SQL-Backup-Data.sql SQL-Backup-Data_split
2. Splitting file in size of 40mb on BSD (FreeBSD, OpenBSD, NetBSD)
freebsd# split -b 40m SQL-Backup-Data.sql SQL-Backup-Data_split
The Second argument the split command takes is actually called a prefix, the prefix is used as a basis name for the creation of the newly generated files cut in pieces file based on SQL-Backup-Data.sql.
As I said identical command will split the SQL-Backup-Data.sql files in a couple of parts which of it will be sized 40 megas.
These command will generate few files output like:
freebsd# ls -1 SQL-Backup-Dat*SQL-Backup-Data.sql

SQL-Backup-Dataa

SQL-Backup-Dataab

SQL-Backup-Dataac

SQL-Backup-Dataad

SQL-Backup-Dataae
As you see the SQL-Backup-Data.sql with size 200MB is being split in four files each of which is sized 40mbytes.
After the files are transfered to another Linux or BSD host, they can easily be again united in the original file with the command:
linux:~# for i in $(ls -1 SQL-Backup-Data_split*); echo $i >> SQL-Backup-Data.sql
Alternatively in most Unices also using cat should be enough to collect back the pieces into the original file, like so:
freebsd# cat SQL-Backup-Data_split* >> SQL-Backup-Data.sql
Enjoy splitting
Tags: ane, bloom, BSD, bsd unix, Coreutils, data carriers, deb, direct access, disallow, distributions, dumps, file, floppy drives, gnu linux, info, interesting fact, linux freebsd, linux hosts, mbytes, mcedit, mysql client, necessery, need, NetBSD, OpenBSD, package, phpmyadmin, place, richard stallman, rpm, splitting, SQL, trivial task, tutorial, usb stick, video, vim
Posted in FreeBSD, Linux, System Administration | No Comments »
Wednesday, July 27th, 2011 If you have used KVM, before you certainly have faced the requirement asked by many Dedicated Server Provider, for establishment of a PPTP (mppe / mppoe) or the so called Microsoft VPN tunnel to be able to later access via the tunnel through a Private IP address the web based Java Applet giving control to the Physical screen, monitor and mouse on the server.
This is pretty handy as sometimes the server is not booting and one needs a further direct access to the server physical Monitor.
Establishing the Microsoft VPN connection on Windows is a pretty trivial task and is easily achieved by navigating to:
Properties > Networking (tab) > Select IPv4 > Properties > Advanced > Uncheck "Use default gateway on remote network".
However achiving the same task on Linux seemed to be not such a trivial, task and it seems I cannot find anywhere information or precise procedure how to establish the necessery VPN (ptpt) ms encrypted tunnel.
Thanksfully I was able to find a way to do the same tunnel on my Debian Linux, after a bunch of experimentation with the ppp linux command.
To be able to establish the IPMI VPN tunnel, first I had to install a couple of software packages, e.g.:
root@linux:~# apt-get install ppp pppconfig pppoeconf pptp-linux
Further on it was necessery to load up two kernel modules to enable the pptp mppe support:
root@linux:~# modprobe ppp_mppe
root@linux:~# modprobe ppp-deflate
I’ve also enabled the modules to be loading up during my next Linux boot with /etc/modules to not be bother to load up the same modules after reboot manually:
root@linux:~# echo ppp_mppe >> /etc/modules

root@linux:~# echo ppp-deflate >> /etc/modules
Another thing I had to do is to enable the require-mppe-128 option in /etc/ppp/options.pptp.
Here is how:
root@linux:~# sed -e 's$#require-mppe-128$require-mppe-128$g' /etc/ppp/options.pptp >> /tmp/options.pptp

root@linux:~# mv /tmp/options.pptp /etc/ppp/options.pptp

root@linux:~# echo 'nodefaultroute' >> /etc/ppp/options.pptp
In order to enable debug log for the ppp tunnel I also edited /etc/syslog.conf and included the following configuration inside:
root@linux:~# vim /etc/syslog.conf

*.=debug;

news.none;mail.none -/var/log/debug

*.=debug;*.=info;

*.=debug;*.=info;

root@linux:~# killall -HUP rsyslogd
The most important part of course is the command line with ppp command to connect to the remote IP via the VPN tunnel ;), here is how I achieved that:
root@linux:~# pppd debug require-mppe pty "pptp ipmiuk2.net --nolaunchpppd" file /etc/ppp/options.pptp user My_Dedi_Isp_Given_Username password The_Isp_Given_Password
This command, brings up the ppp interface and makes the tunnel between my IP and the remote VPN target host.
Info about the tunnel could be observed with command:
ifconfig -a ppp

ppp0 Link encap:Point-to-Point Protocol

inet addr:10.20.254.32 P-t-P:10.20.0.1 Mask:255.255.255.255

UP POINTOPOINT RUNNING NOARP MULTICAST MTU:1496 Metric:1

RX packets:7 errors:0 dropped:0 overruns:0 frame:0

TX packets:12 errors:0 dropped:0 overruns:0 carrier:0

collisions:0 txqueuelen:3

RX bytes:70 (70.0 B) TX bytes:672 (672.0 B)
One more thing before I could finally access the IPMI’s web interface via the private IP was to add routing to the private IP address via the tunnel other side IP address:
# 10.20.0.1 P-t-P IP address

ip route add 10.20.1.124/32 dev ppp0
Now logically one would thing the Web interface to login and use the Java Applet to connect to the server would be accessible but no IT wasn’t !
It took me a while to figure out what is the problem and if not the guys in irc.freenode.net ##networking helped me I would never really find out why http://10.20.1.124/ and https://10.20.1.124/ were inaccessible.
Strangely enough both ports 80 and 443 were opened on 10.20.1.124 and it seems like working, however though I can ping both 10.20.1.124 and 10.20.0.1 there was no possible way to access 10.20.1.124 with TCP traffic.
Routing to the Microsoft Tunnel was fine as I’ve double checked all was fine except whether I tried accessing the IPMI web interface the browser was trying to open the URL and keeps opening like forever.
Thanksfully after a long time of futile try outs, a tip was suggested by a good guy in freenode nick named ne2k
To make the TCP connection in the Microsoft Tunnel work and consequently be able to access the webserver on the remote IPMI host, one needs to change the default MTU set for the ppp0 tunnel interface.
Here is how:
ip link set ppp0 mtu 1438
And tadam! It’s done now IPKVM is accessible via http://10.20.1.124 or https://10.20.1.124 web interface. Horay ! 🙂
Tags: connection, control, debian linux, default gateway, direct access, encrypted tunnel, establishment, gateway, info, information, IPMI, Java, java applet, kernel modules, kvm, linux boot, log, Microsoft, microsoft vpn, modprobe, necessery, none, ppp, ppp linux, ppp options, precise procedure, private ip address, ptpt, root, root linux, screen, server provider, software packages, tab, tmp, trivial task, VPN, vpn connection
Posted in Linux, System Administration | 1 Comment »
Saturday, July 16th, 2011 
It was necessery to clean up some squid cache for some proxy users on a Debian host. Until now I’ve used to run only custom build Squid server on Slackware Linux.
Thus I was curious if Debian guys were smart enough to implement a proxy cache cleaning option as an option to be passed on to squid’s init script.
Honestly I was quite suprised squid clear cache option is not there;
squid-cache:~# /etc/init.d/squid3

Usage: /etc/init.d/squid3 {start|stop|reload|force-reload|restart}

squid-cache:/#
As it was not embedded into init script I still hoped, there might be some Debian way to do the proxy cache clearing, so I spend some 10 minutes checking online as well as checked in squid3‘s manual just to find there is no specific command or Debian accepted way to clean squid’s cache.
Since I couldn’t find any Debian specific, way I did it the old fashioned way 😉 (deleted directory/file structures in /var/spool/squid3/* and used squid’s -z option, to recreate the swap directories.
Here is how:
squid-cache:~# /etc/init.d/squid3 stop;

squid-cache:~# rm -Rf /var/spool/squid3/*;

squid-cache:~# squid3 -z; /etc/init.d/squid3 start
Finally I was quite amazed to realize, there was not even a crontab script to periodically clear and re-create proxy cache.
My previous experience with maintaning an office Squid proxy cache has prooved, that periodic cache clean ups are very helpful, especially to resolve issues with cached unreslovable DNS entries in the server.
Clearing up squid cache every week or something, guarantees that failure to resolve certain hosts at certain times would not stay unresolvable like forever 😉
In that manner of thougths, I decided to put the following crontab which will twice a month clear up proxy’s cache, to possibly solve some failed squid DNS issues.
squid-cache:~# crontab -u root -l > file;

echo '00 04 12,26 * * /etc/init.d/squid3 stop; rm -Rf /var/spool/squid3/*; squid3 -z; /etc/init.d/squid3 start >/dev/null 2>&1'

>> file; crontab file
By the way, implementing the squid clear cache in Debian and Ubuntu ‘s init scripts and putting a periodic proxy clear up cron, seems like a feature worthy to be proposed to the distro developers and hopefully be embbed in some of the upcoming distro releases 😉
Tags: amp, cache option, clear cache, clearing, command, cron, crontab script, dev, DNS, dns entries, experience, failure, feature, fi, fil, file, file structures, guarantees, Honestly, hosts, init script, Linux, necessery, online, option, proxy, proxy cache, proxy users, rf, root, something, specific, spool, squid, squid cache, Stop, thougths, Ubuntu, ups, Usage, var, way
Posted in Linux, System Administration | No Comments »
Thursday, July 14th, 2011 
Just recently it was necessery to load up a tun kernel module on few CentOS Linux servers.
I’m using Debian on daily basis, and everybody that had even little of experience with Debian should already be aware about the existence of the handy:
/etc/modules file.
On Debian to enable a certain kernel module to load up on Linux boot, all necessery is to just place the kernel module name in /etc/modules.
For example loading the tun tunneling kernel module I issue the command:
debian:~# echo tun >> /etc/modules
I wondered if CentOS, also supports /etc/modules as it was necessery now to add this tun module to load up on CentOS’s boot.
After a bit of research I’ve figured out CentOS does not have support for adding modules names in /etc/modules , anyhow after consulting CentOS documentation on http://www.centos.org/docs/5/html/Deployment_Guide-en-US/s1-kernel-modules-persistant.html , I found CentOS and RHEL use /etc/rc.modules instead of Debian’s /etc/modules to load up any custom kernel modules not loaded by default during system boot.
Therefore instructing the RHEL Linux to load up my desired tun module in kernel on next boot was as easy as executing:
[root@centos ~]# echo 'modprobe tun' >> /etc/rc.modules

[root@centos ~]# chmod +x /etc/rc.modules
Now on next boot CentOS will load up the tun module in kernel. Achiving the same module load up is also possible through /etc/rc.local , but it’s not recommended way as /etc/rc.local would load up the kernel module after all of the rest init boot scripts complete and therefore will load up the module slightly later, at the final boot stage.
Tags: basis, boot, boot scripts, boot stage, CentOS, command, custom, custom kernel, daily basis, Debian, deployment guide, everybody, existence, experience, final boot, kernel, kernel module, kernel modules, Linux, linux servers, modprobe, Module, modulesNow, name, necessery, rhel, root, stage, support, system boot, use, way
Posted in Linux, System Administration | No Comments »
Tuesday, July 12th, 2011 
Are you an administrator of servers and it happens a server is DOWN.
You request the Data Center to reboot, however suddenly the server fails to boot properly and you have to request for IPKVM or some web java interface to directly access the server physical terminal …
This is a very normal admin scenario and many people who have worked in the field of remote system administrators (like me), should have experienced that bad times multiple times.
Sadly enough only a insignifant number of administrators try to do their best to reduce this down times to resolve client stuff downtime but prefer spending time playing the ztype! game or watching some porn website 😉
Anyways there are plenty of things like Server Auto Reboot on Crash with software Watchdog etc., that we as sysadmins can do to reduce server downtimes and most of the manual human interactions on server boot time.
In that manner of thougts a very common thing when setting up a new Linux server that many server admins forget or don’t know is to enable all the server partition filesystems to be auto fscked during server boot time.
By not enabling the auto filesystem check options in Linux the server filesystems did not automatically scan and fix hard drive partitions for fs innode inconsistencies.
Even though the filesystems are tuned to automatically get checked on every 38 system reboots, still if some kind of filesystem errors are found that require a manual confirmation the boot process is interrupted and the admin ends up with a server which is not reachable remotely via ssh !
For the remote system administrator, this times are a terrible times of waitings, prayers and hopes that the server hardware is fine 😉 as well as being on hold to get a KVM to get into the server manually and enter the necessery input to fsck prompt.
Many of this bad times can be completely avoided with a very simple fix through /etc/fstab by enabling all server partitions containing any filesystem to be automatically checked and fixed in case if inconsistencies or errors are found by fsck.ext3, fsck.ext4, fsck.reiserfs etc. commands.
A very typical default /etc/fstab file you will find on many servers should look something like:
/dev/sda8 / ext3 errors=remount-ro 0 1

tmpfs /dev/shm tmpfs defaults 0 0

devpts /dev/pts devpts gid=5,mode=620 0 0

sysfs /sys sysfs defaults 0 0

proc /proc proc defaults 0 0

/dev/sda1 /home ext3 defaults 0 0
Notice the line:
/dev/sda1 /home ext3 defaults 0 0
The first column in the example contains the device name, the second one its mount point, third its filesystem type, fourth the mount options, fifth (a number) dump options, and sixth (another number) filesystem check options. Let’s take a closer look at this stuff.
The ones which are interesting to enable auto fsck checking and error resolving is provided usually by the last sixth variable (filesystem check option) which in the above example equals 0 .
When the filesystem check option equals 0 this means the auto fsck and repair for the respective filesystem is disabled.
Some time in the past the dump backup option (5th option in the example) was also used but as far as I can understand today it’s not that important in modern GNU/Linux distributions.
Now having the above sample crontab in order to enable the fsck file checking on Linux boot for /dev/sda1 , we will need to modify the above line’s filesystem check option be 2, e.g. the line would afterwards look like:
/dev/sda1 /home ext3 defaults 0 2
Setting the 2 as an option for filesystem check is necessery for every filesystem which is not mounted as a root filesystem /
In above example /etc/fstab you already see that auto filesystem fsck is enabled for root partition:
/dev/sda8 / ext3 errors=remount-ro 0 1
(notice the 1 in the end of the line)
Finally a modified version of the default sample /etc/fstab which will check the extra /dev/sda1 /home partition would look like so:
/dev/sda8 / ext3 errors=remount-ro 0 1

tmpfs /dev/shm tmpfs defaults 0 0

devpts /dev/pts devpts gid=5,mode=620 0 0

sysfs /sys sysfs defaults 0 0

proc /proc proc defaults 0 0

/dev/sda1 /home ext3 defaults 0 2
Making sure all Linux server partitions has the auto filesystem check option enabled is something absoultely necessery!
Enabling the auto fsck on servers always makes me sleep calmer 😉
Hope it helps your too. 🙂
Tags: auto reboot, boot process, boot time, center, client, crash, data, ext, file, filesystem errors, hard drive partitions, human interactions, inconsistencies, java interface, linux server, multiple times, necessery, number, option, partition, physical terminal, porn website, reiserfs, root, sda, server boot, server downtimes, server hardware, shm, software, something, spending, spending time, system administrators, terminal, terrible times, time, Watchdog, web java, ztype
Posted in Linux, System Administration | 2 Comments »
Tuesday, June 28th, 2011 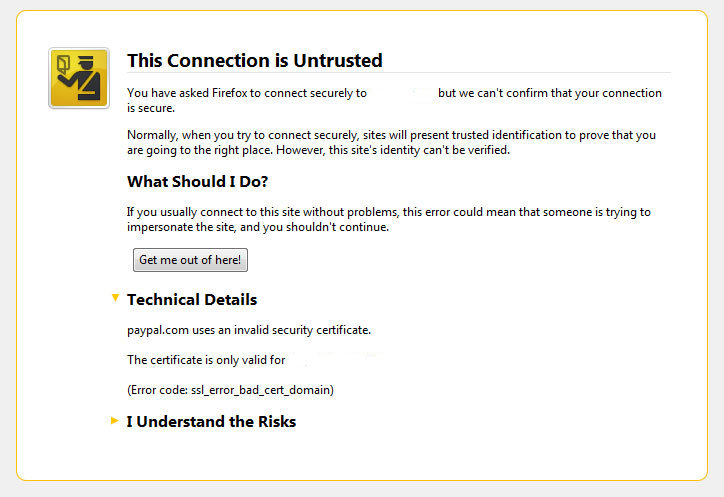
I’ve been issuing new wildcard multiple SSL certificate to renew an expiring ones. After I completed the new certificate setup manually on the server (a CentOS 5.5 Final running SoluSVM Pro – Virtual Private Manager), I launched Firefox to give a try if the certificate is properly configured.
Instead of my expectations that the browser would just accept the certificate without spitting any error messages and all will be fine, insetad I got error with the just installed certificate and thus the browser failed to report the SSL cert is properly authenticated.
The company used to issue the SSL certificate is GlobeSSL – http://globessl.com , it was quite “hassle”, with the tech support as the first certficate generated by globessl was generation based on SSL key file with 4096 key encryption.
As the first issued Authenticated certificate generated by GlobeSSL was not good further on about a week time was necessery to completethe required certificate reissuing ….
It wasn’t just GlobeSSL’s failure, as there were some spam filters on my side that was preventing some of GlobeSSL emails to enter normally, however what was partially their fault as they haven’t made their notification and confirmation emails to pass by a mid-level strong anti-spam filter…
Anyways my overall experience with GlobeSSL certificate reissue and especially their technical support is terrible.
To make a parallel, issuing certificates with GoDaddy is a way more easier and straight forward.
Now let me come back to the main certificate error I got in Firefox …
A bit of further investigation with the cert failure, has led me to the error message which tracked back to the newly installed SSL certificate issues.
In order to find the exact cause of the SSL certificate failure in Firefox I followed to the menus:
Tools -> Page Info -> Security -> View Certificate
Doing so in the General browser tab, there was the following error:
Could not verify this certificate for unknown reasons
The information on Could not verify this certificate for unknown reasons on the internet was very mixed and many people online suggested many possible causes of the issue, so I was about to loose myself.
Everything with the certificate seemed to be configured just fine in lighttpd, all the GlobeSSL issued .cer and .key file as well as the ca bundle were configured to be read used in lighttpd in it’s configuration file:
/etc/lighttpd/lighttpd.conf
Here is a section taken from lighttpd.conf file which did the SSL certificate cert and key file configuration:
$SERVER["socket"] == "0.0.0.0:443" {

ssl.engine = "enable"

ssl.pemfile = "/etc/lighttpd/ssl/wildcard.mydomain.bundle"

}
The file /etc/lighttpd/ssl/wildcard.mydomain.bundle was containing the content of both the .key (generated on my server with openssl) and the .cer file (issued by GlobeSSL) as well as the CA bundle (by GlobeSSL).
Even though all seemed to be configured well the SSL error Could not verify this certificate for unknown reasons was still present in the browser.
GlobeSSL tech support suggested that I try their Web key matcher interface – https://confirm.globessl.com/key-matcher.html to verify that everything is fine with my certificate and the cert key. Thanks to this interface I figured out all seemed to be fine with the issued certificate itself and something else should be causing the SSL oddities.
I was further referred by GlobeSSL tech support for another web interface to debug errors with newly installed SSL certificates.
These interface is called Verify and Validate Installed SSL Certificate and is found here
Even though this SSL domain installation error report and debug tool did some helpful suggestions, it wasn’t it that helped me solve the issues.
What helped was First the suggestion made by one of the many tech support guy in GlobeSSL who suggested something is wrong with the CA Bundle and on a first place the documentation on SolusVM’s wiki – http://wiki.solusvm.com/index.php/Installing_an_SSL_Certificate .
Cccording to SolusVM’s documentation lighttpd.conf‘s file had to have one extra line pointing to a seperate file containing the issued CA bundle (which is a combined version of the issued SSL authority company SSL key and certificate).
The line I was missing in lighttpd.conf (described in dox), looked like so:
ssl.ca-file = “/usr/local/solusvm/ssl/gd_bundle.crt”
Thus to include the directive I changed my previous lighttpd.conf to look like so:
$SERVER["socket"] == "0.0.0.0:443" {

ssl.engine = "enable"

ssl.pemfile = "/etc/lighttpd/ssl/wildcard.mydomain.bundle"

ssl.ca-file = "/etc/lighttpd/ssl/server.bundle.crt"

}
Where server.bundle.crt contains an exact paste from the certificate (CA Bundle) mailed by GlobeSSL.
There was a couple of other ports on which an SSL was configured so I had to include these configuration directive everywhere in my conf I had anything related to SSL.
Finally to make the new settings take place I did a lighttpd server restart.
[root@centos ssl]# /etc/init.d/lighttpd restart

Stopping lighttpd: [ OK ]

Starting lighttpd: [ OK ]
After lighttpd reinitiated the error was gone! Cheers ! 😉
Tags: anti spam filter, bundle, CentOS, cert, certficate, certificate, certificate error, Certificates, completethe, confirmation, confirmation emails, directive, encryption, Engine, error message, error messages, everything, exact cause, failure, file, Firefox, generation, godaddy, hassle, key file, menus, mid level, necessery, pemfile, place, private manager, Socket, something, spam filters, ssl certificate, support, tech support, time, Virtual
Posted in System Administration, Web and CMS | No Comments »


