Yesteday with Baky (my dear Orthodox Coptic Christian friend) and Kliment (a good friend from the old rock’n’roll years), we went to the Dobrich Cinema (sadly just one cinema for the city is available). The cinema in Dobrich is called Cinema Club Icarus (Ikar). For all foreigners who wants to enjoy some movie, the Dobrich Cinema does offer a plenty of English speaking movies (with Bulgarian subtitles).
Pitily the Dobrich Cinema website http://www.kinoikar.com/bg/info/2 is not existing in English, though anyone wanting to check the current projected movies in the cinema can use the movie trailers and the movie pictures to get the necessery info.
Anyways I haven’t been to a cinema for some almost two months, so going for a movie was really relaxing enjoyable experience. Besides that, we were lucky to see a movie which fitted quite well to my movie genre preferences –
Midnight in Paris
. Midnight in Paris is a Romantic Comedy for intellectuals and people who have a glipmse on art. Its a Bohemian movie so to say and I believe it wouldn’t hold a big interest for the avarage man who doesn’t keep interest in Arts, History or Philosophy.
The movie plot revives around a young engaged American couple who went to Paris for a business trip, just to find out there whole life is gonna be changed by this. The main actor Gil a just grown man is writting a Novel book, trying to make a shift of his profession from being a movie directory to a novel publicist. Gil (Owen Wilson) is an odd Bohemian kind of man, who quickly fells in love with Paris rich culture architecture and old fame. Next to that Gil is a dreamer who (just like me dreams about the old glorious times), when people were more respectable better moral and more idealistic than in the current age. After one night of heavy wine drinking, Gil’s fiancee wents for some dancing and leaves him on his own. Gil makes a round in Paris and losts himself and decides to stay for a while in front of sold old Roman Catholic Cathedral, a mysterious very old car crosses by the street and suddenly some “party” gang asks Gil to join. He has no idea where he is going and suddeny finds himself in the epoch of the world famous 1920 of great book publicists like the Fidgeralds family. Night by night Gil is being transferred to a different epoch back in time to meet a world famous artists and authors, people like Ernest Hemingway, Picaso, Salvador Dali etc. etc. 😉
The movie shows many personages of odd world famous people with some of their strangeties known by the current age. It appears all of them are dreaming for all and the same thing, to live in a earlier age to live in the Golden Age of Arts and Poetry 😉
The movie is real fun in Gil’s personage I’ve seen a lot of “me”, also I’ve seen a lot of me in many of the other famous people as of course presented in the movie. I hardly recommend this movie to anyone who wants to take a break, have a good mindful laugh time. Here is Midnight in Paris movie trailer as well to get an idea what to expect:
I’m realizing the more I’m converting to a fully functional GUI user, the less I’m doing coding or any interesting stuff… I remembered of the old glorious times, when I was full time console user and got a memory on a nifty trick I was so used to back in the day. Back then I was quite often writing shell scripts which were fetching (html) webpages and converting the html content into a plain TEXT (TXT) files
In order to fetch a page back in the days I used lynx – (a very simple UNIX text browser, which by the way lacks support for any CSS or Javascipt) in combination with html2text – (an advanced HTML-to-text converter).
Let’s say I wanted to fetch a my personal home page https://www.pc-freak.net/, I did that via the command:
The content from www.pc-freak.net got spit by lynx as an html source and passed html2pdf wchich saves it in plain text file pcfreak_page.txt The bit more advanced elinks – (lynx-like alternative character mode WWW browser) provides better support for HTML and even some CSS and Javascript so to properly save the content of many pages in plain html file its better to use it instead of lynx, the way to produce .txt using elinks files is identical, e.g.:
By the way back in the days I was used more to links , than the superior elinks , nowdays I have both of the text browsers installed and testing to fetch an html like in the upper example and pipe to html2text produced garbaged output.
Here is the time to tell its not even necessery to have a text browser installed in order to fetch a webpage and convert it to a plain text TXT!. wget file downloading tools supports source dump as well, for all those who did not (yet) tried it and want to test it:
$ wget -qO- https://www.pc-freak.net | html2text
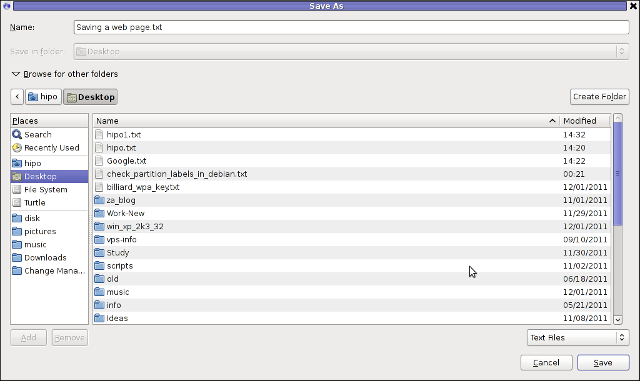
Anyways of course, some pages convertion of text inside HTML tags would not properly get saved with neither lynx or elinks cause some texts might be embedded in some elinks or lynx unsupported CSS or JavaScript. In those cases the GUI browser is useful. You can use any browser like Firefox, Epiphany or Opera ‘s File -> Save As (Text Files) embedded functionality, below is a screenshot showing an html page which I’m about to save as a plain Text File in Mozilla Firefox:
Besides being handy in conjunction with text browsers, html2text is also handy for converting .html pages already existing on the computer’s hard drive to a plain (.TXT) text format. One might wonder, why would ever one would like to do that?? Well I personally prefer reading plain text documents instead of htmls 😉 Converting an html files already existing on hard drive with html2text is done with cmd:
$ html2text index.html >index.txt
To convert a whole directory full of .html (documentation) or whatever files to plain text .TXT , cd the directory with HTMLs and issue the one liner bash loop command:
$ cd html/

html$ for i in $(echo *.html); do html2text $i > $(echo $i | sed -e 's#.html#.txt#g'); done
Now lay off your back and enjoy reading the dox like in the good old hacker days when .TXT files were fashionable 😉
I have never did a proper install of Windows XP on Debian before hand. Even though I experimented once long time ago. I had zero success with installing Windows XP Service Pack 2 . The only Windows I can make correctly working before hand on these early days on my Debian powered notebook with qemu virtual machine emulator was Windows 2000 .
I decided to give it another go today as I hoped the qemu has advanced and I’ve seen many reports online of people who were able to correctly make Windows XP SP2 work out.
As I’ve seen many blog posts online of people who succesfully run with qemu Windows XP SP2, in order to escape from repeating the other guys experience and conduct a fresh experiment, I decided to give qemu a try with Microsoft.Windows.XP.Professional.SP3.Integrated.June.2011.Corporate
Next step is to create an image file with dd or with qemu-img which will be holding the Virtual Machine Windows installation.
4. Create image file for Windows using dd
I decided to create a the image file to be with a size of 5 Gigabytes, this is of course custom so other people might prefer having it less or more the absolute minimum for a proper Windows XP SP3 install is 2000 Megabytes.
debian:~# su hipo -; cd windows;

debian:/home/hipo/windows$ dd of=hd.img bs=1024 seek=5000000 count=0

0+0 records in

0+0 records out

0 bytes (0 B) copied, 1.5505e-05 s, 0.0 kB/s
Notice here that the file dd will create will appear like 0 kb file until the Windows install from a BootCD is run with qemu.
5. Download an image of Microsoft.Windows.XP.Professional.SP3.Integrated.June.2011.Corporate from thepiratebay.org
Microsoft.Windows.XP.Professional.SP3.Integrated.June.2011.Corporate is currently available for download from the thepiratebay.org if in the times to come it is not available it will most likely be available from torrentz.net, isohunt.com etc. so I’ll skip more explanations with this step and let you use your favourite torrent program of choice to download the MS Windows iso. Just to make a note here I used transmission as this is my favourite torrent client. After downloading the iso I used K3B to burn the Image file as Bootable ISO. I’m naturally a GNOME user so to burn it as Image I just open it with K3B by using the GNOME menu and selecting Open with K3B
Next I instructed qemu to boot from the just burnt CD.
6. Boot windows Installation with Qemu from the Boot CD
debian:/home/hipo/windows$ qemu -boot d -cdrom /dev/cdrom -hda hd.img
Notice here that I’m running the qemu virtual machine emulator with a non-privileged reasons. This is important as qemu might have holes in the emulation of Windows Networking stack which if executed as root superuser. Can allow some malicious attacker to remotely compromise your GNU / Linux PC …
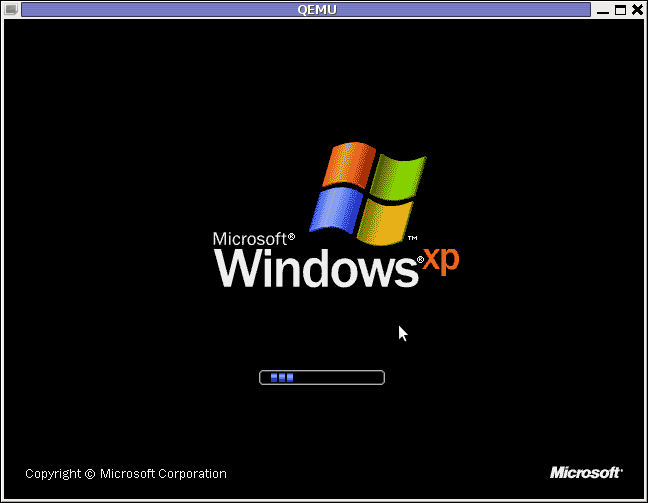
Qemu window will pop-up where one installs the Windows as it will install it using an ordinary PC. To switch qemu to fullscreen mode to have the complete feeling like installing Windows on an non-emulated PC ctrl + alt + f can be pressed.
The Windows installation took like 1 hour 20 minutes on my dual core 1.8 Ghz notebook with 2 GB of RAM. But I should say while installing I had multiple applications running; xmms, transmission, epiphany, icedove, evince etc. probably if I just run the Virtual Machine with no other applications to extra load my PC, probably the Windows install would have been done in max 50 minutes time.
After the installation is complete. To
7. Further run the installed Windowsdebian:/home/hipo/windows$ qemu -hda hd.img -boot c
...
As a next step its necessery to;
8. Bring up the tap0 interface and configure it for the user
I’m running my qemu emulator with my user hipo , so I run cmds:
debian:/home/hipo/windows$ su - root

debian:~# tunctl -u hipo

Set 'tap0' persistent and owned by uid 1000
9. Enable ip_forwarding and arp proxy and for wlan0 and tap0
10. Install the proper Network Drivers inside Windows
That’s just in case, if they’re not supported by the Windows default existing drivers. To do so, I downloaded my LAN drivers from the Vendor and put it on USB and sticked the USB drive to my laptop. In order to make the Kingston USB drive I used to transfer my LAN and Video drivers. I had to restart qemu with the parameter -usb -usbdevice host:0951:1625 , where I used lsusb to check and get the correct USB ID 0951:1625, like shown in the command below:
debian:~# lsusb |grep -i kingston

Bus 001 Device 006: ID 0951:1625 Kingston Technology DataTraveler 101 II
After on I booted again the Windows XP with the following command line in order to make qemu detect the USB Drive:
debian:/home/hipo/windows# sudo qemu -boot c -hda hd.img -usb -usbdevice host:0951:1625
One oddity here is that in order for qemu to detect the USB stick, I had to run it via sudo with super user privileges.Don’t ask me why this is the only way it worked … Next on used the Windows device manager from Control Panel -> System -> Device Manager to point my undetected hardware to the correct Win drivers.
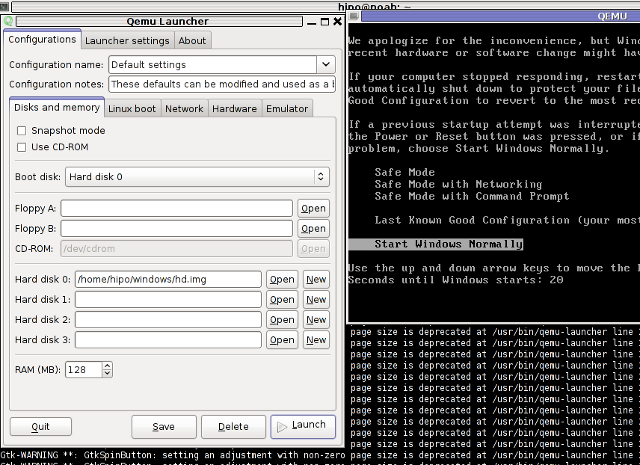
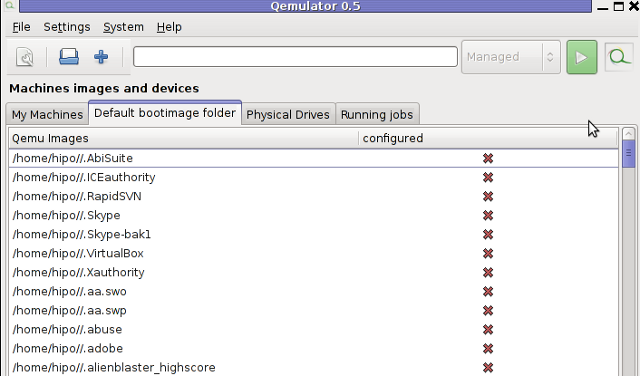
For the GUI preferring user qemu has a nice GNOME GUI interface called qemu-launcher, if you like to use qemu via it instead of scripting the qemu launcher commands, you can install and use via:
One of my friends Windows 7 started returning errors while trying to open from My Computer the local Windows C, D and E drives. This error appeared immediately, after malware and registry fix up programs were run on the PC. The exact programs that lead his PC into the state of returning an error:
This file does not have a program associated with it for performing this action. Create an association in the Set Associations control panel
are:
a-squared
Registry Booster
This two programs by the way are doing quite a good job on fixing Windows XP and Windows Vista PCs which were cleaned up earlier with Malware Bytes and Avira , however it seems they’re not 100% still compatible with the Windows 7 registry database or some uncleaned malware or virus on the PC has post-messed up the registry file associations. As its always the case with Windows you don’t have a clear idea what’s going …
Anyways as said the PC was in a bad situation, where neither Windows Explorer nor in any mean the disk drives can be opened or red, hence there was need for a quick way to revert back the default Windows file association registry settings After some quick research online, I’ve found an archive containing default Windows registry values for file associations
Therefore to revert back all Windows 7 file extensions from Windows install time, I had to download the file All_Default_File_Extensions.zip , extract the archive with WinZip or WinRar and run each of archive contained .reg extension files. The .reg files had to be run with Administrator account. It takes a while and its a bit irritating until all of the .reg files are run and all the file association default Windows settings are reverted back but thankfully in the end the C drive opening error:
This file does not have a program associated with it for performing this action … is resolved. Cheers 😉
It took me like 1 hour of search on the Internet and looking through forum threads and sites to properly install all the hardware. In hope to help someone out there looking to install the hardware Window drivers on ATI RAdeon HD 2600 XT, I’ve made a small archive of all the drivers necessery to make the Video card , Sound Card and Ethernet be properly installed and operating.
Installation of the drivers on Windows is pretty straight forward download the ATI Radeon HD 2600 XT archive extract and install each one of the files contained in the archive. A few restarts will also be necessery after some of the installed drivers to make the drivers work.
ATI Catalyst (included in the archive) will install the Video drivers for the Radeon XT 2600, whether AD1988AB_Audio_V6585_XpVistaWin7 and 11-11_xp32-64_hdmiaudio will install the Audio drivers. Attansic_L1_Lan_V1737907_V10560011159 contained in the archive needs to be extracted and installed to make the Attensic L1 Gigabit ethernet to show up as installed hardware in Windows device manager.
Hope this post will save some time to ppl looking to install the same drivers on XP 😉 Cheers 😉
After upgrading my sis’s notebook from Ubuntu 11.04 to Ubuntu 11.10 on her Acer Aspire 5736Z the default gnome wireless network manager started behaving oddly. The Network Manager did not show any networks, even though the network drivers showed that are loaded properly on the Linux host and using the normal commands like iwlist or iwconfig I could list and see the networks and even connect to a network.
As my sister is not a console geek like me it was necessery of course to have an easy way to connect herself to the Internet with nice GUI application. I personally love WICD Network Manager and as the default gnome manager was misbehaving I immediately installed her wicd. With wicd , the wireless networks were properly listed and there was no connection issues to the wireless networks, however the wicd system tray was missing and hence everytime she wanted to connect to a wireless network, she had to keep wicd-client running active in the Dock or run it manually every time on connect, when she had to change her physical location and connect to another wireless network. This of course is quite unhandy and gives her a bad image of Linux and I definitely want to make her love free software and GNU / Linux. Thus I want to give her a GNU / Linux she will be easy to use.
To make her more satisfied with her Ubuntu I googled around to see what causes the wicd systray to be missing after some research online I found out, its probably due to either wicd bug or some kind of interface changes in unity newer versions of Ubuntu. Some people online suggested a fix via changing values in gconf-editor but this work around by changing the values in gconf-editor:
'desktop' -> 'unity' -> 'panel'
I tried this suggested fix which was reported to work on Ubuntu 11.04 but the gconf registry suggested pathway was missing at all so this solution did not worked.
I further read some other suggested solution using wicd-client by invoking it with two args like so:
stanimira@ubuntu:~$ wicd-client -n &

...stanimira@ubuntu:~$ wicd-client -a &
stanimira@ubuntu:~$ wget https://www.pc-freak.net/files/add-wicd-to-whitelist.sh

...

stanimira@ubuntu:~$ sh add-wicd-to-whitelist.sh

...
For my surprise running the script doesn’t immediately changed nothing and wicd wireless connectivity indicator was still missing from the tray. I thought it might need to reload gnome so I give it a restart and HOORAY! after the restart the WICD connected wireless strength show up, like you can see in the screenshot below 😉
Now hope this fix will, help out there experiencing the same issues to work around his wireless network connectivity issues 😉 Cheers.
If you are a system administrator, you have probably wondered at least once ohw to configure your Linux server to automatically reboot itself if it crashes, is going through a mass CPU overload, e.g. the server load average “hits the sky”. I just learned from a nice article found here that there is a kernel variable which when enabled takes care to automatically restart a crashed server with the terrible Kernel Panic message we all know.
The variable I’m taking about is kernel.panic for instance kernel.panic = 20 would instruct your GNU Linux kernel to automatically reboot if it experiences a kernel panic system crash within a time limit of 20 seconds.
To start using the auto-reboot linux capabilities on a kernel panic occurance just set the variable to /etc/sysctl.conf
Now we will also have to enable the variable to start being use on the system, so execute:
debian-server:~# sysctl -p
There you go automatic system reboots on kernel panics is now on. Now to further assure yourself the linux server you’re responsible of will automatically restart itself on a emergency situation like a system overload I suggest you check Watchdog
You might consider checking out this auto reboot tutorial which explains in simple words how watchdog is installed and configured. On Debian installing and maintaining watchdog is really simple and comes to installing and enabling the watchdog system service, right afteryou made two changes in it’s configuration file/etc/watchdog.conf
Well that should be it, you might also need to load some kernel module to monitor your watchdog. On my system the kernel modules related to watchdog are located in:
/lib/modules/2.6.26-2-amd64/kernel/drivers/watchdog/ If not then you should certainly try the software watchdog linux kernel module called softdog , to do so issue: debian-server:~# /sbin/modprobe softdog
It’s best if you load the module while the softdog daemon is disabled. If you consider auto loadig the softdog software watchdog kernel driver you should exec:
A friend of mine gave me a VCD with some coptic Orthodox Christian exorcism, where there pope was chasing some evil spirits from possessed muslims who came to the Coptic Orthodox Church in egypt. The video was made to be in VCD and as you can expect this did not worked out of the box with Totem and VLC out of the box. Putting in the VCD video inside my cdrom poped up an error like the one in the header of the post. In order to make the video play I had to use the old school and now a bit obsolete mplayer. Hence in order to play the VCD on Debian Linux I had to install mplayer and w32codecs packages first e.g.:
Second to play the video from gnome-terminal, I had to switch to the mounted cdrom location /media/cdrom0 and launch the video with mplayer cmd like so:
debian:~$ cd /media/cdrom0/vcd

debian:/media/cdrom0/vcd$ mplayer vcd://2

...
In some cases it might be necessery to play the video with mplayer command like:
debian:/media/cdrom0/vdd$ mplayer vcd://2 vcd://3
Watching it with mplayer from console has some downsides as I couldn’t make the fast rewind work, but still it’s way better than nothing. Too bad in Debian Squeeze 6 gmplayer is no longer installable. The gmplayer can probably be installed if mplayer is compiled from source, but I’m too lazy to try it out. I’ve red also in some forums online that gxine is capable of playing the VCD play nice, but I couldn’t install it from my existing Debian repositories so I did not give it a go.
In this article in short, I’ll explain how I configured Nagios on a Debian GNU/Linux release (Squeeze 6) to monitor a couple of Windows hosts running inside a local network. Now let’s start.
This config allows the three IPs 192.168.1.4-6 to be able to report for nrpe.
For the changes to nrpe server to take effect, it has to be restrarted.
debian:~# /etc/init.d/nagios-nrpe-server restart
Further on some configurations needs to be properly done on the nrpe agent Windows hosts in this case 192.168.1.4,192.168.1.5,192.168.1.6
4. Install the nsclient++ on all Windows hosts which CPU, Disk, Temperature and services has to be monitored
Download the agent from http://sourceforge.net/projects/nscplus and launch the installer, click twice on it and follow the installation screens. Its necessery that during installation the agent has the NRPE protocol enabled. After the installation is complete one needs to modify the NSC.ini By default many of nsclient++ tracking modules are not enabled in NSC.ini, thus its necessery that the following DLLs get activated in the conf:
Another requirement is to instruct the nsclient++ angent to have access to the Linux installed nagios server again with adding it to the allowed_hosts config variable:
allowed_hosts=192.168.1.1
In my case the Nagios runs on Debian Lenny (Squeeze) 6 and possess the IP address of 192.168.1.1 To test the intalled windows nsclient++ agents are properly installed a simple telnet connection from the Linux host is enough:
5. Create necessery configuration for the nagios Linux server to include all the Windows hosts which will be monitored
There is a window.cfg template file located in /usr/share/doc/nagios3-common/examples/template-object/windows.cfg on Debian.
The file is a good start point for creating a conf file to be understand by nagios and used to periodically refresh information about the status of the Windows hosts.
Thus it’s a good idea to copy the file to nagios3 config directory:
A sample windows.cfg content, (which works for me fine) and monitor a couple of Windows nodes running MS-SQL service and IIS and makes sure the services are up and running are:
define host{

use windows-server ; Inherit default values from a template

host_name Windows1 ; The name we're giving to this host

alias Iready Server ; A longer name associated with the host

address 192.168.1.4 ; IP address of the host

}

define host{

use windows-server ; Inherit default values from a template

host_name Windows2 ; The name we're giving to this host

alias Iready Server ; A longer name associated with the host

address 192.168.1.4 ; IP address of the host

}

define hostgroup{

hostgroup_name windows-servers ; The name of the hostgroup

alias Windows Servers ; Long name of the group

}

define hostgroup{

hostgroup_name IIS

alias IIS Servers

members Windows1,Windows2

}

define hostgroup{

hostgroup_name MSSQL

alias MSSQL Servers

members Windows1,Windows2

}

define service{

use generic-service

host_name Windows1

service_description NSClient++ Version

check_command check_nt!CLIENTVERSION

}

define service{ use generic-service

host_name Windows1

service_description Uptime

check_command check_nt!UPTIME

}

define service{ use generic-service

host_name Windows1

service_description CPU Load

check_command check_nt!CPULOAD!-l 5,80,90

}

define service{

use generic-service

host_name Windows1

service_description Memory Usage

check_command check_nt!MEMUSE!-w 80 -c 90

define service{

use generic-service

host_name Windows1

service_description C: Drive Space

check_command check_nt!USEDDISKSPACE!-l c -w 80 -c 90

}

define service{

use generic-service

host_name Windows1

service_description W3SVC

check_command check_nt!SERVICESTATE!-d SHOWALL -l W3SVC

}

define service{

use generic-service

host_name Windows1

service_description Explorer

check_command check_nt!PROCSTATE!-d SHOWALL -l Explorer.exe

}

define service{

use generic-service

host_name Windows2

service_description NSClient++ Version

check_command check_nt!CLIENTVERSION

}

define service{ use generic-service

host_name Windows2

service_description Uptime

check_command check_nt!UPTIME

}

define service{ use generic-service

host_name Windows2

service_description CPU Load

check_command check_nt!CPULOAD!-l 5,80,90

}

define service{

use generic-service

host_name Windows2

service_description Memory Usage

check_command check_nt!MEMUSE!-w 80 -c 90

define service{

use generic-service

host_name Windows2

service_description C: Drive Space

check_command check_nt!USEDDISKSPACE!-l c -w 80 -c 90

}

define service{

use generic-service

host_name Windows2

service_description W3SVC

check_command check_nt!SERVICESTATE!-d SHOWALL -l W3SVC

}

define service{

use generic-service

host_name Windows2

service_description Explorer

check_command check_nt!PROCSTATE!-d SHOWALL -l Explorer.exe

}

define service{ use generic-service

host_name Windows1

service_description SQL port Check

check_command check_tcp!1433

}

define service{

use generic-service

host_name Windows2

service_description SQL port Check

check_command check_tcp!1433

}
The above config, can easily be extended for more hosts, or if necessery easily setup to track more services in nagios web frontend. 6. Test if connectivity to the nsclient++ agent port is available from the Linux server
debian:~# telnet 192.168.58.6 12489

Trying 192.168.58.6...

Connected to 192.168.58.6.

Escape character is '^]'.

asd

ERROR: Invalid password.
Another good idea is to launch on the Windows host the NSClient++ (system tray) , e.g.:
Start, All Programs, NSClient++, Start NSClient++ (system tray).
Test Nagios configuration from the Linux host running nagios and nrpe daemons to check if the check_nt, can succesfully authenticate and retrieve data generated from the nsclient++ on the Windows host:
If everything is okay and the remote Windows system 192.168.1.5 has properly configured and running NSClient++ the above command should return an output like:
CPU Load 1% (5 min average) 1% (10 min average) | '5 min avg Load'=1%;80;90;0;100 '10 min avg Load'=1%;80;90;0;100
In case of the command returns:
could not fetch information from server
instead this means that probably there is some kind of problem with authentication or handshake of the Linux host’s nagios check_nt to the Windows server’s running on 12489.
This is sometimes caused by misconfigured NSC.ini file, however in other occasions this error is caused by misconfigured Windows Firewall or because the NSClient++ is not running with Administrator user.
By the way important note to make about Windows 2008r2 is that if NSClient++ is running there it’s absolutely required to Login with Windows Administrator and run the NSClient++ /start , if it’s run through the Run As Adminsitrator with an admin privileged user the aforementioned error might appear, so be careful. I’ve experienced this error myself and it took me about 40 minutes to find that I have to run it directly with Administrator user after logging as Administrator.
7. Create nagios web iface Apache configuration
nagios debian pachage is shipped with a config which is suitable to be set
debian:~# cp -rpf /usr/share/doc/nagios3-common/examples/apache2.conf /etc/apache2/sites-avalable/nagios

debian:~# ln -sf /etc/apache2/sites-available/nagios /etc/apache2/sites-enabled/nagios
The /etc/apache2/sites-available/nagios can easily be configured to work on Virtualhost, to do so the above copied file need to be wrapped inside a VirtualHost directive. For that put in the beginning of the file;
<VirtualHost *:80>
and in the end of the file:
<VirtualHost *:80>
8. Restart nagios server and Apache for the new settings to take effect
If some custom configuration about tracking the Debian Linux nagios host running services needs to be made, its also helpful for one to check in /etc/nagios3/conf.d
Well that’s mostly what I had to do to make the Nagios3 server to keep track of a small Windows network on Debian GNU/Linux Squeeze 6, hope this small article helps. Cheers 😉
Recently has become publicly known for the serious hole found in all Apache webserver versions 1.3.x and 2.0.x and 2.2.x. The info is to be found inside the security CVE-2011-3192 – https://issues.apache.org/bugzilla/show_bug.cgi?id=51714
The DoS script is known in the wild under the name killapache.pl killapache.pl PoC depends on perl ForkManager and thus in order to be properly run on FreeBSD, its necessery to install p5-Parallel-ForkManager bsd port :
freebsd# cd /usr/ports/devel/p5-Parallel-ForkManager

freebsd# make install && make install clean

...
Here is an example of the exploit running against an Apache webserver host.
In about 30 seconds to 1 minute time the DoS attack with only 50 simultaneous connections is capable of overloading any vulnerable Apache server.
It causes the webserver to consume all the machine memory and memory swap and consequently makes the server to crash in most cases. During the Denial of Service attack is in action access the websites hosted on the webserver becomes either hell slow or completely absent.
The DoS attack is quite a shock as it is based on an Apache range problem which started in year 2007.
Today, Debian has issued a new versions of Apache deb package for Debian 5 Lenny and Debian 6, the new packages are said to have fixed the issue.
I assume that Ubuntu and most of the rest Debian distrubtions will have the apache’s range header DoS patched versions either today or in the coming few days. Therefore work around the issue on debian based servers can easily be done with the usual apt-get update && apt-get upgrade
On other Linux systems as well as FreeBSD there are work arounds pointed out, which can be implemented to close temporary the Apache DoS hole.
1. Limiting large number of range requests
The first suggested solution is to limit the lenght of range header requests Apache can serve. To implement this work raround its necessery to put at the end of httpd.conf config:
# Drop the Range header when more than 5 ranges.

# CVE-2011-3192

SetEnvIf Range (?:,.*?){5,5} bad-range=1

RequestHeader unset Range env=bad-range

# We always drop Request-Range; as this is a legacy

# dating back to MSIE3 and Netscape 2 and 3.

RequestHeader unset Request-Range

# optional logging.

CustomLog logs/range-CVE-2011-3192.log common env=bad-range

CustomLog logs/range-CVE-2011-3192.log common env=bad-req-range
2. Reject Range requests for more than 5 ranges in Range: header
Once again to implement this work around paste in Apache config file:
This DoS solution is not recommended (in my view), as it uses mod_rewrite to implement th efix and might be additionally another open window for DoS attack as mod_rewrite is generally CPU consuming.
# Reject request when more than 5 ranges in the Range: header.

# CVE-2011-3192

#

RewriteEngine on

RewriteCond %{HTTP:range} !(bytes=[^,]+(,[^,]+){0,4}$|^$)

# RewriteCond %{HTTP:request-range} !(bytes=[^,]+(?:,[^,]+){0,4}$|^$)

RewriteRule .* - [F]
# We always drop Request-Range; as this is a legacy
# dating back to MSIE3 and Netscape 2 and 3.
RequestHeader unset Request-Range
3. Limit the size of Range request fields to few hundreds To do so put in httpd.conf:
LimitRequestFieldSize 200
4. Dis-allow completely Range headers: via mod_headers Apache module
In httpd.conf put:
RequestHeader unset Range

RequestHeader unset Request-Range
This work around could create problems on some websites, which are made in a way that the Request-Range is used.
5. Deploy a tiny Apache module to count the number of Range Requests and drop connections in case of high number of Range: requests
This solution in my view is the best one, I’ve tested it and I can confirm on FreeBSD works like a charm. To secure FreeBSD host Apache, against the Range Request: DoS using mod_rangecnt, one can literally follow the methodology explained in mod_rangecnt.c header:
freebsd# wget http://people.apache.org/~dirkx/mod_rangecnt.c

..

# compile the mod_rangecnt module

freebsd# /usr/local/sbin/apxs -c mod_rangecnt.c

...

# install mod_rangecnt module to Apache

freebsd# /usr/local/sbin/apxs -i -a mod_rangecnt.la

...
Finally to load the newly installed mod_rangecnt, Apache restart is required:
freebsd#  /usr/local/etc/rc.d/apache2 restart

...
I’ve tested the module on i386 FreeBSD install, so I can’t confirm this steps works fine on 64 bit FreeBSD install, I would be glad if I can hear from someone if mod_rangecnt is properly compiled and installed fine also on 6 bit BSD arch.
Deploying the mod_rangecnt.c Range: Header to prevent against the Apache DoS on 64 bit x86_amd64 CentOS 5.6 Final is also done without any pitfalls.
[root@centos ~]# uname -a;

Linux centos 2.6.18-194.11.3.el5 #1 SMP Mon Aug 30 16:19:16 EDT 2010 x86_64 x86_64 x86_64 GNU/Linux

[root@centos ~]#  /usr/sbin/apxs -c mod_rangecnt.c

...

/usr/lib64/apr-1/build/libtool --silent --mode=link gcc -o mod_rangecnt.la  -rpath /usr/lib64/httpd/modules -module -avoid-version    mod_rangecnt.lo

[root@centos ~]# /usr/sbin/apxs -i -a mod_rangecnt.la

...

Libraries have been installed in:

/usr/lib64/httpd/modules

...

[root@centos ~]# /etc/init.d/httpd configtest

Syntax OK

[root@centos ~]#  /etc/init.d/httpd restart

Stopping httpd:                  [  OK  ]

Starting httpd:                  [  OK  ]
After applying the mod_rangecnt patch if all is fine the memory exhaustion perl DoS script‘s output should be like so:
freebsd# perl httpd_dos.pl www.patched-apache-host.com 50

Host does not seem vulnerable
All of the above pointed work-arounds are only a temporary solution to these Grave Apache DoS byterange vulnerability , a few days after the original vulnerability emerged and some of the up-pointed work arounds were pointed. There was information, that still, there are ways that the vulnerability can be exploited. Hopefully in the coming few weeks Apache dev team should be ready with rock solid work around to the severe problem.
In 2 years duration these is the second serious Apache Denial of Service vulnerability after before a one and a half year the so called Slowloris Denial of Service attack was capable to DoS most of the Apache installations on the Net.
Slowloris, has never received the publicity of the Range Header DoS as it was not that critical as the mod_range, however this is a good indicator that the code quality of Apache is slowly decreasing and might need a serious security evaluation.