Posts Tagged ‘necessery’
Thursday, April 7th, 2011 I’ve recently realized that the Easy Adsenser plugin which I used to place google adsense advertisements on my blog, is probably stealing some portion of my clicks.
There were some fraud reports on wordpress.org by people who have found out the author of Easy Adsenser rips clicks, by showing sometimes his own ad code even if the plugin is configured to not grant any clicks as a donation to the plugin author.
I don’t know how true this story is and I don’t have the time to observe the whole plugin code to say for sure if the rumors about clicks stealing are true.
However as I’m paying my internet access (that guarantees) by blog to stay online with some adsense advertisements and the adsense revenues are either equal to my internet tax or a bit higher (depending on the month), it’s quite unpleasent to hear someone is stealing from the ads clicks which still generate very low revenue.
Thus I took the time to read some blog posts online which gave me some hints on how can I directly place the google adsense advertisement code into the theme template files
My goal was to place one google adsense ad to appear right after the title of each article and one to appear as a vertical bar in the end of my sidebar.
In this article in short I’ll explain how I achieved this banner placement via the default wordpress template which obviously I use on my blog.
Let’s start:
1. Add adsense to the index page of the blog
Edit your blog/wp-content/themes/default/index.php file
Therein find the code:
<div id="content" class="narrowcolumn" role="main">
and right after this line put the following php code:
<?php

$postnum = 1;

$showadsense1 = 1;

?>
This code is necessery to assure the adsense code only appears on the first blog post from the blog index page
2. Find the code:
<small><?php the_time('F jS, Y') ?> <!-- by
Immediately after the code place the php code:
<?php if ($postnum == $showadsense1) {

echo '<div class="adsense" style="float:right;margin:12px;">;paste here your adsense code ...</div>';

} ?>
<?php $postnum++; ?>
Now with this changes, 1 adsense advertisements should start appearing right after your first and only on your blog post, next step is to place manually one more vertical adsense banner.
2. Place adsense vertical bannre in wordpress blog sidebar
Login with admin user to wordpress and navigate to:
Appearance -> Widgets
Among the available widgets you will notice the widget called Text click over: Add to add this widget to the list of widgets to appear on your blog sidebar.
Afterwards look up over the Sidebar list of widgets find the newly added Text widget and click over Edit to modify it’s content.
Further on put a Title for the widget or choose to leave the title field as blank if you don’t want a name to appear.
On the next textbox just paste your adsense code and you’re done. A simple refresh of your wordpress blog index page should show you a vertical banner with your adsense code.
! Note that if you have recently issued the adsense code it will take about 10-20 minutes until the banner starts showing up.
Until now wordpress is configured to show adsense adverts on the blog main page, as a next step we need to place the same adsense adverts to appear whether a single blog post is reviewed (opened).
Place an adsense advertisements to single posts opened
For that purpose it’s necessery to edit the file single.php it’s again located in blog/wp-content/themes/default
Once again you will first need to find the code:
if (have_posts())
Put the code after the end of the line on a new line:
<?php

// below code is for adsense

$postnum = 1;

$showadsense1 = 1;

?>
Next lookup in the file for the code:
<h2><?php the_title(); ?></h2>
On a new line after it place:
<?php if ($postnum == $showadsense1) { echo '<div class="adsense" style="float:right;margin:12px;"><script type="text/javascript"> place here your adsense code </div>';

} ?>
<?php $postnum++; ?>
That’s all now the adsense advertisements will be also showing on the single blog posts reviews found via some search engine (google, yahoo etc.).
Hope this article will be helpful to somebody, if so drop me a thanks line in comments 😉
Tags: adsense, advertisement, advertisements, banner placement, blog, class, code, code lt, content themes, div id, file, filesMy, fraud, fraud reports, goal, google, google adsense, index, index page, internet access, internet tax, js, margin, necessery, page, page posts, php, place, plugin, plugin code, quot, right, role, sidebar, someone, start 1, story, template, time, unpleasent, vertical bar, wordpress blog
Posted in SEO, System Administration, Web and CMS, Wordpress | 2 Comments »
Saturday, June 18th, 2011 After installing the Tweet Old Post wordpress plugin and giving it, I’ve been returned an error of my PHP code interpreter:
Call to undefined function: curl_init()
As I’ve consulted with uncle Google’s indexed forums 😉 discussing the issues, I’ve found out the whole issues are caused by a missing php curl module
My current PHP installation is installed from the port tree on FreeBSD 7.2. Thus in order to include support for php curl it was necessery to install the port /usr/ports/ftp/php5-curl :
freebsd# cd /usr/ports/ftp/php5-curl

freebsd# make install clean
(note that I’m using the php5 port and it’s surrounding modules).
Fixing the Call to undefined function: curl_init() on Linux hosts I suppose should follow the same logic, e.g. one will have to install php5-curl to resolve the issue.
Fixing the missing curl_init() function support on Debian for example will be as easy as using apt to install the php5-curl package, like so:
debian:~# apt-get install php5-curl

...
Now my tweet-old-post curl requirement is matched and the error is gone, hooray 😉
Tags: call to undefined function, Debian, ERROR, fatal error, freebsd, function, google, hooray, init function, installation, interpreter, issue, Linux, linux hosts, logic, Module, necessery, note, Old, order, package, php code, php installation, plugin, port, ports, post, requirement, support, tree, usr
Posted in FreeBSD, Linux, Wordpress | No Comments »
Friday, May 27th, 2011 
The aim of this small post is to give just a brief idea of how I fix my qmail server after breaking it or in case it is broken after mail bomb attacks, etc.
Most common cases when I break my qmail queue myself, are after I’m implementing some new patches and reinstall parts of the qmail server with a patched version of default qmail binaries.
On other occasions, I simply used the qmailctl to start or stop the server as a part of some routine tasks necessery for the administration of the qmail server.
Everybody who has already experience with qmail should have experienced, that qmail is very fragile and could break even with a simple changes, though if it works once it’s rock solid piece of mail servant.
Below I explain few ways I used through my days as a qmail sys admin to deal with broken or messed queues.
1. Fixing a broken qmail queue using automatic tools There are few handy tools which in most cases are able to solve issues with the queue, one very popular one isqueue-repair – check http://pyropus.ca/software/queue-repair/.
Installation of qmail-repair is dead easy, but it needs to be installed from source as no official debian package is available:
linux:/usr/local/src# wget http://pyropus.ca/software/queue-repair/queue-repair-0.9.0.tar.gz

linux:/usr/local/src# tar -xzvvf queue-repair-0.9.0.tar.gzdrwxr-xr-x charlesc/qcc 0 2003-10-22 16:54 queue-repair-0.9.0/

-rw-r--r-- charlesc/qcc 268 2003-10-22 16:54 queue-repair-0.9.0/TODO

-rw-r--r-- charlesc/qcc 1700 2003-10-22 16:54 queue-repair-0.9.0/CHANGELOG

-rw-r--r-- charlesc/qcc 18007 2003-10-22 16:54 queue-repair-0.9.0/COPYING

-rw-r--r-- charlesc/qcc 1098 2003-10-22 16:54 queue-repair-0.9.0/BLURB

-rwxr-xr-x charlesc/qcc 26286 2003-10-22 16:54 queue-repair-0.9.0/queue_repair.py
To check if there are issues fixable within the qmail queue it’s as easy as:
linux:/usr/local/src# cd queue-repair-0.9.0

linux:/usr/local/src/queue-repair-0.9.0# ./queue-repair -t

...

checking files...

checking queue/mess files...

checking split locations...
The tool will walk through the mail sub-directories containing mail queued files in /var/qmail/queue and will list any issues found.
It’s recommended that the qmail server is stopped before any queue modify operations are issued on the server:
linux:/usr/local/src# qmailctl stop

...
Further on in order to solve any found issues with the queue, there is the “-r”/repair option:
linux:/usr/local/src/queue-repair-0.9.0# ./queue-repair -r

...
Another tool which comes handy whether a repair of a messed qmail queue is needed is qmhandle – http://sourceforge.net/projects/qmhandle/
The use of qmhandle is also pretty easy, all one has to do is to follow the usual classical steps of a download the source & compile:
linux:/usr/local/src# wget https://www.pc-freak.net/files/qmhandle-1.3.2.tar.gz

linux:/usr/local/src# tar -zxvvf qmhandle-1.3.2

...

linux:/usr/local/src# cd qmhandle-1.3.2
Once again it’s necessery that the qmail server is stopped via its init script before qmHandle tool is used, e.g.:
linux:~# qmailctl stop

...
There is a difference between qmail queue repair tool and qmail handle , while qmail queue-repair tool is used to fix improper permissions of queued files with the qmail queue, qmhandle ‘s application is to completely delete the stored mail contents of a broken queue.
Deleting all the qmail queue content is in some cases the only option to fix the queue.
Often such a drastic measure is required after a heavy mail server overload, let’s say a result of spammers or caused by virus infected mail users which send a massive amounts of spam mails.
Thus at many cases when queue-repair was unable to solve a queue mess, I use qmhandble and sacrifice all the queued emails by completely wiping them out like so:
linux:/usr/local/src/qmhandle-1.3.2# ./qmhandle -D

...
Above command would eradicate all queued emails. Hopefully after the qmail server gets launched again with qmailctl start all the mail server operations should be back to normal.
Note that the use of qmhandle’s queue delete capabilities is pretty dangerous, if you forgot to stop the qmail server before issuing the above command!
Note that in order to use both qmHandle and queue-repair tools you will need to install python interpreter as both of the tools are written in python.
To check what is currently in the queue in Qmail, there are also native tools available, as you should probably know if you have dealt with qmail, e.g.:
debian:~# qmail-qstat

debian:~# qmail-qstat

messages in queue: 2

messages in queue but not yet preprocessed: 0
Often when there are problems with Qmail and more specificly with qmail server queue the qmail-qstat command does show messages in queue, however when an attempt to check what kind of messages are in the queue with qmail-qread no messages are shown, for instance below you see an example of that, even though qmail-qstat claims 2 messages are in the queue, qmail-qread is unable to list the messages:
debian:~# qmail-qread

debian:~#
If all is fine with qmail queue above’s qmail-qread command should have returned something similar to:
debian:~# qmail-qread

26 May 2011 07:46:47 GMT #659982 3517 <hipo@www.pc-freak.net>

remote somemail@gmail.nl

26 May 2011 07:46:47 GMT #659983 3517 <hipo@www.pc-freak.net>
2. Fixing qmail queue manually This is very dangerous initiative, so before you try anything, make sure that you know what you’re doing, the possibility that you make the situation worst if you attempt to tamper manually the qmail queue is quite high 🙂
However if you’re still convinced to try fixing it manually, take a look at /var/qmail/queue it’s very likely that there are permission issues with some of the queued files, in order to fix the situation it’s necessery that the following directories:
/var/qmail/queue/mess/

/var/qmail/queue/remote/

/var/qmail/queue/bounce

/var/qmail/queue/info
gets explored with midnight commander / mc or some kind of convenient file explorer.
If there are queued files owned by users different from qmailq and user group qmail , for instance if owned by the root user, a simple chown qmailq:qmail to the wrong permissions file, should be able to resolve the issues.
Apart from all I explain above, there are many other ways suggested online on howto clean a qmail queue, one very popular one is using James’s qfixq shell script.
This script as of this very date is not working on Debian based systems, the script is dedicated initially to run on Fedora and Redhat based Linuces
Moreover myy experience with qfixq was never successful.
One very important note which is often a cause of many problems, is always make sure you stop and start the qmail server with an interval of at least of 10 seconds.
I’ve managed many servers which after an immediate (undelayed) qmailctl stop and qmailctl start was unable to run the whole engine of the qmail server (and either email sending or email receiving was not properly working) afterwards.
In that cases many weird behaviours are common, consider this seriously if you deal with the qmail-queue, it might happen that even if you have fixed your qmail queue, after a restart the qmail might breaks up.
I’ve experienced this kind of oddities numerous times, thus when I do changes to qmail I always make sure I restart the server a couple of times (at least 5 times 😉 ) always with a good delay between the HUPs.
And as always with qmail prayer is always needed, this server is complex, you never know what will happen next 🙂
Tags: aim, automatic tools, binaries, BLURB-rwxr-xr-x, ca software, COPYING-rw-r--r-, debian package, default, download, everybody, handy tools, init, Linux, mail bomb, mess, necessery, new patches, occasions, option, package, piece, python, qcc, qmailctl, queue, queues, quot, repair, rock, routine tasks, script, servant, simple changes, software queue, tar gz, tool, wget, zxvvf
Posted in Linux, Qmail, System Administration | 3 Comments »
Sunday, September 4th, 2011 
Recently the annoying Viagra spam has emerged again. Therefore I decided to clean up some of the mails received to one of the qmail servers to protect users emailbox from this viagra peril.
To do so I’ve remember about an old script which used to be part of qmailrocks.org qmail install, the script is called qtrap and is able to filter emails based on list of specific mail contained words.
Since qmailrocks.org is gone (down) for some time and its still available only on few mirrored locations which by the way are not too easy to find I decided to write a little post on how qtrap.sh could be integrated quick & easy with any Qmail + Vpopmail install out there.
Hereby I include the description for qtrap.sh given by the script author:
“qtrap.sh script is applied on a per domain basis and serves as a “bad word” scanner to catch any spam that Spamassassin may have missed. This filter serves as the last defense against SPAM before it arrived in your inbox. I like this filter because it helps to get rid of any SPAM that happens to make it by Spamassassin. Without any protection at all, my mailbox gets a shit ton of SPAM every day. Within the first 3 months I enacted the Qtrap filter, Qtrap logged over 9,000 deleted SPAM messages, none of which were legitimate e-mails. My keyboard’s delete key was very appreciated the extra rest.
Any emails that are scanned and contain a banned word will be automatically deleted and logged by the qtrap script. A whitelist feature now exists so that individual addresses or domains can be exempt from the qtrap scan.”
Now as one might have general idea on what the script does. Here is the step by step qtrap.sh integration;
1. Create necessery qtrap directory and logs and set proper permissions
If the vpopmail is installed in /home/vpopmail , issue the following commands.
debian:~# cd /home/vpopmail

debian:~# mkdir -p qtrap/logs

debian:/home/vpopmail/qtrap# cd qtrap

debian:/home/vpopmail/qtrap# wget https://www.pc-freak.net/files/qtrap.sh

...

debian:/home/vpopmail/qtrap# cd ~

debian:~# touch /home/vpopmail/qtrap/logs/qtrap.logdebian:~# chown -R vpopmail:vchkpw /home/vpopmail/qtrapdebian:~# chmod -R 755 /home/vpopmail/qtrap
On older qmail installations it could be vpopmail is installed in /var/vpopmail if that’s the case, link /var/vpopmail to /home/vpopmail and go back to step 1. To link:
debian:~# ln -sf /var/vpopmail/ /home/vpopmail
2. Edit qtrap.sh to whitelist email addresses and build a ban words list
a) Include the email addresses mail arriving from which would not be checked by qtrap.sh
Inside qtrap.sh in line 63, there is a shell function whitelist_check(), the function looks like so:
whitelist_check () {

case $WHITELIST in

address@somewhere.com|address@somewhereelse.com)

echo $SENDER found in whitelist on `date "+%D %H:%M:%S"` >> /home/vpopmail/qtrap/logs/qtrap.log

exit 0;;

*)

;;

esac

}
By default the script has just two sample mails which gets whitelisted this is the line reading:
address@somewhere.com|address@somewhereelse.com
The whitelisted emails should be separated with a pipe, thus to add two more sample emails to get whitelisted by script the line should be changed like:
address@somewhere.com|address@somewhereelse.com|hipod@mymailserver.com|hipo@gmail.com
In order to whitelist an entire domain let’s say yahoo.com add a line to the above code like:
address@somewhere.com|address@somewhereelse.com|hipod@mymailserver.com|hipo@gmail.com|*yahoo.com
b) Defining the bad words ban list, mails containing them should not be delivery by qmail
The function that does check for the ban word list inside the script is checkall();, below is a paste from the script function:
checkall () {

case $BANNED_WORDS in

porn|PORN|Sex|SEX)

printout $BANNED_WORDS

echo MESSAGE DROPPED from $SENDER because of $BANNED_WORDS on `date "+%D %H:%M:%S"` >> /home/vpopmail/qtrap/logs/qtrap.log

exit 99;;

*)

;;

esac

}
checkall(); is located on line 74 in qtrap.sh, the exact list of banned words which the script should look for is located on line 76, the default qtrap.sh filters only mails containing just 4 words, e.g.:
porn|PORN|Sex|SEX)
To add the Viagra and VIAGRA common spam words to the list, modify it and expand like so:
porn|PORN|Sex|SEX|viagra|Viagra)
The delimiter is again | , so proceed further and add any unwanted spam words that are not common for any legit mails.
3. Install qtrap.sh to process all emails delivered to vpopmail
If its necessery to install the dropping of mails based on word filtering only to a single vpopmail virtualdomain do it with cmd:
debian:~# cd /home/vpopmail/domains/yourdomain.com

debian:/home/vpopmail/domains/yourdomain.com# touch .qmail-default.new

debian:/home/vpopmail/domains/yourdomain.com# echo '| /home/vpopmail/qtrap/qtrap.sh' >> .qmail-default.new

debian:/home/vpopmail/domains/yourdomain.com# echo "| /home/vpopmail/bin/vdelivermail '' bounce-no-mailbox" >> .qmail-default.new

debian:/home/vpopmail/domains/yourdomain.com# chown vpopmail:vchkpw .qmail-default.new

debian:/home/vpopmail/domains/yourdomain.com# cp -rpf .qmail-default .qmail-default.bak; mv .qmail-default.new .qmail-default
If however qtrap.sh needs to get installed for all existing vpopmail virtualdomains on the qmail server, issue a one liner bash script:
debian:~# cd /home/vpopmail/domains

debian:/var/vpopmail/domains# for i in *; do cd $i; echo "| /home/vpopmail/qtrap/qtrap.sh" >> $i/.qmail-default.new;

echo "| /home/vpopmail/bin/vdelivermail '' bounce-no-mailbox" >> $i/.qmail-default.new;

chown vpopmail:vchkpw .qmail-default.new; mv .qmail-default .qmail-default.old; mv .qmail-default.new .qmail-default; cd ..; done
This for loop will add ‘| /home/vpopmail/qtrap/qtrap.sh’ to all .qmail-default for all vpopmail domains.
Afterwards the .qmail-default file should contain the following two lines:
| /home/vpopmail/qtrap/qtrap.sh

| /home/vpopmail/bin/vdelivermail '' delete
A very important thing here you should consider that adding some common words, as let’s say hello or mail etc. could easily drop almost all the emails the qmail hands in to vpopmail.
Caution!! Never ever implement common words in the list of words !!
Always make sure the banned words added to qtrap.sh are words that are never enter an everyday legit email.
Another thing to keep in mind is that qtrap.sh doesn’t make a copy of the received message ,though it can easily be modified to complete this task.
Any mail that matches the banned words list will be dropped and lost forever.
4. Check if qtrap.sh is working
To check, if qtrap is working send mail to some mailbox located on the qmail server containing inside subject or mail message body the unwanted word defined inside qtrap.sh.
The mail should not be received in the mailbox to which its sent, if qtrap is working moreover qtrap.sh should log it inside it’s log file:
debian:~# cat /home/vpopmail/qtrap/logs/qtrap.log

MESSAGE DROPPED from hipo@mytestmail.com because of viagra on 09/03/11 11:34:19

MESSAGE DROPPED from support@mymailserver.com because of Viagra on 09/03/11 11:39:29
If the qtrap.log contains records similar to the one above, and the mail matching the banned word is not delivered, qtrap.sh is properly configured. If any issues check in qmail logs, they should have a good pointer on what went wrong with qtrap.sh invokation.
Note that I’ve integrated qtrap.sh to custom qmail install running on Debian Lenny 5.0 GNU/Linux.
If I have time I’ll soon test if its working fine on the latest stable Debian Squeeze and will report here in comments.
If however someone is willing to test if the script works on Debian Squeeze 6.0 or have tested it already please drop a comment to report if it works fine.
qtrap.sh, is a bit oldish and is not written to work too optimal therefore on some heavy loaded mail servers it can create some extra load and a bit delay the mail delivery. Thus when implementang one needs to consider the downsides of putting it in.
Also I was thinking tt might be nice if the script is rewritten to read the ban words and whitelist mails from files instead of as it is now as the words are hard coded in the script.
If I have some free time, I’ll probably do this, though I’m not sure if this is a too good idea as this might have a negative performance impact on the script execution time, as each instance of the script invoked should do one more operation of reading a file storing the ban words.
Well that’s pretty much it, enjoy 😉
Tags: amp, annoying spam, bad word, ban, BANNED, basis, cd home, com, defense against spam, description, esac, filter messages, function, general idea, Gmail, Hereby, hipo, inbox, keyboard, logs, mail, mkdir, necessery, newdebian, peril, PORN, proper permissions, protection, Qmail, qtrapdebian, quot, scanner, script, script author, servers, Sex, spamassassin, time, viagra, vpopmail, whitelist, word scanner, WORDS
Posted in FreeBSD, Linux, Qmail, System Administration | 1 Comment »
Friday, February 10th, 2012

On FreeBSD ntpd , ntpdc , ntpdate , ntpq doesn't need to be installed via a specific package like on GNU/Linux as they're part of the FreeBSD world (binary standardly shipped with FreeBSD basis system).
The FreeBSD handbook has a chapter explaining thoroughfully on ntp on FreeBSD ,however for the lazy ones here is a short few steps tutorial on how to install and configure ntpd on bsd :
1. Copy sample ntp.conf file to /etc/
freebsd# cp -rpf /usr/src/etc/ntp.conf /etc/ntp/
No need for any modifications if you don't want to apply some specific restrictions on whom can access the ntpd server. If you update regularly the FreeBSD system with freebsd-update or directly by rebuilding the FreeBSD kernel / world adding restrictions might be not necessery..
If you check /usr/src/etc/ntp.conf you will notice freebsd project people are running their own ntp servers , by default ntpd will use this servers to fetch timing information. The exact server hosts which as of time of writting are used can be seen in ntp.conf and are:
server 0.freebsd.pool.ntp.org iburst maxpoll 9

server 1.freebsd.pool.ntp.org iburst maxpoll 9

server 2.freebsd.pool.ntp.org iburst maxpoll 9
2. Add ntpd daemon to load on system boot via /etc/rc.conf
By default ntpd is disabled on FreeBSD, you can see if it is disabled or enabled by invoking:
freebsd# /etc/rc.d/ntpd rcvar

# ntpd

ntpd_enable=NO
To Enable ntpd to get loaded each time it boots , following 3 lines has to be added in /etc/rc.conf .
ntpdate_enable="YES"

ntpdate_flags="europe.pool.ntp.org"

ntpd_enable="YES"
Quick way to add them is to use echo :
echo 'ntpdate_enable="YES" >> /etc/rc.conf

echo 'ntpdate_flags="europe.pool.ntp.org" >> /etc/rc.conf

echo 'ntpd_enable="YES" >> /etc/rc.conf
Now as the 3 rc.conf vars are set to "YES", the ntpd can be started. Without having this variables in /etc/rc.conf , "/etc/rc.d/ntpd start" will refuse to start ntpd.
3. Start the ntpd service
freebsd# /etc/rc.d/ntpd start

...
One interesting note to make is ntpd can also operate without specifying any config file (/etc/ntp.conf), the only requirement for the server to start is to have a properly set ntpdate server, like lets say (ntpdate_flags="europe.pool.ntp.org")
4. Permit only certain host or localhost to "talk" to the ntpd server
If you want to imply some ntp server restrictions, the configuration directives are same like on Linux:
To allow only a a host inside a local network with IP 192.168.0.2 as well as localhost, to be able to fetch time information via ntpd server put inside /etc/ntp.conf:
restrict 127.0.0.1

restrict 192.168.0.1 mask 255.255.255.0 nomodify notrap
If you want to prohibit ntpd to serve as a Network Time Server, to any other host except localhost, add in /etc/ntp.conf :
restrict default ignore
Allowing and denying certain hosts can be also done on pf (packet filter) or ipfw firewall level, and in my view is easier (and less confusing), than adding restrictions through ntp.conf. Besides that using directly the server firewall to apply restrictions is more secure. If for instance a remote exploit vulnerability is discovered affecting your ntpd server. this will not affect you externally as access to the UDP port 123 will be disabled on a firewall level.
Something good to mention is NTP servers communicate between each other using the UDP source/destination (port 123). Hence if the NTPD server has to be publicly accessible and there is a firewall already implemented, access to source/dest port 123 should be included in the configured firewall …
5. Check if the ntp server is running properly / ntp server query operations
[root@pcfreak /home/hipo]# ps axuww|grep -i ntp
root 15647 0.0 0.2 4672 1848 ?? Ss 2:49PM 0:00.04 /usr/sbin/ntpd -c /etc/ntp.conf -p /var/run/ntpd.pid -f /var/db/ntpd.drift
To query the now running ntpd server as well as set various configuration options "on the fly" (e.g. without need for ntp.conf edits and init script restart), a tool called ntpdc exists. ntpdc tool could be used to connect to localhost running ntpd as well as to connect and manage remotely a ntpd server.
The most basic use of ntpdc is to check (server peers).:
freebsd# ntpdc localhost

ntpdc> peers

remote local st poll reach delay offset disp

===================================================
kgb.comnet.bg 83.228.93.76 2 64 377 0.00282 -0.050575 0.06059

*billing.easy-la 83.228.93.76 2 64 377 0.01068 -0.057400 0.06770

=ns2.novatelbg.n 83.228.93.76 2 64 377 0.01001 -0.055290 0.06058
ntpdc has also a non-interactive interface, handy if there is a need for requests to a ntpd to be scripted. To check ntpd server peers non-interactively:
freebsd# ntpdc -p localhost

===================================================

kgb.comnet.bg 83.228.93.76 2 64 377 0.00284 -0.043157 0.06184

=billing.easy-la 83.228.93.76 2 64 377 0.01059 -0.042648 0.05811

*ns2.novatelbg.n 83.228.93.76 2 64 377 0.00996 -0.041097 0.06094
ntpdc has plenty of other ntpd query options, e.g. :
ntpdc> help

ntpdc commands:

addpeer controlkey fudge keytype quit timeout

addrefclock ctlstats help listpeers readkeys timerstats

addserver debug host loopinfo requestkey traps

addtrap delay hostnames memstats reset trustedkey

authinfo delrestrict ifreload monlist reslist unconfig

broadcast disable ifstats passwd restrict unrestrict

clkbug dmpeers iostats peers showpeer untrustedkey

clockstat enable kerninfo preset sysinfo version

clrtrap exit keyid pstats sysstats
ntpdc is an advanced query tool for ntpd , servers. Another tool exists called ntpq which syntax is almost identical to ntpdc . The main difference between the two is ntpq is a monitoring tool mostly used just for monitoring purposes, where ntpdc can also change plenty of things in the server configuration.
For people who want to learn more on ntpd the man page is a great reading , containing chapters describing thoroughfully exactly how NTPD time servers operate, etc.
Tags: basis, basis system, boots, comnet, configure, daemon, doesn, echo echo, europe, file, flags, freebsd handbook, freebsd kernel, freebsd system, freebsd world, gnu linux, handbook, iburst, information, level, Linux, localhost, maxpoll, nbsp, necessery, need, ntp servers, ntpd, ntpdate, ntpdc, ntpq, package, pool, quot, root, rpf, server clock, server hosts, system boot, time, timing, tool, variables, writting, YES
Posted in FreeBSD, System Administration | 1 Comment »
Tuesday, January 10th, 2012 I've experienced plenty of problems with Pulseaudio and Skype output sound hell crappy. This stupid proprietary program Skype is a total crap … Anyways again thanks to ArchLinux's wiki, I've used the two mentioned steps to fix all this Skype in / out problems …
1. Fix problems with Glitches, voice skips and crackling In file /etc/pulse/default.pa its necessery to substitute the line;
load-module module-udev-detect
with
load-module module-udev-detect tsched=0
2. Resolve Choppy sound in (Pulseaudio) -> Skype
In /etc/pulse/daemon.conf two lines has to be also substituted:
; default-sample-rate = 44100
Should become;
default-sample-rate = 48000
3. Change /etc/default/pulseaudio to allow dynamic module loading
It is a good idea to the default settings from DISALLOW_MODULE_LOADING=1 to DISALLOW_MODULE_LOADING=0 .This step is not required and I'm not sure if it has some influence on solving sound in / out problems with Skype but I believe it can be helpful in some cases..
So in /etc/default/pulseaudio Substitute:
DISALLOW_MODULE_LOADING=1
to;
DISALLOW_MODULE_LOADING=0
4. Restart PulseAudio server
After the line is changed and substituted a restart of PulseAudio is required. For PulseAudio server restart a gnome session logout is necessery. Just LogOff logged Gnome user and issue cmd:
debian:~# pkill pulseaudio
This will kill any left pulseaudio server previous instances.
Tags: ArchLinux, Auto, Choppy, choppy sound, conf, crackling, crap, crappy, debian gnu, default settings, Draft, file, Glitches, Gnome, gnome user, hell, idea, influence, instances, issue, line, Linux, loading, logout, Module, nbsp, necessery, pkill, plenty, proprietary program, pulse, resolve, Skype, sound glitches, substitute, udev, voice, wiki
Posted in Linux and FreeBSD Desktop, Linux Audio & Video, Skype on Linux | 18 Comments »
Monday, January 9th, 2012 I've recently had to set up a backup system to synchronize backup archive files between two remote servers and as I do usually with this situation I just set up a crontab job to periodically execute rsync to copy data from source server to the destination server . Copying SRC to DEST is the default behaviour rsync uses, however in this case I had to copy from the destination server to the source server host (in other words sync files the reversely.
The usual way to copy with rsync via SSH (from SRC to DEST) is using a cmd line like:
debian:~$ /usr/bin/rsync -avz -e ssh backup-user@xxx.xxx.xxx.xxx:/home/backup-user/my-directory .
Where the xxx.xxx.xxx.xxx is my remote server IP with which files are synched.
According to rsync manual, the proposed docs SYNOPSIS is in the format;
Local: rsync [OPTION…] SRC… [DEST
Obviusly the default way to use rsync is to copy source to destination which I used until now, but in this case I had to the other way around and copy files from a destination host to the source server. It was logical that swapping the SRC and DEST would complete my required task. Anyways I consulted with some rsync gurus in irc.freenode.net , just to make sure it is proper to just swap the SRC, DEST arguments.
I was told this is possible, so I swapped args;
debian:~$ /usr/bin/rsync -avz -e ssh . backup-user@xxx.xxx.xxx.xxx:/home/backup-user/my-directory

...
Surprisingly this worked 😉 Anyways I was adviced by by a good guy nick named scheel , that putting -e ssh to command line is generally unnecessery except if there is no some uncommon used SSH port over which the data is transferred. An example case in which -e 'ssh is necessery would be if transferring via lets say SSH port 1234;
rsync -avz -e 'ssh -p1234' /source user@host:/dest
In all other cases omitting '-e ssh' is better as '-e ssh' is rsync default. Therefore my final swapped line I put in cron to copy from a destinatio to source host with rsync looked like so:
05 03 2 * * /usr/bin/ionice -c 3 /usr/bin/rsync -avz my-directory backup-user@xxx.xxx.xxx.xxx:/home/backup-user/ >/dev/null 2>&1
Tags: archive files, Auto, avz, backup system, case, cmd, cmd line, copy, copying, cron, default, default behaviour, destIn, destinatio, destination, destination host, destination server, docs, Draft, example, example case, few words, format, gurus, host, job, nbsp, necessery, nick, option, port 1234, remote server, rsync, scheel, server host, server ip, source host, source server, ssh port, sync files, system, usr bin
Posted in FreeBSD, Linux, System Administration | No Comments »
Wednesday, December 28th, 2011 
I've recently installed a jabber server on one Debian Lenny server and hence decided to describe my installations steps hoping this would help ppl who would like to run their own jabber server on Debian . After some research of the jabber server softwares available, I decided to install Ejabberd
The reasons I choose Ejabberd is has rich documentation, good community around the project and the project in general looks like one of the best free software jabber servers available presently. Besides that ejabberd doesn't need Apache or MySQL and only depends on erlang programming language.
Here is the exact steps I followed to have installed and configured a running XMPP jabber server.
1. Install Ejabberd with apt
The installation of Ejabberd is standard, e.g.:
debian:~# apt-get --yes install ejabberd
Now as ejabberd is installed, some minor configuration is necessery before the server can be launched:
2. Edit /etc/ejabberd/ejabberd.cfg
Inside I changed the default settings for:
a) Uncomment%%override_acls.. Changed:
%%%% Remove the Access Control Lists before new ones are added.%%%%override_acls.
to
%%

%% Remove the Access Control Lists before new ones are added.

%%

override_acls.
b) Admin User from:
%% Admin user

{acl, admin, {user, "", "example.com"}}.
to
%% Admin user

{acl, admin, {user, "admin", "jabber.myserver-host.com"}}.
c) default %% Hostname of example.com to my real hostname:
%% Hostname

{hosts, ["jabber.myserver-host.com"]}.
The rest of the configurations in /etc/ejabberd/ejabberd.cfg can stay like it is, though it is interesting to read it carefully before continuing as, there are some config timings which might prevent the XMPP server from user brute force attacks as well as few other goodies like for example (ICQ, MSN , Yahoo etc.) protocol transports.
3. Add iptables ACCEPT traffic (allow) rules for ports which are used by Ejabberd
The minimum ACCEPT rules to add are:
/sbin/iptables -A INPUT -p tcp -m tcp --dport 22 -j ACCEPT

/sbin/iptables -A INPUT -p tcp -m tcp --dport 5222 -j ACCEPT

/sbin/iptables -A INPUT -p udp -m udp --dport 5222 -j ACCEPT

/sbin/iptables -A INPUT -p tcp -m tcp --dport 5223 -j ACCEPT

/sbin/iptables -A INPUT -p udp -m udp --dport 5223 -j ACCEPT

/sbin/iptables -A INPUT -p tcp -m tcp --dport 5269 -j ACCEPT

/sbin/iptables -A INPUT -p udp -m udp --dport 5269 -j ACCEPT

/sbin/iptables -A INPUT -p tcp -m tcp --dport 5280 -j ACCEPT

/sbin/iptables -A INPUT -p udp -m udp --dport 5280 -j ACCEPT

/sbin/iptables -A INPUT -p tcp -m tcp --dport 4369 -j ACCEPT

/sbin/iptables -A INPUT -p udp -m udp --dport 4369 -j ACCEPT

/sbin/iptables -A INPUT -p tcp -m tcp --dport 53873 -j ACCEPT
Of course if there is some specific file which stores iptables rules or some custom firewall these rules has to be added / modified to fit appropriate place or chain.
4. Restart ejabberd via init.d script
debian:~# /etc/init.d/ejabberd restart

Restarting jabber server: ejabberd is not running. Starting ejabberd.
5. Create ejabberd necessery new user accounts
debian:~# /usr/sbin/ejabberdctl register admin jabber.myserver-host.com mypasswd1

debian:~# /usr/sbin/ejabberdctl register hipo jabber.myserver-host.com mypasswd2

debian:~# /usr/sbin/ejabberdctl register newuser jabber.myserver-host.com mypasswd3

debian:~# /usr/sbin/ejabberdctl register newuser1 jabber.myserver-host.com mypasswd4

...
etc.
ejabberdctl ejabberd server client (frontend) has multiple other options and the manual is a good reading.
One helpful use of ejabberdctl is:
debian:~# /usr/sbin/ejabberdctl status

Node ejabberd@debian is started. Status: started

ejabberd is running
ejabberctl can be used also to delete some existent users, for example to delete the newuser1 just added above:
debian:~# /usr/sbin/ejabberdctl unregister newuser jabber.myserver-host.com
6. Post install web configurations
ejabberd server offers a web interface listening on port 5280, to access the web interface right after it is installed I used URL: http://jabber.myserver-host.com:5280/admin/
To login to http://jabber.myserver-host.com:5280/admin/ you will need to use the admin username previously added in this case:
admin@jabber.myserver-host.com mypasswd1
Anyways in the web interface there is not much of configuration options available for change.
7. Set dns SRV records
I'm using Godaddy 's DNS for my domain so here is a screenshot on the SRV records that needs to be configured on Godaddy:

In the screenshto Target is the Fually qualified domain hostname for the jabber server.
Setting the SRV records for the domain using Godaddy's DNS could take from 24 to 48 hours to propagate the changes among all the global DNS records so be patient.
If instead you use own custom BIND DNS server the records that needs to be added to the respective domain zone file are:
_xmpp-client._tcp 900 IN SRV 5 0 5222 jabber.myserver-host.com.

_xmpp-server._tcp 900 IN SRV 5 0 5269 jabber.myserver-host.com.

_jabber._tcp 900 IN SRV 5 0 5269 jabber.myserver-host.com.
8. Testing if the SRV dns records for domain are correct
debian:~$ nslookup
> set type=SRV

> jabber.myserver-host.com

 ...
> myserver-host.com
If all is fine above nslookup request should return the requested domain SRV records.
You might be wondering what is the purpose of setting DNS SRV records at all, well if your jabber server has to communicate with the other jabber servers on the internet using the DNS SRV record is the way your server will found the other ones and vice versa.
DNS records can also be checked with dig for example
$ dig SRV _xmpp-server._tcp.mydomain.net
[…]
;; QUESTION SECTION:
;_xmpp-server._tcp.mydomain.net. IN SRV
;; ANSWER SECTION:
_xmpp-server._tcp.mydomain.net. 259200 IN SRV 5 0 5269 jabber.mydomain.net.
;; ADDITIONAL SECTION:
jabber.mydomain.net. 259200 IN A 11.22.33.44
;; Query time: 109 msec
;; SERVER: 212.27.40.241#53(212.27.40.241)
;; WHEN: Sat Aug 14 14:14:22 2010
;; MSG SIZE rcvd: 111
9. Debugging issues with ejabberd
Ejabberd log files are located in /var/log/ejabberd , you will have to check the logs in case of any issues with the jabber XMPP server. Here is the three files which log messages from ejabberd:
debian:~$ ls -1 /var/log/ejabberd/

ejabberd.log

erl_crash.dump

sasl.log
I will not get into details on the logs as the best way to find out about them is to read them 😉
10. Testing ejabberd server with Pidgin
To test if my Jabber server works properly I used Pidgin universal chat client . However there are plenty of other multiplatform jabber clients out there e.g.: Psi , Spark , Gajim etc.
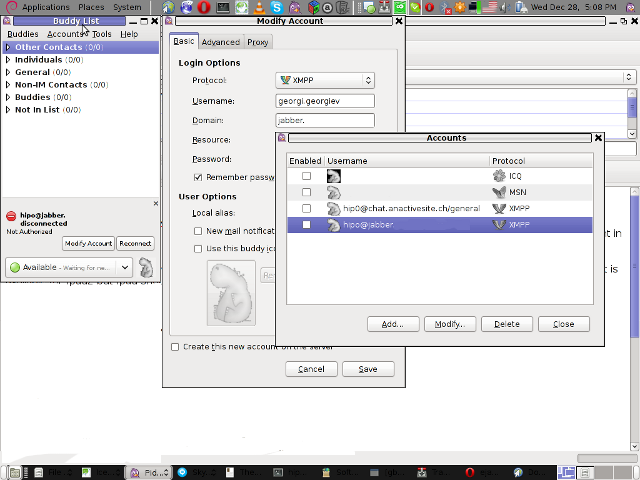
Here is a screenshot of my (Accounts -> Manage Accounts -> Add) XMPP protocol configuration
Tags: admin, apache, best free software, brute force, cfg, com, configure, custom, default hostname, default settings, DNS, doesn, dport, ejabberd, ejabberdctl, exact steps, file, GNU, goodies, hostname, hosts, init, INPUT, Install, installation, Jabber, Linux, Lists, mypasswd, necessery, override, ports, ppl, programming language, Protocol, quot, quot quot, rich documentation, server, servers, software, tcp, transports, uncomment, User, xmpp
Posted in Linux, System Administration, Various | 8 Comments »
Saturday, December 31st, 2011 
Though, I'm GNU / Linux user for many years now. I have to say, everything is not so perfect as many people present it.
Configuring even simple things related to multimedia on Linux is often a complete nightmare.
An example, today I've decided to upgrade my 32 bit Skype version 2.0 beta for Linux to 64 bit Skype 2.2 beta .
The reason I was motivated to upgrade skype was basicly 2.
a) My Skype run through 32 bit binary emulation with /usr/bin/linux32
b) I had issues with my skype if someone give me a Skype Call, while I have a flash video or some other stream in Browser (let's say Youtube).
Actually being unable to receive a skype call or initiate one while I have some kind of music running in the background or just some kind of Youtube video paused was really annoying. Hence until now, everytime I wanted to speak over skype I had to close all Browser windows or tabs that are using my sound card and then restart my Skype program ….
Just imagine how ridiculous is that especially for a modern Multimedia supporting OS as Linux is. Of course the problems, I've experienced wasn't directly a problem of Linux. The problems are caused by the fact I have to use the not well working proprietary software version of Skype on my Debian GNU / Linux.
I would love to actually boycott Skype as RMS recommends, but unfortunately until now I can't, since many of my friends as well as employers use Skype to connect with me on daily basis.
So in a way I had to migrate to newer version of skype in order to make my Linux experience a bit more desktop like …
Back to the my skype 2.0 to 2.2. beta upgrade story, the overall Skype upgrade procedure was easy and went smootlhy, setting correct capturing later on however was a crazy task ….
Here is the step by step to follow to make my upgraded skype and internal notebook mic play nice together:
1. Download 64 bit Skype for Debian from skype.com
For the sake of preservation in case it disappears in future, I've made a mirror of skype for debian you can download here
My upgrade example below uses directly the 64 bit Skype 2.2beta binary mirror:
Here are the cmds once can issue if he has to upgrade to 2.2beta straight using my mirrored skype:
debian:~# wget https://www.pc-freak.net/files/skype-debian_2.2.0.35-1_amd64.deb

...
2. Remove the old version of skype
In my case I have made my previous skype installation using .tar.bz2 archive and not a debian package, however for some testing I also had a version of skype 2.0beta installed as a deb so for the sake of clarity I removed the existing skype deb install:
debian:~# dpkg -r skype

...
3. Install skype-debian_2.2.0.35-1_amd64.deb downloaded deb
debian:~# dpkg -i skype-debian_2.2.0.35-1_amd64.deb

...
After installing skype, I installed pavucontrol – A volume control for the PulseAudio sound server
4. Install pavucontrol
debian:~# apt-get install pavucontrol
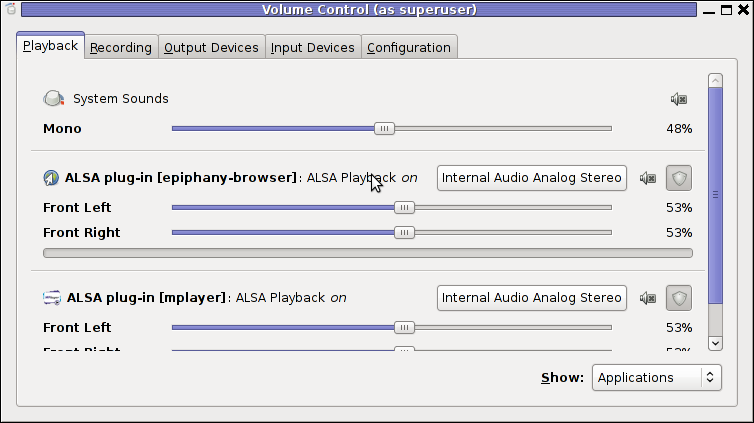
Pavucontrol has plenty of sound configurations and enables the user to change many additional settings which cannot be tuned in alsamixer
pavucontrol was necessery to play with until I managed to make my microphone able to record.
5. Build and install latest Debian (Testing) distribution alsa driver
debian:~# aptitude install module-assistant

debian:~# m-a prepare

debian:~# aptitude -t testing install alsa-source

debian:~# m-a build alsa

debian:~# m-a install alsa

debian:~# rmmod snd_hda_intel snd_pcm snd_timer snd soundcore snd_page_alloc

debian:~# modprobe snd_hda_intel

debian:~# echo 'options snd-hda-intel model=auto' >> /etc/modprobe.d/alsa-base.conf
In my case removing the sound drivers and loading them once again did not worked, so I had to reboot my system before the new compiled alsa sound modules gets loaded …
The last line echo 'options snd-hda-intel model=auto' … was necessery for my Thinkpard r61 Intel audio to work out. For some clarity my exact sb model is:
debian:~$ lspci |grep -i audio

00:1b.0 Audio device: Intel Corporation 82801H (ICH8 Family) HD Audio Controller (rev 03)
For other notebooks with different sound drivers echo 'options snd-hda-intel model=auto' … should be omitted.
6. Tune microphone and sound settings in alsamixer
debian:~$ alsamixer
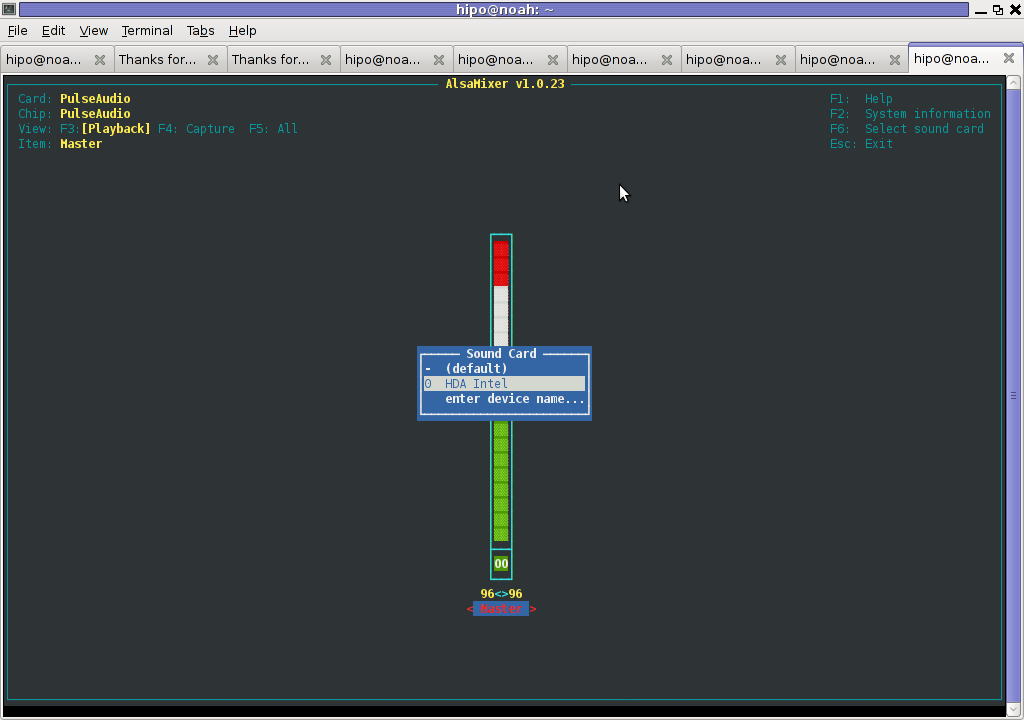
Right after launching alsamixer I had to press F6: Select Sound Card and choose my sound card (0 HDA Intel).
Following my choice I unmuted all the microphones and enabled Microphone Boost as well as did some adjustments to the MIC volume level.
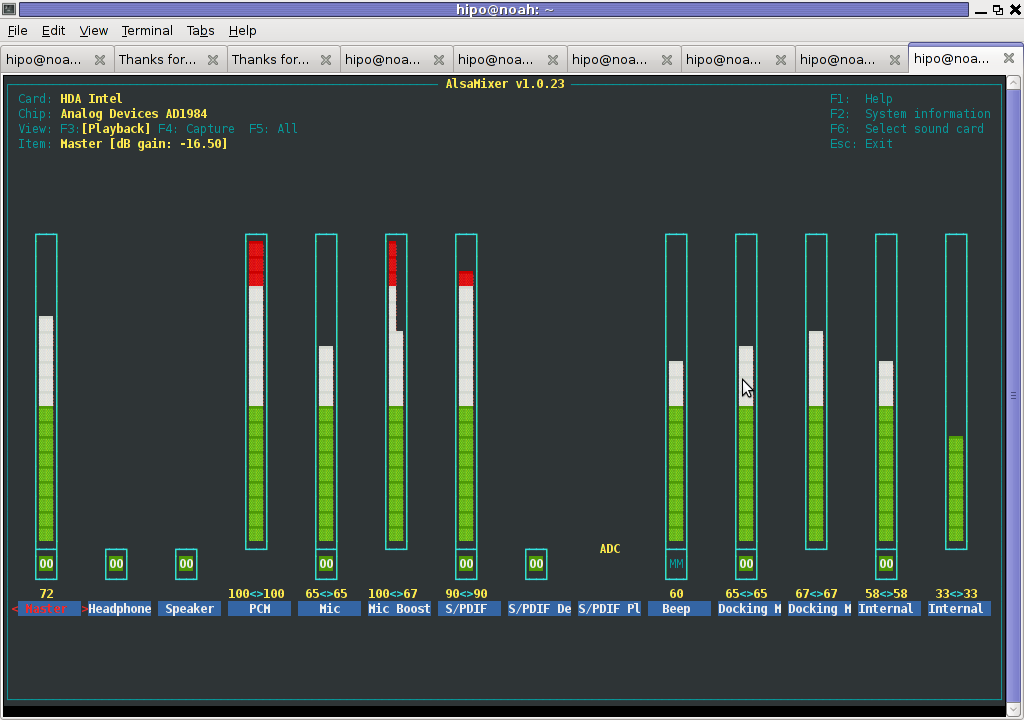
Setting proper MIC Volume levels is absolutely necessery, otherwise there is a constant noise getting out of the speakers …
7. Use aumix to set some other sound settings
For some unclear reasons, besides alsamixer , I often had to fix stuff in aumix . Honestly I don't understand where exactly aumix fits in the picture with Alsa and my loaded alsa sound blaster module?? If someone can explain I'll be thankful.
Launch aumix to further adjust some sound settings …
debian:~$ aumix
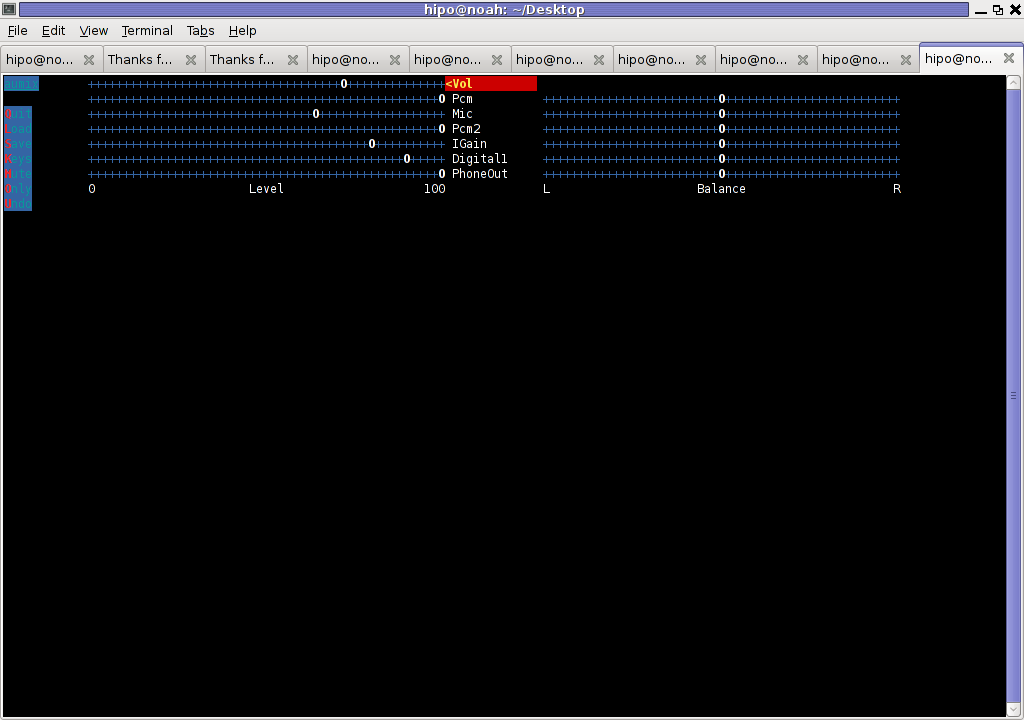
In above screenshot you see, my current aumix settings which works okay with mic and audio output.
9. Test Microphone the mic is capturing sounds correctly
Set ~/.asoundrc configuration for Skype
Edit ~/.asoundrc and put in:
pcm.pulse {

type pulse

}

ctl.pulse {

type pulse

}

pcm.!default {

type pulse

}

ctl.!default {

type pulse

}

pcm.card0 {

type hw

card 0

}

ctl.card0 {

type hw

card 0

}

pcm.dsp0 { type plug slave.pcm "hw:0,0" }

pcm.dmixout {

# Just pass this on to the system dmix

type plug

slave {

pcm "dmix"

}

}

pcm.skype {

type asym

playback.pcm "skypeout"

capture.pcm "skypein"

}

pcm.skypein {

# Convert from 8-bit unsigned mono (default format set by aoss when

# /dev/dsp is opened) to 16-bit signed stereo (expected by dsnoop)

#

# We cannot just use a "plug" plugin because although the open will

# succeed, the buffer sizes will be wrong and we will hear no sound at

# all.

type route

slave {

pcm "skypedsnoop"

format S16_LE

}

ttable {

0 {0 0.5}

1 {0 0.5}

}

}

pcm.skypeout {

# Just pass this on to the system dmix

type plug

slave {

pcm "dmix"

}

}

pcm.skypedsnoop {

type dsnoop

ipc_key 1133

slave {

# "Magic" buffer values to get skype audio to work

# If these are not set, opening /dev/dsp succeeds but no sound

# will be heard. According to the ALSA developers this is due

# to skype abusing the OSS API.

pcm "hw:0,0"

period_size 256

periods 16

buffer_size 16384

}

bindings {

0 0

}

}
I'm not 100% percent if putting those .asoundrc configurations are necessery. I've seen them on archlinux's wiki as a perscribed fix to multiple issues with Skype sound in / out.
Onwardds, for the sake of test if my sound settings set in pavucontrol enables the internal mic to capture sound I used two programs:
1. gnome-sound-recorder

2. arecord
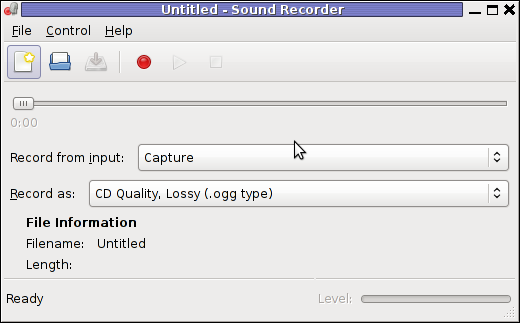
gnome-sound-recorder
gnome-sound-recorder is probably used by most GNOME users, though I'm sure Linux noviced did not play with it yet.
arecord is just a simple console based app to capture sound from the microphone. To test if the microphone works I captured a chunk of sounds with cmd:
debian:~$ arecord cow.wav

Recording WAVE 'cow.wav' : Unsigned 8 bit, Rate 8000 Hz, Mono
Later on I played the file with aplay (part of alsa-utils package in Debian), to check if I'll hear if mic succesfully captured my voice, e.g.:
debian:~$ play cow.wav

cow.wav:

File Size: 22.0k Bit Rate: 64.1k

Encoding: Unsigned PCM

Channels: 1 @ 8-bit

Samplerate: 8000Hz

Replaygain: off

Duration: 00:00:02.75

In:100% 00:00:02.75 [00:00:00.00] Out:22.0k [-=====|=====-] Clip:0

Done.
By the way, the aplay ASCII text equailizer is really awesome 😉 aplay is also capable of playing (Ogg Vorbis .ogg) free sound format.
Further on, I launched the new installed version of skype and tested Skype Calls (Mic capturing), with Skype Echo / Sound Test Service
I'll be glad to hear if this small article, helped anybody to fix any skype Linux related issues ?. I would be happy to hear also from people who had similar issues with a different fixes for skype on Linux.
Its also interesting to hear from Ubuntu and other distributions users if following this tutorial had somehow helped in resolving issues with Skype mic.
Tags: alsa, aptitude, beta, bit, browser windows, Call, card, daily basis, debian gnu, dpkg, emulation, everything, everytime, Flash, GNU, gnu linux, hell, Install, kind of music, Linux, linux experience, linux user, microphone, modern multimedia, modprobe, necessery, nightmare, notebook, proprietary software, reason, rms, sake, Skype, software version, someone, sound card, tabs, upgrade, video
Posted in Linux, Linux and FreeBSD Desktop, Linux Audio & Video, Skype on Linux, Various | No Comments »
Saturday, December 17th, 2011 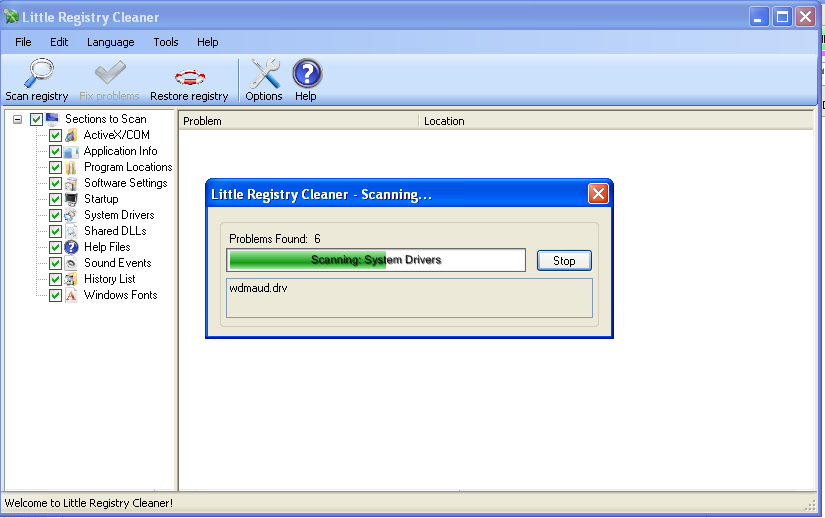
Have you ever wondered, if there is a free (open source) software that could fix Windows XP registry irregularities e.g. (obsolete or unwanted items that build up in the registry over time.)?
I did not either until now, however when I had to fix, few Windows XP computers which was not maintained for a long time fixing the Windows registry was necessery to make the sluggerish computers improve their overall stability and performance.
The reasons of the slowness in computers who run for a long time by users who does not have a "computer culture" are obvious.
Windows programs which has incorrectly placed registry records withint the Windows registry database, Programs which on Uninstall / Removal left behind a lot of registry records just to hang around because of impotent (coders), or records created on purpose on program uninstall to intentionally further track the user behavior etc.
Other reasons why Windows registry gots bloated with time, are due to Malware or polymorphic Viruses which load them selves everytime on Windows load using some obscure registry records.
Though I'm not a big proprietary software lover still my job as a system administrator , enforces me to fix some broken Windowses.
I haven't fixed Windows machines for a long time, so my memories on programs that clean up registry are from my young years.
The software, I've used before to fix Windows 2000 / XP Registry was:
1. Registry Booster
From my current perspective of a free software hobbyist / evangelist it was important for me to clean up the Windows PCs with a program that is Free or Open Source Software.
When I'm asked to fix some Windows computer I always do my best to make most of the programs that roll on the PC to be FOSS.
Using FOSS instead of downloading from torrents, some cracked software has multiple benefits.
1. Usually Free Software is more stable and more robust2. FOSS software for Windows usually does not come with Malware / Spyware as many of the cracked proprietary software
3. Free and Open Source Programs are simplistic in interface and way of use
A bit of research if there is a Free (Open Source) Software immediately lead me to a program called Little Registry Cleaner
You can see a screenshot of the program in the beginning of the article, the program is very easy to install and use and uses some .NET framework classes so right before installing it installs .NET library (code).
The use results of Little Registry Cleaner were amazing. Even though it is a free software the program found and fixed more registry problems than its competitor Windows Registry Booster! 😉
Tags: Booster, code, computer culture, cracked software, database programs, everytime, foss, Free, free open source, free open source software, hobbyist, job, lover, Malware, nbsp, necessery, Open, open source software, perspective, polymorphic viruses, proprietary software, quot, registry database, Removal, right, roll, screenshot, slowness, sluggerish, software, software open source, source windows, spywar, Spyware, time, unwanted items, Viruses, windows computer, windows load, windows pcs, windows programs, windows registry, windows xp registry
Posted in System Administration, Windows | 4 Comments »


How to install and configure Jabber Server (Ejabberd) on Debian Lenny GNU / Linux
Wednesday, December 28th, 2011I've recently installed a jabber server on one Debian Lenny server and hence decided to describe my installations steps hoping this would help ppl who would like to run their own jabber server on Debian . After some research of the jabber server softwares available, I decided to install Ejabberd
The reasons I choose Ejabberd is has rich documentation, good community around the project and the project in general looks like one of the best free software jabber servers available presently. Besides that ejabberd doesn't need Apache or MySQL and only depends on erlang programming language.
Here is the exact steps I followed to have installed and configured a running XMPP jabber server.
1. Install Ejabberd with apt
The installation of Ejabberd is standard, e.g.:
debian:~# apt-get --yes install ejabberd
Now as ejabberd is installed, some minor configuration is necessery before the server can be launched:
2. Edit /etc/ejabberd/ejabberd.cfg
Inside I changed the default settings for:
a) Uncomment%%override_acls.. Changed:
%%%% Remove the Access Control Lists before new ones are added.%%%%override_acls.to
%%
%% Remove the Access Control Lists before new ones are added.
%%
override_acls.
b) Admin User from:
%% Admin user
{acl, admin, {user, "", "example.com"}}.
to
%% Admin user
{acl, admin, {user, "admin", "jabber.myserver-host.com"}}.
c) default %% Hostname of example.com to my real hostname:
%% Hostname
{hosts, ["jabber.myserver-host.com"]}.
The rest of the configurations in /etc/ejabberd/ejabberd.cfg can stay like it is, though it is interesting to read it carefully before continuing as, there are some config timings which might prevent the XMPP server from user brute force attacks as well as few other goodies like for example (ICQ, MSN , Yahoo etc.) protocol transports.
3. Add iptables ACCEPT traffic (allow) rules for ports which are used by Ejabberd
The minimum ACCEPT rules to add are:
/sbin/iptables -A INPUT -p tcp -m tcp --dport 22 -j ACCEPT
/sbin/iptables -A INPUT -p tcp -m tcp --dport 5222 -j ACCEPT
/sbin/iptables -A INPUT -p udp -m udp --dport 5222 -j ACCEPT
/sbin/iptables -A INPUT -p tcp -m tcp --dport 5223 -j ACCEPT
/sbin/iptables -A INPUT -p udp -m udp --dport 5223 -j ACCEPT
/sbin/iptables -A INPUT -p tcp -m tcp --dport 5269 -j ACCEPT
/sbin/iptables -A INPUT -p udp -m udp --dport 5269 -j ACCEPT
/sbin/iptables -A INPUT -p tcp -m tcp --dport 5280 -j ACCEPT
/sbin/iptables -A INPUT -p udp -m udp --dport 5280 -j ACCEPT
/sbin/iptables -A INPUT -p tcp -m tcp --dport 4369 -j ACCEPT
/sbin/iptables -A INPUT -p udp -m udp --dport 4369 -j ACCEPT
/sbin/iptables -A INPUT -p tcp -m tcp --dport 53873 -j ACCEPT
Of course if there is some specific file which stores iptables rules or some custom firewall these rules has to be added / modified to fit appropriate place or chain.
4. Restart ejabberd via init.d script
debian:~# /etc/init.d/ejabberd restart
Restarting jabber server: ejabberd is not running. Starting ejabberd.
5. Create ejabberd necessery new user accounts
debian:~# /usr/sbin/ejabberdctl register admin jabber.myserver-host.com mypasswd1
etc.debian:~# /usr/sbin/ejabberdctl register hipo jabber.myserver-host.com mypasswd2
debian:~# /usr/sbin/ejabberdctl register newuser jabber.myserver-host.com mypasswd3
debian:~# /usr/sbin/ejabberdctl register newuser1 jabber.myserver-host.com mypasswd4
...
ejabberdctl ejabberd server client (frontend) has multiple other options and the manual is a good reading.
One helpful use of ejabberdctl is:
debian:~# /usr/sbin/ejabberdctl status
Node ejabberd@debian is started. Status: started
ejabberd is running
ejabberctl can be used also to delete some existent users, for example to delete the newuser1 just added above:
debian:~# /usr/sbin/ejabberdctl unregister newuser jabber.myserver-host.com
6. Post install web configurations
ejabberd server offers a web interface listening on port 5280, to access the web interface right after it is installed I used URL: http://jabber.myserver-host.com:5280/admin/
To login to http://jabber.myserver-host.com:5280/admin/ you will need to use the admin username previously added in this case:
admin@jabber.myserver-host.com mypasswd1
Anyways in the web interface there is not much of configuration options available for change.
7. Set dns SRV records
I'm using Godaddy 's DNS for my domain so here is a screenshot on the SRV records that needs to be configured on Godaddy:
In the screenshto Target is the Fually qualified domain hostname for the jabber server.
Setting the SRV records for the domain using Godaddy's DNS could take from 24 to 48 hours to propagate the changes among all the global DNS records so be patient.
If instead you use own custom BIND DNS server the records that needs to be added to the respective domain zone file are:
_xmpp-client._tcp 900 IN SRV 5 0 5222 jabber.myserver-host.com.
_xmpp-server._tcp 900 IN SRV 5 0 5269 jabber.myserver-host.com.
_jabber._tcp 900 IN SRV 5 0 5269 jabber.myserver-host.com.
8. Testing if the SRV dns records for domain are correct
debian:~$ nslookup
> set type=SRV
> jabber.myserver-host.com
...
> myserver-host.com
If all is fine above nslookup request should return the requested domain SRV records.
You might be wondering what is the purpose of setting DNS SRV records at all, well if your jabber server has to communicate with the other jabber servers on the internet using the DNS SRV record is the way your server will found the other ones and vice versa.
DNS records can also be checked with dig for example
$ dig SRV _xmpp-server._tcp.mydomain.net
[…]
;; QUESTION SECTION:
;_xmpp-server._tcp.mydomain.net. IN SRV
;; ANSWER SECTION:
_xmpp-server._tcp.mydomain.net. 259200 IN SRV 5 0 5269 jabber.mydomain.net.
;; ADDITIONAL SECTION:
jabber.mydomain.net. 259200 IN A 11.22.33.44
;; Query time: 109 msec
;; SERVER: 212.27.40.241#53(212.27.40.241)
;; WHEN: Sat Aug 14 14:14:22 2010
;; MSG SIZE rcvd: 111
9. Debugging issues with ejabberd
Ejabberd log files are located in /var/log/ejabberd , you will have to check the logs in case of any issues with the jabber XMPP server. Here is the three files which log messages from ejabberd:
debian:~$ ls -1 /var/log/ejabberd/
ejabberd.log
erl_crash.dump
sasl.log
I will not get into details on the logs as the best way to find out about them is to read them 😉
10. Testing ejabberd server with Pidgin
To test if my Jabber server works properly I used Pidgin universal chat client . However there are plenty of other multiplatform jabber clients out there e.g.: Psi , Spark , Gajim etc.
Here is a screenshot of my (Accounts -> Manage Accounts -> Add) XMPP protocol configuration
Tags: admin, apache, best free software, brute force, cfg, com, configure, custom, default hostname, default settings, DNS, doesn, dport, ejabberd, ejabberdctl, exact steps, file, GNU, goodies, hostname, hosts, init, INPUT, Install, installation, Jabber, Linux, Lists, mypasswd, necessery, override, ports, ppl, programming language, Protocol, quot, quot quot, rich documentation, server, servers, software, tcp, transports, uncomment, User, xmpp
Posted in Linux, System Administration, Various | 8 Comments »