Posts Tagged ‘necessery’

How to fix transmission unable to download and connect to torrent tracker on Ubuntu Maverick 10.10

Wednesday, April 27th, 2011

As you can read in my few previous posts I have just installed a new Ubuntu 10.10 on a Toshiba Satellite L40 notebook.

Most of the things which are necessery for a fully working Linux desktop are already installed and the machine works fine, however I just noticed there is an issue with the default torrent gnome client and transmission unable to download files from torrent trackers.

Few minutes of playing with the transmission’s settings has revealed what was causing my torrent download problems.

It seems on Ubuntu 10.10 (probably on other Ubuntus and Debians) by default the transmission bittorrent client is trying to use for torrent download connections an incoming port 53636 number.

As the computer is behind a firewall and does not have a real IP address seeders cannot properly connect to the notebook port 53636 and hence the transmission bittorrent client could not initialize any torrent downloads.

Fixing up the issue is rather easy to fix it I had to change the settings in transmission from the menus:

Edit -> Settings -> Network

You need to select the options:
 

  • Pick a random port on startup
  • Use UPnP or NAT-PMP to redirect connections

Next I had to restart transmission and my torrent downloads started 😉

How to Secure Apache on FreeBSD and CentOS against Range: header DoS attack (affecting Apache 1.3/2.x)

Thursday, June 30th, 2011

How to Secure Apache webserver on FreeBSD and CentOS against Range: header Denial of Service attack

Recently has become publicly known for the serious hole found in all Apache webserver versions 1.3.x and 2.0.x and 2.2.x. The info is to be found inside the security CVE-2011-3192 https://issues.apache.org/bugzilla/show_bug.cgi?id=51714

Apache remote denial of service is already publicly cirtuculating, since about a week and is probably to be used even more heavily in the 3 months to come. The exploit can be obtained from exploit-db.com a mirror copy of #Apache httpd Remote Denial of Service (memory exhaustion) is for download here

The DoS script is known in the wild under the name killapache.pl
killapache.pl PoC depends on perl ForkManager and thus in order to be properly run on FreeBSD, its necessery to install p5-Parallel-ForkManager bsd port :

freebsd# cd /usr/ports/devel/p5-Parallel-ForkManager
freebsd# make install && make install clean
...

Here is an example of the exploit running against an Apache webserver host.

freebsd# perl httpd_dos.pl www.targethost.com 50
host seems vuln
ATTACKING www.targethost.com [using 50 forks]
:pPpPpppPpPPppPpppPp
ATTACKING www.targethost.com [using 50 forks]
:pPpPpppPpPPppPpppPp
...

In about 30 seconds to 1 minute time the DoS attack with only 50 simultaneous connections is capable of overloading any vulnerable Apache server.

It causes the webserver to consume all the machine memory and memory swap and consequently makes the server to crash in most cases.
During the Denial of Service attack is in action access the websites hosted on the webserver becomes either hell slow or completely absent.

The DoS attack is quite a shock as it is based on an Apache range problem which started in year 2007.

Today, Debian has issued a new versions of Apache deb package for Debian 5 Lenny and Debian 6, the new packages are said to have fixed the issue.

I assume that Ubuntu and most of the rest Debian distrubtions will have the apache's range header DoS patched versions either today or in the coming few days.
Therefore work around the issue on debian based servers can easily be done with the usual apt-get update && apt-get upgrade

On other Linux systems as well as FreeBSD there are work arounds pointed out, which can be implemented to close temporary the Apache DoS hole.

1. Limiting large number of range requests

The first suggested solution is to limit the lenght of range header requests Apache can serve. To implement this work raround its necessery to put at the end of httpd.conf config:

# Drop the Range header when more than 5 ranges.
# CVE-2011-3192
SetEnvIf Range (?:,.*?){5,5} bad-range=1
RequestHeader unset Range env=bad-range
# We always drop Request-Range; as this is a legacy
# dating back to MSIE3 and Netscape 2 and 3.
RequestHeader unset Request-Range
# optional logging.
CustomLog logs/range-CVE-2011-3192.log common env=bad-range
CustomLog logs/range-CVE-2011-3192.log common env=bad-req-range

2. Reject Range requests for more than 5 ranges in Range: header

Once again to implement this work around paste in Apache config file:

This DoS solution is not recommended (in my view), as it uses mod_rewrite to implement th efix and might be additionally another open window for DoS attack as mod_rewrite is generally CPU consuming.

# Reject request when more than 5 ranges in the Range: header.
# CVE-2011-3192
#
RewriteEngine on
RewriteCond %{HTTP:range} !(bytes=[^,]+(,[^,]+){0,4}$|^$)
# RewriteCond %{HTTP:request-range} !(bytes=[^,]+(?:,[^,]+){0,4}$|^$)
RewriteRule .* - [F]

# We always drop Request-Range; as this is a legacy
# dating back to MSIE3 and Netscape 2 and 3.
RequestHeader unset Request-Range

3. Limit the size of Range request fields to few hundreds
To do so put in httpd.conf:

LimitRequestFieldSize 200

4. Dis-allow completely Range headers: via mod_headers Apache module

In httpd.conf put:

RequestHeader unset Range
RequestHeader unset Request-Range

This work around could create problems on some websites, which are made in a way that the Request-Range is used.

5. Deploy a tiny Apache module to count the number of Range Requests and drop connections in case of high number of Range: requests

This solution in my view is the best one, I've tested it and I can confirm on FreeBSD works like a charm.
To secure FreeBSD host Apache, against the Range Request: DoS using mod_rangecnt, one can literally follow the methodology explained in mod_rangecnt.c header:

freebsd# wget http://people.apache.org/~dirkx/mod_rangecnt.c
..
# compile the mod_rangecnt modulefreebsd# /usr/local/sbin/apxs -c mod_rangecnt.c
...
# install mod_rangecnt module to Apachefreebsd# /usr/local/sbin/apxs -i -a mod_rangecnt.la
...

Finally to load the newly installed mod_rangecnt, Apache restart is required:

freebsd# /usr/local/etc/rc.d/apache2 restart
...

I've tested the module on i386 FreeBSD install, so I can't confirm this steps works fine on 64 bit FreeBSD install, I would be glad if I can hear from someone if mod_rangecnt is properly compiled and installed fine also on 6 bit BSD arch.

Deploying the mod_rangecnt.c Range: Header to prevent against the Apache DoS on 64 bit x86_amd64 CentOS 5.6 Final is also done without any pitfalls.

[root@centos ~]# uname -a;
Linux centos 2.6.18-194.11.3.el5 #1 SMP Mon Aug 30 16:19:16 EDT 2010 x86_64 x86_64 x86_64 GNU/Linux
[root@centos ~]# /usr/sbin/apxs -c mod_rangecnt.c
...
/usr/lib64/apr-1/build/libtool --silent --mode=link gcc -o mod_rangecnt.la -rpath /usr/lib64/httpd/modules -module -avoid-version mod_rangecnt.lo
[root@centos ~]# /usr/sbin/apxs -i -a mod_rangecnt.la
...
Libraries have been installed in: /usr/lib64/httpd/modules
...
[root@centos ~]# /etc/init.d/httpd configtest
Syntax OK
[root@centos ~]# /etc/init.d/httpd restart
Stopping httpd: [ OK ]
Starting httpd: [ OK ]

After applying the mod_rangecnt patch if all is fine the memory exhaustion perl DoS script's output should be like so:

freebsd# perl httpd_dos.pl www.patched-apache-host.com 50
Host does not seem vulnerable

All of the above pointed work-arounds are only a temporary solution to these Grave Apache DoS byterange vulnerability , a few days after the original vulnerability emerged and some of the up-pointed work arounds were pointed. There was information, that still, there are ways that the vulnerability can be exploited.
Hopefully in the coming few weeks Apache dev team should be ready with rock solid work around to the severe problem.

In 2 years duration these is the second serious Apache Denial of Service vulnerability after before a one and a half year the so called Slowloris Denial of Service attack was capable to DoS most of the Apache installations on the Net.

Slowloris, has never received the publicity of the Range Header DoS as it was not that critical as the mod_range, however this is a good indicator that the code quality of Apache is slowly decreasing and might need a serious security evaluation.
 

How to debug mod_rewrite .htaccess problems with RewriteLog / Solve mod_rewrite broken redirects

Friday, September 30th, 2011

Its common thing that CMS systems and many developers custom .htaccess cause issues where websites depending on mod_rewrite fails to work properly. Most common issues are broken redirects or mod_rewrite rules, which behave differently among the different mod_rewrite versions which comes with different versions of Apache.

Everytime there are such problems its necessery that mod_rewrite’s RewriteLog functionality is used.
Even though the RewriteLog mod_rewrite config variable is well described on httpd.apache.org , I decided to drop a little post here as I’m pretty sure many novice admins might not know about RewriteLog config var and might benefit of this small article.
Enabling mod_rewrite requests logging of requests to the webserver and process via mod_rewrite rules is being done either via the specific website .htaccess (located in the site’s root directory) or via httpd.conf, apache2.conf etc. depending on the Linux / BSD linux distribution Apache config file naming is used.

To enable RewriteLog near the end of the Apache configuration file its necessery to place the variables in apache conf:

1. Edit RewriteLog and place following variables:

RewriteLogLevel 9
RewriteLog /var/log/rewrite.log

RewriteLogLevel does define the level of logging that should get logged in /var/log/rewrite.log
The higher the RewriteLogLevel number defined the more debugging related to mod_rewrite requests processing gets logged.
RewriteLogLevel 9 is actually the highest loglevel that can be. Setting the RewriteLogLevel to 0 will instruct mod_rewrite to stop logging. In many cases a RewriteLogLevel of 3 is also enough to debug most of the redirect issues, however I prefer to see more, so almost always I use RewriteLogLevel of 9.

2. Create /var/log/rewrite.log and set writtable permissions

a. Create /var/log/rewrite.log

freebsd# touch /var/log/rewrite.log

b. Set writtable permissons

Either chown the file to the user with which the Apache server is running, or chmod it to permissions of 777.

On FreeBSD, chown permissions to allow webserver to write in file, should be:

freebsd# chown www:www /var/log/rewrite.log

On Debian and alike distros:

debian:~# chown www-data:www-data /var/log/rewrite.log

On CentOS, Fedora etc.:

[root@centos ~]# chown httpd:httpd /var/log/rewrite.log

On any other distribution, you don’t want to bother to check the uid:gid, the permissions can be set with chmod 777, e.g.:

linux# chmod 777 /var/log/rewrite.log

Next after RewriteLog is in conf to make configs active the usual webserver restart is required.

To restart Apache On FreeBSD:

freebsd# /usr/local/etc/rc.d/apache2 restart
...

To restart Apache on Debian and derivatives:

debian:~# /etc/init.d/apache2 restart
...

On Fedora and derivive distros:

[root@fedora ~]# /etc/init.d/httpd restart
...

Its common error to forget to set proper permissions to /var/log/rewrite.log this has puzzled me many times, when enabling RewriteLog’s logging.

Another important note is when debugging for mod_rewrite is enabled, one forgets to disable logging and after a while if the /var/log partition is placed on a small partition or is on an old server with less space often the RewriteLog fills in the disk quickly and might create website downtimes. Hence always make sure RewriteLog is disabled after work rewrite debugging is no longer needed.

The way I use to disable it is by commenting it in conf like so:

#RewriteLogLevel 9
#RewriteLog /var/log/rewrite.log

Finally to check, what the mod_rewrite processor is doing on the fly its handy to use the well known tail -f

linux# tail -f /var/log/rewrite.log

A bunch of time in watching the requests, should be enough to point to the exact problem causing broken redirects or general website malfunction.
Cheers 😉

Poderosa a tabbed Terminal Emulator (PuTTY Windows Alternative)

Tuesday, December 6th, 2011

Even though, I rarely use Windows to connect to remote servers using SSH or Telnet protocols in some cases I’m forced to do that (in cases I’m away from my Linux notebook). I’m doing my best to keep away from logging anywhere via SSH using Windows as when using Windows you never know what kind of spyware, malware or Viruses is already on the system, not to mention Microsoft are sniffing a lot if not everything which is typed on the keyboard… Anyways, usually I use Putty as a quick way to access a remote SSH, however pitily PuTTY lacks an embedded functionality for Tabs and each new connection to a server I had to run a new instance of PuTTY. This is okay if you need to access a single server but in some cases where access to multple servers is necessery lacking the tab functionality and starting 10 times putty is really irritating and one forgets what kind of connection is present on which PuTTY instance.

Earlier on, I’ve blogged about the existence of PuTTY Connection Manager PuTTY add-on program which is a PuTTY wrapper which enables PuTTY to be used with Connection Tabs feature, however installing two programs is quite inconvenient, especially if you have to do this every few days (in case if travelling a lot).

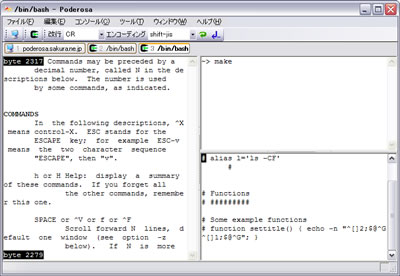
Luckily there is another terminal emulator free program for Windows called PodeRoSA which natively supports a tabbed Secure Shell connections.
If you want to get some experience with it check out Poderosa’s website , here is also a screenshot of the program running few ssh encrypted connections in tabs on a Windows host.

Poderosa Windows ssh / telnet tabs terminal emulator screenshot
Another good reason that one might consider using Poderosa instead of PuTTY is the Apache License under which Poderosa is developed. Currently the Apache License is compatible with GPL free software license which makes the program fully free software. The PuTTY license is under BSD and MIT and some other weird custom license not 100% compatible with GPL and hence PuTTY can be considered less free software in terms of freedom.

How to set custom page titles in Joomla 1.5 manually for better SEO

Thursday, June 2nd, 2011

he Joomla CMS default behaviour is that Page titles of the Joomla Articles created are always set to the page Title assigned to each of the articles.

This is not very good behaviour in terms of SEO, as the page title of each link on the main page is different and there is no continuous repeating pattern in all of the joomla pages.
Everyone that has even basic idea of SEO knows that page titles are very important weight factor to make indexing inside Search Engines succesful.

There is a well know SEO rule which is the more reoccuring pattern one has in his page titles, more is stressed on the keywords contained in the title.
As I said for some weird reason Joomla has no common page Title for all my the created Article pages linked via the Main Menu*

Thus in order to improve this bad default Joomla SEO behaviour one has to change the default auto assigned titles for created pages, manually.

Two things are necessery to change each of the joomla already existing TITLES.

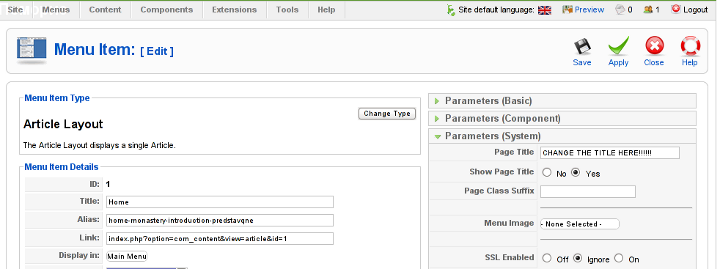
1. Go to each of the pages (.e.g. Home etc.) and change the Parameters System Page Title settings

After logging in with administrator in Joomla, navigate to Menus -> Main Menu*

Further on choose a menu item from all your existing items, let’s say Home and click on it.

On the left side below the Save, Apply, Close and Help buttons you will notice the menus:

Parameters (Basic), Parameters (Component), Parameters (System)

When clicked on Parameters (System) a submenu will appear:
Joomla Main Menu Parameters System Page Title better SEO

Above is a screenshot of the up-described Parameters (System) [Page Title] location

You need to change where it reads on the screenshot CHANGE THE TITLE HERE !!!!!! 😉

After entering your own desired page title go and save the article via the Apply or Save button (also visible in the screenshot).

Now as the custom Page Title is set, next step is to enable the custom Page Title for the respective Article in Article Manager

2. Enable custom Page Title for created pages in Joomla

Go to the Article Manager by following the menus:

Content -> Article Manager

Select the Article of which you want to change the Page Title to some custom text and click over it.

As the article opens for edit in an html editor, navigate to Parameters (Advanced) tab and therein change the Show Title from default setting value:
Use Global
to
Yes

Once again use the Save or Apply button to confirm the new settings and open your website in a new tab, try to browse and check the title of the articles parameters just edited. It should show up in the Title (page heading) the custom input Title.

Now repeat the same procedure for all pages (Articles), existing in Joomla to attune the Page Titles to some Google friendly strings and enjoy the better Search engine indexing which should likely follow.

How to add multi-lingual (multi language) support in Joomla 1.5

Friday, June 3rd, 2011

Joomfish MultiLanguage Support enable plugin

If you are facing the task to build a multi-language enabled Joomla website like me then I think my experience on building a multi-language website with Joomla CMS might be beneficial to you.

In order to build a multi-language website in Joomla you will have to use Joom!Fish multilanguage Joomla support plugin.

The plugin is a bit buggy, but in overall it will allow you to build a multi language website and consequently add the page different languate translations.

To install the plugin on your 1.5 Joomla based install;

1. Download the JoomFish plugin

Install it the usual joomla way joomla plugins are installed, via;

Extensions -> Install/Uninstall

2. Enable the Joom!Fish plugin

To do so navigate to;

Extensions -> Module Manager

Enable the module by ticking under the Enabled column on the line where you read Language Selection

3. Install Language packs for all languages which should be supported by JoomFish

Now as the JoomFish Language selection module is enabled, one needs to install the necessery Joomla Language Packs for all the languages which the Joomla based website is planned to support.

In my case I neede a three lingual website, which will support only the Languages:
 

  • Bulgarian
  • Russian
  • and

  • English

Thus I went on Joomla! Extensions Directory – extensions.joomla.org and downloaded the the three language packs I needed (English, Russian and Bulgarian).

Again the Installation of the language packs is trivial and is done through the Joomla’s:

Extensions -> Install/Uninstall

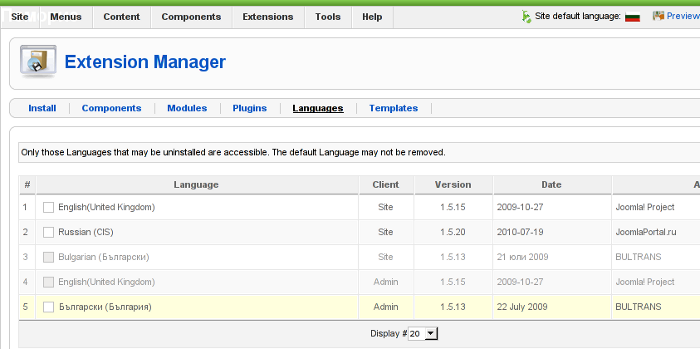
After installation to find out all the languages your Joomla installation will support you can navigate inside Joomla admin to:

Extensions -> Install/Uninstall -> Languages

Screenshot of my installed list of Joomla Language packs Screenshot of my installed list of Joomla Language Packs (Multi-Language setup)
Another way to check the list of enabled installed languages supported in your Joomla is via the menu:

Site -> Control Panel -> Language Manager

Something important here is to a default language is set in the Language Manager

4. Create translations from default installed language to the rest of the installed ones

Go to the JoomFish component through the menus:

Components -> Joom!Fish -> Control Panel

If all your language packs are correctly installed and enabled so far you should notice them listed while clicking on Content Languages

If all the Joomla Languages which your website is supposed to support are not there, this means something is generally wrong with installed lanaguage packs and you need to go back few steps and check what might be wrong, hopefully that’s not the case 😉

To immediately start translating your Joomla website to another from one language to another one, use the control menus:

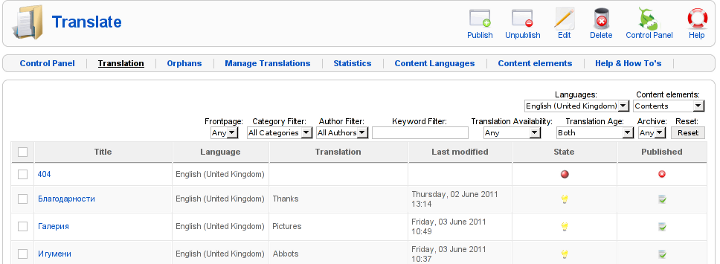
Components -> Joom!Fish -> Translation

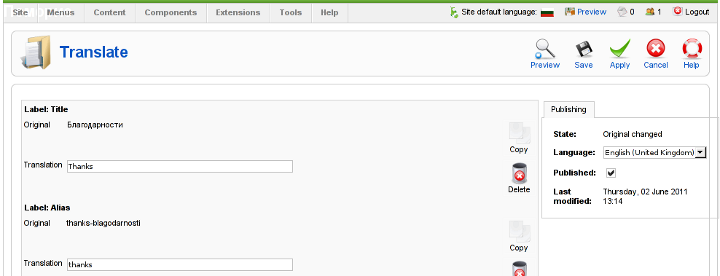
Here is screenshot on how this menu would look like:

Joomla JoomFish Plugin Translate Menu Screenshot

Notice in the above screenshot the Languages: and Content Elements dropdown menus, this ones are actually the two menus used for all language translations.

One needs to select under Languages: menu the Language to which will be translated to, while in Content Elements: has to be choseen the exact site elements which are about to be translated.

The Content Elements: necessery to be translated in most of the cases would be just Menus and Contents

Translating that will have your website user frontend be completely translated info the foreign language choosen in the Languages: dialog.

After finalizing the translations of all Articles available in Menus and Contents make sure the translation is Published, by selecting the Published tick, below I show you an example language translation edit of an article, on the left side you see the Published tick which need to be enabled, for translation to appear officially in Joomla.

Joomla Joomfish published tick enabled screenshot

After completing all the translations of elements offered by the translation window, save the translation by pressing the Apply buttonFurther on you can check the website in a new tab, if everything is okay with translations, on the down left corner of the website footer you should notice the flags of enabled languages to appear.
Clicking on each of the languages should show you the website in the language choosen (if you have previously done the translation to the respective menus).

5. Solving a minor bug in JoomlaFish which prevents translated language text to display on webpages

During translation of my website from Bulgarian to English, I have noticed a bug of JoomFish, even though I did the translation of all my Menus and website Content elements and saved the translations, refreshing the website in a new tab and choosing the desired translation was constantly displaying the error message:

“There are no translations available”

I was not able to find a good explanation on the Internet on why exactly and how this bug occurs, but by some experiments I come up with a workaround.

If you get the “There are no translations available” after properly configuring Joom!Fish Multilang support, in order to solve the error you will have to select temporary a different default website language from the one currently specified by your website.

(E.g.) go to jooma admin panel location:

Site -> Control Panel -> Language Manager

and trigger the default language configured to some of the other available ones. After reverting back in a couple of seconds this setting to your desired default language the annoying: “There are no translations available” message will disappear and your translated content will appear on the website.

6. Changing the location of language flags (language links) in Joomla’s JoomFish

I have seen plenty of people online looking for a solution on how they can change the default image flags location, which by default is placed a place which is not that intuitive and visible by the user.

Maybe I did not searched enough but from my quick research it appears there is no information available on how the placement of language flags switching menu can be changed.

Even though I couldn’t find a solution to change the langage flags in JoomFish , after a bunch of experiments I find a way to do it! 🙂

The placement of Language selector buttons can be easily adjusted through following the Joomla Admin menu:

Extensions -> Module Mamager -> Language Selection

After opening the Language Selection , you will notice the Position: dropdown menu setting. The setting has a bunch of optionsand allows you to choose the best preferred placement of the language selector flag buttons, just take few minutes to experiment which settingfits you best and choose the one most suitable to you and you’re done! 😉

Honestly I never imagined that building a multi-lingual website with Joomla will be such a piece of cake.

The only drawback with JoomFish, is the way language translation is implemented as it is not enough user friendly, anyways having the option to build multi language website for free using open source CMS solution is great. Ain’t it? 🙂

How to change default Comments and No Comments location in WordPress in wordpress default theme

Tuesday, April 5th, 2011

For a number of time I’ve been planning to change my blog comments placement. Until this very day however I’ve kept the default wordpress theme’s Comments button placement.

I realize the default Comments button placement is a bit hard to see and not that much intuitive for the user that enters my blog for a first time.

My first guess was that there might be somewhere a wordpress plugin which will allow me to adjust my comments button placement.
After some research online and a realization that probably there is no such plugin existing yet. I’ve forced myself to tune it up myself.

It was clear to me that in order to change the it will be necessery to edit the WordPress templates files. I’m not a designer and when I hear about templates I usually get scared, however I took the time to take a look at the default wordpress template and find out actually that template modifications is actually rather easier than I thought.

My previous idea was that in order to edit templates you have to be some kind of CSS and HTML guru (which I’m not). Nevertheless it seems that in order to play and adjust in a good way the templates you don’t need ot be a pro.
Even an uneducated fool like myself can easily do almost everything he thinks of throughout few lines of code in the wp templates.

To get back to the major topic thanks God after a bit of review and reading of wordpress.org documentation and some user forums. I’ve figured out that in order to change my Comments placement you need to modify the file:
 

  • blog/wp-content/themes/default/index.php

In index.php find the line starting with:

You will notice within this opened paragraph the php code:

<?php the_tags('Tags: ', ', ', '
'); ?> Posted in <?php the_category(', ') ?>
| <?php edit_post_link('Edit', '', ' | '); ?>
<?php comments_popup_link('No Comments »', '1 Comment »', '% Comments »'); ?>

This is the actual default theme php code that makes the wordpress Comments or No Comments that maes the comments appear on the blog.

Now I’ve decided to let this be as it is but add one more Comment button to wordpress on a different location that is more appealing to my blog visitors

After quick evaluation I’ve determined that probably the best location that the Comments button should have is right after the end of the post text

If you think my idea for button placement is appropriate, to set this location for the Comments button, you will have to find the follwoing code in index.php:

<div class="entry">
<?php the_content('Read the rest of this entry »'); ?>
</div>

Right after the end of this code place the following code:

<?php comments_popup_link('No Comments »', '1 Comment »', '% Comments »'); ?>
</div>