Posts Tagged ‘Listing’

KVM Creating LIVE and offline VM snapshot backup of Virtual Machines. Restore KVM VM from backup. Delete old KVM backups

Tuesday, January 16th, 2024

kvm-backup-restore-vm-logo

For those who have to manage Kernel-Based Virtual Machines it is a must to create periodic backups of VMs. The backup is usually created as a procedure part of the Update plan (schedule) of the server either after shut down the machine completely or live.

Since KVM is open source the very logical question for starters, whether KVM supports Live backups. The simple answer is Yes it does.

virsh command as most people know is the default command to manage VMs on KVM running Hypervisor servers to manage the guest domains.

KVM is flexible and could restore a VM based on its XML configuration and the VM data (either a static VM single file) or a filesystem laying on LVM filesystem etc.

To create a snapshot out of the KVM HV, list all VMs and create the backup:

# export VM-NAME=fedora;
# export SNAPSHOT-NAME=fedora-backup;
# virsh list –all


It is useful to check out the snapshot-create-as sub arguments


# virsh help snapshot-create-as

 OPTIONS
    [–domain] <string>  domain name, id or uuid
    –name <string>  name of snapshot
    –description <string>  description of snapshot
    –print-xml      print XML document rather than create
    –no-metadata    take snapshot but create no metadata
    –halt           halt domain after snapshot is created
    –disk-only      capture disk state but not vm state
    –reuse-external  reuse any existing external files
    –quiesce        quiesce guest's file systems
    –atomic         require atomic operation
    –live           take a live snapshot
    –memspec <string>  memory attributes: [file=]name[,snapshot=type]
    [–diskspec]  disk attributes: disk[,snapshot=type][,driver=type][,file=name]


# virsh shutdown $VM_NAME
# virsh snapshot-create-as –domain $VM-NAME –name "$SNAPSHOT-NAME"


1. Creating a KVM VM LIVE (running machine) backup
 

# virsh snapshot-create-as –domain debian \
–name "debian-snapshot-2024" \
–description "VM Snapshot before upgrading to latest Debian" \
–live

On successful execution of KVM Virtual Machine live backup, should get something like:

Domain snapshot debian-snapshot-2024 created


2. Listing backed-up snapshot content of KVM machine
 

# virsh snapshot-list –domain debian


a. To get more extended info about a previous snapshot backup

# virsh snapshot-info –domain debian –snapshotname debian-snapshot-2024


b. Listing info for multiple attached storage qcow partition to a VM
 

# virsh domblklist linux-guest-vm1 –details

Sample Output would be like:

 Type   Device   Target   Source
——————————————————————-
 file   disk     vda      /kvm/linux-host/linux-guest-vm1_root.qcow2
 file   disk     vdb      /kvm/linux-host/linux-guest-vm1_attached_storage.qcow2
 file   disk     vdc      /kvm/linux-host/guest01_logging_partition.qcow2
 file   cdrom    sda      –
 file   cdrom    sdb      


3. Backup KVM only Virtual Machine data files (but not VM state) Live


# virsh snapshot-create-as –name "mint-snapshot-2024" \
–description "Mint Linux snapshot" \
–disk-only \
–live
–domain mint-home-desktop


4. KVM restore snapshot (backup)
 

To revert backup VM state to older backup snapshot:
 

# virsh shutdown –domain manjaro
# virsh snapshot-revert –domain manjaro –snapshotname manjaro-linux-back-2024 –running


5. Delete old unnecessery KVM VM backup
 

# virsh snapshot-delete –domain dragonflybsd –snapshotname dragonfly-freebsd


How to create SD Card DATA dump image to .ISO with dd and mount it with imdisk from command line on Windows CygWin with MobaXterm

Saturday, September 18th, 2021

dd-command-logo
I'm forced to use Windows every now and then and do some ordinary things which I do usually on Linux such as dumping the content of my Android phone SD Card SanDisk, Kingston etc. to .ISO image etc.

On Linux creating and mounting a data copy of a whole SD Card is a relatively simple thing and there are plenty of ways to do it such as using the dd ( command-line utility for Unix and Unix-like operating systems whose primary purpose is to convert and copy files as said in the command manual .- e.g. ''man dd'. ). On Microsoft Windows environment perhaps one of easiest ways is to use WinCDEmu (which is relatively free under LGPL License).
WinCDEmu is capable of doing plenty of things such as:
 

  • One-click mounting of ISO, CUE, NRG, MDS/MDF, CCD, IMG images.

  • Supports unlimited amount of virtual drives.

  • Runs on 32-bit and 64-bit Windows versions from XP to Windows 10.

  • Allows creating ISO images through a context menu in Explorer.

  • Small installer size – less than 2MB!

  • Have a portable version

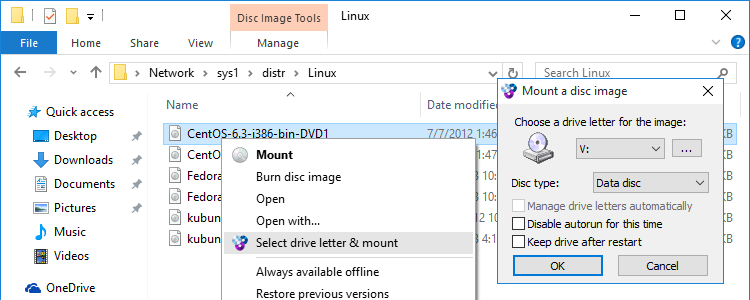
WinCDEmu is a nice piece of software that perhaps every Win poweruser can enjoy, plus it has a nice Graphical frontend:

wincdemu-graphical-create-iso-and-mount-so-ms-windows-software

But what if you're a console geek, like me and you end up forced to be using Windows on your Work PC and you still need to create .iso dump of your Mobile SD Card or external attached Hard Drive, without the graphical mambo jumbo in the old fashioned way with dd?

Luckily Windows advanced command lined users could massively benefit from Cygwin + Mobaxterm (if you don't know or used MobaXterm and you still use things like Putty / SuperPutty or SecureCRT – perhaps you can reconsider and make your sysadmin life easier with MobaXerm gnome-terminal like SSH tabbed Windows alternative.

Once having mobaxterm + cygwin you have dd installed on the Windows host as it is part of the busybox minimal environment and you can use it in the same manner as your used in Linux environment.

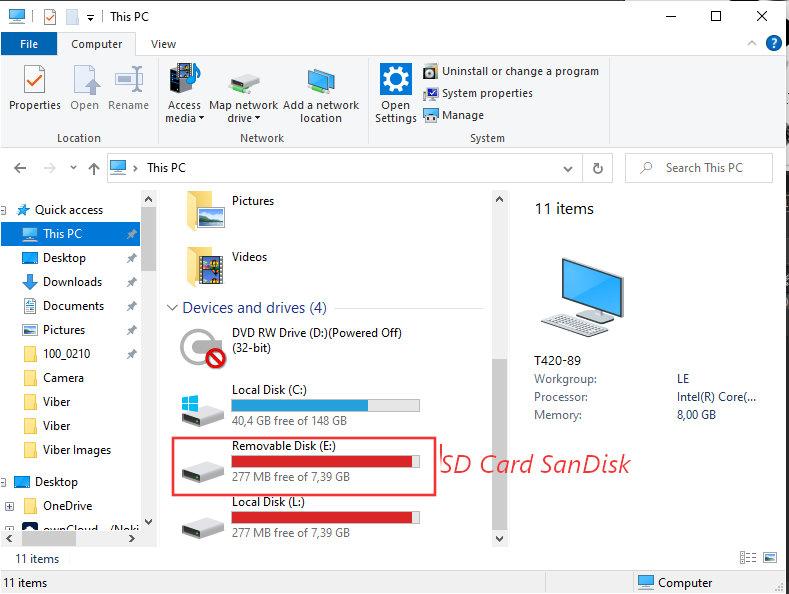
sdcard-sandisk-drive-my-computer-windows-screenshot
 

1. Using dd to copy files on Linux / UNIX OS with a dialog status bar

To use dd the usual syntax on Linux / BSD / Unix is:
 

dd if=/dev/dev-name_ID of=/path/to/directory/dump/location.iso bs=2048


As 2048 BS (Bytes) per second is quite a low value usually on Modern operating systems, this bytesize is usually increased to some MBs  ( Megabytes).

For example if the reading from carrier  is Solid State Drive Disk (SSD) supporting 100 MBs per second and the output SD Card is a 32 Bit Kingston Plus+ drive with whose write speed is up to 50 ~ 100 MBs, you can use cmd as:

dd if=/dev/dev-name_ID of=/path/to/directory/dump/location.iso bs=100M


If you need to have a progress on the dd copy (in case if you copy some large SD Card 128 GB or 256GB or a full copy of a hard drive partition that is really big lets say 8 Terabytes of data, dialog and pv comes quite handy.

To use them install them first:

# apt-get install –yes pv dialog


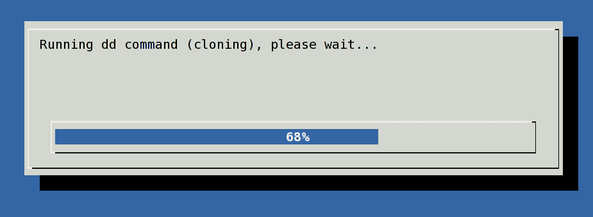
Next to have a beautiful ncurses dialog box with the status (very useful if you're shell scripting), use:
 

(pv -n /dev/sda | dd of=/dev/sdb bs=128M conv=notrunc,noerror) 2>&1 | dialog –gauge "Running dd command (cloning), please wait…" 10 70 0

pv-dialog-dd-command-ncurses-status-screenshot-gnu-linux
 

2. Listing the avaialble copy drives /dev/sda /dev/sdb1 … etc. disk locations on Windows 7 / 10 / 11 OS

[User.T420-89] ➤ for F in /dev/s* ; do echo "$F    $(cygpath -w $F)" ; done

check-drives-loop-on-cygwin-to-be-used-later-with-dd-copy-iso-creating-imageCheck drives device naming on WIndows PC – Screenshot extract from Mobaxterm

As you can see the drive location we've seen in Windows Explorer is located at drive E: above bash for loop reveals us this is located and readable from CygWin / MobaxTerm at /dev/sdb1


3. Create .iso image file on WIndows OS with dd command
 

To create a full data copy dump of to .iso (image file) with dd on Windows , I had to run:

[User.T420-89] ➤ dd if=/dev/sdb1 of=sdcard-blu-r1-hd-sdcard-backup_10092021a.img bs=100M

75+1 records in
75+1 records out
7944011776 bytes (7.4GB) copied, 391.794316 seconds, 19.3MB/s


dd-copy-drive-data-screenshot-100mb-bitesize-windows-mobaxterm


4. Mount the newly create dd Image with imdisk

In order to test the image is properly created, you can attempt to mount it from command line on Linux, mounting it is quite easy and is up to mounting the just created .img file as a loopback (loop) device, like so: 

# mount -o loop file.iso /mnt/dir

Unfortunately cygwin and mobaxterm's embedded mount command on Win OS does not support the loopback device so to have it you have to install and use some additional program  such as the upmentioned WinCDEmu or if you prefer to do it fully from command line and further on automate the process of creating a dump of images of attached drives out of a multiple computers (lets say belonging to a Windows Active Directory domain). You might install and use something like:


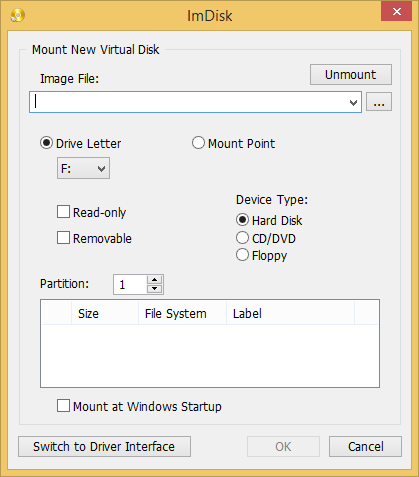
imdisk 

imdisk-gui-interface-ms-windows-screenshot

imdisk handy tool is  created by Olof Lagerkvist. It is free and open-source software, which  will let you mount image files of hard drive, cd-rom or floppy, and create one or several ramdisks with various parameters either from a command line or via its Graphical interface.

To use imdisk download it from its home page on sourceforge extract and install it, pretty much as any other software it has both 32 bit version as a legacy for old computers as well as 64 bit exe installer.
The general command line use of it follows a cmd syntax like:

  • Mounting .iso image files from command line on WIndows host with imdisk


[User.T420-89] ➤ ImDisk.exe -a -f "sdcard-blu-r1-hd-sdcard-backup_10092021.img" -m #:

Where:
 

  • #: – is the actual drive you would like to mount to.
     
  • -a option stands for attach to, it will configure and attach a virtual disk with the parameters specified and attach it to the system.
     
  • -f – is self explanatory, provides the iso image file naming 

If you want to attach the newly created image to lets say  L:\ windows new mapped drive

ImDisk.exe -a -f "sdcard-blu-r1-hd-sdcard-backup_10092021.img" -m l:

  • Unmount mounted .img image with imdisk from cmd line

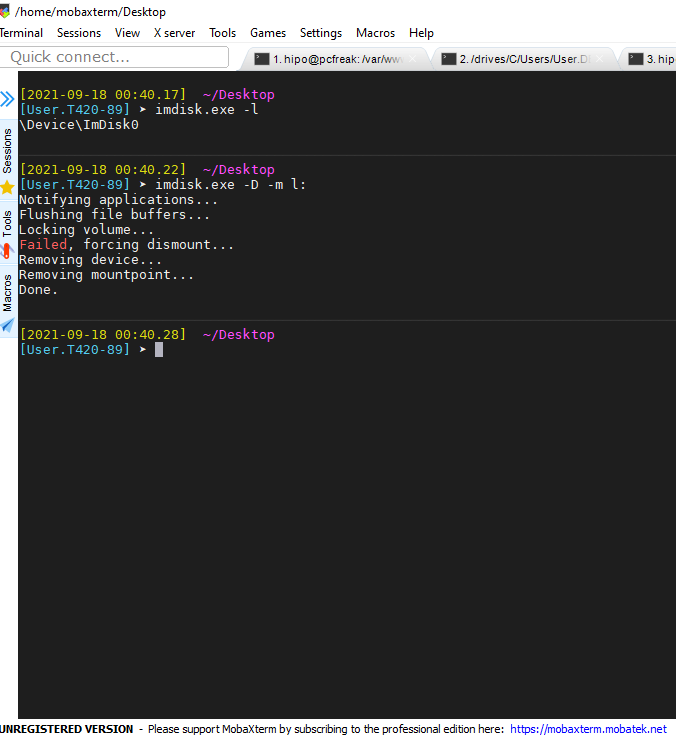
[User.T420-89] ➤ imdisk.exe -l
\Device\ImDisk0
                                                                                                                              ✘

[User.T420-89] ➤ imdisk.exe -D -m l:
Notifying applications…
Flushing file buffers…
Locking volume…
Failed, forcing dismount…
Removing device…
Removing mountpoint…
Done.

imdisk-detach-attached-drive-mobaxterm-windows-screenshot


What we learned ?

What we have learned in this article is how to use Mobaxterm embedded dd Data Convert and Copy command to prepare full image backups of SD card or external drives on Windows OS. Also few alternative ways were entions such as using WinCDEmu free  open source alternative to DaemonTools program to create / mount or convert the image for the GUI lovers. Also for hard core sysadmins as me was shown how to list drives devices attached to the Win PC {/dev/sda,/dev/sdb} etc. and how to copy partition data with dd just like one would do on Linux OS. Finally to test the created image, I've shown you how to use the imdisk free software tool to attach and detach image to a mapped local Windows drive.

Hope this article learned you something new.

Adding proxy to yum repository on Redhat / Fedora / CentOS and other RPM based Linux distributions, Listing and enabling new RPM repositories

Tuesday, September 7th, 2021

yum-add-proxy-host-for-redhat-linux-centos-list-rpm-repositories-enable-disable-repositories

Sometimes if you work in a company that is following PCI standards with very tight security you might need to use a custom company prepared RPM repositories that are accessible only via a specific custom maintained repositories or alternatively you might need the proxy node  to access an external internet repository from the DMZ-ed firewalled zone where the servers lays .
Hence to still be able to maintain the RPM based servers up2date to the latest security patches and install software with yumone very useful feature of yum package manager is to use a proxy host through which you will reach your Redhat Package Manager files  files.

1. The http_proxy and https_proxy shell variables 

To set  a proxy host you need to define there the IP / Hostname or the Fully Qualified Domain Name (FQDN).

By default "http_proxy and https_proxy are empty. As you can guess https_proxy is used if you have a Secure Socket Layer (SSL) certificate for encrypting the communication channel (e.g. you have https:// URL).

[root@rhel: ~]# echo $http_proxy
[root@rhel: ~]#

2. Setting passwordless or password protected proxy host via http_proxy, https_proxy variables

There is a one time very straight forward to configure proxying of traffic via a specific remote configured server with server bourne again  shell (BASH)'s understood variables:
 

a.) Set password free open proxy to shell environment.

[root@centos: ~]# export https_proxy="https://remote-proxy-server:8080"


Now use yum as usual to update the available installabe package list or simply upgrade to the latest packages with lets say:

[root@rhel: ~]# yum check-update && yum update

b.) Configuring password protected proxy for yum

If your proxy is password protected for even tigher security you can provide the password on the command line as well.

[root@centos: ~]# export http_proxy="http://username:pAssW0rd@server:port/"

Note that if you have some special characters you will have to pass the string inside single quotes or escape them to make sure the password will properly handled to server, before trying out the proxy with yum, echo the variable.

[root@centos: ~]# export http_proxy='http://username:p@s#w:E@192.168.0.1:3128/'
  [root@centos: ~]# echo $http_proxy
http://username:p@s#w:E@server:port/

Then do whatever with yum:

[root@centos: ~]# yum check-update && yum search sharutils


If something is wrong and proxy is not properly connected try to reach for the repository manually with curl or wget

[root@centos: ~]# curl -ilk http://download.fedoraproject.org/pub/epel/7/SRPMS/ /epel/7/SRPMS/
HTTP/1.1 302 Found
Date: Tue, 07 Sep 2021 16:49:59 GMT
Server: Apache
X-Frame-Options: SAMEORIGIN
X-Xss-Protection: 1; mode=block
X-Content-Type-Options: nosniff
Referrer-Policy: same-origin
Location: http://mirror.telepoint.bg/epel/7/SRPMS/
Content-Type: text/plain
Content-Length: 0
AppTime: D=2264
X-Fedora-ProxyServer: proxy01.iad2.fedoraproject.org
X-Fedora-RequestID: YTeYOE3mQPHH_rxD0sdlGAAAA80
X-Cache: MISS from pcfreak
X-Cache-Lookup: MISS from pcfreak:3128
Via: 1.1 pcfreak (squid/4.6)
Connection: keep-alive


Or if you need, you can test the user, password protected proxy with wget as so:

[root@centos: ~]# wget –proxy-user=USERNAME –proxy-password=PASSWORD http://your-proxy-domain.com/optional-rpms/


If you have lynx installed on the machine you can do the remote proxy successful authentication check with it with less typing:

[root@centos: ~]# lynx -pauth=USER:PASSWORD http://proxy-domain.com/optional-rpm/


3. Making yum proxy connection permanent via /etc/yum.conf


Perhaps the easiest and quickest way to add the http_proxy / https_proxy configured is to store it to automatically load on each server ssh login in your admin user (root) in /root/.bashrc or /root/.bash_profile or in the global /etc/profile or /etc/profile.d/custom.sh etc.

However if you don't want to have hacks and have more cleanness on the systems, the recommended "Redhat way" so to say is to store the configuration inside /etc/yum.conf

To do it via /etc/yum.conf you have to have some records there like:

# The proxy server – proxy server:port number 
proxy=http://mycache.mydomain.com:3128 
# The account details for yum connections 
proxy_username=yum-user 
proxy_password=qwerty-secret-pass

4. Listing RPM repositories and their state

As I had to install sharutils RPM package to the server which contains the file /bin/uuencode (that is provided on CentOS 7.9 Linux from Repo: base/7/x86_64 I had to check whether the repository was installed on the server.

To get a list of all yum repositories avaiable 

[root@centos:/etc/yum.repos.d]# yum repolist all
Loaded plugins: fastestmirror
Loading mirror speeds from cached hostfile
 * base: centos.telecoms.bg
 * epel: mirrors.netix.net
 * extras: centos.telecoms.bg
 * remi: mirrors.netix.net
 * remi-php74: mirrors.netix.net
 * remi-safe: mirrors.netix.net
 * updates: centos.telecoms.bg
repo id                                repo name                                                                         status
base/7/x86_64                          CentOS-7 – Base                                                                   enabled: 10,072
base-debuginfo/x86_64                  CentOS-7 – Debuginfo                                                              disabled
base-source/7                          CentOS-7 – Base Sources                                                           disabled
c7-media                               CentOS-7 – Media                                                                  disabled
centos-kernel/7/x86_64                 CentOS LTS Kernels for x86_64                                                     disabled
centos-kernel-experimental/7/x86_64    CentOS Experimental Kernels for x86_64                                            disabled
centosplus/7/x86_64                    CentOS-7 – Plus                                                                   disabled
centosplus-source/7                    CentOS-7 – Plus Sources                                                           disabled
cr/7/x86_64                            CentOS-7 – cr                                                                     disabled
epel/x86_64                            Extra Packages for Enterprise Linux 7 – x86_64                                    enabled: 13,667
epel-debuginfo/x86_64                  Extra Packages for Enterprise Linux 7 – x86_64 – Debug                            disabled
epel-source/x86_64                     Extra Packages for Enterprise Linux 7 – x86_64 – Source                           disabled
epel-testing/x86_64                    Extra Packages for Enterprise Linux 7 – Testing – x86_64                          disabled
epel-testing-debuginfo/x86_64          Extra Packages for Enterprise Linux 7 – Testing – x86_64 – Debug                  disabled
epel-testing-source/x86_64             Extra Packages for Enterprise Linux 7 – Testing – x86_64 – Source                 disabled
extras/7/x86_64                        CentOS-7 – Extras                                                                 enabled:    500
extras-source/7                        CentOS-7 – Extras Sources                                                         disabled
fasttrack/7/x86_64                     CentOS-7 – fasttrack                                                              disabled
remi                                   Remi's RPM repository for Enterprise Linux 7 – x86_64                             enabled:  7,229
remi-debuginfo/x86_64                  Remi's RPM repository for Enterprise Linux 7 – x86_64 – debuginfo                 disabled
remi-glpi91                            Remi's GLPI 9.1 RPM repository for Enterprise Linux 7 – x86_64                    disabled
remi-glpi92                            Remi's GLPI 9.2 RPM repository for Enterprise Linux 7 – x86_64                    disabled
remi-glpi93                            Remi's GLPI 9.3 RPM repository for Enterprise Linux 7 – x86_64                    disabled
remi-glpi94                            Remi's GLPI 9.4 RPM repository for Enterprise Linux 7 – x86_64                    disabled
remi-modular                           Remi's Modular repository for Enterprise Linux 7 – x86_64                         disabled
remi-modular-test                      Remi's Modular testing repository for Enterprise Linux 7 – x86_64                 disabled
remi-php54                             Remi's PHP 5.4 RPM repository for Enterprise Linux 7 – x86_64                     disabled
remi-php55                             Remi's PHP 5.5 RPM repository for Enterprise Linux 7 – x86_64                     disabled
remi-php55-debuginfo/x86_64            Remi's PHP 5.5 RPM repository for Enterprise Linux 7 – x86_64 – debuginfo         disabled
!remi-php56                            Remi's PHP 5.6 RPM repository for Enterprise Linux 7 – x86_64                     disabled
remi-php56-debuginfo/x86_64            Remi's PHP 5.6 RPM repository for Enterprise Linux 7 – x86_64 – debuginfo         disabled
remi-php70                             Remi's PHP 7.0 RPM repository for Enterprise Linux 7 – x86_64                     disabled
remi-php70-debuginfo/x86_64            Remi's PHP 7.0 RPM repository for Enterprise Linux 7 – x86_64 – debuginfo         disabled
remi-php70-test                        Remi's PHP 7.0 test RPM repository for Enterprise Linux 7 – x86_64                disabled
remi-php70-test-debuginfo/x86_64       Remi's PHP 7.0 test RPM repository for Enterprise Linux 7 – x86_64 – debuginfo    disabled
remi-php71                             Remi's PHP 7.1 RPM repository for Enterprise Linux 7 – x86_64                     disabled
remi-php71-debuginfo/x86_64            Remi's PHP 7.1 RPM repository for Enterprise Linux 7 – x86_64 – debuginfo         disabled
remi-php71-test                        Remi's PHP 7.1 test RPM repository for Enterprise Linux 7 – x86_64                disabled
remi-php71-test-debuginfo/x86_64       Remi's PHP 7.1 test RPM repository for Enterprise Linux 7 – x86_64 – debuginfo    disabled
!remi-php72                            Remi's PHP 7.2 RPM repository for Enterprise Linux 7 – x86_64                     disabled
remi-php72-debuginfo/x86_64            Remi's PHP 7.2 RPM repository for Enterprise Linux 7 – x86_64 – debuginfo         disabled
remi-php72-test                        Remi's PHP 7.2 test RPM repository for Enterprise Linux 7 – x86_64                disabled
remi-php72-test-debuginfo/x86_64       Remi's PHP 7.2 test RPM repository for Enterprise Linux 7 – x86_64 – debuginfo    disabled
remi-php73                             Remi's PHP 7.3 RPM repository for Enterprise Linux 7 – x86_64                     disabled
remi-php73-debuginfo/x86_64            Remi's PHP 7.3 RPM repository for Enterprise Linux 7 – x86_64 – debuginfo         disabled
remi-php73-test                        Remi's PHP 7.3 test RPM repository for Enterprise Linux 7 – x86_64                disabled
remi-php73-test-debuginfo/x86_64       Remi's PHP 7.3 test RPM repository for Enterprise Linux 7 – x86_64 – debuginfo    disabled
remi-php74                             Remi's PHP 7.4 RPM repository for Enterprise Linux 7 – x86_64                     enabled:    423
remi-php74-debuginfo/x86_64            Remi's PHP 7.4 RPM repository for Enterprise Linux 7 – x86_64 – debuginfo         disabled
remi-php74-test                        Remi's PHP 7.4 test RPM repository for Enterprise Linux 7 – x86_64                disabled
remi-php74-test-debuginfo/x86_64       Remi's PHP 7.4 test RPM repository for Enterprise Linux 7 – x86_64 – debuginfo    disabled
remi-php80                             Remi's PHP 8.0 RPM repository for Enterprise Linux 7 – x86_64                     disabled
remi-php80-debuginfo/x86_64            Remi's PHP 8.0 RPM repository for Enterprise Linux 7 – x86_64 – debuginfo         disabled
remi-php80-test                        Remi's PHP 8.0 test RPM repository for Enterprise Linux 7 – x86_64                disabled
remi-php80-test-debuginfo/x86_64       Remi's PHP 8.0 test RPM repository for Enterprise Linux 7 – x86_64 – debuginfo    disabled
remi-safe                              Safe Remi's RPM repository for Enterprise Linux 7 – x86_64                        enabled:  4,549
remi-safe-debuginfo/x86_64             Remi's RPM repository for Enterprise Linux 7 – x86_64 – debuginfo                 disabled
remi-test                              Remi's test RPM repository for Enterprise Linux 7 – x86_64                        disabled
remi-test-debuginfo/x86_64             Remi's test RPM repository for Enterprise Linux 7 – x86_64 – debuginfo            disabled
updates/7/x86_64                       CentOS-7 – Updates                                                                enabled:  2,741
updates-source/7                       CentOS-7 – Updates Sources                                                        disabled
zabbix/x86_64                          Zabbix Official Repository – x86_64                                               enabled:    178
zabbix-debuginfo/x86_64                Zabbix Official Repository debuginfo – x86_64                                     disabled
zabbix-frontend/x86_64                 Zabbix Official Repository frontend – x86_64                                      disabled
zabbix-non-supported/x86_64            Zabbix Official Repository non-supported – x86_64                                 enabled:      5
repolist: 39,364

[root@centos:/etc/yum.repos.d]# yum repolist all|grep -i 'base/7/x86_64'
base/7/x86_64                       CentOS-7 – Base              enabled: 10,072


As you can see in CentOS 7 sharutils is enabled from default repositories, however this is not the case on Redhat 7.9, hence to install sharutils there you can one time enable RPM repository to install sharutils 

[root@centos:/etc/yum.repos.d]# yum –enablerepo=rhel-7-server-optional-rpms install sharutils

To install zabbix-agent on the same Redhat server, without caring that I need precisely  know the RPM repository that is providing zabbix agent that in that was (Repo: 3party/7Server/x86_64)  I had to:

[root@centos:/etc/yum.repos.d]# yum –enablerepo \* install zabbix-agent zabbix-sender


Permanently enabling repositories of course is possible via editting or creating fresh new file configuration manually on CentOS / Fedora under directory /etc/yum.repos.d/
On Redhat Enterprise Linux  servers it is easier to use the subscription-manager command instead, like this:
 

[root@rhel:/root]# subscription-manager repos –disable=epel/7Server/x86_64

[root@rhel:/root]# subscription-manager repos –enable=rhel-6-server-optional-rpms

Listing installed RPMs by vendor installed on CentOS / RedHat Linux

Friday, January 8th, 2021

Listing installed RPMs by vendor installed on CentOS / RedHat Linux

Listing installed RPMs by vendor is useful sysadmin stuff if you have third party software installed that is not part of official CentOS / RedHat Linux and you want to only list this packages, here is how this is done


[root@redhat ~]# rpm -qa –qf '%{NAME} %{VENDOR} %{PACKAGER} \n' | grep -v 'CentOS' | sort

criu Virtuozzo Virtuozzo (http://www.virtuozzo.com/support/)
gskcrypt64 IBM IBM
gskssl64 IBM IBM
ipxe-roms-qemu Virtuozzo Virtuozzo (http://www.virtuozzo.com/support/)
libevent (none) (none)
libguestfs-appliance Virtuozzo Virtuozzo (http://www.virtuozzo.com/support/)
libguestfs-tools-c Virtuozzo Virtuozzo (http://www.virtuozzo.com/support/)
libguestfs Virtuozzo Virtuozzo (http://www.virtuozzo.com/support/)
libprlcommon Virtuozzo Virtuozzo (http://www.virtuozzo.com/support/)
libprlsdk-python Virtuozzo Virtuozzo (http://www.virtuozzo.com/support/)
libprlsdk Virtuozzo Virtuozzo (http://www.virtuozzo.com/support/)
libprlxmlmodel Virtuozzo Virtuozzo (http://www.virtuozzo.com/support/)
libtcmu Virtuozzo Virtuozzo (http://www.virtuozzo.com/support/)
libvcmmd Virtuozzo Virtuozzo (http://www.virtuozzo.com/support/)
libvirt-client Virtuozzo Virtuozzo (http://www.virtuozzo.com/support/)
libvirt-daemon-config-nwfilter Virtuozzo Virtuozzo (http://www.virtuozzo.com/support/)
libvirt-daemon-driver-interface Virtuozzo Virtuozzo (http://www.virtuozzo.com/support/)
libvirt-daemon-driver-network Virtuozzo Virtuozzo (http://www.virtuozzo.com/support/)
libvirt-daemon-driver-nodedev Virtuozzo Virtuozzo (http://www.virtuozzo.com/support/)
libvirt-daemon-driver-nwfilter Virtuozzo Virtuozzo (http://www.virtuozzo.com/support/)
libvirt-daemon-driver-qemu Virtuozzo Virtuozzo (http://www.virtuozzo.com/support/)
libvirt-daemon-driver-storage-core Virtuozzo Virtuozzo (http://www.virtuozzo.com/support/)
libvirt-daemon-driver-storage Virtuozzo Virtuozzo (http://www.virtuozzo.com/support/)
libvirt-daemon-kvm Virtuozzo Virtuozzo (http://www.virtuozzo.com/support/)
libvirt-daemon Virtuozzo Virtuozzo (http://www.virtuozzo.com/support/)
libvirt-libs Virtuozzo Virtuozzo (http://www.virtuozzo.com/support/)
libvirt-python Virtuozzo Virtuozzo (http://www.virtuozzo.com/support/)
libvirt Virtuozzo Virtuozzo (http://www.virtuozzo.com/support/)
libvzctl Virtuozzo Virtuozzo (http://www.virtuozzo.com/support/)
libvzevent Virtuozzo Virtuozzo (http://www.virtuozzo.com/support/)
openvz-logos Virtuozzo Virtuozzo (http://www.virtuozzo.com/support/)
p7zip-plugins Fedora Project Fedora Project
ploop-lib Virtuozzo Virtuozzo (http://www.virtuozzo.com/support/)
ploop Virtuozzo Virtuozzo (http://www.virtuozzo.com/support/)
prlctl Virtuozzo Virtuozzo (http://www.virtuozzo.com/support/)
prl-disk-tool Virtuozzo Virtuozzo (http://www.virtuozzo.com/support/)
prl-disp-service Virtuozzo Virtuozzo (http://www.virtuozzo.com/support/)
python2-lockfile Fedora Project Fedora Project
python2-psutil Fedora Project Fedora Project
python-daemon Fedora Project Fedora Project
python-subprocess32 Virtuozzo Virtuozzo (http://www.virtuozzo.com/support/)
qemu-img-vz Virtuozzo Virtuozzo (http://www.virtuozzo.com/support/)
qemu-kvm-common-vz Virtuozzo Virtuozzo (http://www.virtuozzo.com/support/)
qemu-kvm-vz Virtuozzo Virtuozzo (http://www.virtuozzo.com/support/)
qt Virtuozzo Virtuozzo (http://www.virtuozzo.com/support/)
rkhunter Fedora Project Fedora Project
seabios-bin Virtuozzo Virtuozzo (http://www.virtuozzo.com/support/)
seavgabios-bin Virtuozzo Virtuozzo (http://www.virtuozzo.com/support/)
spfs Virtuozzo Virtuozzo (http://www.virtuozzo.com/support/)
TIVsm-API64 IBM (none)
TIVsm-APIcit IBM (none)
TIVsm-BAcit IBM (none)
TIVsm-BA IBM (none)
vcmmd Virtuozzo Virtuozzo (http://www.virtuozzo.com/support/)
vmauth Virtuozzo Virtuozzo (http://www.virtuozzo.com/support/)
vzctl Virtuozzo Virtuozzo (http://www.virtuozzo.com/support/)
vzkernel Virtuozzo Virtuozzo (http://www.virtuozzo.com/support/)
vztt_checker Virtuozzo Virtuozzo (http://www.virtuozzo.com/support/)
vztt-lib Virtuozzo Virtuozzo (http://www.virtuozzo.com/support/)
vztt Virtuozzo Virtuozzo (http://www.virtuozzo.com/support/)
zabbix-agent (none) (none)


That instructs rpm to output each package's name and vendor, then we exclude those from "Red Hat, Inc." (which is the exact string Red Hat conveniently uses in the "vendor" field of all RPMs they pacakge).

By default, rpm -qa uses the format '%{NAME}-%{VERSION}-%{RELEASE}', and it's nice to see version and release, and on 64-bit systems, it's also nice to see the architecture since both 32- and 64-bit packages are often installed. Here's how I did that:

[root@redhat ~]# rpm -qa –qf '%{NAME}-%{VERSION}-%{RELEASE}.%{ARCH} %{VENDOR} %{PACKAGER} \n' | grep -v 'CentOS' | sort

criu-3.10.0.23-1.vz7.x86_64 Virtuozzo Virtuozzo (http://www.virtuozzo.com/support/)
gskcrypt64-8.0-55.17.x86_64 IBM IBM
gskssl64-8.0-55.17.x86_64 IBM IBM
ipxe-roms-qemu-20170123-1.git4e85b27.1.vz7.5.noarch Virtuozzo Virtuozzo (http://www.virtuozzo.com/support/)
libevent-2.0.22-1.rhel7.x86_64 (none) (none)
libguestfs-1.36.10-6.2.vz7.12.x86_64 Virtuozzo Virtuozzo (http://www.virtuozzo.com/support/)
libguestfs-appliance-1.36.10-6.2.vz7.12.x86_64 Virtuozzo Virtuozzo (http://www.virtuozzo.com/support/)
libguestfs-tools-c-1.36.10-6.2.vz7.12.x86_64 Virtuozzo Virtuozzo (http://www.virtuozzo.com/support/)
libprlcommon-7.0.162-1.vz7.x86_64 Virtuozzo Virtuozzo (http://www.virtuozzo.com/support/)
libprlsdk-7.0.226-2.vz7.x86_64 Virtuozzo Virtuozzo (http://www.virtuozzo.com/support/)
libprlsdk-python-7.0.226-2.vz7.x86_64 Virtuozzo Virtuozzo (http://www.virtuozzo.com/support/)
libprlxmlmodel-7.0.80-1.vz7.x86_64 Virtuozzo Virtuozzo (http://www.virtuozzo.com/support/)
libtcmu-1.2.0-16.2.vz7.x86_64 Virtuozzo Virtuozzo (http://www.virtuozzo.com/support/)
libvcmmd-7.0.22-3.vz7.x86_64 Virtuozzo Virtuozzo (http://www.virtuozzo.com/support/)
libvirt-3.9.0-14.vz7.38.x86_64 Virtuozzo Virtuozzo (http://www.virtuozzo.com/support/)
libvirt-client-3.9.0-14.vz7.38.x86_64 Virtuozzo Virtuozzo (http://www.virtuozzo.com/support/)
libvirt-daemon-3.9.0-14.vz7.38.x86_64 Virtuozzo Virtuozzo (http://www.virtuozzo.com/support/)
libvirt-daemon-config-nwfilter-3.9.0-14.vz7.38.x86_64 Virtuozzo Virtuozzo (http://www.virtuozzo.com/support/)
libvirt-daemon-driver-interface-3.9.0-14.vz7.38.x86_64 Virtuozzo Virtuozzo (http://www.virtuozzo.com/support/)
libvirt-daemon-driver-network-3.9.0-14.vz7.38.x86_64 Virtuozzo Virtuozzo (http://www.virtuozzo.com/support/)
libvirt-daemon-driver-nodedev-3.9.0-14.vz7.38.x86_64 Virtuozzo Virtuozzo (http://www.virtuozzo.com/support/)
libvirt-daemon-driver-nwfilter-3.9.0-14.vz7.38.x86_64 Virtuozzo Virtuozzo (http://www.virtuozzo.com/support/)
libvirt-daemon-driver-qemu-3.9.0-14.vz7.38.x86_64 Virtuozzo Virtuozzo (http://www.virtuozzo.com/support/)
libvirt-daemon-driver-storage-3.9.0-14.vz7.38.x86_64 Virtuozzo Virtuozzo (http://www.virtuozzo.com/support/)
libvirt-daemon-driver-storage-core-3.9.0-14.vz7.38.x86_64 Virtuozzo Virtuozzo (http://www.virtuozzo.com/support/)
libvirt-daemon-kvm-3.9.0-14.vz7.38.x86_64 Virtuozzo Virtuozzo (http://www.virtuozzo.com/support/)
libvirt-libs-3.9.0-14.vz7.38.x86_64 Virtuozzo Virtuozzo (http://www.virtuozzo.com/support/)
libvirt-python-3.9.0-1.vz7.1.x86_64 Virtuozzo Virtuozzo (http://www.virtuozzo.com/support/)
libvzctl-7.0.506-1.vz7.x86_64 Virtuozzo Virtuozzo (http://www.virtuozzo.com/support/)
libvzevent-7.0.7-5.vz7.x86_64 Virtuozzo Virtuozzo (http://www.virtuozzo.com/support/)
openvz-logos-70.0.13-1.vz7.noarch Virtuozzo Virtuozzo (http://www.virtuozzo.com/support/)
p7zip-plugins-16.02-10.el7.x86_64 Fedora Project Fedora Project
ploop-7.0.137-1.vz7.x86_64 Virtuozzo Virtuozzo (http://www.virtuozzo.com/support/)
ploop-lib-7.0.137-1.vz7.x86_64 Virtuozzo Virtuozzo (http://www.virtuozzo.com/support/)
prlctl-7.0.164-1.vz7.x86_64 Virtuozzo Virtuozzo (http://www.virtuozzo.com/support/)
prl-disk-tool-7.0.43-1.vz7.x86_64 Virtuozzo Virtuozzo (http://www.virtuozzo.com/support/)
prl-disp-service-7.0.925-1.vz7.x86_64 Virtuozzo Virtuozzo (http://www.virtuozzo.com/support/)
python2-lockfile-0.11.0-17.el7.noarch Fedora Project Fedora Project
python2-psutil-5.6.7-1.el7.x86_64 Fedora Project Fedora Project
python-daemon-1.6-4.el7.noarch Fedora Project Fedora Project
python-subprocess32-3.2.7-1.vz7.5.x86_64 Virtuozzo Virtuozzo (http://www.virtuozzo.com/support/)
qemu-img-vz-2.10.0-21.7.vz7.67.x86_64 Virtuozzo Virtuozzo (http://www.virtuozzo.com/support/)
qemu-kvm-common-vz-2.10.0-21.7.vz7.67.x86_64 Virtuozzo Virtuozzo (http://www.virtuozzo.com/support/)
qemu-kvm-vz-2.10.0-21.7.vz7.67.x86_64 Virtuozzo Virtuozzo (http://www.virtuozzo.com/support/)
qt-4.8.7-2.vz7.2.x86_64 Virtuozzo Virtuozzo (http://www.virtuozzo.com/support/)
rkhunter-1.4.6-2.el7.noarch Fedora Project Fedora Project
seabios-bin-1.10.2-3.1.vz7.3.noarch Virtuozzo Virtuozzo (http://www.virtuozzo.com/support/)
seavgabios-bin-1.10.2-3.1.vz7.3.noarch Virtuozzo Virtuozzo (http://www.virtuozzo.com/support/)
spfs-0.09.0010-1.vz7.x86_64 Virtuozzo Virtuozzo (http://www.virtuozzo.com/support/)
TIVsm-API64-8.1.11-0.x86_64 IBM (none)
TIVsm-APIcit-8.1.11-0.x86_64 IBM (none)
TIVsm-BA-8.1.11-0.x86_64 IBM (none)
TIVsm-BAcit-8.1.11-0.x86_64 IBM (none)
vcmmd-7.0.160-1.vz7.x86_64 Virtuozzo Virtuozzo (http://www.virtuozzo.com/support/)
vmauth-7.0.10-2.vz7.x86_64 Virtuozzo Virtuozzo (http://www.virtuozzo.com/support/)
vzctl-7.0.194-1.vz7.x86_64 Virtuozzo Virtuozzo (http://www.virtuozzo.com/support/)
vzkernel-3.10.0-862.11.6.vz7.64.7.x86_64 Virtuozzo Virtuozzo (http://www.virtuozzo.com/support/)
vzkernel-3.10.0-862.20.2.vz7.73.29.x86_64 Virtuozzo Virtuozzo (http://www.virtuozzo.com/support/)
vztt-7.0.63-1.vz7.x86_64 Virtuozzo Virtuozzo (http://www.virtuozzo.com/support/)
vztt_checker-7.0.2-1.vz7.i686 Virtuozzo Virtuozzo (http://www.virtuozzo.com/support/)
vztt_checker-7.0.2-1.vz7.x86_64 Virtuozzo Virtuozzo (http://www.virtuozzo.com/support/)
vztt-lib-7.0.63-1.vz7.x86_64 Virtuozzo Virtuozzo (http://www.virtuozzo.com/support/)
zabbix-agent-3.2.11-1.el7.x86_64 (none) (none)

IBM TSM dsmc console client use for listing configured backups, checking set scheduled backups and backup and restore operations howto

Friday, March 6th, 2020

tsm-ibm-logo_tivoli-dsmc-console-client-listing-backups-create-backups-and-restore-on-linux-unix-windows

Creating a simple home based backup solution with some shell scripting and rsync is a common use. However as a sysadmin in a middle sized or large corporations most companies use some professional backup service such as IBM Tivoli Storage Manager TSM – recently IBM changed the name of the product to IBM Spectrum.

IBM TSM  is a data protection platform that gives enterprises a single point of control and administration for backup and recovery that is used for Privare Clouds backup and other high end solutions where data criticality is top.
Usually in large companies TSM backup handling is managed by a separate team or teams as managing a large TSM infrastructure is quite a complex task, however my experience as a sysadmin show me that even if you don't have too much of indepth into tsm it is very useful to know how to manage at least basic Incremental backup operations such as view what is set to be backupped, set-up a new directory structure for backup, check the backup schedule configured, check what files are included and which excluded from the backup store etc. 

TSM has multi OS support ans you can use it on most streamline Operating systems Windows / Mac OS X and Linux in this specific article I'll be talking concretely about backing up data with tsm on Linux, tivoli can be theoretically brought up even on FreeBSD machines via the Linuxemu BSD module and the 64-Bit Tivoli Storage Manager RPMs.
Therefore in this small article I'll try to give few useful operations for the novice admin that stumbles on tsm backupped server that needs some small maintenance.
 

1. Starting up the dsmc command line client


Nomatter the operating system on which you run it to run the client run:

# dsmc


tsm-check-backup-schedule-set-time

Note that usually dsmc should run as superuser so if you try to run it via a normal non-root user you will get an error message like:


[ user@linux ~]$ dsmc
ANS1398E Initialization functions cannot open one of the Tivoli Storage Manager logs or a related file: /var/tsm/dsmerror.log. errno = 13, Permission denied


Tivoli SM has an extensive help so to get the use basics, type help
 

tsm> help
1.0 New for IBM Tivoli Storage Manager Version 6.4
2.0 Using commands
  2.1 Start and end a client command session
    2.1.1 Process commands in batch mode
    2.1.2 Process commands in interactive mode
  2.2 Enter client command names, options, and parameters
    2.2.1 Command name
    2.2.2 Options
    2.2.3 Parameters
    2.2.4 File specification syntax
  2.3 Wildcard characters
  2.4 Client commands reference
  2.5 Archive
  2.6 Archive FastBack

Enter 'q' to exit help, 't' to display the table of contents,
press enter or 'd' to scroll down, 'u' to scroll up or
enter a help topic section number, message number, option name,
command name, or command and subcommand:    


2. Listing files listed for backups


A note to make here is as in most corporate products tsm supports command aliases so any command supported described in the help like query, could be
abbreviated with its first letters only, e.g. query filespace tsm cmd can be abbreviated as

tsm> q fi

Commands can be run non-interactive mode also so if you want the output of q fi you can straight use:

tsm> dsmc q fi


tsm-check-included-excluded-files-q-file-if-backupped-list-backup-set-directories

This shows the directories and files that are set for backup creation with Tivoli.


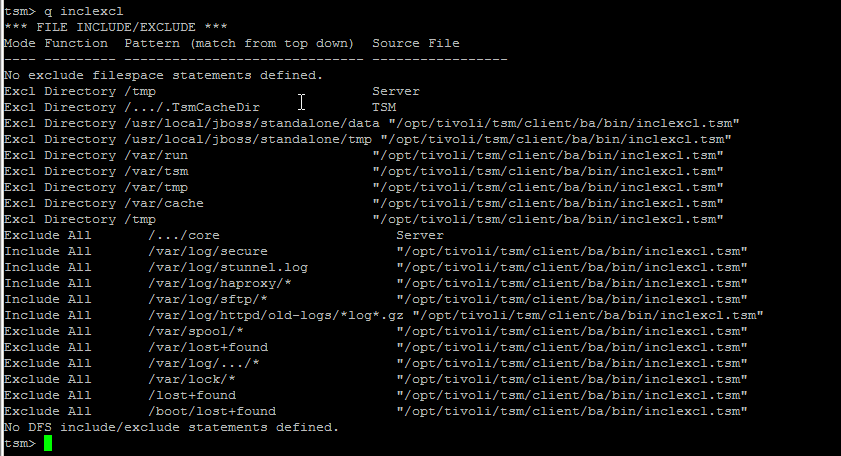
3. Getting included and excluded backup set files


It is useful to know what are the exact excluded files from tsm set backup this is done with query inclexcl

tsm-check-excluded-included-files


4. Querying for backup schedule time

Tivoli as every other backup solution is creating its set to backup files in a certain time slot periods. 
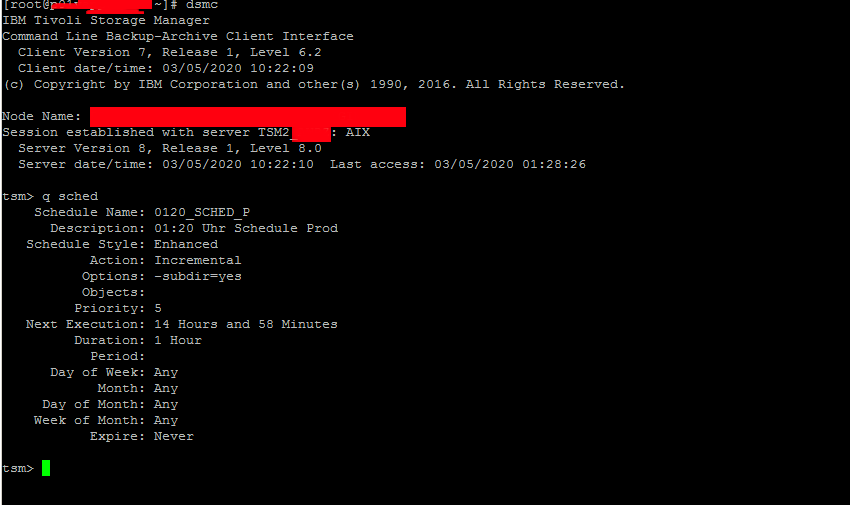
To find out what is the time slot for backup creation use;

tsm> q sched
Schedule Name: WEEKLY_ITSERV
      Description: ITSERV weekly incremental backup
   Schedule Style: Classic
           Action: Incremental
          Options: 
          Objects: 
         Priority: 5
   Next Execution: 180 Hours and 35 Minutes
         Duration: 15 Minutes
           Period: 1 Week  
      Day of Week: Wednesday
            Month:
     Day of Month:
    Week of Month:
           Expire: Never  


tsm-query-partitions-backupeed-or-not


5. Check which files have been backed up

If you want to make sure backups are really created it is a good to check, which files from the selected backup files have already
a working backup copy.

This is done with query backup like so:

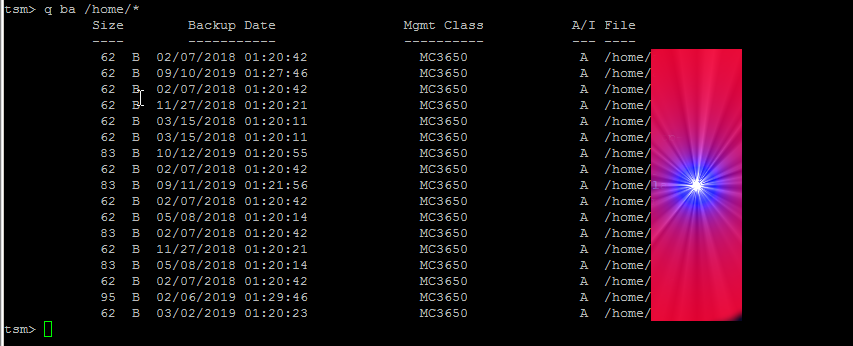
tsm> q ba /home/*


tsm-dsmc-query-user-home-for-backups

If you want to query all the current files and directories backed up under a directory and all its subdirectories you need to add the -subdir=yes option as below:


tsm> q ba /home/hipo/projects/* -subdir=yes
   
Size      Backup Date        Mgmt Class A/I File
   —-      ———–        ———- — —-
    512  12-09-2011 19:57:09    STANDARD    A  /home/hipo/projects/hfs0106
  1,024  08-12-2011 02:46:53    STANDARD    A  /home/hipo/projects/hsm41perf
    512  12-09-2011 19:57:09    STANDARD    A  /home/hipo/projects/hsm41test
    512  24-04-2012 00:22:56    STANDARD    A  /home/hipo/projects/hsm42upg
  1,024  12-09-2011 19:57:09    STANDARD    A  /home/hipo/projects/hfs0106/test
  1,024  12-09-2011 19:57:09    STANDARD    A  /home/hipo/projects/hfs0106/test/test2
 12,048  04-12-2011 02:01:29    STANDARD    A  /home/hipo/projects/hsm41perf/tables
 50,326  30-04-2012 01:35:26    STANDARD    A  /home/hipo/projects/hsm42upg/PMR70023
 50,326  27-04-2012 00:28:15    STANDARD    A  /home/hipo/projects/hsm42upg/PMR70099
 11,013  24-04-2012 00:22:56    STANDARD    A  /home/hipo/projects/hsm42upg/md5check  


  • To make tsm, backup some directories on Linux / AIX other unices:


tsm> incr /  /usr  /usr/local  /home /lib


  • For tsm to backup some standard netware drives, use:


tsm> incr NDS:  USR:  SYS:  APPS:  


  • To backup C:\ D:\ E:\ F:\ if TSM is running on Windows


tsm> incr C:  D:  E: F:  -incrbydate 


  • To back up entire disk volumes irrespective of whether files have changed since the last backup, use the selective command with a wildcard and -subdir=yes as below:


tsm> sel /*  /usr/*   /home/*  -su=yes   ** Unix/Linux


7. Backup selected files from a backup location


It is intuitive to think you can just add some wildcard characters to select what you want
to backup from a selected location but this is not so, if you try something like below
you will get an err.


tsm> incr /home/hipo/projects/*/* -su=yes      
ANS1071E Invalid domain name entered: '/home/hipo/projects/*/*'


The proper way to select a certain folder / file for backup is with:


tsm> sel /home/hipo/projects/*/* -su=yes


8. Restoring tsm data from backup


To restore the config httpd.conf to custom directory use:


tsm> rest /etc/httpd/conf/httpd.conf  /home/hipo/restore/


N!B! that in order for above to work you need to have the '/' trailing slash at the end.

If you want to restore a file under a different name:


tsm> rest /etc/ntpd.conf  /home/hipo/restore/


9. Restoring a whole backupped partition


tsm> rest /home/*  /tmp/restore/ -su=yes


This is using the Tivoli 'Restoring multiple files and directories', and the files to restore '*'
are kept till the one that was recovered (saying this in case if you accidently cancel the restore)


10. Restoring files with back date 


By default the restore function will restore the latest available backupped file, if you need
to recover a specific file, you need the '-inactive' '-pick' options.
The 'pick' interface is interactive so once listed you can select the exact file from the date
you want to restore.

General restore command syntax is:
 

tsm> restore [source-file] [destination-file]


tsm> rest /home/hipo/projects/*  /tmp/restore/ -su=yes  -inactive -pick

TSM Scrollable PICK Window – Restore

     #    Backup Date/Time        File Size A/I  File
   ————————————————————————————————–
   170. | 12-09-2011 19:57:09        650  B  A   /home/hipo/projects/hsm41test/inclexcl.test
   171. | 12-09-2011 19:57:09       2.74 KB  A   /home/hipo/projects/hsm41test/inittab.ORIG
   172. | 12-09-2011 19:57:09       2.74 KB  A   /home/hipo/projects/hsm41test/inittab.TEST
   173. | 12-09-2011 19:57:09       1.13 KB  A   /home/hipo/projects/hsm41test/md5.out
   174. | 30-04-2012 01:35:26        512  B  A   /home/hipo/projects/hsm42125upg/PMR70023
   175. | 26-04-2012 01:02:08        512  B  I   /home/hipo/projects/hsm42125upg/PMR70023
   176. | 27-04-2012 00:28:15        512  B  A   /home/hipo/projects/hsm42125upg/PMR70099
   177. | 24-04-2012 19:17:34        512  B  I   /home/hipo/projects/hsm42125upg/PMR70099
   178. | 24-04-2012 00:22:56       1.35 KB  A   /home/hipo/projects/hsm42125upg/dsm.opt
   179. | 24-04-2012 00:22:56       4.17 KB  A   /home/hipo/projects/hsm42125upg/dsm.sys
   180. | 24-04-2012 00:22:56       1.13 KB  A   /home/hipo/projects/hsm42125upg/dsmmigfstab
   181. | 24-04-2012 00:22:56       7.30 KB  A   /home/hipo/projects/hsm42125upg/filesystems
   182. | 24-04-2012 00:22:56       1.25 KB  A   /home/hipo/projects/hsm42125upg/inclexcl
   183. | 24-04-2012 00:22:56        198  B  A   /home/hipo/projects/hsm42125upg/inclexcl.dce
   184. | 24-04-2012 00:22:56        291  B  A   /home/hipo/projects/hsm42125upg/inclexcl.ox_sys
   185. | 24-04-2012 00:22:56        650  B  A   /home/hipo/projects/hsm42125upg/inclexcl.test
   186. | 24-04-2012 00:22:56        670  B  A   /home/hipo/projects/hsm42125upg/inetd.conf
   187. | 24-04-2012 00:22:56       2.71 KB  A   /home/hipo/projects/hsm42125upg/inittab
   188. | 24-04-2012 00:22:56       1.00 KB  A   /home/hipo/projects/hsm42125upg/md5check
   189. | 24-04-2012 00:22:56      79.23 KB  A   /home/hipo/projects/hsm42125upg/mkreport.020423.out
   190. | 24-04-2012 00:22:56       4.27 KB  A   /home/hipo/projects/hsm42125upg/ssamap.020423.out
   191. | 26-04-2012 01:02:08      12.78 MB  A   /home/hipo/projects/hsm42125upg/PMR70023/70023.tar
   192. | 25-04-2012 16:33:36      12.78 MB  I   /home/hipo/projects/hsm42125upg/PMR70023/70023.tar
        0———10——–20——–30——–40——–50——–60——–70——–80——–90–
<U>=Up  <D>=Down  <T>=Top  <B>=Bottom  <R#>=Right  <L#>=Left
<G#>=Goto Line #  <#>=Toggle Entry  <+>=Select All  <->=Deselect All
<#:#+>=Select A Range <#:#->=Deselect A Range  <O>=Ok  <C>=Cancel
pick> 


To navigate in pick interface you can select individual files to restore via the number seen leftside.
To scroll up / down use 'U' and 'D' as described in the legenda.


11. Restoring your data to another machine


In certain circumstances, it may be necessary to restore some, or all, of your data onto a machine other than the original from which it was backed up.

In ideal case the machine platform should be identical to that of the original machine. Where this is not possible or practical please note that restores are only possible for partition types that the operating system supports. Thus a restore of an NTFS partition to a Windows 9x machine with just FAT support may succeed but the file permissions will be lost.
TSM does not work fine with cross-platform backup / restore, so better do not try cross-platform restores.
 Trying to restore files onto a Windows machine that have previously been backed up with a non-Windows one. TSM created backups on Windows sent by other OS platforms can cause  backups to become inaccessible from the host system.

To restore your data to another machine you will need the TSM software installed on the target machine. Entries in Tivoli configuration files dsm.sys and/or dsm.opt need to be edited if the node that you are restoring from does not reside on the same server. Please see our help page section on TSM configuration files for their locations for your operating system. 

To access files from another machine you should then start the TSM client as below:


# dsmc -virtualnodename=RESTORE.MACHINE      


You will then be prompted for the TSM password for this machine.


You will probably want to restore to a different destination to the original files to prevent overwriting files on the local machine, as below:


  • Restore of D:\ Drive to D:\Restore ** Windows 


tsm> rest D:\*   D:\RESTORE\    -su=yes 


  • Restore user /home/* to /scratch on ** Mac, Unix/Linux


tsm> rest /home/* /scratch/     -su=yes  


  • Restoring Tivoli data on old netware


tsm> rest SOURCE-SERVER\USR:*  USR:restore/   -su=yes  ** Netware


12. Adding more directories for incremental backup / Check whether TSM backup was done correctly?

The easiest way is to check the produced dschmed.log if everything is okay there should be records in the log that Tivoli backup was scheduled in a some hours time
succesfully.
A normally produced backup scheduled in log should look something like:


14-03-2020 23:03:04 — SCHEDULEREC STATUS BEGIN
14-03-2020 23:03:04 Total number of objects inspected:   91,497
14-03-2020 23:03:04 Total number of objects backed up:      113
14-03-2020 23:03:04 Total number of objects updated:          0
14-03-2020 23:03:04 Total number of objects rebound:          0
14-03-2020 23:03:04 Total number of objects deleted:          0
14-03-2020 23:03:04 Total number of objects expired:         53
14-03-2020 23:03:04 Total number of objects failed:           6
14-03-2020 23:03:04 Total number of bytes transferred:    19.38 MB
14-03-2020 23:03:04 Data transfer time:                    1.54 sec
14-03-2020 23:03:04 Network data transfer rate:        12,821.52 KB/sec
14-03-2020 23:03:04 Aggregate data transfer rate:        114.39 KB/sec
14-03-2020 23:03:04 Objects compressed by:                    0%
14-03-2020 23:03:04 Elapsed processing time:           00:02:53
14-03-2020 23:03:04 — SCHEDULEREC STATUS END
14-03-2020 23:03:04 — SCHEDULEREC OBJECT END WEEKLY_23_00 14-12-2010 23:00:00
14-03-2020 23:03:04 Scheduled event 'WEEKLY_23_00' completed successfully.
14-03-2020 23:03:04 Sending results for scheduled event 'WEEKLY_23_00'.
14-03-2020 23:03:04 Results sent to server for scheduled event 'WEEKLY_23_00'.


in case of errors you should check dsmerror.log
 

Conclusion


In this article I've briefly evaluated some basics of IBM Commercial Tivoli Storage Manager (TSM) to be able to  list backups, check backup schedules and how to the files set to be
excluded from a backup location and most importantly how to check that data backed up data is in a good shape and accessible.
It was explained how backups can be restored on a local and remote machine as well as how to  append new files to be set for backup on next incremental scheduled backup.
It was shown how the pick interactive cli interface could be used to restore files at a certain data back in time as well as how full partitions can be restored and how some
certain file could be retrieved from the TSM data copy.

What is inode and how to find out which directory is eating up all your filesystem inodes on Linux, Increase inode count on a ext3 ext4 and ufs filesystems

Tuesday, August 20th, 2019

what-is-inode-find-out-which-filesystem-or-directory-eating-up-all-your-system-inodes-linux_inode_diagram

If you're a system administrator of multiple Linux servers used for Web serving delivery / Mail server sysadmin, Database admin or any High amount of Drives Data Storage used for backup servers infra, Data Repository administrator such as Linux hosted Samba / CIFS shares, etc. or using some Linux Hosting Provider to host your website or any other UNIX like Infrastructure servers that demands a storage of high number of files under a Directory  you might end up with the common filesystem inode depletion issues ( Maximum Inode number for a filesystem is predefined, limited and depending on the filesystem configured size).

In case a directory stored files end up exceding the amount of possible addressable inodes could prevent any data to be further assiged and stored on the Filesystem.

When a device runs out of inodes, new files cannot be created on the device, even though there may be plenty free space available and the first time it happened to me very long time ago I was completely puzzled how this is possible as I was not aware of Inodes existence  …

Reaching maximum inodes number (e.g. inode depletion), often happens on Busy Mail servers (receivng tons of SPAM email messages) or Content Delivery Network (CDN – Website Image caching servers) which contain many small files on EXT3 or EXT4 Journalled filesystems. File systems (such as Btrfs, JFS or XFS) escape this limitation with extents or dynamic inode allocation, which can 'grow' the file system or increase the number of inodes.


Hence ending being out of inodes could cause various oddities on how stored data behaves or communicated to other connected microservices and could lead to random application disruptions and odd results costing you many hours of various debugging to find the root cause of inodes (index nodes) being out of order.

In below article, I will try to give an overall explanation on what is an I-Node on a filesystem, how inodes of FS unit could be seen, how to diagnose a possible inode poblem – e.g.  see the maximum amount of inodes available per filesystem and how to prepare (format) a new filesystem with incrsed set of maximum inodes.


What are filesystem i-nodes?


This is a data structure in a Unix-style file system that describes a file-system object such as a file or a directory.
The data structure described in the inodes might vary slightly depending on the filesystem but usually on EXT3 / EXT4 Linux filesystems each inode stores the index to block that contains attributes and disk block location(s) of the object's data.
– Yes for those who are not aware on how a filesystem is structured on *nix it does allocate all stored data in logical separeted structures called data blocks. Each file stored on a local filesystem has a file descriptor, there are virtual unit structures file tables and each of the inodes that are a reference number has a own data structure (inode table).

Inodes / "Index" are slightly unusual on file system structure that stored the access information of files as a flat array on the disk, with all the hierarchical directory information living aside from this as explained by Unix creator and pioneer- Dennis Ritchie (passed away few years ago).
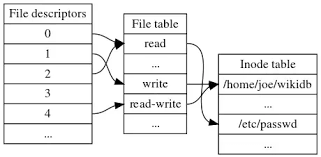
what-is-inode-very-simplified-explanation-diagram-data

Simplified explanation on file descriptors, file table and inode, table on a common Linux filesystem

Here is another description on what is I-node, given by Ken Thompson (another Unix pioneer and father of Unix) and Denis Ritchie, described in their paper published in 1978:

"    As mentioned in Section 3.2 above, a directory entry contains only a name for the associated file and a pointer to the file itself. This pointer is an integer called the i-number (for index number) of the file. When the file is accessed, its i-number is used as an index into a system table (the i-list) stored in a known part of the device on which the directory resides. The entry found thereby (the file's i-node) contains the description of the file:…
    — The UNIX Time-Sharing System, The Bell System Technical Journal, 1978  "


What is typical content of inode and how I-nodes play with rest of Filesystem units?


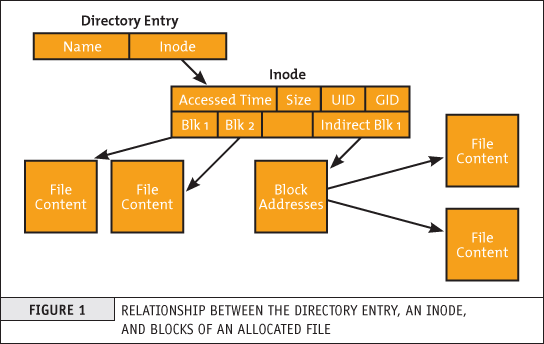
The inode is just a reference index to a data block (unit) that contains File-system object attributes. It may include metadata information such as (times of last change, access, modification), as well as owner and permission data.


On a Linux / Unix filesystem, directories are lists of names assigned to inodes. A directory contains an entry for itself, its parent, and each of its children.
Structure-of-inode-table-on-Linux-Filesystem-diagram


Structure of inode table-on Linux Filesystem diagram (picture source GeeksForGeeks.org)

  • Information about files(data) are sometimes called metadata. So you can even say it in another way, "An inode is metadata of the data."
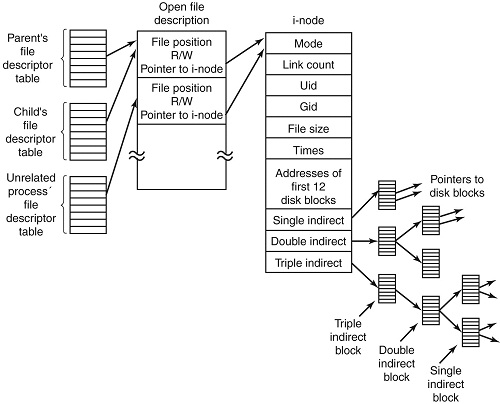
  •  Inode : Its a complex data-structure that contains all the necessary information to specify a file. It includes the memory layout of the file on disk, file permissions, access time, number of different links to the file etc.
  •  Global File table : It contains information that is global to the kernel e.g. the byte offset in the file where the user's next read/write will start and the access rights allowed to the opening process.
  • Process file descriptor table : maintained by the kernel, that in turn indexes into a system-wide table of files opened by all processes, called the file table .

The inode number indexes a table of inodes in a known location on the device. From the inode number, the kernel's file system driver can access the inode contents, including the location of the file – thus allowing access to the file.

  •     Inodes do not contain its hardlink names, only other file metadata.
  •     Unix directories are lists of association structures, each of which contains one filename and one inode number.
  •     The file system driver must search a directory looking for a particular filename and then convert the filename to the correct corresponding inode number.

The operating system kernel's in-memory representation of this data is called struct inode in Linux. Systems derived from BSD use the term vnode, with the v of vnode referring to the kernel's virtual file system layer.


But enough technical specifics, lets get into some practical experience on managing Filesystem inodes.
 

Listing inodes on a Fileystem


Lets say we wan to to list an inode number reference ID for the Linux kernel (files):


root@linux: # ls -i /boot/vmlinuz-*
 3055760 /boot/vmlinuz-3.2.0-4-amd64   26091901 /boot/vmlinuz-4.9.0-7-amd64
 3055719 /boot/vmlinuz-4.19.0-5-amd64  26095807 /boot/vmlinuz-4.9.0-8-amd64


To list an inode of all files in the kernel specific boot directory /boot:


root@linux: # ls -id /boot/
26091521 /boot/


Listing inodes for all files stored in a directory is also done by adding the -i ls command flag:

Note the the '-1' flag was added to to show files in 1 column without info for ownership permissions


root@linux:/# ls -1i /boot/
26091782 config-3.2.0-4-amd64
 3055716 config-4.19.0-5-amd64
26091900 config-4.9.0-7-amd64
26095806 config-4.9.0-8-amd64
26091525 grub/
 3055848 initrd.img-3.2.0-4-amd64
 3055644 initrd.img-4.19.0-5-amd64
26091902 initrd.img-4.9.0-7-amd64
 3055657 initrd.img-4.9.0-8-amd64
26091756 System.map-3.2.0-4-amd64
 3055703 System.map-4.19.0-5-amd64
26091899 System.map-4.9.0-7-amd64
26095805 System.map-4.9.0-8-amd64
 3055760 vmlinuz-3.2.0-4-amd64
 3055719 vmlinuz-4.19.0-5-amd64
26091901 vmlinuz-4.9.0-7-amd64
26095807 vmlinuz-4.9.0-8-amd64


To get more information about Linux directory, file, such as blocks used by file-unit, Last Access, Modify and Change times, current External Symbolic or Static links for filesystem object:
 

root@linux:/ # stat /etc/
  File: /etc/
  Size: 16384         Blocks: 32         IO Block: 4096   catalog
Device: 801h/2049d    Inode: 6365185     Links: 231
Access: (0755/drwxr-xr-x)  Uid: (    0/    root)   Gid: (    0/    root)
Access: 2019-08-20 06:29:39.946498435 +0300
Modify: 2019-08-14 13:53:51.382564330 +0300
Change: 2019-08-14 13:53:51.382564330 +0300
 Birth: –


Within a POSIX system (Linux-es) and *BSD are more or less such, a file has the following attributes[9] which may be retrieved by the stat system call:

   – Device ID (this identifies the device containing the file; that is, the scope of uniqueness of the serial number).
    File serial numbers.
    – The file mode which determines the file type and how the file's owner, its group, and others can access the file.
    – A link count telling how many hard links point to the inode.
    – The User ID of the file's owner.
    – The Group ID of the file.
    – The device ID of the file if it is a device file.
    – The size of the file in bytes.
    – Timestamps telling when the inode itself was last modified (ctime, inode change time), the file content last modified (mtime, modification time), and last accessed (atime, access time).
    – The preferred I/O block size.
    – The number of blocks allocated to this file.


Getting more extensive information on a mounted filesystem


Most Linuxes have the tune2fs installed by default (in debian Linux this is through e2fsprogs) package, with it one can get a very good indepth information on a mounted filesystem, lets say about the ( / ) root FS.
 

root@linux:~# tune2fs -l /dev/sda1
tune2fs 1.44.5 (15-Dec-2018)
Filesystem volume name:   <none>
Last mounted on:          /
Filesystem UUID:          abe6f5b9-42cb-48b6-ae0a-5dda350bc322
Filesystem magic number:  0xEF53
Filesystem revision #:    1 (dynamic)
Filesystem features:      has_journal ext_attr resize_inode dir_index filetype needs_recovery sparse_super large_file
Filesystem flags:         signed_directory_hash
Default mount options:    (none)
Filesystem state:         clean
Errors behavior:          Continue
Filesystem OS type:       Linux
Inode count:              30162944
Block count:              120648960
Reserved block count:     6032448
Free blocks:              13830683
Free inodes:              26575654
First block:              0
Block size:               4096
Fragment size:            4096
Reserved GDT blocks:      995
Blocks per group:         32768
Fragments per group:      32768
Inodes per group:         8192
Inode blocks per group:   512
Filesystem created:       Thu Sep  6 21:44:22 2012
Last mount time:          Sat Jul 20 11:33:38 2019
Last write time:          Sat Jul 20 11:33:28 2019
Mount count:              6
Maximum mount count:      22
Last checked:             Fri May 10 18:32:27 2019
Check interval:           15552000 (6 months)
Next check after:         Wed Nov  6 17:32:27 2019
Lifetime writes:          338 GB
Reserved blocks uid:      0 (user root)
Reserved blocks gid:      0 (group root)
First inode:              11
Inode size:              256
Required extra isize:     28
Desired extra isize:      28
Journal inode:            8
First orphan inode:       21554129
Default directory hash:   half_md4
Directory Hash Seed:      d54c5a90-bc2d-4e22-8889-568d3fd8d54f
Journal backup:           inode blocks


Important note to make here is file's inode number stays the same when it is moved to another directory on the same device, or when the disk is defragmented which may change its physical location. This also implies that completely conforming inode behavior is impossible to implement with many non-Unix file systems, such as FAT and its descendants, which don't have a way of storing this invariance when both a file's directory entry and its data are moved around. Also one inode could point to a file and a copy of the file or even a file and a symlink could point to the same inode, below is example:

$ ls -l -i /usr/bin/perl*
266327 -rwxr-xr-x 2 root root 10376 Mar 18  2013 /usr/bin/perl
266327 -rwxr-xr-x 2 root root 10376 Mar 18  2013 /usr/bin/perl5.14.2

A good to know is inodes are always unique values, so you can't have the same inode number duplicated. If a directory is damaged, only the names of the things are lost and the inodes become the so called “orphan”, e.g.  inodes without names but luckily this is recoverable. As the theory behind inodes is quite complicated and is complicated to explain here, I warmly recommend you read Ian Dallen's Unix / Linux / Filesystems – directories inodes hardlinks tutorial – which is among the best academic Tutorials explaining various specifics about inodes online.


How to Get inodes per mounted filesystem


root@linux:/home/hipo# df -i
Filesystem       Inodes  IUsed   IFree IUse% Mounted on


dev             2041439     481   2040958   1% /dev
tmpfs            2046359     976   2045383   1% /run
tmpfs            2046359       4   2046355   1% /dev/shm
tmpfs            2046359       6   2046353   1% /run/lock
tmpfs            2046359      17   2046342   1% /sys/fs/cgroup
/dev/sdb5        1221600    2562   1219038   1% /usr/var/lib/mysql
/dev/sdb6        6111232  747460   5363772  13% /var/www/htdocs
/dev/sdc1      122093568 3083005 119010563   3% /mnt/backups
tmpfs            2046359      13   2046346   1% /run/user/1000


As you see in above output Inodes reported for each of mounted filesystems has a specific number. In above output IFree on every mounted FS locally on Physical installed OS Linux is good.


Here is an example on how to recognize a depleted Inodes on a OpenXen Virtual Machine with attached Virtual Hard disks.

linux:~# df -i
Filesystem         Inodes     IUsed      IFree     IUse%   Mounted on
/dev/xvda         2080768    2080768     0      100%    /
tmpfs             92187      3          92184   1%     /lib/init/rw
varrun            92187      38          92149   1%    /var/run
varlock            92187      4          92183   1%    /var/lock
udev              92187     4404        87783   5%    /dev
tmpfs             92187       1         92186   1%    /dev/shm


Finding files with a certain inode


At some cases if you want to check all the copy files of a certain file that have the same i-node pointer it is useful to find them all by their shared inode this is possible with simple find (below example is for /usr/bin/perl binary sharing same inode as perl5.28.1:


ls -i /usr/bin/perl
23798851 /usr/bin/perl*


 find /usr/bin -inum 435308 -print
/usr/bin/perl5.28.1
/usr/bin/perl


Find directory that has a large number of files in it?

To get an overall number of inodes allocated by a certain directory, lets say /usr /var


root@linux:/var# du -s –inodes /usr /var
566931    /usr
56020    /var/

To get a list of directories use by inode for a directory with its main contained sub-directories sorted from 1 till highest number use:
 

du -s –inodes * 2>/dev/null |sort -g


Usually running out of inodes means there is a directory / fs mounts that has too many (small files) that are depleting the max count of possible inodes.

The most simple way to list directories and number of files in them on the server root directory is with a small bash shell loop like so:
 

for i in /*; do echo $i; find $i |wc -l; done


Another way to identify the exact directory that is most likely the bottleneck for the inode depletion in a sorted by file count, human readable form:
 

find / -xdev -printf '%h\n' | sort | uniq -c | sort -k 1 -n


This will dump a list of every directory on the root (/) filesystem prefixed with the number of files (and subdirectories) in that directory. Thus the directory with the largest number of files will be at the bottom.


The -xdev switch is used to instruct find to narrow it's search to only the device where you're initiating the search (any other sub-mounted NAS / NFS filesystems from a different device will be omited).


Print top 10 subdirectories with Highest Inode Usage


Once identifed the largest number of files directories that is perhaps the issue, to further get a list of Top subdirectories in it with highest amount of inodes used, use below cmd:


for i in `ls -1A`; do echo "`find $i | sort -u | wc -l` $i"; done | sort -rn | head -10


To list more than 10 of the top inodes used dirs change the head -10 to whatever num needed.

N.B. ! Be very cautious when running above 2 find commands on a very large filesystems as it will be I/O Excessive and in filesystems that has some failing blocks this could create further problems.

To omit putting a high I/O load on a production filesystem, it is possible to also use du + very complex regular expression:
 

cd /backup
du –inodes -S | sort -rh | sed -n         '1,50{/^.\{71\}/s/^\(.\{30\}\).*\(.\{37\}\)$/\1…\2/;p}'


Results returned are from top to bottom.


How to Increase the amount of Inodes count on a new created volume EXT4 filesystem

Some FS-es XFS, JFS do have an auto-increase inode feature in case if their is physical space, whether otheres such as reiserfs does not have inodes at all but still have a field reported when queried for errors. But the classical Linux ext3 / ext4 does not have a way to increase the inode number on a live filesystem. Instead the way to do it there is to prepare a brand new filesystem on a Disk / NAS / attached storage.

The number of inodes at format-time of the block storage can be as high as 4 billion inodes. Before you create the new FS, you have to partition the new the block storage as ext4 with lets say parted command (or nullify the content of an with dd to clean up any previous existing data on a volume if there was already existing data:
 

parted /dev/sda


dd if=/dev/zero of=/dev/path/to/volume


  then format it with this additional parameter:


mkfs.ext4 -N 3000000000 /dev/path/to/volume


Here in above example the newly created filesystem of EXT4 type will be created with 3 Billion inodes !, for setting a higher number on older ext3 filesystem max inode count mkfs.ext3 could be used instead.

Bear in mind that 3 Billion number is a too high number and if you plan to have some large number of files / directories / links structures just raise it up to your pre-planning requirements for FS. In most cases it will be rarely anyone that want to have this number higher than 1 or 2 billion of inodes.

On FreeBSD / NetBSD / OpenBSD setting inode maximum number for a UFS / UFS2 (which is current default FreeBSD FS), this could be done via newfs filesystem creation command after the disk has been labeled with disklabel:


freebsd# newfs -i 1024 /dev/ada0s1d


Increase the Max Count of Inodes for a /tmp filesystem


Sometimes on some machines it is necessery to have ability to store very high number of small files (e.g. have a very large number of inodes) on a temporary filesystem kept in memory. For example some web applications served by Web Server Apache + PHP, Nginx + Perl-FastCGI are written in a bad manner so they kept tons of temporary files in /tmp, leading to issues with exceeded amount of inodes.
If that's the case to temporary work around you can increase the count of Inodes for /tmp to a very high number like 2 billions using:


mount -o remount,nr_inodes=<bignum> /tmp

To make the change permanent on next boot if needed don't forget to put the nr_inodes=whatever_bignum as a mount option for the temporary fs to /etc/fstab

Eventually, if you face this issues it is best to immediately track which application produced the mess and ask the developer to fix his messed up programs architecture.


Conclusion


It was explained on the very common issue of having maximum amount of inodes on a filesystem depleted and the unpleasent consequences of inability to create new files on living FS.
Then a general overview was given on what is inode on a Linux / Unix filesystem, what is typical content of inode, how inode addressing is handled on a FS. Further was explained how to get basic information about available inodes on a filesystem, how to get a filename/s based on inode number (with find), the well known way to determine inode number of a directory or file (with ls) and get more extensive information on a FS on inodes with tune2fs.
Also was explained how to identify directories containing multitudes of files in order to determine a sub-directories that is consuming most of the inodes on a filesystem. Finally it was explained very raughly how to prepare an ext4 filesystem from scratch with predefined number to inodes to much higher than the usual defaults by mkfs.ext3 / mkfs.ext4 and *bsds newfs as well as how to raise the number of inodes of /tmp tmpfs temporary RAM filesystem.

How to list and exclude table names from a database in MySQL (exclude table names from an show tables in MySQL) by using information_schema

Wednesday, March 30th, 2011

Listing all table names from a MySQL database is a very easy and trivial task that every sql or system administrator out there is aware of.

However excluding certain table names from a whole list of tables belonging to a database is not that commonly used and therefore I believe many people have no clue how to do it when they have to.

Today for one of my sql backup scripts it was necessary that certain tables from a database to be excluded from the whole list of tables for a database I’m backupping.
My example database has the sample name exampledatabase and usually I do list all the table contents from that database with the well known command:

mysql> SHOW tables from exampledatabase;

However as my desire was to exclude certain tables from the list (preferrably with a certain SQL query) I had to ask around in irc.freenode.net for some hints on a ways to achieve my exclude table goals.

I was adviced by some people in #mysql that what I need to achieve my goal is the information_schema mysql structure, which is available since MySQL version 5.0.

After a bit of look around in the information_schema and the respective documentation on mysql.com, thanksfully I could comprehend the idea behind the information_schema, though to be honest the first time I saw the documentation it was completly foggy on how to use this information_schema;
It seems using the information_schema is very easy and is not much different from your normal queries syntax used to do trivial operations in the mysql server.

If you wonder just like I did what is mysql’s information_schema go and use the information_schema database (which I believe is a virtual database that is stored in the system memory).

For instance:

mysql> use information_schema;
Database changed
mysql> show tables
+---------------------------------------+
| Tables_in_information_schema |
+---------------------------------------+
| CHARACTER_SETS |
| COLLATIONS |
| COLLATION_CHARACTER_SET_APPLICABILITY |
| COLUMNS |
| COLUMN_PRIVILEGES |
| KEY_COLUMN_USAGE |
| PROFILING |
| ROUTINES |
| SCHEMATA |
| SCHEMA_PRIVILEGES |
| STATISTICS |
| TABLES |
| TABLE_CONSTRAINTS |
| TABLE_PRIVILEGES |
| TRIGGERS |
| USER_PRIVILEGES |
| VIEWS |
+---------------------------------------+
17 rows in set (0.00 sec)

To get a general view on what each of the tables in the information_schema database contains I used the normal SELECT command for example

mysql> select * from TABLES limit 10;

I used the limit clause in order to prevent being overfilled with data, where I could still see the table fields name to get general and few lines of the table to get an idea what kind of information the TABLES table contains.

If you haven’t got any ecperience with using the information_schema I would advice you do follow my example select and look around through all the listed tables in the information_schema database

That will also give you a few hints about the exact way the MySQL works and comprehends it’s contained data structures.

In short information_schema virtual database and it’s existing tables provides a very thorough information and if you’re an SQL admin you certainly want to look over it every now and then.

A bit of playing with it lead me to a command which is actually a good substitute for the normal SHOW TABLES; mysql command.
To achieve a SHOW TABLES from exampledatabase via the information_schema info structure you can for example issue:

select TABLE_NAME from TABLES where TABLE_SCHEMA='exampledatabase';

Now as I’ve said a few words about information_schema let me go back to the main topic of this small article, which is How to exclude table names from a SHOW tables list

Here is how exclude a number of tables from a complete list of tables belonging to a database:

select TABLE_NAME from TABLES where TABLE_SCHEMA='exampledatabase'
AND TABLE_NAME not in
('mysql_table1_to_exlude_from_list', 'mysql_table2_to_exclude_from_list', 'table3_to_exclude');

In this example the above mysql command will list all the tables content belonging to exampledatabase and instruct the MySQL server not to list the table names with names mysql_table1_to_exlude_from_list, mysql_table2_to_exclude_from_list, table3_to_exclude

If you need to exclude more tables from your mysql table listing just add some more tables after the …’table3_to_exclude’, ‘new_table4_to_exclude’,’etc..’);

Of course this example can easily be adopted to a MySQL backup script which requires the exclusion of certain tables from a backed up database.

An example on how you can use the above table exclude command straight from the bash shell would be:

debian:~# echo "use information_schema; select TABLE_NAME from TABLES where
TABLE_SCHEMA='exampledatabase' AND TABLE_NAME not in
('mysql_table1_to_exlude_from_list', 'mysql_table2_to_exclude_from_list', 'table3_to_exclude',);"
| mysql -u root -p

Now this little bash one-liner can easily be customized to a backup script to create backups of a certain databases with a certain tables (e.g. with excluded number of tables) from the backup.

It’s seriously a pity that by default the mysqldump command does not have an option for a certain tables exclude while making a database dump.
I’ve saw the mysqldump exclude option, being suggested somewhere online as a future feature of mysqldump, I’ve also seen it being reported in the mysql.com’s bug database, I truly hope in the upcoming releases we will see the exclude option to appear as a possible mysqldump argument.
 

Allow Directory Listing in Apache Webserver / Get around Directory index forbidden by Options directive

Thursday, October 4th, 2012

I have configured Apache VirtualHost, inside the VirtualHost hosted domain, it is supposed to be a directory, where Directory Listing has to be allowed. My VirtualHost configuration looks like so:


NameVirtualHost *

ServerAdmin my-email@domain-name.com
ServerName www.pc-freak.net
ServerAlias www.domain-name.com domain-name.com
DocumentRoot /var/www
DirectoryIndex index.html index.htm index.php index.html.var

Options FollowSymLinks
AllowOverride All
Order allow,deny
allow from all


Options Indexes FollowSymLinks MultiViews
AllowOverride All
Order allow,deny
allow from all


Options Indexes FollowSymLinks MultiViews
AllowOverride All
Order allow,deny
allow from all

ScriptAlias /cgi-bin/ /usr/lib/cgi-bin/

AllowOverride None
Options +ExecCGI -MultiViews +SymLinksIfOwnerMatch
Order allow,deny
Allow from all

ErrorLog ${APACHE_LOG_DIR}/error.log
LogLevel warn
CustomLog ${APACHE_LOG_DIR}/access.log combined

I have a directory (/var/www/directory), there I store various files and I prefer this directory to be enabled to support Directory listing. I have the whole situation on Debian Linux. By default in Debian Apache is configured to disable directory listing for subdirectories to both default host and Virtualhosts

In order to enable /var/www/directory, accessed inside browser via web address http://wwww.domain-name.com/directory/ I had to add inside my Virtualhost /etc/apache2/sites-available/domain-name.com following Apache directive:


AddDefaultCharset UTF-8
Options FollowSymLinks Indexes
AllowOverride All

As you can see I included also AddDefaultCharset UTF-8, because inside /directory I have files in cyrillic and, if I don’t explicitly set the encoding to UTF-8, the htmls are improperly shown in browsers.

The exact directive that enables directory listing in Apache is:


Options Indexes

Setting Indexes to -Indexes disables directory listing, e.g.


Options -Indexes

BTW if you need to make certain directory accessible for default set Apache Options (permissions) should be set in /etc/apache2/apache2.conf


Options Indexes
...

This will set Apache directory permissions for all Virtualhost, useful if all virtualhosts share common ServerRoot and the directory has to be accessible via all vhosts.
Well that’s all Cheers 😉

How to enable directory listing in apache

Friday, January 15th, 2010

I created a new domain for pc-freak’s exploit collection
I faced a small issue in creating the new VirtualHost to have a proper directory
listing, cause by default directory listing on my FreeBSD running Apache 2.0.63
is disabled.
It’s quite a common problem I’ve faced over the years of administration of
Apache Servers, everyting I had to enable directory listing for some domain
I had to check in Google again and again. I have to admit this is pretty boring.
Thus I decided to post the solution on my blog just in case if I have to enable
directory listing in the future. Here is the exact configuration directives:
ServerAdmin someemail@somehost.com DocumentRoot /util/exploitworld/ ServerName someservername.com AddDefaultCharset Off Options Indexes FollowSymLinks ExecCGI AllowOverride All Order allow,deny Allow from allThat’s it directory listing for someservername.com is already enabled. Cheers 🙂