Posts Tagged ‘linux distribution’
Thursday, October 10th, 2013 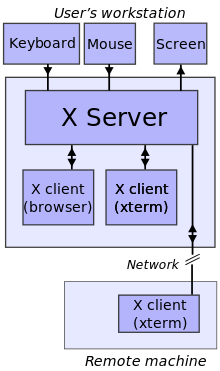
It is useful sometimes in Linux to run multiple Xservers and from there to start few Window Managers (lets say one with Window Maker and one with GNOME and FluxBox). Running second / 3rd etc. X session is nice especially when you you'd like to access remotely your Desktop (lets say from another Linux).
To start second Xsession with only terminal from which you can invoke any GUI environment use:
xinit -- :1
For third one do
xinit -- :2
First Xsession is working on screen :0 (e.g. xinit — :0). To access and navigate later via various X sessions depending on the Linux distribution and how it is configured to which console to start new sessions use
ALT + F5, ALT + F6, ALT + F7.
On GNU / Linux distributions where default Xorg server is running on TTY7 to switch to 2nd and 3rd Window Manager use instead:
ALT + F7, ALT + F8, ALT + F9
Alternative command to issue to launch multiple sessions with lets say GNOME (if that's default set GUI environment) use:
startx -- :1
and
startx -- :2
Whether you want to launch GUI environment from another Linux after connecting through SSH or telnet term client (i.e. you have old machine hardware with Linux with no graphical environment and would like to use 2nd machine with decent hardware and Xorg + GNOME running fine), way to do is via:
xhost +
and exporting DISPLAY to remote IP host.
Here is example how to launch second Xsession with GUI environment from remote Linux host.
For example we assume host which will host 2nd X session is 192.168.1.1 and host from which remote Xorg with GNOME will be accessed is 192.168.1.2.
a. Use ssh from 192.168.1.2 to 192.168.1.1
 # ssh user@192.168.1.1

xorg-machine:~# xhost +
Above command allows all hosts to be able to connect to 192.168.1.1.
To enable just single host to be able to connect to Xorg server on 192.168.1.1:
xorg-machine:~# xhost +192.168.1.1
b. On xorg-machine (192.168.1.1) its necessary export display to 192.168.1.2
xorg-machine:~# export DISPLAY=192.168.1.2:0.0
To make Xorg + default GUI window manager popup then on 192.168.1.2
xorg-machine:~# startx
Tags: gui environment, linux distribution, linux distributions, linux gnome, Window Managers, Xorg server
Posted in Entertainment, Linux and FreeBSD Desktop, Various | No Comments »
Sunday, September 22nd, 2013 
If you're using some GNU / Linux distribution with GNOME 3 and you would like to show output of screen in two connected Monitors to the machine you will stumble upon really unusual behavior. For some unknown reason GNOME environment developers make second monitor to keep fixed on on First Workspace, so whether you try changing Desktops to second / third etc. Virtual Desktop you end up with your secondary monitor focused on Workspace 1. Logically the use of Dual monitor configuration is to show all GUI output identically on both monitors so this behavior is "wrong" ….
Fortunately there is setting that control this weird behavior in GNOME through gconf-editor and simply changing that switches monitors to show properly.
To fix it:
Start Run Command or Press Alt + F2 to invoke GNOME Run menu
Navigate to registry path Desktop -> Gnome -> Shell -> Windows and Uncheck selection on workspaces_only_on_primary

To make new changes take effect its necessary to Log Off or Restart PC.
There is another easier way for command line oriented people to apply changes without using / having installed gconf-editor by issuing:
gsettings set org.gnome.shell.overrides workspaces-only-on-primary false
Tags: developers, dual monitor, gnome environment, Linux, linux distribution, multiple monitors, registry path, Shell, switches, unusual behavior, virtual desktop, weird behavior, workspace
Posted in Everyday Life, Gnome, Linux and FreeBSD Desktop | 1 Comment »
Saturday, May 11th, 2013 
Creating user with access only through FTP is vital in daily routine system administration job. The reason why it is good to disable SSH access to users which don't need it is of course better security. Disabling access to ssh shell for users which don't need it prevents you for user to run malicious code usually exploits or some DDoS Fork bombs – like the infamous Linux shell Denial of Service string;
:(){ :|:&};:
Better not try above string on productive server 😉
So back to the topic here how to add Linux FTP only user;
1. Create a regular user with adduser or useradd (depending) on GNU / Linux distribution
adduser is available across most Linux distributions nowadays, however I remember in past there was some distros which had useradd instead. Anyways for most adduser should be ok. As of time of writting both 3 main stream Linux distributions Slackware, Debian and Fedora has adduser.
linux:~# adduser new-user-for-ftp-only
Adding user `new-user-for-ftp-only' …
Adding new group `new-user-for-ftp-only' (1006) …
Adding new user `new-user-for-ftp-only' (1005) with group `new-user-for-ftp-only' …
Creating home directory `/home/new-user-for-ftp-only' …
Copying files from `/etc/skel' …
Enter new UNIX password:
Retype new UNIX password:
passwd: password updated successfully
Changing the user information for new-user-for-ftp-only
Enter the new value, or press ENTER for the default
Full Name []: New Linux User Only for FTP access
Room Number []:
Work Phone []:
Home Phone []:
Other []:
Is the information correct? [Y/n] Y
linux:~#
2. Change user shell /bin/bash to /bin/false
Again depending on Linux distribution by default /bin/bash /bin/sh or /bin/whatever shell will get added. To make just created user access to SSH disabled. Change shell to /bin/false – a tiny program which just returns a FALSE value and quits immediately.
There are two ways to do so;
a) Edit directly /etc/passwd with vim / joe
linux:~# vim /etc/passwd
Go to end of file and find the record for user, should be smth like:
new-user-for-ftp-only:x:1005:1006:New Linux User Only for FTP access,,,:/home/new-user-for-ftp-only:/bin/bash
Change to;
new-user-for-ftp-only:x:1005:1006:New Linux User Only for FTP access,,,:/home/new-user-for-ftp-only:/bin/false
b) Use chsh cmd
linux:~# chsh new-user-for-ftp-only
Changing the login shell for new-user-for-ftp-only
Enter the new value, or press ENTER for the default
Login Shell [/bin/bash]: /bin/false
linux:~# grep -i new-user-for-ftp-only /etc/passwd
new-user-for-ftp-only:x:1005:1006:New Linux User Only for FTP access,,,:/home/new-user-for-ftp-only:/bin/false
3. Testing if ssh access to new user is disabled
linux:~# ssh new-user-for-ftp-only@localhost
new-user-for-ftp-only@localhost's password:
Linux noah 2.6.32-5-amd64 #1 SMP Mon Feb 25 00:26:11 UTC 2013 x86_64
The programs included with the Debian GNU/Linux system are free software;
the exact distribution terms for each program are described in the
individual files in /usr/share/doc/*/copyright.
Debian GNU/Linux comes with ABSOLUTELY NO WARRANTY, to the extent
permitted by applicable law.
Connection to localhost closed.
Tags: adduser, change user, distros, fedora, ftp access, home directory, linux distribution, linux shell, linux user, main stream, most linux distributions, routine system administration, unix password, user information, useradd
Posted in Computer Security, System Administration, Various | 2 Comments »
Tuesday, March 5th, 2013 
If you happen to install a modern GNU / Linux distribution to a relatively old computer hardware with an ISA non-PNP (Plug and Play) soundcard it will be not visible neither among PCI devices list with (lspci) command nor in USBs list (lsusb). Thus with ISA cards, the way to configure a 16 bit SoundBlaster is via a special kernel modules snd-es18xx and snd-sb16 which thanksfully is still existent even on latest Linux distros. Without this two modules enabled in the kernel trying alsamixer command will be unable to launch the mixer as the soundcard is not detected on run of /etc/init.d/alsa start – ALSA enabling boot script – loaded during the system enters runlevel 2.
For one time test of sound card driver, I tested by running:
manastir-pomorie@manastir-pomorie:~# /sbin/modprobe snd-es18xx
manastir-pomorie@manastir-pomorie:~# /sbin/modprobe snd-sb16
On enabling enabling the sound card via above two drivers on the speakers – volume raised to Loud a kind of beep sound was heard, this led me to thoughts now it might work. Before testing the sound in running Youtube Video with sound in Firefox, I launched alsamixer to see if volume settings for SoundBlaster are not muted. Not surprisingly they were set raised to lowest level as you can see on picture:
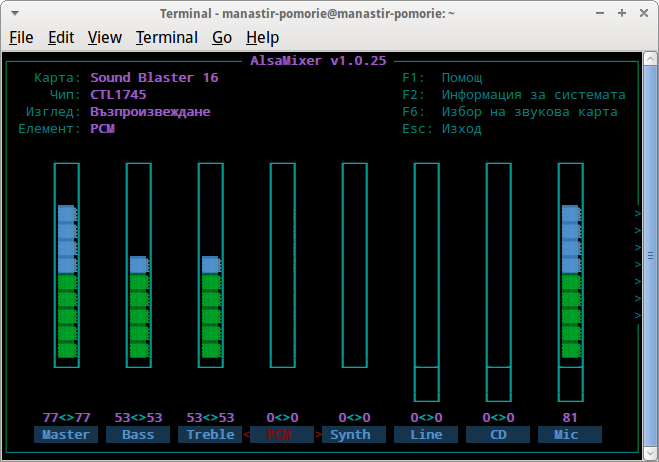
After raising the volume level for PCM and testing in browser thanksfully soundblaster worked fine.
To make the two kernel modules making the ISA card work, I added the modules to /etc/modules
 manastir-pomorie@manastir-pomorie:~# echo 'snd-es18xx' >> /etc/modules

manastir-pomorie@manastir-pomorie:~# echo 'snd-sb16' >> /etc/modules
Even after restarting XUbuntu sound drivers gets loaded. Though I tested this on Xubuntu as Xubuntu is Debian based, same kernel module should be working fine on Ubuntu and Debian. The exact Xubuntu version and kernel on which the ISA card worked is;
 manastir-pomorie@manastir-pomorie:~$ cat /etc/issue

Ubuntu 12.04.2 LTS \n \l
 manastir-pomorie@manastir-pomorie:~$ uname -a;

Linux manastir-pomorie 3.2.0-38-generic #61-Ubuntu SMP Tue Feb 19 12:20:02 UTC 2013 i686 i686 i386 GNU/Linux
Tags: beep sound, driv, isa card, isa cards, isa sound card, kernel modules, linux distribution, manastir, old computer, pci devices, sound card driver, soundblaster, time test, volume level, volume settings
Posted in Linux and FreeBSD Desktop, Linux Audio & Video, Various | No Comments »
Wednesday, May 9th, 2012 I never liked Mandrake Linux, since day 1 I saw it.
Historically Mandrake Linux was one of the best Linux distributions available for free download in the "Linux scene" some 10 to 12 years ago.
Mandrake was simple gui oriented and trendy. It also one the Linux distribution with the most simplified installer program and generally a lot of GUI software for easy configuration and use by the end user.
Though it's outside nice look, still for me it was like an "intuition" that Mandrake is not so good as it appeared.
Now many years later I found by chance that Mandrake has been sued to change their Operating System name with another, due to a law suit requit by the copyright holders of Mandrake The Magician comics. "Mandrake the Magician" used to be a very popular before the Second World war in the 1930's.

It obviously not a co-incidence that the Mandrake names was after this comics and not the mandrake herb plants available in Europe, Africa and Asia. This is clear in Mandrake Linux distro earlier mascot, you see below:

Later on they changed Mandrake's logo to loose the connection with Mandrake The Magician and used another new crafted logo:

Its quite stunning nowdays magician obsession, has so heavily infiltrated our lives that even something like a Free Softwre Linux distribution might have some kind of reference to magician and occult stuff (I saw this from the position of being Christian) …
Later due to the name copyright infringement Mandrake Linux was renamed first to Mandragora Linux.
Instead of putting some nice name non related to occultism or magic stuff the French commercian company behind Mandrake rename it to another non-Christian name Mandragora.
Interestingly the newer name Mandragora as one can read in wikipedia means:
Mandragora (demon), in occultism
Well apparently, someone from the head developers of this Linux distribution has a severe obsession with magic and occultism.
Later MandrakeSoft (The French Company behind Mandrake Linux) renamed finally the distribution to Mandriva under the influence of the merger of Mandrake with the Brazillian company Connectiva this put also an over to the legal dispute copyright infringement dispute with Hearst Corporation (owning the rights of Mandrake the Magician).
Having in mind all fact on current Mandriva "dark names history", I think it is better we Christians avoid it …
Tags: Auto, best linux distributions, chance, comics, commercian, connection, Copyright, copyright infringement, demon, dispute, distribution, download, Draft, europe africa, Free, free softwre, GUI, HEAD, herb plants, intuition, law suit, Linux, linux distribution, linux distro, linux scene, Magician, Mandragora, Mankdrake, nbsp, non, obsession, operating system, quot, requit, second world war, software, someone, something, wel, Wikipedia
Posted in Everyday Life, Various | 3 Comments »
Tuesday, January 24th, 2012 I needed a G/Linux distribution that will work fine on an old PC with hardware configuration:
guest@xubuntu-desktop:~$ grep -i cpu /proc/cpuinfo; free -m; df -h

cpu family : 6

cpu MHz : 797.613cpuid level : 2

total used free shared buffers cachedMem: 497 470 26 0 35 259-/+ buffers/cache: 176 321Swap: 1454 10 1444File System Size Used Free % Mounted on

/dev/sda1 37G 4,3G 31G 13% /
I've read a lot on the internet and come to the conclusion I have basicly two popular Linux distros as option to install on archaic x86 hardware:
 1. Puppy Linux

 2. Xubuntu Linux
I first give Puppy Linux a try. It worked quite nice, but the interface was too old school and the desktop felt like a bit out-dated.
Besides that many of the Puppy Linux shipped programs were not a mainstream programs available across most of the other Linux distributions.
Many of the programs shipped with Puppy are great, but more suitable for a computer geek than for a Windows accustomed GUI user.
My opinion on Puppy (from what I've seen) is that its great distro for old school hardcore Linux users.
Anyways its not suitable for absolutely "uniniated" users who encounter Linux for a first time.
Secondly I installed Xubuntu. Most of the archaic hardware on the PC was detected during install time (a pleasently surprise).
Xubunto works fast and Xfce menus opens "light fast" as on the old 800Mhz pc with 512 mem of ram. Generally the GUI worked quick and responsive.
To conclude I liked Xubuntu a lot and I strongly recommend it to anyone who want to quickly roll on Linux on an old PC.
What impressed me most is the minimalistic look & feel and simplicity.
I'm sure Debian will be working great on old hardware as well, however configuring it will be hell a lot of work. Thus I think Xubuntu is a good choice for people who want save some time in obscure configurations and easily have a neat Linux ready for desktop use.
Tags: Auto, bit, buffers, computer geek, CPU, cpu family, cpu mhz, cpuid, Desktop, distribution, distro, Draft, family, Free, geek, hardcore, hardware 1, hardware configuration, hardware pc, installing linux, level, Linux, linux distribution, linux distributions, linux distros, mainstream, mainstream programs, menus, Mounted, old hardware, old school, opinion, option, puppy linux, quot, school hardcore, sda, simplicity, size, thoughs, time, work, x86 hardware
Posted in Linux, Linux and FreeBSD Desktop, Linux Audio & Video | No Comments »
Tuesday, September 20th, 2011 To prevent tracking and increase anonymity in IPv6 networks the Linux kernel has a variable to change randomly the MAC identifier. This feature will be very useful in terms of security in the short future, when all the IPv4 IP addresses are finished. The UIE (Extended Unified Udentifier) for an ipv6 address can be changed with command:
sysctl -w net.ipv6.conf.all.use_tempaddr=2
Microsoft Windows Vista and Windows 7 has the UIE enabled by default, enabling the random MAC changes automatically for a host cvan be done as usual by adding the net.ipv6.conf.all_use_tempaddr=2 to /etc/sysctl.conf
On an IPv6 network every ifconfig eth0 down and ifconfig eth0 up will instruct the lan card to be set a different MAC address for the ipv6 ip on the interface.
Changing the UIE randomly however also have security downsides if the host gets infected with a Virus or Worm. The security downsides of the enabled UIE affects mainly Windows hosts on IPv6 networks as UIE variable is enabled by default there.I’ve found this great tip in an article in the latest Linux Magazine October 2011. Its the first time I saw a paper Linux Magazine, the magazine contains a lot of helpful info on the latest Linux developments and latest trends in the Linux world. Subscription to receive the magazine via normal post is for the magazine costs 6.65 EUR per month (80 EUR) yearly. The 80 euro yearly includes 12 CDS (each magazine is bundled with a newly launched new version of a Linux distribution).
There is also a cheaper subscription for the magazine which costs 64.90 EUR.
Tags: anonymity, card, default, distribution, eth, euro, Extended, feature, future, host, hosts, info, ip addresses, ipv6 address, ipv6 network, ipv6 networks, lan card, latest trends, Linux, linux developments, linux distribution, linux kernel, linux magazine, linux world, mac address, Microsoft, microsoft windows vista, month, October, pc mac, Subscription, sysctl, time, tip, UIE, Unified, virus, world subscription, worm
Posted in Linux, System Administration | 2 Comments »
Tuesday, August 23rd, 2011 I’ve been working on a servers running Windows 2003 and Windows 2008 these days.
As I wanted to be more flexible on what I can do from the command line I decided to install GNUwin (provides port of GNU tools), most of which are common part of any Linux distribution).
Having most of the command line flexibility on a Windows server is a great thing, so I would strongly recommend GNUWin to any Windows server adminsitrator out there.
Actually it’s a wonderful thing that most of the popular Linux tools can easily be installed and used on Windows for more check GnuWin32 on sourceforge
One of the reasons I installed Gnuwin was my intention to use the good old Linux tail command to keep an eye interactive on the IIS server access log files, which by the way for IIS webserver are stored by default in C:WindowsSystem32LogFilesW3SVC1*.log
I’ve managed to install the GNUWin following the install instructions, not with too much difficulties. The install takes a bit of time, cause many packs containing different parts of the GNUWin has to be fetched.
To install I downloaded the GNUWin installer available from GNUWin32’s website and instructed to extracted the files into C:Program FilesGnuwin
Then I followed the install instructions suggestions, e.g.:
C:> cd c:Program FilesGnuWin

C:Program FilesGnuWin> download.bat

...

C:Program FilesGnuWin> install c:gnuwin32

...
After the installation was succesfully completed on the two Windows machines, both of which by the way are running 64 bit Windows, it was necessery to add the newly installed GNU .exe files to my regular cmd.exe PATH variable in order to be able to access the sed, tail and the rest of the gnuwin32 command line tools.
In order to add C:GnuWin32bin directory to the windows defined Command line Path , I had to do the following:
a. Select (Properties) for My Computer
Start (button) -> My Computer (choose properties)
b. Select the My Computer Advanced (tab)
Then, from the My Computer pane press on Advanced tab
c. Next press on Environment Variables
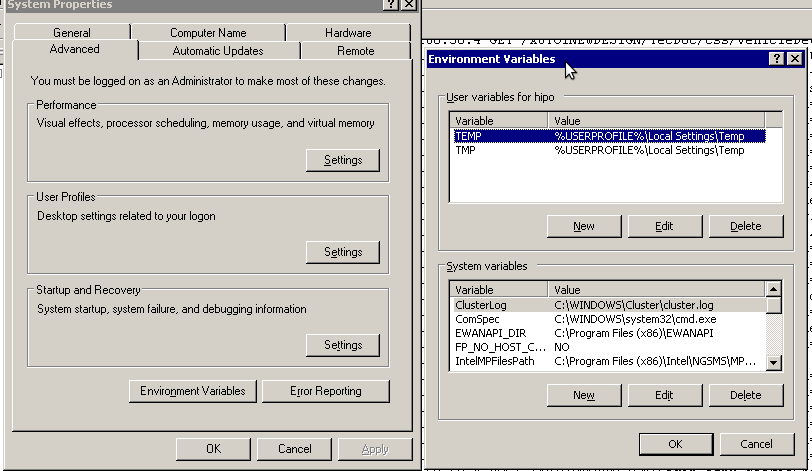
You see in above’s screenshot the Environment Variables config dialog, to add the new path location in System Variables sectiom, between the list I had to add the c:GNUwin32bin path locatiion. To find I pressed on Edit button scrolled down to find the Variable and hence added at the end of the long list defined paths.
After adding in GNUwin, the Windows path looks like this:
C:Program Files (x86)EWANAPI;C:WINDOWSsystem32;C:WINDOWS;C:WINDOWSSystem32Wbem;C:Program Files (x86)IntelNGSMSMPFiles;C:Program Files (x86)Microsoft SQL Server100ToolsBinn;C:Program FilesMicrosoft SQL Server100ToolsBinn;C:Program FilesMicrosoft SQL Server100DTSBinn;C:Program Files (x86)Microsoft SQL Server100ToolsBinnVSShellCommon7IDE;C:Program Files (x86)Microsoft Visual Studio 9.0Common7IDEPrivateAssemblies;C:Program Files (x86)Microsoft SQL Server100DTSBinn;C:WINDOWSsystem32WindowsPowerShellv1.0;C:gnuwin32bin
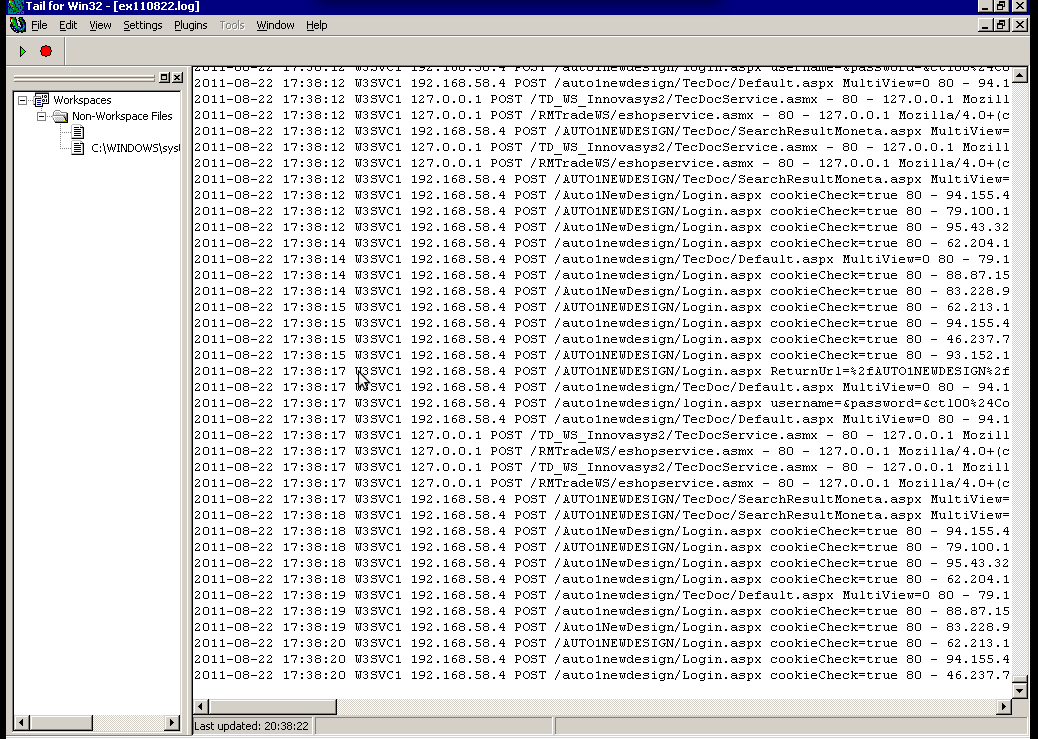
Further on, I launched the tail command to intercatively take an eye on who is accessing the IIS webserver.
Sadly this worked not, trying to use tail with the IIS ex10116.log log;
C:WindowsSystem32LogfilesW3SVC1> tail -f ex10116.log
Spit an error tail: ex10116.log: Bad file descriptor
Since I couldn’t use tail -f I looked for alternative and a quick search led me to Tail 4 Win32 . Lest the name suggests it is supposed to work on 32 bit arch Windows the version on tailforwin32’s website is working perfectly fine on 64 bit Windows as well.
What it does is to simulate a normal tail -f command inside a very simplistic window interface. You see it in action with opened IIS log on below’s screenshot:
Finally my goal is achieved and I can take an eye interactively on IIS logs. End of the article, hope it wasn’t too boring 😉
Tags: bin directory, binary files, Button, c program, command line tools, Computer, distribution, download, exe files, eye, Files, flexibility, gnu tools, gnuwin, gnuwin32, IDE, IIS, installation, line path, linux distribution, linux tools, log, Microsoft, necessery, Path, program, screenshot, select properties, sourceforgeOne, SQL, start button, tail, time, time cause, two windows, windows machines, windows server, wonderful thing
Posted in System Administration, Windows | 1 Comment »
Saturday, July 9th, 2011 
These days, I’m managing many, many servers. The servers are ordered in few groups. Each of the servers in the server groups contains identical hardware, identical Linux distribution as well as identical configuration.
Since managing multiple servers normally, takes a lot of time, applying changes to every single host loosing time in looking for the password is not a a good idea.
Thus I was forced to start managing the servers in a cluster like fashion, by executing commands on a server group using a simple for bash loop etc.
To be able to use this mass execution of course I needed away either to pass on the server group password just once and issue a command on the whole server group or use a passwordless authentication ssh key pair.
Before I switched to using SSH keys to authenticate passwordless, I first tried to use a bit of tools which were claimed to be helpful in the task of executing the same commands to a group of servers. I have tested the tools pssh, sudossh and dsh but none of them was capable of logging in and executing a bunch of commands to the group of remote servers.
I gave my best to make pssh work on Debian and CentOS distributions, but even though all my experiemnts and efforts to make the so much talked about pssh to work were bad!
I’ve seen also another tool called Cluster SSH which was said to be capable of issuing commands simultaneously on a number of hosts.
Cluster SSH looked promising, however the only problem was it’s supposed to run under xterm or some kind of X graphics based terminal and therefore it did not matched my desired.
Finally I got pissed of trying these mostly useless mass command linux server administration tools and decided to come COME BACK TO THE PRIMITIVE 😉 and use the good all known, well established method of Passwordless SSH server login with ssh public/private DSA key auth.
Therefore here the problem come to this to generate one single DSA ssh authenticatoin key and replicate/copy it to the whole group of 50 servers.
These task initially seemed quite complex, but with the help of a one liner bash shell script, it seemed to be a piece of cake 😉
To achieve this task, all I had to do is:
a. Generate an SSH key with ssh-keygen command
and
b. Use a one liner shell script to copy the generated id_rsa.pub file, to each server.
and
c. Create a file containig all server IP addresses to pass to the shell script.
Here are the two lines of code you will have to use to achieve these tasks:
1. Generate a DSA ssh key
linux:~# ssh-keygen -t dsa
Generating public/private dsa key pair.
Enter file in which to save the key (/home/hipo/.ssh/id_dsa): y
Enter passphrase (empty for no passphrase):
Enter same passphrase again:
Your identification has been saved in y.
Your public key has been saved in y.pub.
The key fingerprint is:
b0:28:48:a2:60:65:5a:ed:1b:9d:6c:ff:5f:37:03:e3 hipo@www.pc-freak.net
Here press enter few times and be sure not to fill in any passphrase when asked ’bout it.
2. Create a file containing all server IPs
Just create a file let’s say server-list.txt and make sure you include all the server IPs, one per line.
3. Use the following little script to upload the newly generated id_dsa.pub to the server list
linux:~# while read line; do ssh-copy-id -i ~/.ssh/id_dsa.pub root@"$line"; done < server-list.txt
Now you will have to paste the server password for about 50 times (if you have a file with 50 servers), however the good news is it will be just a wait and paste 50 times, if the servers are all configured to have the same root administrator pass (which was the case with me).
So until you do the boring pasting part, you can start up a nice music and enjoy 😉
Cheers 😉
Tags: administration tools, authentication, BACK, CentOS, course, distributions, DSA, dsh, fashion, file, hipo, host, hosts, Linux, linux distribution, mass, mass execution, none, passphrase, password, PRIMITIVE, pssh, root, server administration, server group, server groups, server login, servers, Shell, ssh server, terminal, time, tool, work, xterm
Posted in Linux, Linux and FreeBSD Desktop, Programming, System Administration | 2 Comments »


