Posts Tagged ‘line’

Remove string line from file on Linux and BSD – Delete entire line with string from file

Tuesday, March 15th, 2016

linux-remove-lines-containing-string-with-sed

If you're already used too using grep -v "sometring" filename to print everything from a file without the certain grepped string output and you want to do the same to delete lines based on strings without having to output the grepped string to a file and then overwritting the original file:
 

grep -v 'whatever' filename > filename1
mv filename1 filename


A much better way to delete an whole line containing a string match from a file is to use sed
sed
should be the tool of choice especially if you're scripting because sed is especially made for such batch edittings.

Here is how to do delete an entire line based on a given string:


sed –in-place '/some string to search and delete/d' myfilename


It might be a good idea to also create backups just to make sure something doesn't get deleted incidently to do use:

sed –in-place=.bak '/some string to search and delete/d' myfilename

If you need to wipe out an exact string from all files within a folder you might use a for loop or perl (some good examples check my previous article here)

In short to use bash's for loop here is how to backup and remove all lines with a string match within all files within a Linux directory:


for f in *.txt; do sed –in-place '/some string/d'
"$f"; done
find -name '*.txt' -exec sed –in-place=.bak '/some
string/d' "{}" ';'


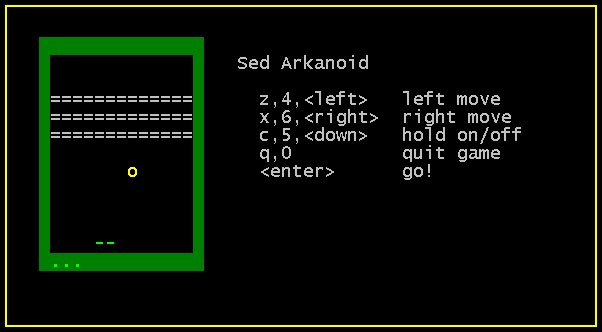
BTW SED is really rich editor and some people got so much into it that there is even a sed written text (console) version of arkanoid 🙂

sed-text-editor-written-arkanoid-game-linux-bsd

If you want to break the ice and get some fun in your boring sysadmin life get sed arkanoid code from here.
I have it installed under pc-freak.net free ASCII Games entertainment service, so if you want to give it a try just login and give a try.

Enjoy 🙂

How to SSH client Login to server with password provided from command line as a script argument – Running same commands to many Linux servers

Friday, March 6th, 2015

ssh-how-to-login-with-password-provided-from-command-line-use-sshpass-to-run-same-command-to-forest-of-linux-servers

Usually admins like me who casuanlly need to administer "forests" (thousands of identicallyconfigured services Linux servers) are generating and using RSA / DSA key authentication for passwordless login, however this is not always possible as some client environments does prohibit the use of RSA / DSA non-pass authentication, thus in such environments to make routine server basic package rpm / deb upgrades or do other maintanance patching its necessery to use normal ssh user / pass login but as ssh client doesn't allow password to be provided from prompt for security reasons and therefore using some custom bash loop to issue single command to many servers (such as explained in my previous article) requires you to copy / paste password on password prompt multiple times. This works its pretty annoying so if you want to run single command on all your 500 servers with specifying the password from password prompt use sshpass tool (for non-interactive ssh password auth).

SSHPASS official site description:
 

sshpass is a utility designed for running ssh using the mode referred to as "keyboard-interactive" password authentication, but in non-interactive mode.


Install sshpass on Debian / Ubuntu (deb based) Linux

sshpass is installable right out of regular repositories so to install run:
 

apt-get install —yes sshpass


Install sshpass on CentOS / Fedora (RPM based) Linux


sshpass is available also across most RPM based distros too so just use yum package manager


yum -y install sshpass


If its not available across standard RPM distro provided repositories, there should be RPM on the net for distro just download latest one and use wget and rpm to install:

 wget -q http://dl.fedoraproject.org/pub/epel/6/x86_64/sshpass-1.05-1.el6.x86_64.rpm

 rpm -ivh sshpass-1.05-1.el6.x86_64.rpm


How Does SshPass Works?


Normally openssh (ssh) client binary uses direct TTY (/dev/tty)= an abbreviation for PhyTeleTYpewriter or (the admin jargon call Physical Console access)  instead of standard remotely defined /dev/ptsVirtual PTY.
To get around this Sshpass runs ssh in a dedicated TTY to emulate the password is indeed issues by interactive keyboard user thus  fooling remote sshd server to thinking password
is provided by interactive user.


SSHPass use

Very basic standard use which allows you to pass the password from command line is like this:
 

sshpass -p 'Your_Password_Goes_here123' ssh username@server.your-server.com


Note that the server you're working is shared with other developers they might be able to steal your username / password by using a simple process list command such as:
 

 ps auxwwef


In my case security is not a hot issue, as I'm the only user on the server (and only concern might be if someone hacks into the server 🙂 


Then assuming that you have a plain text file with all your administered servers, you can easily use sshpass in a Bash Script loop in order to run, lets say a package upgrade across all identical Linux version machines:
 

while read line; do
sshpass -p 'Your_Password_Goes_here123' ssh username@$line "apt-get update && apt-get upgrade && apt-get dist-upgrade" < /dev/null;
done < all_servers_list.txt

Change the command you like to issue across all machines with the string "apt-get …"
Above command can be used to keep up2date all Debian stable server packages. What you will do on servers is up to your imaginations, very common use of above line would be if you want to see uptime /netstat command output across all your network servers.


while read line; do
sshpass -p 'Your_Password_Goes_here123' ssh username@$line "uptime; who; netstat -tunlp; " < /dev/null;
done < all_servers_list.txt


As you can guess SshPass is swiss army knife tool for admins whoneed to automate things with scripts simultaneously across number of servers.
 

Happy SSH-ing 🙂


How to remove the meta generator Content (Joomla! – Copyright) in Joomla 1.5

Thursday, December 30th, 2010

Joomla-remove-meta-generator-content-to-hide-joomla-site-install
Do you wonder How to change <meta name="Generator" content="Joomla! – Copyright (C) 2005 – 2007 Open Source Matters. All rights reserved." /> in Joomla 1.5

If yes, Here is how I've just found to remove the:


in my Joomla installation.

I need to remove that as a part of making my website not to leak out that it runs on top of Joomla.

So here is how:

1. Go to your Joomla website main root directory
2. Edit /libraries/joomla/document/html/renderer/head.php
Look for line: 83 in the /libraries/joomla/document/html/renderer/head.php
There you will notice the code:

$strHtml .= $tab.'<meta name="generator" content="'.$document->getGenerator().'" />'.$lnEnd;

In order to remove the <meta name="generator" content="Joomla …." /> change the above code to something like:

$strHtml .= $tab.'<meta name="generator" content="My Custom Web site Generator name" />'.$lnEnd;

That's all now next time you refresh your website the content="Joomla! – Copyright (C) 2005 – 2009 Open Source Matters. All rights reserved." will be no more.
Cheers! 🙂

Windows batch read variable – equivalent of Linux read line command

Wednesday, March 12th, 2014

bat-file-icon-windows-read-variable
If you need to do some basic batch scripting sooner or later you will have to insert input from command line to a variable. In Linux this is done with read command, i.e.:
$ echo -n "Type a password for admin:";
$ read line;
$ echo $line;

So here is how to do the same if you need it for a Windows Batch (.BAT) file

C:\\Users\\> Set /p string='What do you want to ask?:'
'What do you want to ask?:'

This will define the string variable, to later print out the variable use:
> echo %string%
variable input output

Enable Rsyslog and Syslog cron events logging in /var/log/cron.log on Debian Lenny

Friday, April 9th, 2010

By default Debian doesn’t log it’s cron events in a separate log file.
All the cron events got logged along with all the other syslog events configured by default in either syslog or rsyslog.
So you end up with a /var/log/syslog which includes many versatile messages. That’s really unpleasent if you want to keep track of your cron events separately.
I always change this behaviour while configuring new servers or Desktop systems running Debian.
Therefore I decided to share here what I do to enable separate cron logging. The logged cron events would go to var/log/cron.log.
As a starter please make sure you have the file /var/log/cron.log existing on your filesystem tree, if you have it not then please create it:
debian:~# touch /var/log/cron.log

To configure your crond to log to /var/log/cron.log on a system running syslogd all you have to do is edit /etc/syslog.conf and either include the line:

cron.* /var/log/cron.log
or simply uncomment the same line already laying commented in the syslog.conf.
If you’re using the enhanced version of syslogd for Linux (Rsyslog) the code syntax that is necessery to be included is absolutely identical.
Again you have to include:

cron.* /var/log/cron.log

in /etc/rsyslog.conf or uncomment the line shown above in /etc/rsyslog.conf.

Now last step to do is to reload syslogd or rsyslogd.

With syslogd running on your system execute:

debian:~# killall -HUP syslogd

With rsyslogd as a default system logger:

debian:~# killall -HUP rsyslogd

Now you should have your crond logging to the separate /var/log/cron.log, wish you happy cron.log reading 🙂

How to deb upgrade PHP 5.3.3-7 / MySQL Server 5.1 to PHP 5.4.37 MySQL 5.5 Server on Debian 6.0 / 7.0 Squeeze / Wheezy GNU / Linux

Thursday, February 12th, 2015

how-to-deb-upgrade-mysql-server-5.1-to-mysql-5.5-php-5.3-to-php-5.4-5.5-upgrade-howto-on-old-stable-debian-squeeze-wheezy

I've been still running Debian Squeeze 6.0 GNU / Linux on few of the Linux / Apache / MySQL servers I'm administrating and those servers are running few Wordperss / Joomla websites which lately face severe MySQL performance issues. I tried to optimize using various mysql performance optimization scripts such as mysql-tuner.pl, Tuning-primer.sh and Percona Toolkit – a collection of advanced command-line tools for system administrators and tech / support staff to perform a variety of MySQL and system tasks that are too difficult or complex to perform manually. Though with above tools and some my.cnf tunizations I managed to achieve positive performance improvement results with above optimizations, still I didn't like how MyQSL served queries and since the SQL server is already about 5 years old (running version 5.1) and the PHP on sever is still at 5.3 branch, I was advised by my dear colleague Anatoliy to try version update as a mean to improve SQLserver performance. I took seriously the suggestion to try upgrade as a mean to resolve performance issues in this article I will explain in short what I had to do to make MySQL upgrade a success

Of course to try keep deb installed software versions as fresh as possible possible deb packagse, I'm already using Debian Back Ports (for those who hear it a first time Debian Backports is a special repository for Stable versioned Debian Desktop and Servers  – supporting stable releases of Debian Linux) which allows you to keep install packages versions less outdated (than default installable software which usually are way behind latest stable package versions with 2-5 years).

If you happen to administer Stable Debian servers and you never used BackPorts I warmly recommend it as it often includes security patches of packages part of Debian stable releases that reached End Of Support (EOS) and already too old even for security updates to be issued by respective Debian Long Term Suport (LTS) repositories.

If you're like me and still in situation to manage remotely Debian 6.0 Squeeze and its the first time you hear about BackPorts and Debian LTShttps://wiki.debian.org/LTS/ to start using those two add to your /etc/apt/sources.list below 3 lines

Open with vim editor and press shift+G to go to last line of file and then press I to enter INSERT mode, once you're done to save, press (ESC) then press : and type x! in short key combination for exit and save setting in vim is 
 

Esc + :x! 


debian-server:~# vim /etc/apt/sources.list
deb http://http.debian.net/debian squeeze-lts main contrib non-free
deb-src http://http.debian.net/debian squeeze-lts main contrib non-free
deb http://http.debian.net/debian-backports squeeze-backports main

If you haven't been added a security updates line in /etc/apt/sources.list make sure you add also:


deb http://security.debian.org/ squeeze/updates main contrib non-free
deb-src http://security.debian.org/ squeeze/updates main contrib non-free


Then to apply latest security updates and packages from LTS / Backports repository run the usual:


debian-server:~# apt-get update && apt-get –yes upgrade
….

If you need to search a package or install something from just added backports repository use:


debian-server:~# apt-cache -t squeeze-backports search "mysql-server"
auth2db – Powerful and eye-candy IDS logger, log viewer and alert generator
torrentflux – web based, feature-rich BitTorrent download manager
cacti – Frontend to rrdtool for monitoring systems and services
mysql-server-5.1 – MySQL database server binaries and system database setup
mysql-server-core-5.1 – MySQL database server binaries
mysql-server – MySQL database server (metapackage depending on the latest version)


To install specific packages only with all their dependencies from Backports while keeping rest of packages from Debian Stable:


debian-server:~# apt-get install -t squeeze-backports "package_name"

In same way you can also search or install specific packages from LTS repo:


debian-server:~# apt-get search -t squeeze-lts "package_name"

debian-server:~# apt-get install -t squeeze-lts "package_name"

Latest mysql available from Debian BackPorts and LTS is still quite old 5.1.73-1+deb6u1 therefore I made an extensive research online on how can I easily update MySQL 5.1 to MySQL 5.5 / 5.6 on Debian Stable Linux.
 

Luckily there were already DotDeb deb repositories for Debian LAMP (Linux / Apache  / MySQL / PHP / Nginx ) running servers prepared in order to keep the essential Webserver services up2date even long after distro official support is over. I learned about existence of this repo thanks to a Ryan Tate's post who updates his LAMP stack on TurnKey Linux which by the way is based on slightly modified official stable Debian Linux releases packages

To start using DotDeb repos add in /etc/apt/sources.list (depending whereh you're on Squeeze or Wheeze Debian):


deb http://packages.dotdeb.org squeeze all
deb-src http://packages.dotdeb.org squeeze all

or for Debian Wheezy add repos:


deb http://packages.dotdeb.org wheezy all
deb-src http://packages.dotdeb.org wheezy all


I was updating my DebianLatest MySQL / PHP / Apache release to Latest ones on (6.0.4) Squeeze so added above squeeze repos:

Before refreshing list of package repositories, to authenticate repos issue:


debian-server:~# wget -q http://www.dotdeb.org/dotdeb.gpg
debian-server:~# apt-key add dotdeb.gpg

Once again to update my packages from newly added DodDeb repository


debian-server:~# apt-get update

Before running the SQL upgrade to insure myself, I dumped all databases with:


debian-server:~# mysqldump -u root -p -A > /root/dump.sql

Finally I was brave enough to run apt-get dist-upgrade to update with latest LAMP packages


debian-server:~# apt-get dist-upgrade
Reading package lists… Done
Building dependency tree
Reading state information… Done
Calculating upgrade… Done
The following packages will be REMOVED:
  mysql-client-5.1 mysql-server mysql-server-5.1
The following NEW packages will be installed:
  libaio1 libmysqlclient18 mysql-client-5.5 mysql-client-core-5.5 python-chardet python-debian
The following packages will be upgraded:
  curl krb5-multidev libapache2-mod-php5 libc-bin libc-dev-bin libc6 libc6-dev libc6-i386 libcurl3 libcurl3-gnutls libcurl4-openssl-dev libevent-1.4-2
  libgssapi-krb5-2 libgssrpc4 libjasper1 libk5crypto3 libkadm5clnt-mit7 libkadm5srv-mit7 libkdb5-4 libkrb5-3 libkrb5-dev libkrb53 libkrb5support0 libmysqlclient-dev
  libxml2 libxml2-dev locales mysql-client mysql-common ntp ntpdate php-pear php5 php5-cgi php5-cli php5-common php5-curl php5-dev php5-gd php5-imagick php5-mcrypt
  php5-mysql php5-odbc php5-recode php5-sybase php5-xmlrpc php5-xsl python-reportbug reportbug unzip

50 upgraded, 6 newly installed, 3 to remove and 0 not upgraded.
Need to get 51.7 MB of archives.
After this operation, 1,926 kB of additional disk space will be used.
Do you want to continue [Y/n]? Y

As you see from above output above command updates Apache webservers / PHP and PHP related modules, however it doesn't update MySQL installed version, to update also MySQL server 5.1 to MySQL server 5.5


debian-server:~#  apt-get install –yes mysql-server mysql-server-5.5

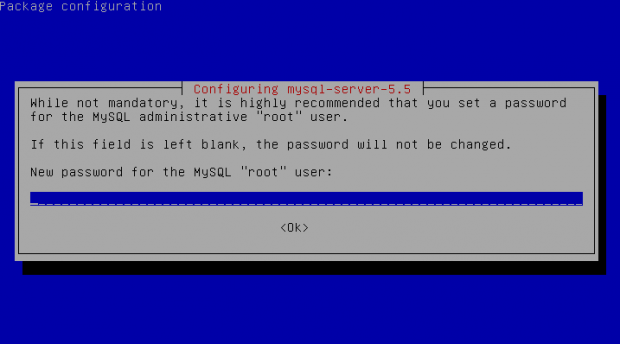
You will be prompted with the usual Debian ncurses text blue interface to set a root password to mysql server, just set it the same as it used to be on old upgraded MySQL 5.1 server.

Well now see whether mysql has properly restarted with ps auxwwf


debian-server:~#  ps axuwwf|grep -i sql
root     22971  0.0  0.0 112360   884 pts/11   S+   15:50   0:00  |                   \_ grep -i sql
root     19436  0.0  0.0 115464  1556 pts/1    S    12:53   0:00 /bin/sh /usr/bin/mysqld_safe
mysql    19837  4.0  2.3 728192 194552 pts/1   Sl   12:53   7:12  \_ /usr/sbin/mysqld –basedir=/usr –datadir=/var/lib/mysql –plugin-dir=/usr/lib/mysql/plugin –user=mysql –pid-file=/var/run/mysqld/mysqld.pid –socket=/var/run/mysqld/mysqld.sock –port=3306
root     19838  0.0  0.0 110112   700 pts/1    S    12:53   0:00  \_ logger -t mysqld -p daemon.error

In my case it was running, however if it fails to run try to debug what is going wrong on initialization by manually executing init script /etc/init.d/mysql stop; /etc/init.d/mysql start and look for errors. You can also manually try to run mysqld_safe from console if it is not running run:


debian-server:~# /usr/bin/mysqld_safe &

This should give you a good hint on why it is failing to run
 

One more thing left is to check whether php modules load correctly to do so issue:


debian-server:~# php -v
Failed loading /usr/lib/php5/20090626/xcache.so:  /usr/lib/php5/20090626/xcache.so: cannot open shared object file: No such file or directory

Failed loading /usr/lib/php5/20090626/xdebug.so:  /usr/lib/php5/20090626/xdebug.so: cannot open shared object file: No such file or directory


You will likely get an exception (error) like above.
To solve the error, reinstall xcache and xcache-debug debs


debian-server:~# apt-get purge php5-xcache php5-xdebug

Now PHP + MySQL + Apache environment should be running much smootly.
debian-squeeze-wheeze-update-install-mysql-sevver5.55-620x344-howto

Upgrading the MySQL server / PHP library to MySQL server 5.6 / PHP 5.5 on Wheeze Linux is done in very much analogous ways all you have to do is change the repositories with above wheeze 7.0 ones and to follow the process as described in this article. I haven't tested update on Wheezy yet, so if you happen to try my article with wheezy reports and got a positive upgrade result please drop a comment.

luckyBackup Linux GUI back-up and synchronization tool

Wednesday, May 14th, 2014

luckybackup_best-linux-graphical-tool-for-backup_linux_gui-defacto-standard-tool
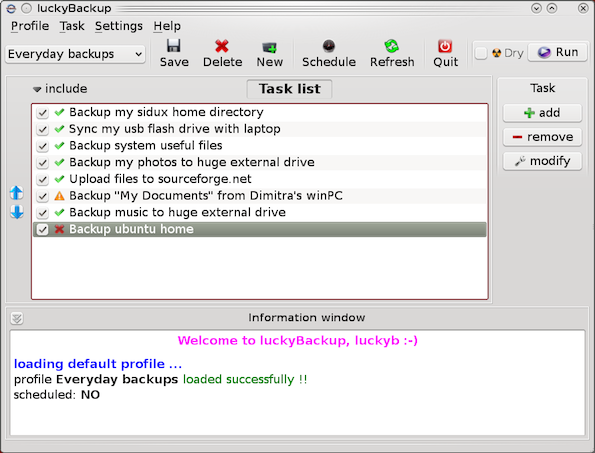
If you're a using GNU / Linux  for Desktop and you're already tired of creating backups by your own hacks using terminal and you want to make your life a little bit more easier and easily automate your important files back up through GUI program take a look at luckyBackup.

Luckibackup is a GUI frontend to the infamous rsync command line backup  tool. Luckibackup is available as a package in almost all modern Linux distributions its very easy to setup and can save you a lot of time especially if you have to manage a number of your Workplace Desktop Office Linux based computers.
Luckibackup is an absolute must have program for Linux Desktop start-up users. If you're migrating from Microsoft Windows realm and you're used to BackupPC, Luckibackup is probably the defacto Linux BackupPC substitute.

The sad news for Linux GNOME Desktop users is luckibackup is written in QT and it using it will load up a bit your notebook.
It is not installed by default so once a new Linux Desktop is installed you will have to install it manually on Debian and Ubuntu based Linux-es to install Luckibackup apt-get it.

debian:~# apt-get install --yes luckibackup
...

On Fedora and CentOS Linux install LuckiBackup via yum rpm package manager

[root@centos :~]# yum -y install luckibackup
.

Luckibackup is also ported for OpenSuSE Slackware, Gentoo, Mandriva and ArchLinux. In 2009 Luckibackup won the prize of Sourceforge Community Choice Awards for "best new project".

luckyBackup copies over only the changes you've made to the source directory and nothing more.
You will be surprised when your huge source is backed up in seconds (after the first backup).

Whatever changes you make to the source including adding, moving, deleting, modifying files / directories etc, will have the same effect to the destination.
Owner, group, time stamps, links and permissions of files are preserved (unless stated otherwise).

Luckibackup creates different multiple backup "snapshots".Each snapshot is an image of the source data that refers to a specific date-time.
Easy rollback to any of the snapshots is possible. Besides that luckibackup support Sync (just like rsync) od any directories keeping the files that were most recently modified on both of them.

Useful if you modify files on more than one PCs (using a flash-drive and don't want to bother remembering what did you use last. Luckibackup is capable of excluding certain files or directories from backupsExclude any file, folder or pattern from backup transfer.

After each operation a logfile is created in your home folder. You can have a look at it any time you want.

luckyBackup can run in command line if you wish not to use the gui, but you have to first create the profile that is going to be executed.
Type "luckybackup –help" at a terminal to see usage and supported options.
There is also TrayNotification – Visual feedback at the tray area informs you about what is going on.


Migrate VMWare Linux Virtual Machine to Virtualbox – Convert VMware .VMX to .OVF (Open Virtual Format)

Monday, June 2nd, 2014

migrate_vmware-virtual-machine-toto-virtualbox-vmx-to-ovf-migration

VMWare Virtual Machines are usually stored in OVA Format  which is bundle of OVF(Open Virtualization Format) and in multiple *.VMDK files.
Though other Virtual Machines are supposed to also support these "open virtualization format", different VM vendors implement and support it differently, therefore though in theory VirtualBox and QEMU are said to support OVA Format. Attempts to import such usually will fail. In this little article I will explain how VMWare stored (exported) VirtualMachine machine can be succesfully imported to VirtualBox.
 

1. Locate where is Virtualbox .vmx files from Window search or via dir command

I'm a console guy, so I prefer looking for VMWare's .vmx from command line:
 

C:\Users\GGEORGI7> cd c:\ C:\> dir /s *.vmx


Volume in drive C is PC COE
Volume Serial Number is XXXX-XXXX

Directory of C:\Users\ggeorgi7\Documents\Virtual Machines\Debian 7

06/02/14 11:06 AM 2,687 Debian 7.vmx
05/28/14 15:44 PM 370 Debian 7.vmxf
2 File(s) 3,057 bytes


2. Switch to wherever the VMWare virtualmachine .vmx file is located


C:\> cd \Users\ggeorgi7\Documents\Virtual Machines\Debian 7
 

N.B. !Make sure the VMWare Virtualmachine is Shutdown (if it is Suspended converted file will not be properly implemented inside VirtualBox!). Whether the migrated virtualhost is suspended, launch VMWare, restore its state and Shut it down properly before starting migration with ovftool.
 

3. Remove Vmware-tools, Reset Display settings and Input D (before exporting to OVF) in VMWare

a) Remove vmware-tools

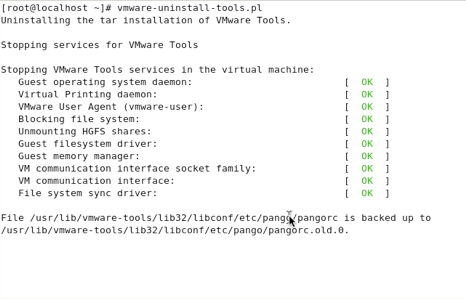
Vmware-tools kernel modules and stuff compiled specific for VMWare are no longer needed and might pose issues, thus it is always a good idea if previously installed in VMWare to wipe them out with cmd:

vmware-uninstall-tools.pl

uninstall-vmware-tools-linux-screenshot-migrating-vmware-to-virtualbox
b) Reset Display Device and Input Devices

Inside VMWare virtual machine Linux host, before shutting it down run:

mv /etc/X11/xorg.conf /etc/X11/xorg.conf.vmware

c) Remove Incomptable devices

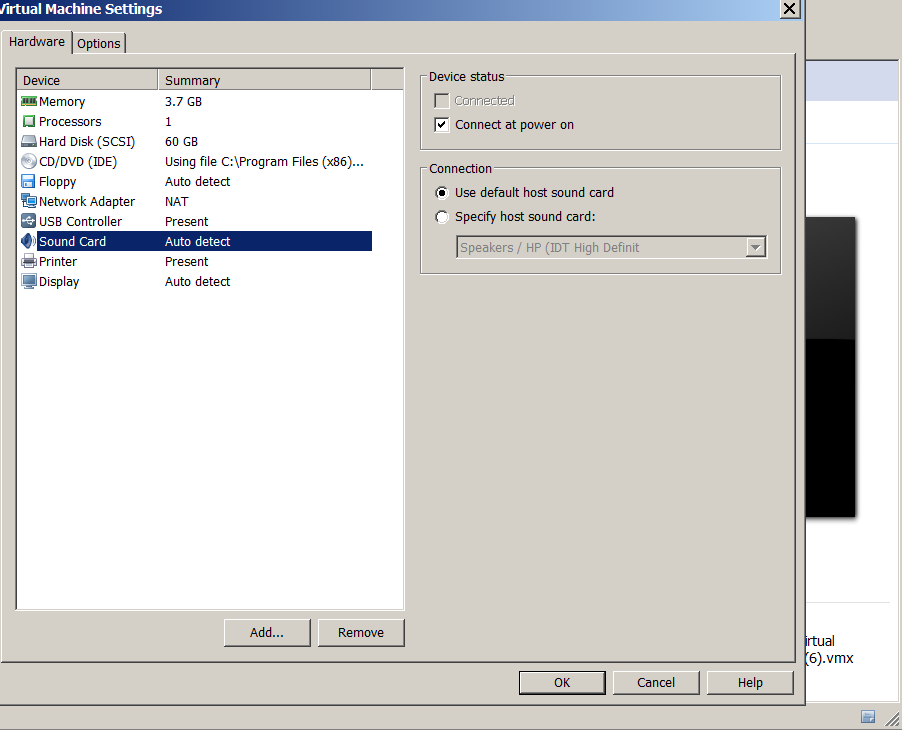
To prevent issues with sound – its necessary to remove VMWare device created for soundcard, in order to let VirtualBox create its soundcard device on 1st boot after migration. To do so click on Virtual Machine and from context menu click Settings then in  Hardware tab select Sound Card and Remove:
 

Settings -> Hardware -> Sound Card (Click Remove)

vmware-migration-remove-soundcard-to-make-work-sound-work-in-virtualbox


4. Make a Clone (Backup) of Virtual Machine

Its always a good idea to create backup of VMWare VM to be migrated just in case something goes wrong during migration, so you have a way to step back to the already working one. Once files are copied it might be a good idea to use use some archiver like PeaZip or 7-Zip to save some disk space.
 

mkdir SomeFolder
copy Path_To_Virtual_Machine Folder_for_Backup_Virtual_Machine


In my case this was


mkdir \Temp\VMWare-machine-backup
C:\>copy "C:\Users\ggeorgi7\Documents\Virtual Machines\Debian 7"\ c:\Temp\VM
ware-machine-backup

Restoring later VMWare VirtualMachines in case of some failure is done by simply copying backuped files to VMWare Working Directory folder

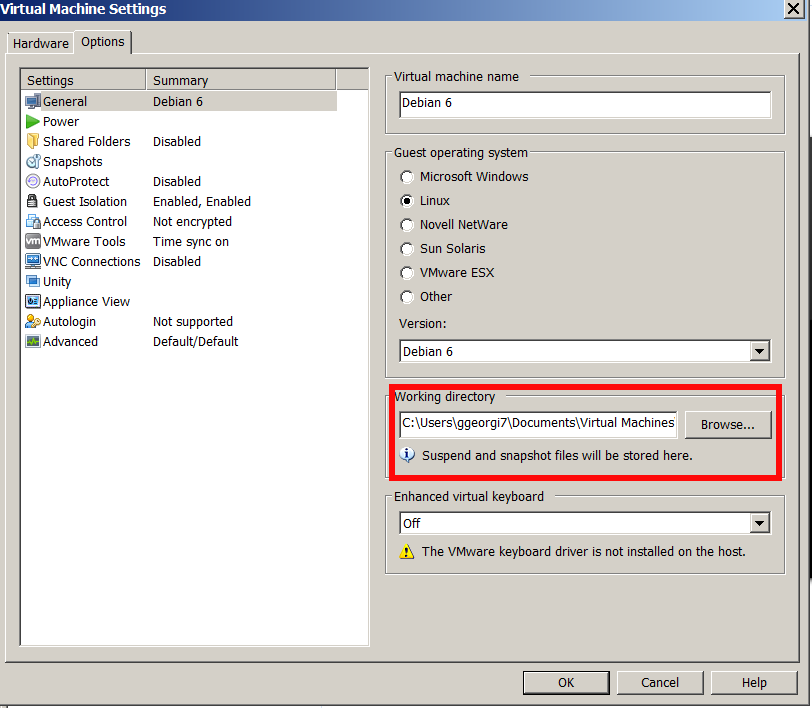
In case if Wondering

Where is stored VMWare Virtual Machines?


Check in:
 

VM -> Settings -> Options


vmware-working-directory-folder-where-are-stored-vmware-virtualmachines

5. Use VMWare ovftool.exe to convert .VMX to Open Virtualization Format (.OVF)


Though export from .VMX to .OVF it can be also done from VMWare GUI from:
 

File -> Export to OVF

Anyways I think it is better to do it via OVFTool console tool:

The most common location for  VMWare Workstation is:
 

C:\Program Files (x86)\Vmware\Vmware Workstation\OVFTool


For VMware Player it is:

C:\Program Files (x86)\Vmware\Vmware Player\OVFTool

Very important thing to mention here is you have to be cautious, Never to run together VMWare and VirtualBox.
!! Before proceeding to next OVTool .vmx to .ovf migration Shutdown the VirtualMachine and as a best practice close VMware completely.

cd Location-directory-ofOVFTool
ovftool.exe Path-folder-to_VMVM_file.vmx Path-folder_to_VM_exportVM_file_export.ovf

C:\> cd "\Program Files (x86)\VMware\VMware Workstation"\OVFTool
C:\Program Files (x86)\VMware\VMware Workstation\OVFTool>ovftool.exe "\Users\ggeorgi7\Documents\Virtual Machines\Debian 7\Debian 7.vmx" C:\Users\ggeorg i7\vmware-debian-export.ovf


vmware-ovftool-convert-vmware-linux-virtual-machine-to-virtualbox


Convertion will take about 30 minutes on a normal computer hardware lets say (Dual Core PC 2Ghz with 4 Gb of RAM).
If you get a “failed to open disk” error during convertion, its likely that the virtual machine is still running or wasn’t shut down properly – boot the virtual machine and perform a shut down.

6. Launch VirtualBox, Install Guest Additions to enable Copy / Paste and USB support in Virtual Machine

After the process completes, you can boot the virtual machine. If you haven't earlier uninstalled vmware-tools  uninstall VMware Tools, and install VirtualBox’s Guest Additions (in order to allow Copy / Paste between VirtualBox and guess OS).
 

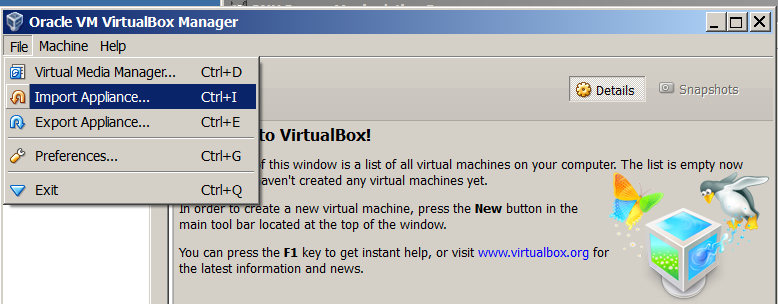
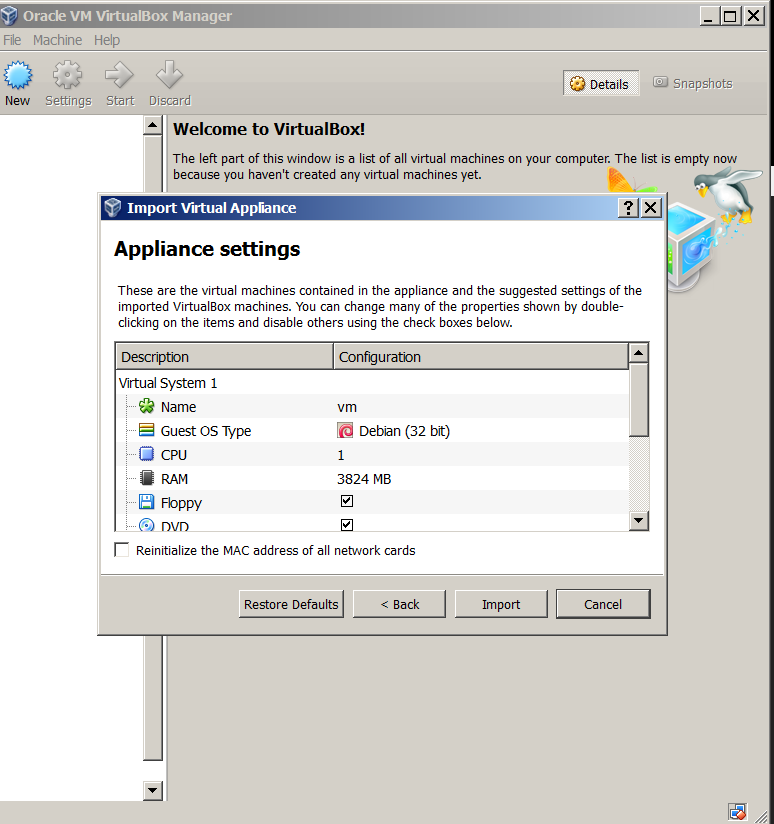
7. Launch VirtualBox and Import exported .OVF

Once Virtual Machine is exported, to import it into VirtualBox, launch VirtualBox and choose:
 

File -> Import Appliance


virtualbox-import-vmware-old-virtual-machine-to-new-linux import vmware appliance

virtualbox-import-vmware-previously-installed-virtual-machine-linux import appliance virtualbox
 

Linux: Virtualbox shared folder – how to share files from host to guest OS in Virtualbox

Monday, June 9th, 2014

add-shared-folder-in-virtualbox-linux-virtual-machine-on-top-of-windows-howto

If you just installed Debian / Ubuntu / CentOS Linux on top of Windows inside Virtualbox Virtual Machine and you're wondering how to Share files between Windows Host Operating System and Guest Operating System (Linux), here is how:

1. First make sure Virtualbox guest additions are installed

Besides installing Virtualbox guest additions which will enable you to resize VBox Window / enable copy paste between guest and host OS it is useful to have also Virtualbox extension packs which allows your Virtual Machine to be accessed remote via Remote Desktop Protocol (RDP) – the so called VRDP

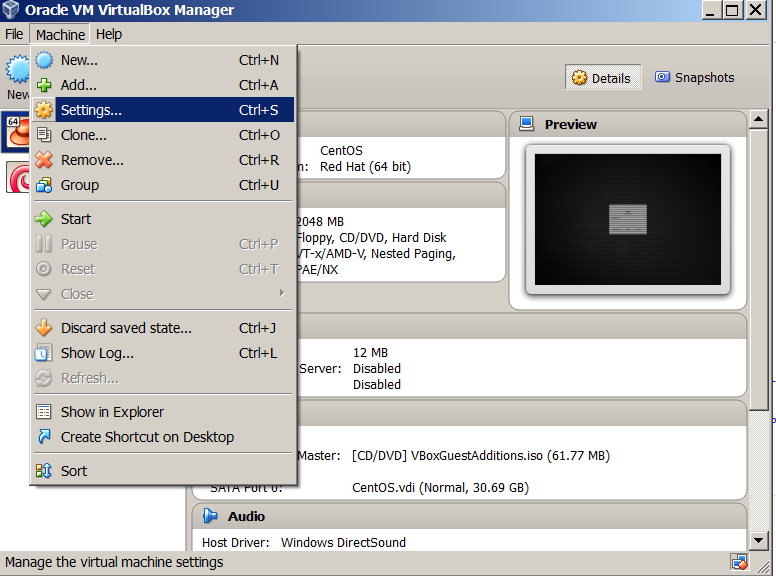
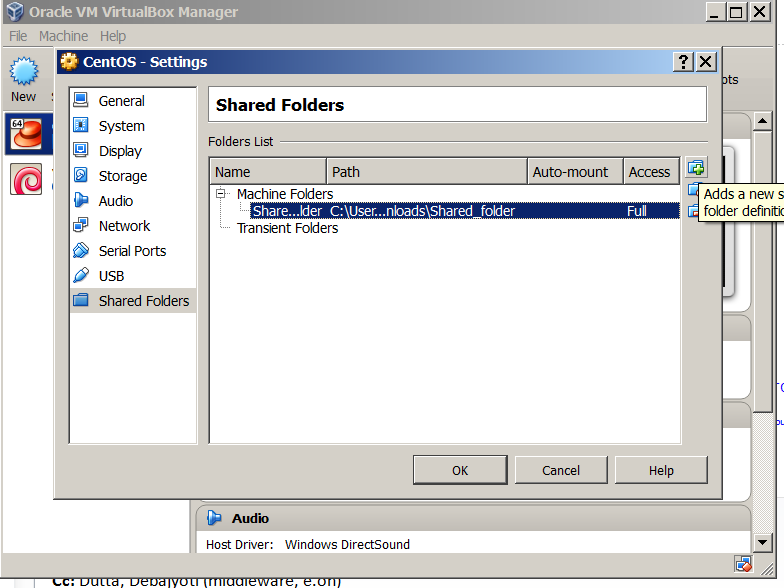
2. From Virtualbox VM select folder on Windows hsot which will be shared

Selection of which Win folder to mount in Vbox is done via Virtualbox menus:
 

Machine -> Settings -> Shared Folder

virtualbox-windows-linux-guest-OS-how-to-shared_folder-screenshot2

virtualbox-windows-linux-guest-OS-how-to-shared_folder-screenshot

3. Launch Linux Virtual Machine and use mount command to mount shared folder

I like the practice of creating a new folder inside c:UsersgeorgiDownloadsShared_folder

Then fire up gnome-terminal / xterm whatever terminal you like and to mount shared folder inside emulated Linux issue:

mount -t vboxsf -o rw Shared_folder /mnt/Shared_folder/


This will mount Shared_folder in rw (read / write) mode, if you prefer to only mount Virtualbox Shared_folder for reading:

mount -t vboxsf -o ro Shared_folder /mnt/Shared_folder/

4. Configure Virtualbox Shared Folder to auto mount in Linux via fstab

As we all know automating mounts in Linux is done by adding line in /etc/fstab to automate Vbox Shared_Folder mount add new line to fstab like:
 

Shared_folder         /mnt/Shared_folder         vboxsf  defaults,rw    0 0

This will auto-mount in vbox shared folder read / write mode, to auto-mount it in read only mode:

Shared_folder         /mnt/Shared_folder         vboxsf  defaults,ro    0 0

  If you added it to /etc/fstab (and you didn't mount Shared Folder manually before), run

mount -a

to make Linux system re-read auto-mounts defined in fstab
 

The new mounted folder will appear in whenever said to be mounted. Enjoy 🙂


ConEmu and Clink – Add Linux shell shortcuts, tabs and tab completion to Windows command line – Far Manager Windows text file explorer

Thursday, June 12th, 2014

If you're a Linux geek and forced to work on Windows for some reason. You will probably want to add some Linux & Feel to Windows console. Yesterday in a discussion with a colleague who is considered to be our team's Windows Guru, I noticed his Windows 7 command line looks slightly different and asked him, "is it some cmd.exe customization?" and this is how I learned about existence of ConEmu and Clink.
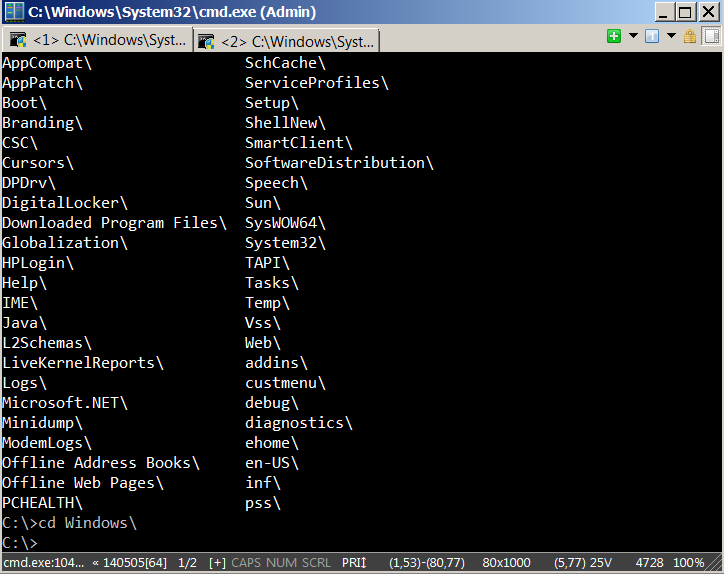
ConEmu is advanced console window where you can run any shell of your choice.

conemu-tabbed-command-prompt-cmd-wrapper-like-gnome-terminal-for-windows

ConEmu (Console Emulator) + Clink combination is very much like MobaXterm (tabbed SSH client and win cmd line) in many sense except it doesn't have an embbed ssh support client. By using Conemu + Clink (Powerful bash style line editing) wrappers to cmd.exe you get the invaluable Linux / UNIX tab completion, command line shortcuts like CTRL + R, CTRL + A, CTRL + P etc. into Windows OS. ConEmu is very useful in Windows environments when you have to heavily use Windows PowerShell

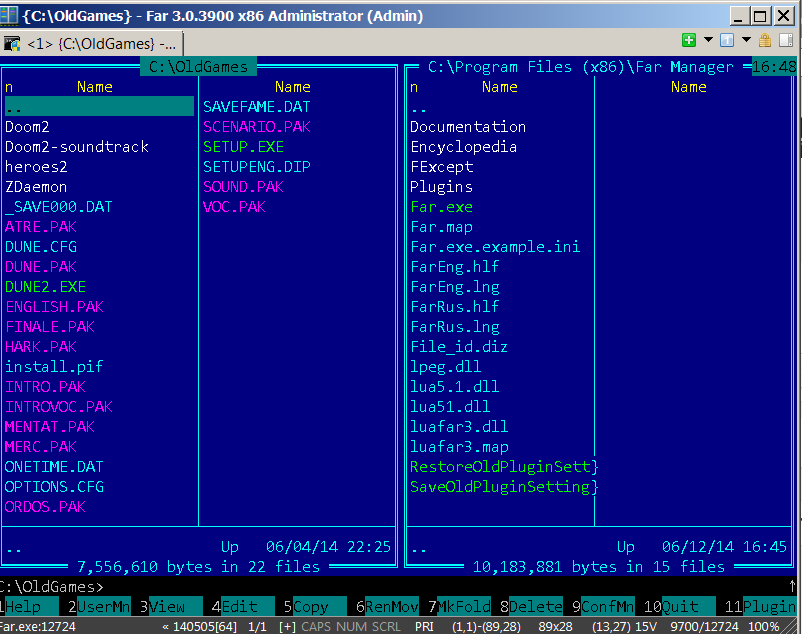
If you're get used to Linux's Midnight Commander (MC)  and you're looking for MC for Windows you will certainly want to check out Far Manager (File and Archive Manager). Far Manager provides simple and intuitive ncurses (mc) like interface on Windows and supports view, edit, copy rename and a lot of other basic operations supported also by mc.

far-manager-mc-like-text-file-browser-for-windows-linux-mc-windows-alternative-software


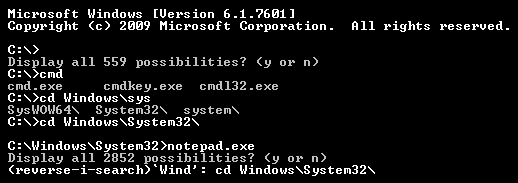
Clink combines the native Windows shell cmd.exe with the powerful command line editing features of the GNU Readline library, which provides rich completion, history, and line-editing capabilities. Readline is well-known and used in Unix shell Bash, the standard shell for Mac OS X and most of Linux distributions.

In my view coolest Clink command shortcut is reverse-search allowing you to auto-type by letters commands (from command line history), lets say you want to invoke dir – you press CTRL + r and type D and all occurances earlier typed starting with "d", pops up as possible choice.

clink_bring-linux-bash-shell-powerful-command-line-editing-for-windows
Everyone who had to administer Windows servers know how annoying is that by default cmd.exe doesn't support window resize.
Using ConEmu solves that as it supports resize of command prompt Window (horizontal and vertical resize).
ConEmu has a status bar, support (configuration colors) and even transperancy but most importantly for old school dos geeks is that it supports integration with dosbox run old DOS applications (games) in Windows 7.

To use the tools use gui installers, here is latest mirror copy of Conemu (for download), current latest Far Manager release and latest present release of Clink (download link). Once installed it is a must to spend some time configure ConEmu to match your preferences. To configure it press with right mouse button on top of Cemu window and do the needful 🙂

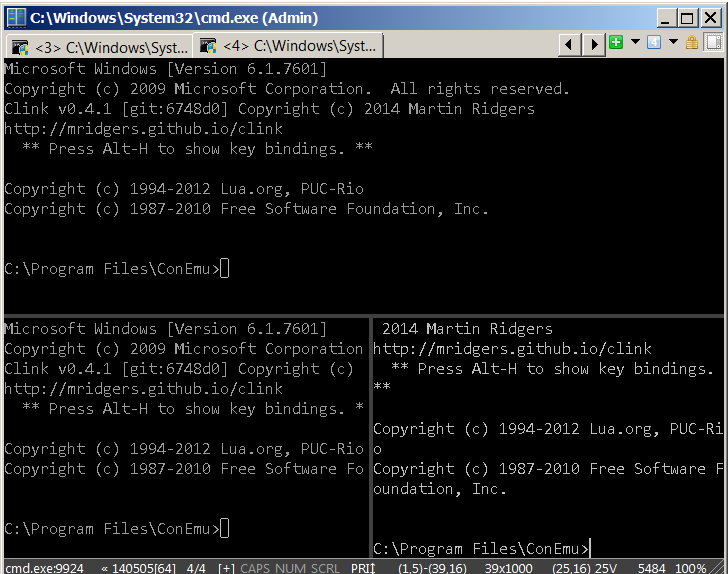
windows-conemu-good-substitute-for-linux-bash-shell-for-microsoft-windows-users-split-screen-how-to-tab-completion-windows
Once everything is installed, you will have to get into the habit to launch ConEmu instead of cmd.exe (as ConEmu doesn't interfere with cmd.exe). To launch far manager from ConEmu command line simply type:

C:> far

To open new tabs in ConEmu the well known Firefox used CTRL + T will not work, but 'open new tab' key shortcut can be customized and also set to CTRL + T.  Default key shortcut for opening new tab in ConEmu is 'Windows Button' + SHIFT + W. While Opening new consoles in ConEmu, there is also the useful option of Splitting console (top and right).

Here is also list with all Clink command shortcuts

C-@     : set-mark
C-a     : beginning-of-line
C-b     : backward-char
C-c     : ctrl-c
C-d     : delete-char
C-e     : end-of-line
C-f     : forward-char
C-g     : abort
C-h     : backward-delete-char
C-i     : clink-completion-shim
C-j     : accept-line
C-k     : kill-line
C-l     : clear-screen
C-m     : accept-line
C-n     : next-history
C-p     : previous-history
C-q     : reload-lua-state
C-r     : reverse-search-history
C-s     : forward-search-history
C-t     : transpose-chars
C-u     : unix-line-discard
C-v     : paste-from-clipboard
C-w     : unix-word-rubout
C-y     : yank
C-z     : undo
C-]     : character-search
C-_     : undo
A-C-c   : copy-line-to-clipboard
A-C-e   : expand-env-vars
A-C-g   : abort
A-C-h   : backward-kill-word
A-C-i   : tab-insert
A-C-j   : vi-editing-mode
A-C-m   : vi-editing-mode
A-C-r   : revert-line
A-C-u   : up-directory
A-C-y   : yank-nth-arg
A-C-[   : complete
A-C-]   : character-search-backward
A-      : set-mark
A-#     : insert-comment
A-&     : tilde-expand
A-*     : insert-completions
A–     : digit-argument
A-.     : yank-last-arg
A-0     : digit-argument
A-1     : digit-argument
A-2     : digit-argument
A-3     : digit-argument
A-4     : digit-argument
A-5     : digit-argument
A-6     : digit-argument
A-7     : digit-argument
A-8     : digit-argument
A-9     : digit-argument
A-<     : beginning-of-history
A-=     : possible-completions
A->     : end-of-history
A-?     : possible-completions
A-     : delete-horizontal-space
A-_     : yank-last-arg
A-b     : backward-word
A-c     : capitalize-word
A-d     : kill-word
A-f     : forward-word
A-h     : show-rl-help
A-l     : downcase-word
A-n     : non-incremental-forward-search-history
A-p     : non-incremental-reverse-search-history
A-r     : revert-line
A-t     : transpose-words
A-u     : upcase-word
A-y     : yank-pop
A-~     : tilde-expand
C-x,C-g : abort
C-x,C-r : re-read-init-file
C-x,C-u : undo
C-x,C-x : exchange-point-and-mark
C-x,(   : start-kbd-macro
C-x,)   : end-kbd-macro
C-x,e   : call-last-kbd-macro