
Posts Tagged ‘kernels’

Why SSH Login Is Slow on Linux and How to Fix It

Thursday, December 18th, 2025

openssh_debug-and-fix-slow-connections-to-linux-how-to-original-openssh-logo

Slow SSH logins are one of those problems that don’t look serious at first — until you realize every connection takes 20–30 seconds to respond. The shell eventually appears, but the delay is long enough to break automation, frustrate users, and make admins suspicious of deeper system issues.

This article walks through some common causes of slow SSH logins and how to diagnose them efficiently on Linux servers.

1. DNS Lookups: The Most Common Culprit

By default, sshd performs a reverse DNS lookup on the connecting IP address. If DNS is misconfigured or unreachable, SSH will wait.

How to Test

From the server (measure how many seconds it takes to do ssh to the machine):
 

$ time ssh localhost

If localhost logins are instant but remote logins are slow, suspect DNS.

Check /etc/ssh/sshd_config:

UseDNS yes

Fix

Disable DNS lookups (at least temporary to test):

UseDNS no

Then restart SSH:

# systemctl restart sshd

Note: This does not reduce security in most environments and is safe for the majority of servers.

2. Broken or Slow PAM Modules

PAM (Pluggable Authentication Modules) can introduce delays — especially if modules depend on:

  • LDAP
  • Kerberos
  • Network home directories
  • Smart card services

Debug with Verbose SSH

From the client:

$ ssh -vvv user@remote-server

Look for pauses during:

debug1: Authentications that can continue:

Test PAM Delay

Temporarily disable PAM in /etc/ssh/sshd_config:

UsePAM no

Restart SSH and test again.
If login becomes instant, inspect /etc/pam.d/sshd.

3. Entropy Shortage on Virtual Machines

Older kernels or low-activity VMs can run out of entropy, causing SSH key operations to block.

Check Entropy Level

# cat /proc/sys/kernel/random/entropy_avail

Values below 100 may cause delays.

Fix

Install an entropy daemon (if on Deb based distro):

# apt install haveged

or on CentOS / RHEL / Fedora

# yum install rng-tools

Then start the service:

# systemctl enable –now haveged

4. GSSAPI Authentication Delay

SSH attempts Kerberos authentication even when not used.

Symptom

Delay occurs before password prompt appears.

Fix

Edit /etc/ssh/sshd_config:

GSSAPIAuthentication no

GSSAPICleanupCredentials no

Restart SSH afterward.

5. Slow Home Directory or Shell Initialization

Sometimes SSH is fast, but the shell is slow.

Test with a Minimal Shell

$ ssh user@server /bin/sh

If this is instant, check:

  • .bashrc
  • .profile
  • .bash_logout

Common mistakes:

  • Network calls (curl, wget)
  • Mounted NFS home directories
  • Broken PATH exports
  • Commands waiting on unavailable resources

6. Logging and Timing the Login Process

Enable SSH debug logging in /etc/ssh/sshd_config:

LogLevel DEBUG

Then watch logs:

# journalctl -u sshd -f

or:

# tail -f /var/log/auth.log

This allows you to see exactly where the delay happens.

7. A Systematic Troubleshooting Checklist

  1. Disable DNS lookups (UseDNS no)
  2. Disable GSSAPI
  3. Test PAM
  4. Check entropy
  5. Test minimal shell
  6. Review auth logs

In practice, 90% of slow SSH issues are DNS or PAM related.

Conclusion

But wait there might be much more behind the SSH slowness such as misconfigured LDAP or other infrastructure in the middle.
Slow SSH logins are rarely “just SSH.", and though this guide should help you with some sporadic random server issues, if the issues is present on a complex infra with multiple ssh servers, then  that is almost always a symptom of:

  • Network misconfiguration
  • Over-engineered authentication
  • Broken assumptions about system dependencies

Approaching the problem methodically saves hours of guesswork and restores what SSH is supposed to be, work without glitches.

Remove old unused kernels and cleanup orphaned packages on CentOS / RHEL/ Fedora and Debian Linux

Friday, October 23rd, 2020

remove-old-unused-kernel-on-centos-redhat-rhel-fedora-linux-howto-delete-orphaned-packages

If you administer CentOS 7 / CentOS  8 bunch of servers it is very likely after one of the scheduled Patch days every 6 months or so, you end up with a multiple Linux OS kernels installed on the system.
In normal situation on a freshly installed CentOS machine only one rpm package is installed on the system with the kernel release shipped with CentOS / RHEL / Fedora distro:
The reason to remove the old unused kernels is very simple, you don't want to have a messy installation and after some of the updates to boot up in a revert back old kernel or if you're pedantic to simply save few megas of space.
Some people choose to have more than one kernel just to make sure, if the new installed one doesn't boot, after a restart from ILO / IDRAC remote console interface you can select to boot the proper kernel. I agree having the old kernel before the system *kernel* upgrade as backup recovery is a good thing but this is a good thing to the point the system gets booted after reboot (you know we sysadmins usually after each major system package upgrade), we like to reboot the system warmly praying and hoping it will boot up next time 🙂
 

1. Remove CentOS last XX kernels from the OS

Of course removal of old kernels could be managed by a simple

yum remove kernel
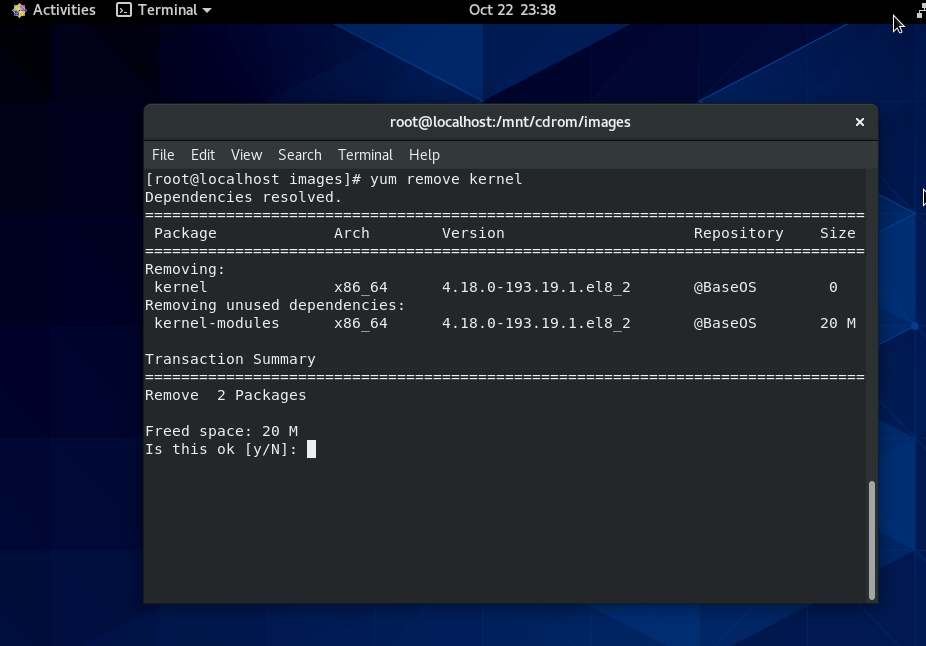

yum-kernel-remove-centos-linux

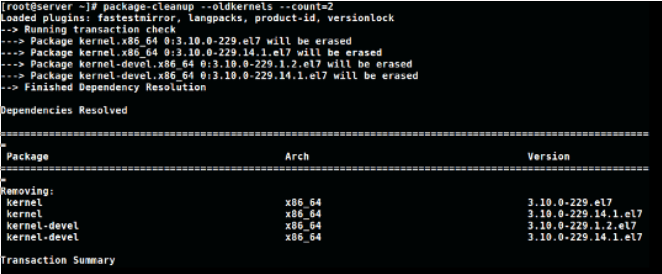
One more than one kernel is present you can hence leave only lets say the last 2 installed kernel on the CentOS host (some people prefer to have only one) but just for the sake of having a backup kernel I like more to have last two kernels installed present, to do so run package-cleanup which is contained in yum-utils rpm package CentOS – this is CentOS / Redhat ( RHEL) specific command.
 

[root@centos ~ ]:# package-cleanup –oldkernels –count=2

package-cleanup-centos-linux-screenshot-1

–count=number argument – tells how many from the  latest version kernels to get removed.

Note if you don't have the package-cleanup command install yum-utils package:

[root@centos ~ :]#  yum install -y yum-utils
cleanup-old-kernels-linux-leave-only-set-of-2-kernels-active-on-centos-rhel-fedora


2. RemoveOld kernels from Fedora Linux – leave only the latest 3 installed

This is done with dnf by setting the –-latest-limit arg to negative value to how many last kernels want to keep

[root@fedora ~ ]:# dnf remove $(dnf repoquery –installonly –latest-limit=-3 -q)


3. Set how many kernels you want to be present on system all the time after package upgrades

It is possible to tell CentOS / RHEL / Fedora's on how many kernels show be kept installed on the system, the default configured on Operating system install time is to keep the last 5 installed kernel on the OS. This is controlled from installonly_limit=5 value that is usually as of year 2020 RPM based distributions found under /etc/yum.conf (on CentOS / RHEL) and in /etc/dnf/dnf.conf (in Fedora) configuration file and sets the desired number of kernels present on system after issuing commands yum upgrade / dnf upgrade –refresh etc.
The minimum number to give to  installonly_limit is 2.
 

4. Remove orphan rpm packages from server

The next thing to do is to check the installed orphan packages to see if we can safely remove them; by orphaned packages we mean all packages which no longer serve a purpose of package dependencies.
Orphan packages are packages who left over from some old dependencies that are no longer needed on the system but just take up space and impose a possible security risk as some of them might end up with time with a public well known and hacked CVE vulnearbility.

Let me try to explain this concept with a quick example: package A is depended on package B, thus, in order to install package A the package B must also be installed. Once the package A is removed the package B might still be installed, hence the package B is now orphaned package.
Here’s how we can safely see the orphan packages we do have on our system:

[root@centos ~ :]#  package-cleanup –quiet –leaves –exclude-bin

And here’s how we can delete them:

[root@centos ~ :]# package-cleanup –quiet –leaves –exclude-bin | xargs yum remove -y


The above commands should be launched multiple times, because the packages deleted with the first batch could create additional orphan packages, and so on: be sure to perform these tasks until no orphan packages appear anymore after the first package-cleanup command.


5. Delete Old Kernels and keep only last three ones on Debian / Ubuntu Linux

To do the same on a debian based distribution there is a command is provided by a deb package byobu, if you want to clean up old kernels on Debians :

$ sudo purge-old-kernels –keep 3


That's all folks enjoy ! 🙂

 

How to disable PC Speaker on FreeBSD / Mute PC-Speaker on BSD kernels

Wednesday, May 16th, 2012


old school personal computer pc speaker / freebsd disable Pc-Speaker picture

After finding out How PC Speaker is muted on Linux , I've decided to also disable the annoying beeps on BSD. This is in tandem with the minimalistic philosophy I try to apply to every server I manage.

Also on BSD Desktop machines it is quite annoying especially if csh (C Shell) is used, everytime you press TAB you get the beep sound. On BSD beep sound produced on tab completion is louder than in Linux and that makes it even more annoying …

Disabling pc-speaker beeps on BSDs is done via a sysctl kernel variable:

freebsd# sysctl hw.syscons.bell=0
hw.syscons.bell: 0 -> 0

To further permanently disable on system boot add hw.syscons.bell=0 to /etc/sysctl.conf, e.g.:

freebsd# echo 'hw.syscons.bell=0' >> /etc/sysctl.conf


Well that's it no more mind drilling beeps :)