Posts Tagged ‘init’
Saturday, March 24th, 2012 
I've written a tiny script to check and restart, Apache if the server encounters, extremely high load avarage like for instance more than (>25). Below is an example of a server reaching a very high load avarage:;
server~:# uptime

13:46:59 up 2 days, 18:54, 1 user, load average: 58.09, 59.08, 60.05

load average: 0.09, 0.08, 0.08
Sometimes high load avarage is not a problem, as the server might have a very powerful hardware. A high load numbers is not always an indicator for a serious problems. Some 16 CPU dual core (2.18 Ghz) machine with 16GB of ram could probably work normally with a high load avarage like in the example. Anyhow as most servers are not so powerful having such a high load avarage, makes the machine hardly do its job routine.
In my specific, case one of our Debian Linux servers is periodically reaching to a very high load level numbers. When this happens the Apache webserver is often incapable to serve its incoming requests and starts lagging for clients. The only work-around is to stop the Apache server for a couple of seconds (10 or 20 seconds) and then start it again once the load avarage has dropped to less than "3".
If this temporary fix is not applied on time, the server load gets increased exponentially until all the server services (ssh, ftp … whatever) stop responding normally to requests and the server completely hangs …
Often this server overloads, are occuring at night time so I'm not logged in on the server and one such unexpected overload makes the server unreachable for hours.
To get around the sudden high periodic load avarage server increase, I've written a tiny bash script to monitor, the server load avarage and initiate an Apache server stop and start with a few seconds delay in between.
#!/bin/sh

# script to check server for extremely high load and restart Apache if the condition is matched

check=`cat /proc/loadavg | sed 's/\./ /' | awk '{print $1}'`

# define max load avarage when script is triggered

max_load='25'

# log file

high_load_log='/var/log/apache_high_load_restart.log';

# location of inidex.php to overwrite with temporary message

index_php_loc='/home/site/www/index.php';

# location to Apache init script

apache_init='/etc/init.d/apache2';

#

site_maintenance_msg="Site Maintenance in progress - We will be back online in a minute";

if [ $check -gt "$max_load" ]; then>

#25 is load average on 5 minutes

cp -rpf $index_php_loc $index_php_loc.bak_ap

echo "$site_maintenance_msg" > $index_php_loc

sleep 15;

if [ $check -gt "$max_load" ]; then

$apache_init stop

sleep 5;

$apache_init restart

echo "$(date) : Apache Restart due to excessive load | $check |" >> $high_load_log;

cp -rpf $index_php_loc.bak_ap $index_php_loc

fi

fi
The idea of the script is partially based on a forum thread – Auto Restart Apache on High Load – http://www.webhostingtalk.com/showthread.php?t=971304Here is a link to my restart_apache_on_high_load.sh script
The script is written in a way that it makes two "if" condition check ups, to assure 100% there is a constant high load avarage and not just a temporal 5 seconds load avarage jump. Once the first if is matched, the script first tries to reduce the server load by overwritting a the index.php, index.html script of the website with a one stating the server is ongoing a maintenance operations.
Temporary stopping the index page, often reduces the load in 10 seconds of time, so the second if case is not necessery at all. Sometimes, however this first "if" condition cannot decrease enough the load and the server load continues to stay too high, then the script second if comes to play and makes apache to be completely stopped via Apache init script do 2 secs delay and launch the apache server again.
The script also logs about, the load avarage encountered, while the server was overloaded and Apache webserver was restarted, so later I can check what time the server overload occured.
To make the script periodically run, I've scheduled the script to launch every 5 minutes as a cron job with the following cron:
# restart Apache if load is higher than 25

*/5 * * * * /usr/sbin/restart_apache_on_high_load.sh >/dev/null 2>&1
I have also another system which is running FreeBSD 7_2, which is having the same overload server problems as with the Linux host.
Copying the auto restart apache on high load script on FreeBSD didn't work out of the box. So I rewrote a little chunk of the script to make it running on the FreeBSD host. Hence, if you would like to auto restart Apache or any other service on FreeBSD server – get /usr/sbin/restart_apache_on_high_load_freebsd.sh my script and set it on cron on your BSD.
This script is just a temporary work around, however as its obvious that the frequency of the high overload will be rising with time and we will need to buy new server hardware to solve permanently the issues, anyways, until this happens the script does a great job 🙂
I'm aware there is also alternative way to auto restart Apache webserver on high server loads through using monit – utility for monitoring services on a Unix system. However as I didn't wanted to bother to run extra services in the background I decided to rather use the up presented script.
Interesting info to know is Apache module mod_overload exists – which can be used for checking load average. Using this module once load avarage is over a certain number apache can stop in its preforked processes current serving request, I've never tested it myself so I don't know how usable it is. As of time of writting it is in early stage version 0.2.2
If someone, have tried it and is happy with it on a busy hosting servers, please share with me if it is stable enough?
Tags: Anyhow, apache server, apache webserver, Auto, avarage, awk print, bak, bash script, bash shell, bash shell script, condition, cron, cron job, Draft, dual core, host, incoming requests, index, index page, init, instance, job, level, level numbers, Linux, linux servers, loc, location, night time, php, quot, Restart, restart apache, rpf, script, server load, server overloads, server services, server uptime, Shell, ssh, ssh ftp, time, unexpected overload, unreachable, utility
Posted in FreeBSD, Programming, System Administration | 5 Comments »
Friday, April 8th, 2011 I have recently installed and configured a Debian Linux server with nginx
. Since then I’ve been testing around different ways to optimize the nginx performance.
In my nginx quest, one of the most crucial settings which dramatically improved the end client performance was enabling the so called output compression which in Apache based servers is also known as content gzip compression .
In Apache webservers the content gzip compression is provided by a server module called mod_deflate .
The output compression nginx settings saves a lot of bandwidth and though it adds up a bit more load to the server, the plain text files like html, xml, js and css’s download time reduces drasticly as they’re streamed to the browser in gzip compressed format.
This little improvement in download speed also does impact the overall end user browser experience and therefore improves the browsing speed experience with websites.
If you have already had experience nginx you already know it is a bit fastidious and you have to be very careful with it’s configuration, however thanksfully enabling the gzip compression was actually rather easier than I thought.
Here is what I added in my nginx config to enable output compression:
## Compression

gzip on;

gzip_buffers 16 8k;

gzip_comp_level 9;

gzip_http_version 1.1;

gzip_min_length 0;

gzip_vary on;
Important note here is that need to add this code in the nginx configuration block starting with:
http {

....

## Compression

gzip on;

gzip_buffers 16 8k;

gzip_comp_level 9;

gzip_http_version 1.1;

gzip_min_length 0;

gzip_vary on;
In order to load the gzip output compression as a next step you need to restart the nginx server, either by it’s init script if you use one or by killing the old nginx server instances and starting up the nginx server binary again:
I personally use an init script, so restarting nginx for me is done via the cmd:
debian:~# /etc/init.d/nginx restart

Restarting nginx: nginx.
Now to test if the output gzip compression is enabled for nginx, you can simply use telnet
hipo@linux:~$ telnet your-nginx-webserver-domain.com 80

Escape character is '^]'.
After the Escape character is set ‘^]’ appears on your screen type in the blank space:
HEAD / HTTP/1.0
and press enter twice.
The output which should follow should look like:
HTTP/1.1 200 OK

Server: nginx

Date: Fri, 08 Apr 2011 12:04:43 GMT

Content-Type: text/html

Content-Length: 13

Last-Modified: Tue, 22 Mar 2011 15:04:26 GMT

Connection: close

Vary: Accept-Encoding

Expires: Fri, 15 Apr 2011 12:04:43 GMT

Cache-Control: max-age=604800

Accept-Ranges: bytes
The whole transaction with telnet command issued and the nginx webserver output should look like so:
hipo@linux:~$ telnet your-nginx-webserver-domain.com 80

Trying xxx.xxx.xxx.xxx...

Connected to your-nginx-webserver-domain.com

.Escape character is '^]'.

HEAD / HTTP/1.0
HTTP/1.1 200 OK
Server: nginx
Date: Fri, 08 Apr 2011 12:04:43 GMT
Content-Type: text/html
Content-Length: 13
Last-Modified: Tue, 22 Mar 2011 15:04:26 GMT
Connection: close
Vary: Accept-Encoding
Expires: Fri, 15 Apr 2011 12:04:43 GMT
Cache-Control: max-age=604800
Accept-Ranges: bytes
The important message in the returned output which confirms your nginx output compression is properly configured is:
Vary: Accept-Encoding
If this message is returned by your nginx server, this means your nginx now will distribute it’s content to it’s clients in compressed format and apart from the browsing boost a lot of server and client bandwitdth will be saved.
Tags: apache webservers, bandwidth, client, client performance, com, compression, compression gzip, config, configuration block, content, different ways, download, EncodingExpires, experience, Fri, GMTConnection, gzip, gzip compression, gzipfile, HEAD, How to, html xml, HTTP, init, init script, js, level, Linux, linux server, Mar, mod, Modified, nginx, OKServer, output compression, plain text files, server instances, servers, text, time, use, xml
Posted in Linux, System Administration, Web and CMS | 3 Comments »
Monday, April 14th, 2014 
Spam has become a severe issue for administrators, not only for mail server admins but also for webshosting adms. Even the most secure spam protected mail server can get affected by spam due to fact it is configured to relay mail from other servers acting as web hosting sites.
Webhosting companies almost always suffer seriously from spam issues and often their mail servers gets blocked (enter spam blacklists), because of their irresponsible clients uploading lets say old vulnerable Joomla, WordPress without Akismet or proper spam handling plugin,a CMS which is not frequently supported / updated or custom client insecure php code.
What I mean is Shared server A is often configured to sent mail via (mail) server B. And often some of the many websites / scripts hosted on server A gets hacked and a spam form is uploaded and tons of spam start being shipped via mail server B.
Of course on mail server level it is possible to configure delay between mail sent and adopt a couple of policies to reduce spam, but the spam protection issue can't be completely solved thus admin of such server is forced to periodically keep an eye on what mail is sent from hosting server to mail server.
If you happen to be one of those Linux (Unix) webhosting admins who find few thousand of spammer emails into mail server logs or your eMail server queue and you can't seem to find what is causing it, cause there are multiple websites shared hosting using mainly PHP + SQL and you can't identify what php script is spamming by reviewing Apache log / PHP files. What you can do is get use of:
PHP mail.log directive
Precious tool in tracking spam issues is a PHP Mail.log parameter, mail log paramater is available since PHP version >= 5.3.0 and above.
PHP Mail.log parameter records all calls to the PHP mail() function including exact PHP headers, line numbers and path to script initiating mail sent.
Here is how it is used:
1. Create empty PHP Mail.log file
touch /var/log/phpmail.log
File has to be writtable to same user with which Apache is running in case of Apache with SuPHP running file has to be writtable by all users.
On Debian, Ubunut Linux:
chown www:data:www-data /var/log/phpmail.log
On CentOS, RHEL, SuSE phpmail.log has to be owned by httpd:
chown httpd:httpd /var/log/phpmail.log
On some other distros it might be chown nobody:nobody etc. depending on the user with which Apache server is running.
2. Add to php.ini configuration following lines
mail.add_x_header = On

mail.log = /var/log/phpmail.log
PHP directive instructs PHP to log complete outbund Mail header sent by mail() function, containing the UID of the web server or PHP process and the name of the script that sent the email;
(X-PHP-Originating-Script: 33:mailer.php)
i.e. it will make php start logging to phpmail.log stuff like:
mail() on [/var/www/pomoriemonasteryorg/components/com_xmap/2ktdz2.php:1]: To: info@globalremarketing.com.au — Headers: From: "Priority Mail" <status_93@pomoriemon
astery.org> X-Mailer: MailMagic2.0 Reply-To: "Priority Mail" <status_93@pomoriemonastery.com> Mime-Version: 1.0 Content-Type: multipart/alternative;boundary="——
—-13972215105347E886BADB5"
mail() on [/var/www/pomoriemonasteryorg/components/com_xmap/2ktdz2.php:1]: To: demil7167@yahoo.com — Headers: From: "One Day Shipping" <status_44@pomoriemonastery.
org> X-Mailer: CSMTPConnectionv1.3 Reply-To: "One Day Shipping" <status_44@pomoriemonastery.com> Mime-Version: 1.0 Content-Type: multipart/alternative;boundary="—
——-13972215105347E886BD344"
mail() on [/var/www/pomoriemonasteryorg/components/com_xmap/2ktdz2.php:1]: To: domainmanager@nadenranshepovser.biz — Headers: From: "Logistics Services" <customer.
id86@pomoriemonastery.com> X-Mailer: TheBat!(v3.99.27)UNREG Reply-To: "Logistics Services" <customer.id86@pomoriemonastery.com> Mime-Version: 1.0 Content-Type: mult
ipart/alternative;boundary="———-13972215105347E886BF43E"
mail() on [/var/www/pomoriemonasteryorg/components/com_xmap/2ktdz2.php:1]: To: bluesapphire89@yahoo.com — Headers: From: "Priority Mail" <status_73@pomoriemonaster
y.org> X-Mailer: FastMailer/Webmail(versionSM/1.2.6) Reply-To: "Priority Mail" <status_73@pomoriemonastery.com> Mime-Version: 1.0 Content-Type: multipart/alternativ
e;boundary="———-13972215105347E886C13F2"
On Debian / Ubuntu Linux to enable this logging, exec:
echo 'mail.add_x_header = On' >> /etc/php5/apache2/php.ini

echo 'mail.log = /var/log/phpmail.log' >> /etc/php5/apache2/php.ini
I find it useful to symlink /etc/php5/apache2/php.ini to /etc/php.ini its much easier to remember php location plus it is a standard location for many RPM based distros.
ln -sf /etc/php5/apache2/php.ini /etc/php.ini
Or another "Debian recommended way" to enable mail.add_x_header logging on Debian is via:
echo 'mail.add_x_header = On' >> /etc/php5/conf.d/mail.ini

echo 'mail.log = /var/log/phpmail.log' >> /etc/php5/conf.d/mail.ini
On Redhats (RHEL, CentOS, SuSE) Linux issue:
echo 'mail.add_x_header = On' >> /etc/php.ini

echo 'mail.log = /var/log/phpmail.log' >> /etc/php.ini
3. Restart Apache
On Debian / Ubuntu based linuces:
/etc/init.d/apache2 restart
P.S. Normally to restart Apache without interrupting client connections graceful option can be used, i.e. instead of restarting do:
/etc/init.d/apache2 graceful
On RPM baed CentOS, Fedora etc.:
/sbin/service httpd restart
or
apachectl graceful
4. Reading the log
To review in real time exact PHP scripts sending tons of spam tail it:
tail -f /var/log/phpmail.log
mail() on [/var/www/remote-admin/wp-includes/class-phpmailer.php:489]: To: theosfp813@hotmail.com — Headers: Date: Mon, 14 Apr 2014 03:27:23 +0000 Return-Path: wordpress@remotesystemadministration.com From: WordPress Message-ID: X-Priority: 3 X-Mailer: PHPMailer (phpmailer.sourceforge.net) [version 2.0.4] MIME-Version: 1.0 Content-Transfer-Encoding: 8bit Content-Type: text/plain; charset="UTF-8"
mail() on [/var/www/pomoriemonasteryorg/media/rsinstall_4de38d919da01/admin/js/tiny_mce/plugins/inlinepopups/skins/.3a1a1c.php:1]: To: 2070ccrabb@kiakom.net — Headers: From: "Manager Elijah Castillo" <elijah_castillo32@pomoriemonastery.com> X-Mailer: Mozilla/5.0 (Windows; U; Windows NT 5.0; es-ES; rv:1.9.1.7) Gecko/20100111 Thunderbird/3.0.1 Reply-To: "Manager Elijah Castillo" <elijah_castillo32@pomoriemonastery.com> Mime-Version: 1.0 Content-Type: multipart/alternative;boundary="———-1397463670534B9A76017CC"
mail() on [/var/www/pomoriemonasteryorg/media/rsinstall_4de38d919da01/admin/js/tiny_mce/plugins/inlinepopups/skins/.3a1a1c.php:1]: To: 20wmwebinfo@schools.bedfordshire.gov.uk — Headers: From: "Manager Justin Murphy" <justin_murphy16@pomoriemonastery.com> X-Mailer: Opera Mail/10.62 (Win32) Reply-To: "Manager Justin Murphy" <justin_murphy16@pomoriemonastery.com> Mime-Version: 1.0 Content-Type: multipart/alternative;boundary="———-1397463670534B9A7603ED6"
mail() on [/var/www/pomoriemonasteryorg/media/rsinstall_4de38d919da01/admin/js/tiny_mce/plugins/inlinepopups/skins/.3a1a1c.php:1]: To: tynyrilak@yahoo.com — Headers: From: "Manager Elijah Castillo" <elijah_castillo83@pomoriemonastery.com> X-Mailer: Mozilla/5.0 (Macintosh; U; Intel Mac OS X 10.5; pl; rv:1.9.1.9) Gecko/20100317 Thunderbird/3.0.4 Reply-To: "Manager Elijah Castillo" <elijah_castillo83@pomoriemonastery.com> Mime-Version: 1.0 Content-Type: multipart/alternative;boundary="———-1397463670534B9A7606308"
mail() on [/var/www/pomoriemonasteryorg/media/rsinstall_4de38d919da01/admin/js/tiny_mce/plugins/inlinepopups/skins/.3a1a1c.php:1]: To: 2112macdo1@armymail.mod.uk — Headers: From: "Manager Justin Murphy" <justin_murphy41@pomoriemonastery.com> X-Mailer: Mozilla/5.0 (Macintosh; U; Intel Mac OS X 10.5; pl; rv:1.9.1.9) Gecko/20100317 Thunderbird/3.0.4 Reply-To: "Manager Justin Murphy" <justin_murphy41@pomoriemonastery.com> Mime-Version: 1.0 Content-Type: multipart/alternative;boundary="———-1397463670534B9A76086D1"
As you can see there is a junky spam mails sent via some spammer script uploaded under name .3a1a1c.php, so to stop the dirty bastard, deleted the script:
rm -f /var/www/pomoriemonasteryorg/media/rsinstall_4de38d919da01/admin/js/tiny_mce/plugins/inlinepopups/skins/.3a1a1c.php
It is generally useful to also check (search) for all hidden .php files inside directoring storing multiple virtualhost websites, as often a weirdly named hidden .php is sure indicator of either a PHP Shell script kiddie tool or a spammer form.
Here is how to Find all Hidden Perl / PHP scripts inside /var/www:
find . -iname '.*.php'

./blog/wp-content/plugins/fckeditor-for-wordpress-plugin/ckeditor/plugins/selection/.0b1910.php

./blog/wp-content/plugins/fckeditor-for-wordpress-plugin/filemanager/browser/default/.497a0c.php

./blog/wp-content/plugins/__MACOSX/feedburner_feedsmith_plugin_2.3/._FeedBurner_FeedSmith_Plugin.php
find . -iname '.*.pl*'
….
Reviewing complete list of all hidden files is also often useful to determine shitty cracker stuff
find . -iname ".*"
Debugging via /var/log/phpmail.log enablement is useful but is more recommended on development and staging (QA) environments. Having it enable on productive server with high amounts of mail sent via PHP scripts or just on dedicated shared site server could cause both performance issues, hard disk could quickly get and most importantly could be a severe security hole as information from PHP scripts could be potentially exposed to external parties.
Tags: alternative, blacklists, blog, com, Date, echo, ini, init, log, logs, mail, mail server, mail servers, multiple, need, note, performance issues, php, php script, php scripts, php5, queue, script, scripts, server, servers, spam, spammer, Ubunut Linux
Posted in Computer Security, Linux, System Administration, Web and CMS | 3 Comments »
Wednesday, June 18th, 2014 
There are plenty of GNU / Linux softwares to monitor server performance (hard disk space, network and CPU load) and general hardware health both text based for SSH console) and from web.
Just to name a few for console precious tools, such are:
And for web based Linux / Windows server monitoring my favourite tools are:
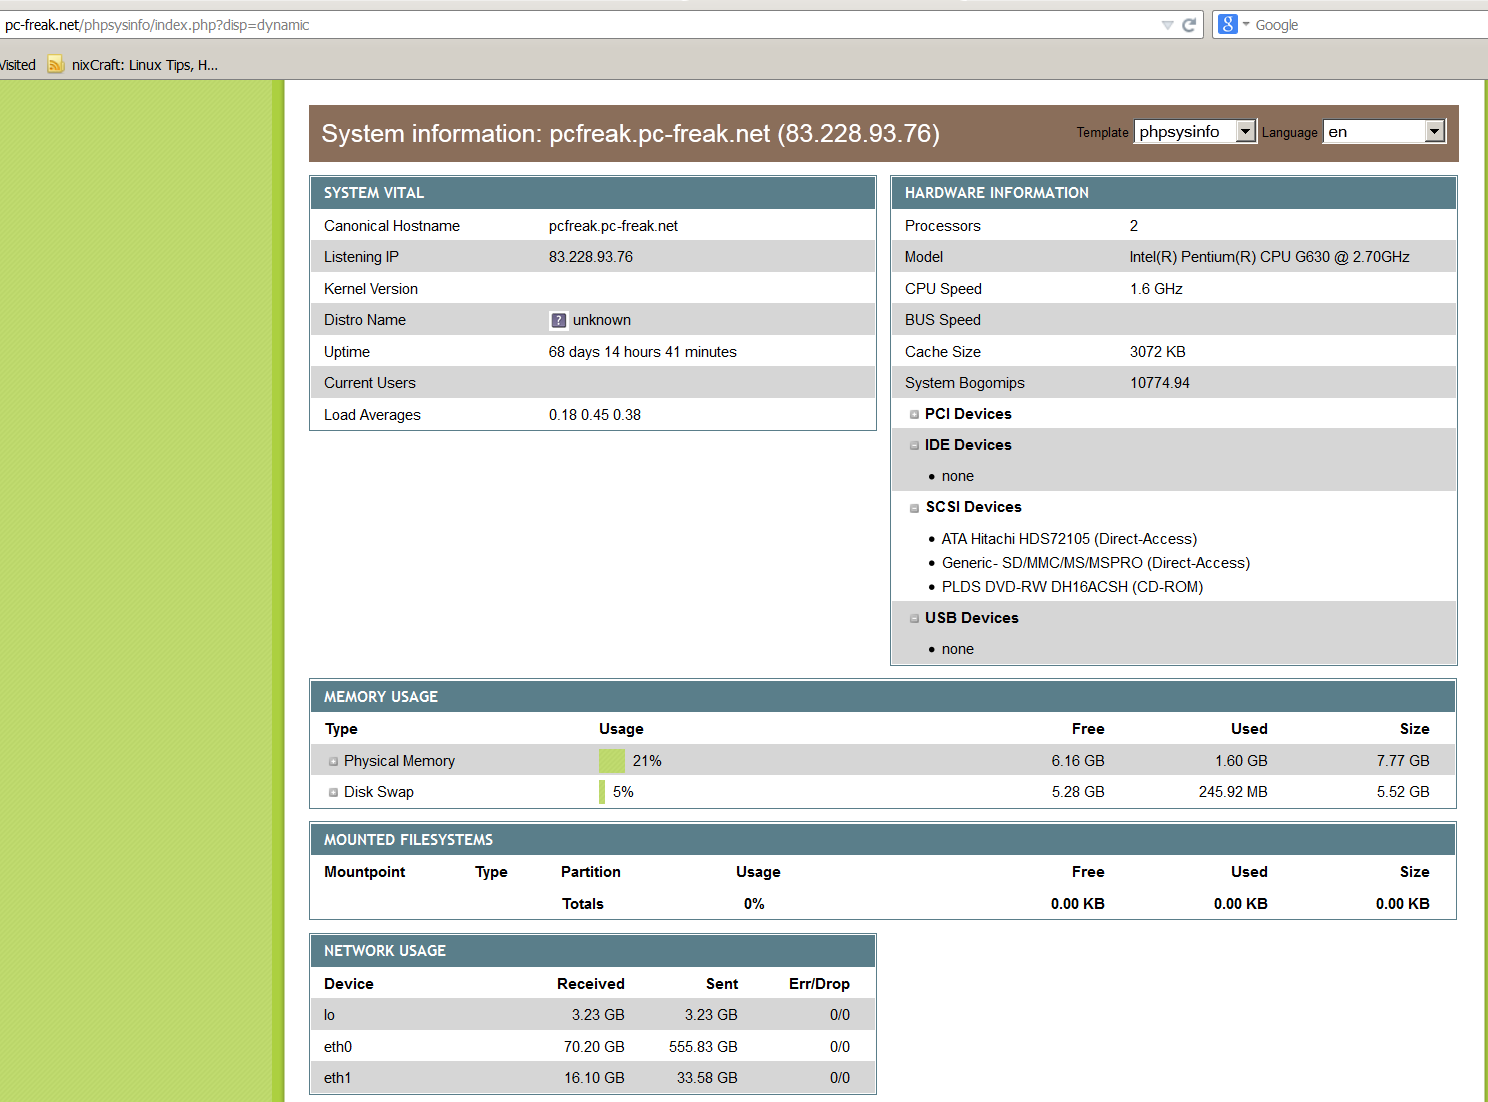
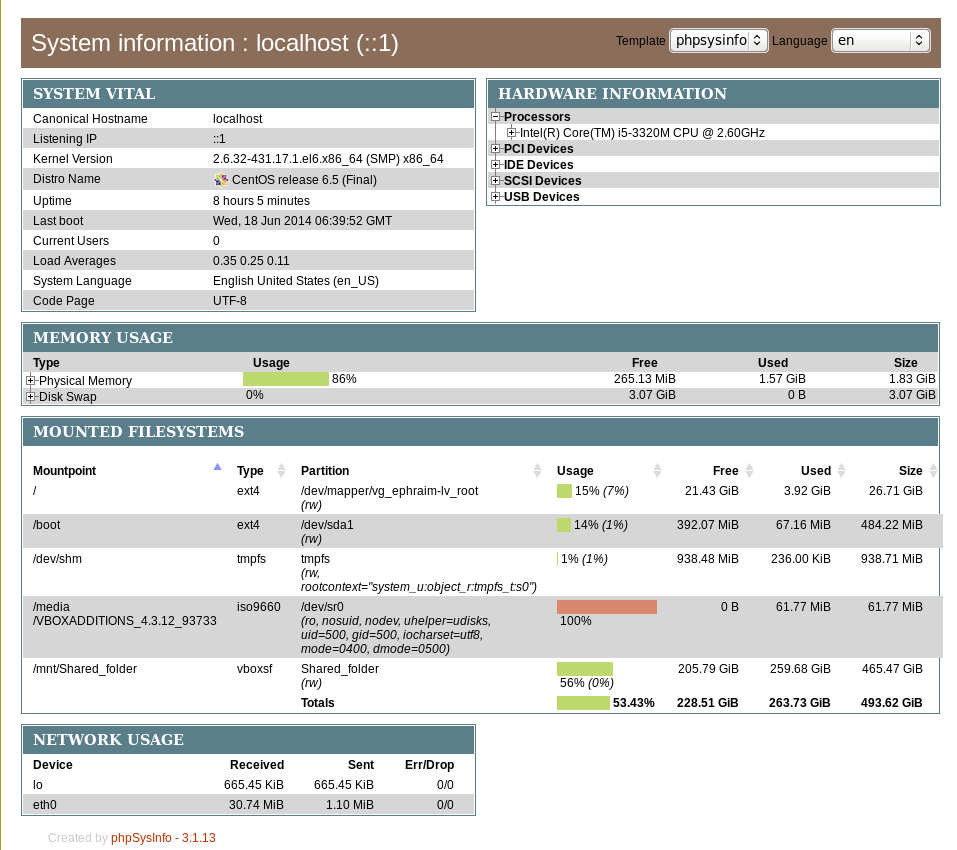
phpsysinfo is yet another web based Linux monitoring software for small companies or home router use it is perfect for people who don't want to spend time learning how to configure complicated and robust multiple server monitoring software like Nagios or Icanga.
phpsysinfo is quick and dirty way to monitor system uptime, network, disk and memory usage, get information on CPU model, attached IDEs, SCSI devices and PCIs from the web and is perfect for Linux servers already running Apache and PHP.
1. Installing PHPSysInfo on Debian, Ubuntu and deb derivative Linux-es
PHPSysInfo is very convenient and could be prefered instead of above tools for the reason it is available by default in Debian and Ubuntu package repositories and installable via apt-get and it doesn't require any further configuration, to roll it you install you place a config and you forget it.
# apt-cache show phpsysinfo |grep -i desc -A 2
Description: PHP based host information
phpSysInfo is a PHP script that displays information about the
host being accessed.
Installation is a piece of cake:
# apt-get install --yes phpsysinfo
…
Add phpsysinfo directives to /etc/apache2/conf.d/phpsysinfo.conf to make it accessible via default set Apache vhost domain under /phpsysinfo
Paste in root console:
cat > /etc/apache2/conf.d/phpsysinfo.conf <<-EOF
Alias /phpsysinfo /usr/share/phpsysinfo
<Location /phpsysinfo>
 Options None
 Order deny,allow
 Deny from all
 #Allow from localhost
 #Allow from 192.168.56.2
 Allow from all
</Location>
EOF
Above config will allow access to /phpsysinfo from any IP on the Internet, this could be a security hole, thus it is always better to either protect it with access .htaccess password login or allow it only from certain IPs, from which you will access it with something like:
Allow from 192.168.2.100
Then restart Apache server:
# /etc/init.d/apache2 restart
To access phpsysinfo monitoring gathered statistics, access it in a browser http://defaultdomain.com/phpsysinfo/
2. Installing PHPSysinfo on CentOS, Fedora and RHEL Linux
Download and untar
# cd /var/www/html

# wget https://github.com/phpsysinfo/phpsysinfo/archive/v3.1.13.tar.gz

# tar -zxvf phpsysinfo-3.1.13.tar.gz

# ln -sf phpsysinfo-3.1.13 phpsysinfo

# mv phpsysinfo.ini.new phpsysinfo.ini
Install php php-xml and php-mbstring RPM packages
yum -y install php php-xml php-mbstring

...
Start Apache web service
[root@ephraim html]# /etc/init.d/httpd restart
…
[root@ephraim html]# ps ax |grep -i http

 8816 ?        Ss     0:00 /usr/sbin/httpd

 8819 ?        S      0:00 /usr/sbin/httpd
As PhpSysInfo is written in PHP it is also possible to install phpsysinfo on Windows.
phpsysinfo is not the only available simple monitoring server performance remotely tool, if you're looking for a little bit extended information and a better visualization interface alternative to phpsysinfo take a look at linux-dash.
In context of web monitoring other 2 web PHP script tools useful in remote server monitoring are:
OpenStatus – A simple and effective resource and status monitoring script for multiple servers.
LookingGlass – User-friendly PHP Looking Glass (Web interface to use Host (Nslookup), Ping, Mtr – Matt Traceroute)
Tags: configure, default, hard disk, information, init, installation, linux windows, little bit, php, rhel, script, security hole, server performance, system, usr, web
Posted in Monitoring, System Administration, Various, Web and CMS | No Comments »
Monday, July 28th, 2014 
At one of companies where I administrate few servers, we are in process of optimizing the server performance to stretch out the maximum out of server hardware and save money from unnecessery hardware costs and thus looking for ways to make server performance better.
On couple of web-sites hosted on few of the production servers, administrating, I've noticed dozens of PHP Notice errors, making the error.log quickly grow to Gigabytes and putting useless hard drive I/O overhead. Most of the php notice warnings are caused by unitialized php variables.
I'm aware having an unitialized values is a horrible security hole, however the websites are running fine even though the notice warnings and currently the company doesn't have the necessery programmers resource to further debug and fix all this undefined php vars, thus what happens is monthly a couple of hundreds megabytes of useless same php notice warnings are written in error.log.
That error.log errors puts an extra hardship for awstats which is later generating server access statistics while generating the 404 errors statistics and thus awstats script has to read and analyze huge files with plenty of records which doesn't have nothing to do with 404 error
We found this PHP Notice warnings logged is one of the things we can optimize had to be disabled.
Here is how this is done:
On the servers running Debian Wheezy stable to disable php notices.
I had to change in /etc/php5/apache2/php.ini error_reporting variable.
Setting was to log everything (including PHP critical errors, warning and notices) like so:
vi /etc/php5/apache2/php.ini
error_reporting = E_ALL & ~E_DEPRECATED
to
error_reporting = E_COMPILE_ERROR|E_ERROR|E_CORE_ERROR
On CentOS, RHEL, SuSE based servers, edit instead /etc/php.ini.
This setting makes Apache to only log in error.log critical errors, php core dump (thread) errors and php code compilation (interpretation errors)
To make settings take affect on Debian host Apache webserver:
/etc/init.d/apache2 restart
On CentOS, RHEL Linux, had to restart Apache with:
/etc/init.d/httpd restart
For other servers running Nginx and Lighttpd webservers, after changing php.ini:
service nginx reload
service lighttpd restart
To disable php notices errors only on some websites, where .htaccess enabled, you can use also place in website DocumentRoot .htaccess:
php_value error_reporting 2039
Other way to disable via .htaccess is by adding to it code:
php_flag display_errors off
Also for hosted websites on some of the servers, where .htaccess is disabled, enabling / disabling php notices can be easily triggered by adding following php code to index.php
define('DEBUG', true);
if(DEBUG == true)
{
ini_set('display_errors', 'On');
error_reporting(E_ALL);
}
else
{
ini_set('display_errors', 'Off');
error_reporting(0);
}
Tags: Apache Nginx Lighttpd, CentOS, core dump, couple, DEBUG, init, log, servers, setting, statistics, www
Posted in Nginx, PHP, Programming, System Administration, Various, Web and CMS | 1 Comment »
Friday, February 6th, 2015 
If you're long time Linux sysadmin but you haven't need to adminster SuSE Linux still and your company buys other business / company which already owns some SuSE servers and you need to deal with them, even though you're just starting up with SuSE Linux but you had already plenty of experience with other Linux distributions Fedora / RHEL / CentOS, don't worry set up / stop / start a service (daemon) to boot on Linux boot time is just the same as any other Redhat (RPM) Linux based distributions. it is done by multiple shell scripts located in /etc/init.d directory which can be manually stopped start by issuing the script with an argument e.g
suse:/etc/init.d# cd /etc/init.d/
suse:/etc/init.d# ./snmpd
Usage: ./snmpd {start|stop|try-restart|restart|force-reload|reload|status}
To configure how each of the /etc/init.d/ existent service boots you can the use good old /sbin/chkconfig (a script written in perl) – which you already know from Fedora / CentOS and other RPM distros.
1. Get a list of all enabled on boot SuSE Linux services
To get a list of all set up to run on boot SuSE server services with chkconfig:
suse:/etc/init.d# /sbin/chkfong –list
Makefile 0:off 1:off 2:off 3:off 4:off 5:off 6:off
OVCtrl 0:off 1:off 2:off 3:on 4:on 5:on 6:off
SuSEfirewall2_init 0:off 1:off 2:off 3:off 4:off 5:off 6:off
SuSEfirewall2_setup 0:off 1:off 2:off 3:off 4:off 5:off 6:off
Tivoli_lcfd1 0:off 1:off 2:on 3:on 4:off 5:on 6:off
Tivoli_lcfd1.bkp 0:off 1:off 2:off 3:off 4:off 5:off 6:off
aaeventd 0:off 1:off 2:off 3:off 4:off 5:off 6:off
acpid 0:off 1:off 2:on 3:on 4:off 5:on 6:off
alsasound 0:off 1:off 2:on 3:on 4:off 5:on 6:off
apache2-eis 0:off 1:off 2:off 3:off 4:off 5:off 6:off
atd 0:off 1:off 2:off 3:off 4:off 5:off 6:off
auditd 0:off 1:off 2:off 3:on 4:off 5:on 6:off
autofs 0:off 1:off 2:off 3:off 4:off 5:off 6:off
autoyast 0:off 1:off 2:off 3:off 4:off 5:off 6:off
boot.apparmor 0:off 1:off 2:on 3:on 4:off 5:on 6:off B:on
cron 0:off 1:off 2:on 3:on 4:off 5:on 6:off
dbus 0:off 1:off 2:off 3:on 4:off 5:on 6:off
earlykbd 0:off 1:off 2:off 3:off 4:off 5:on 6:off
earlysyslog 0:off 1:off 2:off 3:off 4:off 5:on 6:off
esound 0:off 1:off 2:off 3:off 4:off 5:off 6:off
evms 0:off 1:off 2:off 3:off 4:off 5:off 6:off
fbset 0:off 1:on 2:on 3:on 4:off 5:on 6:off
firstboot 0:off 1:off 2:off 3:off 4:off 5:off 6:off
fixperms 0:off 1:off 2:off 3:off 4:off 5:off 6:off
gpm 0:off 1:off 2:off 3:off 4:off 5:off 6:off
gssd 0:off 1:off 2:off 3:off 4:off 5:off 6:off
gwproxy 0:off 1:off 2:on 3:on 4:off 5:on 6:off
haldaemon 0:off 1:off 2:off 3:on 4:off 5:on 6:off
hp-health 0:off 1:off 2:on 3:on 4:on 5:on 6:off
hp-ilo 0:off 1:off 2:off 3:on 4:off 5:on 6:off
hp-snmp-agents 0:off 1:off 2:on 3:on 4:on 5:on 6:off
hpsmhd 0:off 1:off 2:off 3:on 4:on 5:on 6:off
idmapd 0:off 1:off 2:off 3:off 4:off 5:off 6:off
ipmi 0:off 1:off 2:off 3:off 4:off 5:off 6:off
ipmi.hp 0:off 1:off 2:off 3:off 4:off 5:off 6:off
irq_balancer 0:off 1:on 2:on 3:on 4:off 5:on 6:off
itcaIBMTivoliCommonAgent0 0:off 1:off 2:on 3:on 4:off 5:on 6:off
jboss 0:off 1:off 2:off 3:off 4:off 5:off 6:off
joystick 0:off 1:off 2:off 3:off 4:off 5:off 6:off
kadmind 0:off 1:off 2:off 3:off 4:off 5:off 6:off
kbd 0:off 1:on 2:on 3:on 4:off 5:on 6:off S:on
kdump 0:off 1:off 2:off 3:off 4:off 5:off 6:off
kpropd 0:off 1:off 2:off 3:off 4:off 5:off 6:off
krb524d 0:off 1:off 2:off 3:off 4:off 5:off 6:off
krb5kdc 0:off 1:off 2:off 3:off 4:off 5:off 6:off
ldap 0:off 1:off 2:off 3:on 4:off 5:on 6:off
lm_sensors 0:off 1:off 2:off 3:off 4:off 5:off 6:off
lw_agt 0:off 1:off 2:off 3:off 4:off 5:off 6:off
mdadmd 0:off 1:off 2:off 3:off 4:off 5:off 6:off
microcode 0:off 1:on 2:on 3:on 4:off 5:on 6:off S:on
multipathd 0:off 1:off 2:off 3:off 4:off 5:off 6:off
mysql 0:off 1:off 2:off 3:off 4:off 5:off 6:off
network 0:off 1:off 2:on 3:on 4:off 5:on 6:off
nfs 0:off 1:off 2:off 3:on 4:off 5:on 6:off
nfsboot 0:off 1:off 2:off 3:on 4:off 5:on 6:off
nfsserver 0:off 1:off 2:off 3:off 4:off 5:off 6:off
nohup.out 0:off 1:off 2:off 3:off 4:off 5:off 6:off
novell-zmd 0:off 1:off 2:off 3:off 4:off 5:off 6:off
nscd 0:off 1:off 2:off 3:on 4:off 5:on 6:off
ntp 0:off 1:off 2:on 3:on 4:off 5:on 6:off
openct 0:off 1:off 2:off 3:off 4:off 5:off 6:off
opsware-agent 0:off 1:off 2:off 3:on 4:on 5:on 6:off
osddownt 0:off 1:off 2:off 3:on 4:on 5:on 6:off
ovpa 0:on 1:off 2:on 3:on 4:off 5:on 6:off
pcscd 0:off 1:off 2:off 3:off 4:off 5:off 6:off
pctl 0:off 1:off 2:on 3:on 4:off 5:on 6:off
portmap 0:off 1:off 2:off 3:on 4:off 5:on 6:off
postfix 0:off 1:off 2:off 3:on 4:off 5:on 6:off
powerd 0:off 1:off 2:off 3:off 4:off 5:off 6:off
powersaved 0:off 1:off 2:off 3:off 4:off 5:off 6:off
random 0:off 1:off 2:on 3:on 4:off 5:on 6:off
raw 0:off 1:off 2:off 3:off 4:off 5:off 6:off
resmgr 0:off 1:off 2:on 3:on 4:off 5:on 6:off
rpasswdd 0:off 1:off 2:off 3:off 4:off 5:off 6:off
rpmconfigcheck 0:off 1:off 2:off 3:off 4:off 5:off 6:off
rrdtools 0:off 1:off 2:off 3:on 4:off 5:on 6:off
rsyncd 0:off 1:off 2:off 3:off 4:off 5:off 6:off
saslauthd 0:off 1:off 2:off 3:off 4:off 5:off 6:off
skeleton.compat 0:off 1:off 2:off 3:off 4:off 5:off 6:off
slurpd 0:off 1:off 2:off 3:off 4:off 5:off 6:off
smartd 0:off 1:off 2:off 3:off 4:off 5:off 6:off
smpppd 0:off 1:off 2:off 3:off 4:off 5:off 6:off
snmpd 0:off 1:off 2:on 3:on 4:off 5:on 6:off
splash 0:off 1:on 2:on 3:on 4:off 5:on 6:off S:on
splash_early 0:off 1:off 2:on 3:on 4:off 5:on 6:off
sshd 0:off 1:off 2:off 3:on 4:off 5:on 6:off
suseRegister 0:off 1:off 2:off 3:off 4:off 5:off 6:off
svcgssd 0:off 1:off 2:off 3:off 4:off 5:off 6:off
syslog 0:off 1:off 2:on 3:on 4:off 5:on 6:off
sysstat 0:off 1:off 2:off 3:off 4:off 5:off 6:off
tecad_logfile 0:off 1:off 2:off 3:on 4:off 5:on 6:off
tomcat55 0:off 1:off 2:off 3:off 4:off 5:off 6:off
tomcat_eis 0:off 1:off 2:off 3:off 4:off 5:off 6:off
tpmgwproxy.sh 0:off 1:off 2:on 3:on 4:off 5:on 6:off
uc4_smgrp 0:off 1:off 2:off 3:on 4:off 5:on 6:off
uc4_smgrq1 0:off 1:off 2:off 3:on 4:off 5:on 6:off
xbis-ldap-tool 0:off 1:off 2:off 3:off 4:off 5:off 6:off
xdm 0:off 1:off 2:off 3:off 4:off 5:on 6:off
xfs 0:off 1:off 2:off 3:off 4:off 5:off 6:off
xinetd 0:off 1:off 2:off 3:off 4:off 5:off 6:off
ypbind 0:off 1:off 2:off 3:off 4:off 5:off 6:off
xinetd based services:
chargen: off
chargen-udp: off
daytime: off
daytime-udp: off
echo: off
echo-udp: off
netstat: off
rsync: off
servers: off
services: off
systat: off
time: off
time-udp: off
2. Stop / Disable a service in all Linux boot runlevels or in a concrete one
As you should know already in Linux there are multiple runlevels in which server can boot, under normal circumstances SuSE servers (as of time of writting) this article boots into runlevel 3, if you'r'e unsure about the runlevel you can check it with runlevel command:
suse:/etc/init.d# /sbin/runlevel
N 3
To stop a service on all possible boot runlevels – 1,2,3,4,5
suse:/etc/init.d# /sbin/chkconfig xinetd off
If you want to stop xinetd or any other service just for certain runlevels (lets say run-level 3,4,5):
suse:/etc/init.d# chkconfig –level 345 xinetd off
3. Start / Enable a service for a runlevel or all boot levels 1,2,3,4,5
To disable boot.apparmor on all boot runlevels – kernel enhancement that enabled to set a limited set of resources for services (good for tightened security, but often creating issues with some external server configured services).
suse:/etc/init.d# chkconfig boot.apparmor off
Or for single boot modes again with –level option:
suse:/etc/init.d# chkconfig –level 345 boot.apparmor off
suse:/etc/init.d# chkconfig xfs off
4. SuSE Linux Package management zypper console tool
If you need / wonder how to install /remove / update a service on a SuSE Linux server, take a look at zypper tool.
zypper is a command-line interface to ZYPP system management library.
To install a package / service with zypper the syntax is very much like yum, for example:
suse: ~# zypper install vim -emacs
will remove emacs editor and install Vi Improved
The equivalent of yum -y Fedora command in SuSE Enterprise Linux is –non-interactive option
suse:~# zypper –non-interactive install
In SuSE it is pretty annoying when you're asked for accepting licensing on some proprietary (external vendor) non-free software packages to get around this:
suse:~# zypper patch –auto-agree-with-licenses
To keep the SuSE server up2date – i.e. SLES equivalent of CentOS's yum update && yum upgrade
suse:~# zypper list-patches
Loading repository data…
Reading installed packages…
Repository | Name | Version | Category | Status
————————————+———–+———+———-+——-
Updates for openSUSE 11.3 11.3-1.82 | lxsession | 2776 | security | needed
suse:~# zypper patch-check
Loading repository data…
Reading installed packages…
5 patches needed (1 security patch)
To look for a certain package with Zypper (equivalent of yum search packagename)
suse: ~# zypper search apache
To verify whether an RPM installed package dependecies are OK:
suse:~# zypper verify
The equivalent of Fedora yum update command in SuSE (SLES) are:
suse:~# zypper refresh
To force a complete refresh and rebuild of the database, including a forced download of raw metadata.
suse:~# zypper refresh -fdb
For people that are used to ncurses (midnight commander) like text interface you can also use yoast2 (text GUI) package manager:
suse:~# yoast2
If a package is messed you can always go back and use good old RPM (Redhat Package Manager) to solve it.
Tags: boot time, boots, command, good, How to, init, Linux, multiple, package, security, servers, shell scripts, time, update
Posted in Everyday Life, SuSE Linux, System Administration, Various | No Comments »
Sunday, October 30th, 2011 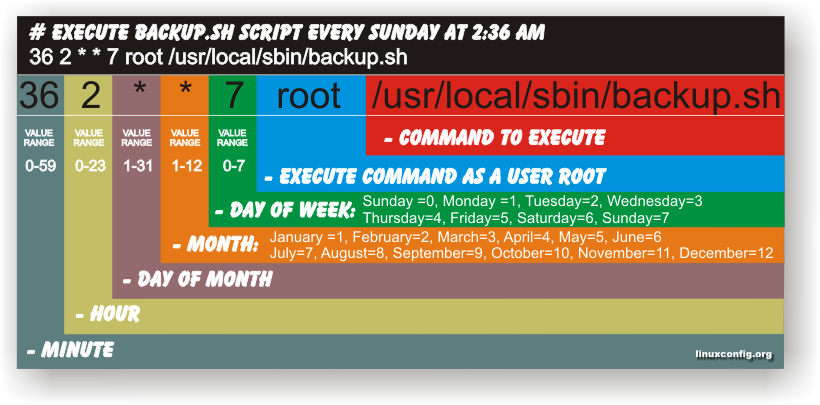
Have you ever been in need to execute some commands scheduled via a crontab, every let’s say 5 seconds?, naturally this is not possible with crontab, however adding a small shell script to loop and execute a command or commands every 5 seconds and setting it up to execute once in a minute through crontab makes this possible.
Here is an example shell script that does execute commands every 5 seconds:
#!/bin/bash
command1_to_exec='/bin/ls';

command2_to_exec='/bin/pwd';

for i in $(echo 1 2 3 4 5 6 7 8 9 10 11); do

sleep 5;

$command1_to_exec; $command2_to_exec;

done
This script will issue a sleep every 5 seconds and execute the two commands defined as $command1_to_exec and $command2_to_exec
Copy paste the script to a file or fetch exec_every_5_secs_cmds.sh from here
The script can easily be modified to execute on any seconds interval delay, the record to put on cron to use with this script should look something like:
# echo '* * * * * /path/to/exec_every_5_secs_cmds.sh' | crontab -
Where of course /path/to/exec_every_5_secs_cmds.sh needs to be modified to a proper script name and path location.
Another way to do the on a number of seconds program / command schedule without using cron at all is setting up an endless loop to run/refresh via /etc/inittab with a number of predefined commands inside. An example endless loop script to run via inittab would look something like:
while [ 1 ]; do

/bin/ls

sleep 5;

done
To run the above sample never ending script using inittab, one needs to add to the end of inittab, some line like:
mine:234:respawn:/path/to/script_name.sh
A quick way to add the line from consone would be with echo:
echo 'mine:234:respawn:/path/to/script' >> /etc/inittab
Of course the proper paths, should be put in:
Then to load up the newly added inittab line, inittab needs to be reloaded with cmd:
# init q
I've also red, some other methods suggested to run programs on a periodic seconds basis using just cron, what I found in stackoverflow.com's as a thread proposed as a solution is:
* * * * * /foo/bar/your_script

* * * * * sleep 15; /foo/bar/your_script

* * * * * sleep 30; /foo/bar/your_script

* * * * * sleep 45; /foo/bar/your_script
One guy, even suggested a shorted way with cron:
0/15 * * * * * /path/to/my/script
Tags: bashcommand, basis, com, command, command2, copy, copy paste, course, cron, crontab, echo 1, echo echo, endless loop, exec, file, foo, foo bar, freebsd, gnu linux, How to, init, inittab, interval, line, Linux, location, loop, mine, minute, name, nbsp, number, Path, predefined commands, pwd, record, refresh, respawn, run, script, script name, secs, SHA, Shell, shell script, sleep, something, stackoverflow, thread, time, time interval, way
Posted in Linux, Linux and FreeBSD Desktop, System Administration, Various | 1 Comment »
Saturday, August 20th, 2011 I’ve recently had to build a Linux server with some other servers behind the router with NAT.
One of the hosts behind the Linux router was running a Window GRE encrypted tunnel service. Which had to be accessed with the Internet ip address of the server.
In order < б>to make the GRE tunnel accessible, a bit more than just adding a normal POSTROUTING DNAT rule and iptables FORWARD is necessery.
As far as I’ve read online, there is quite of a confusion on the topic of how to properly configure the GRE tunnel accessibility on Linux , thus in this very quick tiny tutorial I’ll explain how I did it.
1. Load the ip_nat_pptp and ip_conntrack_pptp kernel module
linux-router:~# modprobe ip_nat_pptp

linux-router:~# modprobe ip_conntrack_pptp
These two modules are an absolutely necessery to be loaded before the remote GRE tunnel is able to be properly accessed, I’ve seen many people complaining online that they can’t make the GRE tunnel to work and I suppose in many of the cases the reason not to be succeed is omitting to load this two kernel modules.
2. Make the ip_nat_pptp and ip_nat_pptp modules to load on system boot time
linux-router:~# echo 'ip_nat_pptp' >> /etc/modules

linux-router:~# echo 'ip_conntrack_pptp' >> /etc/modules
3. Insert necessery iptables PREROUTING rules to make the GRE tunnel traffic flow
linux-router:~# /sbin/iptables -A PREROUTING -d 111.222.223.224/32 -p tcp -m tcp --dport 1723 -j DNAT --to-destination 192.168.1.3:1723

linux-router:~# /sbin/iptables -A PREROUTING -p gre -j DNAT --to-destination 192.168.1.3
In the above example rules its necessery to substitute the 111.222.223.224 ip address withe the external internet (real IP) address of the router.
Also the IP address of 192.168.1.3 is the internal IP address of the host where the GRE host tunnel is located.
Next it’s necessery to;
4. Add iptables rule to forward tcp/ip traffic to the GRE tunnel
linux-router:~# /sbin/iptables -A FORWARD -p gre -j ACCEPT
Finally it’s necessery to make the above iptable rules to be permanent by saving the current firewall with iptables-save or add them inside the script which loads the iptables firewall host rules.
Another possible way is to add them from /etc/rc.local , though this kind of way is not recommended as rules would add only after succesful bootup after all the rest of init scripts and stuff in /etc/rc.local is loaded without errors.
Afterwards access to the GRE tunnel to the local IP 192.168.1.3 using the port 1723 and host IP 111.222.223.224 is possible.
Hope this is helpful. Cheers 😉
Tags: bootup, Cheers, configure, confusion, dport, encrypted tunnel, external internet, flow, Forward, GRE, gre tunnel, Hope, host, hosts, How to, init, init scripts, Insert, internal ip address, internet ip address, ip nat, iptables, iptables firewall, kernel module, kernel modules, linux router, linux server, Load, make, modprobe, module linux, necessery, POSTROUTING, pptp, reason, redirect, sbin, system boot, tcp, topic, traffic flow, tutorial, window
Posted in Linux, System Administration | 6 Comments »
Saturday, April 28th, 2012 When a server hard disk scape gets filled its common that Apache returns empty (no content) pages…
This just happened in one server I administer. To restore the normal server operation I freed some space by deleting old obsolete backups.
Actually the whole reasons for this mess was an enormous backup files, which on the last monthly backup overfilled the disk empty space.
Though, I freed about 400GB of space on the the root filesystem and on a first glimpse the system had plenty of free hard drive space, still restarting the MySQL server refused to start up properly and spit error:
Incorrect key file for table '/tmp/#sql_9315.MYI'; try to repair it" mysql start up error
Besides that there have been corrupted (crashed) tables, which reported next to above error.
Checking in /tmp/#sql_9315.MYI, I couldn't see any MYI – (MyISAM) format file. A quick google look up revealed that this error is caused by not enough disk space. This was puzzling as I can see both /var and / partitions had plenty of space so this shouldn't be a problem. Also manally creating the file /tmp/#sql_9315.MYI with:
server:~# touch /tmp/#sql_9315.MYI
Didn't help it, though the file created fine. Anyways a bit of a closer examination I've noticed a /tmp filesystem mounted besides with the other file system mounts ????
You can guess my great amazement to find this 1 Megabyte only /tmp filesystem hanging on the server mounted on the server.
I didn't mounted this 1 Megabyte filesystem, so it was either an intruder or some kind of "weird" bug…
I digged in Googling to see, if I can find more on the error and found actually the whole mess with this 1 mb mounted /tmp partition is caused by, just recently introduced Debian init script /etc/init.d/mountoverflowtmp.
It seems this script was introduced in Debian newer releases. mountoverflowtmp is some kind of emergency script, which is triggered in case if the root filesystem/ space gets filled.
The script has only two options:
# /etc/init.d/mountoverflowtmp

Usage: mountoverflowtmp [start|stop]
Once started what it does it remounts the /tmp to be 1 megabyte in size and stops its execution like it never run. Well maybe, the developers had something in mind with introducing this script I will not argue. What I should complain though is the script design is completely broken. Once the script gets "activated" and does its job. This 1MB mount stays like this, even if hard disk space is freed on the root partition – / ….
Hence to cope with this unhandy situation, once I had freed disk space on the root partition for some reason mountoverflowtmp stop option was not working,
So I had to initiate "hard" unmount:
server:~# mount -l /tmp
Also as I had a bunch of crashed tables and to fix them, also issued on each of the broken tables reported on /etc/init.d/mysql start start-up.
server:~# mysql -u root -p

mysql> use Database_Name;

mysql> repair table Table_Name extended;

....
Then to finally solve the stupid Incorrect key file for table '/tmp/#sql_XXYYZZ33444.MYI'; try to repair it error, I had to restart once again the SQL server:
Stopping MySQL database server: mysqld.

Starting MySQL database server: mysqld.

Checking for corrupt, not cleanly closed and upgrade needing tables..

root@server:/etc/init.d#
Tadadadadam!, SQL now loads and works back as before!
Tags: amazement, apache, Auto, backup files, backups, Disk, disk space, Draft, drive, emergency, empty space, file, file tmp, first glimpse, format, free hard drive, free hard drive space, google, googling, hard disk, help, Incorrect, init, intruder, key file, mess, MYI, MyISAM, mysql server, mysqld, operation, partition, quot, root, root filesystem, script, server operation, shouldn, size, something, TABLE, tmp, weird bug
Posted in MySQL, System Administration, Web and CMS | 2 Comments »
Saturday, May 12th, 2012 After migrating databases data from FreeBSD MySQL 5.0.83 server to a Debian Squeeze Linux MySQL version 5.1.61, below is a mysql –version issued on both the FreeBSD and the Debian servers
freebsd# mysql --version

mysql Ver 14.12 Distrib 5.0.83, for portbld-freebsd7.2 (i386) using 5.2
debian:~# mysql --version

mysql Ver 14.14 Distrib 5.1.61, for debian-linux-gnu (i486) using readline 6.1
The data SQL dump from the FreeBSD server was dumped with following command arguments:
freebsd# mysqldump --opt --allow-keywords --add-drop-table --all-databases -u root -p > complete_db_dump.sql
Then I used sftp to transfer complete_db_dump.sql dump to the a brand new installed latest Debian Squeeze 6.0.2. The Debian server was installed using a "clean Debian install" without graphical environment with CD downloaded from debian.org's site.
On the Debian machine I imported the dump with command:
debian:~# mysq -u root -p < complete_db_dump.sql
Right After the dump was imported I re-started SQL server which was previously installed with:
debian:~# apt-get install mysql-server
The error I got after restarting the mysql server:
debian:~# #/etc/init.d/mysql restart
was:
 ERROR 1577 (HY000) at line 1: Cannot proceed because system tables used by Event Scheduler were found damaged at server start

ERROR 1547 (HY000) at line 1: Column count of mysql.proc is wrong. Expected 20, found 16. The table is probably corrupted
This error cost me a lot of nerves and searching in google to solve. It took me like half an hour of serious googling ,until I finally found the FIX!!!:
 debian:~# mysql_upgrade -u root -h localhost -p --verbose --force

Enter password:

Looking for 'mysql' as: mysql

Looking for 'mysqlcheck' as: mysqlcheck

Running 'mysqlcheck' with connection arguments: '--port=3306' '--socket=/var/run/mysqld/mysqld.sock' '--host=localhost'

Running 'mysqlcheck' with connection arguments: '--port=3306' '--socket=/var/run/mysqld/mysqld.sock' '--host=localhost'

bible.holy_bible OK

bible.holybible OK

bible.quotes_meta OK
Afterwards finally I had to restart the mysql server once again in order to finally get rid of the shitty:
ERROR 1547 (HY000) at line 1: Column count of mysql.proc is wrong. Expected 20, found 16. The table is probably corrupted error!
 debian:~# /etc/init.d/mysql restart

Stopping MySQL database server: mysqld.

Starting MySQL database server: mysqld.

Checking for corrupt, not cleanly closed and upgrade needing tables..
This solved the insane Column count of mysql.proc is wrong. Expected 20, found 16 once and for all!
Before I came with this fix I tried all kind of forum suggested fixes like:
 debian:~# mysql_upgrade -u root -p

Looking for 'mysql' as: mysql

Looking for 'mysqlcheck' as: mysqlcheck

This installation of MySQL is already upgraded to 5.1.61, use --force if you still need to run mysql_upgrade
 debian:~# mysql_upgrade -p

Looking for 'mysql' as: mysql

Looking for 'mysqlcheck' as: mysqlcheck

This installation of MySQL is already upgraded to 5.1.61, use --force if you still need to run mysql_upgrade
And few more, none of them worked the only one that worked was:
debian:~# #mysql_upgrade -u root -h localhost -p --verbose --force
I have to say big thanks to Mats Lindth wonderful blog post which provided me with the solution.
It seems, since Oracle bought the Community edition of MySQL thinks with this database server are getting more and more messy and backwards incompatible day by day.
Lately, I'm experiencing too much hassles with MySQL version incompitabilities. Maybe I should think for migrating permanently to Postgre …
By the way the ERROR 1547 (HY000) at line 1: Column count of mysql.proc is wrong. is most probably caused of some kind of password hashing incompitability between the password hashing between the BSD and Debian SQL versions, as mysql -u root -p < dump.sql, does override default stored user passwords in the mysql database tables… Such password, hashing issues were common in prior MySQL 4 to MySQL 5 migrations I've done, however since MySQL 5+ is already storing its password strings encrypted with md5 encryption I wonder why on earth this mess happens ….
Tags: Auto, COLUMN, column count, command arguments, connection, cost, count, debian linux, debian server, Draft, event, event scheduler, fix, freebsd server, google, googling, graphical environment, half an hour, host, host localhost, init, installation, line 1, linux gnu, localhost, machine, mysq, mysql server, mysqlcheck, mysqld, nerves, password, port 3306, quot, root, server start, sftp, Socket, SQL, squeeze, system tables, TABLE, verbose
Posted in Everyday Life, MySQL, System Administration, Web and CMS | 2 Comments »


