Posts Tagged ‘init script’
Wednesday, March 15th, 2023 
To keep a good eye on installed Debian Linux server security if you have to be PCI compliant (e.g. follow a high security) standards or you work in a company, where system security is crucial and any kind of security breach is untorrelated and in case of unexpected security holes exploited on running system processess listening on network peripherals (that malicious crackers) does to be able to easily identify what really happened e.g. do a Security RCA (Root Cause Analysis) for how this hack happened in order to mitigate it for future if possible capture the crackers and close the security hole the better, some kind of paranoid running program logging is required.
For such higher security systems, Linux / BSD / UNIX sysadmins can benefit from;
Snoopy command logger – a small library that logs all program executions on your Linux/BSD system.
Embedding snoopy into a running uptodate system is relatively easy, you either have to download the respective distribution package (in this particular article that would be Debian GNU / Linux) or for Linux distributions, that doesn't have the package integrated into the existing package repositories or externally available package repos, the code can be easily git cloned and installed from github snoopy program page following the README.md
However consider that snoopy run and logging the executed commands, make sure that if you use it you have rsyslogd configured to log to external logging server to make sure (someone did not manipulate the running system to avoid their actions being logged by snoopy, this is pointed by snoopy security disclaimer on the FAQ of official github snoopy project page, the page reads as so:
Security disclaimer
WARNING: Snoopy is not a reliable auditing solution.
Rogue users can easily manipulate environment to avoid their actions being logged by Snoopy. Consult this FAQ entry for more information.
Most likely this warning is pointed out by the tool authors, in order to set the logging Tool creators free for any liability in case if someone uses the snoopy tool for some unauthorized logging
and sniffing of systems etc.
Before we proceed with the tool, install first for some clarity it is a good idea to know on what kind of Debian Linux you're about to install Snoopy command logger.
root@linux:~ # cat /etc/os-release
PRETTY_NAME="Debian GNU/Linux 11 (bullseye)"
NAME="Debian GNU/Linux"
VERSION_ID="11"
VERSION="11 (bullseye)"
VERSION_CODENAME=bullseye
ID=debian
HOME_URL="https://www.debian.org/"
SUPPORT_URL="https://www.debian.org/support"
BUG_REPORT_URL="https://bugs.debian.org/"
1. Prepare separate log file for snoopy that will keep log of every system command run by running processes visible by (ps -ef)
Next check the permissions user / group and read / write / executable flags with which the default generated rsyslog will be writting and set snoopy to whatever you would like it to write with
root@linux:~ # cat /etc/rsyslog.conf | grep "^\$File\|\$Umask"~
$FileOwner root
$FileGroup adm
$FileCreateMode 0640
Create Rsyslog configuration for snoopy.log
root@linux:~ # cat << EOF | sudo tee /etc/rsyslog.d/01-snoopy.conf
# Send snoopy messages to a dedicated logfile
if (\$programname startswith "snoopy") then {
action(type="omfile" fileOwner="root" fileGroup="root" fileCreateMode="0600" file="/var/log/snoopy.log")
stop
}
EOF
To make sure that snoopy library will be preloaded after installation on next boot:
root@linux:~ # cat << EOF | sudo debconf-set-selections
snoopy snoopy/install-ld-preload boolean true
EOF
root@linux:~ # systemctl restart rsyslog
root@linux:~ # systemctl status rsyslog
● rsyslog.service – System Logging Service
Loaded: loaded (/lib/systemd/system/rsyslog.service; enabled; vendor preset: enabled)
Active: active (running) since Tue 2023-03-14 12:59:05 EET; 59min ago
TriggeredBy: ● syslog.socket
Docs: man:rsyslogd(8)
man:rsyslog.conf(5)
https://www.rsyslog.com/doc/
Main PID: 713745 (rsyslogd)
Tasks: 6 (limit: 4654)
Memory: 1.1M
CPU: 548ms
CGroup: /system.slice/rsyslog.service
└─713745 /usr/sbin/rsyslogd -n -iNONE
мар 14 12:59:05 haproxy2 systemd[1]: Started System Logging Service.
мар 14 12:59:05 haproxy2 rsyslogd[713745]: warning: ~ action is deprecated, consider using the 'stop' statement instead [v8.210>
мар 14 12:59:05 haproxy2 rsyslogd[713745]: [198B blob data]
мар 14 12:59:05 haproxy2 rsyslogd[713745]: [198B blob data]
мар 14 12:59:05 haproxy2 rsyslogd[713745]: [198B blob data]
мар 14 12:59:05 haproxy2 rsyslogd[713745]: [198B blob data]
мар 14 12:59:05 haproxy2 rsyslogd[713745]: imuxsock: Acquired UNIX socket '/run/systemd/journal/syslog' (fd 3) from systemd. [>
мар 14 12:59:05 haproxy2 rsyslogd[713745]: [origin software="rsyslogd" swVersion="8.2102.0" x-pid="713745" x-info="https://www.>
мар 14 13:19:05 haproxy2 rsyslogd[713745]: — MARK —
мар 14 13:39:05 haproxy2 rsyslogd[713745]: — MARK —
2. Install snoopy deb package and configure it
root@linux:~ # apt install snoopy
Четене на списъците с пакети… Готово
Изграждане на дървото със зависимости… Готово
Четене на информацията за състоянието… Готово
Следните пакети са били инсталирани автоматично и вече не са необходими:
bsdmainutils cpp-8 geoip-database libasan5 libbind9-161 libcroco3 libdns1104 libdns1110 libevent-core-2.1-6
libevent-pthreads-2.1-6 libgdk-pixbuf-xlib-2.0-0 libgdk-pixbuf2.0-0 libgeoip1 libicu63 libisc1100 libisc1105 libisccc161
libisccfg163 libisl19 liblwres161 libmpdec2 libmpx2 libperl5.28 libpython2-stdlib libpython2.7-minimal libpython2.7-stdlib
libpython3.7-minimal libpython3.7-stdlib libreadline7 netcat-traditional node-ansi-align node-arrify node-bluebird
node-boxen node-builtin-modules node-call-limit node-camelcase node-cli-boxes node-cliui node-co node-concat-stream
node-config-chain node-cross-spawn node-cyclist node-decamelize node-decompress-response node-deep-extend node-detect-indent
node-detect-newline node-duplexer3 node-duplexify node-editor node-end-of-stream node-errno node-execa node-find-up
node-flush-write-stream node-from2 node-fs-vacuum node-get-caller-file node-get-stream node-got node-has-symbol-support-x
node-has-to-string-tag-x node-import-lazy node-invert-kv node-is-buffer node-is-builtin-module node-is-npm node-is-object
node-is-plain-obj node-is-retry-allowed node-is-stream node-isurl node-json-buffer node-kind-of node-latest-version
node-lazy-property node-lcid node-libnpx node-locate-path node-lowercase-keys node-mem node-merge-stream node-mimic-fn
node-mimic-response node-minimist node-mississippi node-node-uuid node-npm-run-path node-os-locale node-p-cancelable
node-p-finally node-p-limit node-p-locate node-p-timeout node-package-json node-parallel-transform node-path-exists
node-path-is-inside node-prepend-http node-proto-list node-prr node-pump node-pumpify node-qw node-rc
node-registry-auth-token node-registry-url node-require-directory node-require-main-filename node-semver-diff node-sha
node-shebang-command node-shebang-regex node-slide node-sorted-object node-stream-each node-stream-iterate node-stream-shift
node-strip-eof node-strip-json-comments node-term-size node-through2 node-timed-out node-typedarray node-uid-number
node-unpipe node-url-parse-lax node-url-to-options node-which-module node-widest-line node-wrap-ansi node-xdg-basedir
node-xtend node-y18n node-yargs node-yargs-parser perl-modules-5.28 python-pkg-resources python2 python2-minimal python2.7
python2.7-minimal python3.7-minimal
Използвайте „apt autoremove“ за да ги премахнете.
Следните НОВИ пакети ще бъдат инсталирани:
snoopy
0 актуализирани, 1 нови инсталирани, 0 за премахване и 1 без промяна.
Необходимо е да се изтеглят 46,0 kB архиви.
След тази операция ще бъде използвано 124 kB допълнително дисково пространство.
Изт:1 http://deb.debian.org/debian bullseye/main amd64 snoopy amd64 2.4.12-1 [46,0 kB]
Изтеглени 46,0 kB за 0с (93,2 kB/сек)
Предварително настройване на пакети …
Selecting previously unselected package snoopy.
(Reading database … 56067 files and directories currently installed.)
Preparing to unpack …/snoopy_2.4.12-1_amd64.deb ...
Unpacking snoopy (2.4.12-1) …
Setting up snoopy (2.4.12-1) …
Processing triggers for libc-bin (2.31-13+deb11u5) …
root@linux:/etc# ls -al /var/log/snoopy.log
-rw——- 1 root root 14472 14 мар 13:40 /var/log/snoopy.log
Any specific configuration for snoopy can be tuned through /etc/snoopy.ini
Now you will find all the commands executed by all monitored running processes in /var/log/snoopy.
root@linux:/etc# tail -30 /var/log/snoopy.log
Mar 14 12:59:32 haproxy2 snoopy[713804]: [login:root ssh:(192.168.0.1 62796 192.168.0.210 22) sid:713792 tty:/dev/pts/2 (0/root) uid:root(0)/root(0) cwd:/]: ldconfig
Mar 14 12:59:32 haproxy2 snoopy[713806]: [login:zabbix ssh:((undefined)) sid:682168 tty:(none) ((none)/(none)) uid:zabbix(108)/zabbix(108) cwd:/]: who
Mar 14 12:59:32 haproxy2 snoopy[713807]: [login:zabbix ssh:((undefined)) sid:682168 tty:(none) ((none)/(none)) uid:zabbix(108)/zabbix(108) cwd:/]: wc -l
Mar 14 13:00:07 haproxy2 snoopy[713815]: [login:root ssh:((undefined)) sid:713815 tty:(none) ((none)/(none)) uid:root(0)/root(0) cwd:/usr/lib/sysstat]: /usr/lib/sysstat/sadc -F -L -S DISK 1 1 /var/log/sysstat
Mar 14 13:00:32 haproxy2 snoopy[713823]: [login:zabbix ssh:((undefined)) sid:682168 tty:(none) ((none)/(none)) uid:zabbix(108)/zabbix(108) cwd:/]: who
Mar 14 13:00:32 haproxy2 snoopy[713824]: [login:zabbix ssh:((undefined)) sid:682168 tty:(none) ((none)/(none)) uid:zabbix(108)/zabbix(108) cwd:/]: wc -l
Mar 14 13:01:32 haproxy2 snoopy[713834]: [login:zabbix ssh:((undefined)) sid:682168 tty:(none) ((none)/(none)) uid:zabbix(108)/zabbix(108) cwd:/]: who
Mar 14 13:01:32 haproxy2 snoopy[713835]: [login:zabbix ssh:((undefined)) sid:682168 tty:(none) ((none)/(none)) uid:zabbix(108)/zabbix(108) cwd:/]: wc -l
Mar 14 13:02:32 haproxy2 snoopy[713843]: [login:zabbix ssh:((undefined)) sid:682168 tty:(none) ((none)/(none)) uid:zabbix(108)/zabbix(108) cwd:/]: who
Mar 14 13:02:32 haproxy2 snoopy[713844]: [login:zabbix ssh:((undefined)) sid:682168 tty:(none) ((none)/(none)) uid:zabbix(108)/zabbix(108) cwd:/]: wc -l
Mar 14 13:03:32 haproxy2 snoopy[713855]: [login:zabbix ssh:((undefined)) sid:682168 tty:(none) ((none)/(none)) uid:zabbix(108)/zabbix(108) cwd:/]: who
Mar 14 13:03:32 haproxy2 snoopy[713856]: [login:zabbix ssh:((undefined)) sid:682168 tty:(none) ((none)/(none)) uid:zabbix(108)/zabbix(108) cwd:/]: wc -l
Mar 14 13:04:32 haproxy2 snoopy[713868]: [login:zabbix ssh:((undefined)) sid:682168 tty:(none) ((none)/(none)) uid:zabbix(108)/zabbix(108) cwd:/]: who
3. Set up logrotation (archiving) for snoopy logs
root@linux:/etc# vim /etc/logrotate.d/snoopy
/var/log/snoopy.log {
daily
rotate 30
compress
delaycompress
notifempty
create 640 root adm
}
If you want to test logrotation without actually rotating the file:
root@linux:/etc# logrotate –debug –force /etc/logrotate.d/snoopy
log needs rotating
rotating log /var/log/snoopy.log, log->rotateCount is 30
dateext suffix '-20230314'
glob pattern '-[0-9][0-9][0-9][0-9][0-9][0-9][0-9][0-9]'
previous log /var/log/snoopy.log.1 does not exist
renaming /var/log/snoopy.log.30.gz to /var/log/snoopy.log.31.gz (rotatecount 30, logstart 1, i 30),
…
renaming /var/log/snoopy.log.1.gz to /var/log/snoopy.log.2.gz (rotatecount 30, logstart 1, i 1),
renaming /var/log/snoopy.log.0.gz to /var/log/snoopy.log.1.gz (rotatecount 30, logstart 1, i 0),
log /var/log/snoopy.log.31.gz doesn't exist — won't try to dispose of it
renaming /var/log/snoopy.log to /var/log/snoopy.log.1
creating new /var/log/snoopy.log mode = 0640 uid = 0 gid = 4
4. Monitoring only selected applications executed commands with snoopy
By default snoopy after installed will set itself to monitor all kind of running processes on the system is done by preloading the ldconfig's (libc) ld.so.preload
root@haproxy2:/etc# cat /etc/ld.so.preload
/lib/x86_64-linux-gnu/libsnoopy.so
If you want to monitor a concrete application and not log everything from the running processes in process list, comment this out this line run ldconfig command
Then to any concrete application you would like to monitor with snoopy add to its init script either /etc/init.d/app_init_script or to systemctl's start script before the application binary program run:
export LD_PRELOAD=/lib/snoopy.so
As per the README states
Snoopy is placed in /etc/ld.so.preload to trap all occurrences of exec, if
you wish to monitor only certain applications you can do so through the
LD_PRELOAD environment variable.
Simply set it to /lib/snoopy.so before loading the application.
For example
# export LD_PRELOAD=/lib/snoopy.so
# lynx http://example.com/
Tags: applications, boot, How to, init script, Mar, Monitoring, root linux, root root, root user, security hole, security standards, setting, Temporary, var, Warning, zabbix
Posted in Linux, Security, System Administration, System Optimization | 1 Comment »
Monday, February 15th, 2016 
I really love sysstat and as a console maniac I tend to install it on every server however by default there is some <b>sysstat</b> tuning once installed to make it work, for those unfamiliar with <i>sysstat</i> I warmly recommend to check, it here is in short the package description:<br /><br />
server:~# apt-cache show sysstat|grep -i desc -A 15
Description: system performance tools for Linux
The sysstat package contains the following system performance tools:
– sar: collects and reports system activity information;
– iostat: reports CPU utilization and disk I/O statistics;
– mpstat: reports global and per-processor statistics;
– pidstat: reports statistics for Linux tasks (processes);
– sadf: displays data collected by sar in various formats;
– nfsiostat: reports I/O statistics for network filesystems;
– cifsiostat: reports I/O statistics for CIFS filesystems.
.
The statistics reported by sar deal with I/O transfer rates,
paging activity, process-related activities, interrupts,
network activity, memory and swap space utilization, CPU
utilization, kernel activities and TTY statistics, among
others. Both UP and SMP machines are fully supported.
Homepage: http://pagesperso-orange.fr/sebastien.godard/
If you happen to install sysstat on a Debian / Ubuntu server with:
server:~# apt-get install –yes sysstat
, and you try to get some statistics with sar command but you get some ugly error output from:
server:~# sar Cannot open /var/log/sysstat/sa20: No such file or directory
And you wonder how to resolve it and to be able to have the server log in text databases periodically the nice sar stats load avarages – %idle, %iowait, %system, %nice, %user, then to FIX that Cannot open /var/log/sysstat/sa20: No such file or directory
You need to:
server:~# vim /etc/default/sysstat
By Default value you will find out sysstat stats it is disabled, e.g.:
ENABLED="false"
Switch the value to "true"
ENABLED="true"
Then restart sysstat init script with:
server:~# /etc/init.d/sysstat restart
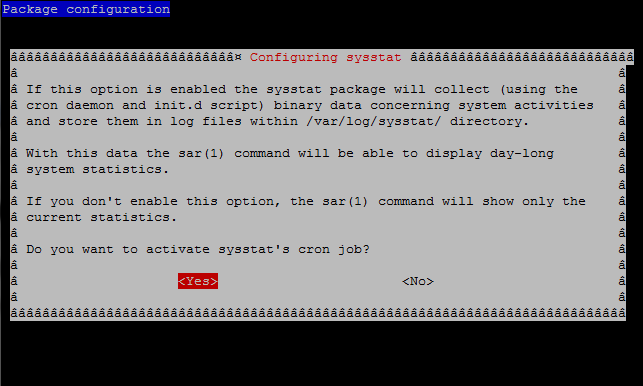
However for those who prefer to do things from menu Ncurses interfaces and are not familiar with Vi Improved, the easiest way is to run dpkg reconfigure of the sysstat:
server:~# dpkg –reconfigure
root@server:/# sar
Linux 2.6.32-5-amd64 (pcfreak) 15.02.2016 _x86_64_ (2 CPU)
0,00,01 CPU %user %nice %system %iowait %steal %idle
0,15,01 all 24,32 0,54 3,10 0,62 0,00 71,42
1,15,01 all 18,69 0,53 2,10 0,48 0,00 78,20
10,05,01 all 22,13 0,54 2,81 0,51 0,00 74,01
10,15,01 all 17,14 0,53 2,44 0,40 0,00 79,49
10,25,01 all 24,03 0,63 2,93 0,45 0,00 71,97
10,35,01 all 18,88 0,54 2,44 1,08 0,00 77,07
10,45,01 all 25,60 0,54 3,33 0,74 0,00 69,79
10,55,01 all 36,78 0,78 4,44 0,89 0,00 57,10
16,05,01 all 27,10 0,54 3,43 1,14 0,00 67,79
Well that's it now sysstat error resolved, text reporting stats data works again, Hooray! 🙂
Tags: databases, debian linux, Debian Ubuntu Linux, directory, file, Howto Fix, information, init script, log, network filesystems, package description, root server, sysstat, var
Posted in Everyday Life, Linux, Linux and FreeBSD Desktop, Monitoring, Performance Tuning, Remote System Administration, System Administration, Various | No Comments »
Tuesday, January 17th, 2012 
My beloved sister was complaining games were failing to properly be played with wine emulator , therefore I decided to be kind and help her by installing a Windows XP to run inside a Virtual Machine.My previous install experiments with running MS Windows XP on Linux was on Debian using QEMU virtualmachine emulator.
However as Qemu is a bit less interactive and slower virtualmachine for running Windows (though I prefer it for being completely free software), this time I decided to install the Windows OS with Virtualbox.
My hope was using VirtualBox would be a way easier but I was wrong… I've faced few troubles and I thought many people who initially try to install Virtualbox VM to run Windows on Ubuntu and other Debian based Linux distros will probably experience the same problems as mine, so here is how this article was born.
Here is what I did to have a VirtualBox OS emulator to run Windows XP SP2 on Ubuntu 11.10 Linux
1. Install Virtualbox required packages with apt
root@ubuntu:~# apt-get install virtualbox virtualbox-dkms virtualbox-guest-dkms
root@ubuntu:~# apt-get install virtualbox-ose-dkms virtualbox-guest-utils virtualbox-guest-x11

...
If you prefer more GUI or lazy to type commands, the Software Package Manager can also be used to straight install the same packages.
virtualbox-dkms virtualbox-guest-dkms packages are the two which are absolutely necessery in order to enable VirtualBox to support installing Microsoft Windows XP. DKMS modules are also necessery to be able to emulate some other proprietary (non-free) operating systems.
The DKMS packages provide a source for building Vbox guest (OS) additional kernel modules. They also require the kernel source to be install otherwise they fail to compile.
Failing to build the DKMS modules will give you error every time you try to create new VirtualMachine container for installing a fresh Windows XP.
The error happens if the two packages do not properly build the vboxdrv extra Vbox kernel module while the Windows XP installer is loaded from a CD or ISO. The error to pop up is:
Kernel driver not installed (rc=-1908)
The VirtualBox Linux kernel driver (vboxdrv) is either not loaded or there is a permission problem with /dev/vboxdrv. Please reinstall the kernel module by executing
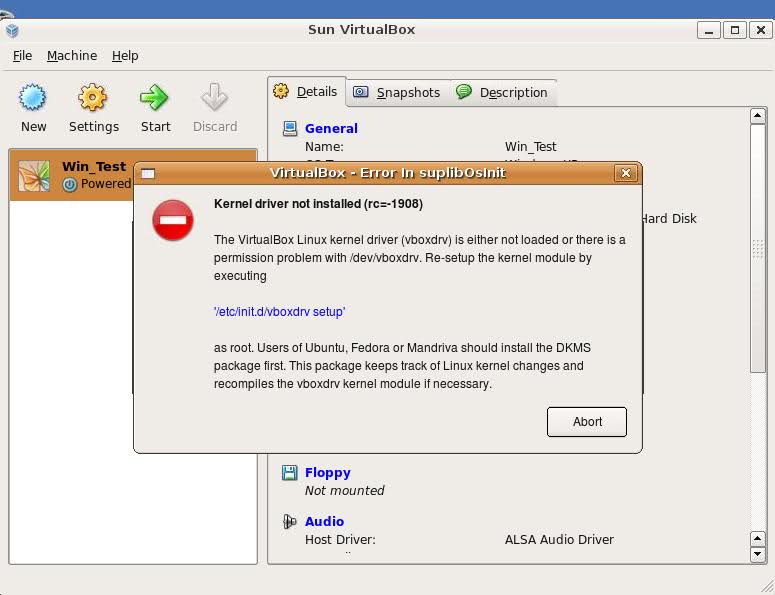
To fix the error:
2. Install latest Kernel source that corresponds to your current kernel version
root@ubuntu:~# apt-get install linux-headers-`uname -r`

...
Next its necessery to rebuild the DKMS modules using dpkg-reconfigure:
3. Rebuild VirtualBox DKMS deb packages
root@ubuntu:~# dpkg-reconfigure virtualbox-dkms

...

root@ubuntu:~# dpkg-reconfigure virtualbox-guest-dkms

...

root@ubuntu:~# dpkg-reconfigure virtualbox-ose-dkms

...
Hopefully the copilation of vboxdrv kernel module should complete succesfully.
To test if all is fine just load the module:
4. Load vboxdrv virtualbox kernel module
root@ubuntu:~# modprobe vboxdrv

root@ubuntu:~#
If you get some error during loading, this means vboxdrv failed to properly compile, try read thoroughfully what the error is and fix it) ;).
As a next step the vboxdrv has to be set to load on every system boot.
5. Set vboxdrv to load on every Ubuntu boot
root@ubuntu:~# echo 'vboxdrv' >> /etc/modules
I am not sure if this step is required, it could be /etc/init.d/virtualbox init script automatically loads the module, anyways putting it to load on boot would do no harm, so better do it.
That's all now, you can launch VirtualBox and use the New button to initiate a new Virtual Machine, I will skip explaining how to do the configurations for a Windows XP as most of the configurations offered by default would simply work without any tampering.
After booting the Windows XP installer I simply followed the usual steps to install Windows and all went smoothly.
Below you see a screenshot showing the installed Windows XP Virtualbox saved VM session. The screenshot letters are in Bulgarian as my sisters default lanaguage for Ubuntu is bulgarian 😉

I hope this article helps someone out there. Please drop me a comment if you experience any troubles with it. Cya 🙂
Tags: Auto, beloved sister, DKMS, Draft, Failing, free operating systems, guest os, How to, init, init script, Install, ISO, kernel modules, kernel source, Linux, loading, Microsoft, microsoft windows, ms windows, necessery, Permission, qemu, root, screenshot, Set, software, software package, system boot, time, type, Ubuntu, uname, vbox, Virtual, virtual machine, VirtualBox, virtualmachine, vm, Windows, windows os, windows xp, windows xp sp2, wine, x11
Posted in Linux, Linux and FreeBSD Desktop, Linux Audio & Video | 1 Comment »
Friday, April 8th, 2011 I have recently installed and configured a Debian Linux server with nginx
. Since then I’ve been testing around different ways to optimize the nginx performance.
In my nginx quest, one of the most crucial settings which dramatically improved the end client performance was enabling the so called output compression which in Apache based servers is also known as content gzip compression .
In Apache webservers the content gzip compression is provided by a server module called mod_deflate .
The output compression nginx settings saves a lot of bandwidth and though it adds up a bit more load to the server, the plain text files like html, xml, js and css’s download time reduces drasticly as they’re streamed to the browser in gzip compressed format.
This little improvement in download speed also does impact the overall end user browser experience and therefore improves the browsing speed experience with websites.
If you have already had experience nginx you already know it is a bit fastidious and you have to be very careful with it’s configuration, however thanksfully enabling the gzip compression was actually rather easier than I thought.
Here is what I added in my nginx config to enable output compression:
## Compression

gzip on;

gzip_buffers 16 8k;

gzip_comp_level 9;

gzip_http_version 1.1;

gzip_min_length 0;

gzip_vary on;
Important note here is that need to add this code in the nginx configuration block starting with:
http {

....

## Compression

gzip on;

gzip_buffers 16 8k;

gzip_comp_level 9;

gzip_http_version 1.1;

gzip_min_length 0;

gzip_vary on;
In order to load the gzip output compression as a next step you need to restart the nginx server, either by it’s init script if you use one or by killing the old nginx server instances and starting up the nginx server binary again:
I personally use an init script, so restarting nginx for me is done via the cmd:
debian:~# /etc/init.d/nginx restart

Restarting nginx: nginx.
Now to test if the output gzip compression is enabled for nginx, you can simply use telnet
hipo@linux:~$ telnet your-nginx-webserver-domain.com 80

Escape character is '^]'.
After the Escape character is set ‘^]’ appears on your screen type in the blank space:
HEAD / HTTP/1.0
and press enter twice.
The output which should follow should look like:
HTTP/1.1 200 OK

Server: nginx

Date: Fri, 08 Apr 2011 12:04:43 GMT

Content-Type: text/html

Content-Length: 13

Last-Modified: Tue, 22 Mar 2011 15:04:26 GMT

Connection: close

Vary: Accept-Encoding

Expires: Fri, 15 Apr 2011 12:04:43 GMT

Cache-Control: max-age=604800

Accept-Ranges: bytes
The whole transaction with telnet command issued and the nginx webserver output should look like so:
hipo@linux:~$ telnet your-nginx-webserver-domain.com 80

Trying xxx.xxx.xxx.xxx...

Connected to your-nginx-webserver-domain.com

.Escape character is '^]'.

HEAD / HTTP/1.0
HTTP/1.1 200 OK
Server: nginx
Date: Fri, 08 Apr 2011 12:04:43 GMT
Content-Type: text/html
Content-Length: 13
Last-Modified: Tue, 22 Mar 2011 15:04:26 GMT
Connection: close
Vary: Accept-Encoding
Expires: Fri, 15 Apr 2011 12:04:43 GMT
Cache-Control: max-age=604800
Accept-Ranges: bytes
The important message in the returned output which confirms your nginx output compression is properly configured is:
Vary: Accept-Encoding
If this message is returned by your nginx server, this means your nginx now will distribute it’s content to it’s clients in compressed format and apart from the browsing boost a lot of server and client bandwitdth will be saved.
Tags: apache webservers, bandwidth, client, client performance, com, compression, compression gzip, config, configuration block, content, different ways, download, EncodingExpires, experience, Fri, GMTConnection, gzip, gzip compression, gzipfile, HEAD, How to, html xml, HTTP, init, init script, js, level, Linux, linux server, Mar, mod, Modified, nginx, OKServer, output compression, plain text files, server instances, servers, text, time, use, xml
Posted in Linux, System Administration, Web and CMS | 3 Comments »
Sunday, June 10th, 2012 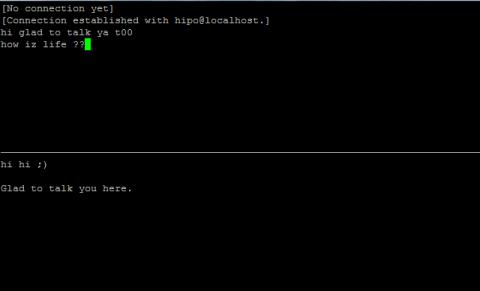
Those who are in familiar with older UNIXes, UNIX BSD derivatives and GNU Linux should certainly remember the times, when we hackers used to talk to each other using talk service.
Those who don't know what talk command is it is a simple console / ssh utility to talk to another logged in users.
Talk is very similar to write and mesg one liner messasing utilities available for *nixes, the difference is it is intendted to provide interactive chat between the two logged in users. People who came to know UNIX or free software in older times most likely don't know talk, however I still remember how precious this tool was for communication back in the day.
I believe still it can be useful so I dediced to install ot on one FreeBSD host.
In order to have the talk service running on BSD it is necessery to have /usr/libexec/ntalkd installed on the system this however is installed by default with standard BSD OS installs, so no need for any external ports install to run it.
talk doesn't have it's own init script to start is not written to run as it own service but in order to run it is is necessery to enable it via inetd
Enabling it is done by;;;
1 — Editting /etc/inetd.conf
Inside the conf the line::
#ntalk dgram udp wait tty:tty /usr/libexec/ntalkd ntalkd
should be uncommented e.g, become ;;;
ntalk dgram udp wait tty:tty /usr/libexec/ntalkd ntalkd
2 — Restart inetd
freebsd# /etc/rc.d/inetd restart

Stopping inetd.

Starting inetd.
talk is planned to be used for peer to peer conversations over SSH so in a way it is the GRANDFATHER 🙂 of IRC, ICQ and Skype;;;
Here is an example on how talk is used ,, Let's say there are three logged in users
pcfreak# w

12:39PM up 3 days, 16:25, 3 users, load averages: 1.12, 0.91, 0.71

USER TTY FROM LOGIN@ IDLE WHAT

testuser p0 192.168.0.7 10:50AM - bash

hipo p3 192.168.0.8 12:23PM - w

root p4 :ttyp2:S.0 12:24PM - vim /usr/local/www/dat
I'm logged in with my username hipo and I would like to talk to testuser ;;;;
pcfreak% tty

/dev/ttyp3
You see I'm logged in on /dev/ttyp3 (this is the specific naming on BSDs) on Linux equivalent is /dev/tty3So to talk the other user testuser;;;;;-
$ talk testuser ttyp0

[No connection yet]

[Waiting for your party to respond]
The testuser logged in via SSH will then get a message ||;
Message from Talk_Daemon@pcfreak at 12:44 on 2012/06/10 ...

talk: connection requested by hipo@localhost

talk: respond with: talk hipo@localhost
To enter a talk session then the logged in testuser has to type:
$ talk hipo@localhost
Tags: Auto, BSD, bsd os, BSDs, Chat, connection, conversations, derivatives, dgram, doesn, Draft, editting, external ports, free software, gnu linux, hackers, hipo, host, init, init script, irc icq, Linux, load averages, localhost, mesg, necessery, need, ntalkd, p3, pcfreak, Restart, Skype, software, ssh, testuser, tool, unix, unix bsd, wait
Posted in FreeBSD | No Comments »
Tuesday, January 4th, 2011 If you experience problems with making your CentoOS 5.5 work with active ftp connections , e.g. every connection you make to the FTP needs to be in a passive mode or the file transfer or FTP directory listing doesn’t initialize at all, here is how you can solve it:
Edit the file /etc/sysconfig/iptables-config and change their the line:
IPTABLES_MODULES="ip_conntrack_netbios_ns"
to look like:
IPTABLES_MODULES=”ip_conntrack_netbios_ns ip_nat_ftp ip_conntrack_ftp”
Adding the two modules ip_nat_ftp and ip_conntrack_ftp will instruct the CentOS’s /etc/init.d/iptables firewall rules to initialize the kernel modules ip_nat_ftp and ip_conntrack_ftp
This modules solves problems with Active FTP not working caused by a host running behind a firewall router or behind a NAT.
This will hopefully resolve your issues with Active FTP not working on CentOS.
If loading this two kernel modules doesn’t solve the issues and you’re running vsftpd FTP server, then it’s likely that the Active FTP non-working problems are caused by your VSFTPD configuration.
If that’s the case something that might help is setting in /etc/vsftpd/vsftpd.conf the following variables:
pasv_enable=NO

pasv_promiscuous=YES
Of course as a final step you will need to restart the iptables firewall:
[root@centos: ~]# /etc/init.d/iptables restart

Flushing firewall rules: [ OK ]

Setting chains to policy ACCEPT: filter [ OK ]

Unloading iptables modules: [ OK ]

Applying iptables firewall rules: [ OK ]

Loading additional iptables modules: ip_conntrack_netbios_ns

ip_nat_ftp ip_conntrack_ftp [ OK ]
As you can see the two modules ip_nat_ftp and ip_conntrack_ftp are now loaded as additional modules.
Moreover if you have also modified your vsftpd.conf you need to restart the vsftpd via the init script:
[root@centos: ~]# /etc/init.d/vsftpd restart

Shutting down vsftpd: [ OK ]

Starting vsftpd for vsftpd: [ OK ]
If adding this two modules and adding this two extra variables in vsftpd configuration doesn’t help with making your FTP server to work in Active FTP mode , it’s very likely that the whole troubles comes from the firewall configuration, so an edit of /etc/sysconfig/iptables would be necessary;
To find out if the firewall is the source of the FTP not able to enter active mode, stop your firewall for a while by issuing the cmd:
[root@centos:~]# /etc/init.d/iptables stop
If iptables is the source of thepassive ftp troubles, an iptables rules similar to this should make your firewall allow active ftp connections;
*filter :INPUT ACCEPT [0:0]
:FORWARD ACCEPT [0:0]
:OUTPUT ACCEPT
[0:0] -A INPUT -i lo -j ACCEPT -A INPUT -d 127.0.0.0/255.0.0.0 -i ! lo -j REJECT –reject-with icmp-port-unreachable
-A INPUT -m state –state RELATED,ESTABLISHED -j ACCEPT
-A INPUT -p tcp -m tcp –dport 80 -j ACCEPT
-A INPUT -p tcp -m state –state NEW -m tcp –dport 44444 -j ACCEPT
-A INPUT -p tcp -m state –state NEW -m tcp –dport 21 -j ACCEPT -A INPUT -p icmp -m icmp –icmp-type 8 -j ACCEPT
-A INPUT -j REJECT –reject-with icmp-port-unreachable -A FORWARD -j REJECT –reject-with icmp-port-unreachable
-A OUTPUT -j ACCEPT -A OUTPUT -p tcp -m tcp –dport 21 -m state –state ESTABLISHED,RELATED -j ACCEPT
Tags: CentoOS, CentOS, chains, connection, course, directory listing, doesn, dport, Enabling Active FTP connections on CentOS 5.5, ESTABLISHED, file, file transfer, firewall router, firewall rules, Forward, ftp ip, help, ICMP, init script, Initialize, INPUT, ip nat, iptables firewall, kernel modules, nbsp, netbios, passive mode, promiscuous, quot, RELATED, root, something, variables, work, YES
Posted in Linux, System Administration | 1 Comment »
Friday, October 28th, 2011 One of the qmail servers I manage today has started returning strange errors in Squirrel webmail and via POP3/IMAP connections with Thunderbird.
What was rather strange is if the email doesn’t contain a link to a webpage or and attachment, e.g. mail consists of just plain text the mail was sent properly, if not however it failed to sent with an error message of:
Requested action aborted: error in processing Server replied: 451 qq temporary problem (#4.3.0)
After looking up in the logs and some quick search in Google, I come across some online threads reporting that the whole issues are caused by malfunction of the qmail-scanner.pl (script checking mail for viruses).
After a close examination on what is happening I found out /usr/sbin/clamd was not running at all?!
Then I remembered a bit earlier I applied some updates on the server with apt-get update && apt-get upgrade , some of the packages which were updated were exactly clamav-daemon and clamav-freshclam .
Hence, the reason for the error:
451 qq temporary problem (#4.3.0)
was pretty obvious qmail-scanner.pl which is using the clamd daemon to check incoming and outgoing mail for viruses failed to respond, so any mail which contained any content which needed to go through clamd for a check and returned back to qmail-scanner.pl did not make it and therefore qmail returned the weird error message.
Apparently for some reason apparently the earlier update of clamav-daemon failed to properly restart, the init script /etc/init.d/clamav-daemon .
Following fix was very simple all I had to do is launch clamav-daemon again:
linux:~# /etc/inid.d/clamav-daemon restart
Afterwards the error is gone and all mails worked just fine 😉
Tags: action, amp, cause and solution, checking, Clamav, clamd, daemon, email, examination, fine, fix, g mail, google, imap connections, init script, link, logs, mail, online, outgoing mail, pl script, processing, Qmail, qq, reason, Requested, scanner, Search, servers, solution, Squirrel, strange errors, Thunderbird, today, update, usr, Viruses, weird error message
Posted in Linux, Qmail, System Administration | No Comments »
Wednesday, January 11th, 2012 Since I've blogged about my recent skype issues. I've played a lot with pulseaudio, alsa, alsa-oss to experimented a lot until I figured out why Skype was failing to properly delivery sound and record via my embedded laptop mic.
Anyways, while researching on the cause of my Thinkpad r61 mic issues, I've red a bunch of blog posts by people experiencing microphone oddities with Lenovo Thinkpads
Throughout the search I come across one very good article, which explained that in many cases the Thinkpad sound problems are caused by the snd-hda-intel alsa kernel module. snd-hda-intel fails to automatically set proper sb model type argument during Linux install when the soundcard is initialized with some argument like options snd-hda-intel model=auto
Hence, the suggested fix which should resolve this on many Thinkpad notebooks is up to passing the right module argument:
To fix its neceessery to edit /etc/modprobe.d/alsa-base.conf .
debian:~# vim /etc/modprobe.d/alsa-base.conf
Find the line in the file starting with:
options snd-hda-intel model=
and substitute with:
options snd-hda-intel model=thinkpad
Finally a restart of Advaned Linux Sound Architecture (alsa) is required:
debian:~# /etc/init.d/alsa restart

...
At most cases just restarting the alsa via its init script is not enough, since the ssnd-hda-intel kernel module is already in use by some program or something, so its best to do a reboot to make sure the module is loaded with the new model=thinkpad argument.
My exact laptop sound card model is:
debian:~# lspci |grep -i audio

00:1b.0 Audio device: Intel Corporation 82801H (ICH8 Family) HD Audio Controller (rev 03)
After changing the module and using alsamixer and aumix to make sure mic is unmuted and its volume is high enough, mic sound rec works fine.
Tags: Advaned, alsa, alsamixer, architecture, argument, audio controller, aumix, Auto, blogged, card, card model, cause, confFind, Draft, file, init, init script, intel corporation, kernel module, laptop, microphone, model auto, model type, modprobe, new model, oddities, pulseaudio, Reboot, script, Search, snd, Solve, something, sound architecture, sound card, soundcard, ssnd, substitute, thinkpad notebooks, thinkpad r61, thinkpads, type, type argument, Ubuntu, vim
Posted in Linux, Various | No Comments »
Saturday, July 16th, 2011 
It was necessery to clean up some squid cache for some proxy users on a Debian host. Until now I’ve used to run only custom build Squid server on Slackware Linux.
Thus I was curious if Debian guys were smart enough to implement a proxy cache cleaning option as an option to be passed on to squid’s init script.
Honestly I was quite suprised squid clear cache option is not there;
squid-cache:~# /etc/init.d/squid3

Usage: /etc/init.d/squid3 {start|stop|reload|force-reload|restart}

squid-cache:/#
As it was not embedded into init script I still hoped, there might be some Debian way to do the proxy cache clearing, so I spend some 10 minutes checking online as well as checked in squid3‘s manual just to find there is no specific command or Debian accepted way to clean squid’s cache.
Since I couldn’t find any Debian specific, way I did it the old fashioned way 😉 (deleted directory/file structures in /var/spool/squid3/* and used squid’s -z option, to recreate the swap directories.
Here is how:
squid-cache:~# /etc/init.d/squid3 stop;

squid-cache:~# rm -Rf /var/spool/squid3/*;

squid-cache:~# squid3 -z; /etc/init.d/squid3 start
Finally I was quite amazed to realize, there was not even a crontab script to periodically clear and re-create proxy cache.
My previous experience with maintaning an office Squid proxy cache has prooved, that periodic cache clean ups are very helpful, especially to resolve issues with cached unreslovable DNS entries in the server.
Clearing up squid cache every week or something, guarantees that failure to resolve certain hosts at certain times would not stay unresolvable like forever 😉
In that manner of thougths, I decided to put the following crontab which will twice a month clear up proxy’s cache, to possibly solve some failed squid DNS issues.
squid-cache:~# crontab -u root -l > file;

echo '00 04 12,26 * * /etc/init.d/squid3 stop; rm -Rf /var/spool/squid3/*; squid3 -z; /etc/init.d/squid3 start >/dev/null 2>&1'

>> file; crontab file
By the way, implementing the squid clear cache in Debian and Ubuntu ‘s init scripts and putting a periodic proxy clear up cron, seems like a feature worthy to be proposed to the distro developers and hopefully be embbed in some of the upcoming distro releases 😉
Tags: amp, cache option, clear cache, clearing, command, cron, crontab script, dev, DNS, dns entries, experience, failure, feature, fi, fil, file, file structures, guarantees, Honestly, hosts, init script, Linux, necessery, online, option, proxy, proxy cache, proxy users, rf, root, something, specific, spool, squid, squid cache, Stop, thougths, Ubuntu, ups, Usage, var, way
Posted in Linux, System Administration | No Comments »
Tuesday, April 12th, 2011 
From my previous two articles How to install nginx webserver from source on Debian Linux / Install Latest Nginx on Debian and How to enable output compression (gzipfile content compression) in nginx webserver , I have explained how the Nginx server can be installed and configured easily.
As I’m continuing my nginx adventures this days, by trying to take the best out of the installed nginx server, I’ve found few configuration options, which does improve nginx’s server performance and thought it might be nice to share it here in hope that some other nginx novice might benefit out if them.
To setup and start using the options you will have of course to place the conf directives in /usr/local/nginx/conf/nginx.conf or wherever your nginx.conf is located.
The configuration options should be placed in nginx’s conf section which starts up with:
http {
Here are the configuration options useful in hastening my nginx’s performance:
1. General options nginx settings
## General Options

ignore_invalid_headers on;

keepalive_requests 2000;

recursive_error_pages on;

server_name_in_redirect off;

server_tokens off;
2. Connection timeout nginx settings
## Timeouts

client_body_timeout 60;

client_header_timeout 60;

keepalive_timeout 60 60;

send_timeout 60;

expires 24h;
3. server options for better nginx tcp/ip performance
## TCP options

tcp_nodelay on;

tcp_nopush on;
4. Increase the number of nginx worker processes
Somewhere near the beginning of nginx.conf file you should have the directive option:
worker_processes 1;
Make sure you change this option to:
worker_processes 4;
This will increase the number of spawned nginx worker processes in a way that more spawned threaded servers will await for client connections:
Being done with all the above settings, as a next step you have to restart the nginx server, in my case via the init script:
debian:~# /etc/init.d/nginx restart

Restarting nginx: nginx.
Now to check everything is fine with nginx and more specific that the worker_processes 4 options has taken place issue the command:
debian:~# ps axu |grep -i nginx|grep -v grep

root 20456 0.0 0.0 25280 816 ? Ss 10:35 0:00 nginx: master process /usr/local/nginx/sbin/nginx

nobody 20457 0.0 0.0 25844 1820 ? S 10:35 0:00 nginx: worker process

nobody 20458 0.0 0.0 25624 1376 ? S 10:35 0:00 nginx: worker process

nobody 20459 0.0 0.0 25624 1376 ? S 10:35 0:00 nginx: worker process

nobody 20460 0.0 0.0 25624 1368 ? S 10:35 0:00 nginx: worker process
Above you notice the 4 nginx processes running with user nobody, they’re the same configured worker_processes I just pointed out above.
Tags: body, client, client connections, compression, configuration options, connection timeout, content, course, directive, everything, file, gzipfile, header, init, init script, Install, keepalive, Linux, nginx, nobody, nopush, novice, number, option, output compression, place, script, server name, server options, server performance, servers, Timeouts, tokens, worker processes
Posted in Linux, System Administration | 2 Comments »


