Posts Tagged ‘howto’

Install certbot on Debian, Ubuntu, CentOS, Fedora Linux 10 / Generate and use Apache / Nginx SSL Letsencrypt certificates

Monday, December 21st, 2020

letsencrypt certbot install on any linux distribution with apache or nginx webserver howto</a><p> Let's Encrypt is a free, automated, and open certificate authority brought to you by the nonprofit <a data-cke-saved-href=
Internet Security Research Group (ISRG). ISRG group gave initiative with the goal to "encrypt the internet", i.e. offer free alternative to the overpriced domani registrer sold certificates with the goal to make more people offer SSL / TSL Free secured connection line on their websites. 
ISRG group supported Letsencrypt non-profit certificate authority actrively by Internet industry standard giants such as Mozilla, Cisco, EFF (Electronic Frontier Foundation),  Facebook, Google Chrome, Amazon AWS, OVH Cloud, Redhat, VMWare, Github and many many of the leading companies in IT.

Letsencrpyt is aimed at automating the process designed to overcome manual creation, validation, signing, installation, and renewal of certificates for secure websites. I.e. you don't have to manually write on console complicated openssl command lines with passing on Certificate CSR /  KEY / PEM files etc and generate Self-Signed Untrusted Authority Certificates (noted in my previous article How to generate Self-Signed SSL Certificates with openssl or use similar process to pay money generate secret key and submit the key to third party authority through a their website webadmin  interface in order to Generate SSL brought by Godaddy or Other Certificate Authority.

But of course as you can guess there are downsides as you submit your private key automatically via letsencrypt set of SSL certificate automation domain scripts to a third party Certificate Authority which is at Letsencrypt.org. A security intrusion in their private key store servers might mean a catastrophy for your data as malicious stealer might be able to decrypt your data with some additional effort and see in plain text what is talking to your Apache / Nginx or Mail Server nevertheless the cert. Hence for a high standards such as PCI environments Letsencrypt as well as for the paranoid security freak admins,  who don't trust the mainstream letsencrypt is definitely not a choice. Anyways for most small and midsized businesses who doesn't hold too much of a top secret data and want a moderate level of security Letsencrypt is a great opportunity to try. But enough talk, lets get down to business.

How to install and use certbot on Debian GNU / Linux 10 Buster?
Certbot is not available from the Debian software repositories by default, but it’s possible to configure the buster-backports repository in your /etc/apt/sources.list file to allow you to install a backport of the Certbot software with APT tool.
 

1. Install certbot on Debian / Ubuntu Linux


root@webserver:/etc/apt# tail -n 1 /etc/apt/sources.list
deb http://ftp.debian.org/debian buster-backports main


If not there append the repositories to file:


  • Install certbot-nginx certbot-apache deb packages

root@webserver:/ # echo 'deb http://ftp.debian.org/debian buster-backports main' >> /etc/apt/sources.list


  • Install certbot-nginx certbot-apache deb packages

root@webserver:/ # apt update
root@webserver:/ # apt install certbot python-certbot-nginx python3-certbot-apache python-certbot-nginx-doc


This will install the /usr/bin/certbot python executable script which is used to register / renew / revoke / delete your domains certificates.
 

2. Install letsencrypt certbot client on CentOS / RHEL / Fedora and other Linux Distributions


For RPM based distributions and other Linux distributions you will have to install snap package (if not already installed) and use snap command :


[root@centos ~ :] # yum install snapd
systemctl enable –now snapd.socket

To enable classic snap support, enter the following to create a symbolic link between

[root@centos ~ :] # ln -s /var/lib/snapd/snap /snap

snap command lets you install, configure, refresh and remove snaps.  Snaps are packages that work across many different Linux distributions, enabling secure delivery and operation of the latest apps and utilities.

[root@centos ~ :] # snap install core; sudo snap refresh core

Logout from console or Xsession to make the snap update its $PATH definitions.

Then use snap universal distro certbot classic package

 [root@centos ~ :] # snap install –classic certbot
[root@centos ~ :] # ln -s /snap/bin/certbot /usr/bin/certbot


If you're having an XOrg server access on the RHEL / CentOS via Xming or other type of Xemulator you might check out also the snap-store as it contains a multitude of packages installable which are not usually available in RPM distros.

 [root@centos ~ :] # snap install snap-store


how-to-install-snap-applications-on-centos-rhel-linux-snap-store

snap-store is a powerful and via it you can install many non easily installable stuff on Linux such as eclipse famous development IDE, notepad++ , Discord, the so favourite for the Quality Assurance guy Protocol tester Postman etc.

  • Installing certbot to any distribution via acme.sh script

Another often preferred solution to Universally deploy  and upgrade an existing LetsEncrypt program to any Linux distribution (e.g. RHEL / CentOS / Fedora etc.) is the acme.sh script. To install acme you have to clone the repository and run the script with –install

P.S. If you don't have git installed yet do

root@webserver:/ # apt-get install –yes git


and then the usual git clone to fetch it at your side

# cd /root
# git clone https://github.com/acmesh-official/acme.sh
Cloning into 'acme.sh'…
remote: Enumerating objects: 71, done.
remote: Counting objects: 100% (71/71), done.
remote: Compressing objects: 100% (53/53), done.
remote: Total 12475 (delta 39), reused 38 (delta 18), pack-reused 12404
Receiving objects: 100% (12475/12475), 4.79 MiB | 6.66 MiB/s, done.
Resolving deltas: 100% (7444/7444), done.

# sh acme.sh –install


To later upgrade acme.sh to latest you can do

# sh acme.sh –upgrade


In order to renew a concrete existing letsencrypt certificiate

# sh acme.sh –renew domainname.com


To renew all certificates using acme.sh script

# ./acme.sh –renew-all


3. Generate Apache or NGINX Free SSL / TLS Certificate with certbot tool

Now lets generate a certificate for a domain running on Apache Webserver with a Website WebRoot directory /home/phpdev/public/www


root@webserver:/ # certbot –apache –webroot -w /home/phpdev/public/www/ -d your-domain-name.com -d your-domain-name.com

root@webserver:/ # certbot certonly –webroot -w /home/phpdev/public/www/ -d your-domain-name.com -d other-domain-name.com


As you see all the domains for which you will need to generate are passed on with -d option.

Once certificates are properly generated you can test it in a browser and once you're sure they work as expected usually you can sleep safe for the next 3 months ( 90 days) which is the default for TSL / SSL Letsencrypt certificates the reason behind of course is security.


4. Enable freshly generated letsencrypt SSL certificate in Nginx VirtualHost config

Go to your nginx VirtualHost configuration (i.e. /etc/nginx/sites-enabled/phpmyadmin.adzone.pro ) and inside chunk of config add after location { … } – 443 TCP Port SSL listener (as in shown in bolded configuration)
 

server {

….
   location ~ \.php$ {
      include /etc/nginx/fastcgi_params;
##      fastcgi_pass 127.0.0.1:9000;
      fastcgi_pass unix:/run/php/php7.3-fpm.sock;
      fastcgi_index index.php;
      fastcgi_param SCRIPT_FILENAME /usr/share/phpmyadmin$fastcgi_script_name;
   }


    listen 443 ssl; # managed by Certbot
    ssl_certificate /etc/letsencrypt/live/phpmyadmin.adzone.pro/fullchain.pem; # managed by Certbot
    ssl_certificate_key /etc/letsencrypt/live/phpmyadmin.adzone.pro/privkey.pem; # managed by Certbot
    include /etc/letsencrypt/options-ssl-nginx.conf; # managed by Certbot
    ssl_dhparam /etc/letsencrypt/ssl-dhparams.pem; # managed by Certbot


5. Enable new generated letsencrypt SSL certificate in Apache VirtualHost


In /etc/apache2/{sites-available,sites-enabled}/your-domain.com-ssl.conf you should have as a minimum a configuration setup like below:


NameVirtualHost *:443 <VirtualHost 123.123.123.12:443>
    ServerAdmin hipo@domain.com
    ServerName www.pc-freak.net
    ServerAlias www.your-domain.com wwww.your-domain.com your-domain.com
 
    HostnameLookups off
    DocumentRoot /var/www
    DirectoryIndex index.html index.htm index.php index.html.var


CheckSpelling on
SSLEngine on

    <Directory />
        Options FollowSymLinks
        AllowOverride All
        ##Order allow,deny
        ##allow from all
        Require all granted
    </Directory>
    <Directory /var/www>
        Options Indexes FollowSymLinks MultiViews
        AllowOverride All
##      Order allow,deny
##      allow from all
Require all granted
    </Directory>

Include /etc/letsencrypt/options-ssl-apache.conf
SSLCertificateFile /etc/letsencrypt/live/your-domain.com/fullchain.pem
SSLCertificateKeyFile /etc/letsencrypt/live/your-domain.com/privkey.pem
</VirtualHost>


6. Simulate a certificate regenerate with –dry-run

Soon before the 90 days period expiry approaches, it is a good idea to test how all installed Nginx webserver certficiates will be renewed and whether any issues are expected this can be done with the –dry-run option.

root@webserver:/ # certbot renew –dry-run


– – – – – – – – – – – – – – – – – – – – – – – – – – – – – – – – – – – – – – – –
** DRY RUN: simulating 'certbot renew' close to cert expiry
**          (The test certificates below have not been saved.)

Congratulations, all renewals succeeded. The following certs have been renewed:
  /etc/letsencrypt/live/adzone.pro/fullchain.pem (success)
  /etc/letsencrypt/live/cdn.natsr.pro/fullchain.pem (success)
  /etc/letsencrypt/live/mail.adzone.pro/fullchain.pem (success)
  /etc/letsencrypt/live/natsr.pro-0001/fullchain.pem (success)
  /etc/letsencrypt/live/natsr.pro/fullchain.pem (success)
  /etc/letsencrypt/live/phpmyadmin.adzone.pro/fullchain.pem (success)
  /etc/letsencrypt/live/www.adzone.pro/fullchain.pem (success)
  /etc/letsencrypt/live/www.natsr.pro/fullchain.pem (success)
** DRY RUN: simulating 'certbot renew' close to cert expiry
**          (The test certificates above have not been saved.)
– – – – – – – – – – – – – – – – – – – – – – – – – – – – – – – – – – – – – – – –


7. Renew a certificate from a multiple installed certificate list

In some time when you need to renew letsencrypt domain certificates you can list them and choose manually which one you want to renew.

root@webserver:/ # certbot –force-renewal
Saving debug log to /var/log/letsencrypt/letsencrypt.log

How would you like to authenticate and install certificates?
– – – – – – – – – – – – – – – – – – – – – – – – – – – – – – – – – – – – – – – –
1: Apache Web Server plugin (apache)
2: Nginx Web Server plugin (nginx)
– – – – – – – – – – – – – – – – – – – – – – – – – – – – – – – – – – – – – – – –
Select the appropriate number [1-2] then [enter] (press 'c' to cancel): 2
Plugins selected: Authenticator nginx, Installer nginx

Which names would you like to activate HTTPS for?
– – – – – – – – – – – – – – – – – – – – – – – – – – – – – – – – – – – – – – – –
1: adzone.pro
2: mail.adzone.pro
3: phpmyadmin.adzone.pro
4: www.adzone.pro
5: natsr.pro
6: cdn.natsr.pro
7: www.natsr.pro
– – – – – – – – – – – – – – – – – – – – – – – – – – – – – – – – – – – – – – – –
Select the appropriate numbers separated by commas and/or spaces, or leave input
blank to select all options shown (Enter 'c' to cancel): 3
Renewing an existing certificate
Deploying Certificate to VirtualHost /etc/nginx/sites-enabled/phpmyadmin.adzone.pro

Please choose whether or not to redirect HTTP traffic to HTTPS, removing HTTP access.
– – – – – – – – – – – – – – – – – – – – – – – – – – – – – – – – – – – – – – – –
1: No redirect – Make no further changes to the webserver configuration.
2: Redirect – Make all requests redirect to secure HTTPS access. Choose this for
new sites, or if you're confident your site works on HTTPS. You can undo this
change by editing your web server's configuration.
– – – – – – – – – – – – – – – – – – – – – – – – – – – – – – – – – – – – – – – –
Select the appropriate number [1-2] then [enter] (press 'c' to cancel): 2
Redirecting all traffic on port 80 to ssl in /etc/nginx/sites-enabled/phpmyadmin.adzone.pro

– – – – – – – – – – – – – – – – – – – – – – – – – – – – – – – – – – – – – – – –
Your existing certificate has been successfully renewed, and the new certificate
has been installed.

The new certificate covers the following domains: https://phpmyadmin.adzone.pro

You should test your configuration at:
https://www.ssllabs.com/ssltest/analyze.html?d=phpmyadmin.adzone.pro
– – – – – – – – – – – – – – – – – – – – – – – – – – – – – – – – – – – – – – – –

IMPORTANT NOTES:
 – Congratulations! Your certificate and chain have been saved at:
   /etc/letsencrypt/live/phpmyadmin.adzone.pro/fullchain.pem

   Your key file has been saved at:
   /etc/letsencrypt/live/phpmyadmin.adzone.pro/privkey.pem
   Your cert will expire on 2021-03-21. To obtain a new or tweaked
   version of this certificate in the future, simply run certbot again
   with the "certonly" option. To non-interactively renew *all* of
   your certificates, run "certbot renew"
 – If you like Certbot, please consider supporting our work by:

   Donating to ISRG / Let's Encrypt:   https://letsencrypt.org/donate
   Donating to EFF:                    https://eff.org/donate-le


8. Renew all present SSL certificates

root@webserver:/ # certbot renew

Processing /etc/letsencrypt/renewal/www.natsr.pro.conf
– – – – – – – – – – – – – – – – – – – – – – – – – – – – – – – – – – – – – – – –
Cert not yet due for renewal


– – – – – – – – – – – – – – – – – – – – – – – – – – – – – – – – – – – – – – – –

The following certs are not due for renewal yet:
  /etc/letsencrypt/live/adzone.pro/fullchain.pem expires on 2021-03-01 (skipped)
  /etc/letsencrypt/live/cdn.natsr.pro/fullchain.pem expires on 2021-02-28 (skipped)
  /etc/letsencrypt/live/mail.adzone.pro/fullchain.pem expires on 2021-02-28 (skipped)
  /etc/letsencrypt/live/natsr.pro-0001/fullchain.pem expires on 2021-03-01 (skipped)
  /etc/letsencrypt/live/natsr.pro/fullchain.pem expires on 2021-02-25 (skipped)
  /etc/letsencrypt/live/phpmyadmin.adzone.pro/fullchain.pem expires on 2021-03-21 (skipped)
  /etc/letsencrypt/live/www.adzone.pro/fullchain.pem expires on 2021-02-28 (skipped)
  /etc/letsencrypt/live/www.natsr.pro/fullchain.pem expires on 2021-03-01 (skipped)
No renewals were attempted.
– – – – – – – – – – – – – – – – – – – – – – – – – – – – – – – – – – – – – – – –


9. Renew all existing server certificates from a cron job


The certbot package will install a script under /etc/cron.d/certbot to be run that will attempt every 12 hours however from my experience
often this script is not going to work, the script looks similar to below:

# Upgrade all existing SSL certbot machine certificates


0 */12 * * * root test -x /usr/bin/certbot -a \! -d /run/systemd/system && perl -e 'sleep int(rand(43200))' && certbot -q renew

Another approach to renew all installed certificates if you want to have a specific options and keep log of what happened is using a tiny shell script like this:


10. Auto renew installed SSL / TSL Certbot certificates with a bash loop over all present certificates

#!/bin/sh
# update SSL certificates
# prints from 1 to 104 (according to each certbot generated certificate and triggers rewew and logs what happened to log file
# an ugly hack for certbot certificate renew
for i in $(seq 1 104); do echo "Updating $i SSL Cert" | tee -a /root/certificate-update.log; yes "$i" | certbot –force-renewal | tee -a /root/certificate-update.log 2>&1; sleep 5; done

Note: The seq 1 104 is the range depends on the count of installed SSL certificates you have installed on the machine, that can be seen and set the proper value according to your case when you run one time certbot –force-renewal.
 

Find largest files on AIX system root / show biggest files and directories in AIX folder howto

Friday, November 6th, 2020

ibm-aix-logo-find-largest-files-and-directories-on-system-to-free-space-if-disk-is-full

On an AIX server if you get a root directory ( / ) to be completely full problem and the AIX running services are unable to write their pid files and logs for example in /tmp /admin /home /var/tmp /var/log/ and rest of directory structure or the system is almost full with mounted filesystems which shows it is 90% or 95%+ full on main partition,  the system is either already stuck or it is on the way to stop functiononing normally. Hence the only way to recover IBM AIX machine to a normal behavior is to clean up some files (if you can't extend the partition) or add more physical Hard drive, just as we usually do on Linux.

So How can we clean up largest files on AIX?


Lets say we want to find all files on AIX larger than 1 MB.

aix-system:/ $ find / -xdev -size 2048 -ls | sort -r +6
12579 1400 -rw-r—–  1 root      security   1433534 Jun 26  2019 /etc/security/tsd/tsd.dat
 9325 20361 -rw-r—–  1 root      system    20848752 Nov  6 16:02 /etc/security/failedlogin
21862 7105 -rwxr-xr-x  1 root      system     7274915 Aug 24  2017 /sbin/zabbix_agentd
   72 7005 -rw-rw—-  1 root      system     7172962 Nov  6 16:19 /audit/stream.out
24726 2810 -rw——-  1 root      system     2876944 Feb 29  2012 /etc/syslog-ng/core
29314 2391 -r-xr-xr-x  1 root      system     2447454 Jun 25  2019 /lpp/bos/bos.rte.filesystem/7.1.5.32.save/update.16
21844 2391 -r-xr-xr-x  1 root      system     2447414 Jun 25  2019 /sbin/helpers/jfs2/logredo64
21843 2219 -r-xr-xr-x  1 root      system     2271971 Jun 25  2019 /sbin/helpers/jfs2/logredo
29313 2218 -r-xr-xr-x  1 root      system     2270835 Jun 25  2019 /lpp/bos/bos.rte.filesystem/7.1.5.32.save/update.15
22279 1800 -rw-r–r–  1 root      system     1843200 Nov  4 08:03 /root/smit.log
12577 1399 -rw-r–r–  1 root      system     1431685 Jun 26  2019 /etc/security/tsd/.tsd.bk
21837 1325 -r-xr-xr-x  1 root      system     1356340 Jun 25  2019 /sbin/helpers/jfs2/fsck64
29307 1325 -r-xr-xr-x  1 root      system     1356196 Jun 25  2019 /lpp/bos/bos.rte.filesystem/7.1.5.32.save/update.9
   12 1262 -rw——-  1 root      system     1291365 Aug  8  2011 /core


Above finds all files greater than 1 MB and sort them in reverse
order with the largest files first.

To search all files larger than 64 Megabytes under root ( / )

aix-system:/ $ find / -xdev -size +131072 -ls | sort -r +6
65139 97019 -rw-r–r–  1 root      system    99347181 Mar 31  2017 /admin/archive.zip


Display 10 largest directories on system

aix-system:/ $ du -a /dir | sort -n -r | head -10


Show biggest files and directories in a directory


aix-system:/ $ du -sk * | sort -n
4       Mail
4       liste
4       my_user
4       syslog-ng.conf
140     smit.script
180     smit.transaction
1804    smit.log

Below du display the size of all files and directories in the current directory with the biggest being at the bottom.


List all largest files in dir decrasingly. If a directory is matches show all sub-dirs largest files.

aix-system:/ $ ls -A . | while read name; do du -sk $name; done | sort -nr

Below ls + while loop command sorts disk usage for all files in the current directory by size, in decreasing order. If the file we suspect happens to be a directory, we can then change into that directory, and re-run the preceding command to determine what is taking up space within that directory.

Continue these steps until you find the desired file or files, at which point you can take appropriate actions.

If the bottom-most item is a directory, then cd into that directory and run the du command again. Keep drilling down until you find the biggest files on your system and get rid of them to save some space.

Set Domain multiple alias (Aliases) in IIS on Windows server howto

Saturday, October 24th, 2020

https://www.pc-freak.net/images/microsoft-iis-logo

On Linux as mentioned in my previous article it is pretty easy to use the VirtualHost Apache directive etc. to create ServerName and ServerAlias but on IIS Domain multiple alias add too me a while to google.

<VirtualHost *>
ServerName whatevever-server-host.com
ServerAlias www.whatever-server-host.com whatever-server-host.com
</VirtualHost>


In click and pray environments as Winblows, sometimes something rather easy to be done can be really annoying if you are not sure what to do and where to click and you have not passed some of the many cryptic microsoft offered ceritification programs offer for professional sysadmins, I'll name a few of them as to introduce UNIX guys like me to what you might ask a M$ admin during an interview if you want to check his 31337 Windows Sk!lls 🙂


  • Microsoft Certified Professional (MCP)
  • Microsoft Technology Associate (MTA) –
  • Microsoft Certified Solutions Expert (MCSE)-
  • Microsoft Specialist (MS) etc. –

A full list of Microsoft Certifed Professsional program here

Ok enough of  balling.

Here is  how to  create a domain alias in IIS on Windows server.

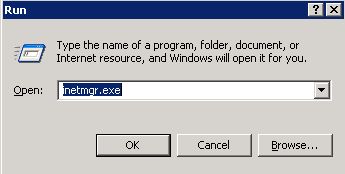
Login to your server and click on the START button then ‘Run’¦’, and then type ‘inetmgr.exe’.

Certainly you can go and click trough the Administrative tools section to start ISS manager, but for me this is fastest and easiest way.

create-domain-alias-on-windows-server-1a
 

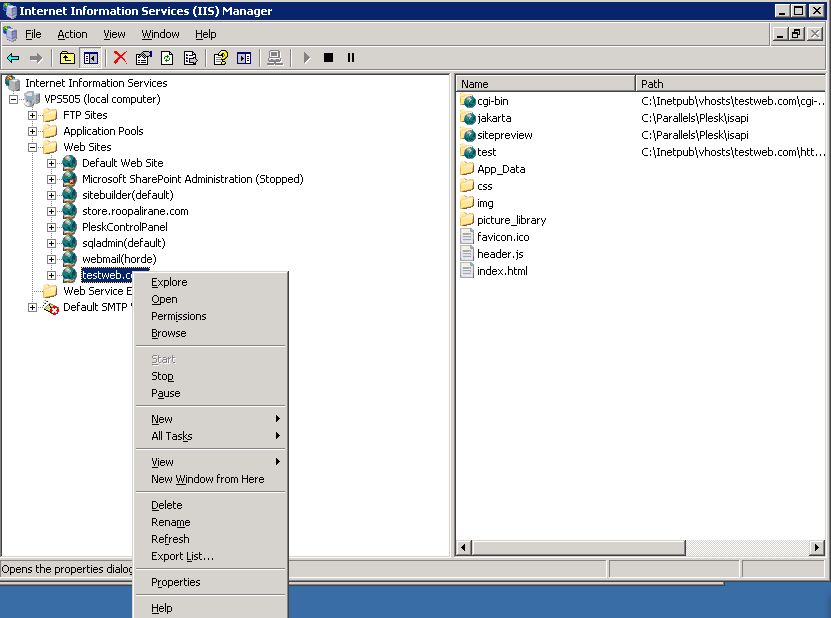
Now expand the (local computer), then ‘Web Sites’ and locate the site for which you want to add alias (here it is called additional web site identification).

Right click on the domain and choose ‘Properties’ option at the bottom.

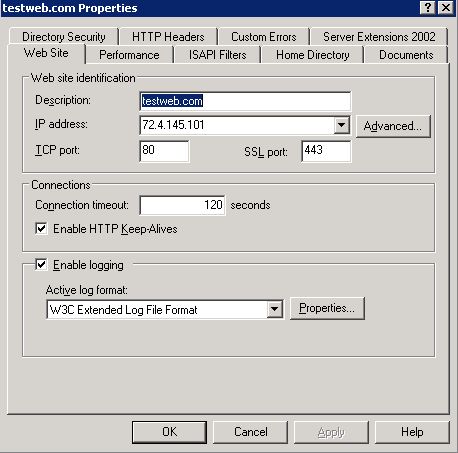
This will open the properties window where you have to choose ‘Web Site’ and then to locate ‘Website identification‘ section. Click on the ‘Advanced’¦’ button which stands next to the IP of the domain.

create-domain-alias-on-windows-server-2a
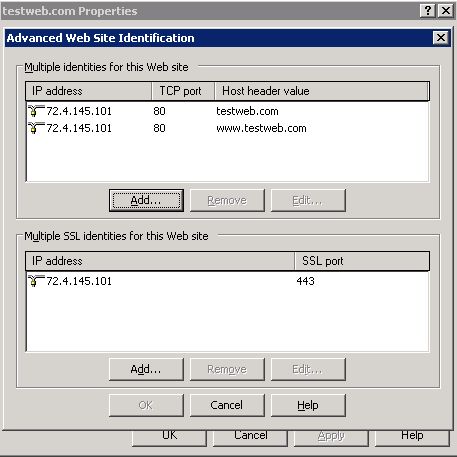
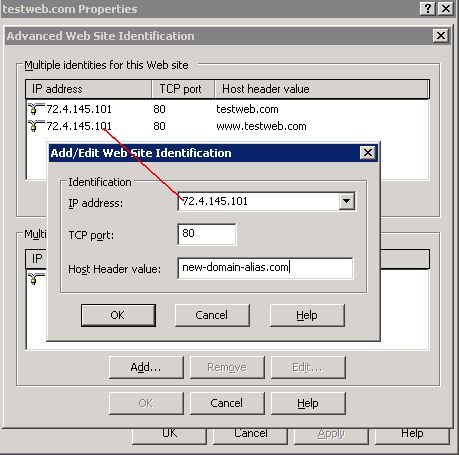
Advanced Web site identification window (Microsoft likes to see the word ‘Advanced’ in all of the management menus) will be opened, where we are going to add a new domain alias.

create-domain-alias-on-windows-server-3a.png

Click on the ‘Add’¦’ button and ‘Add/Edit website (alias)identification’ window will appear.

create-domain-alias-on-windows-server-4a.png

Make sure that you will choose the same IP address from the dropdown menu, then set the port number on which your web server is running (the default is 80), write the domain you want, and click ‘OK’ to create the new domain alias.

Actually click ‘OK’ until you have ‘Advanced Web site identification’ and the domain properties windows closed.

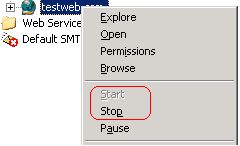
Right click on the domain again and ‘Stop’ and ‘Start’ the service.
This will be enough the IIS domain alias to start working.

create-domain-alias-on-windows-server-5a


Another useful thing for novice IIS admins that come from UNIX is a domain1 to domain2 redirect, this is done with writting an IIS rule which is an interesting but long topic for a limited post as like this, but just for the reference of fun to let you know this exist.

Domain 1 to Domain 2 Redirect
This rule comes handy when you change the name of your site or may be when you need to catch and alias and direct it to your main site. If the new and the old URLs share some elements, then you could just use this rule to have the matching pattern together with the redirect target being

domain1-to-domain2-redirect-iis

That's all folks, if you enjoyed the clicking laziness you're ready to retrain yourself to become a successful lazy Windows admin who calls Microsoft Support everyday as many of the errors and problems Windows sysadmins experience as I heard from a friend can only be managed by M$ Support (if they can be managed at all). 

Yes that's it the great and wonderful life of the avarage sysadmin. Long live computing … it's great! Everyday something broken needs to get fixed everyday something to rethink / relearn / reupdate and restructure or migrate a never ending story of weirdness.

A remark to  make, the idea for this post is originated based on a task I had to do long time ago on IIS, the images and the description behind them are taking from a post originally written on Domain Aliasing in IIS originally written by Anthony Gee unfortunately his blog is not available anymore so credits goes to him.

Check server Internet connectivity Speedtest from Linux terminal CLI

Friday, August 7th, 2020

check-server-console-speedtest

If you are a system administrator of a dedicated server and you have no access to Xserver Graphical GNOME / KDE etc. environment and you wonder how you can track the bandwidth connectivity speed of remote system to the internet and you happen to have a modern Linux distribution, here is few ways to do a speedtest.
 

1. Use speedtest-cli command line tool to test connectivity


speedtest-cli is a tiny tool written in python, to use it hence you need to have python installed on the server.
It is available both for Redhat Linux distros and Debians / Ubuntus etc. in the list of standard installable packages.

a) Install speedtest-cli on Fedora / CentOS / RHEL
 

On CentOS / RHEL / Scientific Linux lower than ver 8:


$ sudo yum install python

On CentOS 8 / RHEL 8 user type the following command to install Python 3 or 2:


$sudo yum install python3
$ sudo yum install python2


On Fedora Linux version 22+


$ sudo dnf install python
$ sudo dnf install pytho3


Once python is at place download speedtest.py or in case if link is not reachable download mirrored version of speedtest.py on www.pc-freak.net here


$ wget -O speedtest-cli https://raw.githubusercontent.com/sivel/speedtest-cli/master/speedtest.py
$ chmod +x speedtest-cli


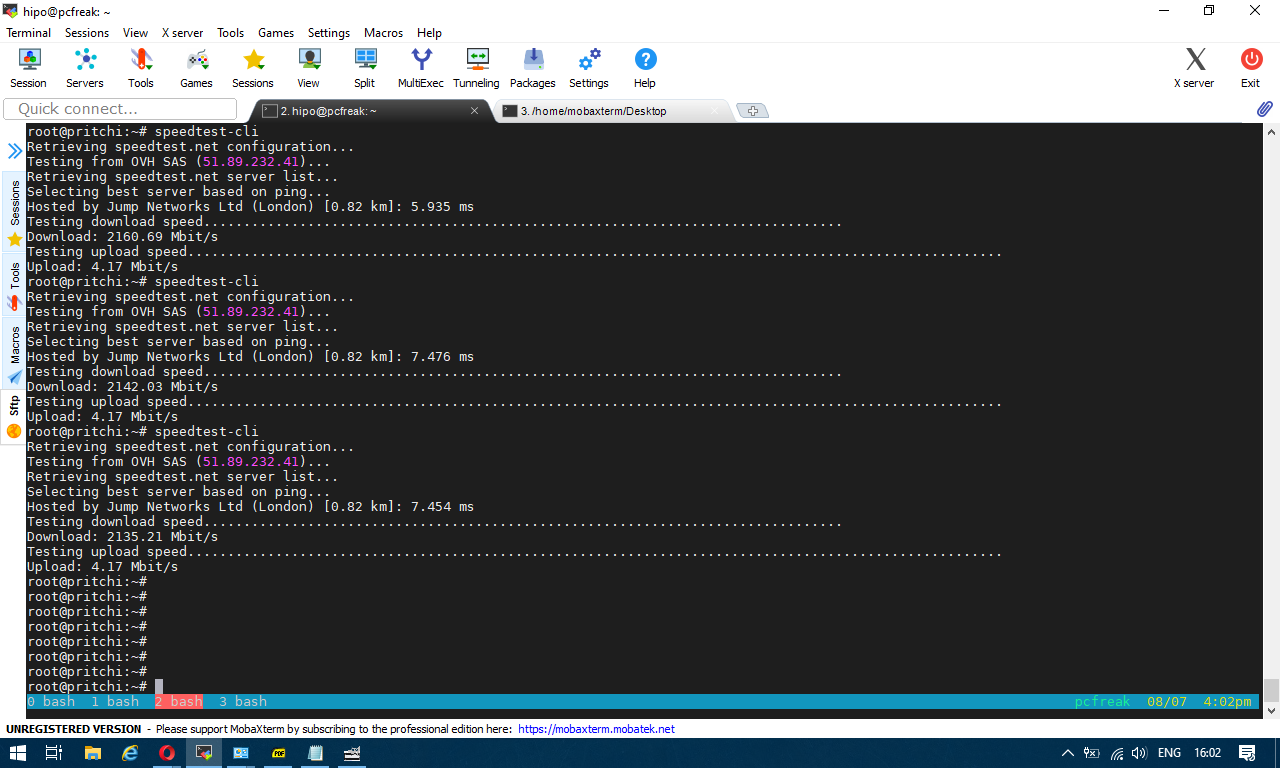
Then it is time to run script speedtest-screenshot-linux-terminal-console-cli-cmd
To test enabled Bandwidth on the server


$ python speedtest-cli


b) Install speedtest-cli on Debian

On Latest Debian 10 Buster speedtest is available out of the box in regular .deb repositories, so fetch it with apt


# apt install –yes speedtest-cli


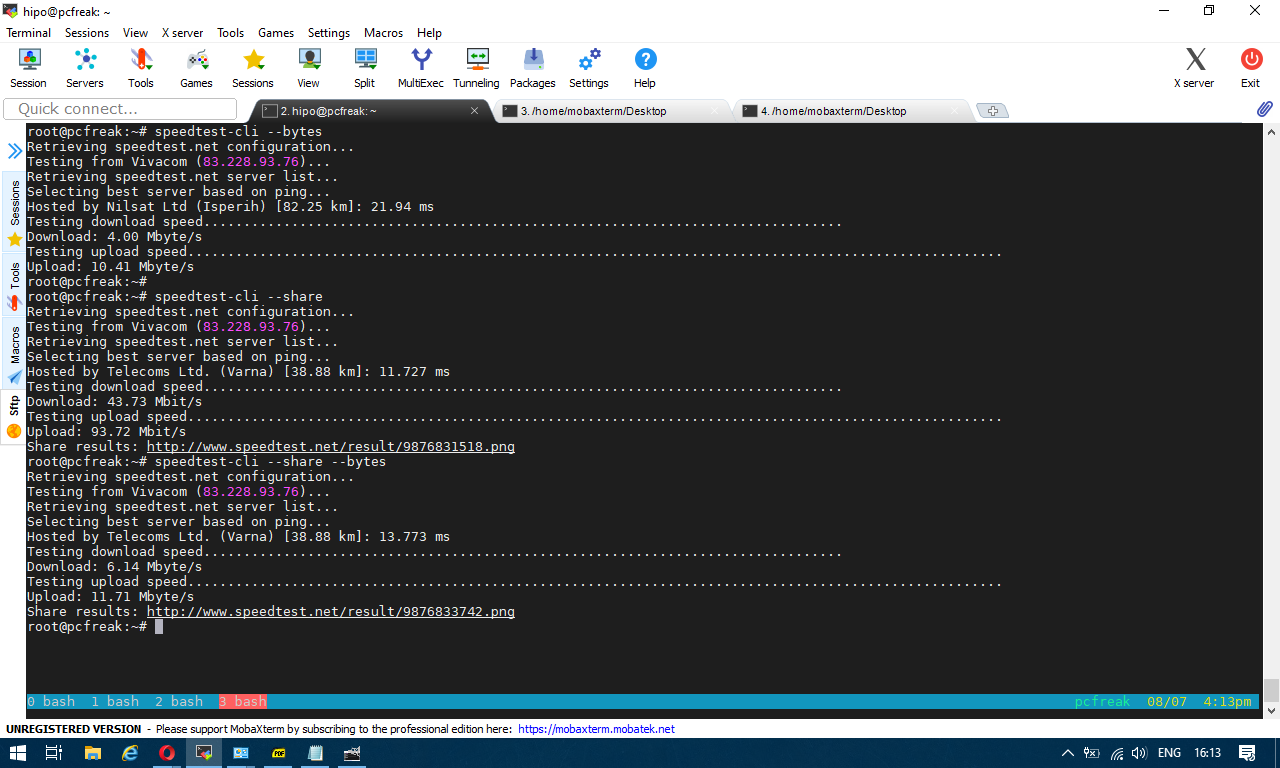
You can give now speedtest-cli a try with –bytes arguments to get speed values in bytes instead of bits or if you want to generate an image with test results in picture just like it will appear if you use speedtest.net inside a gui browser, use the –share option

speedtest-screenshot-linux-terminal-console-cli-cmd-options


2. Getting connectivity results of all defined speedtest test City Locations


Speedtest has a list of servers through which a Upload and Download speed is tested, to run speedtest-cli to test with each and every server and get a better picture on what kind of connectivity to expect from your server towards the closest region capital cities, fetch speedtest-servers.php list and use a small shell loop below is how:


root@pcfreak:~#  wget http://www.speedtest.net/speedtest-servers.php
–2020-08-07 16:31:34–  http://www.speedtest.net/speedtest-servers.php
Преобразувам www.speedtest.net (www.speedtest.net)… 151.101.2.219, 151.101.66.219, 151.101.130.219, …
Connecting to www.speedtest.net (www.speedtest.net)|151.101.2.219|:80… успешно свързване.
HTTP изпратено искане, чакам отговор… 301 Moved Permanently
Адрес: https://www.speedtest.net/speedtest-servers.php [следва]
–2020-08-07 16:31:34–  https://www.speedtest.net/speedtest-servers.php
Connecting to www.speedtest.net (www.speedtest.net)|151.101.2.219|:443… успешно свързване.
HTTP изпратено искане, чакам отговор… 307 Temporary Redirect
Адрес: https://c.speedtest.net/speedtest-servers-static.php [следва]
–2020-08-07 16:31:35–  https://c.speedtest.net/speedtest-servers-static.php
Преобразувам c.speedtest.net (c.speedtest.net)… 151.101.242.219
Connecting to c.speedtest.net (c.speedtest.net)|151.101.242.219|:443… успешно свързване.
HTTP изпратено искане, чакам отговор… 200 OK
Дължина: 211695 (207K) [text/xml]
Saving to: ‘speedtest-servers.php’
speedtest-servers.php                  100%[==========================================================================>] 206,73K  –.-KB/s    in 0,1s
2020-08-07 16:31:35 (1,75 MB/s) – ‘speedtest-servers.php’ saved [211695/211695]

Once file is there with below loop we extract all file defined servers id="" 's 
 

root@pcfreak:~# for i in $(cat speedtest-servers.php | egrep -Eo 'id="[0-9]{4}"' |sed -e 's#id="##' -e 's#"##g'); do speedtest-cli  –server $i; done
Retrieving speedtest.net configuration…
Testing from Vivacom (83.228.93.76)…
Retrieving speedtest.net server list…
Retrieving information for the selected server…
Hosted by Telecoms Ltd. (Varna) [38.88 km]: 25.947 ms
Testing download speed……………………………………………………………………..
Download: 57.71 Mbit/s
Testing upload speed…………………………………………………………………………………………
Upload: 93.85 Mbit/s
Retrieving speedtest.net configuration…
Testing from Vivacom (83.228.93.76)…
Retrieving speedtest.net server list…
Retrieving information for the selected server…
Hosted by GMB Computers (Constanta) [94.03 km]: 80.247 ms
Testing download speed……………………………………………………………………..
Download: 35.86 Mbit/s
Testing upload speed…………………………………………………………………………………………
Upload: 80.15 Mbit/s
Retrieving speedtest.net configuration…
Testing from Vivacom (83.228.93.76)…

…..


etc.

For better readability you might want to add the ouput to a file or even put it to run periodically on a cron if you have some suspcion that your server Internet dedicated lines dies out to some general locations sometimes.
 

3. Testing UPlink speed with Download some big file from source location


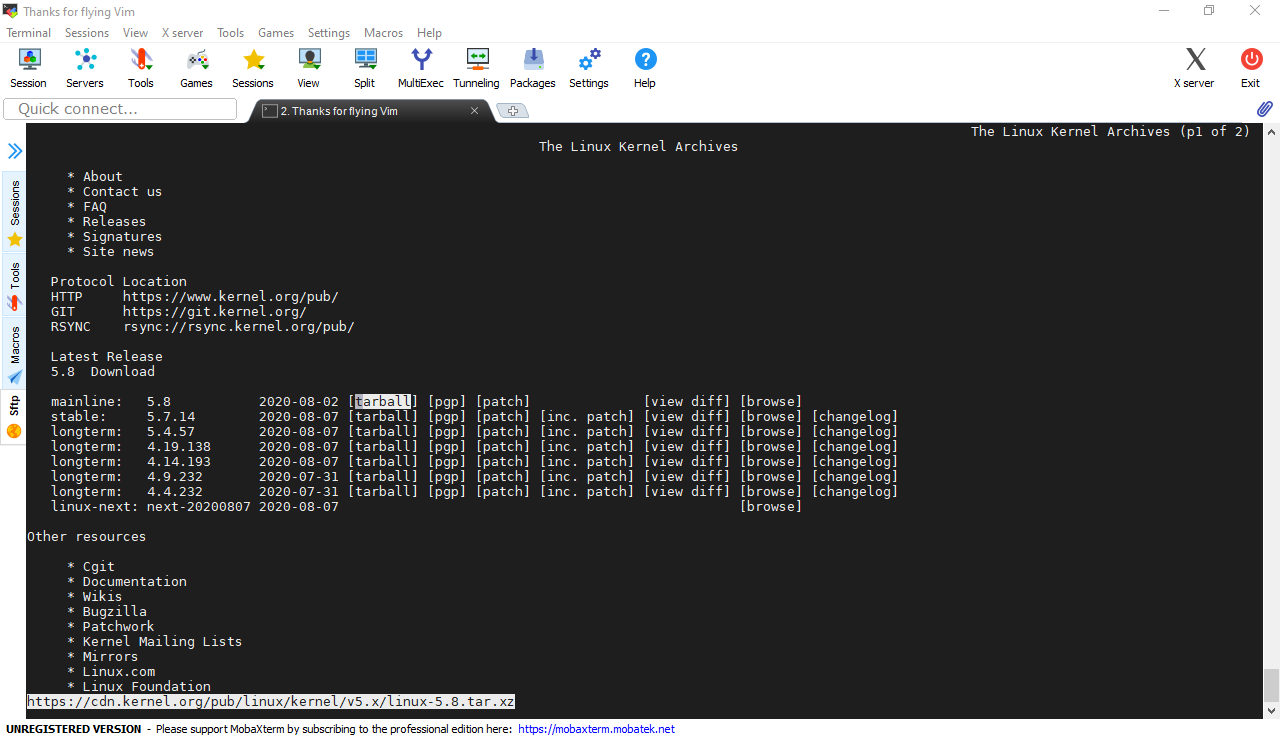
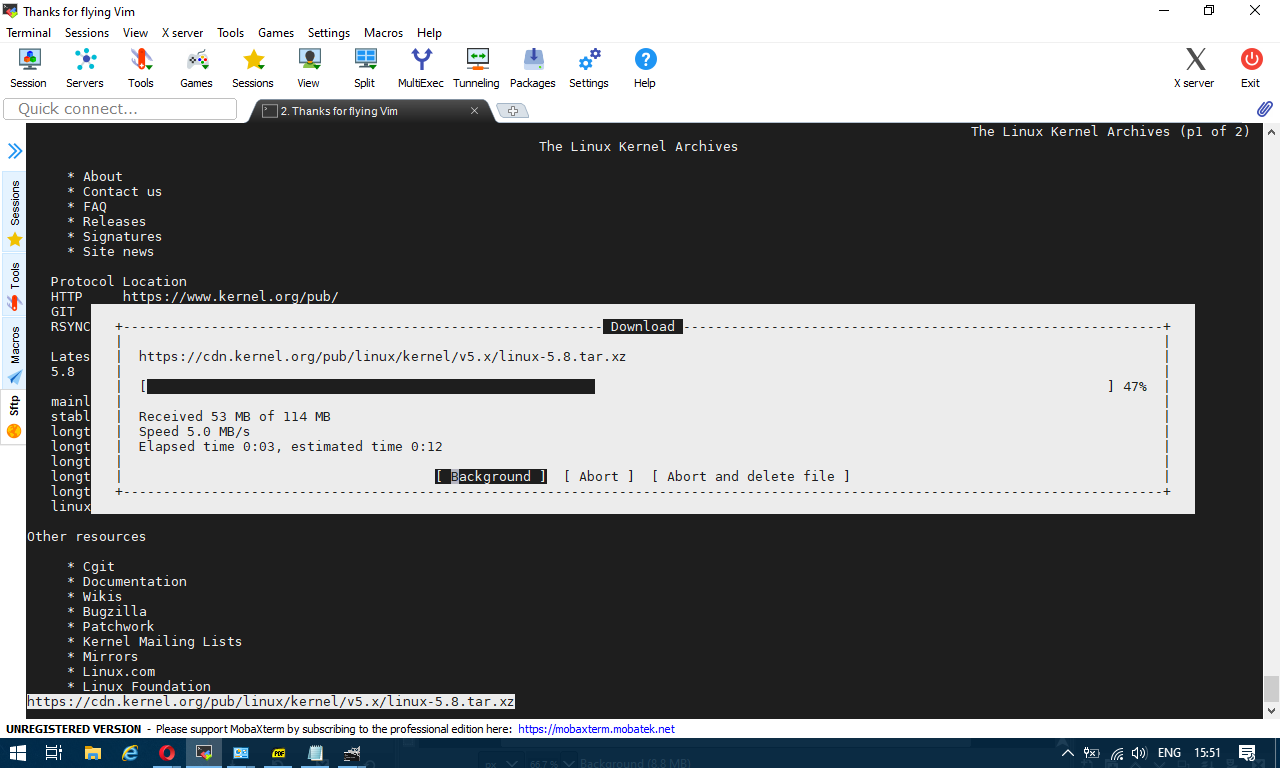
In the past a classical way to test the bandwidth connectivity of your Internet Service Provider was to fetch some big file, Linux guys should remember it was almost a standard to roll a download of Linux kernel source .tar file with some test browser as elinks / lynx / w3c.
speedtest-screenshot-kernel-org-shot1 speedtest-screenshot-kernel-org-shot2
or if those are not at hand test connectivity on remote free shell servers whatever file downloader as wget or curl was used.
Analogical method is still possible, for example to use wget to get an idea about bandwidtch connectivity, let it roll below 500 mb from speedtest.wdc01.softlayer.com to /dev/null few times:


$ wget –output-document=/dev/null http://speedtest.wdc01.softlayer.com/downloads/test500.zip

$ wget –output-document=/dev/null http://speedtest.wdc01.softlayer.com/downloads/test500.zip

$ wget –output-document=/dev/null http://speedtest.wdc01.softlayer.com/downloads/test500.zip


# wget -O /dev/null –progress=dot:mega http://cachefly.cachefly.net/10mb.test ; date
–2020-08-07 13:56:49–  http://cachefly.cachefly.net/10mb.test
Resolving cachefly.cachefly.net (cachefly.cachefly.net)… 205.234.175.175
Connecting to cachefly.cachefly.net (cachefly.cachefly.net)|205.234.175.175|:80… connected.
HTTP request sent, awaiting response… 200 OK
Length: 10485760 (10M) [application/octet-stream]
Saving to: ‘/dev/null’

     0K …….. …….. …….. …….. …….. …….. 30%  142M 0s
  3072K …….. …….. …….. …….. …….. …….. 60%  179M 0s
  6144K …….. …….. …….. …….. …….. …….. 90%  204M 0s
  9216K …….. ……..                                    100%  197M=0.06s

2020-08-07 13:56:50 (173 MB/s) – ‘/dev/null’ saved [10485760/10485760]

Fri 07 Aug 2020 01:56:50 PM UTC


To be sure you have a real picture on remote machine Internet speed it is always a good idea to run download of random big files on a certain locations that are well known to have a very stable Internet bandwidth to the Internet backbone routers.

4. Using Simple shell script to test Internet speed


Fetch and use speedtest.sh


wget https://raw.github.com/blackdotsh/curl-speedtest/master/speedtest.sh && chmod u+x speedtest.sh && bash speedtest.sh


5. Using iperf to test connectivity between two servers 


iperf is another good tool worthy to mention that can be used to test the speed between client and server.

To use iperf install it with apt and do on the server machine to which bandwidth will be tested:


# iperf -s 


On the client machine do:


# iperf -c 192.168.1.1 


where 192.168.1.1 is the IP of the server where iperf was spawned to listen.

6. Using Netflix fast to determine Internet connection speed on host


Fast

fast is a service provided by Netflix. Its web interface is located at Fast.com and it has a command-line interface available through npm (npm is a package manager for nodejs) so if you don't have it you will have to install it first with:

# apt install –yes npm


Note that if you run on Debian this will install you some 249 new nodejs packages which you might not want to have on the system, so this is useful only for machines that has already use of nodejs.


$ fast


     82 Mbps ↓


The command returns your Internet download speed. To get your upload speed, use the -u flag:


$ fast -u


   ⠧ 80 Mbps ↓ / 8.2 Mbps ↑


7. Use speedometer / iftop to measure incoming and outgoing traffic on interface


If you're measuring connectivity on a live production server system, then you might consider that the measurement output might not be exactly correct especially if you're measuring the Uplink / Downlink on a Heavy loaded webserver / Mail Server / Samba or DNS server.
If this is the case a very useful tools to consider to extract the already taken traffic used on your Incoming and Outgoing ( TX / RX ) Network interfaces
are speedometer and iftop, they're present and installable depending on the OS via yum / apt or the respective package manager.


To install on Debian server:


# apt install –yes iftop speedometer


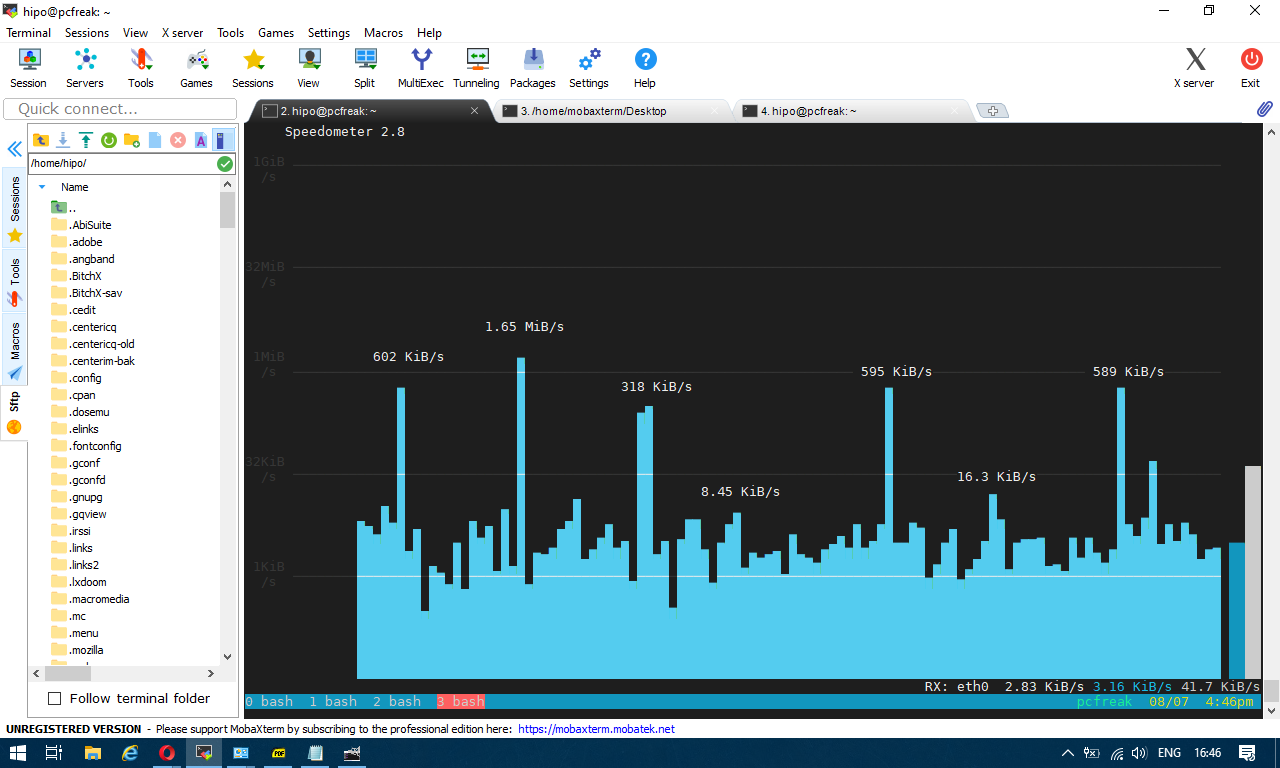
The most basic use to check the live received traffic in a nice Ncurses like text graphic is with: 


# speedometer -r 


speedometer-check-received-transmitted-network-traffic-on-linux1

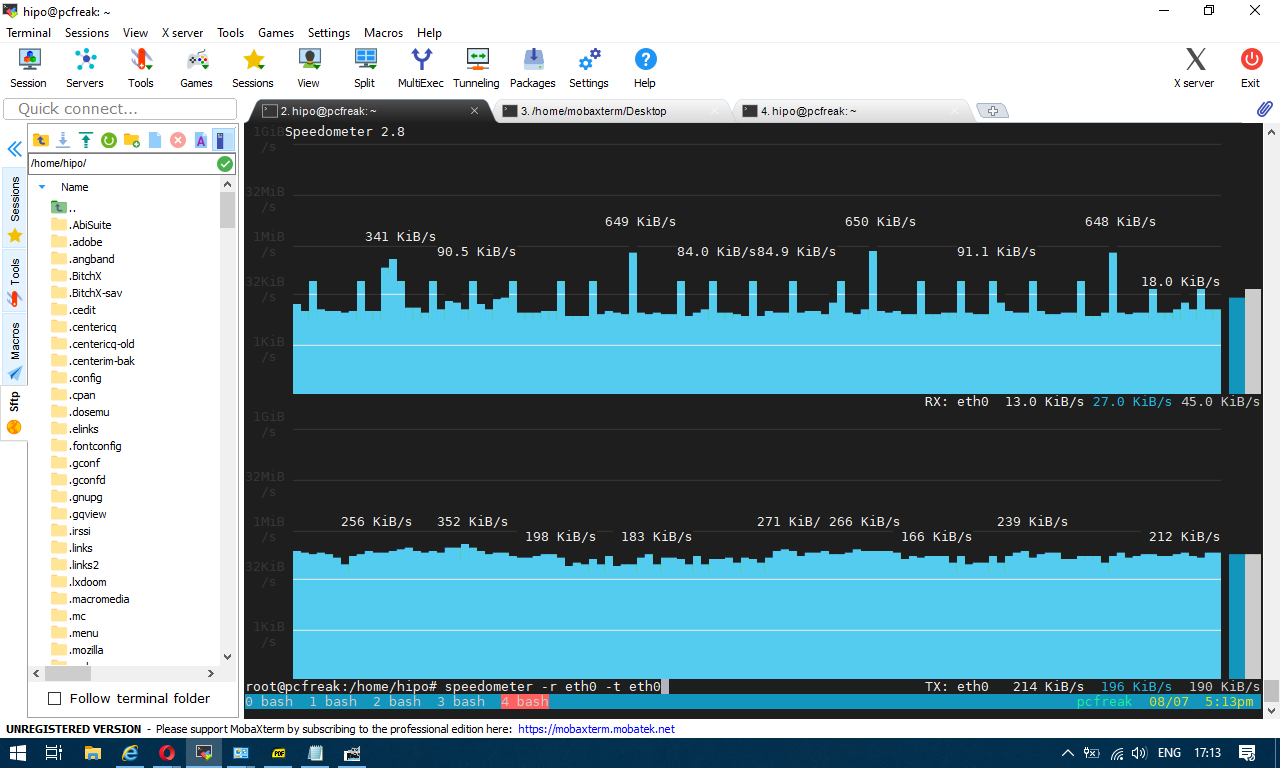
To generate real time ASCII art graph on RX / TX traffic do:


# speedometer -r eth0 -t eth0


speedometer-check-received-transmitted-network-traffic-on-linux


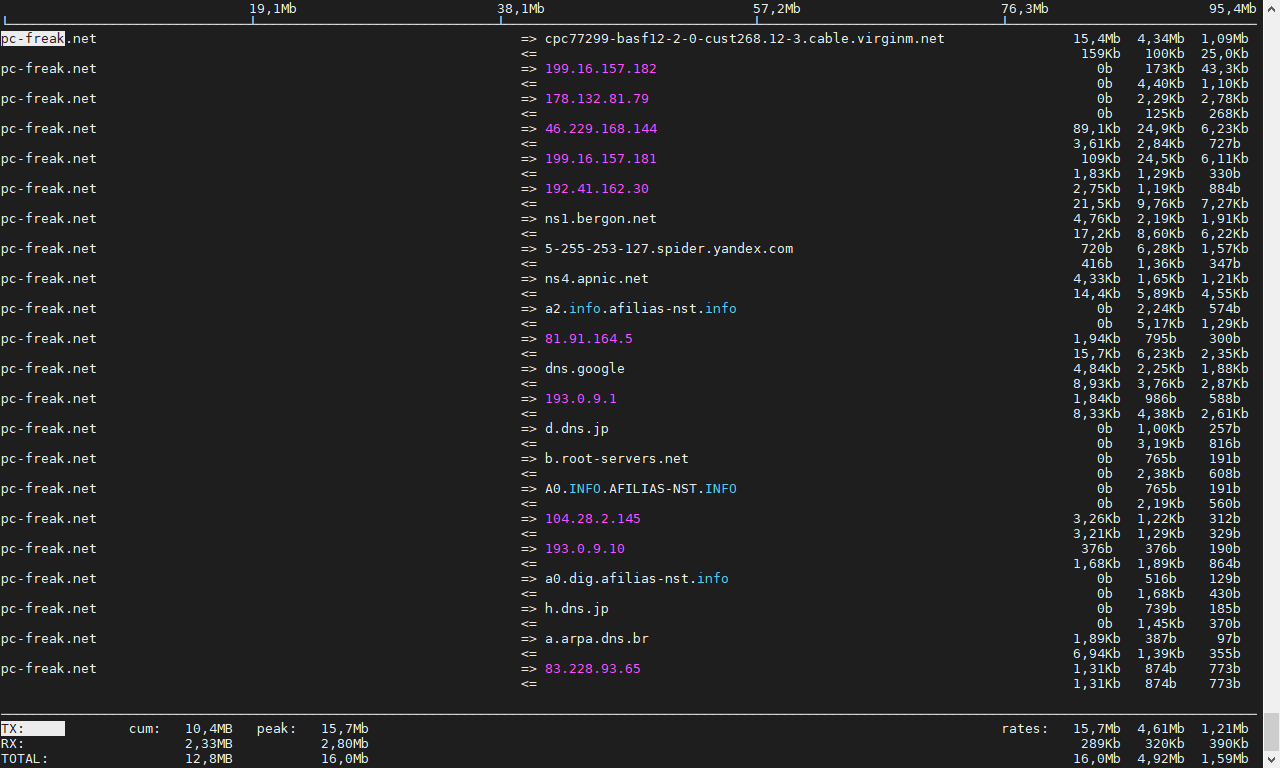
# iftop -P -i eth0


iftop-show-statistics-on-connections-screenshot-pcfreak


Send TCP / UDP strings and commands to Local and Remote Applications without netcat with Bash

Friday, July 24th, 2020

bash-open-network-tcp-udp-connections-from-shell-gnu-bash-shell-shell-logo

Did you ever needed to send TCP / UDP packets manually to send commands to local or remote applications, having a fully functional BASH Shell but not having the luxury to have NC (Netcat Swiss Army Knife of Networking) tool?
This happens if you have some Linux based embeded device as Arduino or a Linux server with a high security PCI requirement which can't affort to have Netcat in place or another portable hardware with a Linux kernel, that needs to communicate in UDP for any reason but you don't want to waste additional 28KB or physically you have access to a Linux device that doesn't have netcat but you want to be able to send UDP externally …

SInce some time in newer GNU Bash's releases support for TCP / UDP data sending is described in Bash's Manual and should be working it is not as good as you might expect but for a small things it could save you the day.

The syntax to use it is:
 

 /dev/protocol/IP/PORT


To open new socket connection to a UDP / TCP protocol with bash you have to simply open a new Shell handler (lets say 3) to:


/dev/tcp/your-url.com/80


or

/dev/udp/83.228.93.76/53


1. Get GOOGLE HTML Source with simple BASH / Getting URL Index with bash sockets


If you happen to have access to a machine where no network downloader tool or a text browser such as curl, wget, lynx, links is available but you want to dump the content of a index.html or any other URL with simply bash you can do it like so:
 

exec 3<>/dev/tcp/www.google.com/80
echo -e "GET / HTTP/1.1\r\n\r\n" >&3 

cat <&3

If you need to open a connection to a Internet Domain with bash and store the output into a separate .html file:

exec 3<>/dev/tcp/www.google.com/80
echo -e "GET / HTTP/1.1\r\n\r\n" >&3 

cat <&3 | tee -a output.html


Note that this will work only if you're logged into into an interactive shell.
If you want instead do it from a shell script (and omit usage) of wget etc. use something like bash_sockets_google_connect.sh basic script :

#!/bin/bash
exec 3<>/dev/tcp/www.google.com/80
printf "GET /\r\n\r\n" >&3
while IFS= read -r -u3 -t2 line || [[ -n “$line” ]]; do echo "$line"; done
exec 3>&-
exec 3<&-


2. Sending UDP protocol data via bash socket


To send test  variables or commands data to localhost (127.0.0.1) UDP listening service:
 

echo 'TEST COMMAND' > /dev/udp/127.0.0.1/538


echo "Any UDP data" > /dev/udp/127.0.0.1/3000


If you happent to have netcat or running on a bash shell that doesn't properly support TCP / UDP sending you can always do it netcat way:

echo "Command" | nc -u -w0 127.0.0.1 3000


Of course this little hack is useful just for simple things and eventually for more comlex stuff and scripting you would like to use a fully functional HTML reader ( W3C compliant Web Browser )
still  for a quick dirty stuff Bash socketing from the console rocks pretty much ! 🙂


Get daily E-Mail Reports statistics on postfix Linux mail server

Tuesday, July 14th, 2020

https://www.pc-freak.net/images/Postfix-email-server-logo.svg-1

I've had today a task at work to monitor a postfix mail send and received emails (MAIL FROM / RPCT TO) and get out a simple statistics on what kind of emails are coming and going out from the Postfix SMTP on a server?

Below is shortly explained how I did it plus you will learn how you can use something more advanced to get server mail count, delivery status, errors etc. daily.
 

1. Using a simple script to process /var/log/messages

For that I made a small script to do the trick, the script simply checks mail delivery logged information from /var/log/maillog process a bit sort and logs in a separate log daily.

#!/bin/sh
# Process /var/log/maillog extract from= and to= mails sort
# And log mails to $LOGF
# Author Georgi Georgiev 14.07.2020

DATE_FORM=$(date +'%m_%d_%y_%H_%M_%S_%h_%m');
LOG='/home/gge/mail_from_to-mails';
LOGF="$LOG.$DATE_FORM.log";
CUR_DATE=$(date +'%m_%d_%y_%T');
echo "Processing /var/log/maillog";
echo "Processing /var/log/maillog" > $LOGF;
echo >>$LOGF
echo "!!! $CUR_DATE # Sent MAIL FROM: addresses: !!!" >> $LOGF;
grep -E 'from=' /var/log/maillog|sed -e 's#=# #g'|awk '{ print $8 }'|sed -e 's#<# #g' -e 's#># #g' -e 's#\,##'|sort -rn|uniq >> $LOGF;

echo "!!! $CUR_DATE # Receive RCPT TO: addresses !!!" >>$LOGF;
grep -E 'to=' /var/log/maillog|sed -e 's#=# #g'|awk '{ print $8 }'|sed -e 's#<# #g' -e 's#># #g' -e 's#\,##'|sort -rn|uniq >> $LOGF;


You can get a copy of the mail_from_to_collect_mails_postfix.sh script here.

I've set the script to run via a crond scheduled job once early in the mornthing and I'll leave it like that for 5 days or so to get a good idea on what are the mailboxes that are receiving incoming mail.

The cron I've set to use is as follows:

# crontab -u root -l 
05 03 * * *     sh /home/gge/mail_from_to.sh >/dev/null 2>&1


This will be necessery later for a Email Server planned migration to relay its mail via another MTA host.


2. Getting More Robust Postifx Mail Statistics from logs


My little script is of course far from best solution to get postfix mail statistics from logs.

If you want something more professional and you need to have a daily report on what mails sent to mail server and mails sent from the MTA to give you information about the Email delivery queue status, number of successful and failed emails from a mail sender / recipient and a whole bunch of useful info you can use something more advanced such as pflogsumm perl script to get daily / weekly monthly mail delivery statistics.

What can pflogsumm do for you ?


Pflogsumm is a log analyzer/summarizer for the Postfix MTA. It is
designed to provide an overview of Postfix activity, with just enough
detail to give the administrator a “heads up” for potential trouble
spots and fixing any SMTP and email related issues.

Pflogsumm generates summaries and, in some cases, detailed reports of
mail server traffic volumes rejected and bounced email and server
warnings, errors, and panics.

At the time of writting this article it is living on jimsun.linxnet.com just in case if pflogsumm.pl's official download location disappears at some time in future here is pflogsumm-1.1.3.tar.gz mirror stored on www.pc-freak.net

– Install pflogsumm

Use of pflogsumm is pretty straight forward, you download unarchive the script to some location such as /usr/local/bin/pflogsumm.pl  add the script executable flag and you run it to create a Postfix Mail Log statistics report for you

wget http://jimsun.linxnet.com/downloads/pflogsumm-1.1.3.tar.gz -O /usr/local/src/pflogsumm-1.1.3.tar.gz


# mkdir -p /usr/local/src/
# cd /usr/local/src/
# tar -zxvf pflogsumm-1.1.3.tar.gz
# cd pflogsumm-1.1.3/

# mv /usr/local/pflogsumm-1.1.3/pflogsumm.pl /usr/local/bin/pflogsumm
# chmod a+x /usr/local/bin/pflogsumm


That's all, assuming you have perl installed on the system with some standard modules, we're now good to go: 

To give it a test report to the command line:

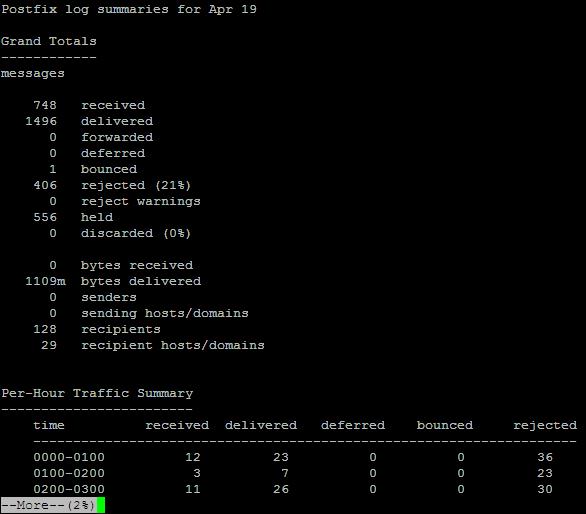
# /usr/local/bin/pflogsumm -d today /var/log/maillog

pflogsumm-log-summary-screenshot-linux-received-forwarded-bounced-rejected

To generate mail server use report and launch to some email of choice do:

# /usr/local/bin/pflogsumm -d today /var/log/maillog | mail -s Mailstats your-mail@your-domain.com


To make pflogsumm report everyday various interesting stuff such as (message deferrals, message bounce, details, smtp delivery failures, fatal errors, recipients by message size etc. add some cronjob like below to the server:

# /usr/sbin/pflogsumm -d yesterday /var/log/maillog | mail -s Mailstats | mail -s Mailstats your-mail@your-domain.com

If you need a GUI graphical mail monitoring in a Web Browser, you will need to install a webserver with a perl / cgi support,  RRDTools and MailGraph.

linux-monitoring-mail-server-with-mailgraph.cgi

How to install KVM Kernel-based Virtual Machine Virtualization on Linux

Sunday, October 14th, 2018

install-KVM-Kernel-based-Virtual-Machine-virtualization-on-Linux

If you want to run multiple virtual machines on GNU / Linux server or your Linux powered Desktop you have the possibility to use a couple of Virtual Machines just to name a few VirtualBox and VMWare are the option the native way to do it is using the Linux kernel via a loadable kernel module called KVM (Kernel-based Virtual Machine).
Though Oracle's Virtualbox generally works and you could add new test beds virtual machines (install multiple Linux / *BSD OS) it is not fully Free Software and not even fully open source licensed, VMWare even though superior as a Virtualization product is proprietary and its application costs a lot of money which not each develpoper or small / mid-sized company could afford.

Once the kvm.ko module is loaded your Linux kernel turns into a full-featured Virtual Machine Hypervisor.
Starting with Linux kernel 2.6.X the KVM Hypervisor is available and easy to install virtually all modern Linux distributions Redhat / CentOS Debian / Ubuntu etc. support it and its up to running few commands to install and start using the Power of Kernel embedded Virtualization.

KVM could be used to run in parallel multiple Operating Systems such as Windows / Linux / FreeBSD and others of BSDs family,  each running under a separate virtual machine with its private dedicated (isolated), disc, graphic card, network card etc.

To start up I assume you have already installed some kind of Linux distribution either locally or on a remote dedicated server.
 

1. Installing KVM on Debian GNU / Linux / Ubuntu / Mint and other deb based distros


Using APT tool install below packages:


root@jeremiah:~# apt install –yes qemu-kvm libvirt-clients libvirt-daemon-system bridge-utils libguestfs-tools genisoimage virtinst libosinfo-bin


2. Installing virt-manager GUI to manage Virtual servers


root@jeremiah:~# apt-cache show virt-manager|grep -i desc -A 1
Description-en: desktop application for managing virtual machines
 It presents a summary view of running domains and their live performance &

Description-md5: 9f7f584744b77cdacc2291f2a8ac220e
Homepage: http://virt-manager.et.redhat.com/


root@jeremiah:~# apt install –yes virt-manager


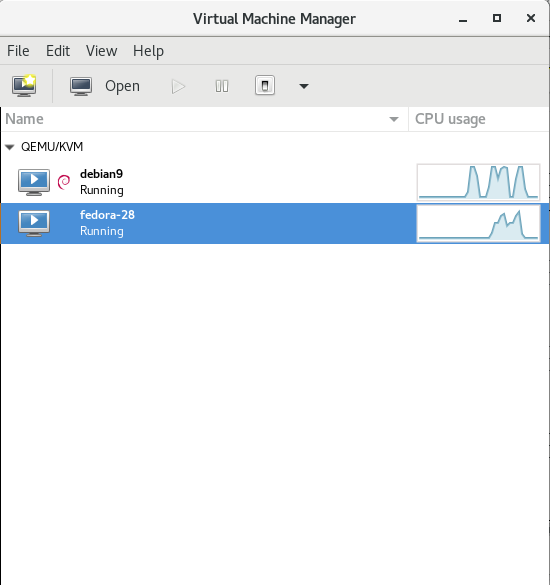
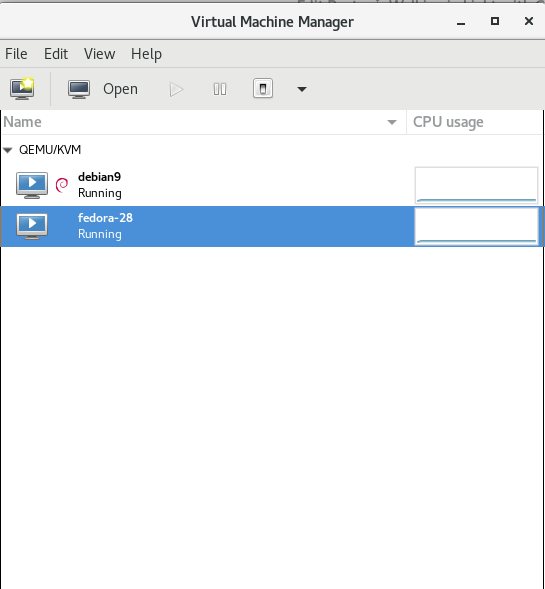
virtual-manager-kvm-gnu-linux-virtual-machines-cpu-hdd-load-statistics-screenshot


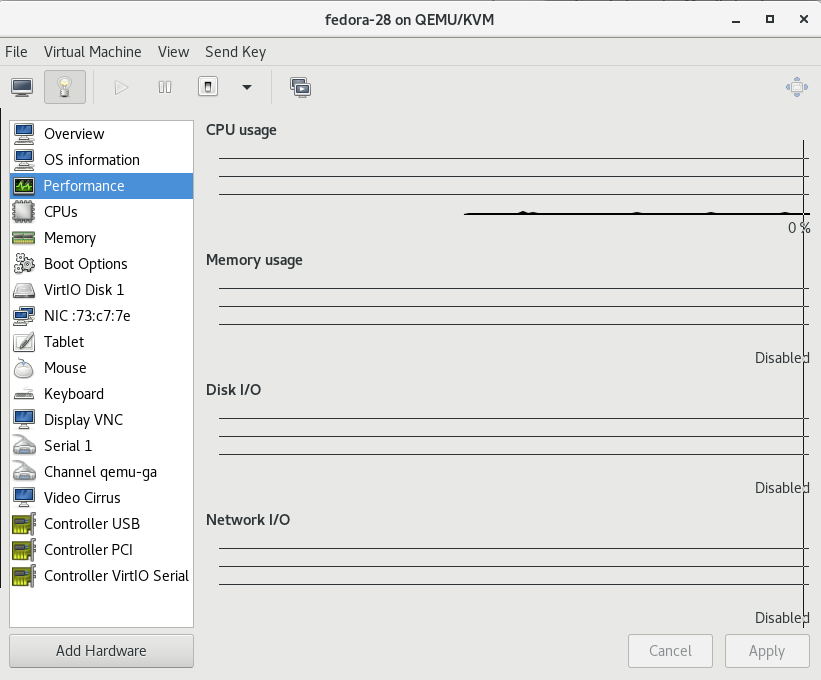
virtual-manager-fedora-28-linux-virtual-machine-settings-screenshot


3. Configure bridged networking to allow access to newly configured VMs

Bridging has to be added via /etc/network/interfaces therefore it is a good idea to create a backup of it before modifying:


# cp -rpf /etc/network/interfaces /etc/network/interfaces.bakup-$(echo $(date '+%Y-%m-%d-%H'))


# vim /etc/network/interfaces

auto br0
 iface br0 inet static
         address 10.15.44.26
         netmask 255.255.255.192
         broadcast 10.15.44.63
         dns-nameservers 10.0.80.11 10.0.80.12
         # set static route for LAN
      post-up route add -net 10.0.0.0 netmask 255.0.0.0 gw 10.18.44.1
      post-up route add -net 161.26.0.0 netmask 255.255.0.0 gw 10.18.44.1
         bridge_ports eth0
         bridge_stp off
         bridge_fd 0
         bridge_maxwait 0
 
 # br1 setup with static wan IPv4 with ISP router as a default gateway
 auto br1
 iface br1 inet static
         address 192.168.222.51
         netmask 255.255.255.248
         broadcast 192.168.222.55
         gateway 192.168.222.49
         bridge_ports eth1
         bridge_stp off
         bridge_fd 0
         bridge_maxwait 0


Once file is saved in vim editor restart the networking.


# systemctl restart network.manager


To verify whether the bridge has been succesfully upped.


root@jeremiah:/home/hipo/kvm# brctl show
bridge name    bridge id        STP enabled    interfaces
virbr0        8000.525400cb1cd1    yes        virbr0-nic


4. List all installable Virtual OS images
 

root@jeremiah:/home/hipo/kvm# virt-builder -list
centos-6                 x86_64     CentOS 6.6
centos-7.0               x86_64     CentOS 7.0
centos-7.1               x86_64     CentOS 7.1
centos-7.2               aarch64    CentOS 7.2 (aarch64)
centos-7.2               x86_64     CentOS 7.2
centos-7.3               x86_64     CentOS 7.3
centos-7.4               x86_64     CentOS 7.4
centos-7.5               x86_64     CentOS 7.5
cirros-0.3.1             x86_64     CirrOS 0.3.1
cirros-0.3.5             x86_64     CirrOS 0.3.5
debian-6                 x86_64     Debian 6 (Squeeze)
debian-7                 sparc64    Debian 7 (Wheezy) (sparc64)
debian-7                 x86_64     Debian 7 (wheezy)
debian-8                 x86_64     Debian 8 (jessie)
debian-9                 x86_64     Debian 9 (stretch)
fedora-18                x86_64     Fedora® 18
fedora-19                x86_64     Fedora® 19
fedora-20                x86_64     Fedora® 20
fedora-21                aarch64    Fedora® 21 Server (aarch64)
fedora-21                armv7l     Fedora® 21 Server (armv7l)
fedora-21                ppc64      Fedora® 21 Server (ppc64)
fedora-21                ppc64le    Fedora® 21 Server (ppc64le)
fedora-21                x86_64     Fedora® 21 Server
fedora-22                aarch64    Fedora® 22 Server (aarch64)
fedora-22                armv7l     Fedora® 22 Server (armv7l)
fedora-22                i686       Fedora® 22 Server (i686)
fedora-22                x86_64     Fedora® 22 Server
fedora-23                aarch64    Fedora® 23 Server (aarch64)
fedora-23                armv7l     Fedora® 23 Server (armv7l)
fedora-23                i686       Fedora® 23 Server (i686)
fedora-23                ppc64      Fedora® 23 Server (ppc64)
fedora-23                ppc64le    Fedora® 23 Server (ppc64le)
fedora-23                x86_64     Fedora® 23 Server
fedora-24                aarch64    Fedora® 24 Server (aarch64)
fedora-24                armv7l     Fedora® 24 Server (armv7l)
fedora-24                i686       Fedora® 24 Server (i686)
fedora-24                x86_64     Fedora® 24 Server
fedora-25                aarch64    Fedora® 25 Server (aarch64)
fedora-25                armv7l     Fedora® 25 Server (armv7l)
fedora-25                i686       Fedora® 25 Server (i686)
fedora-25                ppc64      Fedora® 25 Server (ppc64)
fedora-25                ppc64le    Fedora® 25 Server (ppc64le)
fedora-25                x86_64     Fedora® 25 Server
fedora-26                aarch64    Fedora® 26 Server (aarch64)
fedora-26                armv7l     Fedora® 26 Server (armv7l)
fedora-26                i686       Fedora® 26 Server (i686)
fedora-26                ppc64      Fedora® 26 Server (ppc64)
fedora-26                ppc64le    Fedora® 26 Server (ppc64le)
fedora-26                x86_64     Fedora® 26 Server
fedora-27                aarch64    Fedora® 27 Server (aarch64)
fedora-27                armv7l     Fedora® 27 Server (armv7l)
fedora-27                i686       Fedora® 27 Server (i686)
fedora-27                ppc64      Fedora® 27 Server (ppc64)
fedora-27                ppc64le    Fedora® 27 Server (ppc64le)
fedora-27                x86_64     Fedora® 27 Server
fedora-28                i686       Fedora® 28 Server (i686)
fedora-28                x86_64     Fedora® 28 Server
freebsd-11.1             x86_64     FreeBSD 11.1
scientificlinux-6        x86_64     Scientific Linux 6.5
ubuntu-10.04             x86_64     Ubuntu 10.04 (Lucid)
ubuntu-12.04             x86_64     Ubuntu 12.04 (Precise)
ubuntu-14.04             x86_64     Ubuntu 14.04 (Trusty)
ubuntu-16.04             x86_64     Ubuntu 16.04 (Xenial)
ubuntu-18.04             x86_64     Ubuntu 18.04 (bionic)
opensuse-13.1            x86_64     openSUSE 13.1
opensuse-13.2            x86_64     openSUSE 13.2
opensuse-42.1            x86_64     openSUSE Leap 42.1
opensuse-tumbleweed      x86_64     openSUSE Tumbleweed


5. Create Virtual Machine OS-es from scratch with virt-builder

Below we'll create two images one for Fedora 28 and 1 for Debian 9 using the virt-builder (a tool to build virtual images quickly), the images that could be used are shown through below virt-builder –list command.
 

# iso='fedora-28';
# iso1='debian-9';


# sudo virt-builder $iso \
     –size=10G \
     –format qcow2 -o /var/lib/libvirt/images/$iso-vm1.qcow2 \
     –hostname $iso-vm1 \
     –network \
     –timezone Europe/Sofia


[   3.3] Downloading: http://libguestfs.org/download/builder/fedora-28.xz
[   5.2] Planning how to build this image
[   5.2] Uncompressing
[  20.8] Resizing (using virt-resize) to expand the disk to 10.0G
[  50.8] Opening the new disk
[  53.7] Setting a random seed
[  53.7] Setting the hostname: fedora-28-vm1
[  53.7] Setting the timezone: Europe/Sofia
[  53.7] Setting passwords
virt-builder: Setting random password of root to YMTkxaJIkEU24Ytf

[  54.7] Finishing off
                   Output file: /var/lib/libvirt/images/fedora-28-vm1.qcow2
                   Output size: 10.0G
                 Output format: qcow2
            Total usable space: 9.3G
                    Free space: 8.2G (87%)


# sudo virt-builder $iso1 \
     –size=10G \
     –format qcow2 -o /var/lib/libvirt/images/$iso-vm1.qcow2 \
     –hostname $iso1-vm1 \
     –network \
     –timezone Europe/Sofia


[   3.2] Downloading: http://libguestfs.org/download/builder/debian-9.xz
[   4.1] Planning how to build this image
[   4.1] Uncompressing
[  16.9] Resizing (using virt-resize) to expand the disk to 10.0G
[  40.1] Opening the new disk
[  42.9] Setting a random seed
virt-builder: warning: random seed could not be set for this type of guest
[  42.9] Setting the hostname: debian-9-vm1
[  43.6] Setting the timezone: Europe/Sofia
[  43.6] Setting passwords
virt-builder: Setting random password of root to JtzEYGff9KxL5jCR
[  44.3] Finishing off
                   Output file: /var/lib/libvirt/images/debian-9-vm1.qcow2
                   Output size: 10.0G
                 Output format: qcow2
            Total usable space: 9.8G
                    Free space: 9.0G (91%)


vim bridged.xml

<network>
  <name>br0</name>
  <forward mode="bridge"/>
  <bridge name="br0"/>
</network>


# sudo virsh net-define –file bridged.xml
# sudo virsh net-autostart br0
# sudo virsh net-start br0


Above two commands will download pre-packaged KVM isos and store them inside /var/lib/libvirt/images/ you see also the root (administrator) password for both ISOs printed out.


root@jeremiah:/home/hipo/kvm# ls -ld /var/lib/libvirt/images/*
-rw-r–r– 1 root         root         10739318784 Oct 12 23:45 /var/lib/libvirt/images/debian-9-vm1.qcow2
-rw-r–r– 1 root         root         10739318784 Oct 12 23:46 /var/lib/libvirt/images/fedora-28-vm1.qcow2


To access directly the new created VMs as we have specified the –vnc option it is possible to directly vnc to the new host with VNC client (in linux I use vncviewer), on Windows you can use something like TightVNC.
 

6. Use official Linux distributions ISO boot files to install into KVM VM


Those who would like to run inside KVM VM Linux could do it directly using installable ISO files and install the set of Linux with the required packages, just like installing a fresh new Linux on a bare-metal machine.
To do so download your ISO image from the net (either from official distro website or a mirror website, in case if you need to spin an older version) and use virt-install to run the installer inside KVM.


root@jeremiah:~# cd /var/lib/libvirt/boot/;
root@jeremiah:~# wget http://mirrors.netix.net/centos/7.5.1804/isos/x86_64/CentOS-7-x86_64-DVD-1804.iso


# sudo virt-install \
–virt-type=kvm \
–name centos7 \
–ram 2048 \
–vcpus=2 \
–os-variant=centos7.0 \
–virt-type=kvm \
–hvm \
–cdrom=/var/lib/libvirt/boot/CentOS-7-x86_64-DVD-1804.iso \
–network=bridge=br0,model=virtio \
–network=bridge=br1,model=virtio \
–graphics vnc \
–disk path=/var/lib/libvirt/images/centos7.qcow2,size=40,bus=virtio,format=qcow2


7. List newly created VMs with Virsh command


root@jeremiah:/home/hipo/kvm# virsh list –all
 Id    Name                           State
—————————————————-
 3     fedora-28                      running
 –     debian9                        shut off


The –all parameter lists all available VMs ready to spin, if you want to check what are the VMs that are only running use instead:


root@jeremiah:/home/hipo/kvm# virsh list
 Id    Name                           State
—————————————————-
 3     fedora-28                      running


8. Install Virtual Machine OS-es

Below lines will install 2 Virtual machines one Fedora 28 and Debian 9


 os='fedora-28';
virt-install –import –name $os \
    –ram 2048 \
    –vcpu 2 \
    –disk path=/var/lib/libvirt/images/$os-vm1.qcow2,format=qcow2 \
    –os-variant fedora-unknown \
    –network=bridge=br0,model=virtio \
    –noautoconsole \
  –hvm \
  –graphics vnc

os='debian9';
virt-install –import –name $os     \
–ram 2048     \
–vcpu 2     \
–disk path=/var/lib/libvirt/images/$os-vm1.qcow2,format=qcow2     \
–os-variant debian9     –network=bridge=br0,model=virtio     \
–noautoconsole \
–hvm \
–graphics vnc


To deploy more just change the virtual machine type in os variable and modify the –os-variant variable to match the distribution name, to get the correct –os-variant variables that can be passed use osinfo-query below is output of the cmd:


root@jeremiah:/home/hipo/kvm# osinfo-query os
 Short ID             | Name                                               | Version  | ID                                      
———————-+—————————————————-+———-+—————————————–
 altlinux1.0          | Mandrake RE Spring 2001                            | 1.0      | http://altlinux.org/altlinux/1.0        
 altlinux2.0          | ALT Linux 2.0                                      | 2.0      | http://altlinux.org/altlinux/2.0        
 altlinux2.2          | ALT Linux 2.2                                      | 2.2      | http://altlinux.org/altlinux/2.2        
 altlinux2.4          | ALT Linux 2.4                                      | 2.4      | http://altlinux.org/altlinux/2.4        
 altlinux3.0          | ALT Linux 3.0                                      | 3.0      | http://altlinux.org/altlinux/3.0        
 altlinux4.0          | ALT Linux 4.0                                      | 4.0      | http://altlinux.org/altlinux/4.0        
 altlinux4.1          | ALT Linux 4.1                                      | 4.1      | http://altlinux.org/altlinux/4.1        
 altlinux5.0          | ALT Linux 5.0                                      | 5.0      | http://altlinux.org/altlinux/5.0        
 altlinux6.0          | ALT Linux 6.0                                      | 6.0      | http://altlinux.org/altlinux/6.0        
 altlinux7.0          | ALT Linux 7.0                                      | 7.0      | http://altlinux.org/altlinux/7.0        
 centos6.0            | CentOS 6.0                                         | 6.0      | http://centos.org/centos/6.0            
 centos6.1            | CentOS 6.1                                         | 6.1      | http://centos.org/centos/6.1            
 centos6.2            | CentOS 6.2                                         | 6.2      | http://centos.org/centos/6.2            
 centos6.3            | CentOS 6.3                                         | 6.3      | http://centos.org/centos/6.3            
 centos6.4            | CentOS 6.4                                         | 6.4      | http://centos.org/centos/6.4            
 centos6.5            | CentOS 6.5                                         | 6.5      | http://centos.org/centos/6.5            
 centos6.6            | CentOS 6.6                                         | 6.6      | http://centos.org/centos/6.6            
 centos6.7            | CentOS 6.7                                         | 6.7      | http://centos.org/centos/6.7            
 centos6.8            | CentOS 6.8                                         | 6.8      | http://centos.org/centos/6.8            
 centos6.9            | CentOS 6.9                                         | 6.9      | http://centos.org/centos/6.9            
 centos7.0            | CentOS 7.0                                         | 7.0      | http://centos.org/centos/7.0            
 debian1.1            | Debian Buzz                                        | 1.1      | http://debian.org/debian/1.1            
 debian1.2            | Debian Rex                                         | 1.2      | http://debian.org/debian/1.2            
 debian1.3            | Debian Bo                                          | 1.3      | http://debian.org/debian/1.3            
 debian2.0            | Debian Hamm                                        | 2.0      | http://debian.org/debian/2.0            
 debian2.1            | Debian Slink                                       | 2.1      | http://debian.org/debian/2.1            
 debian2.2            | Debian Potato                                      | 2.2      | http://debian.org/debian/2.2            
 debian3              | Debian Woody                                       | 3        | http://debian.org/debian/3              
 debian3.1            | Debian Sarge                                       | 3.1      | http://debian.org/debian/3.1            
 debian4              | Debian Etch                                        | 4        | http://debian.org/debian/4              
 debian5              | Debian Lenny                                       | 5        | http://debian.org/debian/5              
 debian6              | Debian Squeeze                                     | 6        | http://debian.org/debian/6              
 debian7              | Debian Wheezy                                      | 7        | http://debian.org/debian/7              
 debian8              | Debian Jessie                                      | 8        | http://debian.org/debian/8              
 debian9              | Debian Stretch                                     | 9        | http://debian.org/debian/9              
 debiantesting        | Debian Testing                                     | testing  | http://debian.org/debian/testing        
 fedora-unknown       | Fedora                                             | unknown  | http://fedoraproject.org/fedora/unknown
 fedora1              | Fedora Core 1                                      | 1        | http://fedoraproject.org/fedora/1       
 fedora10             | Fedora 10                                          | 10       | http://fedoraproject.org/fedora/10      
 fedora11             | Fedora 11                                          | 11       | http://fedoraproject.org/fedora/11      
 fedora12             | Fedora 12                                          | 12       | http://fedoraproject.org/fedora/12      
 fedora13             | Fedora 13                                          | 13       | http://fedoraproject.org/fedora/13      
 fedora14             | Fedora 14                                          | 14       | http://fedoraproject.org/fedora/14      
 fedora15             | Fedora 15                                          | 15       | http://fedoraproject.org/fedora/15      
 fedora16             | Fedora 16                                          | 16       | http://fedoraproject.org/fedora/16      
 fedora17             | Fedora 17                                          | 17       | http://fedoraproject.org/fedora/17      
 fedora18             | Fedora 18                                          | 18       | http://fedoraproject.org/fedora/18      
 fedora19             | Fedora 19                                          | 19       | http://fedoraproject.org/fedora/19      
 fedora2              | Fedora Core 2                                      | 2        | http://fedoraproject.org/fedora/2       
 fedora20             | Fedora 20                                          | 20       | http://fedoraproject.org/fedora/20      
 fedora21             | Fedora 21                                          | 21       | http://fedoraproject.org/fedora/21      
 fedora22             | Fedora 22                                          | 22       | http://fedoraproject.org/fedora/22      
 fedora23             | Fedora 23                                          | 23       | http://fedoraproject.org/fedora/23      
 fedora24             | Fedora 24                                          | 24       | http://fedoraproject.org/fedora/24      
 fedora25             | Fedora 25                                          | 25       | http://fedoraproject.org/fedora/25      
 fedora26             | Fedora 26                                          | 26       | http://fedoraproject.org/fedora/26      
 fedora3              | Fedora Core 3                                      | 3        | http://fedoraproject.org/fedora/3       
 fedora4              | Fedora Core 4                                      | 4        | http://fedoraproject.org/fedora/4       
 fedora5              | Fedora Core 5                                      | 5        | http://fedoraproject.org/fedora/5       
 fedora6              | Fedora Core 6                                      | 6        | http://fedoraproject.org/fedora/6       
 fedora7              | Fedora 7                                           | 7        | http://fedoraproject.org/fedora/7       
 fedora8              | Fedora 8                                           | 8        | http://fedoraproject.org/fedora/8       
 fedora9              | Fedora 9                                           | 9        | http://fedoraproject.org/fedora/9       
 freebsd1.0           | FreeBSD 1.0                                        | 1.0      | http://freebsd.org/freebsd/1.0          
 freebsd10.0          | FreeBSD 10.0                                       | 10.0     | http://freebsd.org/freebsd/10.0         
 freebsd10.1          | FreeBSD 10.1                                       | 10.1     | http://freebsd.org/freebsd/10.1         
 freebsd10.2          | FreeBSD 10.2                                       | 10.2     | http://freebsd.org/freebsd/10.2         
 freebsd10.3          | FreeBSD 10.3                                       | 10.3     | http://freebsd.org/freebsd/10.3         
 freebsd10.4          | FreeBSD 10.4                                       | 10.4     | http://freebsd.org/freebsd/10.4         
 freebsd11.0          | FreeBSD 11.0                                       | 11.0     | http://freebsd.org/freebsd/11.0         
 freebsd11.1          | FreeBSD 11.1                                       | 11.1     | http://freebsd.org/freebsd/11.1         
 freebsd2.0           | FreeBSD 2.0                                        | 2.0      | http://freebsd.org/freebsd/2.0          
 freebsd2.0.5         | FreeBSD 2.0.5                                      | 2.0.5    | http://freebsd.org/freebsd/2.0.5        
 freebsd2.2.8         | FreeBSD 2.2.8                                      | 2.2.8    | http://freebsd.org/freebsd/2.2.8        
 freebsd2.2.9         | FreeBSD 2.2.9                                      | 2.2.9    | http://freebsd.org/freebsd/2.2.9        
 freebsd3.0           | FreeBSD 3.0                                        | 3.0      | http://freebsd.org/freebsd/3.0          
 freebsd3.2           | FreeBSD 3.2                                        | 3.2      | http://freebsd.org/freebsd/3.2          
 freebsd4.0           | FreeBSD 4.0                                        | 4.0      | http://freebsd.org/freebsd/4.0          
 freebsd4.1           | FreeBSD 4.1                                        | 4.1      | http://freebsd.org/freebsd/4.1          
 freebsd4.10          | FreeBSD 4.10                                       | 4.10     | http://freebsd.org/freebsd/4.10         
 freebsd4.11          | FreeBSD 4.11                                       | 4.11     | http://freebsd.org/freebsd/4.11         
 freebsd4.2           | FreeBSD 4.2                                        | 4.2      | http://freebsd.org/freebsd/4.2          
 freebsd4.3           | FreeBSD 4.3                                        | 4.3      | http://freebsd.org/freebsd/4.3          
 freebsd4.4           | FreeBSD 4.4                                        | 4.4      | http://freebsd.org/freebsd/4.4          
 freebsd4.5           | FreeBSD 4.5                                        | 4.5      | http://freebsd.org/freebsd/4.5          
 freebsd4.6           | FreeBSD 4.6                                        | 4.6      | http://freebsd.org/freebsd/4.6          
 freebsd4.7           | FreeBSD 4.7                                        | 4.7      | http://freebsd.org/freebsd/4.7          
 freebsd4.8           | FreeBSD 4.8                                        | 4.8      | http://freebsd.org/freebsd/4.8          
 freebsd4.9           | FreeBSD 4.9                                        | 4.9      | http://freebsd.org/freebsd/4.9          
 freebsd5.0           | FreeBSD 5.0                                        | 5.0      | http://freebsd.org/freebsd/5.0          
 freebsd5.1           | FreeBSD 5.1                                        | 5.1      | http://freebsd.org/freebsd/5.1          
 freebsd5.2           | FreeBSD 5.2                                        | 5.2      | http://freebsd.org/freebsd/5.2          
 freebsd5.2.1         | FreeBSD 5.2.1                                      | 5.2.1    | http://freebsd.org/freebsd/5.2.1        
 freebsd5.3           | FreeBSD 5.3                                        | 5.3      | http://freebsd.org/freebsd/5.3          
 freebsd5.4           | FreeBSD 5.4                                        | 5.4      | http://freebsd.org/freebsd/5.4          
 freebsd5.5           | FreeBSD 5.5                                        | 5.5      | http://freebsd.org/freebsd/5.5          
 freebsd6.0           | FreeBSD 6.0                                        | 6.0      | http://freebsd.org/freebsd/6.0          
 freebsd6.1           | FreeBSD 6.1                                        | 6.1      | http://freebsd.org/freebsd/6.1          
 freebsd6.2           | FreeBSD 6.2                                        | 6.2      | http://freebsd.org/freebsd/6.2          
 freebsd6.3           | FreeBSD 6.3                                        | 6.3      | http://freebsd.org/freebsd/6.3          
 freebsd6.4           | FreeBSD 6.4                                        | 6.4      | http://freebsd.org/freebsd/6.4          
 freebsd7.0           | FreeBSD 7.0                                        | 7.0      | http://freebsd.org/freebsd/7.0          
 freebsd7.1           | FreeBSD 7.1                                        | 7.1      | http://freebsd.org/freebsd/7.1          
 freebsd7.2           | FreeBSD 7.2                                        | 7.2      | http://freebsd.org/freebsd/7.2          
 freebsd7.3           | FreeBSD 7.3                                        | 7.3      | http://freebsd.org/freebsd/7.3          
 freebsd7.4           | FreeBSD 7.4                                        | 7.4      | http://freebsd.org/freebsd/7.4          
 freebsd8.0           | FreeBSD 8.0                                        | 8.0      | http://freebsd.org/freebsd/8.0          
 freebsd8.1           | FreeBSD 8.1                                        | 8.1      | http://freebsd.org/freebsd/8.1          
 freebsd8.2           | FreeBSD 8.2                                        | 8.2      | http://freebsd.org/freebsd/8.2          
 freebsd8.3           | FreeBSD 8.3                                        | 8.3      | http://freebsd.org/freebsd/8.3          
 freebsd8.4           | FreeBSD 8.4                                        | 8.4      | http://freebsd.org/freebsd/8.4          
 freebsd9.0           | FreeBSD 9.0                                        | 9.0      | http://freebsd.org/freebsd/9.0          
 freebsd9.1           | FreeBSD 9.1                                        | 9.1      | http://freebsd.org/freebsd/9.1          
 freebsd9.2           | FreeBSD 9.2                                        | 9.2      | http://freebsd.org/freebsd/9.2          
 freebsd9.3           | FreeBSD 9.3                                        | 9.3      | http://freebsd.org/freebsd/9.3          
 freedos1.2           | FreeDOS 1.2                                        | 1.2      | http://freedos.org/freedos/1.2          
 gnome-continuous-3.10 | GNOME 3.10                                         | 3.10     | http://gnome.org/gnome-continuous/3.10  
 gnome-continuous-3.12 | GNOME 3.12                                         | 3.12     | http://gnome.org/gnome-continuous/3.12  
 gnome-continuous-3.14 | GNOME 3.14                                         | 3.14     | http://gnome.org/gnome-continuous/3.14  
 gnome3.6             | GNOME 3.6                                          | 3.6      | http://gnome.org/gnome/3.6              
 gnome3.8             | GNOME 3.8                                          | 3.8      | http://gnome.org/gnome/3.8              
 macosx10.0           | MacOS X Cheetah                                    | 10.0     | http://apple.com/macosx/10.0            
 macosx10.1           | MacOS X Puma                                       | 10.1     | http://apple.com/macosx/10.1            
 macosx10.2           | MacOS X Jaguar                                     | 10.2     | http://apple.com/macosx/10.2            
 macosx10.3           | MacOS X Panther                                    | 10.3     | http://apple.com/macosx/10.3            
 macosx10.4           | MacOS X Tiger                                      | 10.4     | http://apple.com/macosx/10.4            
 macosx10.5           | MacOS X Leopard                                    | 10.5     | http://apple.com/macosx/10.5            
 macosx10.6           | MacOS X Snow Leopard                               | 10.6     | http://apple.com/macosx/10.6            
 macosx10.7           | MacOS X Lion                                       | 10.7     | http://apple.com/macosx/10.7            
 mageia1              | Mageia 1                                           | 1        | http://mageia.org/mageia/1              
 mageia2              | Mageia 2                                           | 2        | http://mageia.org/mageia/2              
 mageia3              | Mageia 3                                           | 3        | http://mageia.org/mageia/3              
 mageia4              | Mageia 4                                           | 4        | http://mageia.org/mageia/4              
 mageia5              | Mageia 5                                           | 5        | http://mageia.org/mageia/5              
 mageia6              | Mageia 6                                           | 6        | http://mageia.org/mageia/6              
 mandrake10.0         | Mandrake Linux 10.0                                | 10.0     | http://mandriva.com/mandrake/10.0       
 mandrake10.1         | Mandrake Linux 10.1                                | 10.1     | http://mandriva.com/mandrake/10.1       
 mandrake10.2         | Mandrake Linux 10.2                                | 10.2     | http://mandriva.com/mandrake/10.2       
 mandrake5.1          | Mandrake Linux 5.1                                 | 5.1      | http://mandriva.com/mandrake/5.1        
 mandrake5.2          | Mandrake Linux 5.2                                 | 5.2      | http://mandriva.com/mandrake/5.2        
 mandrake5.3          | Mandrake Linux 5.3                                 | 5.3      | http://mandriva.com/mandrake/5.3        
 mandrake6.0          | Mandrake Linux 6.0                                 | 6.0      | http://mandriva.com/mandrake/6.0        
 mandrake6.1          | Mandrake Linux 6.1                                 | 6.1      | http://mandriva.com/mandrake/6.1        
 mandrake7.0          | Mandrake Linux 7.0                                 | 7.0      | http://mandriva.com/mandrake/7.0        
 mandrake7.1          | Mandrake Linux 7.1                                 | 7.1      | http://mandriva.com/mandrake/7.1        
 mandrake7.2          | Mandrake Linux 7.2                                 | 7.2      | http://mandriva.com/mandrake/7.2        
 mandrake8.0          | Mandrake Linux 8.0                                 | 8.0      | http://mandriva.com/mandrake/8.0        
 mandrake8.1          | Mandrake Linux 8.1                                 | 8.1      | http://mandriva.com/mandrake/8.1        
 mandrake8.2          | Mandrake Linux 8.2                                 | 8.2      | http://mandriva.com/mandrake/8.2        
 mandrake9.0          | Mandrake Linux 9.0                                 | 9.0      | http://mandriva.com/mandrake/9.0        
 mandrake9.1          | Mandrake Linux 9.1                                 | 9.1      | http://mandriva.com/mandrake/9.1        
 mandrake9.2          | Mandrake Linux 9.2                                 | 9.2      | http://mandriva.com/mandrake/9.2        
 mandriva2006.0       | Mandriva Linux 2006.0                              | 2006.0   | http://mandriva.com/mandriva/2006.0     
 mandriva2007         | Mandriva Linux 2007                                | 2007     | http://mandriva.com/mandriva/2007       
 mandriva2007.1       | Mandriva Linux 2007 Spring                         | 2007.1   | http://mandriva.com/mandriva/2007.1     
 mandriva2008.0       | Mandriva Linux 2008                                | 2008.0   | http://mandriva.com/mandriva/2008.0     
 mandriva2008.1       | Mandriva Linux 2008 Spring                         | 2008.1   | http://mandriva.com/mandriva/2008.1     
 mandriva2009.0       | Mandriva Linux 2009                                | 2009.0   | http://mandriva.com/mandriva/2009.0     
 mandriva2009.1       | Mandriva Linux 2009 Spring                         | 2009.1   | http://mandriva.com/mandriva/2009.1     
 mandriva2010.0       | Mandriva Linux 2010                                | 2010.0   | http://mandriva.com/mandriva/2010.0     
 mandriva2010.1       | Mandriva Linux 2010 Spring                         | 2010.1   | http://mandriva.com/mandriva/2010.1     
 mandriva2010.2       | Mandriva Linux 2010.2                              | 2010.2   | http://mandriva.com/mandriva/2010.2     
 mandriva2011         | Mandriva Linux 2011                                | 2011     | http://mandriva.com/mandriva/2011       
 mbs1.0               | Mandriva Business Server 1.0                       | 1.0      | http://mandriva.com/mbs/1.0             
 mes5                 | Mandriva Enterprise Server 5.0                     | 5.0      | http://mandriva.com/mes/5.0             
 mes5.1               | Mandriva Enterprise Server 5.1                     | 5.1      | http://mandriva.com/mes/5.1             
 msdos6.22            | Microsoft MS-DOS 6.22                              | 6.22     | http://microsoft.com/msdos/6.22         
 netbsd0.8            | NetBSD 0.8                                         | 0.8      | http://netbsd.org/netbsd/0.8            
 netbsd0.9            | NetBSD 0.9                                         | 0.9      | http://netbsd.org/netbsd/0.9            
 netbsd1.0            | NetBSD 1.0                                         | 1.0      | http://netbsd.org/netbsd/1.0            
 netbsd1.1            | NetBSD 1.1                                         | 1.1      | http://netbsd.org/netbsd/1.1            
 netbsd1.2            | NetBSD 1.2                                         | 1.2      | http://netbsd.org/netbsd/1.2            
 netbsd1.3            | NetBSD 1.3                                         | 1.3      | http://netbsd.org/netbsd/1.3            
 netbsd1.4            | NetBSD 1.4                                         | 1.4      | http://netbsd.org/netbsd/1.4            
 netbsd1.5            | NetBSD 1.5                                         | 1.5      | http://netbsd.org/netbsd/1.5            
 netbsd1.6            | NetBSD 1.6                                         | 1.6      | http://netbsd.org/netbsd/1.6            
 netbsd2.0            | NetBSD 2.0                                         | 2.0      | http://netbsd.org/netbsd/2.0            
 netbsd3.0            | NetBSD 3.0                                         | 3.0      | http://netbsd.org/netbsd/3.0            
 netbsd4.0            | NetBSD 4.0                                         | 4.0      | http://netbsd.org/netbsd/4.0            
 netbsd5.0            | NetBSD 5.0                                         | 5.0      | http://netbsd.org/netbsd/5.0            
 netbsd5.1            | NetBSD 5.1                                         | 5.1      | http://netbsd.org/netbsd/5.1            
 netbsd6.0            | NetBSD 6.0                                         | 6.0      | http://netbsd.org/netbsd/6.0            
 netbsd6.1            | NetBSD 6.1                                         | 6.1      | http://netbsd.org/netbsd/6.1            
 netbsd7.0            | NetBSD 7.0                                         | 7.0      | http://netbsd.org/netbsd/7.0            
 netbsd7.1            | NetBSD 7.1                                         | 7.1      | http://netbsd.org/netbsd/7.1            
 netbsd7.1.1          | NetBSD 7.1.1                                       | 7.1.1    | http://netbsd.org/netbsd/7.1.1          
 netware4             | Novell Netware 4                                   | 4        | http://novell.com/netware/4             
 netware5             | Novell Netware 5                                   | 5        | http://novell.com/netware/5             
 netware6             | Novell Netware 6                                   | 6        | http://novell.com/netware/6             
 openbsd4.2           | OpenBSD 4.2                                        | 4.2      | http://openbsd.org/openbsd/4.2          
 openbsd4.3           | OpenBSD 4.3                                        | 4.3      | http://openbsd.org/openbsd/4.3          
 openbsd4.4           | OpenBSD 4.4                                        | 4.4      | http://openbsd.org/openbsd/4.4          
 openbsd4.5           | OpenBSD 4.5                                        | 4.5      | http://openbsd.org/openbsd/4.5          
 openbsd4.8           | OpenBSD 4.8                                        | 4.8      | http://openbsd.org/openbsd/4.8          
 openbsd4.9           | OpenBSD 4.9                                        | 4.9      | http://openbsd.org/openbsd/4.9          
 openbsd5.0           | OpenBSD 5.0                                        | 5.0      | http://openbsd.org/openbsd/5.0          
 openbsd5.1           | OpenBSD 5.1                                        | 5.1      | http://openbsd.org/openbsd/5.1          
 openbsd5.2           | OpenBSD 5.2                                        | 5.2      | http://openbsd.org/openbsd/5.2          
 openbsd5.3           | OpenBSD 5.3                                        | 5.3      | http://openbsd.org/openbsd/5.3          
 openbsd5.4           | OpenBSD 5.4                                        | 5.4      | http://openbsd.org/openbsd/5.4          
 openbsd5.5           | OpenBSD 5.5                                        | 5.5      | http://openbsd.org/openbsd/5.5          
 openbsd5.6           | OpenBSD 5.6                                        | 5.6      | http://openbsd.org/openbsd/5.6          
 openbsd5.7           | OpenBSD 5.7                                        | 5.7      | http://openbsd.org/openbsd/5.7          
 openbsd5.8           | OpenBSD 5.8                                        | 5.8      | http://openbsd.org/openbsd/5.8          
 openbsd5.9           | OpenBSD 5.9                                        | 5.9      | http://openbsd.org/openbsd/5.9          
 openbsd6.0           | OpenBSD 6.0                                        | 6.0      | http://openbsd.org/openbsd/6.0          
 openbsd6.1           | OpenBSD 6.1                                        | 6.1      | http://openbsd.org/openbsd/6.1          
 openbsd6.2           | OpenBSD 6.2                                        | 6.2      | http://openbsd.org/openbsd/6.2          
 opensolaris2009.06   | OpenSolaris 2009.06                                | 2009.06  | http://sun.com/opensolaris/2009.06      
 opensuse-factory     | openSUSE                                           | factory  | http://opensuse.org/opensuse/factory    
 opensuse-unknown     | openSUSE                                           | unknown  | http://opensuse.org/opensuse/unknown    
 opensuse10.2         | openSUSE 10.2                                      | 10.2     | http://opensuse.org/opensuse/10.2       
 opensuse10.3         | openSUSE 10.3                                      | 10.3     | http://opensuse.org/opensuse/10.3       
 opensuse11.0         | openSUSE 11.0                                      | 11.0     | http://opensuse.org/opensuse/11.0       
 opensuse11.1         | openSUSE 11.1                                      | 11.1     | http://opensuse.org/opensuse/11.1       
 opensuse11.2         | openSUSE 11.2                                      | 11.2     | http://opensuse.org/opensuse/11.2       
 opensuse11.3         | openSUSE 11.3                                      | 11.3     | http://opensuse.org/opensuse/11.3       
 opensuse11.4         | openSUSE 11.4                                      | 11.4     | http://opensuse.org/opensuse/11.4       
 opensuse12.1         | openSUSE 12.1                                      | 12.1     | http://opensuse.org/opensuse/12.1       
 opensuse12.2         | openSUSE 12.2                                      | 12.2     | http://opensuse.org/opensuse/12.2       
 opensuse12.3         | openSUSE 12.3                                      | 12.3     | http://opensuse.org/opensuse/12.3       
 opensuse13.1         | openSUSE 13.1                                      | 13.1     | http://opensuse.org/opensuse/13.1       
 opensuse13.2         | openSUSE 13.2                                      | 13.2     | http://opensuse.org/opensuse/13.2       
 opensuse42.1         | openSUSE Leap 42.1                                 | 42.1     | http://opensuse.org/opensuse/42.1       
 opensuse42.2         | openSUSE Leap 42.2                                 | 42.2     | http://opensuse.org/opensuse/42.2       
 opensuse42.3         | openSUSE Leap 42.3                                 | 42.3     | http://opensuse.org/opensuse/42.3       
 opensusetumbleweed   | openSUSE Tumbleweed                                | tumbleweed | http://opensuse.org/opensuse/tumbleweed
 rhel-atomic-7.0      | Red Hat Enterprise Linux Atomic Host 7.0           | 7.0      | http://redhat.com/rhel-atomic/7.0       
 rhel-atomic-7.1      | Red Hat Enterprise Linux Atomic Host 7.1           | 7.1      | http://redhat.com/rhel-atomic/7.1       
 rhel-atomic-7.2      | Red Hat Enterprise Linux Atomic Host 7.2           | 7.2      | http://redhat.com/rhel-atomic/7.2       
 rhel2.1              | Red Hat Enterprise Linux 2.1                       | 2.1      | http://redhat.com/rhel/2.1              
 rhel2.1.1            | Red Hat Enterprise Linux 2.1 Update 1  
/etc/bind/masters/elinvent.com            | 2.1.1    | http://redhat.com/rhel/2.1.1            
 rhel2.1.2            | Red Hat Enterprise Linux 2.1 Update 2              | 2.1.2    | http://redhat.com/rhel/2.1.2            
 rhel2.1.3            | Red Hat Enterprise Linux 2.1 Update 3              | 2.1.3    | http://redhat.com/rhel/2.1.3            
 rhel2.1.4            | Red Hat Enterprise Linux 2.1 Update 4              | 2.1.4    | http://redhat.com/rhel/2.1.4            
 rhel2.1.5            | Red Hat Enterprise Linux 2.1 Update 5              | 2.1.5    | http://redhat.com/rhel/2.1.5            
 rhel2.1.6            | Red Hat Enterprise Linux 2.1 Update 6              | 2.1.6    | http://redhat.com/rhel/2.1.6            
 rhel2.1.7            | Red Hat Enterprise Linux 2.1 Update 7              | 2.1.7    | http://redhat.com/rhel/2.1.7            
 rhel3                | Red Hat Enterprise Linux 3                         | 3        | http://redhat.com/rhel/3                
 rhel3.1              | Red Hat Enterprise Linux 3 Update 1                | 3.1      | http://redhat.com/rhel/3.1              
 rhel3.2              | Red Hat Enterprise Linux 3 Update 2                | 3.2      | http://redhat.com/rhel/3.2              
 rhel3.3              | Red Hat Enterprise Linux 3 Update 3                | 3.3      | http://redhat.com/rhel/3.3              
 rhel3.4              | Red Hat Enterprise Linux 3 Update 4                | 3.4      | http://redhat.com/rhel/3.4              
 rhel3.5              | Red Hat Enterprise Linux 3 Update 5                | 3.5      | http://redhat.com/rhel/3.5              
 rhel3.6              | Red Hat Enterprise Linux 3 Update 6                | 3.6      | http://redhat.com/rhel/3.6              
 rhel3.7              | Red Hat Enterprise Linux 3 Update 7                | 3.7      | http://redhat.com/rhel/3.7              
 rhel3.8              | Red Hat Enterprise Linux 3 Update 8                | 3.8      | http://redhat.com/rhel/3.8              
 rhel3.9              | Red Hat Enterprise Linux 3 Update 9                | 3.9      | http://redhat.com/rhel/3.9              
 rhel4.0              | Red Hat Enterprise Linux 4.0                       | 4.0      | http://redhat.com/rhel/4.0              
 rhel4.1              | Red Hat Enterprise Linux 4.1                       | 4.1      | http://redhat.com/rhel/4.1              
 rhel4.2              | Red Hat Enterprise Linux 4.2                       | 4.2      | http://redhat.com/rhel/4.2              
 rhel4.3              | Red Hat Enterprise Linux 4.3                       | 4.3      | http://redhat.com/rhel/4.3              
 rhel4.4              | Red Hat Enterprise Linux 4.4                       | 4.4      | http://redhat.com/rhel/4.4              
 rhel4.5              | Red Hat Enterprise Linux 4.5                       | 4.5      | http://redhat.com/rhel/4.5              
 rhel4.6              | Red Hat Enterprise Linux 4.6                       | 4.6      | http://redhat.com/rhel/4.6              
 rhel4.7              | Red Hat Enterprise Linux 4.7                       | 4.7      | http://redhat.com/rhel/4.7              
 rhel4.8              | Red Hat Enterprise Linux 4.8                       | 4.8      | http://redhat.com/rhel/4.8              
 rhel4.9              | Red Hat Enterprise Linux 4.9                       | 4.9      | http://redhat.com/rhel/4.9              
 rhel5.0              | Red Hat Enterprise Linux 5.0                       | 5.0      | http://redhat.com/rhel/5.0              
 rhel5.1              | Red Hat Enterprise Linux 5.1                       | 5.1      | http://redhat.com/rhel/5.1              
 rhel5.10             | Red Hat Enterprise Linux 5.10                      | 5.10     | http://redhat.com/rhel/5.10             
 rhel5.11             | Red Hat Enterprise Linux 5.11                      | 5.11     | http://redhat.com/rhel/5.11             
 rhel5.2              | Red Hat Enterprise Linux 5.2                       | 5.2      | http://redhat.com/rhel/5.2              
 rhel5.3              | Red Hat Enterprise Linux 5.3                       | 5.3      | http://redhat.com/rhel/5.3              
 rhel5.4              | Red Hat Enterprise Linux 5.4                       | 5.4      | http://redhat.com/rhel/5.4              
 rhel5.5              | Red Hat Enterprise Linux 5.5                       | 5.5      | http://redhat.com/rhel/5.5              
 rhel5.6              | Red Hat Enterprise Linux 5.6                       | 5.6      | http://redhat.com/rhel/5.6              
 rhel5.7              | Red Hat Enterprise Linux 5.7                       | 5.7      | http://redhat.com/rhel/5.7              
 rhel5.8              | Red Hat Enterprise Linux 5.8                       | 5.8      | http://redhat.com/rhel/5.8              
 rhel5.9              | Red Hat Enterprise Linux 5.9                       | 5.9      | http://redhat.com/rhel/5.9              
 rhel6.0              | Red Hat Enterprise Linux 6.0                       | 6.0      | http://redhat.com/rhel/6.0              
 rhel6.1              | Red Hat Enterprise Linux 6.1                       | 6.1      | http://redhat.com/rhel/6.1              
 rhel6.2              | Red Hat Enterprise Linux 6.2                       | 6.2      | http://redhat.com/rhel/6.2              
 rhel6.3              | Red Hat Enterprise Linux 6.3                       | 6.3      | http://redhat.com/rhel/6.3              
 rhel6.4              | Red Hat Enterprise Linux 6.4                       | 6.4      | http://redhat.com/rhel/6.4              
 rhel6.5              | Red Hat Enterprise Linux 6.5                       | 6.5      | http://redhat.com/rhel/6.5              
 rhel6.6              | Red Hat Enterprise Linux 6.6                       | 6.6      | http://redhat.com/rhel/6.6              
 rhel6.7              | Red Hat Enterprise Linux 6.7                       | 6.7      | http://redhat.com/rhel/6.7              
 rhel6.8              | Red Hat Enterprise Linux 6.8                       | 6.8      | http://redhat.com/rhel/6.8              
 rhel6.9              | Red Hat Enterprise Linux 6.9                       | 6.9      | http://redhat.com/rhel/6.9              
 rhel7.0              | Red Hat Enterprise Linux 7.0                       | 7.0      | http://redhat.com/rhel/7.0              
 rhel7.1              | Red Hat Enterprise Linux 7.1                       | 7.1      | http://redhat.com/rhel/7.1              
 rhel7.2              | Red Hat Enterprise Linux 7.2                       | 7.2      | http://redhat.com/rhel/7.2              
 rhel7.3              | Red Hat Enterprise Linux 7.3                       | 7.3      | http://redhat.com/rhel/7.3              
 rhel7.4              | Red Hat Enterprise Linux 7.4                       | 7.4      | http://redhat.com/rhel/7.4              
 rhl1.0               | Red Hat Linux 1.0                                  | 1.0      | http://redhat.com/rhl/1.0               
 rhl1.1               | Red Hat Linux 1.1                                  | 1.1      | http://redhat.com/rhl/1.1               
 rhl2.0               | Red Hat Linux 2.0                                  | 2.0      | http://redhat.com/rhl/2.0               
 rhl2.1               | Red Hat Linux 2.1                                  | 2.1      | http://redhat.com/rhl/2.1               
 rhl3.0.3             | Red Hat Linux 3.0.3                                | 3.0.3    | http://redhat.com/rhl/3.0.3             
 rhl4.0               | Red Hat Linux 4.0                                  | 4.0      | http://redhat.com/rhl/4.0               
 rhl4.1               | Red Hat Linux 4.1                                  | 4.1      | http://redhat.com/rhl/4.1               
 rhl4.2               | Red Hat Linux 4.2                                  | 4.2      | http://redhat.com/rhl/4.2               
 rhl5.0               | Red Hat Linux 5.0                                  | 5.0      | http://redhat.com/rhl/5.0               
 rhl5.1               | Red Hat Linux 5.1                                  | 5.1      | http://redhat.com/rhl/5.1               
 rhl5.2               | Red Hat Linux 5.2                                  | 5.2      | http://redhat.com/rhl/5.2               
 rhl6.0               | Red Hat Linux 6.0                                  | 6.0      | http://redhat.com/rhl/6.0               
 rhl6.1               | Red Hat Linux 6.1                                  | 6.1      | http://redhat.com/rhl/6.1               
 rhl6.2               | Red Hat Linux 6.2                                  | 6.2      | http://redhat.com/rhl/6.2               
 rhl7                 | Red Hat Linux 7                                    | 7        | http://redhat.com/rhl/7                 
 rhl7.1               | Red Hat Linux 7.1                                  | 7.1      | http://redhat.com/rhl/7.1               
 rhl7.2               | Red Hat Linux 7.2                                  | 7.2      | http://redhat.com/rhl/7.2               
 rhl7.3               | Red Hat Linux 7.3                                  | 7.3      | http://redhat.com/rhl/7.3               
 rhl8.0               | Red Hat Linux 8.0                                  | 8.0      | http://redhat.com/rhl/8.0               
 rhl9                 | Red Hat Linux 9                                    | 9        | http://redhat.com/rhl/9                 
 sled10               | SUSE Linux Enterprise Desktop 10                   | 10       | http://suse.com/sled/10                 
 sled10sp1            | SUSE Linux Enterprise Desktop 10 SP1               | 10.1     | http://suse.com/sled/10.1               
 sled10sp2            | SUSE Linux Enterprise Desktop 10 SP2               | 10.2     | http://suse.com/sled/10.2               
 sled10sp3            | SUSE Linux Enterprise Desktop 10 SP3               | 10.3     | http://suse.com/sled/10.3               
 sled10sp4            | SUSE Linux Enterprise Desktop 10 SP4               | 10.4     | http://suse.com/sled/10.4               
 sled11               | SUSE Linux Enterprise Desktop 11                   | 11       | http://suse.com/sled/11                 
 sled11sp1            | SUSE Linux Enterprise Desktop 11 SP1               | 11.1     | http://suse.com/sled/11.1               
 sled11sp2            | SUSE Linux Enterprise Desktop 11 SP2               | 11.2     | http://suse.com/sled/11.2               
 sled11sp3            | SUSE Linux Enterprise Desktop 11 SP3               | 11.3     | http://suse.com/sled/11.3               
 sled11sp4            | SUSE Linux Enterprise Desktop 11 SP4               | 11.4     | http://suse.com/sled/11.4               
 sled12               | SUSE Linux Enterprise Desktop 12                   | 12       | http://suse.com/sled/12                 
 sled12sp1            | SUSE Linux Enterprise Desktop 12 SP1               | 12.1     | http://suse.com/sled/12.1               
 sled12sp2            | SUSE Linux Enterprise Desktop 12 SP2               | 12.2     | http://suse.com/sled/12.2               
 sled9                | SUSE Linux Enterprise Desktop 9                    | 9        | http://suse.com/sled/9                  
 sles10               | SUSE Linux Enterprise Server 10            
/etc/bind/masters/elinvent.com        | 10       | http://suse.com/sles/10                 
 sles10sp1            | SUSE Linux Enterprise Server 10 SP1                | 10.1     | http://suse.com/sles/10.1               
 sles10sp2            | SUSE Linux Enterprise Server 10 SP2                | 10.2     | http://suse.com/sles/10.2               
 sles10sp3            | SUSE Linux Enterprise Server 10 SP3                | 10.3     | http://suse.com/sles/10.3               
 sles10sp4            | SUSE Linux Enterprise Server 10 SP4                | 10.4     | http://suse.com/sles/10.4               
 sles11               | SUSE Linux Enterprise Server 11                    | 11       | http://suse.com/sles/11                 
 sles11sp1            | SUSE Linux Enterprise Server 11 SP1                | 11.1     | http://suse.com/sles/11.1               
 sles11sp2            | SUSE Linux Enterprise Server 11 SP2                | 11.2     | http://suse.com/sles/11.2               
 sles11sp3            | SUSE Linux Enterprise Server 11 SP3                | 11.3     | http://suse.com/sles/11.3               
 sles11sp4            | SUSE Linux Enterprise Server 11 SP4                | 11.4     | http://suse.com/sles/11.4               
 sles12               | SUSE Linux Enterprise Server 12                    | 12       | http://suse.com/sles/12                 
 sles12sp1            | SUSE Linux Enterprise Server 12 SP1                | 12.1     | http://suse.com/sles/12.1               
 sles12sp2            | SUSE Linux Enterprise Server 12 SP2                | 12.2     | http://suse.com/sles/12.2               
 sles9                | SUSE Linux Enterprise Server 9                     | 9        | http://suse.com/sles/9                  
 solaris10            | Solaris 10                                         | 10       | http://sun.com/solaris/10               
 solaris11            | Oracle Solaris 11                                  | 11       | http://oracle.com/solaris/11            
 solaris9             | Solaris 9                                          | 9        | http://sun.com/solaris/9                
 ubuntu10.04          | Ubuntu 10.04 LTS                                   | 10.04    | http://ubuntu.com/ubuntu/10.04          
 ubuntu10.10          | Ubuntu 10.10                                       | 10.10    | http://ubuntu.com/ubuntu/10.10          
 ubuntu11.04          | Ubuntu 11.04                                       | 11.04    | http://ubuntu.com/ubuntu/11.04          
 ubuntu11.10          | Ubuntu 11.10                                       | 11.10    | http://ubuntu.com/ubuntu/11.10          
 ubuntu12.04          | Ubuntu 12.04 LTS                                   | 12.04    | http://ubuntu.com/ubuntu/12.04          
 ubuntu12.10          | Ubuntu 12.10                                       | 12.10    | http://ubuntu.com/ubuntu/12.10          
 ubuntu13.04          | Ubuntu 13.04                                       | 13.04    | http://ubuntu.com/ubuntu/13.04          
 ubuntu13.10          | Ubuntu 13.10                                       | 13.10    | http://ubuntu.com/ubuntu/13.10          
 ubuntu14.04          | Ubuntu 14.04 LTS                                   | 14.04    | http://ubuntu.com/ubuntu/14.04          
 ubuntu14.10          | Ubuntu 14.10                                       | 14.10    | http://ubuntu.com/ubuntu/14.10          
 ubuntu15.04          | Ubuntu 15.04                                       | 15.04    | http://ubuntu.com/ubuntu/15.04          
 ubuntu15.10          | Ubuntu 15.10                                       | 15.10    | http://ubuntu.com/ubuntu/15.10          
 ubuntu16.04          | Ubuntu 16.04                                       | 16.04    | http://ubuntu.com/ubuntu/16.04          
 ubuntu16.10          | Ubuntu 16.10                                       | 16.10    | http://ubuntu.com/ubuntu/16.10          
 ubuntu17.04          | Ubuntu 17.04                                       | 17.04    | http://ubuntu.com/ubuntu/17.04          
 ubuntu17.10          | Ubuntu 17.10                                       | 17.10    | http://ubuntu.com/ubuntu/17.10          
 ubuntu4.10           | Ubuntu 4.10                                        | 4.10     | http://ubuntu.com/ubuntu/4.10           
 ubuntu5.04           | Ubuntu 5.04                                        | 5.04     | http://ubuntu.com/ubuntu/5.04           
 ubuntu5.10           | Ubuntu 5.10                                        | 5.10     | http://ubuntu.com/ubuntu/5.10           
 ubuntu6.06           | Ubuntu 6.06 LTS                                    | 6.06     | http://ubuntu.com/ubuntu/6.06           
 ubuntu6.10           | Ubuntu 6.10                                        | 6.10     | http://ubuntu.com/ubuntu/6.10           
 ubuntu7.04           | Ubuntu 7.04                                        | 7.04     | http://ubuntu.com/ubuntu/7.04           
 ubuntu7.10           | Ubuntu 7.10                                        | 7.10     | http://ubuntu.com/ubuntu/7.10           
 ubuntu8.04           | Ubuntu 8.04 LTS                                    | 8.04     | http://ubuntu.com/ubuntu/8.04           
 ubuntu8.10           | Ubuntu 8.10                                        | 8.10     | http://ubuntu.com/ubuntu/8.10           
 ubuntu9.04           | Ubuntu 9.04                                        | 9.04     | http://ubuntu.com/ubuntu/9.04           
 ubuntu9.10           | Ubuntu 9.10                                        | 9.10     | http://ubuntu.com/ubuntu/9.10           
 win1.0               | Microsoft Windows 1.0                              | 1.0      | http://microsoft.com/win/1.0            
 win10                | Microsoft Windows 10                               | 10.0     | http://microsoft.com/win/10             
 win2.0               | Microsoft Windows 2.0                              | 2.0      | http://microsoft.com/win/2.0            
 win2.1               | Microsoft Windows 2.1                              | 2.1      | http://microsoft.com/win/2.1            
 win2k                | Microsoft Windows 2000                             | 5.0      | http://microsoft.com/win/2k             
 win2k12              | Microsoft Windows Server 2012                      | 6.3      | http://microsoft.com/win/2k12           
 win2k12r2            | Microsoft Windows Server 2012 R2                   | 6.3      | http://microsoft.com/win/2k12r2         
 win2k3               | Microsoft Windows Server 2003                      | 5.2      | http://microsoft.com/win/2k3            
 win2k3r2             | Microsoft Windows Server 2003 R2                   | 5.2      | http://microsoft.com/win/2k3r2          
 win2k8               | Microsoft Windows Server 2008                      | 6.0      | http://microsoft.com/win/2k8            
 win2k8r2             | Microsoft Windows Server 2008 R2                   | 6.1      | http://microsoft.com/win/2k8r2          
 win3.1               | Microsoft Windows 3.1                              | 3.1      | http://microsoft.com/win/3.1            
 win7                 | Microsoft Windows 7                                | 6.1      | http://microsoft.com/win/7              
 win8                 | Microsoft Windows 8                                | 6.2      | http://microsoft.com/win/8              
 win8.1               | Microsoft Windows 8.1                              | 6.3      | http://microsoft.com/win/8.1            
 win95                | Microsoft Windows 95                               | 4.0      | http://microsoft.com/win/95             
 win98                | Microsoft Windows 98                               | 4.1      | http://microsoft.com/win/98             
 winme                | Microsoft Windows Millennium Edition               | 4.9      | http://microsoft.com/win/me             
 winnt3.1             | Microsoft Windows NT Server 3.1                    | 3.1      | http://microsoft.com/winnt/3.1          
 winnt3.5             | Microsoft Windows NT Server 3.5                    | 3.5      | http://microsoft.com/winnt/3.5          
 winnt3.51            | Microsoft Windows NT Server 3.51                   | 3.51     | http://microsoft.com/winnt/3.51         
 winnt4.0             | Microsoft Windows NT Server 4.0                    | 4.0      | http://microsoft.com/winnt/4.0          
 winvista             | Microsoft Windows Vista                            | 6.0      | http://microsoft.com/win/vista          
 winxp                | Microsoft Windows XP                               | 5.1      | http://microsoft.com/win/xp  


9. Start / Stop listed KVM Virtual Machine


root@jeremiah:~# virsh list –all
 Id    Name                           State
—————————————————-
 3     fedora-28                      running
 –     debian9                        shut off


To start debian9 linux virtual machine that is currently off


root@jeremiah:~# virsh start fedora-28
Domain fedora-28 started


root@jeremiah:/home/hipo# virsh start debian9
error: Failed to start domain debian9
error: Requested operation is not valid: network 'default' is not active

root@jeremiah:/home/hipo# virsh net-list –all
Name                 State      Autostart     Persistent
———————————————————-
br0                  active     yes           yes
default              inactive   no            yes


root@jeremiah:/home/hipo# virsh net-start default
Network default started

root@jeremiah:/home/hipo# virsh start debian9
Domain debian9 started


10. Attach to running VM with virsh or virt-manager


root@jeremiah:~# virsh list
 Id    Name                           State
—————————————————-
 1     fedora-28                      running
 3     debian9                        running

root@jeremiah:~# virsh connect debian9


Note that to make the login prompt appear you have to press enter once after the ^] connection string appears


kvm-connect-to-virtual-machine-with-virsh-command-screenshot-howto

An alternative way is to use virt-manager GUI KVM desktop management interface and click over the Virtual Machine Guest name, in same fashion like in VirtualBox.

virtual-manager-virt-manager-screenshot-with-Virtual-Machines-inside-on-Debian-Linux

virt-manager-gui-interface-connect-to-fedora-28-virtual-machine

If you have KVM running on your Linux desktop PC / notebook you can also connect via VNC with virsh command.


root@jericho:~# virsh vncdisplay centos7


Another handy thing is to expose the Virtualized Guest OS with VNC in order to be able to connect and manage installation or further Linux configuration via VNC using an SSH Tunnel with port forwarding:


$ ssh hipo@www.pc-freak.net -L 5901:127.0.0.1:5901


11.  Start / Shutdown / Suspend / Reboot (safe reboot) a VM guest machine domain


root@jericho:~# virsh shutdown debian9
root@jericho:~# virsh start fedora-28
root@jericho:~# virsh suspend debian9
root@jericho:~# virsh reboot fedora-28


12. Remove / Delete KVM Virtual Machines domain


root@jeremiah:~# virsh undefine fedora-28
root@jeremiah:~# virsh destroy fedora-28


Closing words


Using KVM to experiment with different OS distributions is really fun just like you can easily run a number of the major most popular Linux Distributions and a set of different versions. It takes few minutes to have a fully functional Linux to play with and it saves a lot of hassles when dealing with GNU / Linux and FreeBSD, doing so in Virtualbox for me prooved to be much more complicated (not to mention that often Virtualbox had an ugly bugs so even Importing an Appliance as a Guest VM with an official distro OS-es failed with weird errors.
One other very practical use of Kerkel-based Virtualization is if you want to run your servers using own Micro-Services architecture (e.g. run multiple Linux OS-es each running a separate Apache / Nginx / MySQL / PostGreSQL / Backup / Storage) etc. all of it running on a single dedicated server or a self-hosted bare-metal
There are plenty of Web Interfaces for Management KVM (proprietary and free software) that could even futher simplify the use and deploy / destory of KVM VMs.
All that makes possible running your own Linux or Web hosting provider a relatively easy task and seriously could cut business expenses and operational (maintenance) costs.

If you plan to run youw own hosting company, I can help you establish your infrastructure and advise you on the right technologies to use.


Linux: GNOME Flashback missing Desktop Icons fix – Hack to add desktop icons via gnome-shell in GNOME 3.28 onwards

Monday, September 24th, 2018

how-to-fix-workaround-gnome-3.30-missing-desktop-icons-on-linux

I just upgraded my notebook fom Debian Stretch 9.5 Linux to Buster (current Testing Debian release). All went fine except I got a lot of headaches because it seems in Buster the GNOME Flashback 3.30 which I use has removed the support for Show Desktop Icons in Nautilus because of some migration reasons of Nautilus to a newer version 4, (hopefully that would be temporary) from gnome-tweak-tool whose package now contains no binary for gnome-tweak-tool, instead an equivalent tool now is called gnome-tweaks and this tool is no longer working under Gnome Flashback but only with GNOME Classic 3.30 and the regular GNOME 3.30 launcher available from gdm3 (the Gnome Display manager).
 

1. Displaying Missing Desktop icons on GNOME version 3.30


The way to display Desktop icons in GNOME 3.28 onwards at the moment of writting this post and the whole issue with the removed handling of Desktop icons in Nautilus is explained well by Carlos Soriano a gnome shell extension developer in his blog post Desktop icons goes beta.

The good guy C. S. wrote  the his desktop icons gnome shell extension which is on github.com
To use it you have to fetch it and enable it by fetching the repo source code to gnome-shell extensions directory:
 

hipo@linux:~$ cd ~/.local/share/gnome-shell/extensions
hipo@linux:~$ git clone https://gitlab.gnome.org/World/ShellExtensions/desktop-icons
hipo@linux:~$ mkdir 'desktop-icons@csoriano'
hipo@linux:~$ mv desktop-icons/* 'desktop-icons@csoriano'/
hipo@linux:~$ rm -rf desktop-icons/


Now you should use the gnome-tweaks command tool to enable the new added gnome-shell extension.


hipo@linux:~$ gnome-tweaks


gnome-tweak-on-debian-testing-linux-screenshot

Once enabled your Desktop icons will appear as usual as seen in below shot, the downside this solutions is icons as seen in below screenshot is that pictures doesn't have Thumbnail pictures generated … and icons when kept on with mouse over can move only in a selected square like perimeter (when moved left / right / up down side). That "woody" icon movement sucks a bit but much better than no icons at all.

gnome-3.30-general-desktop-solved-missing-icons-desktop-screenshot-on-debian-linux


2. Displaying Missing Desktop icons in GNOME Flashback 3.30


I really love GNOME Flashback as it used to be a good replacement for Linux MATE (which is the fork of GNOME2 and not bad but lacks Metacity Window Manager and some of the Eye Candy that GNOME 3 and beside that even MATE had to be slightly hacked to make look more like Classical GNOME 2 – for more on that check my previous article Fixing Mate Adwaita Theme problems on Debian and Ubuntu). 

At the moment when I tried to run gnome-tweaks under a GNOME Flashback session I got the following error:


hipo@jericho:~/.local/share/gnome-shell/extensions$ gnome-tweaks 
WARNING : Shell not installed or running
Traceback (most recent call last):
  File "/usr/lib/python3/dist-packages/gtweak/app.py", line 30, in do_activate
    self.win = Window(self, model)
  File "/usr/lib/python3/dist-packages/gtweak/tweakview.py", line 38, in __init__
    self._model.load_tweaks(self)
  File "/usr/lib/python3/dist-packages/gtweak/tweakmodel.py", line 104, in load_tweaks
    mods = __import__("gtweak.tweaks", globals(), locals(), tweak_files, 0)
  File "/usr/lib/python3/dist-packages/gtweak/tweaks/tweak_group_general.py", line 14, in <module>
    _shell_not_ubuntu = _shell.mode != 'ubuntu'
AttributeError: 'NoneType' object has no attribute 'mode'


In regular GNOME session gnome-tweaks works fine and with the help of an GNOME Shell Extension addon it is possible to add the Missing Desktop icons however the only working fix for GNOME FlashBack 3.30 is to substitute nautilus (the default GNOME file manager) with NEMO (which is The Official file manager for Cinnamon Desktop Environment).
Thanksfully this is done relatively easy and all I had to do is to use a little "hack", e.g. install nemo.


root@linux:~# apt-get install –yes -qq nemo


And add a new auto-launcher for gnome that launches nemo file manager instead of nautilus.

To add the auto-launcher in GNOME I had to add a file with following content:


[Desktop Entry]
Type=Application
Name=Nemo
Comment=Start Nemo desktop at log in
Exec=nemo-desktop
OnlyShowIn=GNOME;
AutostartCondition=GSettings org.nemo.desktop show-desktop-icons
X-GNOME-AutoRestart=true
NoDisplay=true


to ~/.config/autostart/

For those who don't know GNOME has this handy way to set an autostart programs by using the specific .desktop extension files that have to be placed under $HOME/.config/autostart (where $HOME = the logged in user home directory).

The one liner to do so is:


echo '[Desktop Entry]
Type=Application
Name=Nemo
Comment=Start Nemo desktop at log in
Exec=nemo-desktop
OnlyShowIn=GNOME;
AutostartCondition=GSettings org.nemo.desktop show-desktop-icons
X-GNOME-AutoRestart=true
NoDisplay=true' >> ~/.config/autostart/nemo.desktop


Then I had to restart my GNOME FlashBack session (e.g. Log Out and Login with a new session) and the icons appeared.

classic-gnome-flashback-debian-gnu-linux-hipos-desktop-screenshot

The downside of this dirty workaround is that desktop icons even though showing up couldn't be moved (rearranged) freely on any location of desktop (are pretty much static) and the even worser  fact about this hack is you can't actually copy paste easily copy files from your Desktop within another desktop folder … 
 I know that's shitty but at the moment there is no better solution and this is better than nothing at all.


P.S. I tried downgrading my Debian Testing to Stable Stretch Linux again with the idea to use the old GNOME 3.22 that the Stable Debian distro provides but, ended up with a lot of mess after experimenting to downgrade using /etc/apt/preferences file records and substitution in /etc/apt/sources.list to include the stable .deb repository and apt dselect and aptitude package management tools. Officially downgrades are not encouraged and supported by Debian, but I hoped I could relatively easily do it by manually fixing the broken dependencies after removing debian packages manually combined with short for bash loops like I did in the past, but it seems this time I broke the system worse, so I could hardly return it back to normal operation in upgrading packages with a lot of manual hacking with apt-get and few one liner scripts. Thus I abandoned as a fix the possiiblity to downgrade Testing Debian to stable, I even considered switching from GNOME desktop environment to something more light as OpenBoxCinnamon / XFCE and gave them one more try but the results weren't nice, I reconsidered again to go back to using the Good Old GNU Step Window Maker as a GNOME alternative which in my opinion is still a great GUI environment for security crackers / sysadmins /hackers (programmers) and eventually perhaps I will switch back to using it, because GNOME is becoming more and more bloated with the years and I can hardly stand it … I mean I did not expected GNOME to be developed in the shitty Mobile Interface  (Unity) way, I have been a loyal user to GNOME for so many years and have lived trhough  all its mess over the years, its painful to see how the good and efficient GNOME 2 went the bad broken road of changing completely concepts and interface in GNOME 3.x
 

3. Closure

GNOME Desktop icons has been with GNOME users already for about 15+ years so IMHO the missing ability to add them easily through gnome tweak tool or Gnome Control Center is a absurd stupidity and killed at least 5 times out of my time to solve and the solution is far from good … I understand that in future the GNOME developers want to make GNOME as modular as possible through GNOME Shell Extensions however if you're removing such an important functionality that's for ages in most mainstream operating systems such as M$ Windows / Mac OS is an insanity. Through my quick research online I found the Missing Desktop Icons is experienced by other people on other Linux distros besides Debian I saw complains by Ubuntu / Fedora and Arch Linux users in forums and mailing lists.
What puzzles me why the reaction of such a major complained are not seriously considered by GNOME developers, especially after all the problems with transition from GNOME 2 -> GNOME 3 which already pushed a lot of GNOME users to move from GNOME to KDE / MATE  (like in Linux Mint whose GUI is based on Linux Mint). Definitely such a general issues would drive further enthusiasts from GNU / Linux and makes a great harm to the Free Software software community.
Hopefully the missing desktop icons hell will be solved in upcoming GNOME releases.

Virtualbox Shared folder set up on Linux between Host and Guest OS – Set up Virtualbox shared folder to Copy files from PC Host to Guest

Wednesday, September 12th, 2018

mount-shares-between-host-OS-and-guest-virtual-machine-howto-virtualbox-vbox-logo

How to set-up Virtualbox shared folder to Copy files from PC Host  and Guest Virtualized OS?

Running VirtualBox Host is an easy thing to set-up across all Operating Systems.  Once you have it sooner or later you will need to copy files from the VM Host OS (that in my case is GNU / Linux) to the virtualized Guest operating system (again in my case that's again another Linux ISO running indide the Virtual Machine).

Below are steps to follow To use Virtualbox Shared Folder functionality to copy files between VBox and your Desktop / server Linux install.

1. Install Virtualbox Guest Additions CD Image ISO

I've explained how to add the Guest Additions CD image thoroughfully in my previous article Howto enable Copy / Paste Virtualbox betwen Linux guest and Host OS
Anyways I'll repeat myself below for sake of clarity:

To do so use Oracle VBox menus (on the booted virtualized OS VBox window):


Devices -> Insert Guest additions CD Image


Mount the ISO inside the Linux Virtual Machine:

root@debian:~# mount /media/cdrom1/
 

If the mount fails and there are no files inside the mount point it might be because the virtualbox-dkms and virtualbox-guest-dkms packages might be missing on the Host OS.

To install them (on Debian GNU / Linux) assuming that you're using virtualbox default distro packages /etc/apt/sources.list :
 

apt-get install –yes -qq virtualbox-dkms virtualbox-guest-dkms


and run:


root@debian:/media/cdrom1# cd /media/cdrom1; sh VBoxLinuxAdditions.run


2. Create directory for Shared Folder that will be used to access Host / OS files from the Guest Virtualized OS
 

root@debian:~# mkdir /mnt/shared_folder


3. Map from VBox program interface Shared folder settings and Mount /mnt/shared_folder location

virtualbox-virtual-machine-devices-shared-folders-shared-folder-settings-linux-screenshot


Devices -> Shared Folder -> Shared Folder settings -> Transient Folders (click blue folder add small button right)


From Transient Folders add whatever directory you want to be shared from your local notebook / PC to the VM.

virtualbox-devices-Shared-Folder-Add-Shared-Folder-add-share-linux-screenshotDepending on whether you would like to mount the shared folder only for reading files (choose Read Only) to make it a permanent shared folder (and not just for the one session of current running Virtual Machine until its killed use Make Permanent) or check Auto-Mount tick if you want the shared_folder mapping to be mounted on every VM boot.
Once the shared_folder directory location is set-up from GUI menu click OK and in order for the settings to take effect, you'll need to restart the VM Guest with Linux (use halt command from terminal) or Power Off the Machine via the VBox menus.

To mount use command like:

mount -t vboxsf name_of_folder_linked_from_vbox  /mnt/name_folder_guest_os/


mount-vboxsf-shared-folder-mnt-shared-linux-guest-screenshot

In my case I wanted to share home folder /home so the command I used is:

root@debian:~# mount -t vboxsf  shared_folder /mnt/shared_folder


If everything is fine your Host OS file content from /home will be visible (for read and write if you Mapped it so) 
under /mnt/shared_folder …

And as Turtles Ninja used to heavily say Cowabunga !!! 🙂
You have it mounted and ready for file share between Desktop -> Virtualized OS.


Bear in mind that above mount command has to run as root (superuser) to succeed.

You now could copy files from your Host OS (running the Virtual Machine) and the Guest OS (Virtualized OS) using /mnt/shared_folder mount point without problems.

The example is if you want to share files between VirtualBox installed Linux and the Guest (Desktop / server) OS, however at many cases mounting your Host OS directory for root users might be not very practical but, instead you might prefer to do the mount for specific non admin user, for example I prefer to do the shared folder mount with my pointed non-root username hipo.

Here is how to do above VM shared_folder mount for non-root user:

First you need to know the exact UID / GID (User ID / Group ID) of user, you can get that with id command:


hipo@linux:~$  id
uid=1000(hipo) gid=1000(hipo) groups=1000(hipo),24(cdrom),25(floppy),29(audio),30(dip),44(video),46(plugdev),108(netdev),114(bluetooth),115(lpadmin),119(scanner)


As you see UID / GID in my case are 1000 / 1000

hipo@linux:~$ sudo mount -t vboxsf -o rw,uid=1000,gid=1000 shared_folder /mnt/shared_folder


mount-virtual-box-shared_folder-with-non-administration-permissions-non-root-permissions-id-and-mount-command-screenshot-linux


4. Mounting configured shared_folder to automatically mount into the Guest OS Linux on every boot

a) Configuring shared_folder auto-mount using /etc/rc.local

If you need the shared_folder to automatically mount next-time you boot the virtual machine quickest way is to add the mount command to /etc/rc.local (on Debian 8 and Debian 9 and newer Ubuntu Linuxes rc.local is missing by default to enable it to work like it worked before read follow my previous article ).

b) Configuring auto-mount for shared_folder through /etc/fstab

The more professional way to auto-mount on emulated OS VM boot time,  you could add the vboxsf mount definitions to /etc/fstab with your favourite text-editor mcedit, nano, joe etc. … (for me that's vim).

Syntax of /etc/fstab is as follows:
 

<Device> <Mount Point> <Type> <Options> <Dump> <Pass>

root@linux:~# vim /etc/fstab


shared_folder /mnt/shared_folder                                vboxsf rw,uid=1000,gid=1000 0 0

Note that you will want to change 1000 / 1000, id / gid with the ones of the non-admin user you would like to add to mount it for.

A quick way to add it to /etc/fstab with a shell one-liner is with command
 

root@linux:~# echo 'shared_folder /mnt/shared_folder                                vboxsf rw,uid=1000,gid=1000 0  0' >> /etc/fstab

An alternative way to add a user to have permissions for vboxsf file system (without specifying the long -o uid=1000,gid=1000 options is to simply add the username in question to group vboxsf like so:

c) Adding non super user username to vboxsf group

root@linux:~# usermod -G vboxsf hipo
root@linux:~# grep -i vboxsf /etc/group
vboxsf:x:999:hipo


hipo@linux:~$ sudo mount -t vboxsf  shared_folder /mnt/shared_folder


without the extra arguments and the options to pass to /etc/fstab (for eventual requirement to auto mount the shared_folder) would be more simple e.g.:


echo 'shared_folder /mnt/shared_folder                                vboxsf ' >> /etc/fstab


One note to make here is if the uesr is added to vboxsf the line for /etc/fstab to auto mount to mount for root user and non-root will be identical.

Then you can get the /etc/fstab auto-mount configured tested by running:

c) Checking auto-mount is working

hipo@linux:~# mount -a
hipo@linux:~# mount |grep -i vboxsf
shared_folder on /mnt/shared_folder type vboxsf (rw,nodev,relatime)


5. What if you end up with mounting failed errors ? – What might be causing the mounting failed Protocol error (a few things to check to solve)


In case of troubles with the mount you might get an error like:

hipo@linux:~# mount -t vboxsf  share_folder /mnt/shared_folder

/sbin/mount.vboxsf: mounting failed with the error: Protocol error


This error might be caused because of Insert Guest Additions CD Image might be not properly enabled and installed using the ISO provided VBoxLinuxAdditions.sh shell script.
Other common reason you might get this error if you have mistyped the Folder name: given in Shared Folders -> Folder Path -> Add Share for example I have given shared_folder as a Map name but as you can see in above mount -t vboxsf, I've mistyped share_folder instead of the correct one shared_folder inserted.
In some VBox releases this error was caused by bugs in the Virtual Machine.
 

virtualbox-virtual-machine-shared-folder-transient-folder-add-folder-linux-VM-guest-linux

One useful tip is to be able to check whether a Virtualbox Virtual Machine has a configured shared_folder (if you're logging to manage the machine on remote server – nomatter whether you have logged in with VNC / Teamviewer / Citrix etc. or via SSH session.

To do so use VBoxControl as of time of writting usually located on most distributions under (/usr/bin/VBoxControl)


hipo@linux:~# VBoxControl sharedfolder list -automount
Oracle VM VirtualBox Guest Additions Command Line Management Interface Version 5.2.18
(C) 2008-2018 Oracle Corporation
All rights reserved.


Auto-mounted Shared Folder mappings (0):

No Shared Folders available.

You can use VBoxControl command to get set and list a number of settings on the VBox VM, here is an useful example with it where you get information about numerous VBox info values:


root@linux:~# VBoxControl guestproperty enumerate
Oracle VM VirtualBox Guest Additions Command Line Management Interface Version 5.2.18
(C) 2008-2018 Oracle Corporation
All rights reserved.


Name: /VirtualBox/GuestInfo/OS/Product, value: Linux, timestamp: 1536681633430852000, flags: <NULL>
Name: /VirtualBox/GuestInfo/Net/0/V4/IP, value: 10.0.2.15, timestamp: 1536681633438717000, flags: <NULL>
Name: /VirtualBox/HostInfo/GUI/LanguageID, value: en_US, timestamp: 1536697521395621000, flags: RDONLYGUEST
Name: /VirtualBox/GuestInfo/Net/0/MAC, value: 08002762FA1C, timestamp: 1536681633442120000, flags: <NULL>
Name: /VirtualBox/GuestInfo/OS/ServicePack, value: <NULL>, timestamp: 1536681633431259000, flags: <NULL>
Name: /VirtualBox/HostInfo/VBoxVerExt, value: 5.2.18, timestamp: 1536681619002646000, flags: TRANSIENT, RDONLYGUEST
Name: /VirtualBox/GuestInfo/Net/0/V4/Netmask, value: 255.255.255.0, timestamp: 1536681633440157000, flags: <NULL>
Name: /VirtualBox/GuestInfo/OS/Version, value: #1 SMP Debian 4.9.110-3+deb9u2 (2018-08-13), timestamp: 1536681633431125000, flags: <NULL>
Name: /VirtualBox/GuestAdd/VersionExt, value: 5.2.18, timestamp: 1536681633431582000, flags: <NULL>
Name: /VirtualBox/GuestAdd/Revision, value: 124319, timestamp: 1536681633432515000, flags: <NULL>
Name: /VirtualBox/HostGuest/SysprepExec, value: <NULL>, timestamp: 1536681619002355000, flags: TRANSIENT, RDONLYGUEST
Name: /VirtualBox/GuestInfo/OS/LoggedInUsers, value: 1, timestamp: 1536681673447293000, flags: TRANSIENT, TRANSRESET
Name: /VirtualBox/GuestInfo/Net/0/Status, value: Up, timestamp: 1536681633443911000, flags: <NULL>
Name: /VirtualBox/GuestInfo/Net/0/Name, value: enp0s3, timestamp: 1536681633445302000, flags: <NULL>
Name: /VirtualBox/HostGuest/SysprepArgs, value: <NULL>, timestamp: 1536681619002387000, flags: TRANSIENT, RDONLYGUEST
Name: /VirtualBox/GuestAdd/Version, value: 5.2.18, timestamp: 1536681633431419000, flags: <NULL>
Name: /VirtualBox/HostInfo/VBoxRev, value: 124319, timestamp: 1536681619002668000, flags: TRANSIENT, RDONLYGUEST
Name: /VirtualBox/GuestInfo/Net/0/V4/Broadcast, value: 10.0.2.255, timestamp: 1536681633439531000, flags: <NULL>
Name: /VirtualBox/HostInfo/VBoxVer, value: 5.2.18, timestamp: 1536681619002613000, flags: TRANSIENT, RDONLYGUEST
Name: /VirtualBox/GuestInfo/OS/LoggedInUsersList, value: hipo, timestamp: 1536681673446498000, flags: TRANSIENT, TRANSRESET
Name: /VirtualBox/GuestInfo/Net/Count, value: 1, timestamp: 1536698949773993000, flags: <NULL>
Name: /VirtualBox/GuestInfo/OS/Release, value: 4.9.0-7-amd64, timestamp: 1536681633431001000, flags: <NULL>
Name: /VirtualBox/GuestInfo/OS/NoLoggedInUsers, value: false, timestamp: 1536681673447965000, flags: TRANSIENT, TRANSRESET
Name: /VirtualBox/GuestAdd/HostVerLastChecked, value: 5.2.18, timestamp: 1536681702832389000, flags: <NULL>

Hope you enjoyed ! Have phun! 🙂