Posts Tagged ‘free operating systems’

How to install VirtualBox Virtual Machine to run Windows XP on Ubuntu Linux (11.10)

Tuesday, January 17th, 2012

Enable_VirtualBox_Windows_XP-fullscreen-with-vboxguest-additions-iso
My beloved sister was complaining games were failing to properly be played with wine emulator , therefore I decided to be kind and help her by installing a Windows XP to run inside a Virtual Machine.My previous install experiments with running MS Windows XP on Linux was on Debian using QEMU virtualmachine emulator.
However as Qemu is a bit less interactive and slower virtualmachine for running Windows (though I prefer it for being completely free software), this time I decided to install the Windows OS with Virtualbox.

My hope was using VirtualBox would be a way easier but I was wrong… I've faced few troubles and I thought many people who initially try to install Virtualbox VM to run Windows on Ubuntu and other Debian based Linux distros will probably experience the same problems as mine, so here is how this article was born.

Here is what I did to have a VirtualBox OS emulator to run Windows XP SP2 on Ubuntu 11.10 Linux

1. Install Virtualbox required packages with apt

root@ubuntu:~# apt-get install virtualbox virtualbox-dkms virtualbox-guest-dkms root@ubuntu:~# apt-get install virtualbox-ose-dkms virtualbox-guest-utils virtualbox-guest-x11
...

If you prefer more GUI or lazy to type commands, the Software Package Manager can also be used to straight install the same packages.
virtualbox-dkms virtualbox-guest-dkms packages are the two which are absolutely necessery in order to enable VirtualBox to support installing Microsoft Windows XP. DKMS modules are also necessery to be able to emulate some other proprietary (non-free) operating systems.
The DKMS packages provide a source for building Vbox guest (OS) additional kernel modules. They also require the kernel source to be install otherwise they fail to compile.

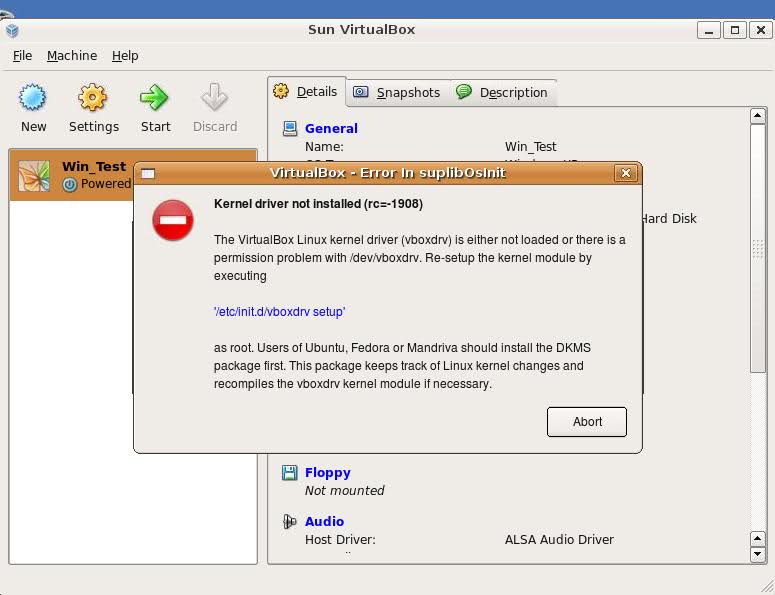
Failing to build the DKMS modules will give you error every time you try to create new VirtualMachine container for installing a fresh Windows XP.
The error happens if the two packages do not properly build the vboxdrv extra Vbox kernel module while the Windows XP installer is loaded from a CD or ISO. The error to pop up is:

Kernel driver not installed (rc=-1908)

The VirtualBox Linux kernel driver (vboxdrv) is either not loaded or there is a permission problem with /dev/vboxdrv. Please reinstall the kernel module by executing

VirtualBox vboxdrv not loaded error Ubuntu Screen

To fix the error:

2. Install latest Kernel source that corresponds to your current kernel version

root@ubuntu:~# apt-get install linux-headers-`uname -r`
...

Next its necessery to rebuild the DKMS modules using dpkg-reconfigure:

3. Rebuild VirtualBox DKMS deb packages

root@ubuntu:~# dpkg-reconfigure virtualbox-dkms
...
root@ubuntu:~# dpkg-reconfigure virtualbox-guest-dkms
...
root@ubuntu:~# dpkg-reconfigure virtualbox-ose-dkms
...

Hopefully the copilation of vboxdrv kernel module should complete succesfully.
To test if all is fine just load the module:

4. Load vboxdrv virtualbox kernel module

root@ubuntu:~# modprobe vboxdrv
root@ubuntu:~#

If you get some error during loading, this means vboxdrv failed to properly compile, try read thoroughfully what the error is and fix it) ;).

As a next step the vboxdrv has to be set to load on every system boot.

5. Set vboxdrv to load on every Ubuntu boot

root@ubuntu:~# echo 'vboxdrv' >> /etc/modules

I am not sure if this step is required, it could be /etc/init.d/virtualbox init script automatically loads the module, anyways putting it to load on boot would do no harm, so better do it.

That's all now, you can launch VirtualBox and use the New button to initiate a new Virtual Machine, I will skip explaining how to do the configurations for a Windows XP as most of the configurations offered by default would simply work without any tampering.

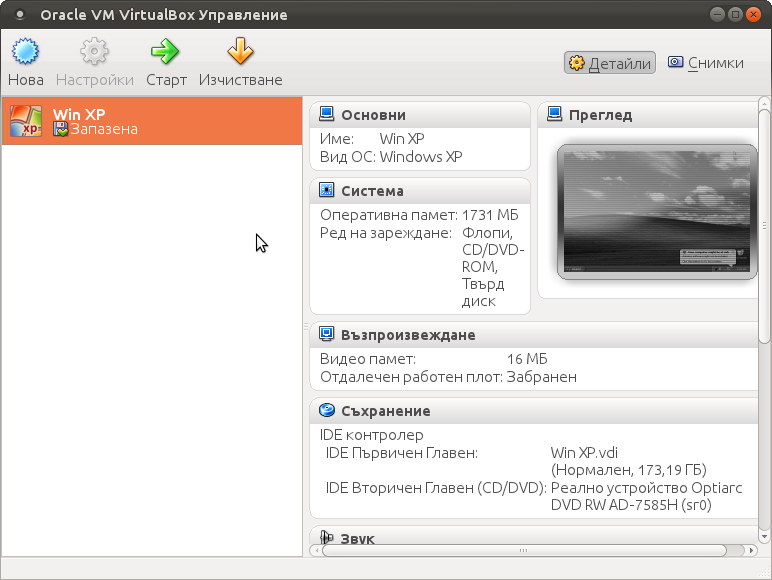
After booting the Windows XP installer I simply followed the usual steps to install Windows and all went smoothly.
Below you see a screenshot showing the installed Windows XP Virtualbox saved VM session. The screenshot letters are in Bulgarian as my sisters default lanaguage for Ubuntu is bulgarian 😉

VirtualBox installed MS Windows VM screenshot

I hope this article helps someone out there. Please drop me a comment if you experience any troubles with it. Cya 🙂

How to make a mirror of website on GNU / Linux with wget / Few tips on wget site mirroring

Wednesday, February 22nd, 2012

how-to-make-mirror-of-website-on-linux-wget

Everyone who used Linux is probably familiar with wget or has used this handy download console tools at least thousand of times. Not so many Desktop GNU / Linux users like Ubuntu and Fedora Linux users had tried using wget to do something more than single files download.
Actually wget is not so popular as it used to be in earlier linux days. I've noticed the tendency for newer Linux users to prefer using curl (I don't know why).

With all said I'm sure there is plenty of Linux users curious on how a website mirror can be made through wget.
This article will briefly suggest few ways to do website mirroring on linux / bsd as wget is both available on those two free operating systems.

1. Most Simple exact mirror copy of website

The most basic use of wget's mirror capabilities is by using wget's -mirror argument:

# wget -m http://website-to-mirror.com/sub-directory/

Creating a mirror like this is not a very good practice, as the links of the mirrored pages will still link to external URLs. In other words link URL will not pointing to your local copy and therefore if you're not connected to the internet and try to browse random links of the webpage you will end up with many links which are not opening because you don't have internet connection.

2. Mirroring with rewritting links to point to localhost and in between download page delay

Making mirror with wget can put an heavy load on the remote server as it fetches the files as quick as the bandwidth allows it. On heavy servers rapid downloads with wget can significantly reduce the download server responce time. Even on a some high-loaded servers it can cause the server to hang completely.
Hence mirroring pages with wget without explicity setting delay in between each page download, could be considered by remote server as a kind of DoS – (denial of service) attack. Even some site administrators have already set firewall rules or web server modules configured like Apache mod_security which filter requests to IPs which are doing too frequent HTTP GET /POST requests to the web server.
To make wget delay with a 10 seconds download between mirrored pages use:

# wget -mk -w 10 -np --random-wait http://website-to-mirror.com/sub-directory/

The -mk stands for -m/-mirror and -k / shortcut argument for –convert-links (make links point locally), –random-wait tells wget to make random waits between o and 10 seconds between each page download request.

3. Mirror / retrieve website sub directory ignoring robots.txt "mirror restrictions"

Some websites has a robots.txt which restricts content download with clients like wget, curl or even prohibits, crawlers to download their website pages completely.

/robots.txt restrictions are not a problem as wget has an option to disable robots.txt checking when downloading.
Getting around the robots.txt restrictions with wget is possible through -e robots=off option.
For instance if you want to make a local mirror copy of the whole sub-directory with all links and do it with a delay of 10 seconds between each consequential page request without reading at all the robots.txt allow/forbid rules:

# wget -mk -w 10 -np -e robots=off --random-wait http://website-to-mirror.com/sub-directory/

4. Mirror website which is prohibiting Download managers like flashget, getright, go!zilla etc.

Sometimes when try to use wget to make a mirror copy of an entire site domain subdirectory or the root site domain, you get an error similar to:

Sorry, but the download manager you are using to view this site is not supported.
We do not support use of such download managers as flashget, go!zilla, or getright

This message is produced by the site dynamic generation language PHP / ASP / JSP etc. used, as the website code is written to check on the browser UserAgent sent.
wget's default sent UserAgent to the remote webserver is:
Wget/1.11.4

As this is not a common desktop browser useragent many webmasters configure their websites to only accept well known established desktop browser useragents sent by client browsers.
Here are few typical user agents which identify a desktop browser:
 

  • Mozilla/5.0 (Windows NT 6.1; rv:6.0) Gecko/20110814 Firefox/6.0
  • Mozilla/5.0 (X11; Linux i686; rv:6.0) Gecko/20100101 Firefox/6.0
  • Mozilla/6.0 (Macintosh; I; Intel Mac OS X 11_7_9; de-LI; rv:1.9b4) Gecko/2012010317 Firefox/10.0a4
  • Mozilla/5.0 (Windows NT 6.1; Win64; x64; rv:2.2a1pre) Gecko/20110324 Firefox/4.2a1pre

etc. etc.

If you're trying to mirror a website which has implied some kind of useragent restriction based on some "valid" useragent, wget has the -U option enabling you to fake the useragent.

If you get the Sorry but the download manager you are using to view this site is not supported , fake / change wget's UserAgent with cmd:

# wget -mk -w 10 -np -e robots=off \
--random-wait
--referer="http://www.google.com" \--user-agent="Mozilla/5.0 (Windows; U; Windows NT 5.1; en-US; rv:1.8.1.6) Gecko/20070725 Firefox/2.0.0.6" \--header="Accept:text/xml,application/xml,application/xhtml+xml,text/html;q=0.9,text/plain;q=0.8,image/png,*/*;q=0.5" \--header="Accept-Language: en-us,en;q=0.5" \--header="Accept-Encoding: gzip,deflate" \--header="Accept-Charset: ISO-8859-1,utf-8;q=0.7,*;q=0.7" \--header="Keep-Alive: 300"

For the sake of some wget anonimity – to make wget permanently hide its user agent and pretend like a Mozilla Firefox running on MS Windows XP use .wgetrc like this in home directory.

5. Make a complete mirror of a website under a domain name

To retrieve complete working copy of a site with wget a good way is like so:

# wget -rkpNl5 -w 10 --random-wait www.website-to-mirror.com

Where the arguments meaning is:
-r – Retrieve recursively
-k – Convert the links in documents to make them suitable for local viewing
-p – Download everything (inline images, sounds and referenced stylesheets etc.)
-N – Turn on time-stamping
-l5 – Specify recursion maximum depth level of 5

6. Make a dynamic pages static site mirror, by converting CGI, ASP, PHP etc. to HTML for offline browsing

It is often websites pages are ending in a .php / .asp / .cgi … extensions. An example of what I mean is for instance the URL http://php.net/manual/en/tutorial.php. You see the url page is tutorial.php once mirrored with wget the local copy will also end up in .php and therefore will not be suitable for local browsing as .php extension is not understood how to interpret by the local browser.
Therefore to copy website with a non-html extension and make it offline browsable in HTML there is the –html-extension option e.g.:

# wget -mk -w 10 -np -e robots=off \
--random-wait \
--convert-links http://www.website-to-mirror.com

A good practice in mirror making is to set a download limit rate. Setting such rate is both good for UP and DOWN side (the local host where downloading and remote server). download-limit is also useful when mirroring websites consisting of many enormous files (documental movies, some music etc.).
To set a download limit to add –limit-rate= option. Passing by to wget –limit-rate=200K would limit download speed to 200KB.

Other useful thing to assure wget has made an accurate mirror is wget logging. To use it pass -o ./my_mirror.log to wget.
 

How to install OpenNTPD NTP server to synchronize system clock on FreeBSD for better security

Sunday, February 12th, 2012

FreeBSD, OpenBSD, NetBSD and Linux ntpd alternative server to synchronize server system time

Lately I've been researching on ntpd and wrote a two articles on how to install ntpd on CentOS, Fedora and how to install ntpd on FreeBSD and during my research on ntpd, I've come across OpenNTPD and decided to give it a go on my FreeBSD home router.
OpenBSD project is well known for it is high security standards and historically has passed the test of time for being a extraordinary secure UNIX like free operating system.
OpenBSD is developed in parallel with FreeBSD, however the development model of the two free operating systems are way different.

As a part of the OpenBSD to be independant in its basis of software from other free operating systems like GNU / Linux and FreeBSD. They develop the all around free software realm known OpenSSH. Along with OpenSSH, one interesting project developed for the main purpose of OpenBSD is OpenNTPD.

Here is how openntpd.org describes OpenNTPD:

"a FREE, easy to use implementation of the Network Time Protocol. It provides the ability to sync the local clock to remote NTP servers and can act as NTP server itself, redistributing the local clock."

OpenNTPD's accent just like OpenBSD's accent is security and hence for FreeBSD installs which targets security openntpd might be a good choice. Besides that the so popular classical ntpd has been well known for being historically "insecure", remote exploits for it has been released already at numerous times.

Another reason for someone to choose run openntpd instead of ntpd is its great simplicity. openntpd configuration is super simple.

Here are the steps I followed to have openntpd time server synchronize clock on my system using other public accessible openntpd servers on the internet.

1. Install openntpd through pkg_add -vr openntpd or via ports tree

a) For binar install with pkg_add issue:

freebsd# pkg_add -vr openntpd
...

b) if you prefer to compile it from source

freebsd# cd /usr/ports/net/openntpd
freebsd# make install clean
...

2. Enable OpenNTPD to start on system boot:

freebsd# echo 'openntpd_enable="YES"' >> /etc/rc.conf

3. Create openntpd ntpd.conf configuration file

There is a default sample ntpd.conf configuration which can be straight use as a conf basis:

freebsd# cp -rpf /usr/local/share/examples/openntpd/ntpd.conf /usr/local/etc/ntpd.conf

Default ntpd.conf works just fine without any modifications, if however there is a requirement the openntpd server to listen and accept time synchronization requests from only certain hosts add to conf something like:

listen on 192.168.1.2
listen on 192.168.1.3
listen on 2607:f0d0:3001:0009:0000:0000:0000:0001
listen on 127.0.0.1

This configuration will enable only 192.168.1.2 and 192.168.1.3 IPv4 addresses as well as the IPv6 2607:f0d0:3001:0009:0000:0000:0000:0001 IP to communicate with openntpd.

4. Start OpenNTPD service

freebsd# /usr/local/etc/rc.d/openntpd

5. Verify if openntpd is up and running

freebsd# ps axuww|grep -i ntp
root 31695 0.0 0.1 3188 1060 ?? Ss 11:26PM 0:00.00 ntpd: [priv] (ntpd)
_ntp 31696 0.0 0.1 3188 1140 ?? S 11:26PM 0:00.00 ntpd: ntp engine (ntpd)
_ntp 31697 0.0 0.1 3188 1088 ?? S 11:26PM 0:00.00 ntpd: dns engine (ntpd)
root 31700 0.0 0.1 3336 1192 p2 S+ 11:26PM 0:00.00 grep -i ntp

Its also good idea to check if openntpd has succesfully established connection with its peer remote openntpd time servers. This is necessery to make sure pf / ipfw firewall rules are not preventing connection to remote 123 UDP port:

freebsd# sockstat -4 -p 123
USER COMMAND PID FD PROTO LOCAL ADDRESS FOREIGN ADDRESS
_ntp ntpd 31696 4 udp4 83.228.93.76:54555 212.70.148.15:123
_ntp ntpd 31696 6 udp4 83.228.93.76:56666 195.69.120.36:123
_ntp ntpd 31696 8 udp4 83.228.93.76:49976 217.75.140.188:123

By default openntpd is also listening to IPv6 if IPv6 support is enabled in freebsd kernel.

6. Resolve openntpd firewall filtering issues

If there is a pf firewall blocking UDP requests to in/out port 123 within /etc/pf.conf rule like:

block in log on $EXT_NIC proto udp all

Before the blocking rule you will have to add pf rules:

# Ipv4 Open outgoing port TCP 123 (NTP)
pass out on $EXT_NIC proto tcp to any port ntp
# Ipv6 Open outgoing port TCP 123 (NTP)
pass out on $EXT_NIC inet6 proto tcp to any port ntp
# Ipv4 Open outgoing port UDP 123 (NTP)
pass out on $EXT_NIC proto udp to any port ntp
# Ipv6 Open outgoing port UDP 123 (NTP)
pass out on $EXT_NIC inet6 proto udp to any port ntp

where $EXT_NIC is defined to be equal to the external lan NIC interface, for example:
EXT_NIC="ml0"

Afterwards to load the new pf.conf rules firewall has to be flushed and reloaded:

freebsd# /sbin/pfctl -f /etc/pf.conf -d
...
freebsd# /sbin/pfctl -f /etc/pf.conf -e
...

In conclusion openntpd should be more secure than regular ntpd and in many cases is probably a better choice.
Anyhow bear in mind on FreeBSD openntpd is not part of the freebsd world and therefore security updates will not be issued directly by the freebsd dev team, but you will have to regularly update with the latest version provided from the bsd ports to make sure openntpd is 100% secure.

For anyone looking for more precise system clock synchronization and not so focused on security ntpd might be still a better choice. The OpenNTPD's official page states it is designed to reach reasonable time accuracy, but is not after the last microseconds.