Posts Tagged ‘errors’

How to Install and Play old Arcade Multiple Arcade Machine Emulator Games on Linux in 2021 with xmame and GXMame GUI Frontend

Friday, May 14th, 2021

mame-multiple-arcade-machine-emulator
I've earlier blogged on how to install and play old arcade games with xmame compiled from source on the now old Debian 7 Linux under the article Install xmame from source on Debian Linux 7.0 (Wheezy) to play for better MAME (Arcade Games Emulation)
as well article on using the newer version of MAME emulator instead of xmame under the article Playing Arcade old school games on Debian Linux as well as how to make the MAME emulator work with a joystick see my previous How to configure Joystick ( Gamepad ) on Debian, Ubuntu, Mint GNU / Linux easily.

Since I have preinstalled my notebook with fresh Debian 10 Buster, for a long time I did not have the time as well as desire to play my favourite games of the youth to name a few this is Xain'd Sleena / Cadillacs and Dinosaurs (1993) / the Punisher (1993) / Captain Commando (1991) / Super Mario / Contra / Final Fight etc. and rest of the the SEGA Mega Drive / GameBoy / Nintendo / Terminator game (fake clone of nintendo) and other killing Arcade Classics of the late 90s and early year 2000, which we played on a public houses on a game cabinets with a joysticks. 
Hence I tried to reproduce some of my articles just as of 2021 to see whether still we can get a nice playable MAME emulator on Linux with a Graphical GUI for Mate or GNOME. And it seems using a straight mame out of Debian standard repositories did not work with some of the more sophisticated ROM .zip files from the nices such as Punisher or XSLEENA.zip, this is how this article got born in an attempt to give a way for such old school game freaks as me to be able to play there favorite games of the youth.

Below is the few steps adapted mostly from above articles with some head banging and loosing multiple hours wondering until I finally got a working XMAME ROM emulator with the simple but working GXMAME graphical frontend for M.A.M.E..

To compile xmame with joystick support be it analog or whatever joystick you have to use a Makefile like below

https://www.pc-freak.net/files/xmame-0.103-Makefile-for-joystick

Copy it on your PC and remove it to Makefile in the xmame-0.103 source dir:

# cd /usr/local/src/xmame-0.103


I have to install all the necessery package dependencies development header files, some of which are mentioned in the beginning of post articles and some of which I had to install manually, such as the preset Debian meta-package build-essentials Things to install on newly installed GNU / Linux (My favourite must have Linux text and GUI programs missing in fresh Linux installs), just to mention a few I remember had to install based on some compilation errors:

# apt-get install build-essential
# apt-get install –yes zlib1g-dev

# apt-get install –yes libexpat1-dev
# apt-get install –yes libghc-x11-dev
# apt-get install –yes x11proto-video-dev
# apt-get install –yes libxv-dev
# apt-get install libxext6
# apt-get install libxext6-dev
# apt-get install libxext-dev
# apt-get install libjpeg62-turbo-dev
# apt-get install libxinerama-dev
# apt-get install libgtk-3-dev
# apt-get install syslog-ng-dev
# apt-get install libgtk2.0-dev


If I'm missing some package necessery here you will have to find it yourself based on the *.h file produced as error during compile you should look it up with a cmd like:

# apt-file search glib2.h


And install it further.

You will need to edit Makefile or take and straight use or if necessery adapt an already prepared Makefile for my purpose:
 

# wget https://www.pc-freak.net/files/xmame-0.103-Makefile-for-joystick;
# mv https://www.pc-freak.net/files/xmame-0.103-Makefile-for-joystick Makefile
# make && make install


Some .zip roms does not properly work with the newer mame you need to instead use xmame ..

Below is the version I use on Debian 10 as of May 2021 year.

hipo@jeremiah:/usr/local/src$ xmame –version
GLINFO: loaded OpenGL library libGL.so!
GLINFO: loaded GLU    library libGLU.so!
xmame (x11) version 0.103 (May 13 2021)


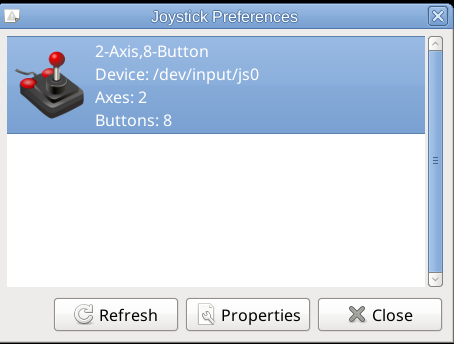
To make the joystick work in xmame you will need to have a preset of modules loaded on the Linux for my old Genius joystick this is what works.

hipo@jeremiah:~/Games$ cat /etc/modules
# /etc/modules: kernel modules to load at boot time.
#
# This file contains the names of kernel modules that should be loaded
# at boot time, one per line. Lines beginning with "#" are ignored.
snd-seq
3c59x
snd-emu10k1
snd-pcm-oss
snd-mixer-oss
snd-seq-oss
joydev
ns558
sidewinder
gameport
analog
adi
pcigame
iforce
evdev
usbhid


Fill in your joystick module there and make sure you manually load each one of the modules with modprobe command.
Next calibrate the joystick with some tool like jktest-gtk

jktest-gtk-linux-screenshot
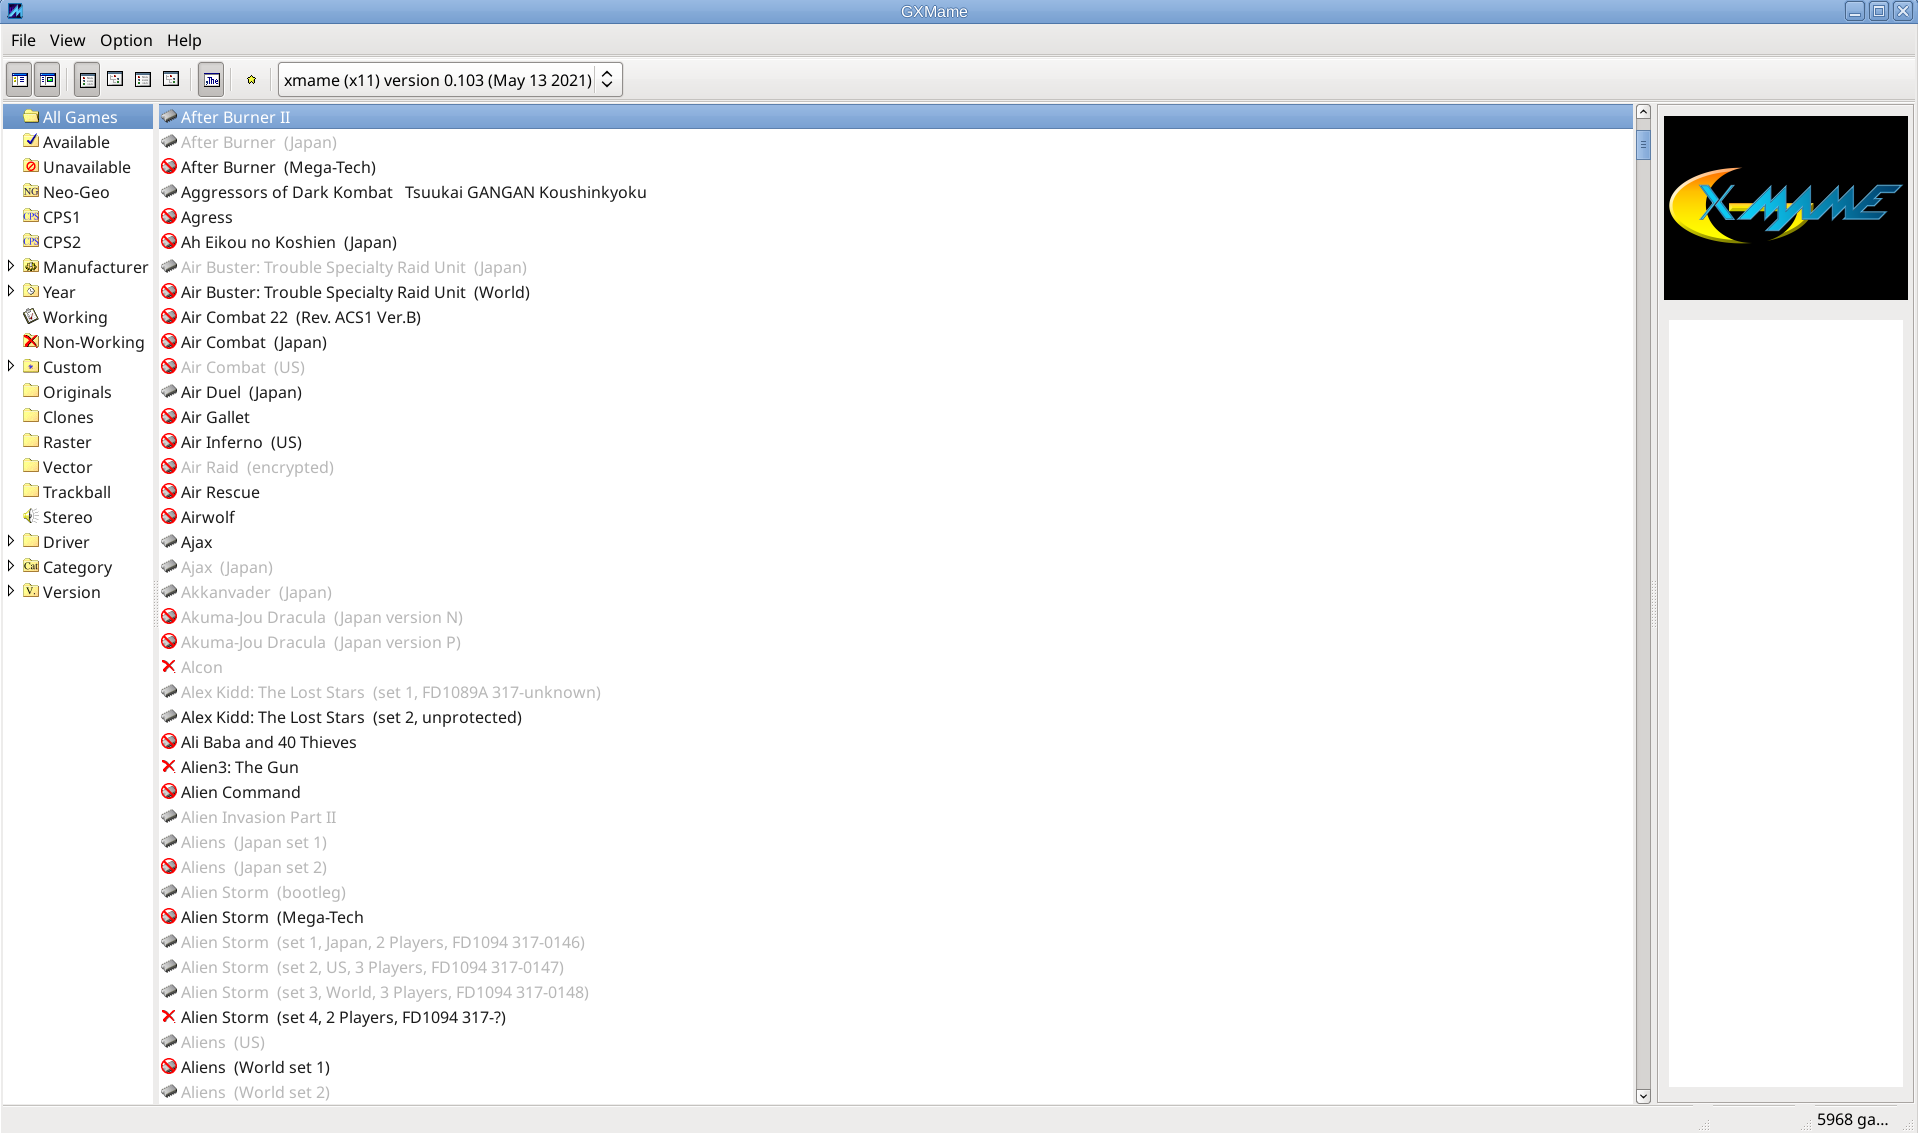
If you need a good frontend for MATE / GNOME for xmame try gxmame. It is a real pain in the ass to configure, note that the only working version of xmame with good configuration as well as gxmame with a game list that is prebuild.
If you need xmame-0.103.tar.bz2 exact xmame version I'm using thethe archive is on:

https://www.pc-freak.net/files/xmame-0.103.tar.bz2
An old bundle of both gxmame and xmamerc configs is here

https://www.pc-freak.net/files/xmame.tar.gz

https://www.pc-freak.net/files/xmame-config-for-joystick-hipo.tar.gz
For example my old working version of xmame ~/.xmame is here https://www.pc-freak.net/files/xmame-config-for-joystick-hipo.tar.gz

Configuration of gxmame (even though it has has a GUI for configuring is below:

https://www.pc-freak.net/files/gxmame.tar.gz

xmamerc sample working file is here

https://www.pc-freak.net/files/xmamerc

My newest current version as of Debian 10 Squeeze of xmame and gxmame is below:

https://www.pc-freak.net/files/gxmame-config-newest_may_2021.tar.gz

https://www.pc-freak.net/files/xmame-config-newest_may_2021.tar.gz

Note that my rom files and stuff is located and configured in neewst configs to be under /home/hipo/Games/roms/ if your location is others grep it in .xmame/* and .gxmame/* files and set the correct PATH locations.

A VERY IMPORTANT NOTE is not to use the stable version of GXMAME even though it worked in 2003 fine as the project is abandoned and unsupported as of 2021 the latest downloadable stable gxmame file on Sourceforge gxmame-0.34b website is not working correctly (even though it compiles fine).
You have to compile and use instead the newer version gxmame-0.35beta1.

If you want to use gxmame with a joystick you need to compile it with the respective option:
 

root@jeremiah:/usr/local/src/gxmame-0.35beta1# ./configure –enable-joystick


gxmame 0.35beta1

Print debugging messages…… : no
Joystick support………….. : yes

GXMame will be installed in /usr/local/bin.
Warning: You have an old copy of gxmame at /usr/local/bin/gxmame.


configure complete, now type 'make'

To install compiled binaries do the usual:
 

# make && make install

gxmame binary should be installed under /usr/local/bin/gxmame once launched you should get the shiny gxmame GUI.

gxmame-screenshot-debian-10-gnu-linux-mate-desktop

Perhaps there was other stuff I've done in the process I forgot to document here, so if you try to follow my guide and something does not work please tell me what I'm missing and you can't handle it either contact me.

The guide is for Debian Linux but should work on other .Deb based Linux distros such as Ubuntu / Linux Mint etc.

To enjoy my 4GB present of ROM files containing many of best well known M.A.M.E. ARCADE GAMES check archive here. Note that this collection was downloaded on the Internet and I do not hold any responsibility of the archive. If it contains files with any copyright infringment this is to be on your own.
 

Howto Upgrade IBM Spectrum Protect Backup Client TSM 7.X to 8.1.8, Update Tivoli 8.1.8 to 8.1.11 on CentOS and Redhat Linux

Thursday, December 3rd, 2020


IBM-spectrum-protect-backup-logo-tivoli-tsm-logo

Having another day of a system administrator boredom, we had a task to upgrade some Tivoli TSM Backup clients running on a 20+ machines powered by CentOS and RHEL Linux to prepare the systems to be on the latest patched IBM Spectrum Backup client version available from IBM. For the task of patching I've used a central server where, I've initially downloaded the provided TSM client binaries archives. From this machine, we have copied TivSM*.tar to each and every system that needs to be patched and then patched. The task is not too complex as the running TSM in the machines are all at the same version and all running a recent patched version of Linux. Hence to make sure all works as expected we have tested TSM is upgraded from 7.X.X to 8.X.X on one machine and then test 8.1.8 to 8.1.11 upgrade on another one. Once having confirmed that Backups works as expected after upgrade. We have proceeded to do it massively on each of the rest 20+ hosts.
Below article's goal is to help some lazy sysadmin with the task to prepare an TSM Backup upgrade procedure to standartize TSM Upgrade, which as many of the IBM's softwares is very specific and its upgrade requires, a bit of manual work and extra cautious as there seems to be no easy way (or at least I don't know it), to do the upgrade by simply adding an RPM repository and doing, something like yum install tivsm*.


0. Check if there is at least 2G free of space

According to documentation the minimum space you need to a functional install without having it half installed or filling up your filesystem is 2 Gigabytes of Free Memory on a filesystem where the .tar and rpms will be living.

Thus check what is the situation with your filesystem where you wills store the .tar archice and extract .RPM files / install the RPM files.

# df -h

1. Download the correct tarball with 8.1 Client

On one central machine you would need to download the Tivoli you can do that via wget / curl / lynx whatever is at hand on the Linux server.

As of time of writting this article TSM's 8.1.11 location is at
URL:

http://public.dhe.ibm.com/storage/tivoli-storage-management/maintenance/client/v8r1/Linux/LinuxX86/BA/v8111/

I've made a local download mirror of Tivoli TSM 8.1.11 here.
In case you need to install IBM Spectrum Backup Client to a PCI secured environment to a DMZ-ed LAN network from a work PC you can Download it first from your local PC and via Citrix client upload program or WinSCP upload it to a central replication host from where you will later copy to each of the other server nodes that needs to be upgraded.

Lets Copy archive to all Server hosts where you want it later installed, using a small hack

Assuming you already have an Excel document or a Plain text document with all the IPs of the affected hosts where you will need to get TSM upgraded. Extract this data and from it create a plain text file /home/user/hosts.txt containing all the machine IPs lined up separated with carriage return separations (\n), so you can loop over each one and use scp to send the files.

– Replicate Tivoli tar to all machine hosts where you want to get IBM Spectrum installed or upgraded.
Do it with a loop like this:

# for i in $(cat hosts.txt); do scp 8.1.11.0-TIV-TSMBAC-LinuxX86.tar user@$i:/home/user/; done

 Copy to a Copy buffer temporary your server password assuming all your passwords to each machine are identical and paste your login user pass for each host to initiate transfer
 

2. SSH to each of the Machine hosts IPs

Once you login to the host you want to upgrade
Go to your user $HOME /home/user and create files where we'll temporary store Tivoli archive files and extract RPMs

[root@linux-server user]# mkdir -p ~/tsm/TSM_BCK/
[root@linux-server user]# mv 8.1.11.0-TIV-TSMBAC-LinuxX86.tar ~/tsm
[root@linux-server user]# cd tsm
[root@linux-server user]# tar -xvvf 8.1.11.0-TIV-TSMBAC-LinuxX86.tar
gskcrypt64-8.0.55.17.linux.x86_64.rpm
GSKit.pub.pgp
gskssl64-8.0.55.17.linux.x86_64.rpm
README_api.htm
README.htm
RPM-GPG-KEY-ibmpkg
TIVsm-API64.x86_64.rpm
TIVsm-APIcit.x86_64.rpm
TIVsm-BAcit.x86_64.rpm
TIVsm-BAhdw.x86_64.rpm
TIVsm-BA.x86_64.rpm
TIVsm-filepath-source.tar.gz
TIVsm-JBB.x86_64.rpm
TIVsm-WEBGUI.x86_64.rpm
update.txt

3. Create backup of old backup files

It is always a good idea to keep old backup files

[root@linux-server tsm]# cp -av /opt/tivoli/tsm/client/ba/bin/dsm.opt ~/tsm/TSM_BCK/dsm.opt_bak_$(date +'%Y_%M_%H')
[root@linux-server tsm]# cp -av /opt/tivoli/tsm/client/ba/bin/dsm.sys ~/tsm/TSM_BCK/dsm.sys_bak_$(date +'%Y_%M_%H')

[root@linux-server tsm]# [[ -f /etc/adsm/TSM.PWD ]] && cp -av /etc/adsm/TSM.PWD ~/TSM_BCK/ || echo 'file doesnt exist'

/etc/adsm/TSM.PWD this file is only there as legacy for TSM it contained encrypted passwords inver 7 for updates. In TSM v.8 encryption file is not there as new mechanism for sensitive data was introduced.
Be aware that from Tivoli 8.X it will return error
exist'

!! Note – if dsm.opt , dsm.sys files are on different locations – please use correct full path locations !!

4. Stop  dsmcad – TSM Service daemon

[root@linux-server tsm]# systemctl stop dsmcad

5. Locate and deinstall all old Clients

Depending on the version to upgrade if you're upgrading from TSM version 7 to 8, you will get output like.

[root@linux-server tsm]# rpm -qa | grep 'TIVsm-'
TIVsm-BA-7.1.6-2.x86_64
TIVsm-API64-7.1.6-2.x86_64

If you're one of this paranoid admins you can remove TIVsm packs  one by one.

[root@linux-server tsm]# rpm -e TIVsm-BA-7.1.6-2.x86_64
[root@linux-server tsm]# rpm -e TIVsm-API64-7.1.6-2.x86_64

Instead if upgrading from version 8.1.8 to 8.1.11 due to the Security CVE advisory recently published by IBM e.g. (IBM Runtime Vulnerability affects IBM Spectrum Backup archive Client) and  vulnerability in Apache Commons Log4J affecting IBM Spectrum Protect Backup Archive Client.

[root@linux-server tsm]# rpm -qa | grep 'TIVsm-'
TIVsm-API64-8.1.8-0.x86_64
TIVsm-BA-8.1.8-0.x86_64

Assuming you're not scared of a bit automation you can straight do it with below one liner too 🙂

# rpm -e $(rpm -qa | grep TIVsm)

[root@linux-server tsm]# rpm -qa | grep gsk
[root@linux-server tsm]# rpm -e gskcrypt64 gskssl64

6. Check uninstallation success:

[root@linux-server tsm]# rpm -qa | grep TIVsm
[root@linux-server tsm]# rpm -qa | grep gsk

Here you should an Empty output, if packages are not on the system, e.g. Empty output is good output ! 🙂

7. Install new client IBM Spectrum Client (Tivoli Storage Manager) and lib dependencies

[root@linux-server tsm]# rpm -ivh gskcrypt64-8.0.55.4.linux.x86_64.rpm
[root@linux-server tsm]# rpm -ivh gskssl64-8.0.55.4.linux.x86_64.rpm

 If you're lazy to type you can do as well

[root@linux-server tsm]# rpm -Uvh gsk*

Next step is to install main Tivoli SM components the the API files and BA (The Backup Archive Client)

[root@linux-server tsm]# rpm -ivh TIVsm-API64.x86_64.rpm
[root@linux-server tsm]# rpm -ivh TIVsm-BA.x86_64.rpm

If you have to do it on multiple servers and you do it manually following a guide like this, you might instead want to install them with one liner.

[root@linux-server tsm]# rpm -ivh TIVsm-API64.x86_64.rpm TIVsm-BA.x86_64.rpm

There are some Not mandatory "Common Inventory Technology" components (at some cases if you're using the API install it we did not need that), just for the sake if you need them on your servers due to backup architecture, install also below commented rpm files.

## rpm -ivh TIVsm-APIcit.x86_64.rpm

## rpm -ivh TIVsm-BAcit.x86_64.rpm

These packages not needed only for operation WebGUI TSM GUI management, (JBB) Journal Based Backup, BAhdw (the ONTAP library)


— TIVsm-WEBGUI.x86_64.rpm
— TIVsm-JBB.x86_64.rpm
— TIVsm-BAhdw.x86_64.rpm

8. Start and enable dsmcad service

[root@linux-server tsm]# systemctl stop dsmcad

You will get

##Warning: dsmcad.service changed on disk. Run 'systemctl daemon-reload' to reload units.

[root@linux-server tsm]# systemctl daemon-reload

[root@linux-server tsm]# systemctl start dsmcad


## enable dsmcad – it is disabled by default after install

[root@linux-server ~]# systemctl enable dsmcad

[root@linux-server tsm]# systemctl status dsmcad

9. Check dmscad service is really running

Once enabled IBM TSM will spawn a process in the bacground dmscad if it started properly you should have the process backgrounded.

[root@linux-server tsm]# ps -ef|grep -i dsm|grep -v grep
root      2881     1  0 18:05 ?        00:00:01 /usr/bin/dsmcad

If process is not there there might be some library or something not at place preventing the process to start …

10. Check DSMCAD /var/tsm logs for errors

After having dsmcad process enabled and running in background

[root@linux-server tsm]# grep -i Version /var/tsm/sched.log|tail -1
12/03/2020 18:06:29   Server Version 8, Release 1, Level 10.000


[root@linux-server tsm]# cat /var/tsm/dsmerror.log

To see the current TSM configuration files we can  grep out comments *

[root@linux-server tsm]# grep -v '*' /opt/tivoli/tsm/client/ba/bin/dsm.sys

Example Configuration of the agent:
—————————————————-
   *TSM SERVER NODE Location
   Servername           tsm_server
   COMMmethod           TCPip
   TCPPort              1400
   TCPServeraddress     tsmserver2.backuphost.com
   NodeName             NODE.SERVER-TO-BACKUP-HOSTNAME.COM
   Passwordaccess       generate
   SCHEDLOGNAME         /var/tsm/sched.log
   SCHEDLOGRETENTION    21 D
   SCHEDMODE            POLLING
   MANAGEDServices      schedule
   ERRORLOGNAME         /var/tsm/dsmerror.log
   ERRORLOGRETENTION    30 D
   INCLEXCL             /opt/tivoli/tsm/client/ba/bin/inclexcl.tsm

11. Remove tsm install directory tar ball and rpms to save space on system

The current version of Tivoli service manager is 586 Megabytes.

[root@linux-server tsm]# du -hsc 8.1.11.0-TIV-TSMBAC-LinuxX86.tar
586M    8.1.11.0-TIV-TSMBAC-LinuxX86.tar

Some systems are on purpose configured to have less space under their /home directory,
hence it is a good idea to clear up unnecessery files after completion.

Lets get rid of all the IBM Spectrum archive source files and the rest of RPMs used for installation.

[root@linux-server tsm]# rm -rf ~/tsm/{*.tar,*.rpm,*.gpg,*.htm,*.txt}

12. Check backups are really created on the configured remote Central backup server

To make sure after the upgrade the backups are continuously created and properly stored on the IBM Tivoly remote central backup server, either manually initiate a backup or wait for lets say a day and run dsmc client to show all created backups from previous day. To make sure you'll not get empty output you can on purpose modify some file by simply opening it and writting over without chaning anything e.g. modify your ~/.bashrc or ~/.bash_profile

## List all backups for '/' root directory from -fromdate='DD/MM/YY'

[root@linux-server tsm]# dsmc
Protect>
IBM Spectrum Protect
Command Line Backup-Archive Client Interface
  Client Version 8, Release 1, Level 11.0
  Client date/time: 12/03/2020 18:14:03
(c) Copyright by IBM Corporation and other(s) 1990, 2020. All Rights Reserved.

Node Name: NODE.SERVER-TO-BACKUP-HOSTNAME.COM
Session established with server TSM2_SERVER: AIX
  Server Version 8, Release 1, Level 10.000
  Server date/time: 12/03/2020 18:14:04  Last access: 12/03/2020 18:06:29
 
Protect> query backup -subdir=yes "/" -fromdate=12/3/2020
           Size        Backup Date                Mgmt Class           A/I File
           —-        ———–                ———-           — —-
         6,776  B  12/03/2020 01:26:53             DEFAULT              A  /etc/freshclam.conf
         6,685  B  12/03/2020 01:26:53             DEFAULT              A  /etc/freshclam.conf-2020-12-02
         5,602  B  12/03/2020 01:26:53             DEFAULT              A  /etc/hosts
         5,506  B  12/03/2020 01:26:53             DEFAULT              A  /etc/hosts-2020-12-02
           398  B  12/03/2020 01:26:53             DEFAULT              A  /opt/tivoli/tsm/client/ba/bin/tsmstats.ini
       114,328  B  12/03/2020 01:26:53             DEFAULT              A  /root/.bash_history
           403  B  12/03/2020 01:26:53             DEFAULT              A  /root/.lesshst

How to enable HaProxy logging to a separate log /var/log/haproxy.log / prevent HAProxy duplicate messages to appear in /var/log/messages

Wednesday, February 19th, 2020

haproxy-logging-basics-how-to-log-to-separate-file-prevent-duplicate-messages-haproxy-haproxy-weblogo-squares
haproxy  logging can be managed in different form the most straight forward way is to directly use /dev/log either you can configure it to use some log management service as syslog or rsyslogd for that.

If you don't use rsyslog yet to install it: 

# apt install -y rsyslog

Then to activate logging via rsyslogd we can should add either to /etc/rsyslogd.conf or create a separte file and include it via /etc/rsyslogd.conf with following content:
 

Enable haproxy logging from rsyslogd


Log haproxy messages to separate log file you can use some of the usual syslog local0 to local7 locally used descriptors inside the conf (be aware that if you try to use some wrong value like local8, local9 as a logging facility you will get with empty haproxy.log, even though the permissions of /var/log/haproxy.log are readable and owned by haproxy user.

When logging to a local Syslog service, writing to a UNIX socket can be faster than targeting the TCP loopback address. Generally, on Linux systems, a UNIX socket listening for Syslog messages is available at /dev/log because this is where the syslog() function of the GNU C library is sending messages by default. To address UNIX socket in haproxy.cfg use:

log /dev/log local2 


If you want to log into separate log each of multiple running haproxy instances with different haproxy*.cfg add to /etc/rsyslog.conf lines like:

local2.* -/var/log/haproxylog2.log
local3.* -/var/log/haproxylog3.log


One important note to make here is since rsyslogd is used for haproxy logging you need to have enabled in rsyslogd imudp and have a UDP port listener on the machine.

E.g. somewhere in rsyslog.conf or via rsyslog include file from /etc/rsyslog.d/*.conf needs to have defined following lines:

$ModLoad imudp
$UDPServerRun 514


I prefer to use external /etc/rsyslog.d/20-haproxy.conf include file that is loaded and enabled rsyslogd via /etc/rsyslog.conf:

# vim /etc/rsyslog.d/20-haproxy.conf

$ModLoad imudp
$UDPServerRun 514​
local2.* -/var/log/haproxy2.log


It is also possible to produce different haproxy log output based on the severiy to differentiate between important and less important messages, to do so you'll need to rsyslog.conf something like:
 

# Creating separate log files based on the severity
local0.* /var/log/haproxy-traffic.log
local0.notice /var/log/haproxy-admin.log


Prevent Haproxy duplicate messages to appear in /var/log/messages

If you use local2 and some default rsyslog configuration then you will end up with the messages coming from haproxy towards local2 facility producing doubled simultaneous records to both your pre-defined /var/log/haproxy.log and /var/log/messages on Proxy servers that receive few thousands of simultanous connections per second.
This is a problem since doubling the log will produce too much data and on systems with smaller /var/ partition you will quickly run out of space + this haproxy requests logging to /var/log/messages makes the file quite unreadable for normal system events which are so important to track clearly what is happening on the server daily.

To prevent the haproxy duplicate messages you need to define somewhere in rsyslogd usually /etc/rsyslog.conf local2.none near line of facilities configured to log to file:

*.info;mail.none;authpriv.none;cron.none;local2.none     /var/log/messages

This configuration should work but is more rarely used as most people prefer to have haproxy log being written not directly to /dev/log which is used by other services such as syslogd / rsyslogd.

To use /dev/log to output logs from haproxy configuration in global section use config like:
 

global
        log /dev/log local2 debug
        chroot /var/lib/haproxy
        stats socket /run/haproxy/admin.sock mode 660 level admin
        stats timeout 30s
        user haproxy
        group haproxy
        daemon

The log global directive basically says, use the log line that was set in the global section for whole config till end of file. Putting a log global directive into the defaults section is equivalent to putting it into all of the subsequent proxy sections.

Using global logging rules is the most common HAProxy setup, but you can put them directly into a frontend section instead. It can be useful to have a different logging configuration as a one-off. For example, you might want to point to a different target Syslog server, use a different logging facility, or capture different severity levels depending on the use case of the backend application. 

Insetad of using /dev/log interface that is on many distributions heavily used by systemd to store / manage and distribute logs,  many haproxy server sysadmins nowdays prefer to use rsyslogd as a default logging facility that will manage haproxy logs.
Admins prefer to use some kind of mediator service to manage log writting such as rsyslogd or syslog, the reason behind might vary but perhaps most important reason is  by using rsyslogd it is possible to write logs simultaneously locally on disk and also forward logs  to a remote Logging server  running rsyslogd service.

Logging is defined in /etc/haproxy/haproxy.cfg or the respective configuration through global section but could be also configured to do a separate logging based on each of the defined Frontend Backends or default section. 
A sample exceprt from this section looks something like:

#———————————————————————
# Global settings
#———————————————————————
global
    log         127.0.0.1 local2

    chroot      /var/lib/haproxy
    pidfile     /var/run/haproxy.pid
    maxconn     4000
    user        haproxy
    group       haproxy
    daemon

    # turn on stats unix socket
    stats socket /var/lib/haproxy/stats

#———————————————————————
defaults
    mode                    tcp
    log                     global
    option                  tcplog
    #option                  dontlognull
    #option http-server-close
    #option forwardfor       except 127.0.0.0/8
    option                  redispatch
    retries                 7
    #timeout http-request    10s
    timeout queue           10m
    timeout connect         30s
    timeout client          20m
    timeout server          10m
    #timeout http-keep-alive 10s
    timeout check           30s
    maxconn                 3000


# HAProxy Monitoring Config
#———————————————————————
listen stats 192.168.0.5:8080                #Haproxy Monitoring run on port 8080
    mode http
    option httplog
    option http-server-close
    stats enable
    stats show-legends
    stats refresh 5s
    stats uri /stats                            #URL for HAProxy monitoring
    stats realm Haproxy\ Statistics
    stats auth hproxyauser:Password___          #User and Password for login to the monitoring dashboard


#———————————————————————
# frontend which proxys to the backends
#———————————————————————
frontend ft_DKV_PROD_WLPFO
    mode tcp
    bind 192.168.233.5:30000-31050
    option tcplog
    log-format %ci:%cp\ [%t]\ %ft\ %b/%s\ %Tw/%Tc/%Tt\ %B\ %ts\ %ac/%fc/%bc/%sc/%rc\ %sq/%bq
    default_backend Default_Bakend_Name


#———————————————————————
# round robin balancing between the various backends
#———————————————————————
backend bk_DKV_PROD_WLPFO
    mode tcp
    # (0) Load Balancing Method.
    balance source
    # (4) Peer Sync: a sticky session is a session maintained by persistence
    stick-table type ip size 1m peers hapeers expire 60m
    stick on src
    # (5) Server List
    # (5.1) Backend
    server Backend_Server1 10.10.10.1 check port 18088
    server Backend_Server2 10.10.10.2 check port 18088 backup


The log directive in above config instructs HAProxy to send logs to the Syslog server listening at 127.0.0.1:514. Messages are sent with facility local2, which is one of the standard, user-defined Syslog facilities. It’s also the facility that our rsyslog configuration is expecting. You can add more than one log statement to send output to multiple Syslog servers.

Once rsyslog and haproxy logging is configured as a minumum you need to restart rsyslog (assuming that haproxy config is already properly loaded):

# systemctl restart rsyslogd.service

To make sure rsyslog reloaded successfully:

systemctl status rsyslogd.service


Restarting HAproxy

If the rsyslogd logging to 127.0.0.1 port 514 was recently added a HAProxy restart should also be run, you can do it with:
 

# /usr/sbin/haproxy -f /etc/haproxy/haproxy.cfg -D -p /var/run/haproxy.pid -sf $(cat /var/run/haproxy.pid)


Or to restart use systemctl script (if haproxy is not used in a cluster with corosync / heartbeat).

# systemctl restart haproxy.service

You can control how much information is logged by adding a Syslog level by

    log         127.0.0.1 local2 info


The accepted values are the standard syslog security level severity:

Value Severity Keyword Deprecated keywords Description Condition
0 Emergency emerg panic System is unusable A panic condition.
1 Alert alert   Action must be taken immediately A condition that should be corrected immediately, such as a corrupted system database.
2 Critical crit   Critical conditions Hard device errors.
3 Error err error Error conditions  
4 Warning warning warn Warning conditions  
5 Notice notice   Normal but significant conditions Conditions that are not error conditions, but that may require special handling.
6 Informational info   Informational messages  
7 Debug debug   Debug-level messages Messages that contain information normally of use only when debugging a program.


Logging only errors / timeouts / retries and errors is done with option:

Note that if the rsyslog is configured to listen on different port for some weird reason you should not forget to set the proper listen port, e.g.:
 

  log         127.0.0.1:514 local2 info

option dontlog-normal

in defaults or frontend section.

You most likely want to enable this only during certain times, such as when performing benchmarking tests.

(or log-format-sd for structured-data syslog) directive in your defaults or frontend
 

Haproxy Logging shortly explained


The type of logging you’ll see is determined by the proxy mode that you set within HAProxy. HAProxy can operate either as a Layer 4 (TCP) proxy or as Layer 7 (HTTP) proxy. TCP mode is the default. In this mode, a full-duplex connection is established between clients and servers, and no layer 7 examination will be performed. When in TCP mode, which is set by adding mode tcp, you should also add option tcplog. With this option, the log format defaults to a structure that provides useful information like Layer 4 connection details, timers, byte count and so on.

Below is example of configured logging with some explanations:

Log-format "%ci:%cp [%t] %ft %b/%s %Tw/%Tc/%Tt %B %ts %ac/%fc/%bc/%sc/%rc %sq/%bq"

haproxy-logged-fields-explained
Example of Log-Format configuration as shown above outputted of haproxy config:

Log-format "%ci:%cp [%tr] %ft %b/%s %TR/%Tw/%Tc/%Tr/%Ta %ST %B %CC %CS %tsc %ac/%fc/%bc/%sc/%rc %sq/%bq %hr %hs %{+Q}r"

haproxy_http_log_format-explained1

To understand meaning of this abbreviations you'll have to closely read  haproxy-log-format.txt. More in depth info is to be found in HTTP Log format documentation


haproxy_logging-explained

Logging HTTP request headers

HTTP request header can be logged via:
 

 http-request capture

frontend website
    bind :80
    http-request capture req.hdr(Host) len 10
    http-request capture req.hdr(User-Agent) len 100
    default_backend webservers


The log will show headers between curly braces and separated by pipe symbols. Here you can see the Host and User-Agent headers for a request:

192.168.150.1:57190 [20/Dec/2018:22:20:00.899] website~ webservers/server1 0/0/1/0/1 200 462 – – —- 1/1/0/0/0 0/0 {mywebsite.com|Mozilla/5.0 (X11; Linux x86_64) AppleWebKit/537.36 (KHTML, like Gecko) Ubuntu Chromium/71.0.3578.80 } "GET / HTTP/1.1"


Haproxy Stats Monitoring Web interface


Haproxy is having a simplistic stats interface which if enabled produces some general useful information like in above screenshot, through which
you can get a very basic in browser statistics and track potential issues with the proxied traffic for all configured backends / frontends incoming outgoing
network packets configured nodes
 experienced downtimes etc.

haproxy-statistics-report-picture

The basic configuration to make the stats interface accessible would be like pointed in above config for example to enable network listener on address
 

https://192.168.0.5:8080/stats


with hproxyuser / password config would be:

# HAProxy Monitoring Config
#———————————————————————
listen stats 192.168.0.5:8080                #Haproxy Monitoring run on port 8080
    mode http
    option httplog
    option http-server-close
    stats enable
    stats show-legends
    stats refresh 5s
    stats uri /stats                            #URL for HAProxy monitoring
    stats realm Haproxy\ Statistics
    stats auth hproxyauser:Password___          #User and Password for login to the monitoring dashboard


Sessions states and disconnect errors on new application setup

Both TCP and HTTP logs include a termination state code that tells you the way in which the TCP or HTTP session ended. It’s a two-character code. The first character reports the first event that caused the session to terminate, while the second reports the TCP or HTTP session state when it was closed.

Here are some essential termination codes to track in for in the log:
 

Here are some termination code examples most commonly to see on TCP connection establishment errors:

Two-character code    Meaning
—    Normal termination on both sides.
cD    The client did not send nor acknowledge any data and eventually timeout client expired.
SC    The server explicitly refused the TCP connection.
PC    The proxy refused to establish a connection to the server because the process’ socket limit was reached while attempting to connect.


To get all non-properly exited codes the easiest way is to just grep for anything that is different from a termination code –, like that:

tail -f /var/log/haproxy.log | grep -v ' — '


This should output in real time every TCP connection that is exiting improperly.

There’s a wide variety of reasons a connection may have been closed. Detailed information about all possible termination codes can be found in the HAProxy documentation.
To get better understanding a very useful reading to haproxy Debug errors with  is in haproxy-logging.txt in that small file are collected all the cryptic error messages codes you might find in your logs when you're first time configuring the Haproxy frontend / backend and the backend application behind.

Another useful analyze tool which can be used to analyze Layer 7 HTTP traffic is halog for more on it just google around.

How to Avoid the 7 Most Frequent Mistakes in Python Programming

Monday, September 9th, 2019

python-programming-language-logo

Python is very appealing for Rapid Application Development for many reasons, including high-level built in data structures, dynamic typing and binding, or to use as glue to connect different components. It’s simple and easy to learn but new Python developers can fall in the trap of missing certain subtleties.

Here are 7 common mistakes that are harder to catch but that even more experienced Python developers have fallen for.


1. The misuse of expressions as function argument defaults

Python allows developers to indicate optional function arguments by giving them default values. In most cases, this is a great feature of Python, but it can create some confusion when the default value is mutable. In fact, the common mistake is thinking that the optional argument is set to whatever default value you’ve set every time the function argument is presented without a value. It can seem a bit complicated, but the answer is that the default value for this function argument is only evaluated at the time you’ve defined the function, one time only.  

how-to-avoid-the-7-most-frequent-mistakes-in-python-programming-3


2. Incorrect use of class variables

Python handles class variables internally as dictionaries and they will follow the Method Resolution Order (MRO). If an attribute is not found in one class it will be looked up in base classes so references to one part of the code are actually references to another part, and that can be quite difficult to handle well in Python. For class attributes, I recommend reading up on this aspect of Python independently to be able to handle them.

how-to-avoid-the-7-most-frequent-mistakes-in-python-programming-2


3. Incorrect specifications of parameters for exception blocks

There is a common problem in Python when except statements are provided but they don’t take a list of the exceptions specified. The syntax except Exception is used to bind these exception blocks to optional parameters so that there can be further inspections. What happens, however, is that certain exceptions are then not being caught by the except statement, but the exception becomes bound to parameters. The way to get block exceptions in one except statement has to be done by specifying the first parameter as a tuple to contain all the exceptions that you want to catch.

how-to-avoid-the-7-most-frequent-mistakes-in-python-programming-1
 

4. Failure to understand the scope rules

The scope resolution on Python is built on the LEGB rule as it’s commonly known, which means Local, Enclosing, Global, Built-in. Although at first glance this seems simple, there are some subtleties about the way it actually works in Python, which creates a more complex Python problem. If you make an assignment to a variable in a scope, Python will assume that variable is local to the scope and will shadow a variable that’s similarly named in other scopes. This is a particular problem especially when using lists.


5. Modifying lists during iterations over it


When a developer deletes an item from a list or array while iterating, they stumble upon a well known Python problem that’s easy to fall into. To address this, Python has incorporated many programming paradigms which can really simplify and streamline code when they’re used properly. Simple code is less likely to fall into the trap of deleting a list item while iterating over it. You can also use list comprehensions to avoid this problem.

how-to-avoid-the-7-most-frequent-mistakes-in-python-programming-8


6. Name clash with Python standard library


Python has so many library modules which is a bonus of the language, but the problem is that you can inadvertently have a name clash between your module and a module in the standard library. The problem here is that you can accidentally import another library which will import the wrong version. To avoid this, it’s important to be aware of the names in the standard library modules and stay away from using them.

how-to-avoid-the-7-most-frequent-mistakes-in-python-programming-5


7. Problems with binding variables in closures


Python has a late binding behavior which looks up the values of variables in closure only when the inner function is called. To address this, you may have to take advantage of default arguments to create anonymous functions that will give you the desired behavior – it’s either elegant or a hack depending on how you look at it, but it’s important to know.


how-to-avoid-the-7-most-frequent-mistakes-in-python-programming-6

Python is very powerful and flexible and it’s a great language for developers, but it’s important to be familiar with the nuances of it to optimize it and avoid these errors.

Ellie Coverdale, a technical writer at Essay roo and UK Writings, is involved in tech research and projects to find new advances and share her insights. She shares what she has learned with her readers on the Boom Essays blog.

Howto resolve issues with gmplayer errors “[AO_ALSA] Unable to find simple control ‘PCM’,0”

Tuesday, March 30th, 2010

It’s really easy to solve, all you need to do is open gmplayer.
Go to gmplayer’s Prefences -> Audio there you should tick the
Enable Software Mixer. That’s it you shouldn’t experience the problemany longer 🙂