Posts Tagged ‘encryption’

Things to install on newly installed GNU / Linux (My favourite must have Linux text and GUI programs missing in fresh Linux installs)

Thursday, September 7th, 2017

must-have-packages-to-install-on-a-freshly-brand-new-linux-installed-on-desktop-computer-gnu-linux-logo

On every next computer I use as a Desktop or Laptop, I install with Debian GNU / Linux I install the following bunch of extra packages in order to turn the computer into a powerful Multimedia, User, Sys Admin army knife tools, A Programmer desktop and Hacker / Penetration Testing security auditting station.

The packages names might vary less or more across various Debian releases and should be similar or the same in Ubuntu / Linux Mint and the rest of Deb based distribtuions.

Also some of the package names might given in the article might change from time of writting this article just like some  already changed in time from a release to release, nomatter that the general list is a collection of packages I have enjoyed for the last 8 years. And I believe anyone who is new to GNU / Linux and  or even some experienced free software users in need of  full featured computer system for remote system administration purposes or general software development and even small entertainment such as Movie Watching or Playing some unsophisticated basic games to kill some time might benefit from the list of programs collected from my experience as a Free Software GNU / Linux users over the last 12 years or so.

So here we go as you might know, once you have a Debian GNU / Linux, first thing to do is to add some extra repositories in /etc/apt/sources.list

For example my debian 9 Stretch sources.list looks like this:

cp -rpf /etc/apt/sources.list /etc/apt/sources.list-bak

vim /etc/apt/sources.list

And delete / substitute everything within with something as following:

deb http://deb.debian.org/debian stretch main non-free
deb-src http://deb.debian.org/debian stretch main

deb http://deb.debian.org/debian stretch-updates main
deb-src http://deb.debian.org/debian stretch-updates main

deb http://security.debian.org/ stretch/updates main
deb-src http://security.debian.org/ stretch/updates main

deb http://security.debian.org/debian-security stretch/updates main contrib
deb-src http://security.debian.org/debian-security stretch/updates main contrib

deb http://download.virtualbox.org/virtualbox/debian stretch contrib

If you're using an older Debian release for example debian 7 or 8, the sources.list codename stretch word should be changed to wheezy for legacy debian 7 or jessie for debian 8, do it respectively for any future or older Deb releases.

Then proceed and update all current installed packages to their latest release with:

apt-get update && apt-get upgrade

If you're running on a very old Debian GNU / Linux release , you might encounter errors from above cmds, if that's your case just follow the online guides and update to a newer still supported Deb release.

Once all this is done assuming you have connected to the internet via LAN network or if on a laptop via Wireless, here are some useful stuff to install especially if you're planning to use your computer effectively in both console and graphics environment.


1. Install some basic packages necessery if you're planning to be using compilers on the freshly installed GNU / linux

apt-get install –yes gcc autoconf build-essential fakeroot devscripts equivs libncurses5-dev g++ make libc6-dev fontconfig gdc

The most notable package here is build-essential it provides the following collection of C / C++ programs on Deb package based distributions Debian / Ubuntu / Mint etc.
 

  1. libc6-dev – C standard library.
  2. gcc – C compiler.
  3. g++ – C++ compiler.
  4. make – GNU make utility to maintain groups of programs.
  5. dpkg-dev – Debian package development tools.

2. Install w3m lynx elinks text browsers

apt-get install –yes lynx elinks w3m-img w3m

3. Install wireless and networking tools
 

apt-get install  –yes tcpdump vnstat wpasupplicant wpagui dnsutils

4. Install Network sniffing, penetration testing and network evaluation tools
 

apt-get install  –yes wireshark nmap zenmap sniffit iptraf iptraf-ng tshark dsniff netsniff-ng netwox netwag sslsniff darkstat kismet netcat ngrep hashcat hydra hydra-gtk ophcrack ophcrack-cli

————–

wiresharkGUI network traffic analyzer

nmapnmap port mapper and security audit tool

zenmapGUI frontend to nmap

sniffitconsole text based basic packet sniffer and monitoring tool very used tool to sniff servers authenticatoins in the past

iptraf-ngNext Generation interactive colorful IP Lan mointor

tsharkanother network traffic analyzer console version

dsniffVarious tools to sniff network traffic for cleartext insecurities

netsniff-ngLinux network packet sniffer toolkit

netwoxProvides more than 200 tools to solve network problems with DNS, FTP, HTTP, IRC, NNTP, SMTP, SNMP, SYSLOG, TELNET, TFTP

netwaggraphical frontend to netwox

sslsniff SSL/TLS man-in-the-middle attack tool

darkstatnetwork traffic analyzer

kismetwireless sniffer and monitor (very useful in the past for sniffing passwords on a Wi-Fi network)

netcatTCP / IP swiss army knife (good tool to listen and connect to local and remote ports)

ngrepgrep like tool for network traffic

hashcatClaims to be world's fastest and most advanced password recovery utility, capable of attacking more than 160 highly optimized hashing algorithms, supports CPU and GPU (using the video card CPU to enhance password cracking speed), also could be used for distributed password cracking

hydra Very fast network logon cracker, supports webforms works with dictionary attacks etc.

hydra-gtkGTK GUI version of Hydra

ophcrackMicrosoft Windows password cracker using rainbow tables GUI

ophcrack-cli Console version of Microsoft Windows password cracker using rainbow tables for speed

————


5. Install multimedia, entertainment few useful tools and other useful stuff
 

apt-get install –yes workrave xscreensaver xscreensaver-data xulrunner xutils zenity yelp zgv   tracker-utils alltray ant apt-utils bsdutils  aumix bwidget ca-certificates pulseaudio-module-jack aumix audacious ffmpeg bluefish bluefish-plugins blender blueman bluez cabextract bluez-firmware bsdmainutils dcraw dmidecode evtest file fonts-liberation fonts-stix fonts-uralic fonts-opensymbol fonts-lyx fonts-cantarell fuse gimp gimp-data-extras gimp-plugin-registry git gnupg gnupg2 imagemagick imwheel inkscape iw less 


bsdutils – Provides some nice old school programs such as :

-=-=-=-=-=-

wall – a program to write to every logged in user console, used in old times on time sharing servers to notify all users about sys admin planning for a reboot or for some other update activity

renice – allows to renice priority over already prioritized process with (nice command)

script – Allows you to do a recorder like saves of user activity on a console / terminal

logger – send logging output from programs to syslog 

-=-=-=-=-=-

alltray – A small program that allows you to bring to dock any program useful to make Thunderbird appear in Gnome / Mate / KDE Dock in a similar manner as Outlook does in m$ Windows

zgv – SVGAlib graphical (picture viewer) useful to view pictures from tty consoles

zenity – allows to display graphical dialog boxes by using shell scripts

aumix – Simple text based mixer control, useful to tune up sound values and mic recording volume from console

WorkRave – is a useful program to periodically remind you to stand out of the computer on a specified interval and shows you graphically some exercies to do to prevent your physical health to not deteriorate by standing all day immobilized

Bluefish – Is Advanced GTK+ HTML Editor useful if you're about to edit HTML / CSS and other Web files

dcraw – Decode raw digital images

dmidecode – Text program that reports your computer hardware

blueman, bluez – Programs to enable USB support on your Linux

evtest – evtest is a utility to monitor Linux input devices

file – little tool to determine file type based on "magic numbes"

fontsliberation – Fonts with same metrics as Times, Arial and Courier


6. Install Text based console Multimedia Mp3 / Mod / S3m players

apt-get install –yes mpg321 mpg123 cmus mp3blaster mplayer sox  ogg123 mikmod cplay cdcd cdck eject

———

mpg321, mpg123 Mp3 and Ogg Vorbis console player historically one of the earliest I used to play my music

cmus Another awesome ncurses menu based small music player

mp3blaster Full Screen ncurses text console mp3 and Ogg vorbis music player

mplayer An awesome old school (the defacto standard) and still one of the best Music and Video player for GNU / Linux

sox Swiss army knife of sound processing, contains (sox, play, rec and soxi commands), which could be used to play, rec and add effects to WAV and other popular old sound formats

ogg123 Play Ogg Vorbis .OGG Free encoding file format in console

mikmodThe most famous Tracker (S3M, MOD, IT) music player for *NIX, play the old soundtracker formats on your GNU / Linux

cplay – A really nice text front end to music players, the cool thing about it it shows how much is left for the song to over using ASCII

cdcd – play Audio CDs from console

eject – eject your CD Drive from console

cdck – tool to verify the quality of written CDs/DVDs

———


7. Install Games

apt-get install –yes xpenguins frozen-bubble alex4 bsdgames bb ninvaders blobwars btanks chromium-bsu criticalmass figlet freetennis njam swell-foop dreamchess extremetuxracer gltron gnuchess wesnoth njam wing nikwi dreamchess gltron gnome-games swell-foop aisleriot prboom

———–

xpenguins – little penguins walk on your screen great to use as a screensaver

frozen-bubble – cool game with bubbles you have to pop out

blobwars – platform shooting game

njam – pacman like game with multiplayer support

extremetuxracer – 3D racing game featuring Tux the Linux penguin mascot

gltron – 3D remake of the good well known Tron Game

gnuchess – GNU remake of classic Chess game

wing – arcade Galaga like game for GNU / Linux

wesnoth – Fantasy turne based strategy game

dremachess – 3D chess game

swell-fool – Colored ball puzzle game

gnome-games – A collection of Games for the GNOME Desktop

nikwi – platform game with a goal to collect candies

aisleriot – GNOME solitaire card game 

prboom – PrBoom, a remake of the Doom 3d shooter classic game using SDL (supports OpenGL), to play it you will need WAD files if you don't have it install (doom-wad-shareware) package

figlet – Make large character ASCII banners out of ordinary provided text (just provide any text and get a nice ASCII picture out of it)

———-
 

8. Install basic archivers such as rar, zip, arj etc.

apt-get install –yes zip unrar arj cpio p7zip unzip bzip2 file-roller


———–

cpioGNU cpio, a program to manager archive files

bzip2BunZip2 block compressor decompressor utility (necessery to untar the .tar.bz2 tar balls)

unzipDe-archiver for .zip files console version

rar, unrarArchiver Unarchiver for .rar files in terminal / console (unfortunately non-free software)

file-rollerArchive manager for gnome

gpg – gnu privacy guard to be able to generate gpg keys

————-

If you're looking for an advanced file archive, dearchive software GUI that be a substitute for Windows WinRar,  WinZip there is also the proprietary software PeaZip for Linux, as I stay as much as possible away from non-free software I don't use PeaZip though. For me file-roller's default GNOME archiver / unarchiver does a pretty good job and if it fails someties I use the console versions of above programs
 

9. Install text and speech synthesizer festival freetts
 

apt-get install –yes festival festival-cmu festvox-kallpc16k festvox-ru mbrola-en1 speech-dispatcher-festival freetts flite yasr gnupg2

————-

FestivalIs the general multi-lingual speech synthesis system

yasris a basic console screen reader program

flitea small run time speech synthesis engine alternative to festival, another free software synthesis tool based built using FestVox

————–

Festival is great if you want to listen to text files and can easily be used to convert basic PDFs or DOC files to listen them if you're lazy to read I've explained on how you can use festival to read speak for you PDFs and DOCs, ODF (Open Document Format) here
 

10. Install linux-header files for latest installed Debian kernel

apt-get install –yes linux-headers-$(uname -r)

You will need that package if you need to compile external usually DRM (Digital Rights Management)  external modules that could be loaded to current Debian precompiled kernel, I recommend you abstain from it since most of the modules are DRMed and doesn't respect your freedom.
 

11. Install GUI programs and browsers

apt-get install –yes gnome-themes-standard gnome-themes-standard-data epiphany-browser dconf-tools gnome-tweak-tool

epiphany-browserIntuitive GNOME web browser (I love this browser, though sometimes Crashing I prefer to use it as it is really fast and lightweight I think Mac OS's Safari has been partially based on its programming code)

dconf-tools Dconf is a low-level key / value database designed for storing desktop environment variables (provides dconf-editor – which allows you to tune tons of gnome settings tunable only through this database it is something like Windows regedit registry editor tool but for GNOME)

gnome-themes-standard / gnome-themes-standard-data The name says it all it provides beautiful gnome standard themes

gnome-tweak-tool Graphic tool to adjust many advanced configuration settings in GNOME in GNOME 3.2, many of the old GNOME 3.0 and 2.X capabilities such as Desktop icons or Computer on the Desktop and many more useful gnome capabilities you might be used for historically can be enabled through that handy tool, it is a must for the GNOME user

12. Install text and GUI mail clients

apt-get install –yes mutt fetchmail bsd-mailx mailutils thunderbird aspell-bg aspell-en aspell-ru

I use primary 3 languages Russian, Bulgarian and English, so by installing the 3 packages aspell-bg, aspell-en, aspell-ru, that would add a possiility for Thunderbird and LibreOffice to have ability to spell check your mails and ODF documents, if your native language is different or you speak different languages do run:
 

apt-cache search aspell 


And install whatever languages spell check support you need


13. Install filesystem mount, check and repair tools
 

apt-get install –yes ntfs-3g sshfs dosfstools ext3grep  e2fsprogs e2fsck-static growisofs  e2undel extundelete recover bleachbit


———–

ntfs-3g – read / write NTFS driver support for FUSE (Filesystem in UserSpace) or in other words install these to be able to mount in read/write mode NTFS filesystems

sshfs – filesystem client based on SSH File Transfer Protocol, that little nitty tool enables you to mount remotely SSH Filesystems to your local Linux Desktop, it is also useful to install across servers if you need to remotely mount SSH Filesystems

e2fsprogs ext2 / ext3 / ext4 filesystem utilities to check, fix, tune, defragment resize and create etc. new filesystems  (provides crucial commands such as fsck.ext2, fsck.ext3, fsck.ext4, e2label, lsattr, chattr, resize2fs, mkfs.ext2, mkfs.ext3, mkfs.ext4 …)

dosfstoolstool giving you ability to check, create and diagnose DOS and Windows FAT 32 Filesystems provides commands such as dosfsck, mkdosfs, dosfslabel, fsck.msdos, fsck.vfat, mkfs.msdos

growisofs DVD+ RW / Read Only Recorder

ext3greptool to help recover deleted files on ext3 filesystems

e2undel Undelete utility for ext2 filesystems
———–

14. Install emulators for PC OS Emuation (Qemu), DOS and Wine to run native Windows programs on GNU / Linux
 

apt-get install –yes qemu qemu-utils aqemu dosbox mame mame-extra os8 simh wine nestopia dgen


—————-

QemuVirtual Machine emulator with support UEFI firmware

Aqemu – Qemu QT VM GUI Frotend

Dosbox – Dos Emulator, great to have to play the good old DOS games on your GNU / Linux

Mame – Multiple Arcade Machine Emulator, great if you want to play the old arcade games of your youth such as The Punisher, Cadillacs and Dinosaurs, Captain America, Robocop, Captain Commando, Wonderboy and so on the list goes on and on …

simh – PDP-1 PDP-4 PDP-7, PDP-9, PDP-10, PDP-11, PDP-15 HP 2100, IBM System 3, IBM 1620, Interdata, SDS, LGP-21, LGP-30, DEC VaX emulator

nestopia Nintendo Entertainment System / Famicom Emulator

dgen – Sega MegaDrive GNU / Linux Emulator

—————


15. Install Network Time protocol daemon and ntpdate (time synchronizing text client)

apt-get install –yes ntpdate ntp

16. Install Djview and CHM books reader

apt-get install –yes djview djview4 djvulibre-bin xchm kchmviewer chm2pdf

Install this packages to be able read DjView and CHM book formats

17. Install other text stuff

# Install text calculator I always prefer and use this console tool instead of the GUI gnome-calculator

apt-get install –yes bc

18. Install printing CUPs and printing utilities

apt-get install –yes cups-client cups-daemon cups-server-common hplip hplip-data printer-driver-hpcups printer-driver-hpijs ghostscript 

A bunch of packages for your Linux Deskto po properly support printing, you might need to install some extra packages depending on the type of printer you need to use, perhaps you will have to take few minutes probably to configure CUPs.

19. Install text monitoring tools

apt-get install –yes htop atop  dnstop  iftop iotop  jnettop ntopng  pktstat  powertop  sntop mariadb-client  iotop  itop jnettop kerneltop logtop
pgtop powertop


—————–

htop – More interactive colorful process viewer similar to top

atop – Monitor for system resources and process activity

dnstop – Console tool for analyze DNS traffic

iftop displays bandwidth usage information on a chosen network interface

iotopsimple top-like I/O (I / O) information output by the Linux kernel

jnettopView hosts / ports taking up the most network traffic

ntopng High-Speed Web-based Traffic analysis and Flow Collection tool

pktstat top like utility for network connections usage

powertop tool to diagnose issues with power consumption and management (useful for Linux running laptops)

sntop A ncurses-based utility that polls hosts to determine connectivity

mariadb-clientthis is the new name for the old mytop / mtop MySQL top package

kerneltop shows Linux kernel usage in a style like top

pgtop Show PostgreSQL queries in a top like style

lograte real time log line rate analyzer

—————-

20. Install text command line tools for transferring data from Web sites and FTP

apt-get install –yes curl wget lftp filezilla gftp transmission linuxdcpp

———-
curl command line tool for transferring data with URL syntax

wget tool to retrvie files and html from the web

lftp sophisticated command-line FTP/HTTP/BitTorrent client program

filezilla Full-featured graphical FTP/FTPS/SFTP client

gftp X/GTK+ and console FTP client

transmission lightweight Bittorrent client

linuxdcpp – Port of the Windows file-sharing program DC++

———–

21. Install text based communication programs

apt-get install –yes irssi freetalk centerim finch

———-

Irssi Great console IRC chat client with support for encryption

FreeTalk console based jabber client

centerim Console based ICQ client

finch – Multi protocol Text console client for AIM/ICQ, Yahoo!, MSN, IRC, Jabber / XMPP / Google Talk Sametime, MySpaceIM, Napster, Zephyr, Gadu-Gadu, Bonjour, GroupWise

———-

22. Install Apache Webserver and MySQL

This two are necessery if you're about to use your computer as a PHP / MySQL develment station

apt-get install –yes mysql-server phpmyadmin apache2 libapache2-mod-php php-pear php php-mysql  ant ant-contrib apache2-dev apache2-ssl-dev

———-

mysql-server MySQL community edition

ant Java based build tool like make (necessery for building many third party apache modules and code)

libapache2-mod-php5the php module loaded into apache

phpmyadminWebtool admin to manage your MySQL database

——–

23. Install mouse support for consoles

apt-get install –yes gpm


———–

gpm is the general purpose mouse interface, if you want to have support for your mouse in TTY consoles (the ones you go to with CTRL + ALT + F2, CTRL + ALT + F3 and so on install it).

———–

24. Install various formats converter tools

apt-get install –yes html2text pdf2djvu unoconv oggconvert webkit2pdf img2pdf gsscan2pdf netpbm dir2ogg soundconverter


————

gsscan2pdfGUI program to produce PDF or DJVU from scanned documents

img2pdfLossless conversion of raster images to PDF

webkit2pdfexport web pages to PDF files or printer

html2textAdvanced HTML to text converter

oggcconvert – convert media files to free format 

netpbmGraphics conversion tools between image formats

dir2ogg – converts MP3, M4A, WMA, FLAC, WAV files and Audio CDs to the open-source OGG format.

soundconverter – GNOME application to convert audio files into other formats

————

There are probably a lot of more handy packages that other Free Software users like to install to make the GNU / Linux desktop notebook even more entertaining and fulfillful for daily work. If you can think of other useful packages not mentioned here you tend to use on a daily basis no matter where Debian based or other distro, please share that would help me too to learn a new thing and I'll be greateful.

Enjoy !

UPDATE: If you get errors with missing packages, just delete them out of the apt-get lines. The reason is some packages are beying removed from .deb repositories or the software package name has changed due to some reason.
 

How to configure mutual Apache WebServer SSL authentication – Two Way SSL mutual authentication for better security and stronger encryption

Tuesday, September 12th, 2017

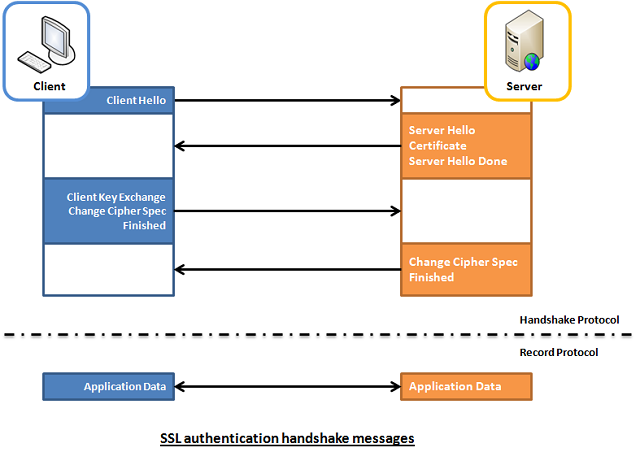
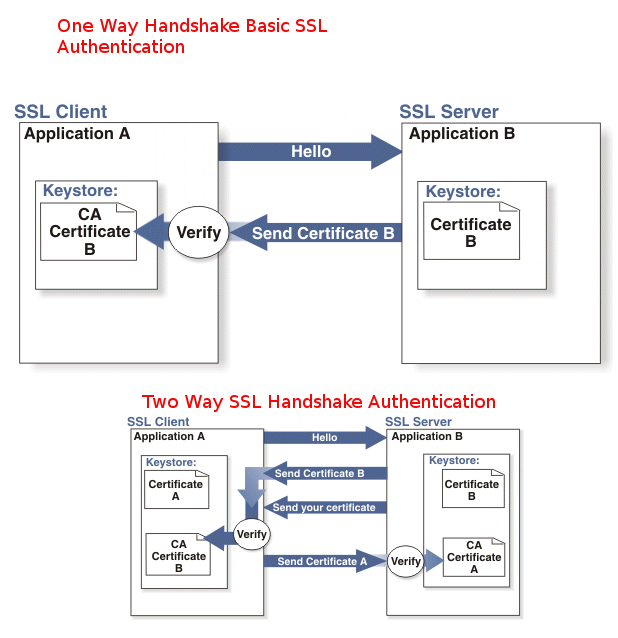
how-to-configure-one-way-and-two-way-handshake-authentication-apache-one-and-two-way-ssl-handshake-authentication-explained-diagram

In this post I'm about to explain how to configure Apache Web server for Two Way SSL Authentication alone and how to configure Two Way SSL Authentication for a Certain Domain URL Locations and the mixture of both One Way standar SSL authentication and Two Way Handshake Authentication .
 

Generally before starting I have to say most Web sites does not require a Mutual SSL  Authentication (the so called Two-Way SSL).

In most configurations Apache Web server is configured for One Way Basic authentication where The Web server authenticates to the Client usuall that's Browser program such as Mozilla  Firefox / Chrome / IE / Epiphany whatever presenting certificate signed by Trustable Certificate Authority such as VeriSign.

1WaySSL-clien-to-server-illustrated
 

The authority then autneticates to the browser that the Installed certificate on the Apache Web Server is trustable and the website is not a fraudulant, that is especially important for websites where sensitive data is being transferred, lets say Banks (Doing Money Transfers online), Hospitals (Transfelling your Medical results data) or purchasing something from Amazon.com, Ebay.Com, PayPal etc.

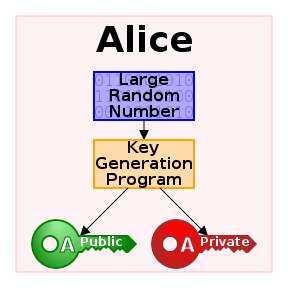
Once client validates the certificate the communication line gets encrypted based on Public Key, below diagram illustrates this.

Public Ke Cryptography diagram how it works

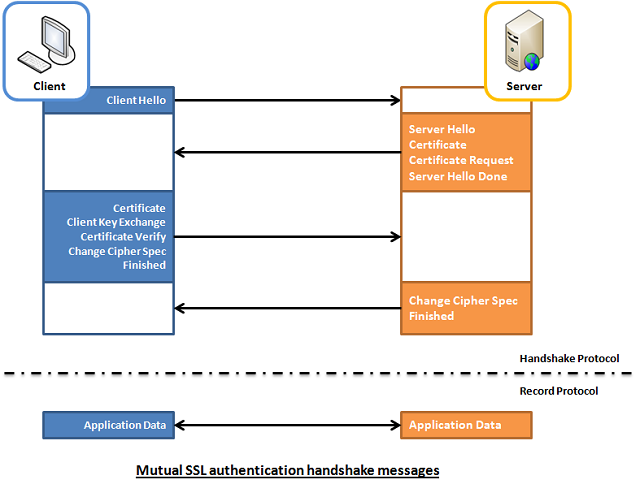
However in some casis where an additional Security Hardening is required, the Web Server might be configured to require additional certificate so the authentication between Client -> Server doesn't work by certificating with just a Server provided certificate but to work Two Ways, e.g. the Client might be setup to also have a Trusted Authority Certificate and to present it to server and send back this certificate to the Server as well for a mutual authentication and only once the certificate handshake between;

client -> server and server -> client

2WaySSL-client-to-server-and-server-to-client-mutual-authentication-illustration

is confirmed as successful the two could establish a trustable encypted SSL channel over which they can talk securely this is called
Two way SSL Authentication.


1. Configure Two Way SSL Authentication on Apache HTTPD
 

To be able to configure Two Way SSL Authentication handshake on Apache HTTPD just like with One way standard one, the mod_ssl Apache module have to enabled.

Enabling two-way SSL is usually not done on normal clients but is done with another server acting as client that is using some kind of REST API to connect to the server


The Apache directive used for Mutual Authentication is SSLVerifyClient directive (this is provided by mod_ssl)

the options that SSLVerifyClient receives are:

none: instructs no client Certificate is required
optional: the client is allowed to present a valid certificate but optionally
require: the client is always required to present a valid Certificate for mutual Authenticaton
optional_no_ca: the client is asked to present a valid Certificate however it has to be successfully verified.

In most of Apache configuratoins the 2 ones that are used are either none or require
because optional is reported to not behave properly with some of the web browsers and
optional_no_ca is not restrictive and is usually used just for establishing basic SSL test pages.

At some cases when configuring Apache HTTPD it is required to have a mixture of both One Way and Two Way Authentication, if that is your case the SSLVerifyClient none is to be used inside the virtual host configuration and then include SSLVerifyClient require to each directory (URL) location that requires a client certificate with mutual auth.

Below is an example VirtualHost configuration as a sample:


The SSLVerifyClient directive from mod_ssl dictates whether a client certificate is required for a given location:
 

<VirtualHost *:443>

SSLVerifyClient none
<Location /whatever_extra_secured_location/dir>
            …
            SSLVerifyClient require
</Location>
</VirtualHost>


Because earlier in configuration the SSLVerifyClient none is provided, the client will not be doing a Two Way Mutual Authentication for the whole domain but just the selected Location the client certificate will be not requested by the server for a 2 way mutual auth, but only when the client requests the Location setupped resouce a renegotiation will be done and client will be asked to provide certificate for the two way handshake authentication.

Keep in mind that on a busy servers with multitudes of connections this renegotiation might put an extra load on the server and this even can turn into server scaling issue on a high latency networks, because of the multiple client connects. Every new SSL renegotiation is about to assign new session ID and that could have a negative impact on overall performance and could eat you a lot of server memory.
To avoid this often it i suseful to use SSLRenegBufferSize directive which by default is set in Apache 2.2.X to 128 Kilobytes and for multiple connects it might be wise to raise this.

A mutual authentication that is done on a Public Server that is connected to the Internet without any DMZ might be quite dangerous thing as due to to the multiple renegotiations the server might end up easily a victim of Denial of Service (DOS) attack, by multiple connects to the server trying to consume all its memory …
Of course the security is not dependent on how you have done the initial solution design but also on how the Client software that is doing the mutual authentication is written to make the connections to the Web Server.


2. Configure a Mixture of One Way Standard (Basic) SSL Authentication together with Two Way Client Server Handshake SSL Authentication


Below example configuring is instructing Apache Webserver to listen for a mixture of One Way standard Client to browser authentication and once the client browser establishes the session it asks for renegotiation for every location under Main Root / to be be authenticated with a Mutual Two Way Handshake Authentication, then the received connection is proxied by the Reverse Proxy to the end host which is another proxy server listening on the same host on (127.0.0.1 or localhost) on port 8080.


<VirtualHost *:8001>
  ServerAdmin name@your-server.com
  SSLEngine on
  SSLCertificateFile /etc/ssl/server-cert.pem
  SSLCertificateKeyFile /etc/ssl/private/server-key.pem

  SSLVerifyClient require
  SSLVerifyDepth 10
  SSLCACertificateFile /home/etc/ssl/cacert.pem
  <location />
    Order allow,deny
    allow from all
    SSLRequire (%{SSL_CLIENT_S_DN_CN} eq "clientcn")
 </location>
  ProxyPass / http://127.0.0.1:8080/
  ProxyPassReverse / http://127.0.0.1:8080/
</VirtualHost>


3. So what other useful options do we have?


Keep Connections Alive

This is a good option but it may consume significant amount of memory. If Apache is using the prefork MPM (as many Webservers still do instead of Apache Threading), keeping all connections alive means multiple live processes. For example, if Apache has to support 1000 concurrent connections, each process consuming 2.7MB, an additional 2700MB should be considered. This may be of lesser significance when using other MPMs. This option will mitigate the problem but will still require SSL renegotiation when the SSL sessions will time out.

Another better approach in terms of security to the mixture of requirement for both One Side Basic SSL Authentication to a Webserver and Mutual Handshake SSL Auth is just to set different Virtualhosts one or more configuration to serve the One Way SSL authentication and others that are configured just to do the Mutual Two Way Handshake SSL to specified Locations.

4. So what if you need to set-up multiple Virtualhosts with SSL authentication on the Same IP address Apache (SNI) ?


For those who did not hear still since some time Apache Web Server has been rewritten to support SNI (Server Name Indication), SNI is really great feature as it can give to the webserver the ability to serve multiple one and two way handshake authentications on the same IP address. For those older people you might remember earlier before SNI was introduced, in order to support a VirtualHost with SSL encryption authentication the administrator had to configure a separate IP address for each SSL certificate on each different domian name.  

SNI feature can also be used here with both One Way standard Apache SSL auth or Two Way one the only downside of course is SNI could be a performance bottleneck if improperly scaled. Besides that some older browsers are not supporting SNI at all, so possibly for public services SNI is less recommended but it is better to keep-up to the good old way to have a separate IP address for each :443 set upped VirtualHost.
One more note to make here is SNI works by checking the Host Header send by the Client (browser) request
SSL with Virtual Hosts Using SNI.

SNI (Server Name Indication) is a cool feature. Basically it allows multiple virtual hosts with different configurations to listen to the same port. Each virtual host should specify a unique server name identification using the SeverName directive. When accepting connections, Apache will select a virtual host based on the host header that is part of the request (must be set on both HTTP and SSL levels). You can also set one of the virtual hosts as a default to serve clients that don’t support SNI. You should bear in mind that SNI has different support levels in Java. Java 1.7 was the first version to support SNI and therefore it should be a minimum requirement for Java clients.

5. Overall list of useful Options for Mutual Two Way And Basic SSL authentication
 

Once again the few SSL options for Apache Mutual Handhake Authentication

SSLVerifyClient -> to enable the two-way SSL authentication

SSLVerifyDepth -> to specify the depth of the check if the certificate has an approved CA

SSLCACertificateFile -> the public key that will be used to decrypt the data recieved

SSLRequire -> Allows only requests that satisfy the expression


Below is another real time example for a VirtualHost Apache configuration configured for a Two Way Handshake Mutual Authentication


For the standard One way Authentication you need the following Apache directives


SSLEngine on -> to enable the single way SSL authentication

SSLCertificateFile -> to specify the public certificate that the WebServer will show to the users

SSLCertificateKeyFIle -> to specify the private key that will be used to encrypt the data sent


6. Configuring Mutual Handshake SSL Authentication on Apache 2.4.x

Below guide is focusing on Apache HTTPD 2.2.x nomatter that it can easily be adopted to work on Apache HTTPD 2.4.x branch, if you're planning to do a 2 way handshake auth on 2.4.x I recommend you check SSL / TLS Apache 2.4.x Strong Encryption howto official Apache documentation page.

In meantime here is one working configuration for SSL Mutual Auth handshake for Apache 2.4.x:


<Directory /some-directory/location/html>
    RedirectMatch permanent ^/$ /auth/login.php
    Options -Indexes +FollowSymLinks

    # Anything which matches a Require rule will let us in

    # Make server ask for client certificate, but not insist on it
    SSLVerifyClient optional
    SSLVerifyDepth  2
    SSLOptions      +FakeBasicAuth +StrictRequire

    # Client with appropriate client certificate is OK
    <RequireAll>
        Require ssl-verify-client
        Require expr %{SSL_CLIENT_I_DN_O} eq "Company_O"
    </RequireAll>

    # Set up basic (username/password) authentication
    AuthType Basic
    AuthName "Password credentials"
    AuthBasicProvider file
    AuthUserFile /etc/apache2/htaccess/my.passwd

    # User which is acceptable to basic authentication is OK
    Require valid-user

    # Access from these addresses is OK
    Require ip 10.20.0.0/255.255.0.0
    Require ip 10.144.100
</Directory>

Finally to make the new configurations working depending you need to restart Apache Webserver depending on your GNU / Linux / BSD or Windows distro use the respective script to do it.

Enjoy!

Enable TLS 1.2 Internet Explorer / Make TLS 1.1 and TLS 1.2 web sites work on IE howto

Monday, August 1st, 2016

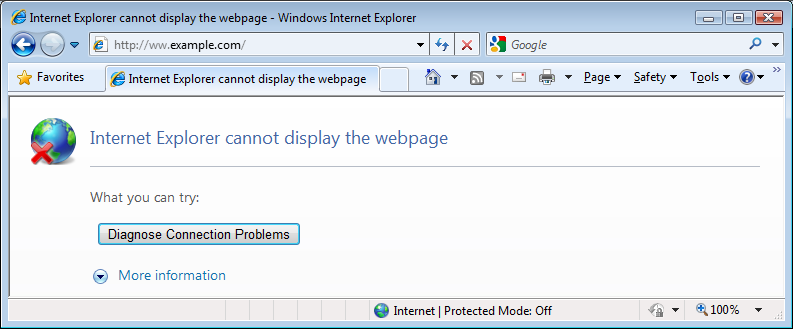
Internet-Explorer-cannot-display-the-webpage-IE-error
 

Some corporate websites and web tools especially one in DMZ-ed internal corporation networks require an encryption of TLS 1.2 (Transport Layer of Security cryptographic protocol)   TLS 1.1 protocol   both of which are already insecure (prone to vulnerabilities).

Besides the TLS 1.2 browser requirements some corporate tool web interfaces like Firewall Opening request tools etc. are often are very limited in browser compitability and built to only work with certain versions of Microsoft Internet Explorer like leys say IE (Internet Explorer) 11.

TLS 1.2 is supported across IE 8, 9, 10 and 11, so sooner or later you might be forced to reconfigure your Internet Explorer to have enabled the disabled by OS install TLS 1.2 / 1.1.

For those unaware of what TLS (Transport Layer of Security) protocol is so to say the next generation encryption protocol after SSL (Secure Socket Layer) also both TLS and SSL terms are being inter-exchangably used when referring with encrypting traffic between point (host / device etc.) A and B by using a key and a specific cryptographic algorithm.
TLS is usually more used historically in Mail Servers, even though as I said some web tools are starting to use TLS as a substitute for the SSL certificate browser encryption or even in conjunction with it.
For those who want to dig a little bit further into What is TLS? – read on technet here.

I had to enable TLS on IE and I guess sooner others will need a way to enable TLS 1.2 on Internet Explorer, so here is how this is done:
 

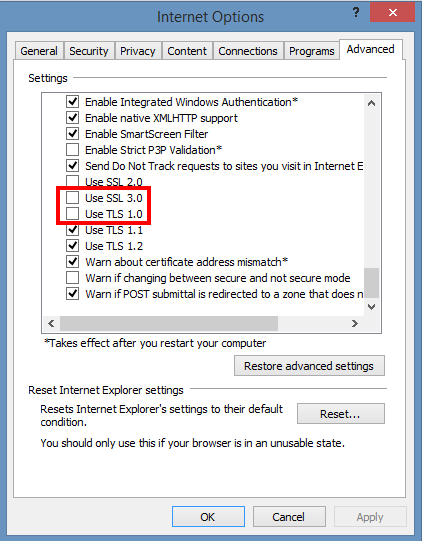
Enable-Internet-Explorer-TLS1.2-TLS-1.1-internet-options-IE-screensho


    1. On the Internet Explorer Main Menu (press Alt + F to make menu field appear)
    Select Tools > Internet Options.

    2. In the Internet Options box, select the Advanced tab.

    3. In the Security category, uncheck Use SSL 3.0 (if necessery) and Check the ticks:

    Use TLS 1.0,
    Use TLS 1.1 and Use TLS 1.2 (if available).

    4. Click OK
   
     5. Finally Exit browser and start again IE.


Once browser is relaunched, the website URL that earlier used to be showing Internet Explorer cannot display the webpagre can't connect / missing website error message will start opening normally.

Note that TLS 1.2 and 1.1 is not supported in Mozilla Firefox older browser releases though it is supported properly in current latest FF releases >=4.2.

If you  have fresh new 4.2 Firefox browser and you want to make sure it is really supporting TLS 1.1 and TLS 1.2 encrpytion:


(1) In a new tab, type or paste about:config in the address bar and press Enter/Return. Click the button promising to be careful.

(2) In the search box above the list, type or paste TLS and pause while the list is filtered

(3) If the security.tls.version.max preference is bolded and "user set" to a value other than 3, right-click > Reset the preference to restore the default value of 3

(4) If the security.tls.version.min preference is bolded and "user set" to a value other than 1, right-click > Reset the preference to restore the default value of 1

The values for these preferences mean:

1 => TLS 1.0 2 => TLS 1.1 3 => TLS 1.2


To get a more concrete and thorough information on the exact TLS / SSL cryptography cipher suits and protocol details supported by your browser check this link


N.B. ! TLS is by default disabled in many latest version browsers such as Opera, Safari etc.  in order to address the POODLE SSL / TLS cryptographic protocol vulnerability

How to password encrypt / decrypt files on Linux to keep and pass your data private

Thursday, August 7th, 2014

how-to-password-protect-encrypt-decrypt-files-linux-tux-logo.png
If you have a sensitive data like a scan copy of your ID card, Driving License, Birth Certificate, Marriage Certificate or some revolutionary business / idea or technology and you want to transfer that over some kind of network lets say Internet vie some public unencrypted e-mail service like (Gmail.com / Yahoo Mail / Mail.com / (Bulgarian Mail Abv.bg)) etc. you will certainly want to transfer the file in encrypted form to prevent, someone sniffing your Network or someone having administrative permissions to servers of free mail where your mail data is stored.

Transferring your files in encrypted form become very important these days especially after recent Edward Snowden disclosures about American Mass Surveilance program PRISM – for those who didn't yet hear of PRISM (this is a American of America's NSA – National Security Agency aiming to sniff and log everyone's information transferred in digital form via the Internet and even Mobile Phone conversations)…

First step to mitigate surveilance is to use fully free software (100% free software) OS distribution like Trisquel GNU / Linux.
Second is to encrypt to use encryption –  the process of transforming information (referred to as plaintext) using an algorithm (called cipher) to make it unreadable to anyone except those possessing special knowledge, usually referred to as a key.
There are many ways to encrypt your data on Linux and to later decrpyt it, I've earlier blogged about encryping files with GPG and OpenSSL on Linux, however encryption with GPG and OpenSSL is newer as concept than the old-school way to encrypt files on UNIX with crypt command which in Linux is replaced by mcrypt command.

mcrypt is provided by mcrypt package by default on most if not all Linux distributions, however mcrypt is not installed by default so to start using it you have to install it first.

1. Install mcrypt on Debian / Ubuntu / Mint (deb based) Linux

apt-get install –yes mcrypt


2. Install mcrypt on Fedora / CentOS rest of RPM bases Linux

yum -y install libmcrypt


3. Encrypting file with mcrypt

To get a list with all supported algorithms by mcrypt:
 

mcrypt –list
cast-128 (16): cbc cfb ctr ecb ncfb nofb ofb
gost (32): cbc cfb ctr ecb ncfb nofb ofb
rijndael-128 (32): cbc cfb ctr ecb ncfb nofb ofb
twofish (32): cbc cfb ctr ecb ncfb nofb ofb
arcfour (256): stream
cast-256 (32): cbc cfb ctr ecb ncfb nofb ofb
loki97 (32): cbc cfb ctr ecb ncfb nofb ofb
rijndael-192 (32): cbc cfb ctr ecb ncfb nofb ofb
saferplus (32): cbc cfb ctr ecb ncfb nofb ofb
wake (32): stream
blowfish-compat (56): cbc cfb ctr ecb ncfb nofb ofb
des (8): cbc cfb ctr ecb ncfb nofb ofb
rijndael-256 (32): cbc cfb ctr ecb ncfb nofb ofb
serpent (32): cbc cfb ctr ecb ncfb nofb ofb
xtea (16): cbc cfb ctr ecb ncfb nofb ofb
blowfish (56): cbc cfb ctr ecb ncfb nofb ofb
enigma (13): stream
rc2 (128): cbc cfb ctr ecb ncfb nofb ofb
tripledes (24): cbc cfb ctr ecb ncfb nofb ofb


mcrypt < File-To-Crypt.PDF > File-To-Crypt.PDF.cpy


Enter the passphrase (maximum of 512 characters)
Please use a combination of upper and lower case letters and numbers.
Enter passphrase:
Enter passphrase:


If crypt is invoked to create the encrypted file without OS redirects (< >), i.e.:
 

mcrypt -a blowfish File-To-Crypt.PDF

Please use a combination of upper and lower case letters and numbers.
Enter passphrase:
Enter passphrase:

File File-To-Crypt was encrypted.


mcrypt outputs encrypted file in .nc extension and the new file and file default mode of 0600 (read write only for root user) are set, while new file keeps the modification date of the original.


4. Decrypting file with mcrypt

Decryption of files is done mdecrypt

mdecrypt File-To-Crypt.PDF.cpy
 

Enter passphrase:
File File-To-Crypt.PDF.cpy was decrypted.

To make mcrypt behave in a certain way when invoked modify ~/.mcryptrd

mcrypt is also available as a module for php5 (php5-mcrypt).

Selecting Best Wireless channel / Choosing Best Wi-FI channel for Wireless Routers or (How to improve Wireless Network performance)

Monday, February 22nd, 2010

Wireless AP
Below are some valuable advices on Wireless Access Point initial install and configuration to better off your Wireless connection.It’s worthy to note that the 2.4 GHz

Wi-Fi signal range is divided into a number of smaller bands or “channels,” similar to television channels. I decided to run my wireless on channel 12 since this there was no other wireless routers operating on that frequency, though most routers are preconfigured to spread it’s signal on channel 6.

There is a difference in channels available for setup for 802.11b and 802.11g wireless networks in the United States and the European Union. In the USA the wireless channels available are from (1 to 11) whether in the EU it’s in the range of (1-13). Each of the Wireless channels run on a different frequency.

The lower the number of the channel is the lowest the radiating frequence band on which data is transmitted .Subsequently, increasing the channel increases the frequency slightly. Therefore the higher the channel you select on your AP the lesser the overlap with other devices running on the same channel and thus the lesser the possibility to overlap and interference.
It’s quite likely that you experience problems, if you use the default wireless channel which is 6.
If that’s the case it’s recommended to use either channel 1 or channel 11. In case of interference, i.e. overlap with other wireless networks, cellphones etc., there are 2 possible ways to approach the situation. In case of smaller interference, any change in channel on which there is no wireless device running could fix it up. The second way is to choose a wireless channel for your router in between 1,6 or 11 in (The USA) or 1,7,13 in Europe.
Up to 3 networks can run on the same space with minimum interference, therefore it would be a wise idea to check the list of wireless routers in your and check if there are others running on the same frequency.
As I mentioned in the beginning of the post I initially started running my wireless on channel 12, however after I discovered it is recommended to run your wireless router either on channel 1 7 or 13 in Europe I switched my D-Link DI-524 wireless router to transmit it’s signal on Channel 13.

I should testify that after changing the wireless channel, there was quite an improvement in my wireless connection.For instance before I change to Channel 13 (when my wireless internet was still streamed on channel 12) my wireless had constantly issues with disconnects because of low wireless signal.

Back then My wireless located physically in like 35 meters away set in another room, I can see my wireless router hardly connected on like 35%, changing to channel 13 enhanced my connection to the current 60% wireless router availability.

It’s also an interesting fact that Opened Wireless networks had better network thoroughput, so if you’re living in a house with a neighbors a bit distant from your place then you might consider it as a good idea to completely wipe out Wireless Router security encryption and abandon the use of WEP or WPA network encryption.

In case if all of the above is not working for you, you might consider take a close look at your Wireless Wireless LAN pc card and see if there are no any kind of bumps there. Another really interesting fact to know is that many people here in Bulgaria tend to configure there Wireless Access Points on channels either 1,6 or 11 which is quite inadequate considering that we’re in the EU and we should use a wireless channel between 1, 7 or 13 as prescribed for EU citizens.

Another thing not to forget is to place your wireless in a good way and prevent it from interferences with other computer equipment. For example keep the router at least few meters away from PC equipment, printers, scanners, cellphones, microwaves. Also try to put your wireless router on some kind of central place in your home, if you want to have the wireless signal all around your place.

At my place I have a microwave in the Kitchen which is sometimes an obstacle for the Wireless signal to flow properly to my notebook, fortunately this kind of interference happens rare (only when the Microwove is used to warm-up food etc.).Upgrading 802.11b wireless card / router to a better one as 802.11g is a wise idea too. 802.11g are said to be like 5 times faster than 802.11b.

You can expect 802.11b wireless network to transfer maximum between 2-5 Mbp/s whether 802.11g is claimed to transfer at approximately (12 to 23 Mbp/s). If even though the above prescriptions there is no wireless signal at some remote place at your home, you might consider adding a wireless repeater or change the AP router antenna.

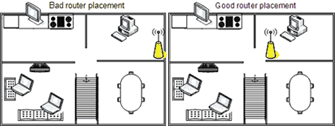
By default wireless Routers are designed to be omni-directional (in other terms they broadcast the wireless signal all around the place. Thus is quite unhandy if you intend to use your Wireless net only in certain room or location at your place. If that’s the case for you, you might consider upgrading to a hi-gain antenna that will focus the wireless signal to an exact direction. Let me close this article with a small diagram taken from the net which illustrates a good router placement that will enable you to have a wwireless connection all over your place.

improve wireless router placement diagram

How to encrypt files with GPG and OpenSSL on GNU / Linux

Friday, November 25th, 2011

Encrypt files and directories with OpenSSL and GPG (GNUPG), OpenSSL and GPG encryption logo

I have just recently found out that it is possible to use openssl to encrypt files to tighten your security.
Why would I want to encrypt files? Well very simple, I have plain text files where I write down my passwords for servers or account logins for services I use on the internet.

Before this very day I use gpg to encrypt and decrypt my sensitive information files and archives. The way to encrypt files with GPG is very simple, here is an example:

server:~# ls -al test.txt
-rw-r--r-- 1 root root 12 Nov 25 16:50 test.txt
server:~# gpg -c test.txt > test.txt.gpg
Enter passphrase:
Repeat passphrase:

Typing twice the same password produces the encrypted file test.txt.gpg . In order to later decrypt the gpg password protected file I use cmd:

server:~# gpg -d test.txt.gpg >test.txt
Enter passphrase:
Repeat passphrase:
gpg: CAST5 encrypted data
gpg: encrypted with 1 passphrase
gpg: WARNING: message was not integrity protected

As one can see from above output by default gpg uses the CAST5 algorithm to encrypt the data. For all those curious on what kind of encryption does CAST5 provide and where the CAST5 origins are, in short CAST5 is a GNU invented cryptographic algorithm, the short description of the algorithm is as follows:

“…a DES-like Substitution-Permutation Network (SPN) cryptosystem which appears to have good resistance to differential cryptanalysis, linear cryptanalysis, and related-key cryptanalysis. This cipher also possesses a number of other desirable cryptographic properties, including avalanche, Strict Avalanche Criterion (SAC), Bit Independence Criterion (BIC), no complementation property, and an absence of weak and semi-weak keys.”

Anyways, for all those who trust more the DES128 encryption as an encryption algorithm to keep your data secret, the openssl command tool provides another mean to encrypt sensitive data.
To encrypt a file using the openssl’s DES encryption capabilities:

server:~# openssl des -salt -in test.txt -out test.txt.des
enter des-cbc encryption password:
Verifying - enter des-cbc encryption password:

As you can see to encrypt with the DES-CBC its necessery to type twice the secret password “salt” keyword which will be used as an encryption key.

To decrypt later on the DES encrypted file the cmd is:

server:~# openssl des -d -salt -in file.des -out file

In order to encrypt a whole directory earlier compressed with tar zip:

server:~# tar -czf - directory | openssl des -salt -out directory.tar.gz.des

Where directory is the name of directory which will be tarred and crypted.

To later decrypt with openssl the above encrypted tar.gz.des file:

server:~# openssl des -d -salt -in directory.tar.gzdes | tar -x
 

How to fix “Could not verify this certificate for unknown reasons” SSL certificate lighttpd troubles

Tuesday, June 28th, 2011

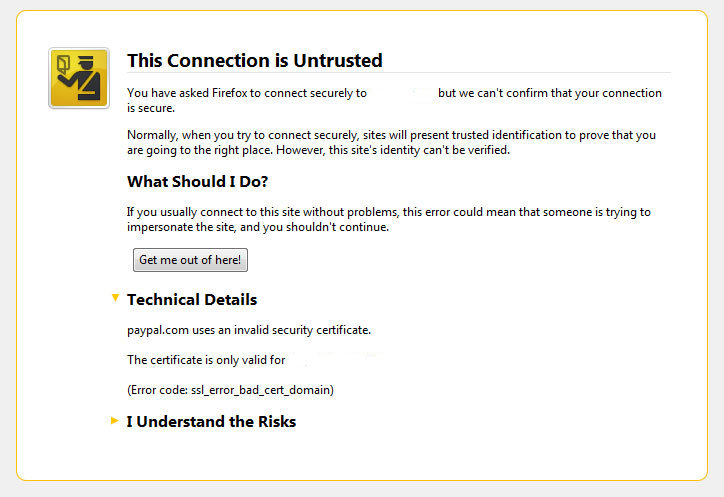
Firefox SSL Pro could not verify for uknown reasons solve error

I’ve been issuing new wildcard multiple SSL certificate to renew an expiring ones. After I completed the new certificate setup manually on the server (a CentOS 5.5 Final running SoluSVM Pro – Virtual Private Manager), I launched Firefox to give a try if the certificate is properly configured.

Instead of my expectations that the browser would just accept the certificate without spitting any error messages and all will be fine, insetad I got error with the just installed certificate and thus the browser failed to report the SSL cert is properly authenticated.

The company used to issue the SSL certificate is GlobeSSL – http://globessl.com , it was quite “hassle”, with the tech support as the first certficate generated by globessl was generation based on SSL key file with 4096 key encryption.

As the first issued Authenticated certificate generated by GlobeSSL was not good further on about a week time was necessery to completethe required certificate reissuing ….

It wasn’t just GlobeSSL’s failure, as there were some spam filters on my side that was preventing some of GlobeSSL emails to enter normally, however what was partially their fault as they haven’t made their notification and confirmation emails to pass by a mid-level strong anti-spam filter…

Anyways my overall experience with GlobeSSL certificate reissue and especially their technical support is terrible.
To make a parallel, issuing certificates with GoDaddy is a way more easier and straight forward.

Now let me come back to the main certificate error I got in Firefox …

A bit of further investigation with the cert failure, has led me to the error message which tracked back to the newly installed SSL certificate issues.
In order to find the exact cause of the SSL certificate failure in Firefox I followed to the menus:

Tools -> Page Info -> Security -> View Certificate

Doing so in the General browser tab, there was the following error:

Could not verify this certificate for unknown reasons

The information on Could not verify this certificate for unknown reasons on the internet was very mixed and many people online suggested many possible causes of the issue, so I was about to loose myself.

Everything with the certificate seemed to be configured just fine in lighttpd, all the GlobeSSL issued .cer and .key file as well as the ca bundle were configured to be read used in lighttpd in it’s configuration file:
/etc/lighttpd/lighttpd.conf

Here is a section taken from lighttpd.conf file which did the SSL certificate cert and key file configuration:

$SERVER["socket"] == "0.0.0.0:443" {
ssl.engine = "enable"
ssl.pemfile = "/etc/lighttpd/ssl/wildcard.mydomain.bundle"
}

The file /etc/lighttpd/ssl/wildcard.mydomain.bundle was containing the content of both the .key (generated on my server with openssl) and the .cer file (issued by GlobeSSL) as well as the CA bundle (by GlobeSSL).

Even though all seemed to be configured well the SSL error Could not verify this certificate for unknown reasons was still present in the browser.

GlobeSSL tech support suggested that I try their Web key matcher interfacehttps://confirm.globessl.com/key-matcher.html to verify that everything is fine with my certificate and the cert key. Thanks to this interface I figured out all seemed to be fine with the issued certificate itself and something else should be causing the SSL oddities.
I was further referred by GlobeSSL tech support for another web interface to debug errors with newly installed SSL certificates.
These interface is called Verify and Validate Installed SSL Certificate and is found here

Even though this SSL domain installation error report and debug tool did some helpful suggestions, it wasn’t it that helped me solve the issues.

What helped was First the suggestion made by one of the many tech support guy in GlobeSSL who suggested something is wrong with the CA Bundle and on a first place the documentation on SolusVM’s wiki – http://wiki.solusvm.com/index.php/Installing_an_SSL_Certificate .
Cccording to SolusVM’s documentation lighttpd.conf‘s file had to have one extra line pointing to a seperate file containing the issued CA bundle (which is a combined version of the issued SSL authority company SSL key and certificate).
The line I was missing in lighttpd.conf (described in dox), looked like so:

ssl.ca-file = “/usr/local/solusvm/ssl/gd_bundle.crt”

Thus to include the directive I changed my previous lighttpd.conf to look like so:

$SERVER["socket"] == "0.0.0.0:443" {
ssl.engine = "enable"
ssl.pemfile = "/etc/lighttpd/ssl/wildcard.mydomain.bundle"
ssl.ca-file = "/etc/lighttpd/ssl/server.bundle.crt"
}

Where server.bundle.crt contains an exact paste from the certificate (CA Bundle) mailed by GlobeSSL.

There was a couple of other ports on which an SSL was configured so I had to include these configuration directive everywhere in my conf I had anything related to SSL.

Finally to make the new settings take place I did a lighttpd server restart.

[root@centos ssl]# /etc/init.d/lighttpd restart
Stopping lighttpd: [ OK ]
Starting lighttpd: [ OK ]

After lighttpd reinitiated the error was gone! Cheers ! 😉

Howto create a (wildcard / multiple) SSL certificate

Thursday, June 23rd, 2011

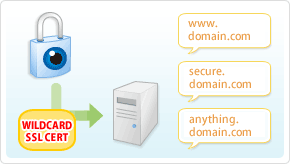
Wildcard SSL picture

It’s the first time I’m creating a wildcard ssl certificate. It appeared there is no fundamental difference between generating a normal SSL certificate and generating a wildcard certificate.

The procedure for generating a wildcard SSL certificate is as follows:

1. Generate an SSL key file

server:~# /usr/bin/openssl genrsa -des3 -out domain.com.key 2048
Enter pass phrase for domain.com.key:

Fill in any passphrase you like, the 2048 specifies the encryption level, 2048 is good enough and is the most commonly used as of today.
I’ve saw there is also an option to use 4096 bits encryption but I never tried that myself, I would be glad if somebody can share if he has succesfully established an SSL certificate with 4096 encryption.

2. Generate the certificate request file

server:~# /usr/bin/openssl req -new -key /home/hipo/domain.com.key -out /home/hipo/domain.com.csr

Further on it’s necessery to fill in some info concerning the newly generated webserver SSL, e.g.:

Enter pass phrase for /home/hipo/domain.com.key:
You are about to be asked to enter information that will be incorporated
into your certificate request.
What you are about to enter is what is called a Distinguished Name or a DN.
There are quite a few fields but you can leave some blank
For some fields there will be a default value,
If you enter '.', the field will be left blank.
-----
Country Name (2 letter code) [AU]:
State or Province Name (full name) [Some-State]:
Locality Name (eg, city) []:
Organization Name (eg, company) [Internet Widgits Pty Ltd]:
Organizational Unit Name (eg, section) []:
Common Name (eg, YOUR name) []:
Email Address []:
Please enter the following 'extra' attributes
to be sent with your certificate request
A challenge password []:
An optional company name []:

Fill all the values according to your requirements, the only vital thing here is to fill in a proper Common Name (eg, YOUR name) []:

The Common Name should always be equal to *.domain.com , if something else is typed in the SSL certificate won’t be considered a valid one when placed on the multiple subdomains.

The newly generated domain.com.csr file should be looking something similar to:

server:~# less < domain.com.csr
-----BEGIN CERTIFICATE REQUEST-----
MIIC2jCCAcICAQAwgZQxCzAJBgNVBAYTAkdCMQ8wDQYDVQQIEwZMb25kb24xDzAN
BgNVBAcTBkxvbmRvbjEQMA4GA1UEChMHU2FudHJleDEWMBQGA1UECwwNKi5zYW50
cmV4Lm5ldDEWMBQGA1UEAwwNKi5zYW50cmV4Lm5ldDEhMB8GCSqGSIb3DQEJARYS
bWFzcmF3eXpAeWFob28uY29tMIIBIjANBgkqhkiG9w0BAQEFAAOCAQ8AMIIBCgKC
AQEAlm9NwcQiA+AAVuVIjg8nCCn5nN14C3rSdcRNuE6oFo9E5uhl9yz8YDIg7wNx
FNQsmw0AwMzkao5Qv9yrmHqbht8qqPfG7YpcTiAoAuSaN6Nm25/zYrSu1uRsnc4C
9lINS8Va+n0Jt+CCQmomTKSarJqNfgo3j1ZU/HuOKcCEktIe0eKigMWxFKCM8wLh
CIdj6AwburckW1/ubOGlu2XKdcY5CbFe4cNGyME3rg33ft8b6v/ORWLSBMrt3QGP
bj42uZP6NoLaZCpsquJLeziLkT4rxdArUApdaTaEFrNMnwzGmUK10qmfx8SQodUl
QXmyd+PpQtaglymjIKN0L8Y36QIDAQABoAAwDQYJKoZIhvcNAQEFBQADggEBAIKe
UTXUt7XvaqVOesTmGCuVmv+Lz/GtGOEw+lfCNM4UFB950H975hHKo63YQr9Vqqqn
WlqZ0nXuwbZdfIh3xhTxzUqF/4m00OFQTbM9hwt6dyqLkmcc4J0rnTsvqjPkUsW5
U7iAIB/UIyDYUcAEky3gnokq3MLH42zXBViPM2+g/fkmJA4jaeoHGINbYMuxFh6Z
r2fIgAfGjms+hNaJvINDoBN5y6YUQbeJc+RoXMrG9clrDsUIGfmkTKCkG0BRJ2ki
Sdbm4IZMtQKU/C4a8vxZkFdleGqWeWL1SBtjjAnTtpb0uF+QmOPLcCoKnBwtEUU9
dPJlEzI+TCgAmKhZoXo=
-----END CERTIFICATE REQUEST-----

Next on this BEGIN CERTIFICATE REQUEST will have to be filled in to the certificate issuer website, whether it’s requested, let’s say in GlobeSSL.

Based on the certificate request a valid SSL certificate will be issued by the SSL provider.
Here one important note to make is that if your domain contians some prohibited keywords like, let’s say bank, finance, poker etc., a keywords which might be considered a fraud or forgery then probably the SSL certificate won’t be issued by the SSL issuer and you will have to further contact the SSL cert provider and send them some more information related to the type of business the new website is going to run.
This kind of domain keyword filter, that is implemented by SSL certificate issuer companies is made to protect internet users from possible frauds or scam websites as well as reduce the level of potential dangerous pyramid like businesses that are so modern on the net these days.

Last step before the certificate will be visible in a browser is to set it for a domain name or virtualhost in Apache, lighttpd or whatever webser is used.
As I’m personally using it with Apache webserver, below I’ll describe how to set it in Apache version 2.x.
3. Configure the newly configured SSL certificate to run on Apache virtualhost

Open up the virtualhost file which coresponds to the domain name to be secured with SSL, for example /etc/apache/sites-available/www.domain.com
Within the <Virtualhost> directives place in a code similar to:

SSLEngine on
# domain.com.crt cointains the wildcard SSL certificate generated and obtained by you from RapidSSL
SSLCertificateFile /etc/apache2/ssl/domain.com.pem

Here the file /etc/apache2/ssl/domain.com.pem should contain both the:

—-BEGIN RSA PRIVATE KEY—– issued earlier in step one with openssl command, as well as:

—–BEGIN CERTIFICATE—– which will be issued by the SSL certificate reseller.

Finally it’s necessery that Apache is restarted to load the new configured certificate:

server:~# /etc/init.d/apache2 restart

The above described steps need to be repeated for all the wildcard subdomains which will use the multiple SSL generated certificate and hopefully if all is well tuned, the certificates should start appearing to all the web domain subdomains immediately.

Getting around “Secure Connection Failed Peer’s, Certificate has been revoked., (Error code: sec_error_revoked_certificate)

Friday, April 8th, 2011

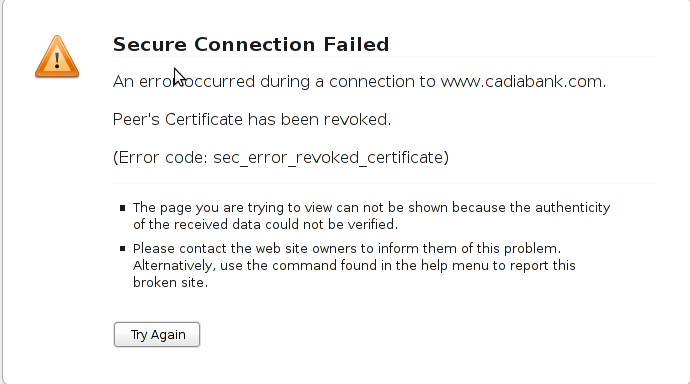
Certificate has been revoked, sec_error_revoked_certificate screenshot

One of the SSL secured websites (https://) which I have recently accessed couldn’t be opened with an error message showing up:

Secure Connection Failed

An error occurred during a connection to www.domain.com.

Peer’s Certificate has been revoked.

(Error code: sec_error_revoked_certificate)

* The page you are trying to view can not be shown because the authenticity of the received data could not be verified.
* Please contact the web site owners to inform them of this problem. Alternatively, use the command found in the help menu to report this broken site.

That error catched my attention so I digged further in what the message means. Here is what I found as an explanation to what is certificate revocation online

What is a SSL Certificate revocation

Revocation of a certificate means that the Certificate Authority (CA) that issuer of the certificate for a website have decided that the certificate is no longer valid, even if it has not expired.

The information about revocation can be distributed in two ways: Certificate Revocation Lists (CRLs), or by using the Online Certificate Status Protocol (OCSP).

CRLs are (usually) large files that contain a list with information about all the currentely active (unexpired) certificates that are no longer valid. This file has to be downloaded from the CA by the client at regular intervals (usually at least a week apart), and may be quite large.

OCSP, on the other hand, means that the client asks the CA “Is this particular certificate still valid?”, and the server responds “Yes” or “No”. This method can usually be fairly well up to date, meaning the information is at most a few days old, as opposed to at least a week for CRLs.

All the major browsers support OCSP, but some (like Opera) does not currently support CRLs.

By this time most of the modern browsers (Firefox, Chrome, Opera and Internet explorer does support revocation lists and all of the aforementioned hsa enabled at least OCSP by default.

Why SSL revocation error might occur:

A CA can revoke a certificate due to a number of reasons:

– A new certificate has been issued to the website, meaning the old one is not going to be used anymore.
– The website with the certificate is being used for purposes that are not accepted by the CA.
– The certificate was issued based on incorrect information.
– The owner is no longer able to use the private key associated with the certificate, for example the password is lost, the key storage was destroyed somehow, etc.
– The private key has been compromised or stolen, which means traffic to the site is no longer secure.
– The certificate and key have been stolen and is actually being used for fraud while posing as a legitimate website …

Now after all above being said the error:

Secure Connection Failed Peer's, Certificate has been revoked., (Error code: sec_error_revoked_certificate)

is a sure indicator that the website which had the certificate problem as a one you could not trust to make money transactions or do any operation that has a direct relation to your personal private date.

However as there are still websites which use an SSL encryption and are entertainment websites or just a news websites, sometimes getting around the ssl revocation issue to check this website is a necessity.

Therefore to enable your Firefox 3.5 / Iceweasel browser with a website which has ssl certificate revocation issue you need to do the following:

Edit -> Preferences -> Advanced -> Encryption -> Validation

After you see the Certificate Validation screen remove the tick set on:

Use the Online Certificate Status Protocol (OCSP) to confirm the current validity of certificates

Now refresh the website and you will skip the certificate revocation issue error and the webpage will open up.
Note that even though this will work, it’s not recommended to use this work around!