Posts Tagged ‘drop’

How to show country flag, web browser type and Operating System in WordPress Comments

Wednesday, February 15th, 2012

!!! IMPORTANT UPDATE COMMENT INFO DETECTOR IS NO LONGER SUPPORTED (IS OBSOLETE) AND THE COUNTRY FLAGS AND OPERATING SYSTEM WILL BE NOT SHOWING INSTEAD,

!!!! TO MAKE THE COUNTRY FLAGS AND OS WP FUNCTIONALITY WORK AGAIN YOU WILL NEED TO INSTALL WP-USERAGENT !!!

I've come across a nice WordPress plugin that displays country flag, operating system and web browser used in each of posted comments blog comments.
Its really nice plugin, since it adds some transperancy and colorfulness to each of blog comments 😉
here is a screenshot of my blog with Comments Info Detector "in action":

Example of Comments Info Detector in Action on wordpress blog comments

Comments Info Detector as of time of writting is at stable ver 1.0.5.
The plugin installation and configuration is very easy as with most other WP plugins. To install the plugin;

1. Download and unzip Comments Info Detector

linux:/var/www/blog:# cd wp-content/plugins
linux:/var/www/blog/wp-content/plugins:# wget http://downloads.wordpress.org/plugin/comment-info-detector.zip
...
linux:/var/www/blog/wp-content/plugins:# unzip comment-info-detector.zip
...

Just for the sake of preservation of history, I've made a mirror of comments-info-detector 1.0.5 wp plugin for download here
2. Activate Comment-Info-Detector

To enable the plugin Navigate to;
Plugins -> Inactive -> Comment Info Detector (Activate)

After having enabled the plugin as a last 3rd step it has to be configured.

3. Configure comment-info-detector wp plugin

By default the plugin is disabled. To change it to enabled (configure it) by navigating to:

Settings -> Comments Info Detector

Next a a page will appear with variout fields and web forms, where stuff can be changed. Here almost all of it should be left as it is the only change should be in the drop down menus near the end of the page:

Display Country Flags Automatically (Change No to Yes)
Display Web Browsers and OS Automatically (Change No to Yes

Comments Info Detector WordPress plugin configuration Screenshot

After the two menus are set to "Yes" and pressing on Save Changes the plugin is enabled it will immediately start showing information inside each comment the GeoIP country location flag of the person who commented as well as OS type and Web Browser 🙂

MobaXTerm: A good gnome-terminal like tabbed SSH client for Windows / Windows Putty Tabs Alternative

Wednesday, November 13th, 2013

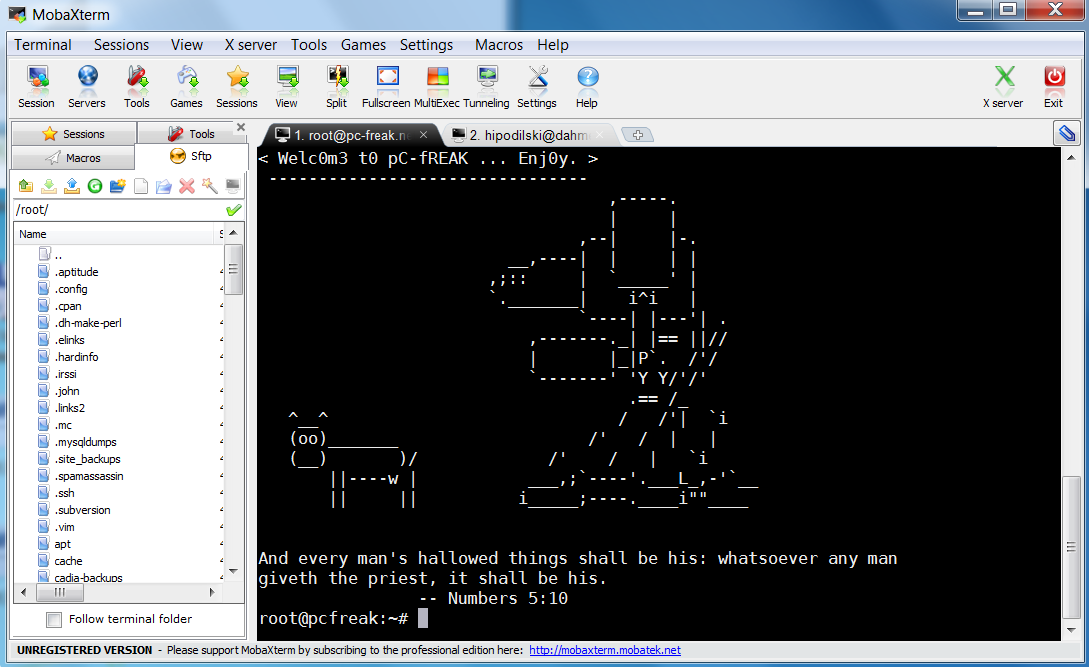
Mobaxterm ssh client putty MS Windows alternative with tabs suitable for ex linux users

mobaxterm with tabbed ssh connections screenshot best putty windows ssh client alternative now

Last 10+ years I worked on GNU / Linux as Desktop. Last 7 years most of my SSH connections were managed from GNOME and I'm quite used to gnome-terminal ssh tabbing. In my new Employee Hewlett Packard. I'm forced to work on Microsoft Windows 7 and thus I used for a month or so Putty and Kitty fork from version 0.63 of PuTTY advertising itself as the best telnet / SSH client in the world. Both of the two lack tabbing and have interface which is pretty unfamiliar to me. As I'm so used to using native UNIX terminal. Fortunately a colleague of mine Ivelin was using an SSH client called MobaXTerm which very much did emulation similar to my favourite gnome-terminal. MobaXterm is not free software / open source app but this doesn't matter so much to me as anyways I'm running a non-free Win OS on my desktop. What makes MobaXterm so attractive is its rich functionality (cosmic years infront of Putty).

Here is website description of MobaXterm quoted from its website:

MobaXterm is an enhanced terminal for Windows with an X11 server, a tabbed SSH client and several other network tools for remote computing (VNC, RDP, telnet, rlogin). MobaXterm brings all the essential Unix commands to Windows desktop, in a single portable exe file which works out of the box.

Overall list of features MobaXterm offers are;

  •     multitab terminal with embedded Unix commands (ls, cd, cat, sed, grep, awk, rsync, wget, …)

  •     embedded X11 server for easily exporting your Unix/Linux display

  •     a session manager with several network utilities: SSH, RDP, VNC, Telnet, Rlogin, FTP, SFTP and XDMCP

  •     passwords management for SSH, RDP, VNC, SFTP (on demand password saving)

  •     easy graphical file transfer using drag and drop during SSH sessions

  •     advanced SSH tunnels creation tool (graphical port forwarding builder)

  •     tasks automation using scripts or macros

Mobaxterm is portable just like Putty so its useful to use on HOP stations to servers like used in big companies like HP. Featured embedded Unix commands (e.g., ls, cd, cat, sed, grep, awk, rsync, wget) gives a feeling like you're working on pure Linux console making people addicted to Linux / BSD quite confortable. Some other very useful terminal emulator functions are support for anti-aliasing session manager (save / remember passwords for ssh sessions in Crypted format so much missing in Putty) and it even supports basic macros.
Basic UNIX commands embedded in MobaXterm are taken and ported from Cygwin projectLinux-like environment for Windows making it possible to port software running on POSIX systems (such as Linux, BSD, and Unix systems) to Windows. A very cool think is also MobaXterm gives you a Linux like feel of console navigation in between basic files installed from Cygwin. Some downside I found is program menus which look at first glimpse a bit confusing especially for people used to simplicity of gnome-terminal. Once logged in to remote host via ssh command the program offers you to log you in also via SFTP protocol listing in parallel small window with possibility to navigate / copy / move etc. between server files in SFTP session which at times is pretty useful as it saves you time to use some external SFTP connector tools like  WinSCP.

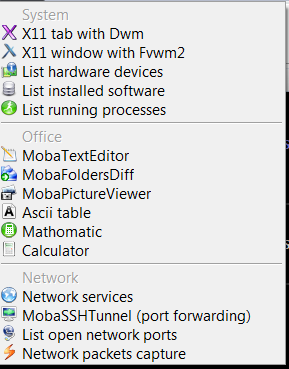
From Tools configuration menu, there are few precious tools as well;
         – embedded text editor MobaTextEditor
         – MobaFoldersDiff (Able to show diffeernces between directories)
         – AsciiTable (Complete List of Ascii table with respective codes and characters)
         – Embedded simple Calculator
         – List open network ports – GUI Tool to list all open ports on Windows localhost
         – Network packets capture – A Gui tool showing basic info like from UNIX's tcpdump!
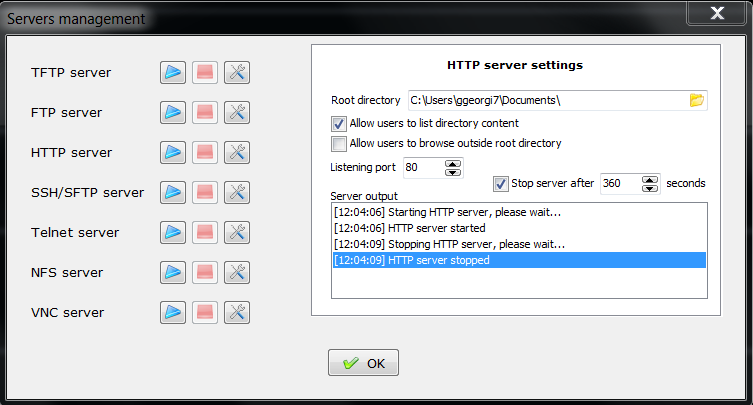
         – Ability to start quickly on local machine (TFTP, FTP, SFTP / SSH server, Telnet server, NFS server, VNC Server and even simple implementation of HTTP server)

Mobaxterm list of tools various stuff

         Mobaxterm run various services quickly on Windows servers management screenshot

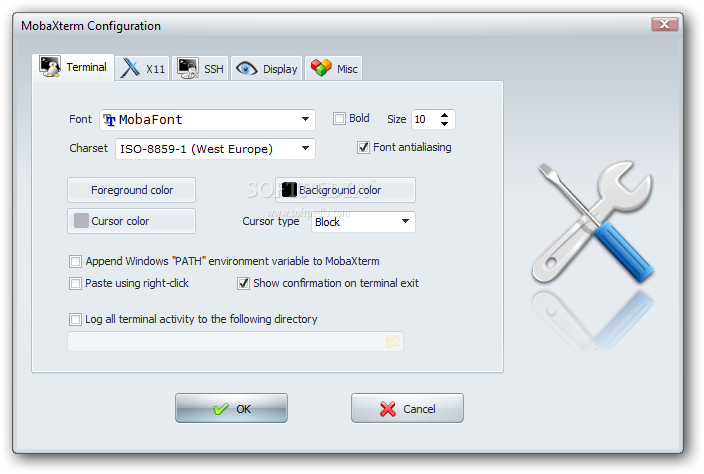
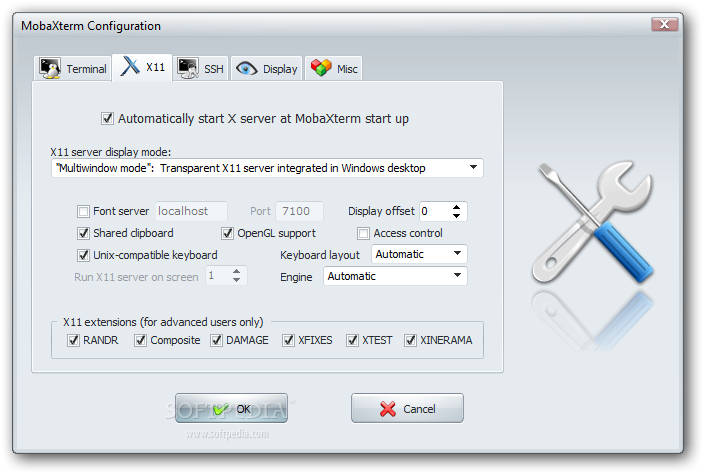
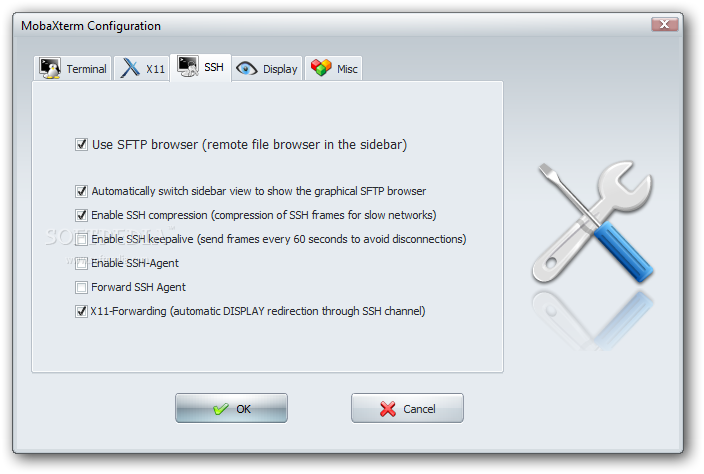
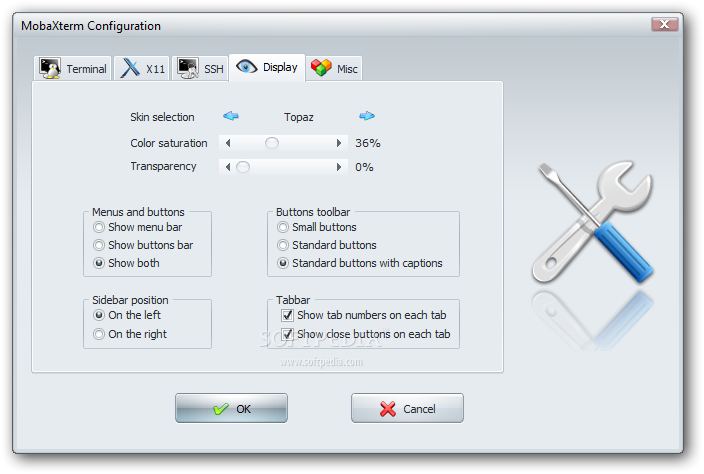
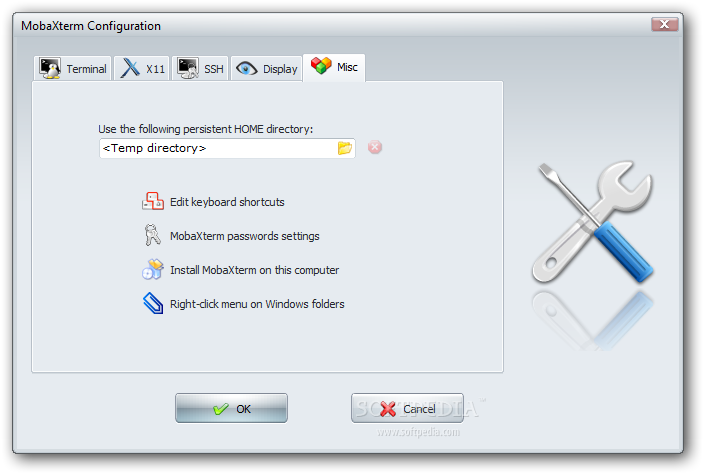
Below are few screenshots to get you also idea about what kind of configuration MobaXterm supports
  mobaxterm terminal configuration settings screenshot

mobaxterm better putty alternative x11 configuration tab screenshot

mobaxterm windows ssh client for linux users configuration ssh tab screenshot

mobaxterm-putty-alternative-for-windows-configuration-display-screenshot
MobaXTerm Microsoft Windows ssh client configuration misc menu screenshot
To configure and use Telnet, RSH, RDP, VNC, FTP etc. Sessions use the Sessions tab on top menu.

One very handy thing is MobaXterm supports export of remote UNIX display with no requirement to install special Xserver like already a bit obsolete Xming – X server for Windows.
The X Display Manager Control Protocol (XCMCP) is a key feature of the X11 architecture. Together with XDMCP, the X network protocol allows distributed operation of the X server and X display manager. The requesting X server runs on the client (usually as an X terminal), thus providing a login service, that why the X server ported to MobaXterm from Cygwin also supports XDMCP. If, for example, you want to start a VNC session with a remote VNC server, all you have to do is enter the remote VNC server’s IP address in the VNC area; the default VNC port is already registered.

Accessing the remote Windows server via RDP (Remote Desktop Protocol) is also a piece of cake. Once you establish a session to RDP or other Proto it is possible to save this session so later you just choose between session to access. The infamous (X11 Port Forwarding) or creation of SSH encrypted tunnels between hosts to transfer data securily or hide your hostname is also there.

MobaXterm is undoubtedly a very useful and versatile tool. Functionally, the software is well mannered, and Windows users who want to sniff a little Linux/Unix air can get a good idea of how Linux works. A closer look reveals that anything you can do with MobaXterm can be achieved directly with freely available tools (Cygwin) and Unix tools ported from Cygwin. However, although Cygwin provides a non-Posix environment for Windows, it doesn’t offer a decent terminal, which is one thing Moba-Xterm has going for it.

Admittedly, in pure vanilla Cygwin, you can start an X server automatically and then use xterm, but xterm lacks good-quality fonts, whereas MobaXterm conveniently lets you integrate a font server.

A list of Christian Metal website resources on the Net for Christian Metal lovers

Thursday, July 26th, 2012

I’ve been an old times Metal head. The moment I accepted Jesus Christ as a Lord and Saviour and been visited by the Lord’s Holy Ghost grace, my life changed severely. I found out most of the metal bands, I used to be regularly listening to is against Christ and anti-christian in essence, I still however hold my love for Metal as my teenage years were dominated by Metal Music. Happily I found there is plenty of nice Metal music a Metal head could enjoy that are written for glorification of Christ and hence did not have the negative spiritual anti-christian charge that is so typical for a lot of the bads in the metal music world. Recently I’m not listening to as much music as few years from now but still every now and then I like playing some of my old Christian metal loved bands. I was maintaining a small list of Christian metal nice bands I found and playlisted on youtube. If you’re a metal geek you might enjoy my old christian metal playlist here 🙂.

For Christians, who are looking for online Christian Metal community I also suggest you check out Firestream – The believer’s Heavy Music Refugee . There are plenty of other interesting places on the net dedicated for Christian metal fans;;;

I will end up this post with 2 videos of one very favourite Ukrainian Christian Metal band – Angel 7;

Angel 7 – Jesus the Saviour

Angel 7 – The Last Day

There are probably plenty of other nice Christian Metal sites and resources on the net; surely I’m missing a lot here? if you know some other good Christian Rock / Metal resources please drop a comment.

How to disable PC Spaker on Debian and Ubuntu Linux

Sunday, May 13th, 2012


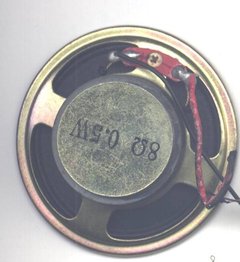
How to disable pc-speaker on Linux / PC-Speaker Old Desktop Computer picture

A PC Speaker is helpful as it could be used as a tool for diagnosing system hardware failures (different systems produce different beep sequences depending on the machine BIOS type).
Using the instructions for the respective BIOS vendor and version one could determine the type of problem experienced by a machine based on the sequence and frequency of sounds produced by the SPEAKER.
Lets say a hardware component on a server is down with no need for a monitor or screen to be attached you can say precisely if it is the hard drive, memory or fan malfunctioning…

Generally speaking historically embedded PC Speaker was inseparatable part of the Personal Computers, preceding the soundblasters, now this is changing but for compitability sake many comp equipment vendors still produce machines with pc-speaker in.
Some newer machines (mostly laptops) are factory produced with no PC-SPEAKER component anymore.
For those who don't know what is PC SPEAKER, it is a hardware device capable of emitting very simple short beep sounds at certain system occasions.

Talking about PC-Speaker, it reminds me of the old computer days, where we used pc-speakers to play music in DOS quite frequently.
It was wide practice across my friends and myself to use the pc-speaker to play Axel Folly and other mod files because we couldn't afford to pay 150$ for a sound cards. Playing a song over pc-speaker is quite a nice thing and it will be a nice thing if someone writes a program to be able to play songs on Linux via the pc-speaker for the sake of experiment.

As of time of writting, I don't know of any application capable of playing music files via the pc-speaker if one knows of something like this please, drop me a comment..

As long as it is used for hardware failure diagnosis the speaker is useful, however there are too many occasions where its just creating useless annoying sounds.
For instance whether one uses a GUI terminal or console typing commands and hits multiple times backspace to delete a mistyped command. The result is just irritating beeps, which could be quite disturbing for other people in the room (for example if you use Linux as Desktop in heterogeneous OS office).
When this "unplanned" glitchering beeps are experienced 100+ times a day you really want to break the computer, as well as your collegues are starting to get mad (if not using their headphones) 🙂

Hence you need sometimes to turn off the pc-speaker to save some nerves.

Here is how this is done on major Linux distros.

On Debian and most other distros, the PC SPEAKER is controlled by a kernel module, so to disable communication with the speaker you have to remove the kernel module.

On Debian and Fedora disabling pcspeaker is done with:

# modprobe -r pcspkr

Then to permanently disable load of the pcspkr module on system boot:

debian:~# echo 'blacklist pcspkr' >> /etc/modprobe.d/blacklist.conf

On Ubuntu to disable load on boot /etc/modprobe.d/blacklist, file should be used:

ubuntu:~# echo 'blacklist pcspkr' >> /etc/modprobe.d/blacklist
Well that's all folks …

How to take area screenshots in GNOME – Take quick area selection screenshots in G* / Linux and BSD

Thursday, March 15th, 2012

Quick Area screenshot in GNOME how to make quick area selection screenshots in Linux and FreeBSD gnome-screenshot shot

Often when, you do something on your PC, you need to make a quick screenshot of a screen area.. Yes GNOME's feature to take complete screenshots of Screen with Print Screen SysRQ and consequential picture edit with GIMP is one way, but this is far away from quick. This method to chop out of a complete display screenshot usually takes from 40 secs to 1 minute to properly cut and save a selection of the whole picture.
Another common use, that I love in GNOME is the ALT + Print Screen SysRQ key combination. alt+ print scr sysrq is handy while taking a single window screenshot is desired. Anyways often you only need to make a screenshot of a tiny area of the screen. Many people might think this is not possible currently in GNOME, but they will be wrong as there are no impossible but hard things to achieve on Linux / FreeBSD 😉

There are at least two ways using a predefined command for taking quick area screen snapshot.

1. Taking quick area screenshot by using ImageMagick's import command

To use import you will need to have installed ImageMagickswiss army knife of command line image manipulation 😉
For area screenshot with import, press ALT+F2 and type inside Run Application box:
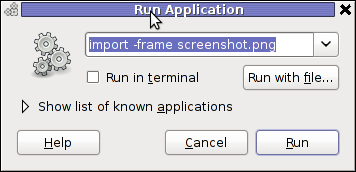
Screenshot GNOME run application GNU / Linux Debian ImageMagick import area screenshot

import -frame screenshot.png

Now make the selection of the exact screen area you would like to screeshot in file screenshot.png
Note that screenshot.png file will be saved by default in your home directory as it is read from $HOME shell variable:

hipo@noah:~$ echo $HOME/home/hipo
hipo@noah:~$ ls -al screenshot.png
-rw-r--r-- 1 hipo hipo 4950 Mar 14 21:11 screenshot.png

You see my $HOME equals /home/hipo, therefore screenshot.png just grabbed is saved in there.

One downside of taking the screenshot with import is that picture snapshot is not further edittable, if it has to be further processed with GIMP or some other graphic editor program.

In the screenshot, below I show you one screen area of my XMMS taken with import -frame screenshot.png cmd:
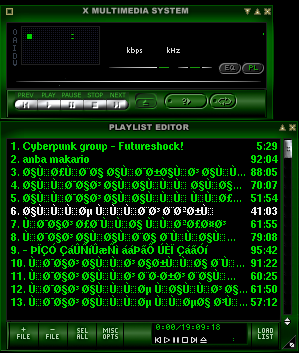
XMMS Screen Area Screenshot import screenshot

Trying to open the screenshot.png, file with GIMP displays the following error in GIMP:
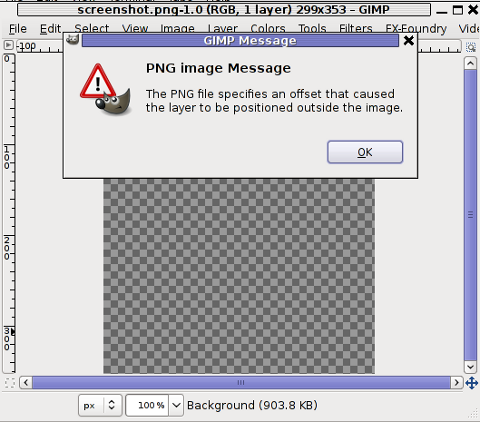
PNG image message PNG the file specifies offset that caused the layer to be positioned outiside image GIMP screenshot

Not all area snapshots taken with import -frame, create this issue sometimes screenshots are opening in GIMP but only area of the screenshot.png is visible in gimp.

Thanksfull, there is work around to this issue by converting the import generated PNG format picture to JPEG with ImageMagick's convert and then edit the .JPEG with GIMP etc.:

hipo@noah:~$ convert screenshot.png screenshot.jpg

Hence to permanently work around it, in case you intend to apply (GIMP modifications), once area snapshot is made instruct import to save its output picture in .jpeg, e.g.:

hipo@noah:~$ import -frame screenshot.jpeg

2. Taking quick area screenshot using gnome-screenshot cmd

Once again invoke the GNOME command Launcher by pressing Alt+F2 (holding alt and pressing F2) and type in the launch box:

gnome-screenshot -a
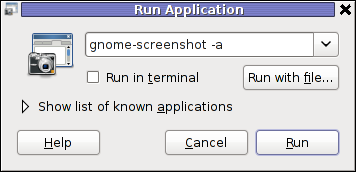
gnome-screenshot Run Application in GNOME 2.30 on Debian GNU / Linux

Below is a small area from my desktop, chopped with gnome-screenshot 🙂

GNOME desktop area chop screenshot with gnome-screenshot on my home Debian Linux

You see on above screenshot a tiny (picture) icon one of the greatest, if not the greatest bulgarian saint – saint John of Rila. St. John's lived as hermit for many years in Rila mountain and by God's grace possessed incorruptable body. His incorruptable body is still kept and can be venerated in Rila Monastery. The monastery is located 160 km from Bulgaria's capital city Sofia

St. Johns first Bulgarian established monastery Rila Monastery is currently the biggest functioing monastery in Bulgaria. The saints monastery is considered one of the most holy places in Bulgaria. If you have a travel or plan a holiday in Bulgaria, I warmly recommend you go there and venerate the saint incorruptable relics.

3. Binding keys to allow quick area screenshot taking with gnome-screenshot in GNOME

This configuration is for GNOME 2.x and is tested to work on my Debian (Squeeze 6.0), GNOME ver. 2.30.2, it should work in earlier Ubuntu versions shipped with GNOME 2.2.xx too. As I've red on the Internet it works well with Ubuntu 10.10Binding a key for screenshot area grab, should be working properly also on any GNOME 2.2.x supporting OS, including the BSD family OSes (FreeBSD, OpenBSD, NetBSD)

a) setting gnome-screenshot key binding for interactive screenshot area grab

Navigate the mouse cursor to GNOME main menus panel in left top, where you see (Applications, Places, System).
Therein use menus:

System -> Preferences -> Keybord Shortcuts -> Add ->

Alternatively if you prefer you can directly invoke the Keyboard Shortcuts configuration with command:

hipo@noah:~$ gnome-keybinding-properties

Further on, assign a shortcut by filling in something like:

name: grab-screen-area
command: gnome-screenshot -i -a
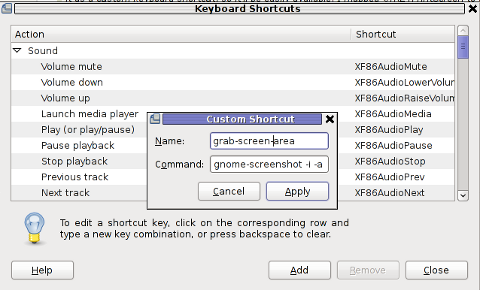
GNOME add keyboard shortcut map key for area interactive screenshot

press Apply and next map a key to the new defined key binding:
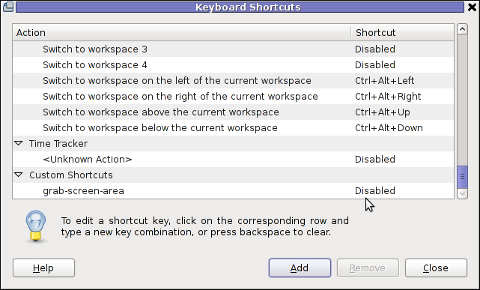
GNOME add keyboard shortcut map key

Under the Shortcut column click on Disabled and assign some key combination to invoke the cmd for example Ctrl+F4

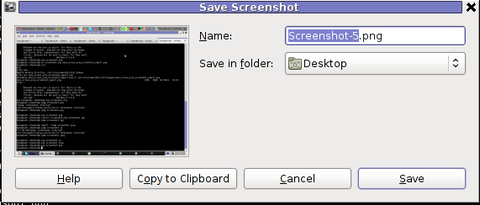
The command gnome-screenshot -i makes gnome-screenshot, show interactive make screenshot dialog like the one in below screenshot.
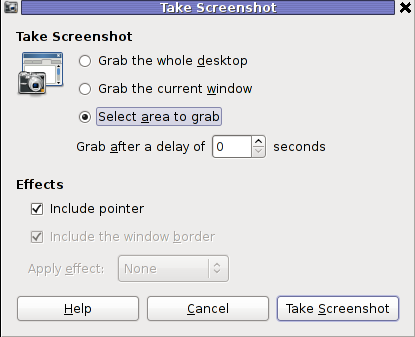
GNOME screenshot interactive screenshot select area grab shot

b) creating gnome-screenshot -a area screenshot key binding for quick area screenshots "on the fly"

The procedure is precisely the same as with adding interactive screenshot; Under Keyboard Shortcuts GNOME config assign new key binding by pressing Add button and adding:

name: grab-screen-area1
command: gnome-screenshot -a

Once again in Shortcut column in line starting with grab-screen-area1 add your desired key switch. I personally like Ctrl+Print Screen SysRQ as it is close to the default GNOME key combination assigned for taking screenshot for a Windows Alt+Print SysRq

It was logical, that this key binding should work and a direct selection mouse cursor to appear once Alt+Print SysRQ is pressed, however for some reason this is not working (hmm, maybe due to bug) ??

Thanksfully it is always possible to substitute the just assigned gnome-screenshot -a key binding with import -frame /home/hipo/Desktop/screenshot.png

If you have followed literally my article so far and you did tried to place a bind for gnome-screenshot -a, modifty grab-screen-area1 to be something like:

name: grab-screen-area1
command: import -frame /home/hipo/Desktop/screenshot.png

Where modify the path /home/hipo/Desktop/screenshot.png, to wherever you prefer the region screep capture to be stored.

c) bind keys for delayed screenshot

This also a handy binding, especially if you every now and then need to make screenshots of screen with a few secs interval.
Add one more keyboard shortcut;

name: grab-screen-area2
command: gnome-screenshot -d 5

Assign a key to make a screenshot of the active display after a delay of 5 seconds. I prefer Ctrl+F5

Onwards every time you would like to make an area screenshot, just use the defined keys:

Ctrl+F4 - will prompt you interactively for the precise type of screenshot you would like to take
Ctrl+Print SysRQ - will prompt you for a direct area to select and once selected will immediately screenshot it
Ctrl+F5 - would do delayed screenshot of entire screen after a delay of 5 seconds

4. Adding border and drop shadow effects with gnome-screenshot Actually, there is plenty of interesting things to do with Screenshots which I never thought were possible.
While reading gnome-screenshot's man page, I've stumbled to an interesting argument:

-e, --effect=EFFECT,
Add an effect to the outside of the screenshot border. EFFECT can be ``shadow'' (adding drop shadow), ``border'' (adding
rectangular space around the screenshot) or ``none'' (no effect). Default is ``none''.

This would have been a nice feature but as of time of writting this article, untofrtunately it is not working in GNOME 2.30.2. I'm not sure if this is a local Debian bug, however I suspect on other Linux distributions with different GNOME build configuration, this features might be working well. My guess here is drop shadow effect and border effect are not working because, gnome-screenshot was compiled without (support for ImageMagick?).
Anyways the way the feature is supposed to be work is by invoking commands:
:

hipo@noah:~$ gnome-screenshot --border-effect=shadow
hipo@noah:~$ nome-screenshot --border-effect=border

The same basic effects, are also available through GIMP's menus:

Image -> Effects

5. Setting default behaviour of gnome-screenshot in gconf-editor GConf (Gnome config registry db)

Experienced, GNOME users should already know about the existence of gconf-editor and the gnome registry database. For those who have don't, coming from MS-Windows background gconf-editor is GNOME (graphical environment) equivalent to Microsoft Windows registry regedit command

gconf-editor can be used to atune the way the screenshots are taken by default. To do so, launch gconf-editor cmd and follow to sub-structure:

/ -> apps -> gnome-screenshot
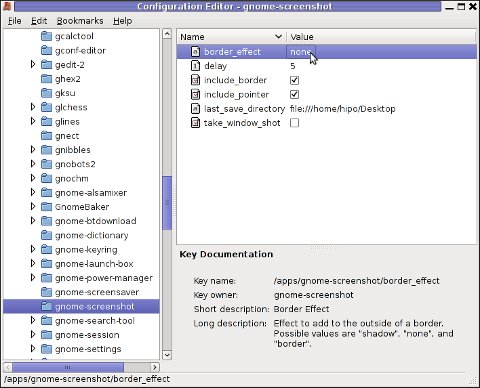
gconf-editor GNOME screenshot border effect none default gnome-screenshot gnome behaviour

The settings in above screenshot are configurations which are used by default by gnome-screenshot, right after install.
You can play with the options to change the default way PrintScreen SysRQ key press will take screenshots.
Here is one example for changing the gnome-screenshot default GNOME behaviour:
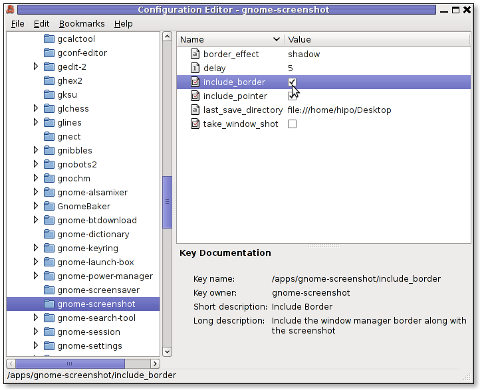
GConf Editor GNOME screenshot, border effect drop shadow and include border option set on Linux Debian

As you can see in above screenshot, I've changed my default gnome-screenshot snap taking to include a drop shadow effect:
Name | Value
border_effect | shadow include_border | (tick on)
last_save_directory | file://home/hipo/Desktop

As you see you can also control, where by default gnome-screenshot will save its screenshots, by default, its saved in $HOME/Desktop
. If you prefer some custom directory to only contain Screenshots taken for instance $HOME/Screenshots, create the directory:
hipo@noah:~$ mkdir ~/Screenshots

and then change the value for last_save_directory gconf var:

last_save_directory | file://home/hipo/Screenshots

Once settings are applied screenshots with Print Screen SysRQ key will be made with Shadow Border effect and saved in /home/hipo/Screenshots

Strangely enough, changing gnome-screenshot default screenshotting values to include screenshot effects like drop shadow or screenshot border effect works just fine.
Even though gnome-screenshot –border-effect=shadow and gnome-screenshot –border-effect=border doesn't directly affect the current screenshot to be made, I've later noticed writting this two commands in the gnome-terminal, does change the border settings for gconf-editor screenshot border.

If you enjoyed, this article and you intend to become "a professional screnshotter" :), you might also enjoy my two other articles:

Happy screenshotting 😉

How to find out which processes are causing a hard disk I/O overhead in GNU/Linux

Wednesday, September 28th, 2011

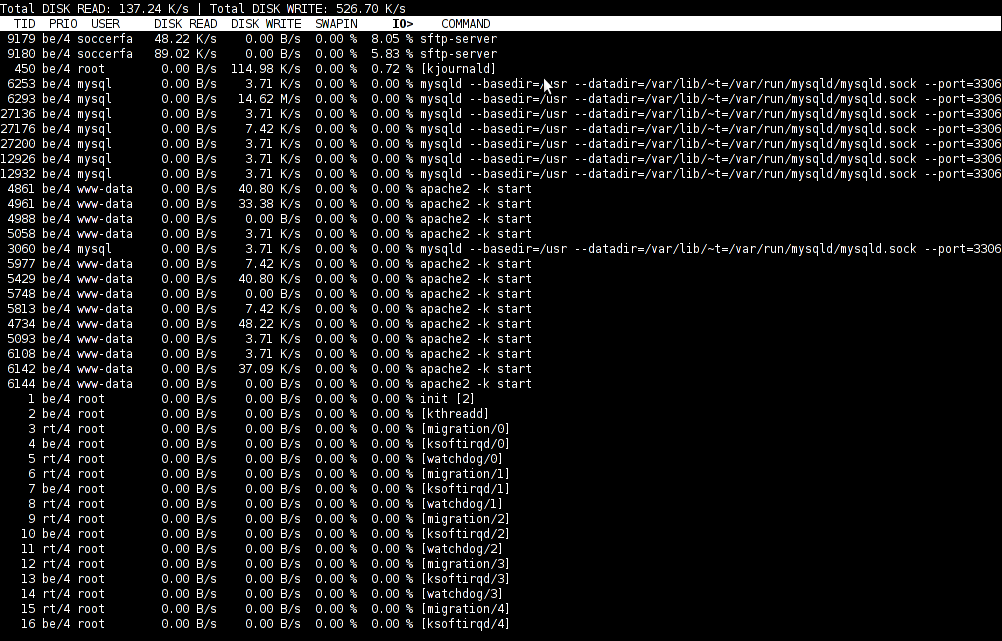
iotop monitor hard disk io bottlenecks linux
To find out which programs are causing the most read/write overhead on a Linux server one can use iotop

Here is the description of iotop – simple top-like I/O monitor, taken from its manpage.

iotop does precisely the same as the classic linux top but for hard disk IN/OUT operations.

To check the overhead caused by some daemon on the system or some random processes launching iotop without any arguments is enough;

debian:~# iotop

The main overview of iostat statistics, are the:

Total DISK READ: xx.xx MB/s | Total DISK WRITE: xx.xx K/s
If launching iotop, shows a huge numbers and the server is facing performance drop downs, its a symptom for hdd i/o overheads.
iotop is available for Debian and Ubuntu as a standard package part of the distros repositories. On RHEL based Linuxes unfortunately, its not available as RPM.

While talking about keeping an eye on hard disk utilization and disk i/o’s as bottleneck and a possible pitfall to cause a server performance down, it’s worthy to mention about another really great tool, which I use on every single server I administrate. For all those unfamiliar I’m talking about dstat

dstat is a – versatile tool for generating system resource statistics as the description on top of the manual states. dstat is great for people who want to have iostat, vmstat and ifstat in one single program.
dstat is nowdays available on most Linux distributions ready to be installed from the respective distro package manager. I’ve used it and I can confirm tt is installable via a deb/rpm package on Fedora, CentOS, Debian and Ubuntu linuces.

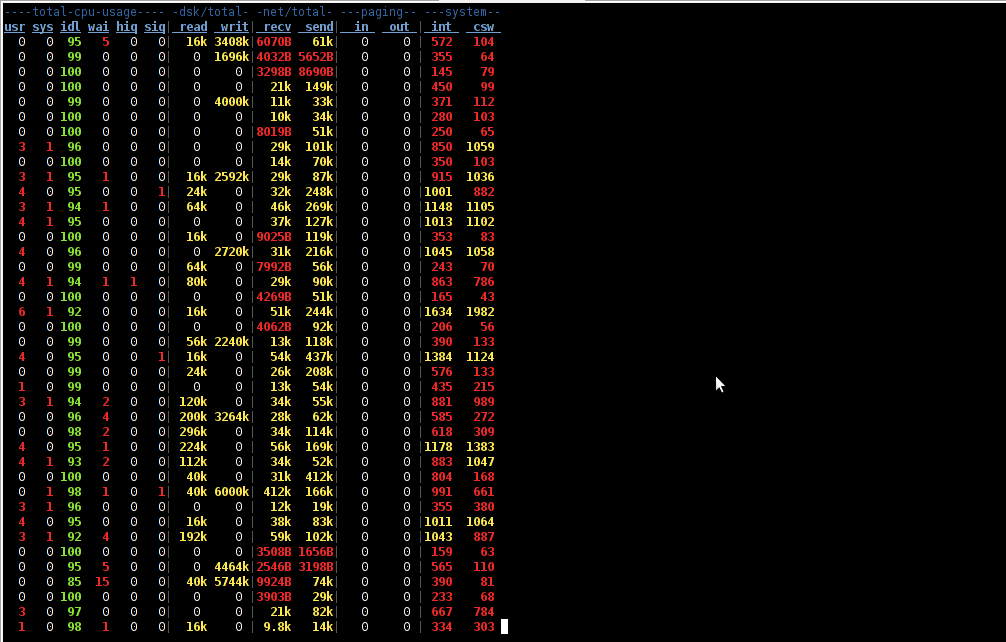
Here is how the tool in action looks like:

dstat Linux hdd load stats screenshot

The most interesting things from all the dstat cmd output are read, writ and recv, send , they give a good general overview on hard drive performance and if tracked can reveal if the hdd disk/writes are a bottleneck to create server performance issues.
Another handy tool in tracking hdd i/o problems is iostat its a tool however more suitable for the hard core admins as the tool statistics output is not easily readable.

In case if you need to periodically grasp data about disks read/write operations you will definitely want to look at collectl i/o benchmarking tool .Unfortunately collect is not included as a packaget for most linux distributions except in Fedora. Besides its capabilities to report on servers disk usage, collect is also capable to show brief stats on cpu, network.

Collectl looks really promosing and even seems to be in active development the latest tool release is from May 2011. It even supports NVidia’s GPU monitoring 😉 In short what collectl does is very similar to sysstat which by the way also has some possibilities to track disk reads in time.  collectl’s website praises the tool, much and says that in most machines the extra load the tool would add to a system to generate reports on cpu, disk and disk io is < 0.1%.  I couldn’t find any data online on how much sysstat (sar) extra loads a system. It will be interesting if some of someone concluded some testing and can tell which of the two puts less load on a system.

How to block IP address with pf on FreeBSD, NetBSD and OpenBSD

Wednesday, July 27th, 2011

Pf Firewall BSD logo

I’ve noticed some IPs which had a kind of too agressive behaviour towards my Apache webserver and thus decided to filter them out with the Firewall.
As the server is running FreeBSD and my firewall choise is bsd’s pf I added the following lines to my /etc/pf.conf to filter up the abiser IP:

table persist file "/etc/pf.blocked.ip.conf"
EXT_NIC="ml0" # interface connected to internet
block drop in log (all) quick on $EXT_NIC from to any
echo '123.123.123.123' >> /etc/pf.blocked.ip.conf

As you see I’m adding the malicious IP to /etc/pf.blocked.ip.conf, if I later decide to filter some other IPs I can add them up there and they will be loaded and filtered by pf on next pf restart.

Next I restarted my pf firewall definitions to make the newly added rules in pf.conf to load up.

freebsd# pfctl -d
freebsd# pfctl -e -f /etc/pf.conf

To show all IPs which will be inside the blockips filtering tables, later on I used:

pfctl -t blockips -T show

I can also later use pf to add later on new IPs to be blocked without bothering to restart the firewall with cmd:

freebsd# pfctl -t blockedips -T add 111.222.333.444

Deleting an IP is analogous and can be achieved with:

freebsd# pfctl -t blockedips -T delete 111.222.333.444

There are also logs stored about pf IP blocking as well as the other configured firewall rules in /var/log/pflog file.
Hope this is helpful to somebody.