Posts Tagged ‘Device’

How to configure bond0 bonding and network bridging for KVM Virtual machines on Redhat / CentOS / Fedora Linux

Tuesday, February 16th, 2021

configure-bond0-bonding-channel-with-bridges-on-hypervisor-host-for-guest-KVM-virtual-machines-howto-sample-Hypervisor-Virtual-machines-pic
 1. Intro to Redhat RPM based distro /etc/sysconfig/network-scripts/* config vars shortly explained

On RPM based Linux distributions configuring network has a very specific structure. As a sysadmin just recently I had a task to configure Networking on 2 Machines to be used as Hypervisors so the servers could communicate normally to other Networks via some different intelligent switches that are connected to each of the interfaces of the server. The idea is the 2 redhat 8.3 machines to be used as  Hypervisor (HV) and each of the 2 HVs to each be hosting 2 Virtual guest Machines with preinstalled another set of Redhat 8.3 Ootpa. I've recently blogged on how to automate a bit installing the KVM Virtual machines with using predefined kickstart.cfg file.

The next step after install was setting up the network. Redhat has a very specific network configuration well known under /etc/sysconfig/network-scripts/ifcfg-eno*# or if you have configured the Redhats to fix the changing LAN card naming ens, eno, em1 to legacy eth0, eth1, eth2 on CentOS Linux – e.g. to be named as /etc/sysconfig/network-scripts/{ifcfg-eth0,1,2,3}.

The first step to configure the network from that point is to come up with some network infrastrcture that will be ready on the HV nodes server-node1 server-node2 for the Virtual Machines to be used by server-vm1, server-vm2.

Thus for the sake of myself and some others I decide to give here the most important recognized variables that can be placed inside each of the ifcfg-eth0,ifcfg-eth1,ifcfg-eth2 …

A standard ifcfg-eth0 confing would look something this:
 

[root@redhat1 :~ ]# cat /etc/sysconfig/network-scripts/ifcfg-eth0
TYPE=Ethernet
BOOTPROTO=none
DEFROUTE=yes
IPV4_FAILURE_FATAL=no
IPV6INIT=yes
IPV6_AUTOCONF=yes
IPV6_DEFROUTE=yes
IPV4_FAILURE_FATAL=no
NAME=eth0
UUID=…
ONBOOT=yes
HWADDR=0e:a4:1a:b6:fc:86
IPADDR0=10.31.24.10
PREFIX0=23
GATEWAY0=10.31.24.1
DNS1=192.168.50.3
DNS2=10.215.105.3
DOMAIN=example.com
IPV6_PEERDNS=yes
IPV6_PEERROUTES=yes


Lets say few words to each of the variables to make it more clear to people who never configured Newtork on redhat without the help of some of the console ncurses graphical like tools such as nmtui or want to completely stop the Network-Manager to manage the network and thus cannot take the advantage of using nmcli (a command-line tool for controlling NetworkManager).

Here is a short description of each of above configuration parameters:

TYPE=device_type: The type of network interface device
BOOTPROTO=protocol: Where protocol is one of the following:

  • none: No boot-time protocol is used.
  • bootp: Use BOOTP (bootstrap protocol).
  • dhcp: Use DHCP (Dynamic Host Configuration Protocol).
  • static: if configuring static IP

EFROUTE|IPV6_DEFROUTE=answer

  • yes: This interface is set as the default route for IPv4|IPv6 traffic.
  • no: This interface is not set as the default route.

Usually most people still don't use IPV6 so better to disable that

IPV6INIT=answer: Where answer is one of the following:

  • yes: Enable IPv6 on this interface. If IPV6INIT=yes, the following parameters could also be set in this file:

IPV6ADDR=IPv6 address

IPV6_DEFAULTGW=The default route through the specified gateway

  • no: Disable IPv6 on this interface.

IPV4_FAILURE_FATAL|IPV6_FAILURE_FATAL=answer: Where answer is one of the following:

  • yes: This interface is disabled if IPv4 or IPv6 configuration fails.
  • no: This interface is not disabled if configuration fails.

ONBOOT=answer: Where answer is one of the following:

  • yes: This interface is activated at boot time.
  • no: This interface is not activated at boot time.

HWADDR=MAC-address: The hardware address of the Ethernet device
IPADDRN=address: The IPv4 address assigned to the interface
PREFIXN=N: Length of the IPv4 netmask value
GATEWAYN=address: The IPv4 gateway address assigned to the interface. Because an interface can be associated with several combinations of IP address, network mask prefix length, and gateway address, these are numbered starting from 0.
DNSN=address: The address of the Domain Name Servers (DNS)
DOMAIN=DNS_search_domain: The DNS search domain (this is the search Domain-name.com you usually find in /etc/resolv.conf)

Other interesting file that affects how routing is handled on a Redhat Linux is

/etc/sysconfig/network

[root@redhat1 :~ ]# cat /etc/sysconfig/network
# Created by anaconda
GATEWAY=10.215.105.

Having this gateway defined does add a default gateway

This file specifies global network settings. For example, you can specify the default gateway, if you want to apply some network settings such as routings, Alias IPs etc, that will be valid for all configured and active configuration red by systemctl start network scripts or the (the network-manager if such is used), just place it in that file.

Other files of intesresting to control how resolving is being handled on the server worthy to check are 

/etc/nsswitch.conf

and

/etc/hosts

If you want to set a preference of /etc/hosts being red before /etc/resolv.conf and DNS resolving for example you need to have inside it, below is default behavior of it.
 

root@redhat1 :~ ]#   grep -i hosts /etc/nsswitch.conf
#     hosts: files dns
#     hosts: files dns  # from user file
# Valid databases are: aliases, ethers, group, gshadow, hosts,
hosts:      files dns myhostname

As you can see the default order is to read first files (meaning /etc/hosts) and then the dns (/etc/resolv.conf)
hosts: files dns

Now with this short intro description on basic values accepted by Redhat's /etc/sysconfig/network-scripts/ifcfg* prepared configurations.


I will give a practical example of configuring a bond0 interface with 2 members which were prepared based on Redhat's Official documentation found in above URLs:

https://access.redhat.com/documentation/en-us/red_hat_enterprise_linux/8/html/configuring_and_managing_networking/configuring-network-bonding_configuring-and-managing-networking
 

# Bonding on RHEL 7 documentation
https://access.redhat.com/documentation/en-us/red_hat_enterprise_linux/7/html/networking_guide/sec-network_bonding_using_the_command_line_interface

https://access.redhat.com/documentation/en-us/red_hat_enterprise_linux/7/html/networking_guide/sec-verifying_network_configuration_bonding_for_redundancy

https://access.redhat.com/documentation/en-us/red_hat_enterprise_linux/6/html/deployment_guide/s2-networkscripts-interfaces_network-bridge

# Network Bridge with Bond documentation
https://access.redhat.com/documentation/en-us/red_hat_enterprise_linux/6/html/deployment_guide/sec-Configuring_a_VLAN_over_a_Bond

https://docs.fedoraproject.org/en-US/Fedora/24/html/Networking_Guide/sec-Network_Bridge_with_Bond.html


2. Configuring a single bond connection on eth0 / eth2 and setting 3 bridge interfaces bond -> br0, br1 -> eth1, br2 -> eth2

The task on my machines was to set up from 4 lan cards one bonded interface as active-backup type of bond with bonded lines on eth0, eth2 and 3 other 2 eth1, eth2 which will be used for private communication network that is connected via a special dedicated Switches and Separate VLAN 50, 51 over a tagged dedicated gigabit ports.

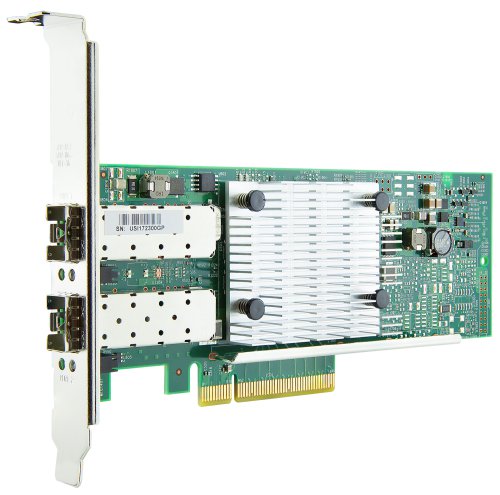
As said the 2 Servers had each 4 Broadcom Network CARD interfaces each 2 of which are paired (into a single card) and 2 of which are a solid Broadcom NetXtreme Dual Port 10GbE SFP+ and Dell Broadcom 5720 Dual Port 1Gigabit Network​.

2-ports-broadcom-netxtreme-dual-port-10GBe-spf-plus

On each of server-node1 and server-node2 we had 4 Ethernet Adapters properly detected on the Redhat

root@redhat1 :~ ]# lspci |grep -i net
01:00.0 Ethernet controller: Broadcom Inc. and subsidiaries NetXtreme BCM5720 2-port Gigabit Ethernet PCIe
01:00.1 Ethernet controller: Broadcom Inc. and subsidiaries NetXtreme BCM5720 2-port Gigabit Ethernet PCIe
19:00.0 Ethernet controller: Broadcom Inc. and subsidiaries BCM57412 NetXtreme-E 10Gb RDMA Ethernet Controller (rev 01)
19:00.1 Ethernet controller: Broadcom Inc. and subsidiaries BCM57412 NetXtreme-E 10Gb RDMA Ethernet Controller (rev 01)


I've already configured as prerogative net.ifnames=0 to /etc/grub2/boot.cfg and Network-Manager service disabled on the host (hence to not use Network Manager you'll see in below configuration NM_CONTROLLED="no" is telling the Redhat servers is not to be trying NetworkManager for more on that check my previous article Disable NetworkManager automatic Ethernet Interface Management on Redhat Linux , CentOS 6 / 7 / 8.

3. Types of Network Bonding

mode=0 (balance-rr)

This mode is based on Round-robin policy and it is the default mode. This mode offers fault tolerance and load balancing features. It transmits the packets in Round robin fashion that is from the first available slave through the last.

mode-1 (active-backup)

This mode is based on Active-backup policy. Only one slave is active in this band, and another one will act only when the other fails. The MAC address of this bond is available only on the network adapter part to avoid confusing the switch. This mode also provides fault tolerance.

mode=2 (balance-xor)

This mode sets an XOR (exclusive or) mode that is the source MAC address is XOR’d with destination MAC address for providing load balancing and fault tolerance. Each destination MAC address the same slave is selected.

mode=3 (broadcast)

This method is based on broadcast policy that is it transmitted everything on all slave interfaces. It provides fault tolerance. This can be used only for specific purposes.

mode=4 (802.3ad)

This mode is known as a Dynamic Link Aggregation mode that has it created aggregation groups having same speed. It requires a switch that supports IEEE 802.3ad dynamic link. The slave selection for outgoing traffic is done based on a transmit hashing method. This may be changed from the XOR method via the xmit_hash_policy option.

mode=5 (balance-tlb)

This mode is called Adaptive transmit load balancing. The outgoing traffic is distributed based on the current load on each slave and the incoming traffic is received by the current slave. If the incoming traffic fails, the failed receiving slave is replaced by the MAC address of another slave. This mode does not require any special switch support.

mode=6 (balance-alb)

This mode is called adaptive load balancing. This mode does not require any special switch support.

Lets create the necessery configuration for the bond and bridges

[root@redhat1 :~ ]# cat ifcfg-bond0
DEVICE=bond0
NAME=bond0
TYPE=Bond
BONDING_MASTER=yes
#IPADDR=10.50.21.16
#PREFIX=26
#GATEWAY=10.50.0.1
#DNS1=172.20.88.2
ONBOOT=yes
BOOTPROTO=none
BONDING_OPTS="mode=1 miimon=100 primary=eth0"
NM_CONTROLLED="no"
BRIDGE=br0


[root@redhat1 :~ ]# cat ifcfg-bond0.10
DEVICE=bond0.10
BOOTPROTO=none
ONPARENT=yes
#IPADDR=10.50.21.17
#NETMASK=255.255.255.0
VLAN=yes

[root@redhat1 :~ ]# cat ifcfg-br0
STP=yes
BRIDGING_OPTS=priority=32768
TYPE=Bridge
PROXY_METHOD=none
BROWSER_ONLY=no
BOOTPROTO=none
DEFROUTE=yes
IPV4_FAILURE_FATAL=no
#IPV6INIT=yes
#IPV6_AUTOCONF=yes
#IPV6_DEFROUTE=yes
#IPV6_FAILURE_FATAL=no
#IPV6_ADDR_GEN_MODE=stable-privacy
IPV6_AUTOCONF=no
IPV6_DEFROUTE=no
IPV6_FAILURE_FATAL=no
IPV6_ADDR_GEN_MODE=stable-privacy
NAME=br0
UUID=4451286d-e40c-4d8c-915f-7fc12a16d595
DEVICE=br0
ONBOOT=yes
IPADDR=10.50.50.16
PREFIX=26
GATEWAY=10.50.0.1
DNS1=172.20.0.2
NM_CONTROLLED=no

[root@redhat1 :~ ]# cat ifcfg-br1
STP=yes
BRIDGING_OPTS=priority=32768
TYPE=Bridge
PROXY_METHOD=none
BROWSER_ONLY=no
BOOTPROTO=none
DEFROUTE=no
IPV4_FAILURE_FATAL=no
#IPV6INIT=yes
#IPV6_AUTOCONF=yes
#IPV6_DEFROUTE=yes
#IPV6_FAILURE_FATAL=no
#IPV6_ADDR_GEN_MODE=stable-privacy
IPV6INIT=no
IPV6_AUTOCONF=no
IPV6_DEFROUTE=no
IPV6_FAILURE_FATAL=no
IPV6_ADDR_GEN_MODE=stable-privacy
NAME=br1
UUID=40360c3c-47f5-44ac-bbeb-77f203390d29
DEVICE=br1
ONBOOT=yes
##IPADDR=10.50.51.241
PREFIX=28
##GATEWAY=10.50.0.1
##DNS1=172.20.0.2
NM_CONTROLLED=no

[root@redhat1 :~ ]# cat ifcfg-br2
STP=yes
BRIDGING_OPTS=priority=32768
TYPE=Bridge
PROXY_METHOD=none
BROWSER_ONLY=no
BOOTPROTO=none
DEFROUTE=no
IPV4_FAILURE_FATAL=no
#IPV6INIT=yes
#IPV6_AUTOCONF=yes
#IPV6_DEFROUTE=yes
#IPV6_FAILURE_FATAL=no
#IPV6_ADDR_GEN_MODE=stable-privacy
IPV6INIT=no
IPV6_AUTOCONF=no
IPV6_DEFROUTE=no
IPV6_FAILURE_FATAL=no
IPV6_ADDR_GEN_MODE=stable-privacy
NAME=br2
UUID=fbd5c257-2f66-4f2b-9372-881b783276e0
DEVICE=br2
ONBOOT=yes
##IPADDR=10.50.51.243
PREFIX=28
##GATEWAY=10.50.0.1
##DNS1=172.20.10.1
NM_CONTROLLED=no
NM_CONTROLLED=no
BRIDGE=br0

[root@redhat1 :~ ]# cat ifcfg-eth0
TYPE=Ethernet
NAME=bond0-slaveeth0
BOOTPROTO=none
#UUID=61065574-2a9d-4f16-b16e-00f495e2ee2b
DEVICE=eth0
ONBOOT=yes
MASTER=bond0
SLAVE=yes
NM_CONTROLLED=no

[root@redhat1 :~ ]# cat ifcfg-eth1
TYPE=Ethernet
NAME=eth1
UUID=b4c359ae-7a13-436b-a904-beafb4edee94
DEVICE=eth1
ONBOOT=yes
BRIDGE=br1
NM_CONTROLLED=no

[root@redhat1 :~ ]#  cat ifcfg-eth2
TYPE=Ethernet
NAME=bond0-slaveeth2
BOOTPROTO=none
#UUID=821d711d-47b9-490a-afe7-190811578ef7
DEVICE=eth2
ONBOOT=yes
MASTER=bond0
SLAVE=yes
NM_CONTROLLED=no

[root@redhat1 :~ ]#  cat ifcfg-eth3
TYPE=Ethernet
PROXY_METHOD=none
BROWSER_ONLY=no
#BOOTPROTO=dhcp
BOOTPROTO=none
DEFROUTE=no
IPV4_FAILURE_FATAL=no
#IPV6INIT=yes
#IPV6_AUTOCONF=yes
#IPV6_DEFROUTE=yes
#IPV6_FAILURE_FATAL=no
#IPV6_ADDR_GEN_MODE=stable-privacy
IPV6INIT=no
IPV6_AUTOCONF=no
IPV6_DEFROUTE=no
IPV6_FAILURE_FATAL=no
IPV6_ADDR_GEN_MODE=stable-privacy
BRIDGE=br2
NAME=eth3
UUID=61065574-2a9d-4f16-b16e-00f495e2ee2b
DEVICE=eth3
ONBOOT=yes
NM_CONTROLLED=no

[root@redhat2 :~ ]# cat ifcfg-bond0
DEVICE=bond0
NAME=bond0
TYPE=Bond
BONDING_MASTER=yes
#IPADDR=10.50.21.16
#PREFIX=26
#GATEWAY=10.50.21.1
#DNS1=172.20.88.2
ONBOOT=yes
BOOTPROTO=none
BONDING_OPTS="mode=1 miimon=100 primary=eth0"
NM_CONTROLLED="no"
BRIDGE=br0

# cat ifcfg-bond0.10
DEVICE=bond0.10
BOOTPROTO=none
ONPARENT=yes
#IPADDR=10.50.21.17
#NETMASK=255.255.255.0
VLAN=yes
NM_CONTROLLED=no
BRIDGE=br0

[root@redhat2 :~ ]# cat ifcfg-br0
STP=yes
BRIDGING_OPTS=priority=32768
TYPE=Bridge
PROXY_METHOD=none
BROWSER_ONLY=no
BOOTPROTO=none
DEFROUTE=yes
IPV4_FAILURE_FATAL=no
#IPV6INIT=yes
#IPV6_AUTOCONF=yes
#IPV6_DEFROUTE=yes
#IPV6_FAILURE_FATAL=no
#IPV6_ADDR_GEN_MODE=stable-privacy
IPV6_AUTOCONF=no
IPV6_DEFROUTE=no
IPV6_FAILURE_FATAL=no
IPV6_ADDR_GEN_MODE=stable-privacy
NAME=br0
#UUID=f87e55a8-0fb4-4197-8ccc-0d8a671f30d0
UUID=4451286d-e40c-4d8c-915f-7fc12a16d595
DEVICE=br0
ONBOOT=yes
IPADDR=10.50.21.17
PREFIX=26
GATEWAY=10.50.21.1
DNS1=172.20.88.2
NM_CONTROLLED=no

[root@redhat2 :~ ]#  cat ifcfg-br1
STP=yes
BRIDGING_OPTS=priority=32768
TYPE=Bridge
PROXY_METHOD=none
BROWSER_ONLY=no
BOOTPROTO=none
DEFROUTE=no
IPV4_FAILURE_FATAL=no
#IPV6INIT=no
#IPV6_AUTOCONF=no
#IPV6_DEFROUTE=no
#IPV6_FAILURE_FATAL=no
#IPV6_ADDR_GEN_MODE=stable-privacy
IPV6INIT=no
IPV6_AUTOCONF=no
IPV6_DEFROUTE=no
IPV6_FAILURE_FATAL=no
IPV6_ADDR_GEN_MODE=stable-privacy
NAME=br1
UUID=40360c3c-47f5-44ac-bbeb-77f203390d29
DEVICE=br1
ONBOOT=yes
##IPADDR=10.50.21.242
PREFIX=28
##GATEWAY=10.50.21.1
##DNS1=172.20.88.2
NM_CONTROLLED=no

[root@redhat2 :~ ]# cat ifcfg-br2
STP=yes
BRIDGING_OPTS=priority=32768
TYPE=Bridge
PROXY_METHOD=none
BROWSER_ONLY=no
BOOTPROTO=none
DEFROUTE=no
IPV4_FAILURE_FATAL=no
#IPV6INIT=no
#IPV6_AUTOCONF=no
#IPV6_DEFROUTE=no
#IPV6_FAILURE_FATAL=no
#IPV6_ADDR_GEN_MODE=stable-privacy
IPV6INIT=no
IPV6_AUTOCONF=no
IPV6_DEFROUTE=no
IPV6_FAILURE_FATAL=no
IPV6_ADDR_GEN_MODE=stable-privacy
NAME=br2
UUID=fbd5c257-2f66-4f2b-9372-881b783276e0
DEVICE=br2
ONBOOT=yes
##IPADDR=10.50.21.244
PREFIX=28
##GATEWAY=10.50.21.1
##DNS1=172.20.88.2
NM_CONTROLLED=no

[root@redhat2 :~ ]# cat ifcfg-eth0
TYPE=Ethernet
NAME=bond0-slaveeth0
BOOTPROTO=none
#UUID=ee950c07-7eb2-463b-be6e-f97e7ad9d476
DEVICE=eth0
ONBOOT=yes
MASTER=bond0
SLAVE=yes
NM_CONTROLLED=no

[root@redhat2 :~ ]# cat ifcfg-eth1
TYPE=Ethernet
NAME=eth1
UUID=ffec8039-58f0-494a-b335-7a423207c7e6
DEVICE=eth1
ONBOOT=yes
BRIDGE=br1
NM_CONTROLLED=no

[root@redhat2 :~ ]# cat ifcfg-eth2
TYPE=Ethernet
NAME=bond0-slaveeth2
BOOTPROTO=none
#UUID=2c097475-4bef-47c3-b241-f5e7f02b3395
DEVICE=eth2
ONBOOT=yes
MASTER=bond0
SLAVE=yes
NM_CONTROLLED=no


Notice that the bond0 configuration does not have an IP assigned this is done on purpose as we're using the interface channel bonding together with attached bridge for the VM. Usual bonding on a normal physical hardware hosts where no virtualization use is planned is perhaps a better choice. If you however try to set up an IP address in that specific configuration shown here and you try to reboot the machine, you will end up with inacessible machine over the network like I did and you will need to resolve configuration via some kind of ILO / IDRAC interface.

4. Generating UUID for ethernet devices bridges and bonds

One thing to note is the command uuidgen you might need that to generate UID identificators to fit in the new network config files.

Example:
 

[root@redhat2 :~ ]#uuidgen br2
e7995e15-7f23-4ea2-80d6-411add78d703
[root@redhat2 :~ ]# uuidgen br1
05e0c339-5998-414b-b720-7adf91a90103
[root@redhat2 :~ ]# uuidgen br0
e6d7ff74-4c15-4d93-a150-ff01b7ced5fb


5. How to make KVM Virtual Machines see configured Network bridges (modify VM XML)

To make the Virtual machines installed see the bridges I had to

[root@redhat1 :~ ]#virsh edit VM_name1
[root@redhat1 :~ ]#virsh edit VM_name2

[root@redhat2 :~ ]#virsh edit VM_name1
[root@redhat2 :~ ]#virsh edit VM_name2

Find the interface network configuration and change it to something like:

    <interface type='bridge'>
      <mac address='22:53:00:56:5d:ac'/>
      <source bridge='br0'/>
      <model type='virtio'/>
      <address type='pci' domain='0x0000' bus='0x01' slot='0x00' function='0x0'/>
    </interface>
    <interface type='bridge'>
      <mac address='22:53:00:2a:5f:01'/>
      <source bridge='br1'/>
      <model type='virtio'/>
      <address type='pci' domain='0x0000' bus='0x07' slot='0x00' function='0x0'/>
    </interface>
    <interface type='bridge'>
      <mac address='22:34:00:4a:1b:6c'/>
      <source bridge='br2'/>
      <model type='virtio'/>
      <address type='pci' domain='0x0000' bus='0x08' slot='0x00' function='0x0'/>
    </interface>


6. Testing the bond  is up and works fine

# ip addr show bond0
The result is the following:


4: bond0: <BROADCAST,MULTICAST,MASTER,UP,LOWER_UP> mtu 1500 qdisc noqueue state UP group default qlen 1000
    link/ether 52:54:00:cb:25:82 brd ff:ff:ff:ff:ff:ff


The bond should be visible in the normal network interfaces with ip address show or /sbin/ifconfig


# cat /proc/net/bonding/bond0
Ethernet Channel Bonding Driver: v3.7.1 (April 27, 2011)

Bonding Mode: fault-tolerance (active-backup)
Primary Slave: None
Currently Active Slave: eth0
MII Status: up
MII Polling Interval (ms): 100
Up Delay (ms): 0
Down Delay (ms): 0

Slave Interface: eth2
MII Status: up
Speed: 10000 Mbps
Duplex: full
Link Failure Count: 0
Permanent HW addr: 00:0c:29:ab:2a:fa
Slave queue ID: 0


According to the output eth0 is the active slave.

The active slaves device files (eth0 in this case) is found in virtual file system /sys/

# find /sys -name *eth0
/sys/devices/pci0000:00/0000:00:15.0/0000:03:00.0/net/eth0
/sys/devices/virtual/net/bond0/lower_eth0
/sys/class/net/eth0


You can remove a bond member say eth0 by 


 cd to the pci* directory
Example: /sys/devices/pci000:00/000:00:15.0


# echo 1 > remove


At this point the eth0 device directory structure that was previously located under /sys/devices/pci000:00/000:00:15.0 is no longer there.  It was removed and the device no longer exists as seen by the OS.

You can verify this is the case with a simple ifconfig which will no longer list the eth0 device.
You can also repeat the cat /proc/net/bonding/bond0 command from Step 1 to see that eth0 is no longer listed as active or available.
You can also see the change in the messages file.  It might look something like this:

2021-02-12T14:13:23.363414-06:00 redhat1  device eth0: device has been deleted
2021-02-12T14:13:23.368745-06:00 redhat1 kernel: [81594.846099] bonding: bond0: releasing active interface eth0
2021-02-12T14:13:23.368763-06:00 redhat1 kernel: [81594.846105] bonding: bond0: Warning: the permanent HWaddr of eth0 – 00:0c:29:ab:2a:f0 – is still in use by bond0. Set the HWaddr of eth0 to a different address to avoid conflicts.
2021-02-12T14:13:23.368765-06:00 redhat1 kernel: [81594.846132] bonding: bond0: making interface eth1 the new active one.


Another way to test the bonding is correctly switching between LAN cards on case of ethernet hardware failure is to bring down one of the 2 or more bonded interfaces, lets say you want to switch from active-backup from eth1 to eth2, do:
 

# ip link set dev eth0 down


That concludes the test for fail over on active slave failure.

7. Bringing bond updown (rescan) bond with no need for server reboot

You know bonding is a tedious stuff that sometimes breaks up badly so only way to fix the broken bond seems to be a init 6 (reboot) cmd but no actually that is not so.

You can also get the deleted device back with a simple pci rescan command:

# echo 1 > /sys/bus/pci/rescan


The eth0 interface should now be back
You can see that it is back with an ifconfig command, and you can verify that the bond sees it with this command:

# cat /proc/net/bonding/bond0


That concludes the test of the bond code seeing the device when it comes back again.

The same steps can be repeated only this time using the eth1 device and file structure to fail the active slave in the bond back over to eth0.

8. Testing the bond with ifenslave command (ifenslave command examples)

Below is a set of useful information to test the bonding works as expected with ifenslave command  comes from "iputils-20071127" package

– To show information of all the inerfaces

                  # ifenslave -a
                  # ifenslave –all-interfaces 


– To change the active slave

                  # ifenslave -c bond0 eth1
                  # ifenslave –change-active bond0 eth1 


– To remove the slave interface from the bonding device

                  # ifenslave -d eth1
                  # ifenslave –detach bond0 eth1 


– To show master interface info

                  # ifenslave bond0 


– To set the bond device down and automatically release all the slaves

                  # ifenslave bond1 down 

– To get the usage info

                  # ifenslave -u
                  # ifenslave –usage 

– To set to verbose mode

                  # ifenslave -v
                  # ifenslave –verbose 

9. Testing the bridge works fine

Historically over the years all kind of bridges are being handled with the brctl part of bridge-utils .deb / .rpm installable package.

The classical way to check a bridge is working is to do

# brctl show
# brctl show br0; brctl show br1; brctl show br2

# brctl showmacs br0
 

etc.

Unfortunately with redhat 8 this command is no longer available so to get information about configured bridges you need to use instead:


# bridge link show
3:eth0: <BROADCAST,MULTICAST,UP,LOWER_UP> mtu 1500 master bridge0 state forwarding priority 32 cost 100
4:eth2: <BROADCAST,MULTICAST,UP,LOWER_UP> mtu 1500 master bridge0 state listening priority 32 cost 100


10. Troubleshooting network connectivity issues on bond bridges and LAN cards

Testing the bond connection and bridges can route proper traffic sometimes is a real hassle so here comes at help the good old tcpdump

If you end up with issues with some of the ethernet interfaces between HV1 and HV2 to be unable to talk to each other and you have some suspiciousness that some colleague from the network team has messed up a copper (UTP) cable or there is a connectivity fiber optics issues. To check the VLAN tagged traffic headers on the switch you can listen to each and every bond0 and br0, br1, br2 eth0, eth1, eth2, eth3 configured on the server like so:

# tcpdump -i bond0 -nn -e vlan


Some further investigation on where does a normal ICMP traffic flows once everything is setup is a normal thing to do, hence just try to route a normal ping via the different server interfaces:

# ping -I bond0 DSTADDR

# ping -i eth0 DSTADDR

# ping -i eth1 DSTADDR

# ping -i eth2 DSTADDR


After conducting the ping do the normal for network testing big ICMP packages (64k) ping to make sure there are no packet losses etc., e.g:

# ping -I eth3 -s 64536  DSTADDR


If for 10 – 20 seconds the ping does not return package losses then you should be good.

Howto create Linux Music Audio CD from MP3 files / Create playable WAV format Audio CD Albums from MP3s

Tuesday, July 16th, 2019

cdburning-audio-music-cd-from-mp3-on-linuxcomapct-disc-tux-linux-logo

Recently my Mother asked me to prepare a Music Audio CD for her from a popular musician accordionist Stefan Georgiev from Dobrudja who has a unique folklore Bulgarian music.

As some of older people who still remember the age of the CD and who had most likely been into the CD burning Copy / Piracy business so popular in the countries of the ex-USSR so popular in the years 1995-2000 audio ,  Old CD Player Devices were not able to play the MP3 file format due to missing codecs (as MP3 was a proprietary compression that can't be installed on every device without paying the patent to the MP3 compression rights holder.

The revolutionary MP3 compression used to be booming standard for transferring Music data due to its high compression which made an ordinary MP3 of 5 minutes of 5MB (10+ times more compression than an ordinary classic WAV Audio the CPU intensiveness of MP3 files that puts on the reading device, requiring the CD Player to have a more powerful CPU.

Hence  due to high licensing cost and requirement for more powerful CPU enabled Audio Player many procuders of Audio Players never introduced MP3 to their devices and MP3 Neve become a standard for the Audio CD that was the standard for music listening inside almost every car out there.

Nowdays it is very rare need to create a Audio CD as audio CDs seems to be almost dead (As I heard from a Richard Stallman lecture In USA nowadays there is only 1 shop in the country where you can still buy CD or DVD drives) and only in third world as Africa Audio CDs perhaps are still in circulation.

Nomatter that as we have an old Stereo CD player on my village and perhaps many others, still have some old retired CD reading devices being able to burn out a CD is a useful thing.

Thus to make mother happy and as a learning excercise, I decided to prepare the CD for her on my Linux notebook.
Here I'll shortly describe the takes I took to make it happen which hopefully will be useful for other people that need to Convert and burn Audio CD from MP3 Album.


1. First I downloaded the Album in Mp3 format from Torrent tracker

My homeland Bulgaria and specific birth place place the city of Dobrich has been famous its folklore:  Galina Durmushlijska and Stefan Georgiev are just 2 of the many names along with Оркестър Кристал (Orchestra Crystal) and the multitude of gifted singers. My mother has a santiment for Stefan Georgiev, as she listened to this gifted accordinist on her Uncle's marriage.

Thus In my case this was (Стефан Георгиев Хора и ръченици от Добруджа) the album full song list here If you're interested to listen the Album and Enjoy unique Folklore from Dobrudja (Dobrich) my home city, Stefan Georgiev's album Hora and Rachenica Dances is available here


Stefan_Georgiev-old-audio-Music-CD-Hora-i-Rychenici-ot-Dobrudja-Horos-and-Ruchenitsas-from-Dobrudja-CD_Cover
I've downloaded them from Bulgarian famous torrent tracker zamunda.net in MP3 format.
Of course you need to have a CD / DVD readed and write device on the PC which nowdays is not present on most modern notebooks and PCs but as a last resort you can buy some cheap External Optical CD / DVD drive for 25 to 30$ from Amazon / Ebay etc.


2. You will need to install a couple of programs on Linux host (if you don't have it already)


To be able to convert from command line from MP3 to WAV you will need as minimum ffmpeg and normalize-audio packages as well as some kind of command line burning tool like cdrskin  wodim which is
the fork of old good known cdrecord, so in case if you you're wondering what happened with it just
use instead wodim.

Below is a good list of tools (assuming you have enough HDD space) to install:


root@jeremiah:/ # apt-get install –yes dvd+rw-tools cdw cdrdao audiotools growisofs cdlabelgen dvd+rw-tools k3b brasero wodim ffmpeg lame normalize-audio libavcodec58


Note that some of above packages I've installed just for other Write / Read operations for DVD drives and you might not need that but it is good to have it as some day in future you will perhaps need to write out a DVD or something.
Also the k3b here is specific to KDE and if you're a GNOME user you could use Native GNOME Desktop app such brasero or if you're in a more minimalistic Linux desktop due to hardware contrains use XFCE's native xfburn program.

If you're a console / terminal geek like me you will definitely enjoy to use cdw
 

root@jeremiah:/ # apt-cache show cdw|grep -i description -A 1
Description-en: Tool for burning CD's – console version
 Ncurses-based frontend for wodim and genisoimage. It can handle audio and

Description-md5: 77dacb1e6c00dada63762b78b9a605d5
Homepage: http://cdw.sourceforge.net/


3. Selecting preferred CD / DVD / BD program to use to write out the CD from Linux console


cdw uses wodim (which is a successor of good old known console cdrecord command most of use used on Linux in the past to burn out new Redhat / Debian / different Linux OS distro versions for upgrade purposes on Desktop and Server machines.

To check whether your CD / DVD drive is detected and ready to burn on your old PC issue:


root@jeremiah:/# wodim -checkdrive
Device was not specified. Trying to find an appropriate drive…
Detected CD-R drive: /dev/cdrw
Using /dev/cdrom of unknown capabilities
Device type    : Removable CD-ROM
Version        : 5
Response Format: 2
Capabilities   :
Vendor_info    : 'HL-DT-ST'
Identification : 'DVDRAM GT50N    '
Revision       : 'LT20'
Device seems to be: Generic mmc2 DVD-R/DVD-RW.
Using generic SCSI-3/mmc   CD-R/CD-RW driver (mmc_cdr).
Driver flags   : MMC-3 SWABAUDIO BURNFREE
Supported modes: TAO PACKET SAO SAO/R96P SAO/R96R RAW/R16 RAW/R96P RAW/R96R

You can also use xorriso (whose added value compared to other console burn cd tools is is not using external program for ISO9660 formatting neither it use an external or an external burn program for CD, DVD or BD (Blue Ray) drive but it has its own libraries incorporated from libburnia-project.org libs.

Below output is from my Thinkpad T420 notebook. If the old computer CD drive is there and still functional in most cases you should not get issues to detect it.

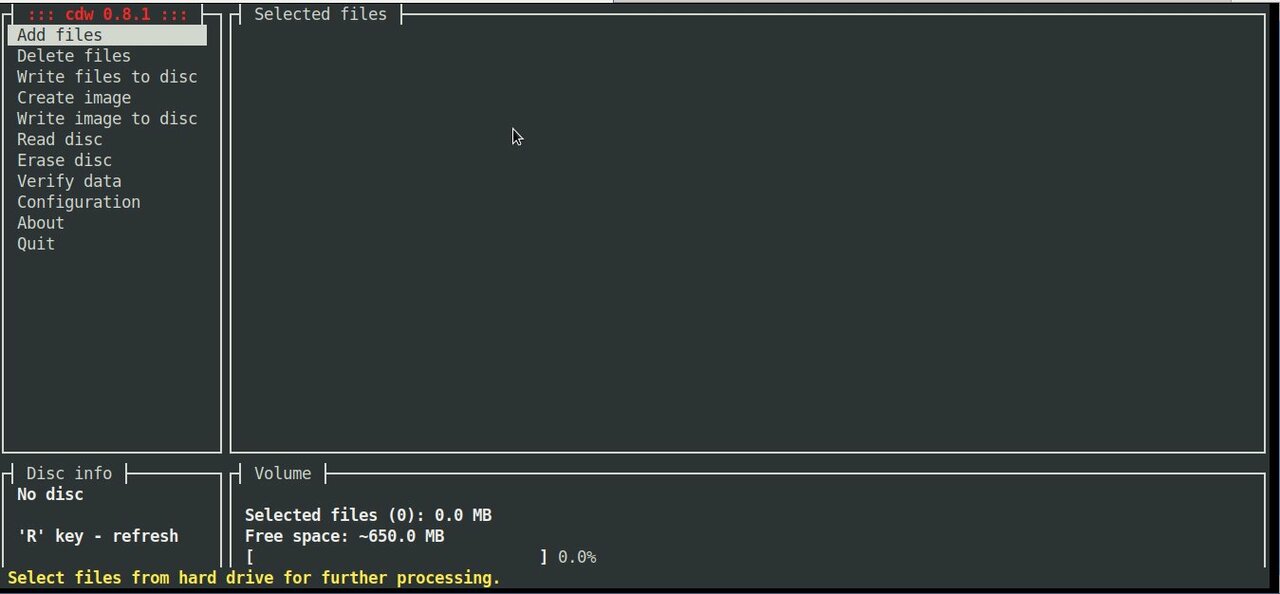
cdw ncurses text based CD burner tool's interface is super intuitive as you can see from below screenshot:

cdw-burn-cds-from-console-terminal-on-GNU-Linux-and-FreeBSD-old-PC-computer

CDW has many advanced abilities such as “blanking” a disk or ripping an audio CD on a selected folder. To overcome the possible problem of CDW not automatically detecting the disk you have inserted you can go to the “Configuration” menu, press F5 to enter the Hardware options and then on the first entry press enter and choose your device (by pressing enter again). Save the setting with F9.
 

4. Convert MP3 / MP4 Files or whatever format to .WAV to be ready to burn to CD


Collect all the files you want to have collected from the CD album in .MP3 a certain directory and use a small one liner loop to convert files to WAV with ffmpeg:
 

cd /disk/Music/Mp3s/Singer-Album-directory-with-MP3/

for i in $( ls *.mp3); do ffmpeg -i $i $i.wav; done


If you don't have ffmpeg installed and have mpg123 you can also do the Mp3 to WAV conversion with mpg123 cmd like so:


for i in $( ls ); do mpg123 -w $i.wav $i.mp3; done


Another alternative for conversion is to use good old lame (used to create Mp3 audio files but abling to also) decode
mp3 to wav.


lame –decode somefile.mp3 somefile.wav


In the past there was a burn command tool that was able to easily convert MP3s to WAV but in up2date Linux modern releases it is no longer available most likely due to licensing issues, for those on older Debian Linux 7 / 8 / 9 / Ubuntu 8 to 12.XX / old Fedoras etc. if you have the command you can install burn and use it (and not bother with shell loops):

apt-get install burn

or

yum install burn


Once you have it to convert


$ burn -A -a *.mp3


5. Fix file naming to remove empty spaces such as " " and substitute to underscores as some Old CD Players are
unable to understand spaces in file naming with another short loop.


for f in *; do mv "$f" `echo $f | tr ' ' '_'`; done


6. Normalize audio produced .WAV files (set the music volume to a certain level)


In case if wondering why normalize audio is needed here is short extract from normalize-audio man page command description to shed some light.

"normalize-audio  is  used  to  adjust  the volume of WAV or MP3 audio files to a standard volume level.  This is useful for things like creating mp3 mixes, where different recording levels on different albums can cause the volume to  vary  greatly from song to song."
 

cd /disk/Music/Mp3s/Singer-Album-directory-with-MP3/

normalize-audio -m *.wav


7. Burn the produced normalized Audio WAV files to the the CD


wodim -v -fix -eject dev='/dev/sr0' -audio -pad *.wav


Alternatively you can conver all your MP3 files to .WAV with anything be it audacity
or another program or even use 
GNOME's CDBurn tool brasero (if gnome user) or KDE's CDBurn which in my opinion is
the best CD / DVD burning application for Linux K3B.

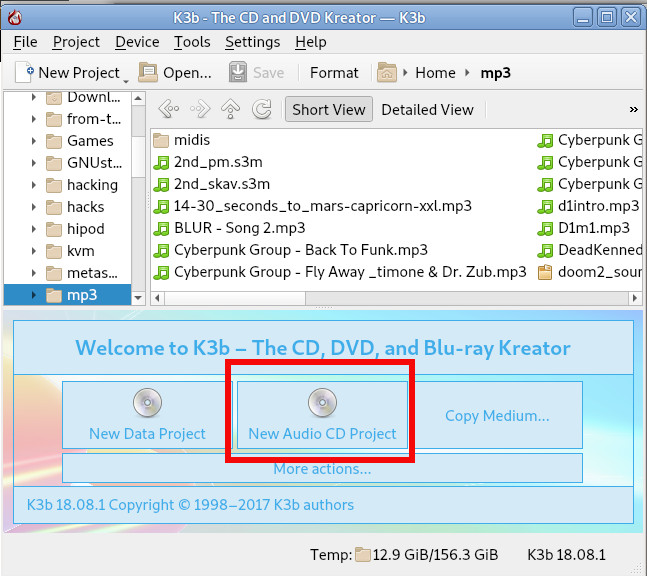
Burning Audio CD with K3b is up to few clicks and super easy and even k3b is going to handle the MP3 to WAV file Conversion itself. To burn audio with K3B just run it and click over 'New Audio CD Project'.

k3b-on-debian-gnu-linux-burn-audio-cd-screenshot

For those who want to learn a bit more on CD / DVD / Blue-Ray burning on GNU / Linux good readings are:
Linux CD Burning Mini Howto, is Linux's CD Writing Howto on ibiblio (though a bit obsolete) or Debian's official documentation on BurnCD.
 

8. What we learned here


Though the accent of this tutorial was how to Create Audio Music CD from MP3 on GNU / Linux, the same commands are available in most FreeBSD / NetBSD / OpenBSD ports tree so you can use the same method to build prepare Audio Music CD on *BSDs.

In this article, we went through few basic ways on how to prepare WAV files from MP3 normalize the new created WAV files on Linux, to prepare files for creation of Audio Music CD for the old mom or grandma's player or even just for fun to rewind some memories. For GUI users this is easily done with  k3b,  brasero or xfburn.

I've pointed you to cdw a super useful text ncurses tool that makes CD Burninng from plain text console (on servers) without a Xorg / WayLand  GUI installed super easy. It was shortly reviewed what has changed over the last few years and why and why cdrecord was substituted for wodim. A few examples were given on how to handle conversion through bash shell loops and you were pointed to some extra reading resources to learn a bit more on the topic.
There are plenty of custom scripts around for doing the same CD Burn / Covnersion tasks, so pointing me to any external / Shell / Perl scripts is mostly welcome.

Hope this learned you something new, Enjoy ! 🙂

Windows key Shortcuts and Commands List every Win admin / support must know

Tuesday, November 25th, 2014

windows-XP-vista-7-8-server-2003-rc2-2012--full-complete-keyboard-shortcuts-list
If you're a system administrator of Windows Servers or or just a PC support in a small company and you have to fix PCs running Microsoft Windows XP / 7 / 8  daily, sooner or later you will be interested into how to optimize your windows maintainance work to be able to do more adminsitration work for less time.

M$ Windows OS has evolved a lot over the past 10+ years and many of the features available GUI are now either possibile to be done via a standard commands and the GUI interfaces. Various adminsitration and common daily work simplification goodies are now accessible through quick access shortcuts and commands.

Virtually all Windows operating system environment could be now customized by using such shortcuts, this reduces the multitude of annoying double clicks which are truely pissing off sysadmins and tech-supports involved in  Windows Ticket solving.

Win Shortcuts and Commands helps to:

  • Quickly invoke almost all System Settings available from Windows Control Panel
  • Access all admins tools GUIs throguh command
  • Speed up Opening Video, Pictures, Documents, Downloads folders start Windows Update, Configure Printers / Fax / Add Sharings

etc..

A lot of the commands were new to me thus I decided to try out all of the commands in command prompt (cmd). Many of the tools down-mentioned were news to me and let me understand better on Windows Internals, so if you time try them out.
 

Function Comand
Open Documents Folder Start menu -> Search (Type documents)
Open Videos folder Start -> Search (Type videos)
Open Downloads Folder Start -> Search (Type downloads)
Open Favorites Folder favorites
View Recent messages of your PC Start menu -> Search (Type recent)
Open Recent Folder N/A
Open Pictures Folder Start menu -> Search (Type pictures)
Windows Sideshow control.exe /name Microsoft.WindowsSideshow
Windows CardSpace (Windows ID Manager) control.exe /name Microsoft.cardspace
Windows Anytime Upgrade Start menu -> Search dialog (Type WindowsUpdate)
Taskbar and Start Menu control.exe /name Microsoft.TaskbarandStartMenu
Troubleshooting control.exe /name Microsoft.Troubleshooting
User Accounts (Run user accounts Interface) control.exe /name Microsoft.UserAccounts
Adding a new Device devicepairingwizard
Add Hardware Wizard hdwwiz
Advanced User Accounts Management netplwiz
Advanced User Accounts (Authorization Mgr) azman.msc
Windows Backup and Restore sdclt
Bluetooth File Transfer fsquirt
Calculator calc
Certificates Manager certmgr.msc
Change Computer Performance Settings systempropertiesperformance (Remove visual effects)
Change Data Execution Prevention Settings systempropertiesdataexecutionprevention
Change Data Execution Prevention Settings printui
Character Map charmap
ClearType Tuner cttune (Make text onscreen more readable)
Color Management colorcpl
Command Prompt cmd
Component Services comexp.msc
Component Services dcomcnfg
Computer Management Interface compmgmt.msc
Computer Management Interface compmgmtlauncher
Connect to Network Project via Network netproj
Connect to a Projector displayswitch (Alias for Fn key + F4)
Run Control Panel command control
Create A Shared Folder Wizard shrpubw
Create a System Repair Disc recdisc
Credential Backup and Restore Wizard credwiz
Data Execution Prevention systempropertiesdataexecutionprevention
Date and Time timedate.cpl
Default Location locationnotifications
Device Manager devmgmt.msc
Device Manager hdwwiz.cpl
Device Pairing Wizard devicepairingwizard
Diagnostics Troubleshooting Wizard msdt
Digitizer Calibration Tool tabcal
DirectX Diagnostic Tool dxdiag
Disk Cleanup cleanmgr
Disk Defragmenter dfrgui
Disk Management diskmgmt.msc
Display (Change font size of text onscreen) dpiscaling
Display Color Calibration dccw
Display Switch displayswitch
DPAPI Key Migration Wizard dpapimig
Driver Verifier Manager verifier
Ease of Access Center utilman
EFS Wizard rekeywiz
Event Viewer eventvwr.msc
Fax Cover Page Editor fxscover
File Signature Verification sigverif
Font Viewer fontview
Game Controllers joy.cpl
Windows Getting Started Iface gettingstarted
IExpress Wizard iexpress
Another alias for Getting Started irprops.cpl
Install or Uninstall Display Languages lusrmgr
Internet Explorer iexplore
Run Internet Explorer Internet Options inetcpl.cpl
iSCSI Initiator Configuration Tool iscsicpl
Language Pack Installer lpksetup
Local Group Policy Editor gpedit.msc
Local Security Policy secpol.msc
Local Users and Groups lusrmgr.msc
Location Activity locationnotifications
Magnifier magnify
Malicious Software Removal Tool mrt (Might be not existent on some Windows versions)
Manage Your File Encryption Certificates rekeywiz
Math Input Panel mip
Microsoft Management Console mmc
Microsoft Support Diagnostic Tool msdt
Mouse main.cpl
NAP Client Configuration napclcfg.msc
Narrator narrator
Network Connections ncpa.cpl
New Scan Wizard wiaacmgr
Notepad notepad
ODBC Data Source Administrator odbcad32
ODBC Driver Configuration odbcconf
On-Screen Keyboard osk
Paint mspaint
Pen and Touch tabletpc.cpl
People Near Me collab.cpl
Performance Monitor perfmon.msc
Performance Options systempropertiesperformance
Phone and Modem telephon.cpl
Phone Dialer dialer
Power Options powercfg.cpl
Presentation Settings presentationsettings
Print Management printmanagement.msc
Printer Migration printbrmui
Printer User Interface printui
Private Character Editor eudcedit
Problem Steps Recorder psr
Programs and Features (Install / Uninstall) appwiz.cpl
Protected Content Migration dpapimig
Region and Language intl.cpl
Registry Editor regedit
Registry Editor 32 regedt32
Remote Access Phonebook rasphone
Remote Desktop Connection mstsc
Resource Monitor resmon
Resultant Set of Policy rsop.msc
SAM Lock Tool syskey
Screen Resolution desk.cpl
Securing the Windows Account Database syskey
Services services.msc
Set Program Access and Computer Defaults computerdefaults
Share Creation Wizard shrpubw
Shared Folders fsmgmt.msc
Snipping Tool snippingtool
Sound mmsys.cpl
Sound recorder soundrecorder
SQL Server Client Network Utility cliconfg
Sticky Notes stikynot
Stored User Names and Passwords credwiz
Sync Center mobsync
System Configuration msconfig
System Configuration Editor sysedit
System Information msinfo32
System Properties sysdm.cpl
System Properties (Advanced Tab) systempropertiesadvanced
System Properties (Computer Name Tab) systempropertiescomputername
System Properties (Hardware Tab) systempropertieshardware
System Properties (Remote Tab) systempropertiesremote
System Properties (System Protection Tab) systempropertiesprotection
System Restore rstrui
Task Manager taskmgr
Task Scheduler taskschd.msc
Trusted Platform Module (TPM) Management tpm.msc
User Account Control Settings useraccountcontrolsettings
Utility Manager utilman
Version Reporter Applet winver
Volume Mixer sndvol
Windows Action Center wscui.cpl
Windows Activation Client slui (Runs on Windows license activation time)
Windows Anytime Upgrade Results windowsanytimeupgraderesults
Windows CardSpace infocardcpl.cpl
Windows Disc Image Burning Tool isoburn (Command line tool to burn images)
Windows DVD Maker dvdmaker (N/A on Windows 7, 8)
Windows Easy Transfer migwiz (N/A on many Windows versions)
Run Windows Explorer explorer
Windows Fax and Scan wfs
Windows Features optionalfeatures
Windows Firewall firewall.cpl
Windows Firewall with Advanced Security wf.msc
Windows Journal journal (N/A on Windows 7)
Windows Media Player wmplayer (N/A on many Windows releases)
Windows Memory Diagnostic Scheduler mdsched (Check your PC memory on next boot)
Windows Mobility Center (Stats) mblctr
Windows Picture Acquisition Wizard wiaacmgr
Windows PowerShell powershell
Windows PowerShell ISE powershell_ise
Windows Remote Assistance msra
Windows Repair Disc recdisc
Windows Script Host wscript
Windows Update wuapp
Windows Update Standalone Installer wusa
Show Windows Version winver
WMI Management wmimgmt.msc
WordPad write
XPS Viewer xpsrchvw


Most of above commands works fine with Windows XP, Vista and Windows 7 / 8, Windows 2003 / 2012, however some cmds are missing across some win versions.

Here is list of other useful Windows shortcut keys:
 

General keyboard shortcuts

  • Ctrl+C (Copy)
  • Ctrl+X (Delete selected item and save a copy to the clipboard)
  • Ctrl+V (Paste)
  • Ctrl+Z (Undo)
  • Delete (Delete) 
  • Shift+Delete (Delete the selected item permanently without moving the item to the Recycle Bin) 
  • Ctrl while dragging an item (Copy the selected item)
  • Ctrl+Shift while dragging an item (Create a shortcut to the selected item)
  • F2 key (Rename the selected item)
  • Ctrl+Right Arrow (Move the cursor to the beginning of the next word) 
  • Ctrl+Left Arrow (Move the cursor to the beginning of the previous word) 
  • Ctrl+Down Arrow (Move the cursor to the beginning of the next paragraph) 
  • Ctrl+Up Arrow (Move the cursor to the beginning of the previous paragraph) 
  • Ctrl+Shift with any arrow key (Highlight a block of text) 
  • Shift with any arrow key (Select more than one item in a window or on the desktop, or select text in a document) 
  • Ctrl+A (Select all) 
  • F3 key (Search for a file or a folder)
  • Alt+Enter (View the properties for the selected item) 
  • Alt+F4 (Close the active item, or exit the active program) 
  • Alt+Enter (Display the properties of the selected object) 
  • Alt+Spacebar (Open the shortcut menu for the active window) 
  • Ctrl+F4 (Close the active document in programs that enable multiple documents to be open at the same time) 
  • Alt+Tab (Switch between the open items) 
  • Alt+Esc (Cycle through items in the order in which they were opened) 
  • F6 key (Cycle through the screen elements in a window or on the desktop)
  • F4 key (Display the Address bar list in My Computer or in Windows Explorer) 
  • Shift+F10 (Display the shortcut menu for the selected item)
  • Alt+Spacebar (Display the System menu for the active window) 
  • Ctrl+Esc (Display the Start menu) 
  • Alt+Underlined letter in a menu name (Display the corresponding menu)
  • Underlined letter in a command name on an open menu (Perform the corresponding command)
  • F10 key (Activate the menu bar in the active program)
  • Right Arrow  (Open the next menu to the right, or open a submenu)
  • Left Arrow  (Open the next menu to the left, or close a submenu)
  • F5 key (Update the active window)
  • Backspace (View the folder one level up in My Computer or Windows Explorer) 
  • Esc (Cancel the current task)
  • Shift when you insert a CD into the CD drive (Prevent the CD from automatically playing)
  • Ctrl+Shift+Esc (Open Task Manager) 

Dialog box keyboard shortcuts

  • Ctrl+Tab (Move forward through the tabs)
  • Ctrl+Shift+Tab (Move backward through the tabs)
  • Tab (Move forward through the options)
  • Shift+Tab (Move backward through the options)
  • Alt+Underlined letter (Perform the corresponding command, or select the corresponding option)
  • Enter (Perform the command for the active option or button)
  • Spacebar (Select or clear the check box if the active option is a check box)
  • Arrow keys (Select a button if the active option is a group of option buttons)
  • F1 key (Display Help)
  • F4 key (Display the items in the active list)
  • Backspace (Open a folder one level up if a folder is selected in the Save As or Open dialog box)

Microsoft natural keyboard shortcuts

  • Windows Logo (Display or hide the Start menu)
  • Windows Logo+Break (Display the System Properties dialog box)
  • Windows Logo+D (Display the desktop)
  • Windows Logo+M (Minimize all the windows)
  • Windows Logo+Shift+M (Restore the minimized windows)
  • Windows Logo+E (Open My Computer)
  • Windows Logo+F (Search for a file or a folder)
  • Ctrl+Windows Logo+F (Search for computers)
  • Windows Logo+F1 (Display Windows Help)
  • Windows Logo+ L (Lock the keyboard)
  • Windows Logo+R (Open the Run dialog box)
  • Windows Logo+U (Open Utility Manager)

Accessibility keyboard shortcuts

  • Right Shift for eight seconds (Switch FilterKeys on or off)
  • Left Alt+left Shift+Print Screen (Switch High Contrast on or off)
  • Left Alt+left Shift+Num Lock (Switch the MouseKeys on or off)
  • Shift five times (Switch the StickyKeys on or off)
  • Num Lock for five seconds (Switch the ToggleKeys on or off)
  • Windows Logo +U (Open Utility Manager)

Windows Explorer keyboard shortcuts


  • End (Display the bottom of the active window)
  • Home (Display the top of the active window)
  • Num Lock+Asterisk sign (*) (Display all the subfolders that are under the selected folder)
  • Num Lock+Plus sign (+) (Display the contents of the selected folder)
  • Num Lock+Minus sign (-) (Collapse the selected folder)
  • Left Arrow  (Collapse the current selection if it is expanded, or select the parent folder)
  • Right Arrow  (Display the current selection if it is collapsed, or select the first subfolder) 

Keyboard Shortcuts for Character Map


After you double-click a character on the grid of characters, you can move through the grid by using the keyboard shortcuts:

  • Right Arrow  (Move to the right or to the beginning of the next line)
  • Left Arrow  (Move to the left or to the end of the previous line) 
  • Up Arrow (Move up one row)
  • Down Arrow (Move down one row)
  • Page Up  (Move up one screen at a time)
  • Page Down (Move down one screen at a time)
  • Home (Move to the beginning of the line)
  • End (Move to the end of the line)
  • Ctrl+Home (Move to the first character)
  • Ctrl+End (Move to the last character)
  • Spacebar (Switch between Enlarged and Normal mode when a character is selected) 

Microsoft Management Console (MMC) main window keyboard shortcuts


  • Ctrl+O (Open a saved console)
  • Ctrl+N (Open a new console)
  • Ctrl+S (Save the open console)
  • Ctrl+M (Add or remove a console item)
  • Ctrl+W (Open a new window)
  • F5 key (Update the content of all console windows)
  • Alt+Spacebar (Display the MMC window menu)
  • Alt+F4 (Close the console)
  • Alt+A (Display the Action menu)
  • Alt+V (Display the View menu)
  • Alt+F (Display the File menu)
  • Alt+O (Display the Favorites menu) 

Microsoft Management Console (MMC) window keyboard shortcuts

  • Ctrl+P (Print the current page or active pane)
  • Alt+Minus sign (-) (Display the window menu for the active console window)
  • Shift+F10 (Display the Action shortcut menu for the selected item)
  • F1 key (Open the Help topic, if any, for the selected item)
  • F5 key (Update the content of all console windows)
  • Ctrl+F10 (Maximize the active console window)
  • Ctrl+F5 (Restore the active console window)
  • Alt+Enter (Display the Properties dialog box, if any, for the selected item)
  • F2 key (Rename the selected item)
  • Ctrl+F4 (Close the active console window. When a console has only one console window, this shortcut closes the console)

Remote desktop connection navigation


  • Ctrl+Alt+End (Open the Microsoft Windows NT Security dialog box)
  • Alt+Page Up (Switch between programs from left to right)
  • Alt+Page Down (Switch between programs from right to left)
  • Alt+Insert (Cycle through the programs in most recently used order)
  • Alt+Home (Display the Start menu)
  • Ctrl+Alt+Break (Switch the client computer between a window and a full-screen display)
  • Alt+Delete (Display the Windows menu)
  • Ctrl+Alt+Minus sign (-) (Put a snapshot of the complete client window area on the Terminal server clipboard and provide the same functionality as pressing Alt+Print Screen on a local computer)
  • Ctrl+Alt+Plus sign (+) (Put a snapshot of the active window in the client on the Terminal server clipboard and provide the same functionality as pressing Print Screen on a local computer.) 

Microsoft Internet Explorer navigation


  • Ctrl+B (Open the Organize Favorites dialog box)
  • Ctrl+E (Open the Search bar)
  • Ctrl+F (Start the Find utility)
  • Ctrl+H (Open the History bar)
  • Ctrl+I (Open the Favorites bar)
  • Ctrl+L (Open the Open dialog box)
  • CtrlL+N (Start another instance of the browser with the same web address)
  • Ctrl+O (Open the Open dialog box, the same as CTRL+L)
  • Ctrl+P (Open the Print dialog box)
  • Ctrl+R (Update the current webpage)
  • Ctrl+W (Close the current window) 

Complete list of Windows Keyboard Shorcuts is on Microsoft website