Posts Tagged ‘default’

Check weather forecast from console (terminal) on GNU / Linux and FreeBSD howto

Friday, August 23rd, 2019

how to get weather forecast prognosis from command line text terminal / console on Linux and FreeBSD

Doing everything in Linux console / terminal is a question perhaps every Linux / BSD hacker wants to do as Graphical user interface and using web search or using Graphical Environment plugins is an unneded complexity + googling or duckduckgoing for weather to check your next vacation destination city has been more and more of a terrible experience (for me) as I'm not a big fan of using the OS in a GUI.
In that manner of thoughts, as a Linux console geek and hard core ASCII art fan. I was recently happy to find that  possible to check weather forecast in tty console or Linux terminal in a beautiful ascii art way easily through a Web wttr.in service – a web application weather forecast service that supports displaying the current and few days in future, weather forecast either in browser as a plain text or from the command line by simply accessing it with your favourite web access / transfer tool such as;
wget / curl or any of your favourite text browser elinks / lynx / w3m or if on *BSDs use fetch command.


Install Curl data transfer tool if it is not already


Wget is installed by default across most Linux distributions and fetch is present by default on BSDs, displaying it in text browser would perhaps be never used but if you decide to give it a try maybe try with elinks (to get colorful output), w3m and lynx will display a black and white results.

In case if you miss curl, install it:

On Debian distro


aptitude install -y curl


or Fedora

yum install -y curl


Of course to use wttr.in as it is Internet based Weather Forecast service the minimum you need to have is to have Internet connection to your Linux / BSD desktop computer.

Text based Weather Forecast Web App currently supports:

display the current weather as well as a 3-day weather forecast, split into morning, noon, evening and night

  • Temperature is displayed for morning, noon, evening and night (includes temperature range, wind speed and direction, viewing distance, precipitation amount and probability)
  • Provide results for Weather based on City / town / village location
  • Supports display of Moon Phases Forecast in calendar days
  • Supports multilingual names (Bulgarian Phonetic cyrillic / Russian and other exotic UTF-8 encodings such as Chineese and Japanese),  50+ languages are currently supported
  • Has ability for prognosis for hostname (domain) location based on an its IP GeoIP location on the Globe
  • Geographical locations / landmarks such as Lakes / Mountains etc. can be easily queried
  • Query results metrics could be configured, e.g. USCS units or EU and rest of world accepted ones (SI) metric
  • Displayed result could be either in ANSI (if from terminal / console / HTML if queried from browser or in PNG – if needed)


Where wttr.in could be useful ?

The best applications use, I can think of are for server (shell) / perl scripting automation purposes, it could be useful especially in TOO HOT, TOO, COLD, TOO WET location in Small and Middle sized Data Centers Green Energy (Sun Panel) Parks / Wind Energy situated Linux monitoring hosts to track possible problems of overheats or overcolding of servers due to abnormal excessive temperatures such as the ones we experienced this summer here All across in Europe or in too Cold DC locations such as heat locations Deserts in African Countries, Saudi Arabia or Chukotka or Siberia in Russia.
Other application is as a backup option to other normal Weather report services by PHP or Python scripts that fetch data, from multiple places.
Of course since this is a third party controlled service, the downtime is due to excessive connection requests, the service could get flooded and stopped working, but I guess for any Commercial use, wttr.in creator Igor Chubin would be happy to sell a specific crafted service for any end user candidates.


Here is few examples of the beautiful returned ASCII art formatted output of wttr.in.
 

1. Getting a three days Weather Forecast prognosis for city / town location

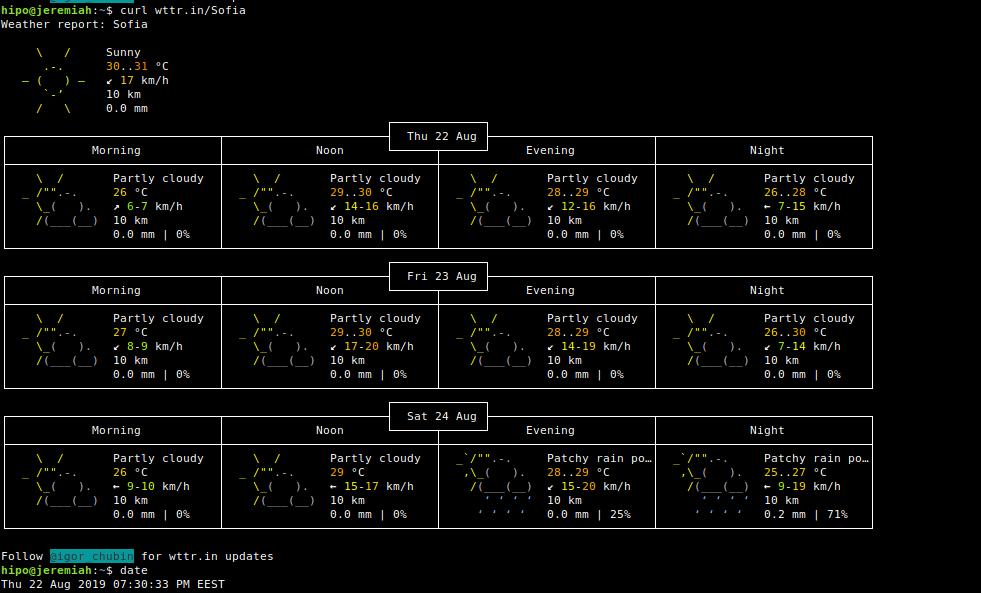
To get what is current weather in my current city of Living, Sofia Bulgaria just pass the city to the URL address

curl http://wttr.in/Sofia
text-console-wttr.in-Weather-forecast-Sofia-for-Linux


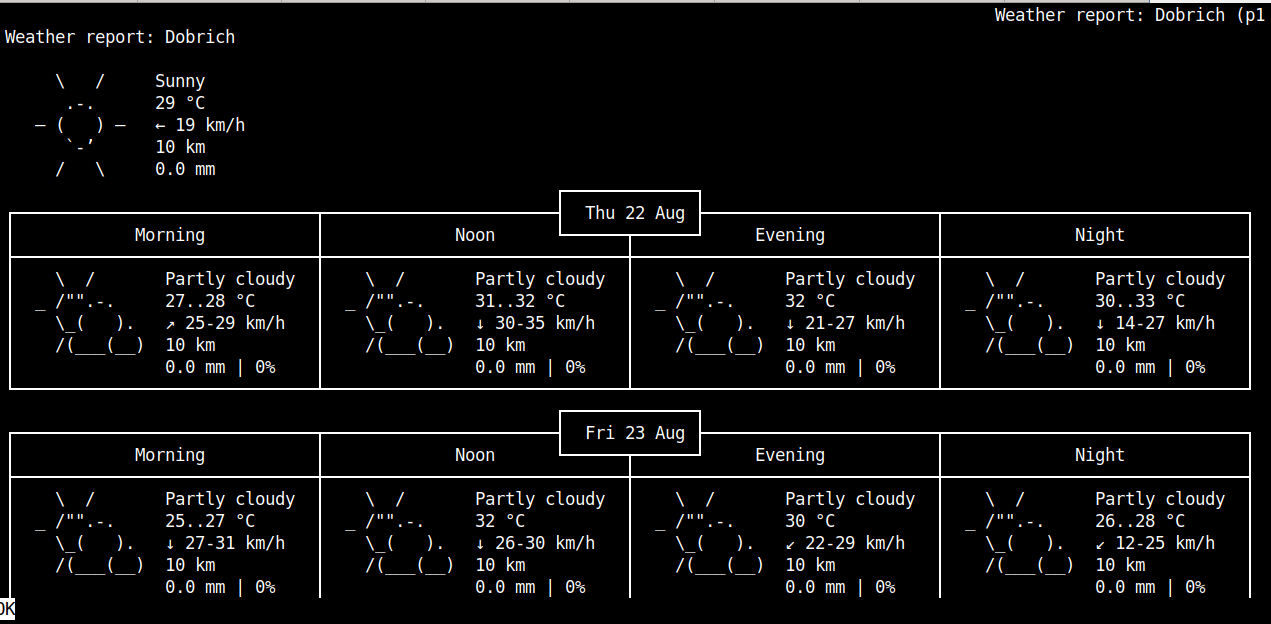
links http://wttr.in/Dobrich


curl-Linux-show--Dobrich-Weather-forecast-in-lynx-text-browser


Default links (Linux) www text browser produces ugly black and white

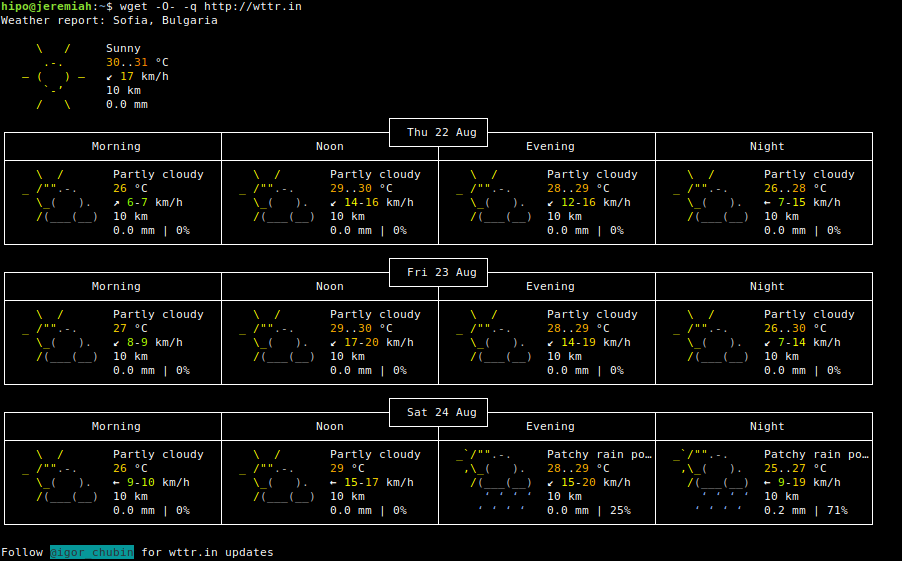
2. Displaying Weather forecast with wget


wget -O- -q http://wttr.in

getting-weather-forecast-on-linux-terminal-console-with-wget-command

If you're lazy you can even omit the http:// as wget will look for HyperText Transmission Protocol by itself


wget -O- -q wttr.in


3. Getting Forecast results for a Tourist Destination


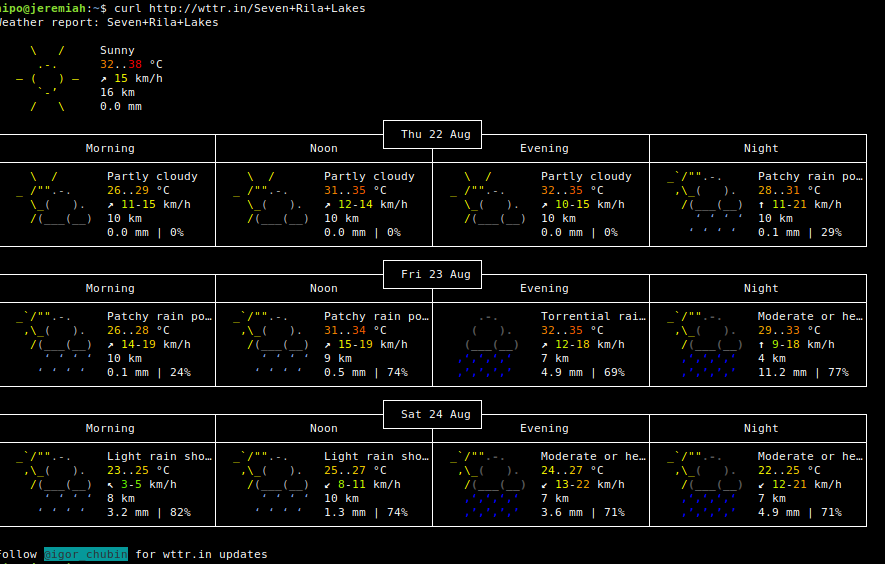
Lets get the weather forecast for the popular tourist Bulgarian destination of the Seven Rila Lakes (near Rila Monastery), situated in the Rila Mountain BG.


curl http://wttr.in/Seven+Rila+Lakes
 

Console-terminal-Weather-forecast-Linux-Seven-Rila-Lakes


4. Display Forecast for a specific server IP


Displaying information on specific server IP address current situated in GeoIP database, of course could be not really true, as the IP could be just a Load Balancer a router that does NAT to some internal DMZ-ed location server, but anyways it is a cool feature.

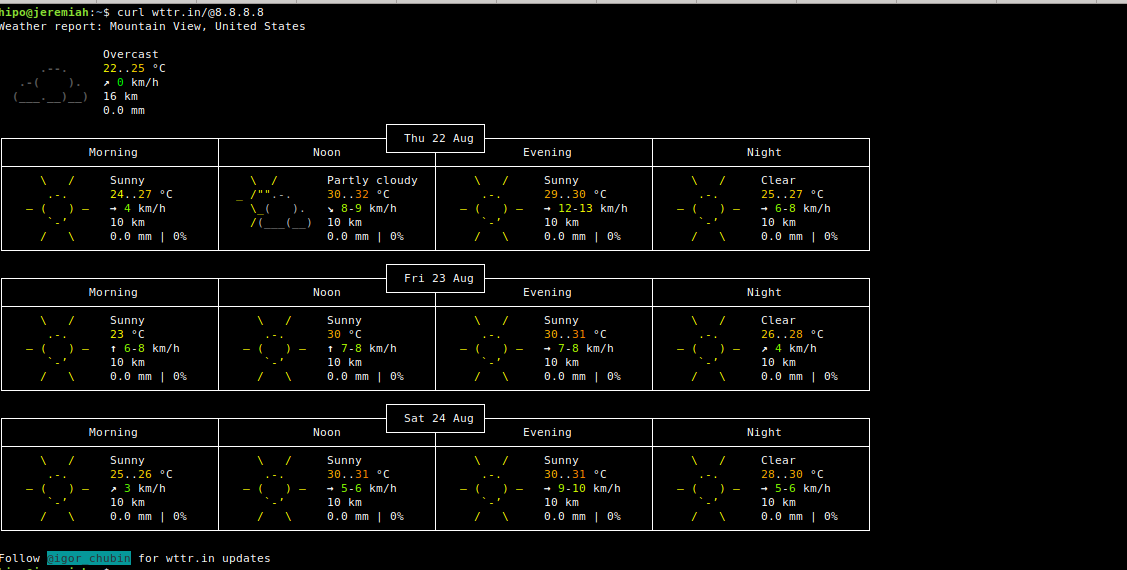
Lets get information on what is the weather on Google Global's Public DNS server IP 8.8.8.8 so commonly used to guarantee a Windows and Linux Desktop client machines Internet connectivity.
 

curl wttr.in/@8.8.8.8
 

wttr.in-Linux-text--forecast-service-curl-screenshot Google Public DNS location weather forecast

5. Download PNG image picture from wttr.in service


Lets say you want to get a 3 days standard Weather forecast for the popular Black Sea Resort town in Bulgaria Pomorie (a beautiful sea city which has even a functioning 5 Monks Monastery Pomorie Monastery situated near sea coast)


curl http://wttr.in/Pomorie.png


–2019-08-22 20:15:51–  http://wttr.in/Pomorie.png
Resolving wttr.in (wttr.in)… 5.9.243.187
Connecting to wttr.in (wttr.in)|5.9.243.187|:80… connected.
HTTP request sent, awaiting response… 200 OK
Length: 42617 (42K) [image/png]
Saving to: ‘Pomorie.png’

Pomorie.png                                     100%[=======================================================================================================>]  41.62K  –.-KB/s    in 0.07s   

2019-08-22 20:15:52 (586 KB/s) – ‘Pomorie.png’ saved [42617/42617]


Note: The generated .png is again the ASCII art produced by a direct text fetch bug in pic format


6. Displaying Current Moon Phase


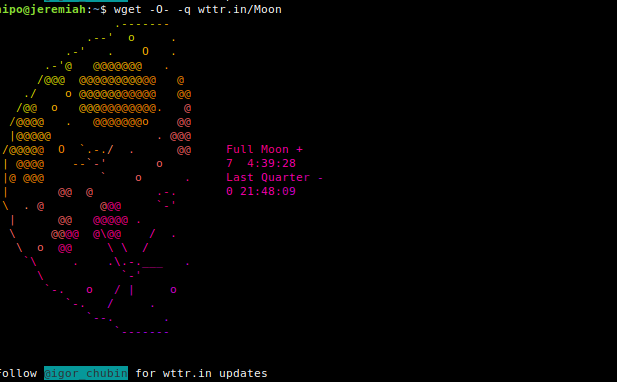
If you want to enjoy a text based Moon phase picture through wttr.in 🙂

wget -O- -q wttr.in/Moon

Display-current-Phase-of-Moon-in-terminal-console-Linux-wttr.in-service

You can also get a Moon Phase prognosis for a current future date or get a previous date phase


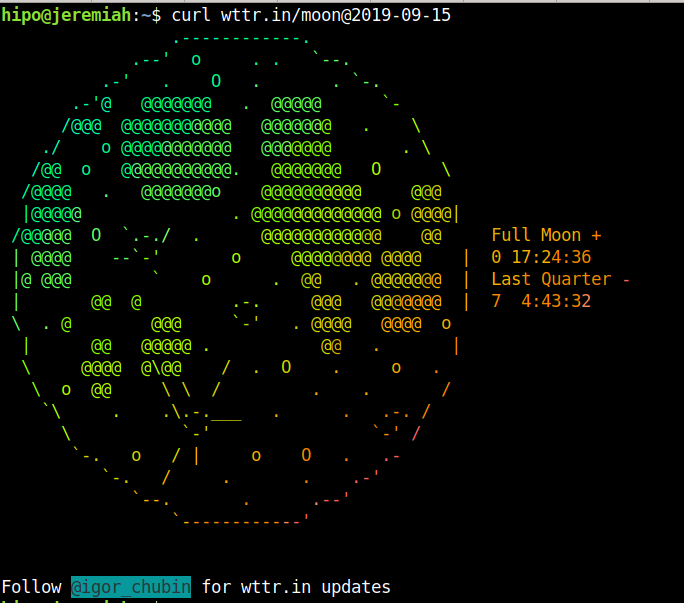
curl wttr.in/moon@2019-09-15

Full-Moon-Weather-forecast-text-console-reporting-via-wttr.in-on-Gnu_Linux


Full Moon Madness !! – Vampires are out beaware and Enjoy the ultra kewl ASCII Colorful Art 🙂
 

7. Getting help for wttr.in terminal Waether Forecast results


$ curl wttr.in/:help
Usage:


    $ curl wttr.in          # current location
    $ curl wttr.in/muc      # weather in the Munich airport

Supported location types:

    /paris                  # city name
    /~Eiffel+tower          # any location
    /Москва                 # Unicode name of any location in any language
    /muc                    # airport code (3 letters)
    /@stackoverflow.com     # domain name
    /94107                  # area codes
    /-78.46,106.79          # GPS coordinates

Special locations:

    /moon                   # Moon phase (add ,+US or ,+France for these cities)
    /moon@2016-10-25        # Moon phase for the date (@2016-10-25)

Units:

    m                       # metric (SI) (used by default everywhere except US)
    u                       # USCS (used by default in US)
    M                       # show wind speed in m/s

View options:

    0                       # only current weather
    1                       # current weather + 1 day
    2                       # current weather + 2 days
    A                       # ignore User-Agent and force ANSI output format (terminal)
    F                       # do not show the "Follow" line
    n                       # narrow version (only day and night)
    q                       # quiet version (no "Weather report" text)
    Q                       # superquiet version (no "Weather report", no city name)
    T                       # switch terminal sequences off (no colors)

PNG options:

    /paris.png              # generate a PNG file
    p                       # add frame around the output
    t                       # transparency 150
    transparency=…        # transparency from 0 to 255 (255 = not transparent)

Options can be combined:

    /Paris?0pq
    /Paris?0pq&lang=fr
    /Paris_0pq.png          # in PNG the file mode are specified after _
    /Rome_0pq_lang=it.png   # long options are separated with underscore

Localization:

    $ curl fr.wttr.in/Paris
    $ curl wttr.in/paris?lang=fr
    $ curl -H "Accept-Language: fr" wttr.in/paris

Supported languages:

    af da de el et fr fa hu id it nb nl pl pt-br ro ru tr uk vi (supported)
    az be bg bs ca cy cs eo es fi ga hi hr hy is ja jv ka kk ko ky lt lv mk ml nl fy nn pt pt-br sk sl sr sr-lat sv sw th te uz zh zu he (in progress)

Special URLs:

    /:help                  # show this page
    /:bash.function         # show recommended bash function wttr()
    /:translation           # show the information about the translators


8. Comparing two cities weather from command line


One useful use of wttr.in if you plan to travel from Location city A to Location city B is to compare the temperatures with a simple bash one liner script:


diff -Naur <(curl -s http://wttr.in/Sofia ) <(curl -s http://wttr.in/Beograd )


9. Using ansiweather command to get Weather Temperature / Wind / Humidity in one line beuatiful text


If you go and install answeather Linux package


apt-get install –yes ansiweather


You will get a shell script wrapper with ANSI colors and Unicode symbols support. Weather data comes from OpenWeatherMap, this is useful if wttr.in is not working due to some URL malfunction (due to service is DoS-ed) etc.


ansiweather -l Atina


ansiweather-Atina-weather-forecast-result-linux-text-console

Lets use ansiweather to print the weather prognosis for upcoming 5 days for near port of Burgas, BG
 

ansiweather -F -l Burgas

ansiweather-print-weather-forecast-prognosis-for-5-days-in-Linux-text-terminal


10. Get all Weather current forecast for each Capital in the world


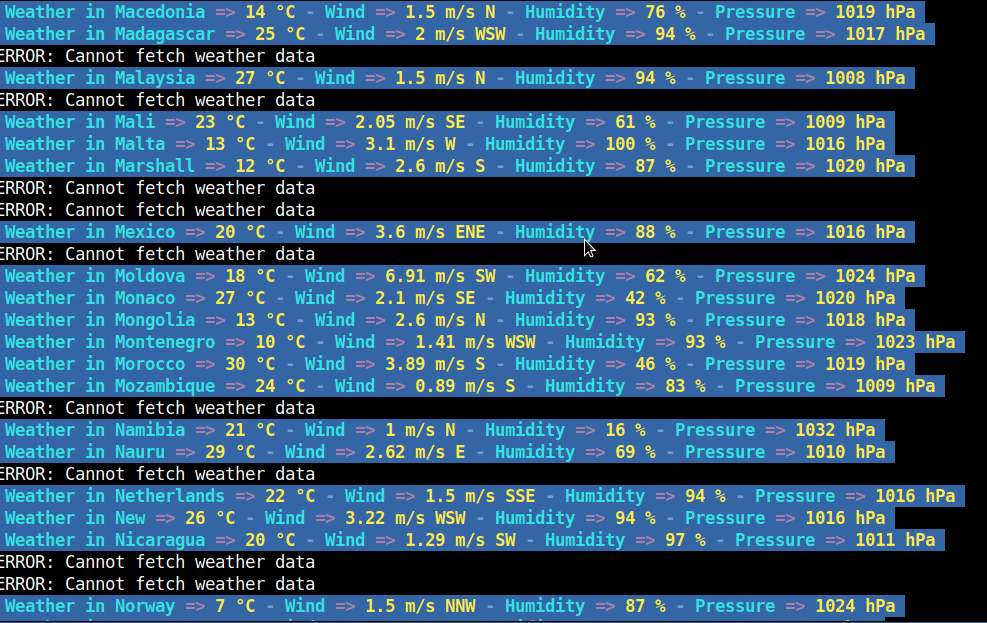
You can download and use this simple plain text file list of All Country Capitals in the World (country-capitals-all-world.txt) with ansiweather and a bash loop to get displayed each and every current day Weather Forecast in the World, here is how:


while read line; do ansiweather -l $line; sleep 3; done < country-capitals-all-world.txt

ansiweather-all-countires-capitals-result

As you can see some of the very exotic third world capitals does not return data so 'ERROR: Cannot fetch weather data' is returned.


You can also substitute ansiweather with curl wttr.in/$line to do get the beautiful ASCII art 3 days weather forecast via wttr.in


while read line; do curl http://wttr.in/$line; sleep 3; done < country-capitals-all-world.txt


I'll be happy to know other nice ASCII Art supporting Web service to enjoy from text terminal on Linux (nomatter useful or) just funny joyful prank maniacal pranks such as Watching text ASCII version remake of Star Wars Classic Movie by simply telnetting to towel.blinkenlights.nl (if you haven't so just telnet and enjoy the streamed ASCIIs ! 🙂


telnet towel.blinkenlights.nl
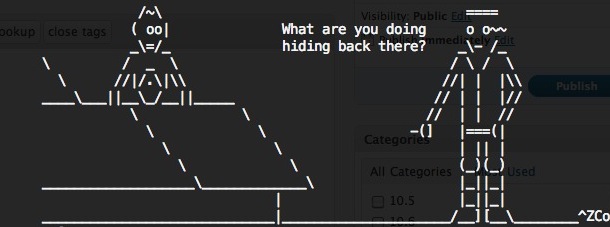
 

watch-star-wars-ascii-art-version-remake-online-with-telnet-on-linux-console-terminal


Talking about fun and ASCII, its worthy to mention hollywood Linux package

hipo@jeremiah:~/Desktop$ apt-cache show hollywood|grep -i desc -A 3
Description-en: fill your console with Hollywood melodrama technobabble
 This utility will split your console into a multiple panes of genuine
 technobabble, perfectly suitable for any Hollywood geek melodrama.
 It is particularly suitable on any number of computer consoles in the


Description-md5: 768f44c76220ea2b35f855ea34c8bc35
Homepage: http://launchpad.net/hollywood
Section: games
Priority: optional


Once installed on Debian with:

aptitude install -y hollywood

You can get in a rapid manner plenty of tmux (screen like – virtual console emulator) split screen statistics about your notebook / workstation / server CPU usage, mlocate.db status, info about plugged in machine voltage, Speedometer (statistics about Network bandwidth usage), System load avarage (CPU Count, Memory Utilization) and some other random info coming out of dmesg kernel log and more. The information displayed in splitted windows changes rapidly and (assuming you run it at home Desktop with a soundblaster) and not remotely, a james bond Agent 007 soundtrack is played on the back, that brings up one's adrenaline and makes it look even cooler.
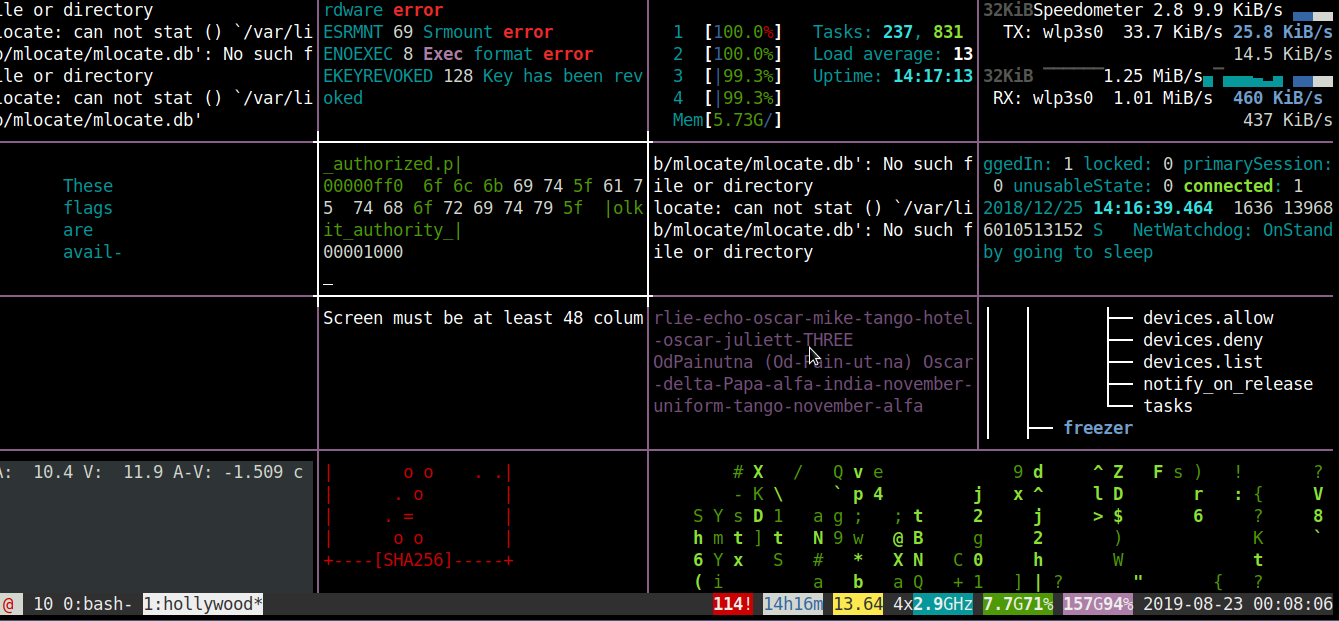
hollywood-melodrama-technobubble-split-console-multiple-panes-for-genuine-technobubble

To give you an idea what to expect, here is shot of /usr/games/hollywood (the program start binary location) on Debian GNU / Linux running, Enjoy! 🙂
 

Remove pre-installed HP, Dell, Asus, Acer, Toshiba not needed default vendor software on a new bought PC notebook quickly with Decrap My Computer

Thursday, April 14th, 2016

remove-default-unneded-software-from-manufacturer-hp-asus-acer-dell-toshiba
While browsing today and looking for software to clean up all the spy software from my corporate HP laptop, I've come across an interesting tool called Decrap which aims at removing Bloatware from a Windows PC / notebook (mirrored here because original software site was down)

So what is Bloatware ?

The term Bloatware (also called jokingly crapware) is term is the one that was coined to describe, the default pre-installed software that comes to you together with Windows pre-installed OS by the hardware manufacturer.
I'm sure anyone who bought brand new branded PC or laptop over the last 10 years have already suffered the unwanted and unnecessery
bunch of software that comes pre-installed freeware programs aiming to help you in your daily work but in reality just slowing down your PC
and showing annoying popups or at best keeping useless in Windows system apptray.

Let me give you an example:

Cleanup (Remove) common ASUS, HP, Dell default  installed unneded (Bloatware) software

Many users may want to uninstall ASUS Crapware software such as ASUS Tutor, ASUS LifeFrame3, ASUS WebStorage and ASUSVibe.

Like Asus, HP computers often come preloaded with useless software from factory, example for this is HP Customer Service enhancements, HP Update, HP Total Care Setup and ProtectSmart.

If you buy Dell PC notebook soon you'll discover that there are several preloaded software (often unnecessery software) such as Dell Stage, Dell Digital Delivery and Dell DataSafe.

Toshiba computers and notebooks contain pre-loeaded "crapware" software from Toshiba.
Just to mention a few of those: Toshiba Disc Creator, Toshiba ReelTime, Service Station, Bulletin Board and Toshiba Assist.

Often there are fingerprint reader programs, Wi-Fi connection managers, Bluetooth managers, Audio Management sofware and other third party vendor software which tend to be not working as good as others softwares from third vendor, so Decrap is to help you to identify and remove these too in a easy GUI manner.

Non-experienced Computer users often leave the bloatware to hang around for even years and only if some relative that is an IT involved person / sysadmin / Even once you're aware that the Bloatware is on the system the ordinary user is hard to remove it as he is scared not to break the system.
Besides that fften this bloatware just soft comes so much integrated into Windows that removing it costs hours of tries and research online on
all the Bloatware components and even then could mislead you so you break the PC. programmer etc. comes home of such users finds out about the happily existing of the useless software on the notebook.


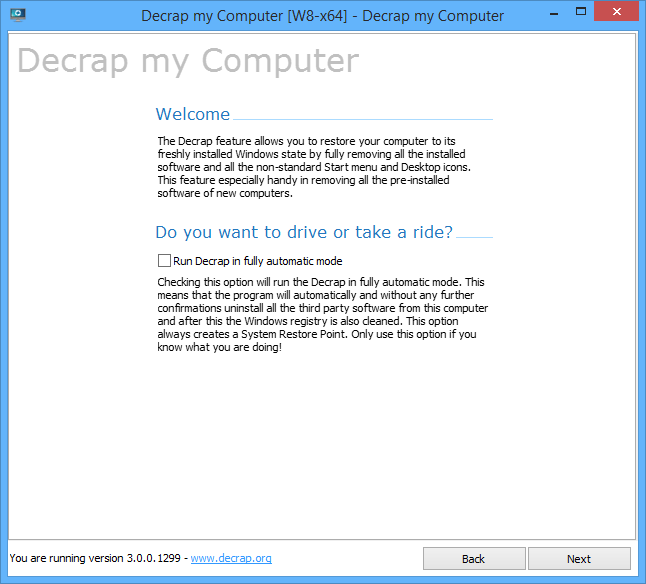
So here is Decrap My Computer coming at place aiming to help to remove the unnecessery Hardware vendor software in few easy (Click, Click, Click Next ..) steps.

decrap-my-computer-clean-up-bloatware-crapware-on-windows-laptop-main-gui

Then decrap does silently all the complex operations and suggestions to make the HP, Dell, Asus, Toshiba manufacturer prebundled software to be stopped and uninstalled.
Decrap My Computer is a freeware, lightweight and easy to use and lets you safely remove crapware and bloatware, or any software, from any Windows PC.

Even for Old computers, Decrap comes handy for the unexperienced avarage user who used his laptop with this useless  default vendors programs silently killing the performance respectively user experience for years.

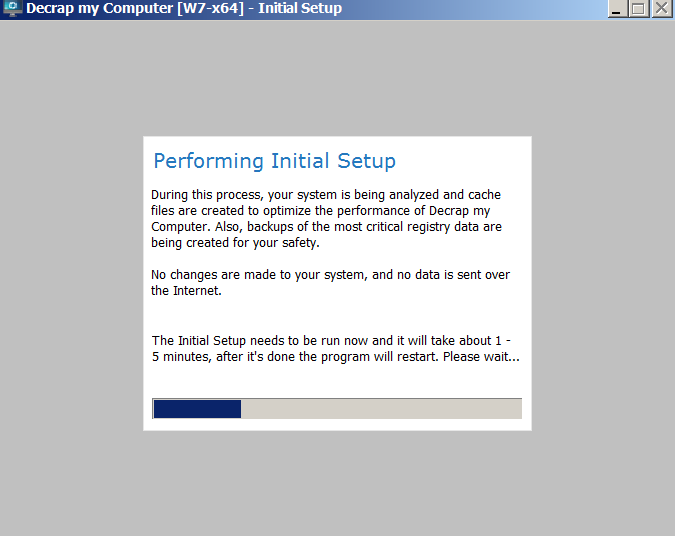
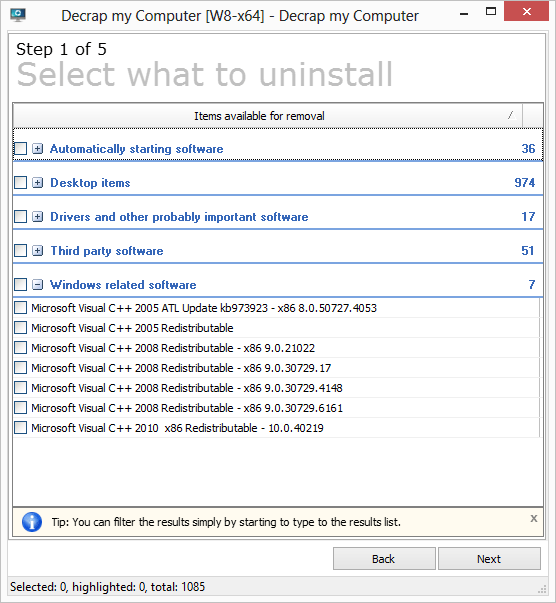
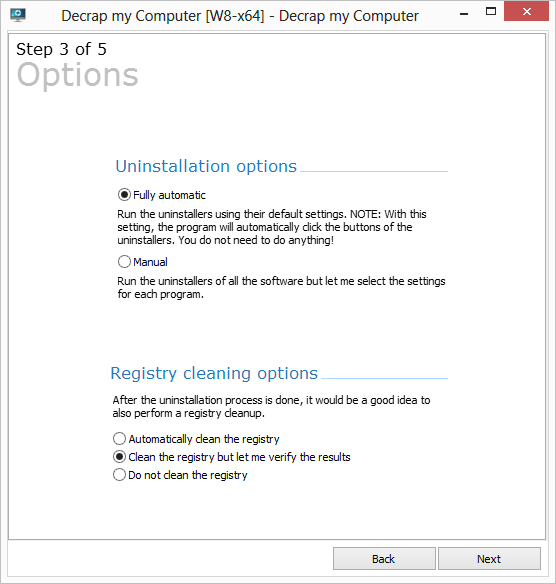
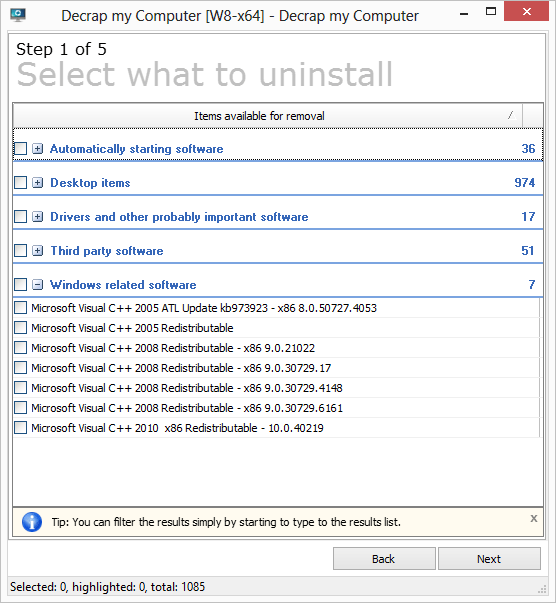
Using Decrap is quite intuitive PC is scanned for Bloatware and then after a backup Windows Restore Point is offered you're offered to review and Uninstall the unwanted softwares. There is also an automatic mode but those one still could be a bit dangerous, so use the automatic mode only on multiple machines with the same model  / brand notebooks that comes prebundled with same sofware after testing and confirming the automatic mode on 1 initial machine will not break up some needed functionality.

decrap-your-pc-clean-up-windows-from-hp-dell-toshiba-asus-bloatware-unuseful-programs

Here is few screenshots of the tool in action:
decrap-choose-what-default-laptop-manufacturer-software-you-want-to-clean-from-new-bought-pc

decrap-choose-what-default-laptop-manufacturer-software-you-want-to-clean-from-new-bought-pc-1

decrap-choose-what-default-laptop-manufacturer-software-you-want-to-clean-from-new-bought

Another good alternative (since decrap seems to be not maintained anymore) as I just leardned from Natasha Myles (thanks for pointing me about the broken link to decrap website) is SpeedUpPC more on speeding up old PC or laptop is her article 

Putty load as default session another session – Save other Putty session configuration to default howto

Thursday, November 29th, 2018

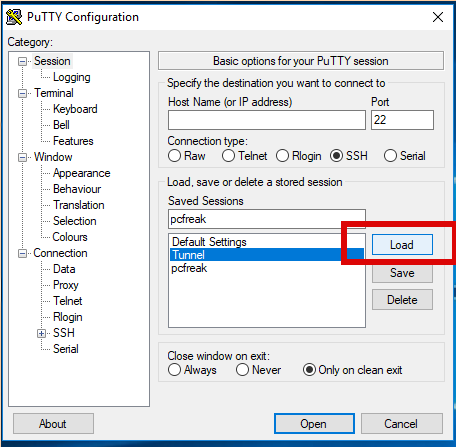
putty-load-button-screenshot

Recently I had to use PuTTY which I haven't used for years to open a number of SSH Pernanent Tunnels necessery for my daily work as a SAP Consultant.

I've saved them under a certain new profile and saved the set SSH Tunnel configuration not in the default Session but in separate named one, therefore had to press Load button every time after clicking over my Putty shortcut icon. 

That was annoying and took few seconds out of my life every next morning for about a week, so finally I found osme time to google it and it seemed it is pretty easy to have any Putty sessoin loaded you like.

Here is how:

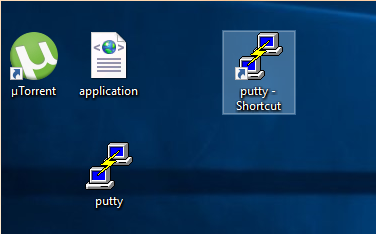
1. Create a new Putty Shortcut

putty-screenshot1

putty-shortcut-screenshot-windows

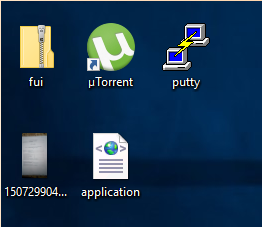
Click over Putty icon while holding CTRL + SHIFT (Control SHIFT keys simultaneously ) and move the mouse somewhere on the desktop to create the shortcut.
 

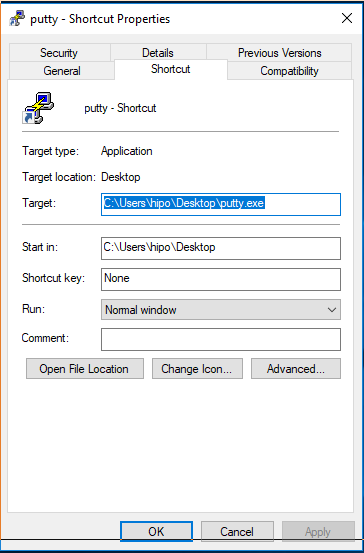
2. Right click on Putty Shortcut

putty-target-screenshot-windows1

putty-target-screenshot-windows2


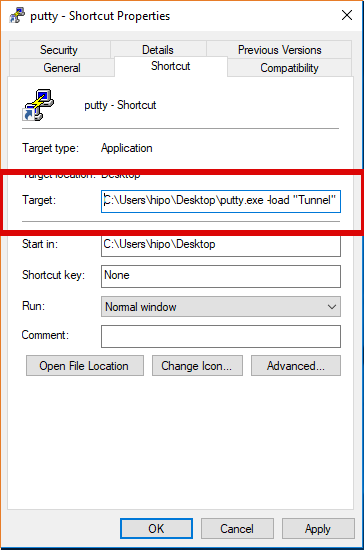
"C:\Program Files\PuTTY\putty.exe" -load "your_saved_session" "username@your_server_address" -pw "your_password"


fill out "target" field of shortcut using above code (alter to your own properties).
click Apply button.

If you need to pass a user and password from Shortcut itself (which is a bad practice for security but sometimes useful, for not so important Tunnels – for example a tunnel to an Open Proxy), do it by typing in the target field like so:
 

"C:\Program Files\PuTTY\putty.exe" -load "your_saved_session" "username@your_server_address" -pw "your_password"


And Hooray !!! After that when you click on PuTTy shortcut it loads your session automatically using given username and password.

How to enable Control Alt Backspace to Kill X server on Debian / Ubuntu Linux

Thursday, September 28th, 2017

kill-X-server-switch-revert-back-to-ctrl-alt-backspace-howto
Being a long time GNU / Linux user, I've been quite dissatisfied for the fact that in latest Debian and Ubuntu Linux, the default Key combination to Kill X (CTRL + ALT + BACKSPACE) is no longer working.

Though nowdays Xorg (XServer) is pretty stable it still happens from time to time for some application to overload the PC badly and make Gnome or KDE environment little or no responsive at all and here comes the goody CTRL + ALT + BACKSPACE it is pretty much  like  (CTRL + ALT + DEL) did restarted the computer in DOS and earlier Windows OS-es once the environment became unusable with the only difference that just Xorg server is restarted and the other using programs that are in background work just like they used to. 

CTRL + ALT + Backspace is a great thing to use especially if you're running some homebrew server and you use it both as a Server with some few little websites and as a Desktop environment to browse the net and do basic stuff.

So here comes the question how to make the CTRL + ALT + BACKSPACE keyboard combination be killing Xserver like in the good old days?

The easiest way to do it interactively in ncurses interface is by  running:


root@noah:~# dpkg-reconfigure keyboard-configuration


If somehow on the machine you don't have dpkg-reconfigure or you prefer to do set CTRL + ALT + BACKSPACE Kill Switch manually edit /etc/default/keyboard 

inside change value of


XKBOPTIONS="terminate:ctrl_alt_bksp" 


like shown below file:

root@noah:/home/hipo# cat  /etc/default/keyboard

# KEYBOARD CONFIGURATION FILE

# Consult the keyboard(5) manual page.

XKBMODEL="pc105"
XKBLAYOUT="us"
XKBVARIANT=""
XKBOPTIONS="terminate:ctrl_alt_bksp"

BACKSPACE="guess"

The configuration should be working across Debian 7, 8, 9 as well as Ubuntu 12 ..14 .. 16 and hopefully in future releases too, just as many other Linux distributions like Mint etc. the Xserver Kill Switch setting should be located in same file.

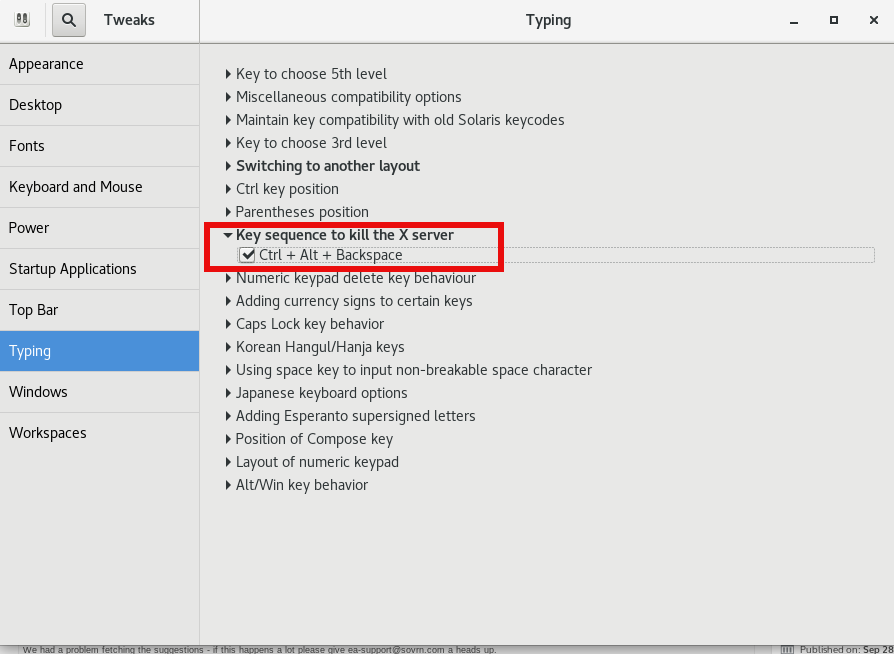
Finally if even after that change the Control Alt BackSpace Kill Switch sequence refuses to work in GNOME Desktop environment, it might be due to a local setting typical for GNOME and this should be fixed via the good known gnome-tweak-tool

So GNOME users should run it from command line and check the setting there, e.g.:


$ gnome-tweak-tool


You should check:


Typing -> Kill Sequence to Kill the X Server


it should look like shown in below screenshot:

how-to-set-X-server-kill-switch-in-GNOME-gnak-tool-screenshot-debian-stretch


How to set the preferred cipher suite on Apache 2.2.x and Apache 2.4.x Reverse Proxy

Thursday, May 4th, 2017

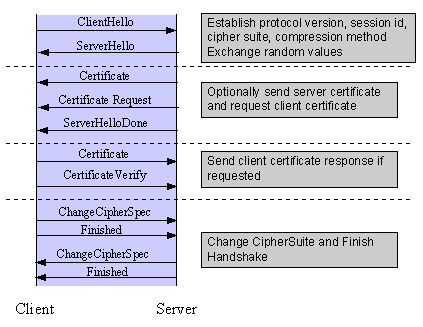
how-to-set-the-preferred-default-delivered-ssl-cipher-suite-apache-2.2-apache-2.4-how-ssl-handshake-works

1. Change default Apache (Reverse Proxy) SSL client cipher suite to end customer for Android Mobile applications to work

If you're a sys admin like me and you need  to support client environments with multiple Reverse Proxy Apache servers include old ones Apache version 2.2.x (with mod_ssl compiled in Apache or enabled as external module)
and for that reason a certain specific Apache Reverse Proxy certificate SSL encoding cipher default served suite change to be TLS_DHE_RSA_WITH_AES_128_CBC_SHA in order for the application to properly communicate with the server backend application then this article might help you.

There is an end user client application which is Live on a production servers some of which running on  backend WebSphere Application Servers (WAS) / SAP /  Tomcat servers and for security and logging purposes the traffic is being forwarded from the Apache Reverse Proxies (whose traffic is incoming from a roundup Load Balancers).

Here is a short background history of why cipher suite change is necessery?

The application worked fine and was used by a desktop PCs, however since recently there is an existent Android and Apple Store (iOS) mobile phone application and the Android Applications are unable to properly handle the default served Apache Reverse Proxy cipher suite and which forced the client to ask for change in the default SSL cipher suite to:

TLS_DHE_RSA_WITH_AES_128_CBC_SHA

By default, the way the client lists the cipher suites within its Client Hello will influence on Apache the selection of the cipher suite used between the client and server.

The current httpd.conf in Apache is configured so the ciphers for RP client cipher suite Hello transferred between Reverse Proxy -> Client are being provided in the following order:


1.    TLS_RSA_WITH_RC4_128_MD5
2.    TLS_RSA_WITH_RC4_128_SHA
3.    TLS_RSA_WITH_RC4_128_CBC_SHA
4.    TLS_DHE_RSA_WITH_AES_128_CBC_SHA


This has to be inverted so:

4. TLS_DHE_RSA_WITH_AES_128_CBC_SHA
becomes on the place of
1. TLS_RSA_WITH_RC4_128_MD5


A very good reading that helped me achieve the task as usual was Apache's official documentation about mod_ssl see here


So to fix the SSL/TLS cipher suite default served order use SSLCipherSuite and SSLHonorCipherOrder directives.


SSLCipherSuite directive is used to specify the cipher suites enabled on the server.
To dictate also  preferred cipher suite order directive and that's why you need SSLHonorCipherOrder directive (note that this is not available for older  Apache 2.x branch), the original bug for this directive can be seen within
 

For Example:


SSLHonorCipherOrder On
SSLCipherSuite RC4-SHA:AES128-SHA:AES256-SHA:DHE-RSA-AES128-SHA:DHE-RSA-AES256-SHA:DES-CBC3-SHA


So here is my fix for changing the Ciphersuite SSL Crypt order (notice the TLS_DHE_RSA_WITH_AES_128_CBC_SHA being given as first argument):


SSLHonorCipherOrder On
SSLCipherSuite TLS_DHE_RSA_WITH_AES_128_CBC_SHA:RC4-SHA:AES128-SHA:AES256-SHA:DHE-RSA-AES128-SHA:DHE-RSA-AES256-SHA:DES-CBC3-SHA

if you want also to enable TLSv1.2 certificate cipher support you can use also:
 

SSLProtocol -all +TLSv1.2

SSLHonorCipherOrder on


# Old Commented configuration from my httpd.conf – no RC4, 3DES allowed
#SSLCipherSuite "EECDH+ECDSA+AESGCM EECDH+aRSA+AESGCM EECDH+ECDSA+SHA384 EECDH+ECDSA+SHA256 EECDH+aRSA+SHA384 EECDH+aRSA+SHA256 EECDH+aRSA+RC4 EECDH EDH+aRSA 3DES-EDE-CBC-SHA RC4 !aNULL !eNULL !LOW !MD5 !EXP !PSK !SRP !DSS !RC4"


Because there was also requirement for a multiple of SSL cipher encryption (to support large range of both mobile and desktop computers and operating systems the final) cipher suite configuration in httpd.conf that worked for the client looked like so:
 

SSLCipherSuite ECDHE-RSA-AES128-GCM-SHA256:ECDHE-ECDSA-AES128-GCM-SHA256:ECDHE-RSA-AES256-GCM-SHA384:ECDHE-ECDSA-AES256-GCM-SHA384:DHE-DSS-AES128-GCM-SHA256:kEDH+AESGCM:ECDHE-RSA-AES128-SHA256:ECDHE-ECDSA-AES128-SHA256:ECDHE-RSA-AES128-SHA:ECDHE-ECDSA-AES128-SHA:ECDHE-RSA-AES256-SHA384:ECDHE-ECDSA-AES256-SHA384:ECDHE-RSA-AES256-SHA:ECDHE-ECDSA-AES256-SHA:DHE-DSS-AES128-SHA256:DHE-DSS-AES256-SHA:AES128-GCM-SHA256:AES256-GCM-SHA384:AES128-SHA:AES256-SHA:AES:CAMELLIA:DES-CBC3-SHA:!aNULL:!eNULL:!EXPORT:!DES:!RC4:!MD5:!PSK:!aECDH:!EDH-DSS-DES-CBC3-SHA:!EDH-RSA-DES-CBC3-SHA:!KRB5-DES-CBC3-SHA:!DHE-RSA-AES128-GCM-SHA256:!DHE-RSA-AES256-GCM-SHA384:!DHE-RSA-AES128-SHA256:!DHE-RSA-AES256-SHA:!DHE-RSA-AES128-SHA:!DHE-RSA-AES256-SHA256:!DHE-RSA-CAMELLIA128-SHA:!DHE-RSA-CAMELLIA256-SHA


Once this was done the customer requested HTTP cookie restriction to be added to the same virtual host.
There initial request was to:

2. Set HTTP cookie secure flag and HttpOnly on every cookie that is not being accessed from Internal website JavaScript code

To make Apache Reverse Proxy to behave that way here is the httpd.conf config added to httpd.conf
 

# vim httpd.conf


   #Header edit Set-Cookie ^(.*)$ $1;HttpOnly;Secure
   Header always edit Set-Cookie ^(.*)$ $1;HttpOnly;Secure

Finally an Apache restart was necessery

Enable TLS 1.2 Internet Explorer / Make TLS 1.1 and TLS 1.2 web sites work on IE howto

Monday, August 1st, 2016

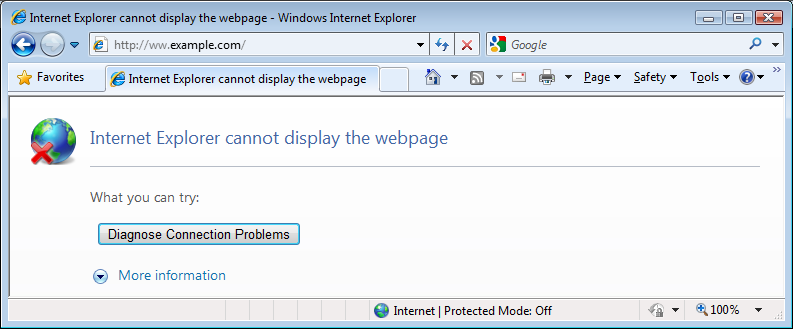
Internet-Explorer-cannot-display-the-webpage-IE-error
 

Some corporate websites and web tools especially one in DMZ-ed internal corporation networks require an encryption of TLS 1.2 (Transport Layer of Security cryptographic protocol)   TLS 1.1 protocol   both of which are already insecure (prone to vulnerabilities).

Besides the TLS 1.2 browser requirements some corporate tool web interfaces like Firewall Opening request tools etc. are often are very limited in browser compitability and built to only work with certain versions of Microsoft Internet Explorer like leys say IE (Internet Explorer) 11.

TLS 1.2 is supported across IE 8, 9, 10 and 11, so sooner or later you might be forced to reconfigure your Internet Explorer to have enabled the disabled by OS install TLS 1.2 / 1.1.

For those unaware of what TLS (Transport Layer of Security) protocol is so to say the next generation encryption protocol after SSL (Secure Socket Layer) also both TLS and SSL terms are being inter-exchangably used when referring with encrypting traffic between point (host / device etc.) A and B by using a key and a specific cryptographic algorithm.
TLS is usually more used historically in Mail Servers, even though as I said some web tools are starting to use TLS as a substitute for the SSL certificate browser encryption or even in conjunction with it.
For those who want to dig a little bit further into What is TLS? – read on technet here.

I had to enable TLS on IE and I guess sooner others will need a way to enable TLS 1.2 on Internet Explorer, so here is how this is done:
 

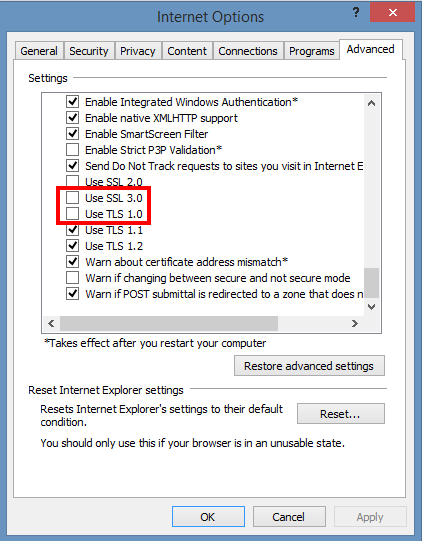
Enable-Internet-Explorer-TLS1.2-TLS-1.1-internet-options-IE-screensho


    1. On the Internet Explorer Main Menu (press Alt + F to make menu field appear)
    Select Tools > Internet Options.

    2. In the Internet Options box, select the Advanced tab.

    3. In the Security category, uncheck Use SSL 3.0 (if necessery) and Check the ticks:

    Use TLS 1.0,
    Use TLS 1.1 and Use TLS 1.2 (if available).

    4. Click OK
   
     5. Finally Exit browser and start again IE.


Once browser is relaunched, the website URL that earlier used to be showing Internet Explorer cannot display the webpagre can't connect / missing website error message will start opening normally.

Note that TLS 1.2 and 1.1 is not supported in Mozilla Firefox older browser releases though it is supported properly in current latest FF releases >=4.2.

If you  have fresh new 4.2 Firefox browser and you want to make sure it is really supporting TLS 1.1 and TLS 1.2 encrpytion:


(1) In a new tab, type or paste about:config in the address bar and press Enter/Return. Click the button promising to be careful.

(2) In the search box above the list, type or paste TLS and pause while the list is filtered

(3) If the security.tls.version.max preference is bolded and "user set" to a value other than 3, right-click > Reset the preference to restore the default value of 3

(4) If the security.tls.version.min preference is bolded and "user set" to a value other than 1, right-click > Reset the preference to restore the default value of 1

The values for these preferences mean:

1 => TLS 1.0 2 => TLS 1.1 3 => TLS 1.2


To get a more concrete and thorough information on the exact TLS / SSL cryptography cipher suits and protocol details supported by your browser check this link


N.B. ! TLS is by default disabled in many latest version browsers such as Opera, Safari etc.  in order to address the POODLE SSL / TLS cryptographic protocol vulnerability

Windows 7 fix menu messed up cyrillic – How to fix cyrillic text in Windows

Friday, July 22nd, 2016

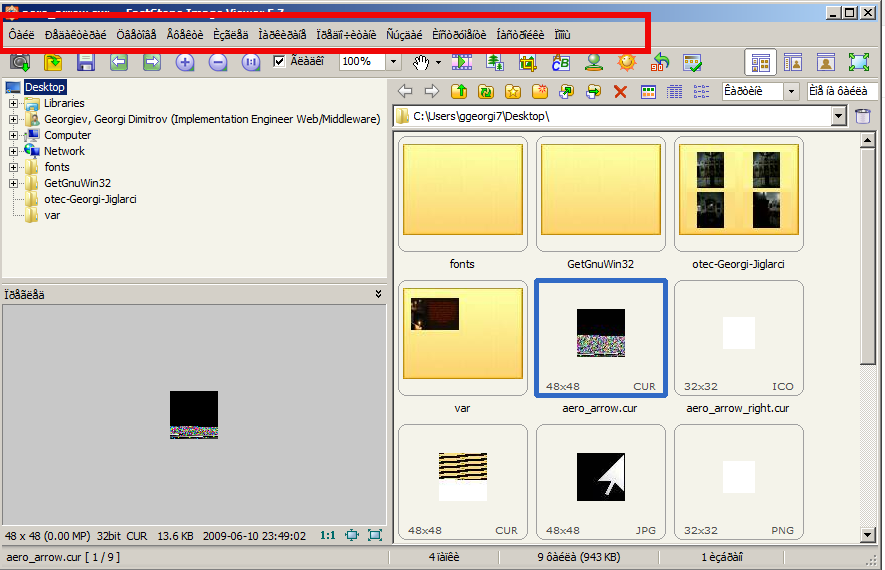
faststone-viewer-messed-up-menu-cyrillic-windows-7-screenshot

How to fix Cyrillic text on Windows 7

I've reinstalled my HP provided company work notebook with Windows 7 Enterprise x86 and had troubles with seeing Cyrillic written text, letters and fonts.
The result after installing some programs and selecting as a default language Bulgarian during installation setup prompt let me to see in some programs and in some of my old written text file names and Cyrillic WIN CP1251 content to be showing a cryptic letters like in above screenshot.

If you're being curious what is causing the broken encoding cyrillic text, it is the fact that in past a lot of cyrillic default encoding was written in KOI-8R and WIN-CP1251 encoding which is not unicode e.g. not compatible with the newer standard encoding for cyrillic UTF-8. Of course the authors of some old programs and documents are not really responsbie for the messed up cyrillic as noone expected that every Cyrillic text will be in UTF-8 in newer times.

Thanksfully there is a way to fix the unreadable / broken encoding cyrillic text by:

Going too menus:

Start menu -> Control Panel -> Change display language -> Clock, Language and Religion

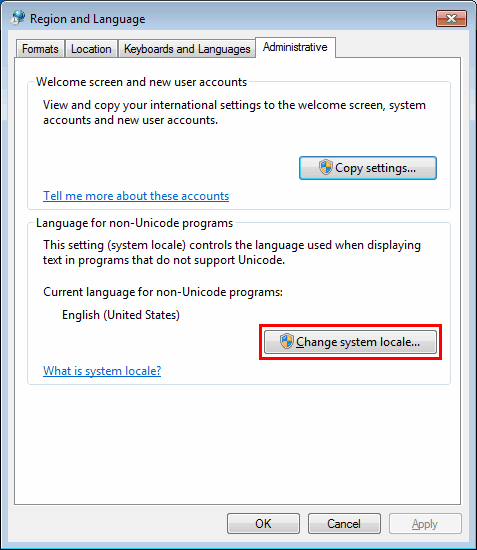
Once there click the Administratibe tab

and choose

Change system locale.

windows-7_administrative_tab_change-system-locale

Here if you're not logged in with administrator user you will be prompted for administrative privileges.

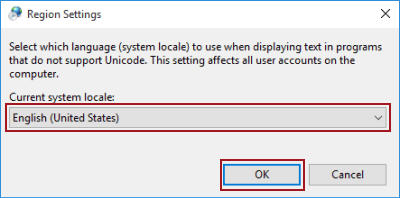
select-system-locale-choose-bulgarian-and-hit-ok-windows-7

Being there choose your language (country) to be:

Bulgarian (Bulgaria) – if you're like me a Bulgarian or Russian (if you're Russian / Belarusian / Ukrainian) or someone from the countries of ex-USSR.
Click OK

And reboot (restart) your computer in order to make the new settings active.
 

This should be it from now on all cyrillic letters in all programs / documents and file names on your PC should visualize fine just as it was intended more or less by the cyrillic assumed creator Saint Climent Ohridski who was a  who reformed Cyrillic from Glagolic alphabet.

Secure your work PC internet traffic using SSH Dynamic Tunnel as Proxy to get around Corporate Spy Proxy and Site Filtering

Friday, March 20th, 2015

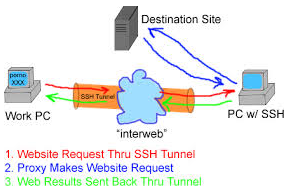
use-ssh-dynamic-tunnel-as-socks5-proxy-to-get-around-corporate-website-filtering-restrictions

If you work for some huge corporations such as IBM / Sony / Toshiba / Concentrix / HP etc. and you're using a Windows Work Computer (notebook), pre-installed with a custom Company software which is by default configured to use a Proxy Server for all your Browsing activities and at a certain point you start being filtered some of the websites you love to visit so much because of some Corporate policies (limitations) at some filtered sites you will start getting empty pages or some   nasty filtering messages.

Even if you don't get a filtering message but you know all your Company Internal Network traffic is proxified for the sake of keeping your personal (privacy) high stop browsing using company's default proxy, because all your access requests (passwords) and queries to the internet are probably logged for later (review) in case if you enter the company's paragraph of "non-compliant employee".
If you fail on time to get around the default set "Corporate Proxy", sooner or later you will start getting filtering messages to some of the regular websites you use daily, as I did today while trying to open my personal blog (to check if there are new user comments):

Your request was denied because of its content categorization: "Hacking;Malicious Sources/Malnets;Religion"
For assistance, contact your network support team.

Screenshot of above message from today here

You see this guys or automated Proxy filter became so prudent that my site was filtered because it contains some Proof of Concept (PoC) security tools and content related to Christian (Faith) Religion. I guess its the time to think seriously is there a censorship in large corporations and how far could censorship go and if such censorship so easily adopted in large companies wouldn't same happen also on a backbone ISP level in short future??
If today my site is being filtered out to be unable to open from a corporation network because it contains "Religious" contain I would not be surprised if tomorrow, I've been prohibited to confess publicly my faith in salvation power of the Cross of our Lord Jesus Christ or even already in a blacklist because I'm trying to be a dedicated Orthodox Christian …
The fact that Religion is already perceived in same light as Hacking and Malicious Source or Malnet bots is also very eloquent and shows how very big part of people nowdays (including the person that added my site to this proxy filtering rules) think of religion and in what bad state our society and understanding of freedom and respect for others went.

Obviously it is time to react to this censorship and stop the evil corporation from spying on your traffic and logging all that matches there "kilometer long" prohibited sites filter lists. There are few ways to do that and the most straight forward is to set-up and use a Own Proxy server such as Privoxy / Polipo or Squid Proxy, however the proxy method requires that your company local network doesn't have too strick (restrictive) firewall rules (e.g. you need some port opened to the Internet such as 8080, 3128, 8118, 1080 standard port for (socks) etc.

As many companies are too restrictive in their outbound firewall rules and you might be in situation like with me where Browsers such as Internet Explorer / Opera / Firefox and Chrome are configured to use by default company proxy host (autocache.proxy-ur-company.hp.com:80) (with a custom Proxy PAC file filtering out a whole ranges of useful domains and IPs) and only allowed firewall access outside of local corporate network in on port 22 (for outside ssh session purposes) only.

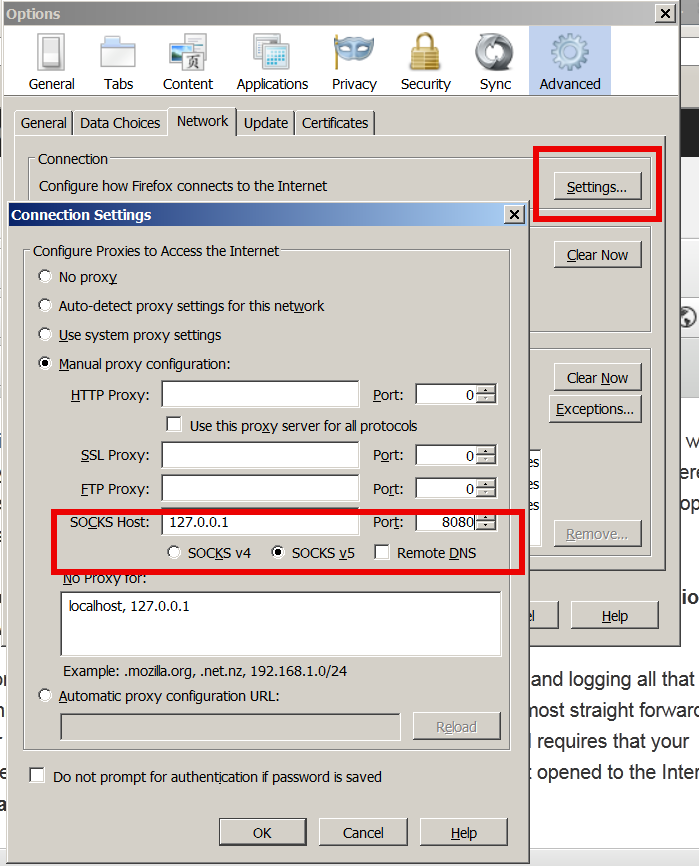
Then your best way to get across such restrictive network configuration is to run your own home Linux / BSD / Windows server with opensshd installed and use OpenSSH protocol Dynamic Tunneling (Proxy socks5 like) capabilities to tunnel all your favourite Web Browser Traffic (lets say Firefox's) through your remote-home-host.com:22.


In short once you have installed plink.exe on your PC run manually from command line (cmd.exe)


plink.exe -ssh UserName@remote-home-host.com -P 22 -pw Secret_Password -D 127.0.0.1:8080 -N


For people who use MobaXTerm it is even easier as there is an integrated SSH tunneling input interface which can be used to create the SSH tunnel.

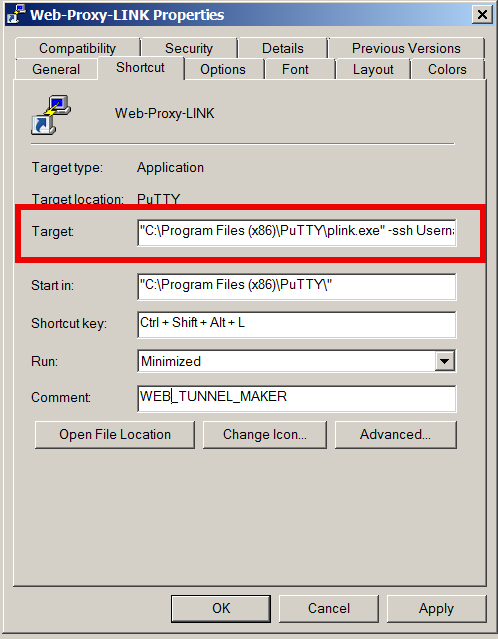
To have a quick way to Enable SSH Dynamic Tunnel button on your Desktop make a SymLink to Plink with Target below command line:

web-tunnel-maker-with-plink-win-ssh-connection-tool-screenshot-on-ms-windows-7

  • If from Linux / *BSD / Mac OS host to create Dynamic SSH Tunnel to your remote home SSH server host run in a Terminal
     

ssh -D 8080 Username@remote-home-host.com


To start tunneling all your Web traffic via just created Dynamic SSH Tunnel to host remote-home-host.com, just set in browser's proxy options to use as proxy socks5 – localhost:8080

Secure-your-work-PC-notebook-internet-traffic-using-SSH-Dynamic-Tunnel-as-Proxy

To test whether your traffic is going to the Internet from remote-home-host.com open in just set proxy browser www.myip.ru .
You should see your home SSH server IP as IP which made the request to www.myip.ru.

‘host-name’ is blocked because of many connection errors; unblock with ‘mysqladmin flush-hosts’

Sunday, May 20th, 2012

mysql-logo-host-name-blocked-because-of-many-connection-errors
My home run machine MySQL server was suddenly down as I tried to check my blog and other sites today, the error I saw while trying to open, this blog as well as other hosted sites using the MySQL was:

Error establishing a database connection

The topology, where this error occured is simple, I have two hosts:

1. Apache version 2.0.64 compiled support externally PHP scripts interpretation via libphp – the host runs on (FreeBSD)

2. A Debian GNU / Linux squeeze running MySQL server version 5.1.61

The Apache host is assigned a local IP address 192.168.0.1 and the SQL server is running on a host with IP 192.168.0.2

To diagnose the error I've logged in to 192.168.0.2 and weirdly the mysql-server was appearing to run just fine:
 

debian:~# ps ax |grep -i mysql
31781 pts/0 S 0:00 /bin/sh /usr/bin/mysqld_safe
31940 pts/0 Sl 12:08 /usr/sbin/mysqld –basedir=/usr –datadir=/var/lib/mysql –user=mysql –pid-file=/var/run/mysqld/mysqld.pid –socket=/var/run/mysqld/mysqld.sock –port=3306
31941 pts/0 S 0:00 logger -t mysqld -p daemon.error
32292 pts/0 S+ 0:00 grep -i mysql

Moreover I could connect to the localhost SQL server with mysql -u root -p and it seemed to run fine. The error Error establishing a database connection meant that either something is messed up with the database or 192.168.0.2 Mysql port 3306 is not properly accessible.

My first guess was something is wrong due to some firewall rules, so I tried to connect from 192.168.0.1 to 192.168.0.2 with telnet:
 

freebsd# telnet 192.168.0.2 3306
Trying 192.168.0.2…
Connected to jericho.
Escape character is '^]'.
Host 'webserver' is blocked because of many connection errors; unblock with 'mysqladmin flush-hosts'
Connection closed by foreign host.

Right after the telnet was initiated as I show in the above output the connection was immediately closed with the error:

Host 'webserver' is blocked because of many connection errors; unblock with 'mysqladmin flush-hosts'Connection closed by foreign host.

In the error 'webserver' is my Apache machine set hostname. The error clearly states the problems with the 'webserver' apache host unable to connect to the SQL database are due to 'many connection errors' and a fix i suggested with mysqladmin flush-hosts

To temporary solve the error and restore my normal connectivity between the Apache and the SQL servers I logged I had to issue on the SQL host:

mysqladmin -u root -p flush-hostsEnter password:

Thogh this temporar fix restored accessibility to the databases and hence the websites errors were resolved, this doesn't guarantee that in the future I wouldn't end up in the same situation and therefore I looked for a permanent fix to the issues once and for all.

The permanent fix consists in changing the default value set for max_connect_error in /etc/mysql/my.cnf, which by default is not too high. Therefore to raise up the variable value, added in my.cnf in conf section [mysqld]:

debian:~# vim /etc/mysql/my.cnf
...
max_connect_errors=4294967295

and afterwards restarted MYSQL:

debian:~# /etc/init.d/mysql restart
Stopping MySQL database server: mysqld.
Starting MySQL database server: mysqld.
Checking for corrupt, not cleanly closed and upgrade needing tables..

To make sure the assigned max_connect_errors=4294967295 is never reached due to Apache to SQL connection errors, I've also added as a cronjob.

debian:~# crontab -u root -e
00 03 * * * mysqladmin flush-hosts

In the cron I have omitted the mysqladmin -u root -p (user/pass) input options because for convenience I have already stored the mysql root password in /root/.my.cnf

Here is how /root/.my.cnf looks like:

debian:~# cat /root/.my.cnf
[client]
user=root
password=a_secret_sql_password

Now hopefully, this would permanently solve SQL's 'failure to accept connections' due to too many connection errors for future.