Posts Tagged ‘Debian’
Wednesday, March 30th, 2016 
To find out the Linux install date, there is no one single solution according to the Linux distribution type and version, there are some common ways to get the Linux OS install age.
Perhaps the most popular way to get the OS installation date and time is to check out when the root filesystem ( / ) was created, this can be done with tune2fs command
server:~# tune2fs -l /dev/sda1 | grep 'Filesystem created:'
Filesystem created: Thu Sep 6 21:44:22 2012
server:~# ls -alct /|tail -1|awk '{print $6, $7, $8}'
sep 6 2012
root home directory is created at install time
server:~# ls -alct /root
…
root@server:~# ls -lAhF /etc/hostname
-rw-r–r– 1 root root 8 sep 6 2012 /etc/hostname
For Debian / Ubuntu and other deb based distributions the /var/log/installer directory is being created during OS install, so on Debian the best way to check the Linux OS creation date is with:
root@server:~# ls -ld /var/log/installer
drwxr-xr-x 3 root root 4096 sep 6 2012 /var/log/installer/
root@server:~# ls -ld /lost+found
drwx—— 2 root root 16384 sep 6 2012 /lost+found/
On Red Hat / Fedora / CentOS, redhat based Linuces , you can use:
rpm -qi basesystem | grep "Install Date"
basesystem is the package containing basic Linux binaries many of which should not change, however in some cases if there are some security updates package might change so it is also good to check the root filesystem creation time and compare whether these two match.
Tags: check, check archlinux install date, check fedora install date, check linux os installation date, check mint install date, check OS creation date linux, check rhel install date, check ubuntu install date, creation time, Debian, hostname, Linux, log, OS, package, root filesystem, root root, root server
Posted in Everyday Life, Linux, Linux and FreeBSD Desktop, Various | No Comments »
Monday, March 14th, 2016 
If you have been hacked or have been suspicious that someone has broken up in some of the shared web hosting servers you happent o manage you already probably have tried the server with rkhuter, chroot and unhide tools which gives a general guidance where a server has been compromised
However with the evolution of hacking tools out there and the boom of Web security XSS / CSS / Database injections and PHP scripts vulnerability catching an intruder especially spammers has been becoming more and more hard to achieve.
Just lately a mail server of mine's load avarage increased about 10 times, and the CPU's and HDD I/O load jump over the sky.
I started evaluating the situation to find out what exactly went wrong with the machine, starting with a hardware analysis tools and a physical check up whether all was fine with the hardware Disks / Ram etc. just to find out the machine's hardware was working perfect.
I've also thoroughfully investigated on Logs of Apache, MySQL, TinyProxy and Tor server and bind DNS and DJBDns which were happily living there for quite some time but didn't found anything strange.
Not on a last place I investigated TOP processes (with top command) and iostat and realized the CPU high burst lays in exessive Input / Output of Hard Drive. Checking the Qmail Mail server logs and the queue with qmail-qstat was a real surprise for me as on the queue there were about 9800 emails hanging unsent, most of which were obviously a spam, so I realized someone was heavily spamming through the server and started more thoroughfully investigating ending up to a WordPress Blog temp folder (writtable by all system users) which was existing under a Joomla directory infrastructure, so I guess someone got hacked through the Joomla and uploaded the malicious php spammer script to the WordPress blog. I've instantly stopped and first chmod 000 to stop being execuded and after examing deleted view73.php, javascript92.php and index8239.php which were full of PHP values with binary encoded values and one was full of encoded strings which after being decoding were actually the recepient's spammed emails.
BTW, the view*.php javascript*.php and index*.php files were owned by www-data (the user with which Apache was owned), so obviously someone got hacked through some vulnerable joomla or wordpress script (as joomla there was quite obscure version 1.5 – where currently Joomla is at version branch 3.5), hence my guess is the spamming script was uploaded through Joomla XSS vulnerability).
As I was unsure wheteher the scripts were not also mirrored under other subdirectories of Joomla or WP Blog I had to scan further to check whether there are no other scripts infected with malware or trojan spammer codes, webshells, rootkits etc.
And after some investigation, I've actually caught the 3 scripts being mirrored under other webside folders with other numbering on filename view34.php javascript72.php, index8123.php etc..
I've used 2 tools to scan and catch malware the trojan scripts and make sure no common rootkit is installed on the server.
1. Lynis (to check for rootkits)
2. ISPProtect (Proprietary but superb Website malware scanner with a free trial)
1. Lynis – Universal security auditing tool and rootkit scanner
Lynis is actually the well known rkhunter, I've used earlier to check servers BSD and Linux servers for rootkits.
To have up-to-date version of Lynis, I've installed it from source:
cd /tmp
wget https://cisofy.com/files/lynis-2.1.1.tar.gz
tar xvfz lynis-2.1.1.tar.gz
mv lynis /usr/local/
ln -s /usr/local/lynis/lynis /usr/local/bin/lynis
Then to scan the server for rootkits, first I had to update its malware definition database with:
lynis update info
Then to actually scan the system:
lynis audit system
Plenty of things will be scanned but you will be asked on a multiple times whether you would like to conduct different kind fo system services and log files, loadable kernel module rootkits and common places to check for installed rootkits or server placed backdoors. That's pretty annoying as you will have to press Enter on a multiple times.
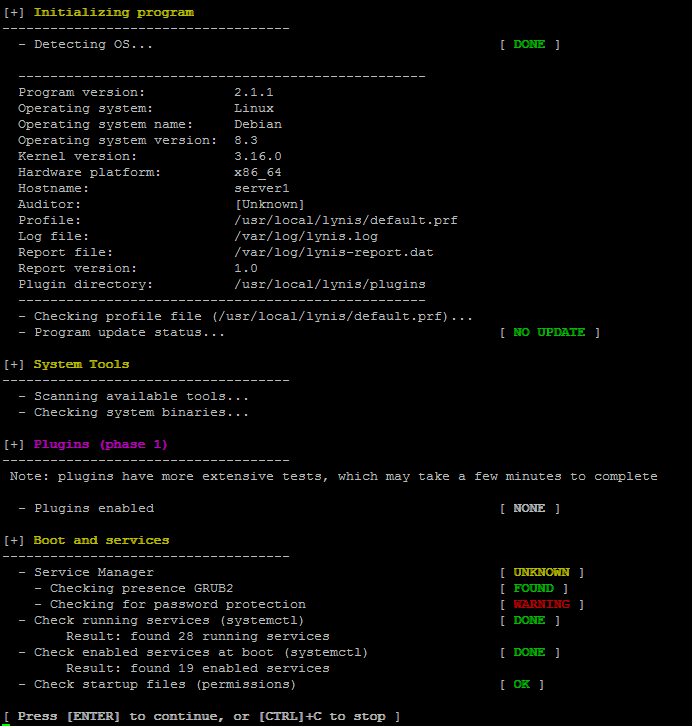
Once scan is over you will get a System Scan Summary like in below screenshot:
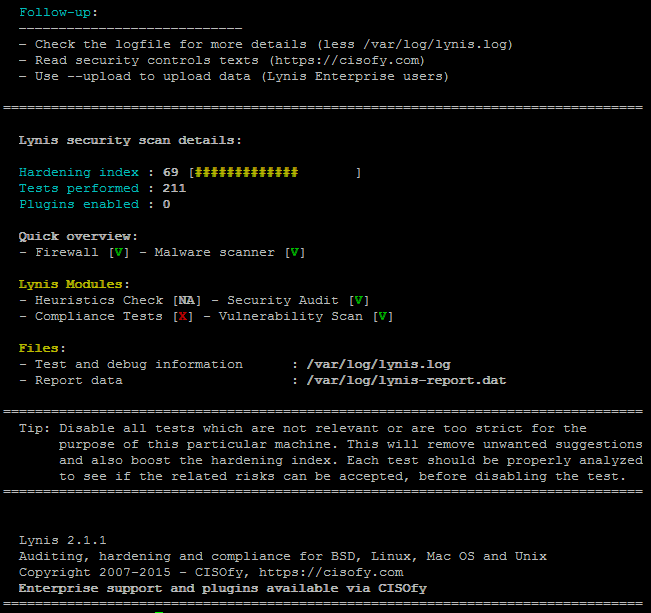
Lynis suggests also a very good things that might be tampered to make the system more secure, so using some of its output when I have time I'll work out on hardening all servers.
To prevent further incidents and keep an eye on servers I've deployed Lynis scan via cron job once a month on all servers, I've placed under a root cronjob on every first dae of month in following command:
server:~# crontab -u root -e
0 3 1 * * /usr/local/bin/lynis –quick 2>&1 | mail -s "lynis output of my server" admin-mail@my-domain.com)
2. ISPProtect – Website malware scanner
ISPProtect is a malware scanner for web servers, I've used it to scan all installed CMS systems like WordPress, Joomla, Drupal etc.
ISPProtect is great for PHP / Pyhon / Perl and other CMS based frameworks.
ISPProtect contains 3 scanning engines: a signature based malware scanner, a heuristic malware scanner, and a scanner to show the installation directories of outdated CMS systems.
Unfortunately it is not free software, but I personally used the FREE TRIAL option which can be used without registration to test it or clean an infected system.
I first webserver first locally for the infected site and then globally for all the other shared hosting websites.
As I wanted to check also rest of hosted websites, I've run ISPProtect over the all bunch of installed websites.
Pre-requirement of ISPProtect is to have a working PHP Cli and Clamav Anti-Virus installed on the server thus on RHEL (RPM) based servers make sure you have it installed if not:
server:~# yum -y install php
server:~# yum -y install clamav
Debian based Linux servers web hosting admins that doesn't have php-cli installed should run:
server:~# apt-get install php5-cli
server:~# apt-get install clamav
Installing ISPProtect from source is with:
mkdir -p /usr/local/ispprotect
chown -R root:root /usr/local/ispprotect
chmod -R 750 /usr/local/ispprotect
cd /usr/local/ispprotect
wget http://www.ispprotect.com/download/ispp_scan.tar.gz
tar xzf ispp_scan.tar.gz
rm -f ispp_scan.tar.gz
ln -s /usr/local/ispprotect/ispp_scan /usr/local/bin/ispp_scan
To initiate scan with ISPProtect just invoke it:
server:~# /usr/local/bin/ispp_scan
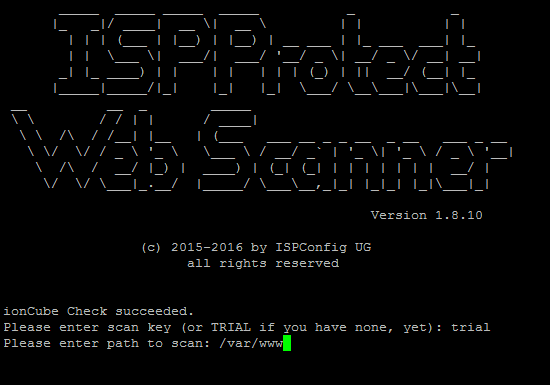
I've used it as a trial
Please enter scan key: trial
Please enter path to scan: /var/www
You will be shown the scan progress, be patient because on a multiple shared hosting servers with few hundred of websites.
The tool will take really, really long so you might need to leave it for 1 hr or even more depending on how many source files / CSS / Javascript etc. needs to be scanned.
Once scan is completed scan and infections found logs will be stored under /usr/local/ispprotect, under separate files for different Website Engines and CMSes:
After the scan is completed, you will find the results also in the following files:
Malware => /usr/local/ispprotect/found_malware_20161401174626.txt
Wordpress => /usr/local/ispprotect/software_wordpress_20161401174626.txt
Joomla => /usr/local/ispprotect/software_joomla_20161401174626.txt
Drupal => /usr/local/ispprotect/software_drupal_20161401174626.txt
Mediawiki => /usr/local/ispprotect/software_mediawiki_20161401174626.txt
Contao => /usr/local/ispprotect/software_contao_20161401174626.txt
Magentocommerce => /usr/local/ispprotect/software_magentocommerce_20161401174626.txt
Woltlab Burning Board => /usr/local/ispprotect/software_woltlab_burning_board_20161401174626.txt
Cms Made Simple => /usr/local/ispprotect/software_cms_made_simple_20161401174626.txt
Phpmyadmin => /usr/local/ispprotect/software_phpmyadmin_20161401174626.txt
Typo3 => /usr/local/ispprotect/software_typo3_20161401174626.txt
Roundcube => /usr/local/ispprotect/software_roundcube_20161401174626.txt
ISPProtect is really good in results is definitely the best malicious scripts / trojan / trojan / webshell / backdoor / spammer (hacking) scripts tool available so if your company could afford it you better buy a license and settle a periodic cron job scan of all your servers, like lets say:
server:~# crontab -u root -e
0 3 1 * * /usr/local/ispprotect/ispp_scan –update && /usr/local/ispprotect/ispp_scan –path=/var/www –email-results=admin-email@your-domain.com –non-interactive –scan-key=AAA-BBB-CCC-DDD
Unfortunately ispprotect is quite expensive so I guess most small and middle sized shared hosting companies will be unable to afford it.
But even for a one time run this tools worths the try and will save you an hours if not days of system investigations.
I'll be glad to hear from readers if aware of any available free software alternatives to ISPProtect. The only one I am aware is Linux Malware Detect (LMD).
I've used LMD in the past but as of time of writting this article it doesn't seems working any more so I guess the tool is currently unsupported / obsolete.
Tags: backdoors find linux, catch trojan linux, checking, cms, com, cron job, Debian, Joomla Wordpress, Linux Unix Web, malicious scripts on server linux, Malware, php, recover from hacked website, scanner, scripts, tar, Tools, usr, www
Posted in Everyday Life, Linux, PHP, System Administration, Various, Web and CMS | No Comments »
Tuesday, August 5th, 2014 
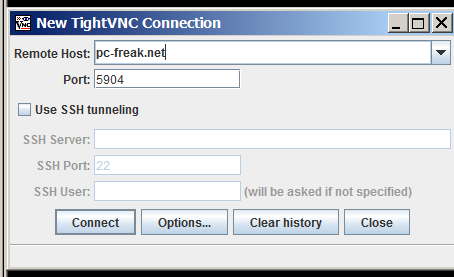
For M$ Windows users its always handy to have remote access to your home PC or notebook via Remote Desktop (RDP) protocol.
However in GNU / Linux, there is no native implementation of RDP protocol. So if you're using Linux as your Desktop like me you will probably want to be able to access the Linux system remotely not only via terminal with SSH using (Putty) or MobaXTerm all in one tabbed Windows terminal program but also be able to use your Linux GNOME / KDE Graphical environment from anywhere on the Internet.
This will make you ponder – Is it possible to access Linux Desktop via proprietary RDP protocol and if not how you can achieve remote GUI access to Linux?
1. Using Linux Xorg and Xming Xserver for Windows
Most people should already know of Linux ability to start multiple Xserver sessions remotely which is the native way to access between two Linux hosts or access remotely Linux from other Linux UNIX like OS. It is also possible to use xinit / startx / xhost commands to establish remotely connection to new or running Linux (Xorg) Xserver by using them in combination with XMing – XServer for Windows running on the Windows host and Debian package (x11-xserver-utils) – providing xhost cmd, however this method is a bit complicated and not so convenient.
I used to be using this method XMing (whose mirror is here), earlier in my university years to use remotely my Debian Linux from Windows 98 and this works perfectly fine.
2. Using RDP emulation with XRDP server
in order to be able to access your desk from any friend or computer club in the world using standard available in MS Windows Remote Desktop client (mstsc.exe).
There is also another alternative way by using Windows Desktop sharing RDP experimental server xrdp:
apt-cache show xrdp |grep -i descr -A 3
Description: Remote Desktop Protocol (RDP) server
Based on research work by the rdesktop project, xrdp uses the Remote
Desktop Protocol to present a graphical login to a remote client.
xrdp can connect to a VNC server or another RDP server.
To make your Linux host accessible via RDP:
On Debian / Ubuntu etc. deb based Linux:
apt-get update
apt-get install xrdp
$ /etc/init.d/xrdp status
Checking status of Remote Desktop Protocol server xrdp [ OK ]
Checking status of RDP Session Manager sesman
/etc/init.d/xrdp start
On Fedora Linux:
yum -y install xrdp
systemctl enable xrdp.service
systemctl start xrdp.service
systemctl enable xrdp-sesman.service
systemctl start xrdp-sesman.service
It is possible to access remote Linux host using xrdp RDP server, but this will only work in older releases of mstsc.exe (Windows XP / Vista / 2003) and will not work on Windows 7 / 8, because in MS Windows 7 and onwards RDP proto version has changed and the client no longer has compatability with older mstsc releases. There is a work around for this for anyone who stubbornly want to use RDP protocol to access Linux host. If you want to connect to xrdp from Windows 7 you have to copy the old RDP client (mstsc.exe and mstscax.dll) from a WinXP install to the Windows 7 box and run it independently, from the default installed ones, anyways this method is time consuming and not really worthy …
3. Using the VNC withTightVNC server / client
Taking above in consideration, for me personally best way to access Linux host from Windows and Mac is to use simply the good old VNC protocol with TightVNC.
TightVNC is cross-platform free and open source remote Desktop client it uses RFB protocol to control another computer screen remotely.
To use tightvnc to access remote Debian / Ubuntu – deb based Linux screen, tightvncserver package has to be installed:
apt-cache show tightvncserver|grep -i desc -A 7
Description-en: virtual network computing server software
VNC stands for Virtual Network Computing. It is, in essence, a remote
display system which allows you to view a computing `desktop' environment
not only on the machine where it is running, but from anywhere on the
Internet and from a wide variety of machine architectures.
.
This package provides a server to which X clients can connect and the
server generates a display that can be viewed with a vncviewer.
—
apt-get –yes install tightvncserver
…
TightVNCserver package is also available in default repositories of Fedora / CentOS / RHEL and most other RPM based distros, to install there:
yum -y install tightvnc-server
…
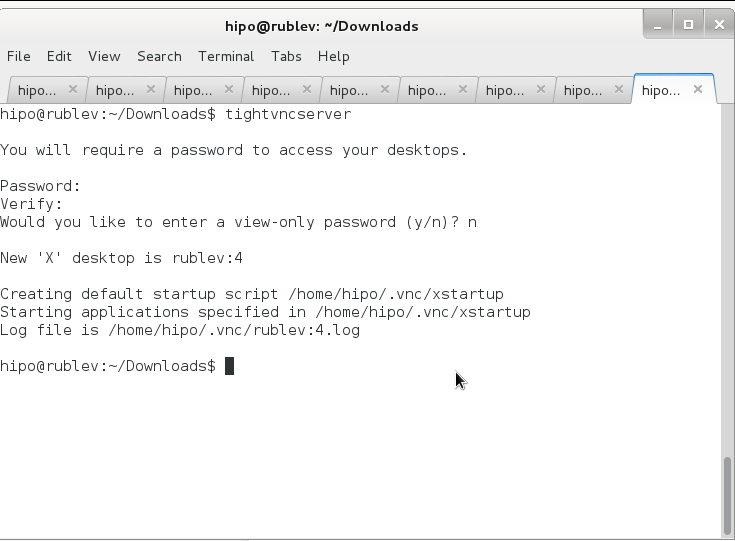
Once it is installed to make tightvncserver running you have to start it (preferrably with non-root user), usually this is the user with which you're using the system:
tightvncserver
You will require a password to access your desktops.
Password:
Verify:
Would you like to enter a view-only password (y/n)? n
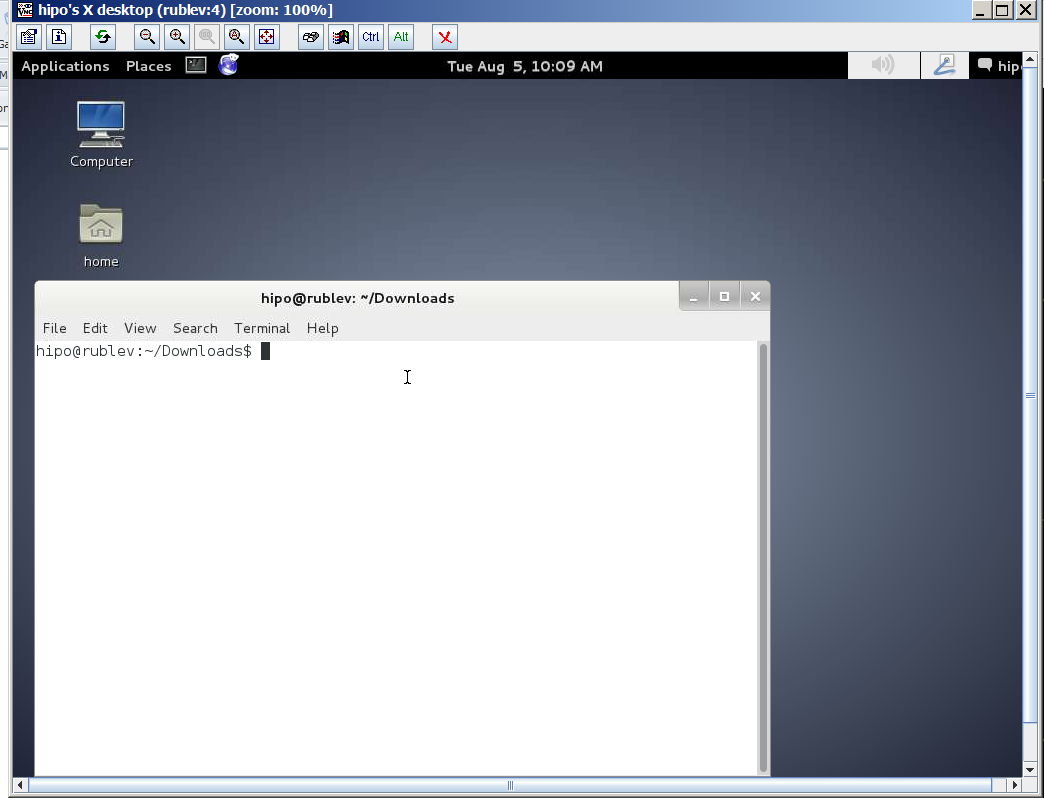
New 'X' desktop is rublev:4
Creating default startup script /home/hipo/.vnc/xstartup
Starting applications specified in /home/hipo/.vnc/xstartup
Log file is /home/hipo/.vnc/rublev:4.log
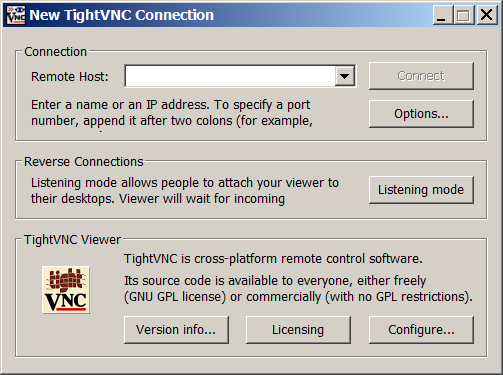
To access now TightVncserver on the Linux host Download and Install TightVNC Viewer client
note that you need to download TightVNC Java Viewer JAR in ZIP archive – don't install 32 / 64 bit installer for Windows, as this will install and setup TightVNCServer on your Windows – and you probably don't want that (and – yes you will need to have Oracle Java VM installed) …
Once unzipped run tightvnc-jviewer.jar and type in the IP address of remote Linux host and screen, where TightVNC is listening, as you can see in prior screenshot my screen is :4, because I run tightvnc to listen for connections in multiple X sessions. once you're connected you will be prompted for password, asker earlier when you run tightvncserver cmd on Linux host.
If you happen to be on a Windows PC without Java installed or Java use is prohibited you can use TightVNC Viewer Portable Binary (mirrored here)
If you have troubles with connection, on Linux host check the exact port on which TightVncServer is running:
ps ax |grep -i Tightvnc
8630 pts/8 S 0:02 Xtightvnc :4 -desktop X -auth /var/run/gdm3/auth-for-hipo-7dpscj/database -geometry 1024×768 -depth 24 -rfbwait 120000 -rfbauth /home/hipo/.vnc/passwd -rfbport 5904 -fp /usr/share/fonts/X11/misc/,/usr/share/fonts/X11/Type1/,/usr/share/fonts/X11/75dpi/,/usr/share/fonts/X11/100dpi/ -co /etc/X11/rgb
Then to check, whether the machine you're trying to connect from doesn't have firewall rules preventing the connection use (telnet) – if installed on the Windows host:
telnet www.pc-ferak.net 5904
Trying 192.168.56.101…
Connected to 192.168.56.101.
Escape character is '^]'.
RFB 003.008
telnet> quit
Connection closed.
Tags: alternative, client, Connected, Creating, Debian, fedora linux, Linux Xorg Xserver, Quick, RDP, remote desktop, repositories, screenshot, share, time consuming, use, VNC, work
Posted in Everyday Life, Linux and FreeBSD Desktop, Remote System Administration, System Administration | 3 Comments »
Friday, December 16th, 2011 
1. Frogatto & Friends – Is an Indian Free Software (Open Source) game in the spirit of old-school jump’en runs like Commander Keen, Prehistoric, Jazz Jack Rabbit
The game is really entertaining, the graphics looks approximately nice, the music is awesome, the gamelplay is good even though after some point in the game the moment with “where should I go now, I can’t find exit” comes through and it gets boring.
Generally if you compare with all the existing jump and run arcade games free software games available for Linux and FreeBSD the game will definetely arrange itself in the list of TOP 10 free software Arcade Games
and therefore its my own believe that Frogatto is a game that every GNU / Linux and FreeBSD desktop should have in Application -> Games GNOME menu.
Frogatto is rich of levels, enemies obstacles objects, places to visit (which puts it ahead of many of the linux arcade games which often miss enough game levels, has a too short game plots, or simply miss overall game diversity).

The game’s general look & feel is like a professional game and not just some tiny free software arcade, made by its authors for the sake to learn some programming, graphics or music creation.


Besides that Frogatto & Friends is multi-platform supporting all the major operating systems.
Game supports:
- Windows
- Mac
- iPhone
- Debian GNU / Linux
- FreeBSD
The game source code is also available on Frogatto.com – The Game’s Official website
The game is available as a deb package in Debian and Ubuntu GNU / Linuxes so to install on those deb based distributions, simply use apt:
debian:~# apt-get install frogatto

...
The above command will install two packages frogatto (containing the game’s main executable binary) and frogatto-data containinng all the game textures, levels, graphics, music etc.
BTW the package saparation on a gamename and gamename-data in Debian (for all those who have not still noticed), can be seen on most of the games with a game data that takes more disk space.
After the game is installed the only way to start the game is to run it manually through pressing ALT+F2 in GNOME or running the progrtam through gnome-terminal with cmd:
debian:~$ frogatto
Here are few more Frogatto gameplay screenshots:


I’ve noticed Frogatto is also available as an RPM package for Fedora Linux, as well as has a FreeBSD port in the /usr/ports/games/frogatto and this makes it easy to install on most free software OSes in the wild.
While checking frogatto.com , I found an interesting link to a website offering free graphics (pictures), textures and sounds for free and open source games for all those who hold interest into the development of Free Software & Open Source Games make sure you check OpenGameArt.org
OpenGameArt.org looks like a great initiative and will definitely be highly beneficial to the development of more and better FSOS Games so I wish them God speed with this noble initiative.
Frogatto is very suitable for growing kids since it doesn’t contain no violence and every now and then the main game actor the Frogatto Frog leads few lines English dialogues with some of the characters found in the quest.
For none speaking English countries, the game can help the kids to learn some basic english words and thus can help develop kids intellect and knowledge
And oh yeah one more criticism towards the game is the Enlish structure, it seems people who wrote the plot can work this out in the time to come. Many of the English sentences during dialogues the frog leads with the cranks he met does not sound like a common and sometimes even correct english / phrases.
Besides those little game “defect”, the game is pretty awesome and worthy to kill some time and relax from a long stressy day.
Tags: arcade games, code, com, deb package, Debian, debian gnu, Desktop, Disk, English, exit, fedora linux, Free, free software games, freebsd, game levels, game source code, game textures, Gnome, gnu linux, Indian, IPhone, jack rabbit, jack rabbitthe, Jazz, jazz jack rabbit, jump, jump and run, knowledge, linux freebsd, look feel, menu, music creation, nbsp, official, Open, open source game, open source games, operating systems, package, Prehistoric, professional game, programming graphics, quot, saparation, school jump, short game, software, software arcade, software open source, Source, time, Ubuntu
Posted in Everyday Life, FreeBSD, Games Linux, Linux, Linux and FreeBSD Desktop | No Comments »
Monday, May 12th, 2014 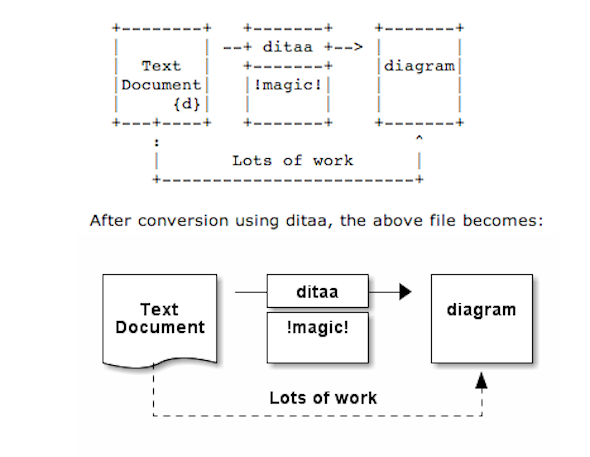
As part of my passion for ASCII art, I've found another interesting tool useful to ASCII art maniacs like me, the tool is called ditta and is able to convert manually drawn ASCII art diagrams to graphics, below is tool description from my debian apt-cache as well as a screenshot:
apt-cache show ditaa|grep -i ditaa -A 4
Package: ditaa
Priority: optional
Section: graphics
Installed-Size: 164
Maintainer: David Paleino <dapal@debian.org>
—
Filename: pool/main/d/ditaa/ditaa_0.9+ds1-2_all.deb
Size: 107270
MD5sum: 05ec52d9274b954b053f1835ca5d7a7f
SHA1: 792d91d05fff2a2a19c0ebce317351d138436c18
SHA256: c4319d32e7918aab782e2f38cdad745bc9023f9f09a999033d983095ee4f70d5
—
DiTAA is a small command-line utility that can convert diagrams drawn using
ASCII art ("drawings" that contain characters that resemble lines, like | /
and -), into proper bitmap graphics.
.
DiTAA also uses special markup syntax to increase the possibilities of shapes
and symbols that can be rendered.
Homepage: http://ditaa.org
To install ditaa on Debian and Ubuntu Linux:
debian:~# apt-get install --yes ditaa

...
Ditaa text diagram to Graphics converter is also available in Fedora Linux and in Source RPMs to be used on Redhat Based RPM distributions.
To install in most of RPM based Linuxes:
[root@fedora:~]# yum install -y ditaa
…
For most people probably Ditta will not be of any value except as a PoC and of a Hack value just like Ditaa's home page suggests. Nomatter that Ditta is cool but has just 2 drawback it doesn't understand non-latin characters i.e. Cyrillic and requires Java Virtual Machine .. but if you're a real geek you will do the sacrifice to install a whole bunch of the heavy java for the sake of some oldschool fun 🙂 Being written in Java makes Ditta multi-platform, but you will need a Java VM version of at least 1.6 (it doesn't work with Java 1.5).
The format Ditta understands is close to HTML
<ditaa [optional parameters]>

... (some ditaa-code) ...

</ditaa>
There are also special tags understood by Ditta which are automatically turned into shaped graphical buttons and forms.
Not all shape selector tags are documented on the ditaa site. A quick source scan revealed:
| tag | Description |
| {c} | decision(Choice) |
| {d} | document |
| {io} | input/output, parallelogram |
| {mo} | manual operation |
| {o} | ellipse, circle |
| {s} | storage |
| {tr} | trapezoid (looks like an inverted {mo} ) |
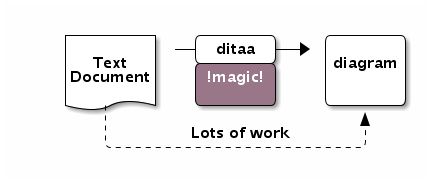
Here is an example Ditta code
<ditaa round noedgesep right>
+--------+   +-------+    +-------+
|        | --+ ditaa +--> |       |
|  Text  |   +-------+    |diagram|
|Document|   |!magic!|    |       |
|     {d}|   |  c478 |    |       |
+---+----+   +-------+    +-------+
:                         ^
|       Lots of work      :
+-------------------------+
</ditaa>
This Ditta code will generate following picture:
To learn more on ditta please check Ditaa's Project homepage on Sourceforge
Many thanks to Cybercity's 30 Cool Open Source Software of 2013 for inspiring this post.
Tags: Ascii, bitmap, bunch, close, command line utility, Cool Open Source Software, Debian, diagram, doesn, Graphics, input output, Java, java virtual machine, need, org, passion, picture, platform, possibilities, site, syntax, tool, utility
Posted in Curious Facts, Entertainment, Everyday Life, Various | 1 Comment »
Wednesday, May 14th, 2014 
If you're a using GNU / Linux for Desktop and you're already tired of creating backups by your own hacks using terminal and you want to make your life a little bit more easier and easily automate your important files back up through GUI program take a look at luckyBackup.
Luckibackup is a GUI frontend to the infamous rsync command line backup tool. Luckibackup is available as a package in almost all modern Linux distributions its very easy to setup and can save you a lot of time especially if you have to manage a number of your Workplace Desktop Office Linux based computers.
Luckibackup is an absolute must have program for Linux Desktop start-up users. If you're migrating from Microsoft Windows realm and you're used to BackupPC, Luckibackup is probably the defacto Linux BackupPC substitute.
The sad news for Linux GNOME Desktop users is luckibackup is written in QT and it using it will load up a bit your notebook.
It is not installed by default so once a new Linux Desktop is installed you will have to install it manually on Debian and Ubuntu based Linux-es to install Luckibackup apt-get it.
debian:~# apt-get install --yes luckibackup

...
On Fedora and CentOS Linux install LuckiBackup via yum rpm package manager
[root@centos :~]# yum -y install luckibackup

.
Luckibackup is also ported for OpenSuSE Slackware, Gentoo, Mandriva and ArchLinux. In 2009 Luckibackup won the prize of Sourceforge Community Choice Awards for "best new project".
luckyBackup copies over only the changes you've made to the source directory and nothing more.
You will be surprised when your huge source is backed up in seconds (after the first backup).
Whatever changes you make to the source including adding, moving, deleting, modifying files / directories etc, will have the same effect to the destination.
Owner, group, time stamps, links and permissions of files are preserved (unless stated otherwise).
Luckibackup creates different multiple backup "snapshots".Each snapshot is an image of the source data that refers to a specific date-time.
Easy rollback to any of the snapshots is possible. Besides that luckibackup support Sync (just like rsync) od any directories keeping the files that were most recently modified on both of them.
Useful if you modify files on more than one PCs (using a flash-drive and don't want to bother remembering what did you use last. Luckibackup is capable of excluding certain files or directories from backups – Exclude any file, folder or pattern from backup transfer.
After each operation a logfile is created in your home folder. You can have a look at it any time you want.
luckyBackup can run in command line if you wish not to use the gui, but you have to first create the profile that is going to be executed.
Type "luckybackup –help" at a terminal to see usage and supported options.
There is also TrayNotification – Visual feedback at the tray area informs you about what is going on.
Tags: ArchLinux, area, backups, bit, command, Debian, Easy, file, GUI, line, linux desktop, little bit, look, make, manager, package, program, project, rpm, rsync, snapshots, terminal, time, tool, transfer, Ubuntu, use, Workplace Desktop Office Linux, yum
Posted in Computer Security, Everyday Life, Linux and FreeBSD Desktop, System Administration | No Comments »
Friday, May 16th, 2014 
I juset setup a VMWare Virtual Machine on my HP notebook and installed Debian 7.0 stable Wheezy. Though VMWare identified my Office Internet and configured automatically NAT, I couldn't access the internet from a browser until I remembered all HP traffic is going through a default set browser proxy.
After setting a proxy to Iceweasel, Internet pages started opening normally, however as every kind of traffic was also accessible via HP's proxy, package management with apt-get (apt-get update, apt-get install etc. were failing with errors):
# apt-get update
Ign cdrom://[Debian GNU/Linux 7.2.0 _Wheezy_ – Official i386 CD Binary-1 20131012-12:56] wheezy Release.gpg
Ign cdrom://[Debian GNU/Linux 7.2.0 _Wheezy_ – Official i386 CD Binary-1 20131012-12:56] wheezy Release
Ign cdrom://[Debian GNU/Linux 7.2.0 _Wheezy_ – Official i386 CD Binary-1 20131012-12:56] wheezy/main i386 Packages/DiffIndex
Ign cdrom://[Debian GNU/Linux 7.2.0 _Wheezy_ – Official i386 CD Binary-1 20131012-12:56] wheezy/main Translation-en_US
Err http://ftp.by.debian.org wheezy Release.gpg
Could not connect to ftp.by.debian.org:80 (86.57.151.3). – connect (111: Connection refused)
Err http://ftp.by.debian.org wheezy-updates Release.gpg
Unable to connect to ftp.by.debian.org:http:
Err http://security.debian.org wheezy/updates Release.gpg
Cannot initiate the connection to security.debian.org:80 (2607:ea00:101:3c0b:207:e9ff:fe00:e595). – connect (101: Network is unreachable) [IP: 2607:ea00:101:3c0b:207:e9ff:fe00:e595 80]
Reading package lists…
This error is caused because apt-get is trying to directly access above http URLs and because port 80 is filtered out from HP Office, it fails in order to make it working I had to configure apt-get to use Proxy host – here is how:
a) Create /etc/apt/apt.conf.d/02proxy file (if not already existing)
and place inside:
Acquire::http::proxy::Proxy "https://web-proxy.cce.hp.com";
Acquire::ftp::proxy::Proxy "ftp://web-proxy.cce.hp.com";
To do it from console / gnome-terminal issue:
echo ''Acquire::http::Proxy "https://web-proxy.cce.hp.com:8088";' >> /etc/apt/apt.conf.d/02proxy

echo ''Acquire::ftp::Proxy "https://web-proxy.cce.hp.com:8088";' >> /etc/apt/apt.conf.d/02proxy
That's all now apt-get will tunnel all traffic via HTTP and FTP proxy host web-proxy.cce.hp.com and apt-get works again.
Talking about Proxyfing Linux's apt-get, its possible to also set proxy shell variables, which are red and understood by many console programs like Console browsers lynx, links, elinks as well as wget and curl commands, e.g.:
export http_proxy=http://192.168.1.5:5187/

export https_proxy=$http_proxy

export ftp_proxy=$http_proxy

export rsync_proxy=$http_proxy

export no_proxy="localhost,127.0.0.1,localaddress,.localdomain.com"
For proxies protected with username and password export variables should look like so:
 echo -n "username:"

read -e username

echo -n "password:"

read -es password

export http_proxy="http://$username:$password@proxyserver:8080/"

export https_proxy=$http_proxy

export ftp_proxy=$http_proxy

export rsync_proxy=$http_proxy

export no_proxy="localhost,127.0.0.1,localaddress,.localdomain.com"
To make this Linux proxy settings system wide on Debian / Ubuntu there is the /etc/environment file add to it:
http_proxy=http://proxy.server.com:8080/

https_proxy=http://proxy.server.com:8080/

ftp_proxy=http://proxy.server.com:8080/

no_proxy="localhost,127.0.0.1,localaddress,.localdomain.com"

HTTP_PROXY=http://proxy.server.com:8080/

HTTPS_PROXY=http://proxy.server.com:8080/

FTP_PROXY=http://proxy.server.com:8080/

NO_PROXY="localhost,127.0.0.1,localaddress,.localdomain.com"
To make proxy global (systemwide) for most (non-Debian specific) Linux distributions shell environments create new file /etc/profile.d/proxy.sh and place something like:
function proxy(){

echo -n "username:"

read -e username

echo -n "password:"

read -es password

export http_proxy="http://$username:$password@proxyserver:8080/"

export https_proxy=$http_proxy

export ftp_proxy=$http_proxy

export rsync_proxy=$http_proxy

export no_proxy="localhost,127.0.0.1,localaddress,.localdomain.com"

echo -e "nProxy environment variable set."

}

function proxyoff(){

unset HTTP_PROXY

unset http_proxy

unset HTTPS_PROXY

unset https_proxy

unset FTP_PROXY

unset ftp_proxy

unset RSYNC_PROXY

unset rsync_proxy

echo -e "nProxy environment variable removed."

}
To set Global Proxy (make Proxy Systemwide) for a user in GNOME Desktop environment launch gnome-control-center
And go to Network -> Network Proxy

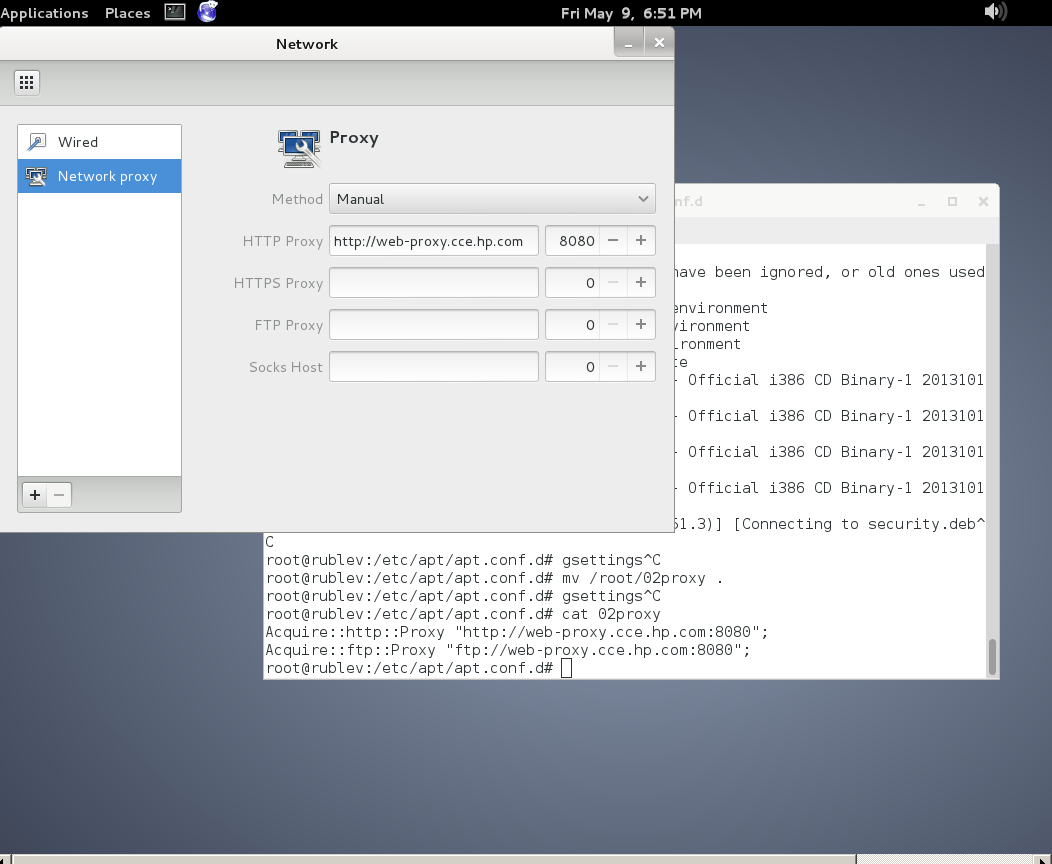
To make proxy settings also system wide for some GUI Gnome GTK3 applications
gsettings set org.gnome.system.proxy mode 'manual'

gsettings set org.gnome.system.proxy.http host 'your-proxy.server.com'

gsettings set org.gnome.system.proxy.http port 8080
Tags: browser, com, conf, Debian, export, Gnome, hp, Linux, localdomain, make, org, proxy, proxy settings, Proxy Systemwide, reading package, server, system, Ubuntu, variables
Posted in Linux, Linux and FreeBSD Desktop, Various | No Comments »
Wednesday, May 28th, 2014 
If you need to use Virtual Machine to run some testing on heterogenous Operating Systems and you have chosen VMWare as a Virtual Machine. You will soon notice some of Virtual Machines functionality like copy between host operating system and Virtual Machine, true fullscreen mode and most importantly Copy paste between your host operating system and VMWare is not working. I'm not too much into Virtualization these days so for me it was truely shocking that a proprietary software like VMWare, claimed to be the best and most efficient Virtual Machine nowadays is not supporting copy / paste, fullscreen and copy between host and guest OS. For those arguing why I'm using VMWare at all as it is proprietary and there is already free software Virtual Machines like QEMU and Oracle's VirtualBox its simply because now I have the chance to install and use VMWare 9 Enterprise on my work place at HP with a free Corporate license – in other words I'm using VMWare just for the sake of educating myself and would always recommend VirtualBox for those looking for good substitute free alternative to VMWare.
Before trying out VMWare, I tried Virtualbox to emulate Linux on my HP work PC running Windows with VirtualBox I was having issues with keyboard not working (because of lack of support of USB, no full screen support and lack of copy / paste between OS-es), I've just recently understood this is not because Virtualbox is bad Virtualization solution but because I forgot to install VirtualBox Oracle VM VirtualBox Extension Pack which allows support for USB, enables copy paste and full screen support. The equivalent to Virtualbox Oracle VM VirtualBox in VMWare world is called VMWare-Tools and once the guest operating system is installed inside VMWare VM, its necessary to install vmware-tools to enable better screen resolution and copy paste.
In Windows Virtual Machine installation of vmware-tools is pretty straight forward you go through VMWare's menus
VM -> Install Vmware-tools
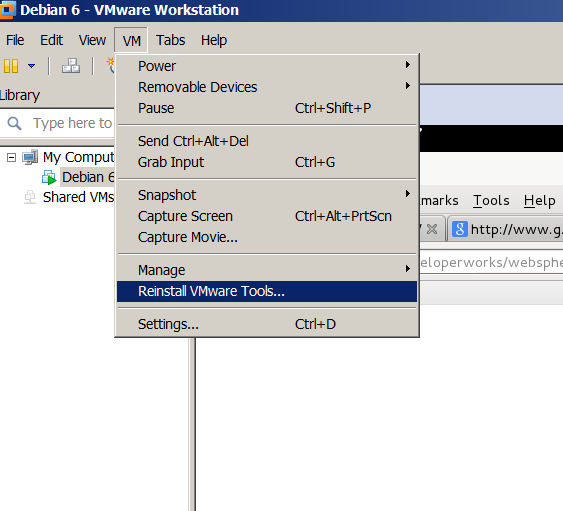
follow the instructions and you're done, however as always installing VMWare-tools on Linux is little bit more complicated you need to run few commands from Linux installed inside the Virtual Machine to install vmware-tools. Here is how vmware-tools is installed on Debian / Ubuntu / Linux Mint and rest of Debian based operating systems:
1. Install Build essentials and gcc You need to have this installed some developer tools as well as GCC compiler in order for the vmware-tools to compile a special Linux kernel module which enables extra support (integration) between the VMWare VM and the installed inside VM Linux distro
apt-get install --yes build-essential gcc

...
2. Install appropriate Linux headers corresponding to current Linux OS installed kernel
apt-get install --yes linux-headers-$(uname -r)

....
3. Mount CD (Virtual) Content to obtain the vmware-tools version for your Linux
Be sure to have first checked from VMWare menus on menus VM -> Intall Vmware Tools
This step is a little bit strange but just do it without too much questioning …
mount /dev/cdrom /mnt/

umount /media/cdrom0/

mount /media/cdrom

mount /dev/sr0 /mnt/cdrom/

mount /dev/sr0 /mnt/
Note that /dev/sr0, might already be mounted and sometimes it might be necessary to unmount it first (don't remember exactly if I unmounted it or not)
4. Copy and Untar VMwareTools-9.2.0-799703.tar.gz
cp -rpf /media/cdrom/VMwareTools-9.2.0-799703.tar.gz /tmp/

cd /tmp/

tar -zxvvf VMwareTools-9.2.0-799703.tar.gz

...
5. Run vmware-tools installer
cd vmware-tools-distrib/

./vmware-install.pl
You will be asked multiple questions you can safely press enter to answer with default settings to all settings, hopefully if all runs okay this will make VMWare Tools installed
Creating a new VMware Tools installer database using the tar4 format.
Installing VMware Tools.
In which directory do you want to install the binary files?
[/usr/bin]
What is the directory that contains the init directories (rc0.d/ to rc6.d/)?
[/etc]
What is the directory that contains the init scripts?
[/etc/init.d]
In which directory do you want to install the daemon files?
[/usr/sbin]
In which directory do you want to install the library files?
[/usr/lib/vmware-tools]
The path "/usr/lib/vmware-tools" does not exist currently. This program is
going to create it, including needed parent directories. Is this what you want?
[yes]
In which directory do you want to install the documentation files?
[/usr/share/doc/vmware-tools]
The path "/usr/share/doc/vmware-tools" does not exist currently. This program
is going to create it, including needed parent directories. Is this what you
want? [yes]
The installation of VMware Tools 9.2.0 build-799703 for Linux completed
successfully. You can decide to remove this software from your system at any
time by invoking the following command: "/usr/bin/vmware-uninstall-tools.pl".
Before running VMware Tools for the first time, you need to configure it by
invoking the following command: "/usr/bin/vmware-config-tools.pl". Do you want
this program to invoke the command for you now? [yes]
Initializing…
Making sure services for VMware Tools are stopped.
Stopping VMware Tools services in the virtual machine:
Guest operating system daemon: done
Unmounting HGFS shares: done
Guest filesystem driver: done
[EXPERIMENTAL] The VMware FileSystem Sync Driver (vmsync) is a new feature that creates backups of virtual machines. Please refer to the VMware Knowledge Base for more details on this capability. Do you wish to enable this feature?
[no]
Before you can compile modules, you need to have the following installed…
make
gcc
kernel headers of the running kernel
Searching for GCC…
Detected GCC binary at "/usr/bin/gcc-4.6".
The path "/usr/bin/gcc-4.6" appears to be a valid path to the gcc binary.
Would you like to change it? [no]
Searching for a valid kernel header path…
Detected the kernel headers at "/lib/modules/3.2.0-4-amd64/build/include".
The path "/lib/modules/3.2.0-4-amd64/build/include" appears to be a valid path
to the 3.2.0-4-amd64 kernel headers.
Would you like to change it? [no]
The vmblock enables dragging or copying files between host and guest in a
Fusion or Workstation virtual environment. Do you wish to enable this feature?
[no] yes
make: Leaving directory `/tmp/vmware-root/modules/vmblock-only'
No X install found.
Creating a new initrd boot image for the kernel.
update-initramfs: Generating /boot/initrd.img-3.2.0-4-amd64
Checking acpi hot plug done
Starting VMware Tools services in the virtual machine:
Switching to guest configuration: done
VM communication interface: done
VM communication interface socket family: done
File system sync driver: done
Guest operating system daemon: done
The configuration of VMware Tools 8.6.10 build-913593 for Linux for this
running kernel completed successfully.
You must restart your X session before any mouse or graphics changes take
effect.
You can now run VMware Tools by invoking "/usr/bin/vmware-toolbox-cmd" from the
command line or by invoking "/usr/bin/vmware-toolbox" from the command line
during an X server session.
To enable advanced X features (e.g., guest resolution fit, drag and drop, and
file and text copy/paste), you will need to do one (or more) of the following:
1. Manually start /usr/bin/vmware-user
2. Log out and log back into your desktop session; and,
3. Restart your X session.
Enjoy,
–the VMware team
Found VMware Tools CDROM mounted at /mnt. Ejecting device /dev/sr0 …
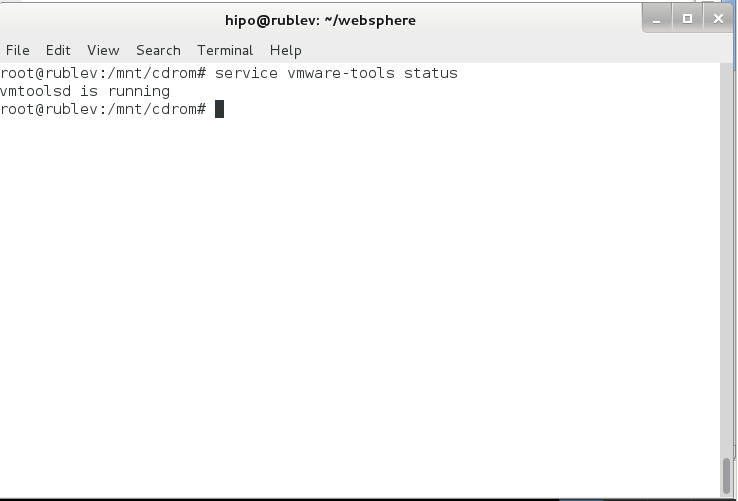
.To make sure vmware-tools compiled modules are loaded into Linux kernel inside VM, restart the Virtual Machine. Once Linux boots again and you login to gnome-terminal to check what is vmware-tools status (e.g. if properly loaded) run:
service vmware-tools status

vmtoolsd is running
This method of installing works on Debian 7 (Wheezy) but same steps should work on any Ubuntu and rest of Debian derivatives. For Redhat (RPM) based Linux distributions to install vmware-tools after mounting cdrom drive following above instructions you will have an rpm package instead of .tar.gz archive so all you have to do is install the rpm, e.g. launch smth. like:
rpm -Uhv /mnt/cdrom/VMwareTools-9.2.0-799703.i386.rpm
Cheers 😉
Tags: checking, copy paste, Debian, Debian Ubuntu Linux Mint, directory, fullscreen, host, kernel, mount dev, need, operating systems, proprietary software, running, testing, usr bin, virtual machines, working
Posted in Everyday Life, Various, Windows | No Comments »
Friday, December 9th, 2011 I have few servers, which have automatically enabled IPv6 protocols (IPv6 gets automatically enabled on Debian), as well as on most latest Linux distribituions nowdays.
Disabling IPv6 network protocol on Linux if not used has 2 reasons:
1. Security (It’s well known security practice to disable anything not used on a server)
Besides that IPv6 has been known for few criticil security vulnerabilities, which has historically affected the Linux kernel.
2. Performance (Sometimes disabling IPv6 could have positive impact on IPv4 especially on heavy traffic network servers).
I’ve red people claiming disabling IPv6 improves the DNS performance, however since this is not rumors and did not check it personally I cannot positively confirm this.
Disabling IPv6 on all GNU / Linuces can be achieved by changing the kernel sysctl settings net.ipv6.conf.all.disable_ipv6 by default net.ipv6.conf.all.disable_ipv6 equals 1 which means IPv6 is enabled, hence to disable IPv6 I issued:
server:~# sysctl net.ipv6.conf.all.disable_ipv6=0
To set it permanently on system boot I put the setting also in /etc/sysctl.conf :
server:~# echo 'net.ipv6.conf.all.disable = 1 >> /etc/sysctl.conf
The aforedescribed methods should be working on most Linux kernels version > 2.6.27 in that number it should work 100% on recent versions of Fedora, CentOS, Debian and Ubuntu.
To disable IPv6 protocol on Debian Lenny its necessery to blackist the ipv6 module in /etc/modprobe.d/blacklist by issuing:
echo 'blacklist ipv6' >> /etc/modprobe.d/blacklist
On Fedora / CentOS there is a another universal “Redhat” way disable IPv6.
On them disabling IPv6 is done by editting /etc/sysconfig/network and adding:
NETWORKING_IPV6=no

IPV6INIT=no
I would be happy to hear how people achieved disabling the IPv6, since on earlier and (various by distro) Linuxes the way to disable the IPv6 is probably different.
Alto to stop Iptables IPV6 on CentOS / Fedora and RHEL issue:
# service ip6tables stop
# service ip6tables off
Tags: blackist, boot, Cannot, CentOS, conf, Debian, Disabling, distro, DNS, echo, fedora, gnu linux, heavy traffic, How to, impact, ipv, ipv4, ipv6, kernel, kernel 2, Linux, linux kernel, linux kernels, methodology, modprobe, Module, necessery, net, network, network protocol, network servers, Networking, number, performance, Protocol, protocols, quot, Redhat, security, security practice, security vulnerabilities, sysconfig, sysctl, system boot, traffic network, Ubuntu, version, way, working
Posted in Computer Security, Linux, System Administration, Various | No Comments »
Wednesday, January 15th, 2014 
Recently I've been asked How to make communication to MySQL database encrypted. The question was raised by a fellow developer who works on developing a Desktop standalone application in Delphi Programming Language with DevArt an (SQL Connection Component capable to connect Delphi applications to multiple databases like MySQL, Oracle, PostgreSQL, Interbase, Firebird etc.
Communicating in Secured form to MySQL database is not common task to do, as MySQL usually communicates to applications hosted on same server or applications to communicate to MySQL are in secured DMZ or administrated via phpMyAdmin web interface.
MySQL supports encrypted connections to itself using Secure Socket Layer (SSL) encryption. Setting up MySQL db to be communicated encrypted is a must for standalone Desktop applications which has to extract / insert data via remote SQL.
Configuring SQL to support communicated queries encrpytion is supported by default and easily configured on most standard Linux version distributions (Debian, RHEL, Fedora) with no need to recompile it.
1. Generate SSL Certificates
$ mkdir /etc/mysql-ssl && cd mysql-ssl
# Create CA certificate
$ openssl genrsa 2048 > ca-key.pem
$ openssl req -new -x509 -nodes -days 3600 \
-key ca-key.pem -out ca-cert.pem
Create server certificate, remove passphrase, and sign it
server-cert.pem is public key, server-key.pem is private key
$ openssl req -newkey rsa:2048 -days 3600 \
-nodes -keyout server-key.pem -out server-req.pem
$ openssl rsa -in server-key.pem -out server-key.pem
$ openssl x509 -req -in server-req.pem -days 3600 \
-CA ca-cert.pem -CAkey ca-key.pem -set_serial 01 -out server-cert.pem
Create client certificate, remove passphrase, and sign it
client-cert.pem is public key and client-key.pem is private key
$ openssl req -newkey rsa:2048 -days 3600 \
-nodes -keyout client-key.pem -out client-req.pem
$ openssl rsa -in client-key.pem -out client-key.pem
$ openssl x509 -req -in client-req.pem -days 3600 \
-CA ca-cert.pem -CAkey ca-key.pem -set_serial 01 -out client-cert.pem
After generating the certificates, verify them:
$ openssl verify -CAfile ca-cert.pem server-cert.pem client-cert.pem
2. Add SSL support variables to my.cnf
Once SSL key pair files are generated in order to active SSL encryption support in MySQL server, add to (/etc/my.cnf, /etc/mysql/my.cnf, /usr/local/etc/my.cnf … ) or wherever config is depending on distro …
# SSL

ssl-ca=/etc/mysql-ssl/ca-cert.pem

ssl-cert=/etc/mysql-ssl/server-cert.pem

ssl-key=/etc/mysql-ssl/server-key.pem
3. Restart MySQL server
 /etc/init.d/mysqld restart

...
4. Create SQL user to require SSL login
Create new user with access to database;
GRANT ALL ON Sql_User_DB.* TO Sql_User@localhost;

FLUSH PRIVILEGES;
To create administrator privileges user:
 GRANT ALL PRIVILEGES ON *.* TO ‘ssluser’@'%’ IDENTIFIED BY ‘pass’ REQUIRE SSL;

FLUSH PRIVILEGES;
5. Test SSL Connection with MySQL CLI client or with few lines of PHP
To use mysql cli for testing whether SSL connection works:
$ mysql -u ssluser -p'pass' –ssl-ca /etc/mysql-ssl/client-cert.pem –ssl-cert /etc/mysql-ssl/client-key.pem
Once connected to MySQL to verify SSL connection works fine:
 mysql> SHOW STATUS LIKE 'Ssl_Cipher';

 +---------------+--------------------+

| Variable_name | Value              |

 +---------------+--------------------+

| Ssl_cipher    | DHE-RSA-AES256-SHA |

+---------------+--------------------+
If you get this output this means MySQL SSL Connection is working as should.
Alternative way is to use test-mysqli-ssl.php script to test availability to mysql over SSL.
$conn=mysqli_init();

mysqli_ssl_set($conn, '/etc/mysql-ssl/client-key.pem', '/etc/mysql-ssl/client-cert.pem', NULL, NULL, NULL);

if (!mysqli_real_connect($conn, '127.0.0.1', 'ssluser', 'pass')) { die(); }

$res = mysqli_query($conn, 'SHOW STATUS like "Ssl_cipher"');

print_r(mysqli_fetch_row($res));

mysqli_close($conn);
Note: Change username password according to your user / pass before using the script
That's all now you have mysql communicating queries data over SSL
Tags: administrator, application, change, cnf, common, data, databases, Debian, Delphi Programming Language, Desktop, DMZ, fellow, How to, make, multiple, null, openssl, password, pem, php, queries, rhel, script, setting, SSL, testing, username, variables
Posted in MySQL, System Administration, Web and CMS | No Comments »


