Posts Tagged ‘debian linux’

Play Dune2 on Debian Linux with dosbox – Dune 2 Mother of all Real Time Strategy games

Saturday, March 1st, 2014

medium_1809-dune-ii-the-building-of-a-dynasty_one_of_best_games_ever_linux_windows.gif

Dune II: The Building of a Dynasty (known also as Dune II: Battle for Arrakis in Europe is a game that my generation will never forget. Dune 2 is the "first" computer Real Time Strategy (RTE) game of the genre of the Warcraft I and Warcraft II / III and later Command and Conquer – Red Aleart, Age of Empires I / II and Starcraft …

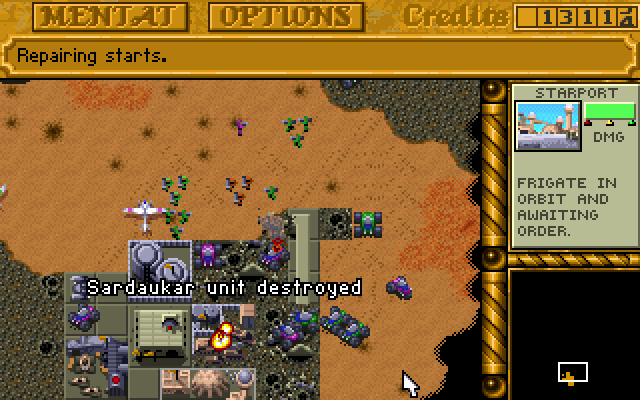
dune2-unit-destroyed

I've grown up with Dune2 and the little computer geek community in my school was absolutely crazy about playing it. Though not historically being the first Real Time Strategy game, this Lucas Inc. 
game give standards that for the whole RTE genre for years and will stay in history of Computer Games as one of best games of all times.

I've spend big part of my teenager years with my best friends playing Dune2 and the possibility nowadays to resurrect the memories of these young careless years is a blessing.  Younger computer enthusiasts and gamers probably never heard of Dune 2 and this is why I decided to place a little post here about this legendary game.

dune-2-tank-vehicle - one of best games computer games ever

Its worthy out of curiosity or for fun to play Dune 2 on modern OS be it Windows or Linux. Since Dune is DOS game, it is necessary to play it via DOS emulator i.e. – (DosBox). 
Here is how I run dune2 on my Debian Linux:

1. Install dosbox DOS emulator

apt-get install --yes dosbox

2. Download Dune2 game executable

You can download my mirror of dune2 here

Note that you will need unzip to uanrchive it, if you don't have it installed do so:

apt-get install --yes unzip

cd ~/Downloads/
wget https://www.pc-freak.net/files/dune-2.zip

3.  Unzip archive and create directory to mount it emulating 'C:\' drive

mkdir -p ~/.dos/Dune2
cd ~/.dos/Dune2

unzip ~/Downloads/dune-2.zip
 

4. Start dosbox and create permanent config for C: drive auto mount


dosbox

To make C:\ virtual drive automatically mounted you have to write a dosbox config from inside dbox console

config -writeconf /home/hipo/.dosbox.conf

My home dir is in /home/hipo, change this with your username /home/username

Then exit dosbox console with 'exit' command

To make dune2 game automatically mapped on Virtual C: drive:

echo "mount c /home/hipo/.dos" >> ~/.dosbox.conf

Further to make dosbox start each time with ~/.dosbox.conf add alias to your ~/.bashrc 

vim ~/.bashrc
echo "alias dosbox='dosbox -conf /home/hipo/.dosbox.conf'" >> ~/.bashrc
source ~/.bashrc

Then to run DUNE2 launch dosbox:

dosbox

and inside console type:

c:
cd Dune2
Dune2.exe

dune2-first-real-time-strategy-game-harkonen-screenshot

For the lazy ones who would like to test dune you can play dune 2 online on this website

How to Enable Open files with Microsoft Office Word 2003 in GNOME nautilus on Linux

Saturday, November 24th, 2012

how to addmicrosoft office to linux gui ms word logo with linux tux mascot in GNOME desktop nautiilus

Do you work with Linux and need communicate via e-mail with people sending you Microsoft Doc files created with Microsoft Office Word?

Do you end up with crappy (not identicaly looking) .doc files, after editing with Open Office and mailing back to Windows users, using Microsoft Office (Word)?

I experienced this many time and though it is not completely Open Office fault it is hard to explain or convince others to simply switch to Libre Office and distribute text in .ODT. Also pitily,  most computer users are much below the avarege level and too used to MS Office, so it is hardly possible  to change their bad habits (I try that with my co-students in Anrhem Business School) and I tell you from experience it is not possible …

I use GNU / Linux  as main Desktop operating system for  10 years now and for my work and studying, it is common the colleagues send me files in MS Word .DOC format. Usually I use OpenOffice to read and edit them and send back. However, not all formatted .doc files looks later nice in MS Word 2003 / 2007. Thus I have also a Native Microsoft Office 2003 installed on my Debian Linux running through – WINE Windows emulator.

Often, when I want to be sure a received MS .DOC file should be displaying exactly the same on MS Windows OS – to (avoid collegues criticism). I open the document using wine emulated Microsoft Office 2003.

Most of the MS .doc files are received over e-mail (I use as pop3 client Icedove- Mozilla Thunderbird), so I save them further on my hard disk and need to read / modifythem.
It is rather inconvenient and time inefficient to start Microsoft Office from gnome-terminal and type in below long command in order to edit .docs:

wine ~/.wine/drive_c/"Program Files"/"Microsoft Office"/OFFICE11/WINWORD.EXE

Thus I wanted a more convenient, easy way to be able to directly open .doc files with emulated Microsoft Word from GUI on my Debian Linux notebook.
This is possible using a nautilus plugin tool called nautilus-scripts-manager. Earlier I blogged about how to make extracting PDF to images possible with nautilus-scripts-manager, in the exactly same manner of logic is possible to add as many processing scripts to be available for invokement via the Scriptsnautilus scripts Properties menu.

Here is how to add MS Word to nautilus GNOME menus:

1. Install nautilus-scripts-manager (if not already installed)

debian:~# apt-get install --yes nautilus-scripts-manager

2. Create ~/.gnome2/nautilus-scripts/ directory

(~/ is shortcut for /home/yourusername/) – To add it globally for all users, one has to create the same .gnome2/nautilus-scripts/ directory with respective scripts for all existing users on host.

mkdir ~/.gnome2/nautilus-scripts/

3. Create ~/.gnome2/nautilus-scripts/word.sh MS Word launcher script

  Edit ~/.gnome2/nautilus-scripts/word.sh and add  like following 2 liners script: (note the paths to WINWORD.EXE might vary depending on exact Microsoft Office installed version:

#!/bin/sh
wine ~/.wine/drive_c/"Program Files"/"Microsoft Office"/OFFICE11/WINWORD.EXE "$1"

You can also download nautilus word.sh script here

Further on once placed, make word.sh script executable:

noah:~$ chmod +x ~/.gnome2/nautilus-scripts/word.sh

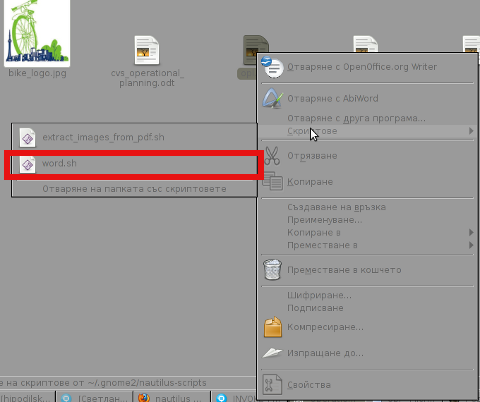
Onwards it is possible to open .doc files from Nautilus Scripts Manager menu press on the .doc file with last mouse button and choose Scripts :

open doc files with Microsoft Word 2003 nautilus script manager on GNU Linux and FreeBSD My GNOME env is configured in Bulgarian language so on below script you see the bulgarian translated word for Scripts (Скриптове).

screenshot of random open doc file with microsoft word 2003 nautilus script manager on my Debian GNU / Linux

Right now I don't have at hand FreeBSD, and I'm not sure if nautilus-scripts-manager is available with FreeBSD gnome so, if someone has tested this and can confirm this works on FreeBSD drop a comment please.

Well that's all enjoy easily opening your .doc files with Microsoft Office on Linux.

Make QMAIL with vpopmail vchkpw, courier-authlib and courier-imap auth work without MySQL on Debian Linux qmailrocks Thibs install

Friday, September 28th, 2012

How to make qmail vpopmail vchkpw courier-authlib and courier-imap work storing mails on hard disk with qmailrocks Thibs install

Recently installed a new QMAIL, following mostly Thibs Qmailrocks install guide. I didn’t followed literally Thibs good guide, cause in his guide in few of the sections like Install Vpopmail he recommends using MySQL as a Backend to store Vpopmail email data and passwords; I prefer storing all vpopmail data on the file system as I believe it is much better especially for tiny QMAIL mail servers with less than 500 mail box accounts.

In this little article I will explain, how I made Vpopmail courier-authlib and courier-imap play nice together without storing data in SQL backend.

1. Compile vpopmail with file system data storage support

So here is how I managed to make vpopmail + courier-authlib + courier-imap, work well together:

First its necessery to compile Vpopmailin store all its users data and mail data on file system. For this in Thibs Vpopmail Intsall step compiled Vpopmail without support for MySQL, e.g. instead of using his pointed compile time ./configure, arguments I used:


# cd /downloads/vpopmail-5.4.33
# ./configure \
--enable-qmaildir=/var/qmail/ \
--enable-qmail-newu=/var/qmail/bin/qmail-newu \
--enable-qmail-inject=/var/qmail/bin/qmail-inject \
--enable-qmail-newmrh=/var/qmail/bin/qmail-newmrh \
--enable-tcprules-prog=/usr/bin/tcprules \
--enable-tcpserver-file=/etc/tcp.smtp \
--enable-clear-passwd \
--enable-many-domains \
--enable-qmail-ext \
--enable-logging=y \
--enable-auth-logging \
--enable-libdir=/usr/lib/ \
--disable-roaming-users \
--disable-passwd \
--enable-domainquotas \
--enable-roaming-users
....
....
# make && make install-strip
# cat > ~vpopmail/etc/vusagec.conf < < __EOF__
Server:
Disable = True;
__EOF__
echo 'export PATH=$PATH:/var/qmail/bin/:/home/vpopmail/bin/' > /etc/profile.d/extrapath.sh
chmod +x /etc/profile.d/extrapath.sh
source /etc/profile

A tiny shell script with all above options to compile (qmail) vpopmail without MySQL / PostgreSQL support is here

For other steps concerning creation of vpopmail/vchkpw – user/group just follow as Thibs suggests.

2. Compile and install courier-authlib-0.59.1

I’ve made mirror of courier-authlib.0.59.1.tar.gz cause this version includes support for vchkpw without mysql, its a pity newer versions of courier-authlib not any more have support for vpopmail to store its data directly on the hard disk.

Then on downlaod, compile && install courier-authlib:

Download authlib courier-authlib.0.59.1.tar.gz – (I made mirror of courier-authlib.0.59.1.tar.gz you can use my mirror or download it somewhere else from the net):


# cd /usr/local/src
# wget -q https://www.pc-freak.net/files/courier-authlib.0.59.1.tar.gz
# tar -zxvvf courier-authlib.0.59.1.tar.gz

Compile courier-authlib

# ./configure --prefix=/usr/local --exec-prefix=/usr/local --with-authvchkpw --without-authldap --without-authmysql --disable-root-check --with-ssl --with-authchangepwdir=/usr/local/libexec/authlib
....
# make && make install && make install-strip && make install-configure
....

On Debian Squeeze, this version of courier-authlib compiles fine, on Debian Lenny I use it too and there it is okay.

Unless above commands returns a compile error authlib will be installed inside /usr/local/libexec. If you get any errors it is most likely due to some missing header files. The error should be self explanatory enough, but just in case you have troubles to find what deb is necessery to install, please check here the complete list of installed packages I have on the host . In case of problems the quickest way (if on Debian Squeeze) is to install same packages, type:


# wget -q https://www.pc-freak.net/files/list_of_all_deb_necessery_installed_packages_for_authlib.txt
# for i in $(cat list_of_all_deb_necessery_installed_packages_for_authlib.txt |awk '{ print $2 }'); do
apt-get install --yes $i;
done

This is for the lazy ones though it might install you some packs you don’t like to have on your host, so just install it in case you know what you’re doing 🙂

Next step is to set proper configuration for courier-authdaemon.

3. Configure courier-authlib in /usr/local/etc/authlib

Again for the lazy ones I have prepared a good config which is working 100% with vpopmail configured to store mails on the file system, to install the “good” configs, fetch mine and put them in proper location, e.g.:


# cd /usr/local/etc
# wget -q https://www.pc-freak.net/files/authlib-config-for-qmail-with-hdd-directory-stored-userdata.tar.gz
# tar -zxvvf authlib-config-for-qmail-with-hdd-directory-stored-userdata.tar.gz
....

For those who prefer not to use my configuration as pointed above, here is what you will need to change manually in configs:

Edit /usr/local/etc/authlib/authdaemonrc and make sure there variable authmodulelist and authmodulelist and daemons=5
equals to:


authmodulelist="authvchkpw"


authmodulelistorig="authuserdb authpgsql authldap authmysql authcustom authvchkpw authpipe"


daemons=10

Bear in mind here the setting daemons, will set how many maximum parallel connections should be possible to authdaemond on new IMAP fetch mail user requests. Setting it to 10 will allow your mail server to support up to 10 users to paralelly check your mail for a tiny mail server this setting is okay if you expect higher number of parallel mail users raise the setting to some setting fitting your needs.

P.S. On some qmail installations this value has created weird problems and took me hours to debug the whole mess is caused by this setting, make sure you plan it now unless you don’t to loose some time in future.

4. Stop debian courier-authdaemon and start custom compiled one

Now all is ready and authdaemond can be started, but before that if you have installed courier-authlib as a debian package you need to stop it via init script and only when completely sure old default Debian courier-authdaemon is stopped launch the new installed one:


# /etc/init.d/courier-authdaemon stop
# s ax |grep -i authdaemond |grep -v grep
#
# /usr/local/sbin/authdaemond start
#

To make the newly custom source installed courier-authdaemon to load itself on system boot instead of the debian installed package


# dpkg -l |grep -i courier-authdaemon
ii courier-authdaemon 0.63.0-3 Courier authentication daemon

open /etc/init.d/courier-authdaemond, after line:


. /lib/lsb/init-functions

add


/usr/local/sbin/authdaemond start
exit 0

This will make the script exit once launches cmd /usr/local/sbin/authdaemond start

5. Compile and Install courier-imap

You will also have to install from courier-imap archive source, I have tested it and know Qmail + Vpopmail + Courier-Imap works for sure with version courier-imap-4.1.2.tar.bz2

As of time of writing this post courier-imap-4.11.0.tar.bz2 is the latest available for download from Courier-imap download site unfortunately this version requires higher version of >= courier-authlib-0.63

In order install courier-imap-4.1.2.tar.bz2


# cd /usr/local/src
# wget -q https://www.pc-freak.net/files/courier-imap-4.1.2.tar.bz2
# tar -jxvvf courier-imap-4.1.2.tar.bz2
...
# chown -R hipo:hipo courier-imap-4.1.2
# su hipo
$ cd courier-imap-4.1.2/
$ export CFLAGS="-DHAVE_OPEN_SMTP_RELAY -DHAVE_VLOGAUTH"
$ export COURIERAUTHCONFIG=/usr/local/bin/courierauthconfig
$ export CPPFLAGS=-I/usr/local/courier-authlib/include
$ ./configure --prefix=/usr/local/courier-imap --disable-root-check
...
$ exit
# make
...
# make install
...
# make install configure

It is recommended courier-imap to be compiled with non root username. In above code I use my username hipo, other people have to use any non-root user.

6. Set proper configuration and new init script for courier-imap

In /usr/lib/courier-imap, download following working configs (for convenience I’ve made tar with my configs):


# cd /usr/lib/courier-imap
# rm -rf etc
# wget -q https://www.pc-freak.net/files/courier-imap-config-etc.tar.gz

Then you will have to overwrite default courier-imap init script in /etc/init.d/courier-imap with another one to start the custom compiled one instead of debian default installed courier-imap


# mv /etc/init.d/courier-imap /root
# cd /etc/init.d
# wget -q https://www.pc-freak.net/files/debian-courier-imap
# mv debian-courier-imap courier-imap
# chmod +x courier-imap

This init script is written use /var/lock/subsys/courier-imap, so you will have to also create /var/lock/subsys/


# mkdir -p /var/lock/subsys

7. Start custom installed courier-imap

The start/stop init script of newly installed courier-imap is /usr/lib/courier-imap/libexec/imapd.rc


/usr/lib/courier-imap/libexec/imapd.rc start

Since a new /etc/init.dcourier-imap is installed too, it can be also used to control courier-imap start/stop.

Well thats should be enough for Courier-authlib and Courier-Authlib to communicate fine between each other and be able to connect and fetch e-mail stored in file system by vpopmail.

8. Test if Qmail IMAP proto finally works


# telnet localhost 143
Trying 127.0.0.1...
Connected to localhost.
Escape character is '^]'.
* OK [CAPABILITY IMAP4rev1 UIDPLUS CHILDREN NAMESPACE THREAD=ORDEREDSUBJECT THREAD=REFERENCES SORT QUOTA IDLE AUTH=CRAM-MD5 ACL ACL2=UNION STARTTLS] Courier-IMAP ready. Copyright 1998-2011 Double Precision, Inc. See COPYING for distribution information.
a login username@mail-domain.com my-username-password
a OK LOGIN Ok.
a LIST "" "*"
* LIST (\HasNoChildren) "." "INBOX.Sent"
* LIST (\Marked \HasChildren) "." "INBOX"
* LIST (\HasNoChildren) "." "INBOX.Drafts"
* LIST (\HasNoChildren) "." "INBOX.Trash"
a OK LIST completed
a EXAMINE Inbox
* FLAGS (\Draft \Answered \Flagged \Deleted \Seen \Recent)
* OK [PERMANENTFLAGS ()] No permanent flags permitted
* 6683 EXISTS
* 471 RECENT
* OK [UIDVALIDITY 1272460837] Ok
* OK [MYRIGHTS "acdilrsw"] ACL
a OK [READ-ONLY] Ok
* 1 FETCH (BODY[] {2619}
Return-Path:
Delivered-To: hipo@my-domain-name.com
Received: (qmail 22304 invoked by uid 1048); 24 Apr 2012 14:49:49 -0000
Received: from unknown (HELO localhost) (127.0.0.1)
by mail.my-domain-name.com with SMTP; 24 Apr 2012 14:49:49 -0000
Delivered-To: hipo@my-domain-name.com
Received: from localhost [127.0.0.1]
......
......

That’s all it works. Enjoy 🙂

Substitute for the Gnome bluetooth / Or how to properly manage your bluetooth (obex) connections in Gnome

Saturday, June 5th, 2010

I connect my Nokia 9300i mobile phone over bluetooth every now and then. In that connection, everyoften I do experience problems with properly connecting the device to my notebook running Debian Squeeze/Sid Unstable on it’s Desktop.
Until recently it really annoyed me that I had to loose time restring the Linux system sometimes when an access to the mobiledevice was failing, without any good trackable error message.
The connection error I have experienced quite often when I was trying to browse my Nokia 9300i cellphone using the bluetooth protocolon Linux was:
“the name org.openobex.client was not provided”
You can read about a similar error to the one encountered by me when using bluetooth on my Debian Linux in debian bugs mailing list on osdir
The way I solved the issues with connecting over bluetooth on Linux until recently was by rebooting the whole Linux system (dumb)!.
Some other things I try to get arround the bluetooth connection errors was by trying to re-enable my bluetooth notebook embedded device on my Lenovo Thinkpad with command:

root@noah:~# echo disable > /proc/acpi/ibm/bluetooth
root@noah:~# echo enable > /proc/acpi/ibm/bluetooth

I alsy tried to physically remove the bluetooth module, rfcomm and a few other modules which were preventing the removal with rmmod of the bluetooth module.
However this solution did’t help either .. To solve the issues I tried few other stuff one of which was installing libobexftp0 and obexftp since my Nokia 9300i uses the obex protocol to communicate with the computer through bluetooth

I have to note that so far I have used the embedded general gnome application Gnome Bluetooth by using the bluetooth-applet .

Well all my worries came to end finally by simply using another piece of bluetooth communication software callde blueman
Since I have installed that handy software bluetooth is working perfectly fine everytime with my mobile. I warmly recommend to everybody out there to switch to the blueman which is a substitute for the old crappy gnome-bluetooth pack
check out the up-mentioned provided website.
It’s probably also worthy to say that the blueman app is written in python.
Well I’m pretty happy now whilst using blueman, hopefully you’ll enjoy it too as well as solve your bluetooth issues ! 🙂

Secure Apache webserver against basic Denial of Service attacks with mod_evasive on Debian Linux

Wednesday, September 7th, 2011

Secure Apache against basic Denial of Service attacks with mod evasive, how webserver DDoS works

One good module that helps in mitigating, very basic Denial of Service attacks against Apache 1.3.x 2.0.x and 2.2.x webserver is mod_evasive

I’ve noticed however many Apache administrators out there does forget to install it on new Apache installations or even some of them haven’t heard about of it.
Therefore I wrote this small article to create some more awareness of the existence of the anti DoS module and hopefully thorugh it help some of my readers to strengthen their server security.

Here is a description on what exactly mod-evasive module does:

debian:~# apt-cache show libapache2-mod-evasive | grep -i description -A 7

Description: evasive module to minimize HTTP DoS or brute force attacks
mod_evasive is an evasive maneuvers module for Apache to provide some
protection in the event of an HTTP DoS or DDoS attack or brute force attack.
.
It is also designed to be a detection tool, and can be easily configured to
talk to ipchains, firewalls, routers, and etcetera.
.
This module only works on Apache 2.x servers

How does mod-evasive anti DoS module works?

Detection is performed by creating an internal dynamic hash table of IP Addresses and URIs, and denying any single IP address which matches the criterias:

  • Requesting the same page more than number of times per second
  • Making more than N (number) of concurrent requests on the same child per second
  • Making requests to Apache during the IP is temporarily blacklisted (in a blocking list – IP blacklist is removed after a time period))

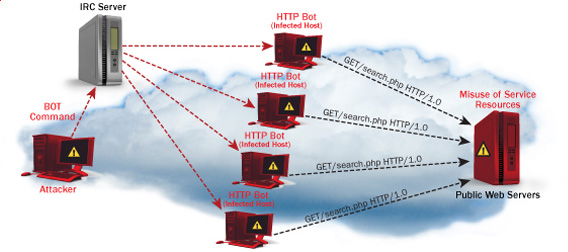
These anti DDoS and DoS attack protection decreases the possibility that Apache gets DoSed by ana amateur DoS attack, however it still opens doors for attacks who has a large bot-nets of zoombie hosts (let’s say 10000) which will simultaneously request a page from the Apache server. The result in a scenario with a infected botnet running a DoS tool in most of the cases will be a quick exhaustion of system resources available (bandwidth, server memory and processor consumption).
Thus mod-evasive just grants a DoS and DDoS security only on a basic, level where someone tries to DoS a webserver with only possessing access to few hosts.
mod-evasive however in many cases mesaure to protect against DoS and does a great job if combined with Apache mod-security module discussed in one of my previous blog posts – Tightening PHP Security on Debian with Apache 2.2 with ModSecurity2
1. Install mod-evasive

Installing mod-evasive on Debian Lenny, Squeeze and even Wheezy is done in identical way straight using apt-get:

deiban:~# apt-get install libapache2-mod-evasive
...

2. Enable mod-evasive in Apache

debian:~# ln -sf /etc/apache2/mods-available/mod-evasive.load /etc/apache2/mods-enabled/mod-evasive.load

3. Configure the way mod-evasive deals with potential DoS attacks

Open /etc/apache2/apache2.conf, go down to the end of the file and paste inside, below three mod-evasive configuration directives:

<IfModule mod_evasive20.c>
DOSHashTableSize 3097DOS
PageCount 30
DOSSiteCount 40
DOSPageInterval 2
DOSSiteInterval 1
DOSBlockingPeriod 120
#DOSEmailNotify hipo@mymailserver.com
</IfModule>

In case of the above configuration criterias are matched, mod-evasive instructs Apache to return a 403 (Forbidden by default) error page which will conserve bandwidth and system resources in case of DoS attack attempt, especially if the DoS attack targets multiple requests to let’s say a large downloadable file or a PHP,Perl,Python script which does a lot of computation and thus consumes large portion of server CPU time.

The meaning of the above three mod-evasive config vars are as follows:

DOSHashTableSize 3097 – Increasing the DoSHashTableSize will increase performance of mod-evasive but will consume more server memory, on a busy webserver this value however should be increased
DOSPageCount 30 – Add IP in evasive temporary blacklist if a request for any IP that hits the same page 30 consequential times.
DOSSiteCount 40 – Add IP to be be blacklisted if 40 requests are made to a one and the same URL location in 1 second time
DOSBlockingPeriod 120 – Instructs the time in seconds for which an IP will get blacklisted (e.g. will get returned the 403 foribden page), this settings instructs mod-evasive to block every intruder which matches DOSPageCount 30 or DOSSiteCount 40 for 2 minutes time.
DOSPageInterval 2 – Interval of 2 seconds for which DOSPageCount can be reached.
DOSSiteInterval 1 – Interval of 1 second in which if DOSSiteCount of 40 is matched the matched IP will be blacklisted for configured period of time.

mod-evasive also supports IP whitelisting with its option DOSWhitelist , handy in cases if for example, you should allow access to a single webpage from office env consisting of hundred computers behind a NAT.
Another handy configuration option is the module capability to notify, if a DoS is originating from a number of IP addresses using the option DOSEmailNotify
Using the DOSSystemCommand in relation with iptables, could be configured to filter out any IP addresses which are found to be matching the configured mod-evasive rules.
The module also supports custom logging, if you want to keep track on IPs which are found to be trying a DoS attack against the server place in above shown configuration DOSLogDir “/var/log/apache2/evasive” and create the /var/log/apache2/evasive directory, with:
debian:~# mkdir /var/log/apache2/evasive

I decided not to log mod-evasive DoS IP matches as this will just add some extra load on the server, however in debugging some mistakenly blacklisted IPs logging is sure a must.

4. Restart Apache to load up mod-evasive debian:~# /etc/init.d/apache2 restart
...

Finally a very good reading which sheds more light on how exactly mod-evasive works and some extra module configuration options are located in the documentation bundled with the deb package to read it, issue:

debian:~# zless /usr/share/doc/libapache2-mod-evasive/README.gz

Installing Usual PHP Apache needed modules for new Debian GNU / Linux servers

Tuesday, September 18th, 2012

Almost evertime whether install a new Debian Linux server to host some websites, use the popular small and mid-sized hosting solution combination:
 

  • Apache webserver
  • PHP module to interpret the PHP programming code
  • MySQL to store the DB Backend

Installing the basis for on Debian is easy:


# apt-get install --yes apache2 apache2-mpm-prefork libapache2-mod-php \
mysql-server php5 php5-mysql mysql-client mysql-common phpmyadmin
....

This of course is in case, if necessery to run websites which are written to usephp code which is not thread safety (Use Apache child prefork technology to manage processes); For websites writen to be thread safety (not use some forking php functions like: php – exec(); fork(); etc. – I install apache2-mpm-prefork for better Webserver performance and speed.

This minimum collection of packages is good only for basic, websites and most Joomla, WordPress, Drupal or whatever custom PHP websites has to be hosted usually require much more PHP functions which are not part of this basic bundle. Hence as I said prior on almost all new Linux debian / ubuntu deb package based servers need to install following list of extra PHP deb packages:


# apt-get install --yes php-apc php-auth-ssl php-mail \
php-http php-net-smtp php-net-socket php-pear php5-cli php5-curl \
php5-gd php5-imagick php5-mapscript php5-mcrypt php5-odbc php5-sybase \
php5-xsl
...,

After installing this standard bundle of modules PHP is extended to support somenice functionalities like Image editting / convertion / resizing … various graphic editting functions as supported by infamous ImageMagick and GDlib, PEAR support (PHP Extension and Application Repository) bundle providing number of useful PHP classes.
php5-xInstalling Usual PHP Apache needed modules for new Debian GNU / Linux serverssl is usually necessery for websites which pass data in XSL format (a specific formatted XML data). php5-xsl is usually necessery for websites containing flash animationsPresentation, videos, games etc.

That is mostly it, hope this helps some sys admin like me who need configure new Debian based hosting server 🙂

Debian Linux: Installing and monitoring servers with Icanga (Nagios fork soft)

Monday, June 3rd, 2013

icinga-monitoring-processes-and-servers-linux-logo

There is plenty of software for monitoring how server performs and whether servers are correctly up and running. There is probably no Debian Linux admin who didn't already worked or at least tried Nagios and Mointor to monitor and notify whether server is unreachable or how server services operate. Nagios and Munin are play well together to prevent possible upcoming problems with Web / Db / E-mail services or get notify whether they are completely inaccessible. One similar "next-generation" and less known software is Icanga.
The reason, why to use Icinga  instead of Nagios is  more features a list of what does Icinga supports more than Nagios is on its site here
I recently heard of it and decided to try it myself. To try Icanga I followed Icanga's install tutorial on Wiki.Icanga.Org here
In Debian Wheezy, Icinga is already part of official repositories so installing it like in Squeeze and Lenny does not require use of external Debian BackPorts repositories.

1. Install Icinga pre-requirement packages

debian:# apt-get --yes install php5 php5-cli php-pear php5-xmlrpc php5-xsl php5-gd php5-ldap php5-mysql

2. Install Icanga-web package

debian:~# apt-get --yes install icinga-web

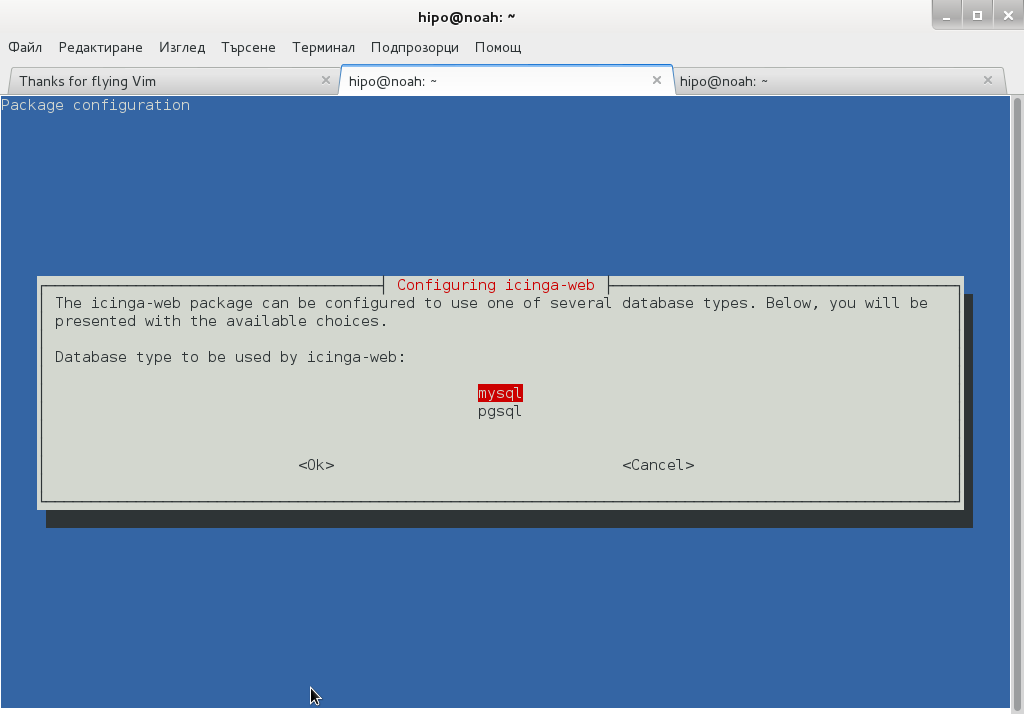
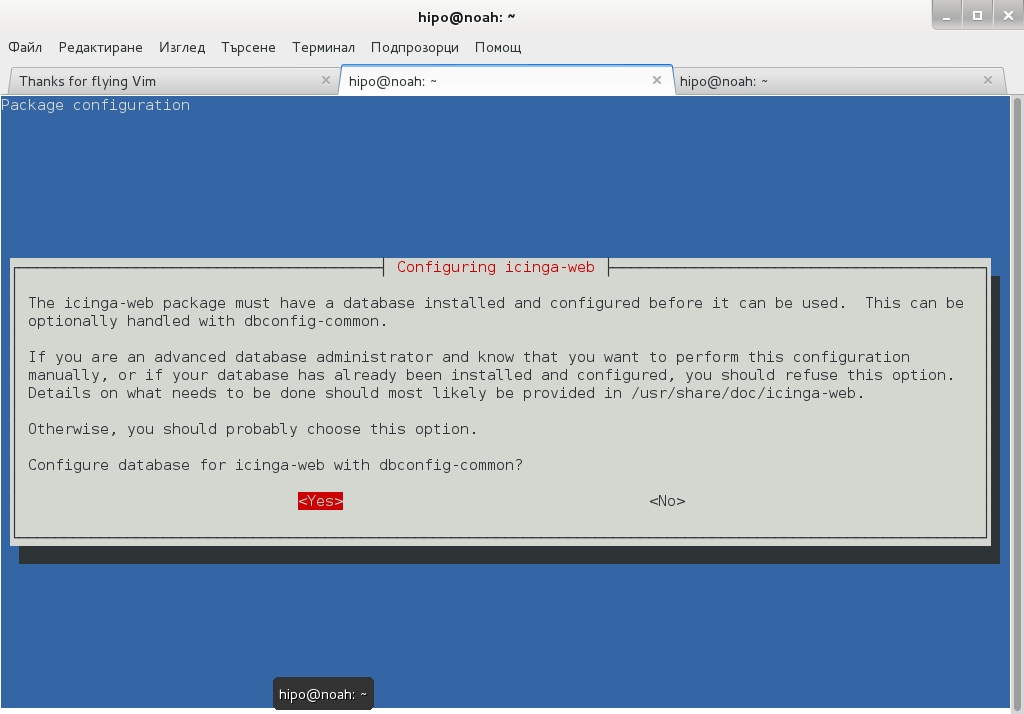
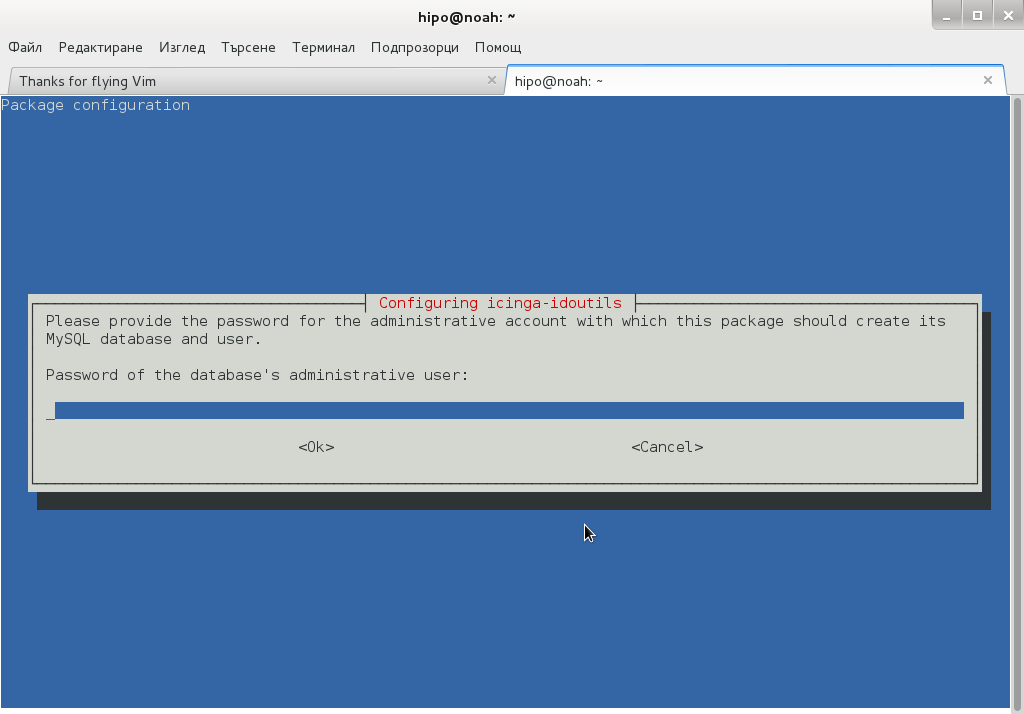
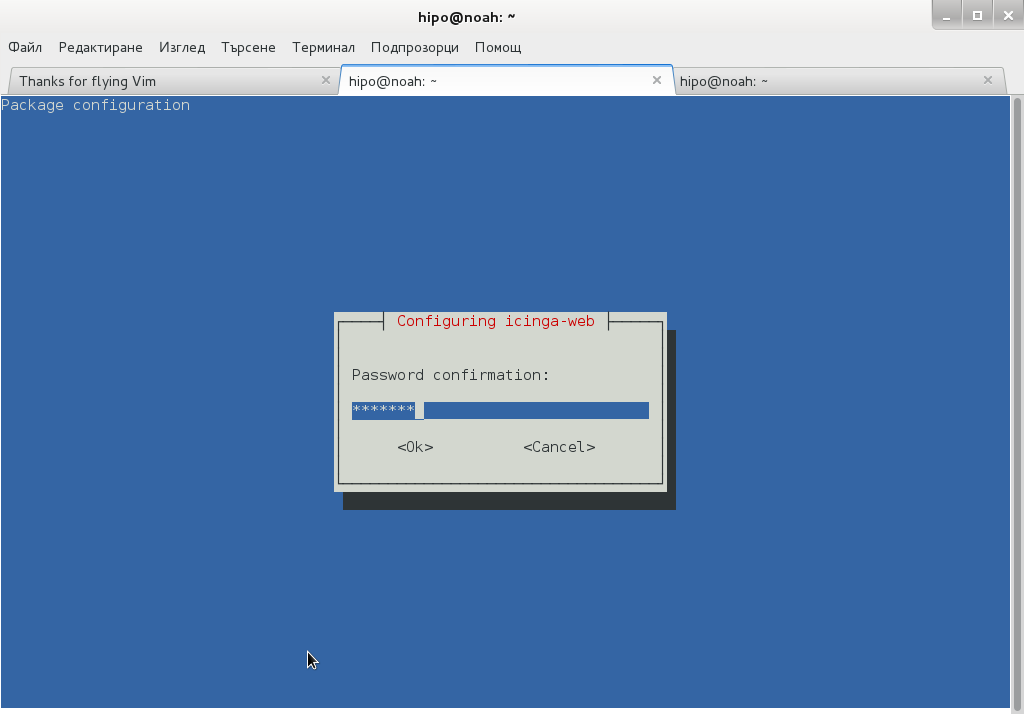
Here you will be prompted a number of times to answer few dialog questions important for security, as well as fill in MySQL server root user / password as well as SQL password that will icinga_web mySQL user use.

icinga-choosing-database-type

configuring-icinga-web-debian-linux-configuring-database-shot

debian-config-screenshot-configuring-icinga-idoutils

icinga-password-confirmation-debian-linux
….

Setting up icinga-idoutils (1.7.1-6) …
dbconfig-common: writing config to /etc/dbconfig-common/icinga-idoutils.conf
granting access to database icinga for icinga-idoutils@localhost: success.
verifying access for icinga-idoutils@localhost: success.
creating database icinga: success.
verifying database icinga exists: success.
populating database via sql…  done.
dbconfig-common: flushing administrative password
Setting up icinga-web (1.7.1+dfsg2-6) …
dbconfig-common: writing config to /etc/dbconfig-common/icinga-web.conf

Creating config file /etc/dbconfig-common/icinga-web.conf with new version
granting access to database icinga_web for icinga_web@localhost: success.
verifying access for icinga_web@localhost: success.
creating database icinga_web: success.
verifying database icinga_web exists: success.
populating database via sql…  done.
dbconfig-common: flushing administrative password

Creating config file /etc/icinga-web/conf.d/database-web.xml with new version
database config successful: /etc/icinga-web/conf.d/database-web.xml

Creating config file /etc/icinga-web/conf.d/database-ido.xml with new version
database config successful: /etc/icinga-web/conf.d/database-ido.xml
enabling config for webserver apache2…
Enabling module rewrite.
To activate the new configuration, you need to run:
  service apache2 restart
`/etc/apache2/conf.d/icinga-web.conf' -> `../../icinga-web/apache2.conf'
[ ok ] Reloading web server config: apache2 not running.
root password updates successfully!
Basedir: /usr Cachedir: /var/cache/icinga-web
Cache already purged!

3. Enable Apache mod_rewrite


debian:~# a2enmod rewrite
debian:~# /etc/init.d/apache2 restart


4. Icinga documentation files

Some key hints on Enabling some more nice Icinga features are mentioned in Icinga README files, check out, all docs files included with Icinga separate packs are into:
 

debian:~# ls -ld *icinga*/
drwxr-xr-x 3 root root 4096 Jun  3 10:48 icinga-common/
drwxr-xr-x 3 root root 4096 Jun  3 10:48 icinga-core/
drwxr-xr-x 3 root root 4096 Jun  3 10:48 icinga-idoutils/
drwxr-xr-x 2 root root 4096 Jun  3 10:48 icinga-web/

debian:~# less /usr/share/doc/icinga-web/README.Debian debian:~# less /usr/share/doc/icinga-idoutils/README.Debian

5. Configuring Icinga

Icinga configurations are separated in two directories:

debian:~# ls -ld *icinga*

drwxr-xr-x 4 root root 4096 Jun  3 10:50 icinga
drwxr-xr-x 3 root root 4096 Jun  3 11:07 icinga-web

>

etc/icinga/ – (contains configurations files for on exact icinga backend server behavior)


/etc/icinga-web – (contains all kind of Icinga Apache configurations)
Main configuration worthy to look in after install is /etc/icinga/icinga.cfg.

6. Accessing newly installed Icinga via web

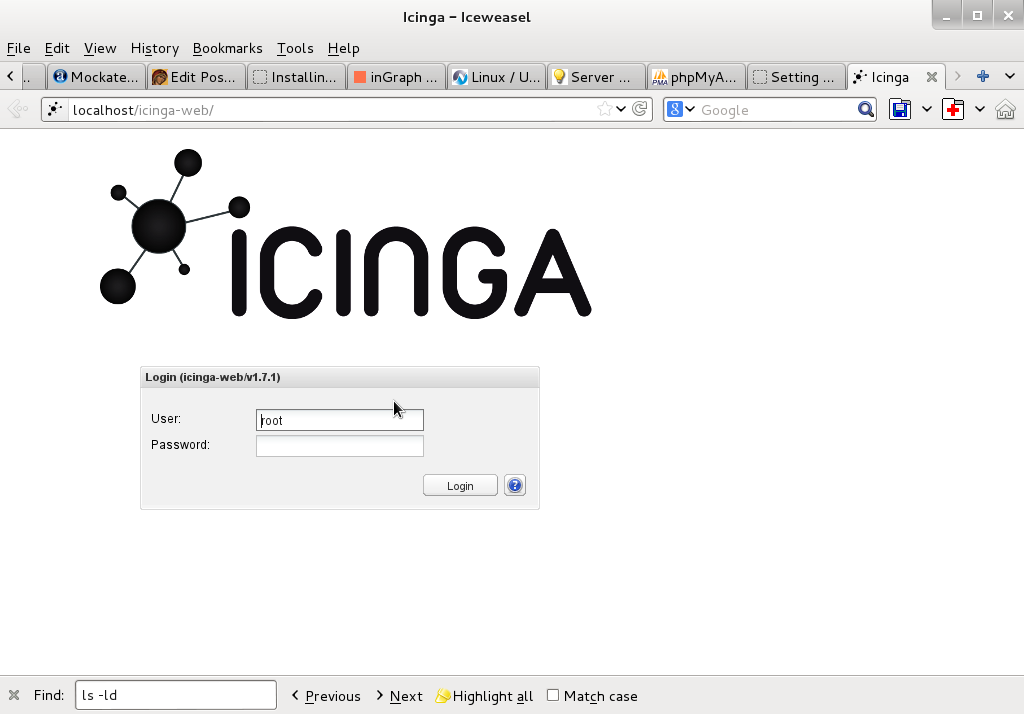
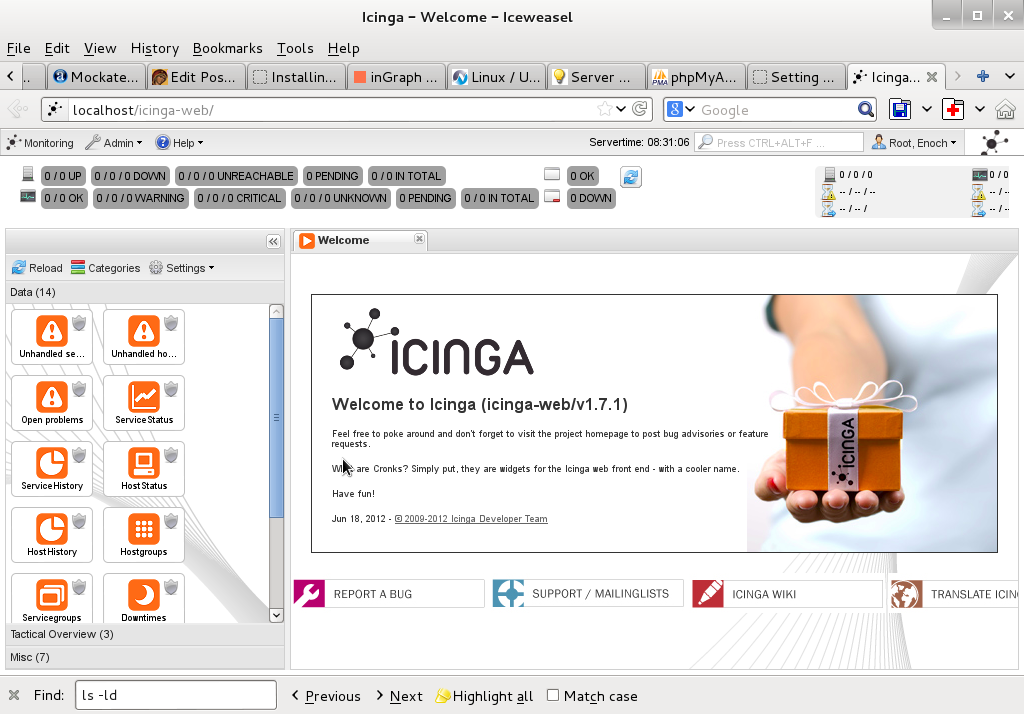
To access just installed Icinga, open in browser URL – htp://localhost/icinga-web

icinga web login screen in browser debian gnu linux

logged in inside Icinga / Icinga web view and control frontend


7. Monitoring host services with Icinga (NRPE)

As fork of Nagios. Icinga has similar modular architecture and uses number of external plugins to Monitor external host services list of existing plugins is on Icinga's wiki here.
Just like Nagios Icinga supports NRPE protocol (Nagios Remote Plugin Executor). To setup NRPE, nrpe plugin from nagios is used (nagios-nrpe-server). 

To install NRPE on any of the nodes to be tracked;
debian: ~# apt-get install –yes nagios-nrpe-server

 Then to configure NRPE edit /etc/nagios/nrpe_local.cfg


Once NRPE is supported in Icinga, you can install on Windows or Linux hosts NRPE clients like in Nagios to report on server processes state and easily monitor if server disk space / load or service is in critical state.

Installation and Configuration of Clamav antivirus on Debian GNU / Linux

Monday, September 9th, 2013

Clamav logo installing Clamav antivirus to scan periodically Debian server websites for viruses

Clamav Antivirus is one of must have packages installed on a new Debian Linux server. It is not only necessary whether configuring a new Mail server be it Qmail or Postfix but is good to have to always check files on a Webserver. Until few years infecting of Sites with Viruses / Installing WebShells or Backdooring for further access using Perl or PHP vulnerable PHP code was not so common, However nowadays with increase of complexity of languages and increase of not security minded programmers this possibility dramatically increaed. Thus nowadays, whether I configure a new Apache + PHP + CGI support server I always install Clamav AV. Some might argue that Clamav Virus definitions are still too little compared to proprietary solutions like BitDefender / AVG or Avast but since my experience with this under Linux is not so bright as well as Clamav captures essential Viruses and Backdoors I still prefer to keep on with Clamav.  Even on home Desktops with Linux clamav is of use as there are plenty of free-ware software for Linux which come only distributed only in a binary form and hence its good to check them with clamav before use whether they don't contain some well known Rootkit or Virus. Over the years Clamav has done great job for me whether I had to clean up "hacked" hosts containing  script kiddie exploit scanners or Virus infected ELF binaries
.
1. Installing ClamAV in Debian Wheezy Linux

Before time there was a separate Debian repository called Volatille providing latest version release of Clamav, since Debian Squeeze Volatille project is discontinued, thus installing on Wheezy as a deb package is only available via standard Debian repositories.

apt-get update && apt-get --yes upgrade
...

apt-get install --yes clamav clamav-daemon

As package dependencies you get installed:

clamav clamav-base clamav-freshclam libbz2-1.0 libclamav1 libcurl3 libidn11 ucf

Clamav-Daemon will launch immediately after packages are installed and is available as process name /usr/sbin/clamd

# ps ax |grep -i clam
 2641 ?        Ssl    6:39 /usr/sbin/clamd
 2791 ?        Ss    12:04 /usr/bin/freshclam -d --quiet
12300 pts/0    S+     0:00 grep -i clam

2. Updating Clamav Antivirus Definitions

Its worthy say few words on clamav-freshclam as it is part of ClamAV which is used to update Clamav Virus definitions. Update of ClamAV vir definitions are updating automatically through /usr/bin/freshclam daemon which is started automatically by Debian postconfiguration scripts right after Clamav install.

Manual update of AV definitions can be done also with freshclam.

# freshclam
ClamAV update process started at Sun Sep  8 17:48:36 2013
main.cvd is up to date (version: 54, sigs: 1044387, f-level: 60, builder: sven)
daily.cvd is up to date (version: 17830, sigs: 1696886, f-level: 63, builder: neo)
bytecode.cld is up to date (version: 225, sigs: 42, f-level: 63, builder: dgoddard)


To keep an eye on definition auto-updates (useful to check where something fails), check out in /var/log/clamav/freshclam.log

A sure indication that Anvirus updates are conducting fine should be log records like:
 

Sun Sep  8 16:27:44 2013 -> ————————————–
Sun Sep  8 17:27:44 2013 -> Received signal: wake up
Sun Sep  8 17:27:44 2013 -> ClamAV update process started at Sun Sep  8 17:27:44 2013
Sun Sep  8 17:27:44 2013 -> main.cvd is up to date (version: 54, sigs: 1044387, f-level: 60, builder: sven)
Sun Sep  8 17:27:44 2013 -> daily.cld is up to date (version: 17830, sigs: 1696886, f-level: 63, builder: neo)
Sun Sep  8 17:27:44 2013 -> bytecode.cld is up to date (version: 225, sigs: 42, f-level: 63, builder: dgoddard)
Sun Sep  8 17:27:47 2013 -> ————————————–


3. Configuring ClamAV

For Desktop use clamav default config is pretty good. However for servers its good to raise  2 up MaxThreads:

By default MaxThreads is 12

MaxThreads 12

Change to from 30 to 80 depending on how powerful machine ClamAV runs, even on some servers more Clamav threads might be necessary

MaxThreads 30

Other value I like changing is SelfCheck 3600 is too long time for clamav Virus definitions integrity I prefer to set it to 600, i.e.

SelfCheck 600

By default ClamAV is also configured to scan archive files as well. However for this to work you will have to have previously installed unzip and unrar on system. If still you don't have them installed run:

# apt-get install --yes unrar unzip
...

Note that you will need to have non-free part of Debian deb repositories to /etc/apt/sources.list

Here is one of my sources.list
 

deb http://ftp.uk.debian.org/debian squeeze main contrib non-free
deb http://security.debian.org/ squeeze/updates main contrib non-free
deb-src http://security.debian.org/ squeeze/updates main contrib non-free

deb http://ftp.debian.skynet.be/ftp/debian/ squeeze main contrib non-free
deb-src http://ftp.debian.skynet.be/ftp/debian/ stable main contrib non-free

deb http://security.debian.org squeeze/updates main contrib non-free
deb-src http://security.debian.org/ squeeze/updates main contrib non-free

3. Scanning with ClamAV

# clamscan -r /tmp/
./dos-58.160.208.43: OK
./dos-108.18.38.140: OK
./dos-188.194.80.100: OK
./dos-91.224.160.135: OK
./dos-128.253.117.70: OK
./dos-128.172.143.110: OK
./dos-77.92.102.34: OK
./dos-195.230.5.12: OK
...

....
----------- SCAN SUMMARY -----------
Known viruses: 2735887
Engine version: 0.97.8
Scanned directories: 1
Scanned files: 129
Infected files: 0
Data scanned: 0.00 MB
Data read: 0.00 MB (ratio 0.00:1)
Time: 4.769 sec (0 m 4 s)


-r flag stands for recursive scan – e.g. scan all sub-directories in directory and its content

To not flood your console / ssh connection one very useful option is -i (print only whetherinfected files are matched). Here is one more sample case:

# clamscan -r -i /var/tmp/
----------- SCAN SUMMARY -----------
Known viruses: 2735887
Engine version: 0.97.8
Scanned directories: 1
Scanned files: 2
Infected files: 0
Data scanned: 0.26 MB
Data read: 0.13 MB (ratio 1.97:1)
Time: 4.824 sec (0 m 4 s)


Whether you're on a physical server console and it has pc speaker or sound blaster use –bell option to ring a bell every time a Virus infection is found, for exmpl.

# clamscan -r -i --bell /var/www/

4. Scanning periodically and reporting with ClamAV directories with websites

A very common use of ClamAV is to just setup a scheduled cronjob once a month to scan, whether server folder containing a bunch of websites in separate Virtualhosts contain some viruses or malicious stuff. Then as administrator check those logs once a month to make sure server site or group of sites does not become banned in search engine (blocked by Google Chrome and Firefox as Virus hotbed) …
# crontab -u root -e
00 02 01 * * clamscan -r /var/www -l /var/log/websites-scan.log

Then once a month check out /var/log/websites-scan.log

Linux PHP Disable chmod() and chown() functions for better Apache server security

Monday, July 15th, 2013

php_tighten_security_by_enabling_safe_mode-php-ini-function-prevent-crackers-break-in-your-server
I have to administer few inherited Linux servers with Ubuntu and Debian Linux. The servers hosts mainly websites with regularly un-updated Joomlas and some custom developed websites which were developed pretty unsecure. To mitigate hacked websites I already disabled some of most insecure functions like system(); eval etc. – I followed literally my previous tutorial PHP Webhosting security disable exec();, system();, open(); and eval();
Still in logs I see shits like:
 

[error] [client 66.249.72.100] PHP Warning:  mkdir(): No such file or directory in /var/www/site/plugins/system/jfdatabase/intercept.jdatabasemysql.php on line 161

Hence to prevent PHP mkdir(); and chown(); functiosn being active, I had to turn on in /etc/php5/apache2/php.ini – safe_mode . For some reason whoever configured Apache leave it off.

safe_mode = on

Hopefully by disabling this functions will keep cracker bot scripts to not create some weird directory structures on HDD or use it as mean to DoS overflow servers filesystem.

Hope this help others stabilize their servers too. Enjoy ! 🙂

Linux: Configure Midnight Commander to use mcedit instead of nano or vi text editor

Friday, June 21st, 2013

reverting mc text editor to mcedit fix problem with mcedit not working in linux

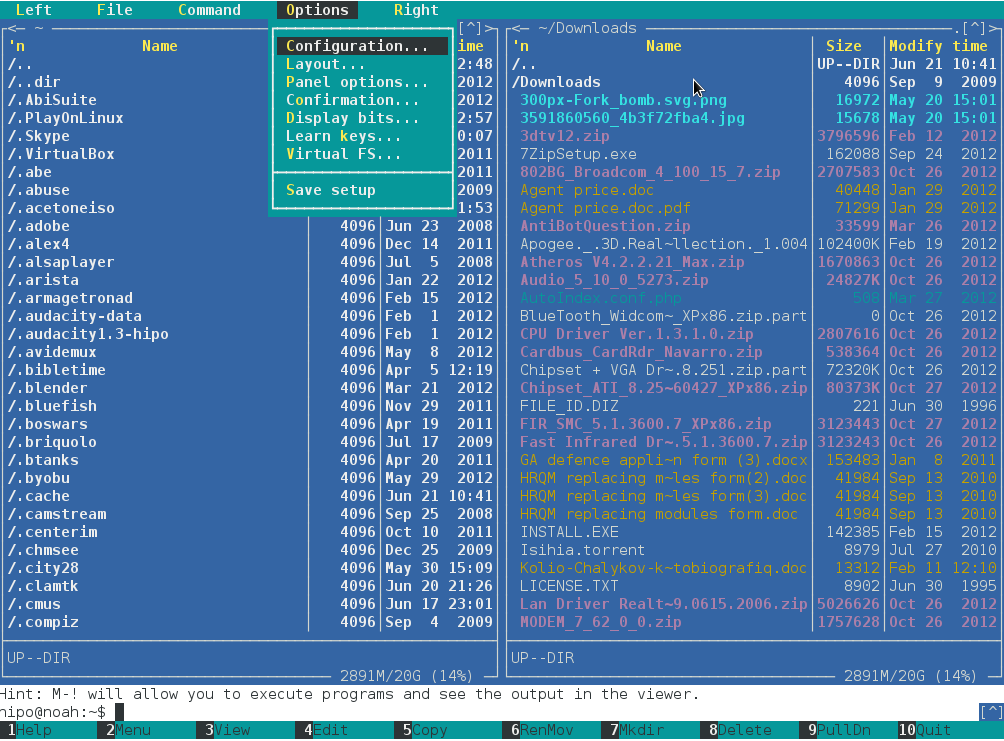
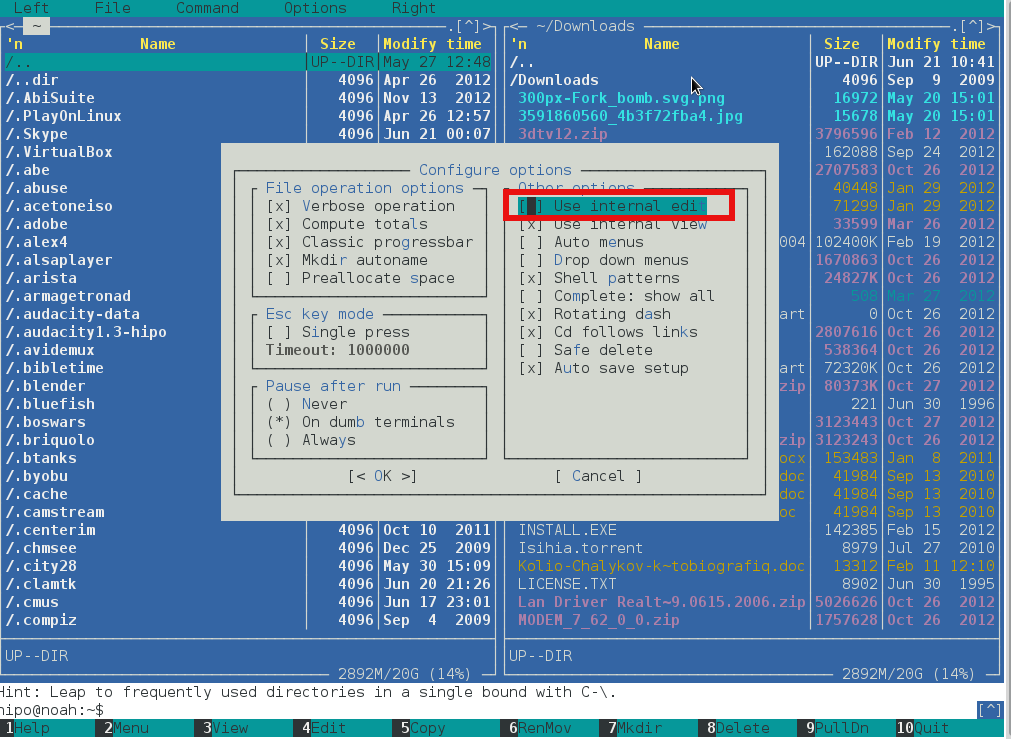
I use Midnight Commander console file manager on any UNIX like servers, since my early days as system administrator. mc comes with its own text editor mcedit which is often very handy for reading config files or pieces of source code. Many times I had to modify files which were spitting errors which I couldn't track in VIM, jor or whatever text editor had on server at hand and after checking file with mcedit I caught my config or source code mistake. I guess many other admins has similar nice experiences with mcedit Internal file editor of GNU Midnight Commander. Nowadays, I install mostly Debian Linux on new configured servers and using mc to navigate in file system is very useful. I prefer mc to open files for edit with F4 (Edit – kbd shortcut) with its default mcedit, however for some reasons most of Debian / Ubuntu and other Linuxes, nowadays has set global environment text editor to nano. I totally dislike this text editor and like changing mc always to use mcedit. This is done straight from MC menus by:

Pressing F9 -> Going to Options -> Configuration -> (Setting mark on) -> Use Inernal Edit
/code>

unix terminal file manager midnight commander configuration menu screenshot

linux console file manager midnight commander use internal edit menu unchecked screenshot

<