Posts Tagged ‘deb’

How to upgrade single package with their dependencies on Debian and Ubuntu Linux

Friday, March 16th, 2012

Debian GNU / Linux apt-get upgrade a package selection of a whole bunch of packages ready to upgrade apt artistic logo

Are you a Debian System Administrator and you recently run apt-get upgrade && apt-get upgrade finding out there are plenty of new packagesfor upgrade? Do you need only a pre-selected number of packages to upgrade with apt?
I run apt-get update && apt-get upgrade on one of our company Debian servers, just to see there are a number of packages to be upgraded among which there was some I didn't wanted to upgrade. Here is a little paste output from apt-get upgrade:

debian:~# apt-get update && apt-get upgrade
Hit http://security.debian.org squeeze/updates Release.gpg
...
Hit http://security.debian.org squeeze/updates/main amd64 Packages
Fetched 128 kB in 0s (441 kB/s)
Reading package lists... Done
Building dependency tree
Reading state information... Done
The following packages will be upgraded:
at imagemagick libdbd-pg-perl libfreetype6 libmagickcore3 libmagickcore3-extra libmagickwand3 libmysqlclient16 mysql-client
mysql-client-5.1 mysql-common mysql-server mysql-server-5.1 mysql-server-core-5.1
Do you want to continue [Y/n]
14 upgraded, 0 newly installed, 0 to remove and 0 not upgraded.

From first sight it seems logical to issue apt-get upgrade packagename to upgrade only single package with its package dependencies, instead of the whole group the above packs. However doing:
apt-get upgrade imagemagick will still try to upgrade all the packages instead of just imagemagick and its dependency package deb libmagickcore3

debian:~# apt-get upgrade imagemagick
Reading package lists... Done
Building dependency tree
Reading state information... Done
The following packages will be upgraded:
at imagemagick libdbd-pg-perl libfreetype6 libmagickcore3 libmagickcore3-extra libmagickwand3 libmysqlclient16 mysql-client
mysql-client-5.1 mysql-common mysql-server mysql-server-5.1 mysql-server-core-5.1
14 upgraded, 0 newly installed, 0 to remove and 0 not upgraded.
Do you want to continue [Y/n]

Doing all package,upgrade is not a good idea in my case, since upgrading mysql-server will require a MySQL server restart (something which we cannot afford to do right now) on this production server.
MySQL server restart during upgrade is never a good idea especially on productive busy (heavy loaded) SQL servers.
A restart of the MySQL server serving thousands of requests per second could lead often to crashed tables and hence temporary server downtime etc.

Still it is a good idea to upgrade the rest of packages with their newer versions. For exmpl. to upgrade; imagemagick, at , libfreetype6 and so on.

In order to upgrade only this 3 ones and their respective package dependencies, issue:

debian:~# apt-get --yes install imagemagick at libfreetype6

Repeat the apt-get install command with passing all the single package name you want to be upgraded and voila you're done :).
Be sure the apt-get install packagename upgrade doesn't require also upgrade of myssql-server, mysql-client, mysql-common or mysql-server-core-5.1 or any of the package name you want to preserve from upgrading.

Convert single PDF pages to multiple SVG files on Debian Linux with pdf2svg

Sunday, February 26th, 2012

In my last article, I've explained How to create PNG, JPG, GIF pictures from one single PDF document
Convertion of PDF to images is useful, however as PNG and JPEG graphic formats are raster graphics the image quality gets crappy if the picture is zoomed to lets say 300%.
This means convertion to PNG / GIF etc. is not a good practice especially if image quality is targetted.

I myself am not a quality freak but it was interesting to find out if it is possible to convert the PDF pages to SVG (Scalable Vector Graphics) graphics format.

Converting PDF to SVG is very easy as for GNU / Linux there is a command line tool called pdf2svg
pdf2svg's official page is here

The traditional source way compile and install is described on the homepage. For Debian users pdf2svg has already existing a deb package.

To install pdf2svg on Debian use:

debian:~# apt-get install --yes pdf2svg
...

Once installed usage of pdf2svg to convert PDF to multiple SVG files is analogous to imagemagick's convert .
To convert the 44 pages Projects.pdf to multiple SVG pages – (each PDF page to a separate SVG file) issue:

debian:~/project-pdf-to-images$ for i in $(seq 1 44); do \
pdf2svg Projects.pdf Projects-$i.SVG $i; \
done

This little loop tells each page number from the 44 PDF document to be stored in separate SVG vector graphics file:

debian:~/project-pdf-to-images$ ls -1 *.svg|wc -l
44

For BSD users and in particular FreeBSD ones png2svg has a bsd port in:

/usr/ports/graphics/pdf2svg

Installing on BSD is possible directly via the port and convertion of PDF to SVG on FreeBSD, should be working in the same manner. The only requirement is that bash shell is used for the above little bash loop, as by default FreeBSD runs the csh. 
On FreeBSD launch /usr/local/bin/bash, before following the Linux instructions if you're not already in bash.

Now the output SVG files are perfect for editting with Inkscape or Scribus and the picture quality is way superior to old rasterized (JPEG, PNG) images

Debian (Unstable) Squeeze / Sid /usr/lib32/alsa-lib/libasound_module_pcm_pulse.so linked to missing libraries

Thursday, September 10th, 2009

While playing with my installed programs on my recently updated Debian I stepped into a problem with /usr/lib32/alsa-lib/libasound_module_pcm_pulse.so. It seems the library was linked to two non-existing libraries: /emul/ia32-linux/lib/libwrap.so.0 as well as /emul/ia32-linux/usr/lib/libgdbm.so.3. A temporary solution to the issue is pointed out in Debian of the Debian Bug reports . As the report reads to solve that it’s required to:

1. Download libwrap0_7.6.q-18_i386.deb and libgdbm3_1.8.3-6+b1_i386.deb.

2. Extract the packages:dpkg -X libwrap0_7.6.q-18_i386.deb /emul/ia32-linux/dpkg -X libgdbm3_1.8.3-6+b1_i386.deb /emul/ia32-linux/

3. echo /emul/ia32-linux/lib >> /etc/ld.so.conf.d/ia32.conf

4. Execute /sbin/ldconfig

5. Check if all is properly linkedExecute ldd /usr/lib32/alsa-lib/libasound_module_pcm_pulse.so|grep -i “not found”Hopefully all should be fixed now.

Kill everything that Moves (KETM) an arcade spaceship Tyrian GNU / Linux game

Saturday, January 7th, 2012

I always love so much to go back to the times, when games were games and people had still valued words like moral and respect.
In that great days of old school computing, we used to play the awesome old schools Tyrian and the Nintendo 1941 game (hopefully some still remember).

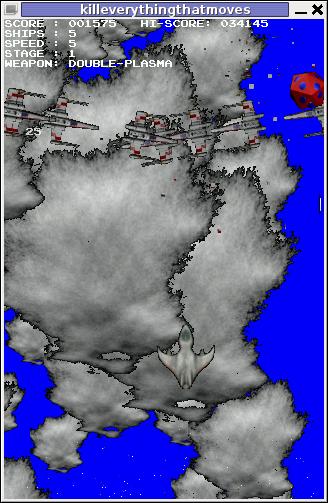
KETM Tyrian like Old School 2d Spaceship shooter awesome

For all who don't Tyrian is one of the best Spaceship Arcades of all times!, and especially for DOS operating system the best I've personally seen.

Recently I was checking the arcade games available for install on my Debian GNU / Linux and happily come across a game called KETM.

KETM acronym stands for the memorizable KILL EVERYTHING THAT MOVES and is free software distributed game under GPL.
The original creation idea was probably to resemble the so famous in the '90s spaceshooter games.

KETM is pretty addictive just like tyrian and has santimental meaning for me since it brings me memories for my arcade gaming years 😉

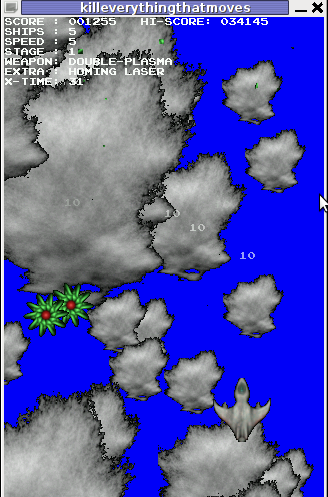
The game is easy to play and has a feeling of "diversity" especially in type of weapons your ship can obtain and use against enemies.

The powerups you get is quite plenty compared to the enemy ship types you should destroy 😉 In overall the game is quite easy to play, this however is also a good thing, as you can play more smoothly without dying every few secs like it is in so many arcade games…

The game has only 4 game levels and on each level end there is a big spaceship "the boss" which is the last in line to destroy in the tradition of the 2d arcade games.

KETM Tyrian like Linux Debian arcade game

Kill Everything That Moves is available for Debian and Ubuntu as a deb installable with apt. To install the game on Debian and Ubuntu

debian:~# apt-get install ketm
...

ketm's official latest available source and binary of time of writting this article is at version 0.6 and as far as I checked it unfortunately seems like the game development is stucked and the code seems a unmaintained.
I'm sure ketm has a lot of potential en hope somebody will adopt the code and will push further its development.
The game runs by default in the annoying windowed mode, I don't like this so I always run it fullscreen:

Kill Everything that Moves Tyrian like arcade game for Debian Ubuntu Linux

debian:~# ketm -f

KETM also reminds a bit on GEKI 2 / 3, which I have previously blogged about but I found KETM to be more enjoyable than gekis.
I've seen KETM has RPM ports as well so installing the game on fedora will be probably as easy as downloading the respective RPMs fulfilling the RPM package requirements and installing with rpm -i. I would be glad to hear from people who had succesfully run the game on Fedora and other RPM based Linux distributions?

The only thing that prevents the game to feel a bit more awesome (in my view) is the missing sound & music … Even though in the game settings inside the main menu there is an option for Sound On / Off the game runs by default without any sound or music (at least on my Debian).
I hope you will have some fun with KETM just I like I did! 😉
Also if you haven't played Tyrian yet, then I strongly advice you download Tyrian from here and try it out with dosbox (a dos gnu linux / bsd game emulator)

Absolute Game Classics Tyrian native game play with dosbox Linux screenshot

Interesting fact to mention here,  while looking for the native tyrian game info , I found tyrian has an open source version under development called OpenTyrian . I'll check the game and write on it when I have time.

Install jwchat web chat jabber interface to work with Debian ejabberd jabber server

Wednesday, January 4th, 2012

JWChat ejabber jabber Ajax / HTML based client logo
 

I have recently blogged how I've installed & configured ejabberd (jabber server) on Debian .
Today I decided to further extend, my previous jabberd installation by installing JWChat a web chat interface frontend to ejabberd (a good substitute for a desktop app like pidgin which allows you to access a jabber server from anywhere)

Anyways for a base of installing JWChat , I used the previously installed debian deb version of ejabberd from the repositories.

I had a lot of troubles until I actually make it work because of some very minor mistakes in following the official described tutorial ejabberd website jwchat install tutorual

The only way I can make jwchat work was by using the install jwchat with ejabberd's HTTP-Bind and file server method

Actually for quite a long time I was not realizing that, there are two ways to install JWChat , so by mistake I was trying to mix up some install instructions from both jwchat HTTP-Bind file server method and JWchat Apache install method

I've seen many people complaining on the page of Install JWChat using Apache method which seemed to be experiencing a lot of strangle troubles just like the mines when I mixed up the jwchat php scripts install using instructions from both install methods. Therefore my guess is people who had troubles in installing using the Apache method and got the blank page issues while accessing http://jabber.servername.com:5280/http-poll/ as well as various XML Parsing Error: no element found errors on – http://ejabberd.oac.com:5280/http-poll/ is most probably caused by the same install instructions trap I was diluted in.

The steps to make JWChat install using the HTTP-Bind and file server method, if followed should be followed absolutely precisely or otherwise THEY WILL NOT WORK!!!

This are the exact steps I followed to make ejabberd work using the HTTP-Bind file server method :

1. Create directory to store the jwchat Ajax / htmls

debian:~# mkdir /var/lib/ejabberd/www
debian:~# chmod +x /var/lib/ejabberd
debian:~# chmod +x /var/lib/ejabberd/www

2. Modify /etc/ejabberd/ejabberd.cfg and include the following configs

While editting the conf find the section:

{listen,
[


Scrolling down you will fine some commented code marked with %% that will read:

{5269, ejabberd_s2s_in, [
{shaper, s2s_shaper},
{max_stanza_size, 131072}
]},

Right after it leave one new line and place the code:

{5280, ejabberd_http, [
{request_handlers, [
{["web"], mod_http_fileserver}
]},

http_bind,
http_poll,
web_admin
]}
]}.

Scrolling a bit down the file, there is a section which says:

%%% =======
%%% MODULES

%%
%% Modules enabled in all ejabberd virtual hosts.
%%

The section below the comments will look like so:

{modules, [ {mod_adhoc, []},
{mod_announce, [{access, announce}]}, % requires mod_adhoc
{mod_caps, []},
{mod_configure,[]}, % requires mod_adhoc
{mod_ctlextra, []},
{mod_disco, []},
%%{mod_echo, [{host, "echo.localhost"}]},
{mod_irc, []},
{mod_last, []},

After the {mod_last, … the following lines should be added:

{mod_http_bind, []},
{mod_http_fileserver, [
{docroot, "/var/lib/ejabberd/www"},
{accesslog, "/var/log/ejabberd/webaccess.log"}
]},

3. Download and extract latest version of jwchat

Of the time of writting the latest version of jwchat is jwchat-1.0 I have mirrored it on pc-freak for convenience:

debian:~# wget https://www.pc-freak.net/files/jwchat-1.0.tar.gz
….

debian:~# cd /var/lib/ejabberd/www
debian:/var/lib/ejabberd/www# tar -xzvf jwchat-1.0.tar.gz
...
debian:/var/lib/ejabberd/www# mv jwchat-1.0 jwchat
debian:/var/lib/ejabberd/www# cd jwchat

4. Choose the language in which you will prefer jwchat web interface to appear

I prefer english as most people would I suppose:

debian:/var/lib/ejabberd/www/jwchat# for a in $(ls *.en); do b=${a%.en}; cp $a $b; done

For other languages change in the small one liner shell script b=${a%.en} (en) to whatever language you will prefer to make primary.After selecting the correct langauge a rm cmd should be issued to get rid of the .js.* and .html.* in other language files which are no longer needed:

debian:/var/lib/ejabberd/www/jwchat# rm *.html.* *.js.*

5. Configure JWChat config.js

Edit /var/lib/ejabberd/www/jwchat/config.js , its necessery to have inside code definitions like:

/* If your Jabber server is jabber.example.org, set this: */
var SITENAME = "jabber.example.org";

/* If HTTP-Bind works correctly, you may want do remove HTTP-Poll here */
var BACKENDS =
[
{
name:"Native Binding",
description:"Ejabberd's native HTTP Binding backend",
httpbase:"/http-bind/",
type:"binding",
servers_allowed:[SITENAME]
}
];

6. Restart EJabberd server to load the new config settings

debian:~# /etc/init.d/ejabberd restart
Restarting jabber server: ejabberd..

7. Test JWChat HTTP-Bind and file server backend

I used elinksand my beloved Epiphany (default gnome browser) which by the way is the browser I use daily to test that the JWChat works fine with the ejabberd.
To test the newly installed HTTP-Bind ejabberd server backend on port 5280 I used URL:

http://jabber.mydomain.com:5280/web/jwchat/I had quite a struggles with 404 not found errors, which I couldn't explain for half an hour. After a thorough examination, I've figured out the reasons for the 404 errors was my stupidity …
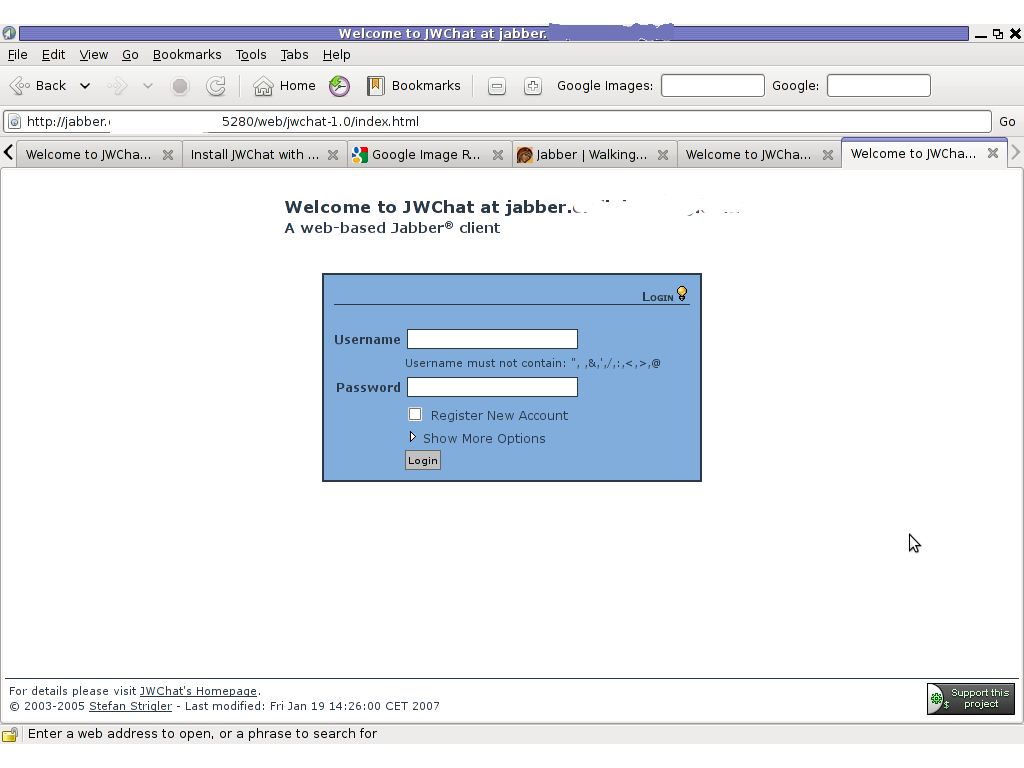
The URL http://jabber.mydomain.com:5280/web/jwchat/ was incorrect because I fogrot to move jwchat-1.0 to jwchat e.g. (mv jwchat-1.0 jwchat) earlier explained in that article was a step I missed. Hence to access the web interface of the ejabberd without the 404 error I had to access it via:

http://jabber.mydomain.com:5280/web/jwchat-1.0

JWChat Ejabber webchat Epiphany Linux screenshot

Finally it is handy to add a small index.php redirect to redirect to http://jabber.mydomain.com:5280/web/jwchat-1.0/

The php should like so:


<?
php
header( 'Location: http://jabber.mydomain.com:5280/web/jwchat-1.0' ) ;
?>

How to check /dev/ partition disk labeling in Debian GNU / Linux

Thursday, December 8th, 2011

The usual way that one is supposed to check a certain partition let’s say /dev/sda1 disk UUID (Universal Unique Identifier) label is through a command:
vol_id /dev/sda1

For reason however Debian does not include vol_id command. To check the UUID assigned disk labels on Debian one should use another command called blkid (part of util-linux deb package).

blkid will list all block device attributes so it doesn’t specifically, passing any partition as argument.
Here is an example output of blkid :

server:/root# blkid
/dev/sda1: UUID="cdb1836e-b7a2-4cc7-b666-8d2aa31b2da4" SEC_TYPE="ext2" TYPE="ext3"
/dev/sda5: UUID="c67d6d43-a48f-43ff-9d65-7c707a57dfe6" TYPE="swap"
/dev/sdb1: UUID="e324ec28-cf04-4e2e-8953-b6a8e6482425" TYPE="ext2"
/dev/sdb5: UUID="1DWe0F-Of9d-Sl1J-8pXW-PLpy-Wf9s-SsyZfQ" TYPE="LVM2_member"
/dev/mapper/computer-root: UUID="fbdfc19e-6ec8-4000-af8a-cde62926e395" TYPE="ext3"
/dev/mapper/computer-swap_1: UUID="e69100ab-9ef4-45df-a6aa-886a981e5f26" TYPE="swap"
/dev/mapper/computer-home: UUID="2fe446da-242d-4cca-8b2c-d23c76fa27ec" TYPE="ext3"


Easy way to look for irregularities and problems in log files / Facilitate reading log files on GNU / Linux and FreeBSD

Thursday, November 24th, 2011

LogWatch logo picture check Logcheck Linux BSD look for irregularities in log files

As a System Administrator I need to check daily the log files produced on various GNU / Linux distributions or FreeBSD. This can sometimes take too much time if the old fashioned way using the normal system tools cat, less and tail etc. is used.

Reading logs one by one eats too much of my time and often as logs are reviewed in a hurry some crucial system irregularities, failed ssh or POP3 / Imap logins, filling disk spaces etc. are missed.

Therefore I decided to implement automated log parsing programs which will summary and give me an overview (helicopter view) on what were the system activities from the previous day (24h) until the moment I logged the system and issued the log analyzer program.
There are plenty of programs available out there that does “wide scale” log analysis, however there are two applications which on most GNU / Linux and BSD systems had become a de-facto standard programs to scan system log files for interesting lines.

These are:
 

  • 1. logwatchsystem log analyzer and reporter
  • 2. logcheckprogram to scan system log files for interesting lines

1. logwatch is by default installed on most of the Redhat based Linux systems (Fedora, RHEL, CentOS etc.). On Debian distributions and as far as I know (Ubuntu) and the other deb based distros logwatch is not installed by default. Most of the servers I manage these days are running Debian GNU / Linux so, to use logwatch I needed to install it from the available repository package, e.g.:

debian:~# apt-get install logwatch
...

logwatch is written in perl and with some big files to analyze, parsing them might take hell a lot of time. It does use a bunch of configuration scripts which defines how logwatch should read and parse the various services logwatch support by default. These conf scripts are also easily extensible, so if one has to analyze some undefined service in the conf files he can easily come up with a new conf script that will support the service/daemon of choice.Using logwatch is very easy, to get an overview about server system activity invoke the logwatch command:

debian:~# logwatch
################### Logwatch 7.3.6+cvs20080702-debian (07/02/08) ####################
Processing Initiated: Thu Nov 24 05:22:07 2011
Date Range Processed: yesterday
( 2011-Nov-23 )
Period is day.
Detail Level of Output: 0
Type of Output/Format: stdout / text
Logfiles for Host: debian
 ################################################# 

——————— dpkg status changes Begin ————- 

Upgraded:
libfreetype6 2.3.7-2+lenny7 => 2.3.7-2+lenny8
libfreetype6-dev 2.3.7-2+lenny7 => 2.3.7-2+lenny8

———————- dpkg status changes End ————————-

——————— httpd Begin ————————

Requests with error response codes
400 Bad Request
HTTP/1.1: 2 Time(s)
admin/scripts/setup.php: 2 Time(s)
401 Unauthorized


———————- vpopmail End ————————-

——————— Disk Space Begin ————————

Filesystem Size Used Avail Use% Mounted on
/dev/md0 222G 58G 154G 28% /

———————- Disk Space End ————————-

###################### Logwatch End #########################

The execution might take up from 10 to 20 seconds up to 10 or 20 minutes depending on the log files size and the CPU / RAM hardware on the machine where /var/log/… logs will be analyzed.

logwatch output can be easily mailed to a custom mail address using a crontab if the server runs a properly configured SMTP server. Using a cron like:

00 5 * * * /usr/sbin/logwatch | mail -s "$(hostname) log files for $(date)"

Here is time to make a note that logwatch is ported also to FreeBSD and is available from BSD’s port tree, from a port with path:

/usr/ports/security/logcheck

2. logcheck is another handy program, which does very similar job to logwatch . The “interesting” information it returns is a bit less than compared to logwatch

The good thing about logcheck is that by default it is made to mail every 1 hour a brief data summary which might be of an interest to the sys admin.
Logcheck is available for install on RedHat distros via yum and has existing package for Debian as well as a port for FreeBSD under the port location /usr/ports/security/logcheck

To install on logcheck on Debian:

debian:~# apt-get install logcheck
...

After installation I found it wise to change the default mailing time from each and every hour to just once per day to prevent my email from overfilling with “useless” mails.

This is done by editting the default cron tab installed by the package located in /etc/cron.d/logcheck

The default file looks like so:

# /etc/cron.d/logcheck: crontab entries for the logcheck package
PATH=/usr/local/sbin:/usr/local/bin:/sbin:/bin:/usr/sbin:/usr/bin
MAILTO=root
@reboot logcheck if [ -x /usr/sbin/logcheck ]; then nice -n10 /usr/sbin/logcheck -R; fi
2 * * * * logcheck if [ -x /usr/sbin/logcheck ]; then nice -n10 /usr/sbin/logcheck; fi
# EOF

To change it run only once per day its content should looks something like:

# /etc/cron.d/logcheck: crontab entries for the logcheck package
PATH=/usr/local/sbin:/usr/local/bin:/sbin:/bin:/usr/sbin:/usr/bin
MAILTO=root
@reboot logcheck if [ -x /usr/sbin/logcheck ]; then nice -n10 /usr/sbin/logcheck -R; fi
2 5 * * * logcheck if [ -x /usr/sbin/logcheck ]; then nice -n10 /usr/sbin/logcheck; fi
# EOF

Altering it that way the log summary interesting info analysis will be sent on mail every day in 05:02 a.m.
Changing the default email logcheck will ship its log analyzer report emails on deb based distros is done via editting the file:

/etc/logcheck/logcheck.conf

And changing the SENDMAILTO=”” variable to point to the appropriate admin email email addr.
 

Fix to Nagios is currently not checking for external commands

Wednesday, August 24th, 2011

While I was deploying a new Nagios install to Monitor some Windows hosts I’ve came across the following error in Nagios’s web interface:

Sorry, but Nagios is currently not checking for external commands, so your command will not be committed!
Read the documentation for information on how to enable external commands...

This error is caused by an option configuration for /etc/nagios/nrpe.cfg (part of the nrpe-nagios-server Debian package.

The config variable in nrpe.cfg causing the error is check_external_command=0 , the fix comes to changing the variable to:

check_external_command=1

As well as restart the /etc/init.d/nagios-nrpe-server and /etc/init.d/nagios3 services:

debian:~# /etc/init.d/nagios3 restart
...
debian:~# /etc/init.d/nagios-nrpe-server
...

This changes has work out the error Sorry, but Nagios is currently not checking for external commands, so your command will not be committed! , however immediately after another kind of error appared in Nagios web interface when I tried to use the send Nagios commands button. The error was:

Error: Could not stat() command file '/var/lib/nagios3/rw/nagios.cmd'!

This error is due to a deb package, which seems to be affecting the current deb versions of Nagios shipped with Debian 6 Squeeze stable, as well as the Latest Ubuntu release 11.04.

Thanksfully there is a work around to the problem I found online, to fix it up I had to execute the commands:

debian:~# /etc/init.d/nagios3 stop debian:~# dpkg-statoverride --update --add nagios www-data 2710 /var/lib/nagios3/rw
debian:~# dpkg-statoverride --update --add nagios nagios 751 /var/lib/nagios3
debian:~# /etc/init.d/nagios3 start

And hooray Thanks God the error is gone 😉

How to Split files on Linux FreeBSD, NetBSD and OpenBSD

Sunday, July 31st, 2011

Split large files in pieces Scissors

Did you have the need to sometimes split an SQL extra large files to few pieces in order to be able to later upload it via phpmyadmin?
Did you needed an extra large video or data file to be cut in few pieces in order to transfer it in few pieces over an USB stick?
Or just to give you an another scenario where I sometimes need to have an enormous file let’s say 3G split in few pieces, in order to later read it in vim or mcedit .
I sometimes need to achieve this on FreeBSD and Linux hosts thus I thought it will be helpful to somebody to give a very quick tutorial on the way large files can be cut in pieces on Linux and BSD hosts.

GNU/Linux and FreeBSD are equipped with the split command. The purpose of this command is exactly the cutting of a file to a number of pieces.

On Linux the split command comes by default install to the system with the coreutils package on most Debian (deb) based and Redhat based (rpm) distributions, theerefore Linux’s version of split is GNU/split since it’s part of the GNU Coreutils package. An interesting fact about Linux split is that one of the two programmers who has coded it is Richard Stallman 😉

On BSD Unix split is the AT&T UNIX (BSD) split

In the past splitting files in pieces was much more needed than today, as people used floppy drives to transfer data, though today with the bloom of Internet and the improve of the data carriers transferring even an extra large files from one place to another is a way more trivial task still at many occasions splitting it in pieces is needed.

Even though today splitting file is very rarely required, still there are times when being able to split a file in X number of parts is very much needed.
Maybe the most common use of splitting a file today is necessery when a large SQL file dumps, like let’s say 200 MBytes of info database needs to be moved from ane hosting provider to another one.
Many hosting providers does disallow direct access with standard mySQL client programs to the database directly and only allow a user to connect only via phpMyAdmin or some other web interface like Cpanel to improve data into the SQL or PostgreSQL server.

In such times, having knowledge on the Unix split command is a priceless asset.

Even though on Linux and BSD the code for the split command is not identical and GNU/split and BSD/split has some basic differences, the use of split on both of these Unices is identical.
The way to split a file in few pieces using on both Linux and BSD OSes is being done with one and the same command, here is how:

1. Splitting file in size of 40 mb On Linux

linux:~# split -b 40m SQL-Backup-Data.sql SQL-Backup-Data_split

2. Splitting file in size of 40mb on BSD (FreeBSD, OpenBSD, NetBSD)

freebsd# split -b 40m SQL-Backup-Data.sql SQL-Backup-Data_split

The Second argument the split command takes is actually called a prefix, the prefix is used as a basis name for the creation of the newly generated files cut in pieces file based on SQL-Backup-Data.sql.

As I said identical command will split the SQL-Backup-Data.sql files in a couple of parts which of it will be sized 40 megas.

These command will generate few files output like:

freebsd# ls -1 SQL-Backup-Dat*SQL-Backup-Data.sql
SQL-Backup-Dataa
SQL-Backup-Dataab
SQL-Backup-Dataac
SQL-Backup-Dataad
SQL-Backup-Dataae

As you see the SQL-Backup-Data.sql with size 200MB is being split in four files each of which is sized 40mbytes.

After the files are transfered to another Linux or BSD host, they can easily be again united in the original file with the command:

linux:~# for i in $(ls -1 SQL-Backup-Data_split*); echo $i >> SQL-Backup-Data.sql

Alternatively in most Unices also using cat should be enough to collect back the pieces into the original file, like so:

freebsd# cat SQL-Backup-Data_split* >> SQL-Backup-Data.sql

Enjoy splitting

Send message to GNOME on Linux over plain text ssh terminal session

Wednesday, July 27th, 2011

I just had some fun as, my work day is over. I was curious if I can send message directly to a logged in Gnome user on Ubuntu / Debian environment.

After quick investigation I’ve found gxmessage which is available as deb package for both Debian and Ubuntu.

I installed it and use in the following way:

root@linux:~# apt-get install gxmessage

hipo@linux:~$ ssh root@remotehost.com
hipo@remote-desktop:~$ DISPLAY=:0; XAUTHORITY=~owner_of:0/.Xauthority; export DISPLAY XAUTHORITY
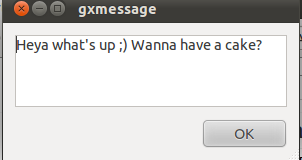
hipo@remote-desktop:~$ gxmessage 'Heya what's up ;) Wanna have a cake?"

Below you see what pops up on the screen on the remote-desktop Gnome Desktop 😉
GxMessage Gnome message Screenshot