Posts Tagged ‘course’
Monday, August 15th, 2011 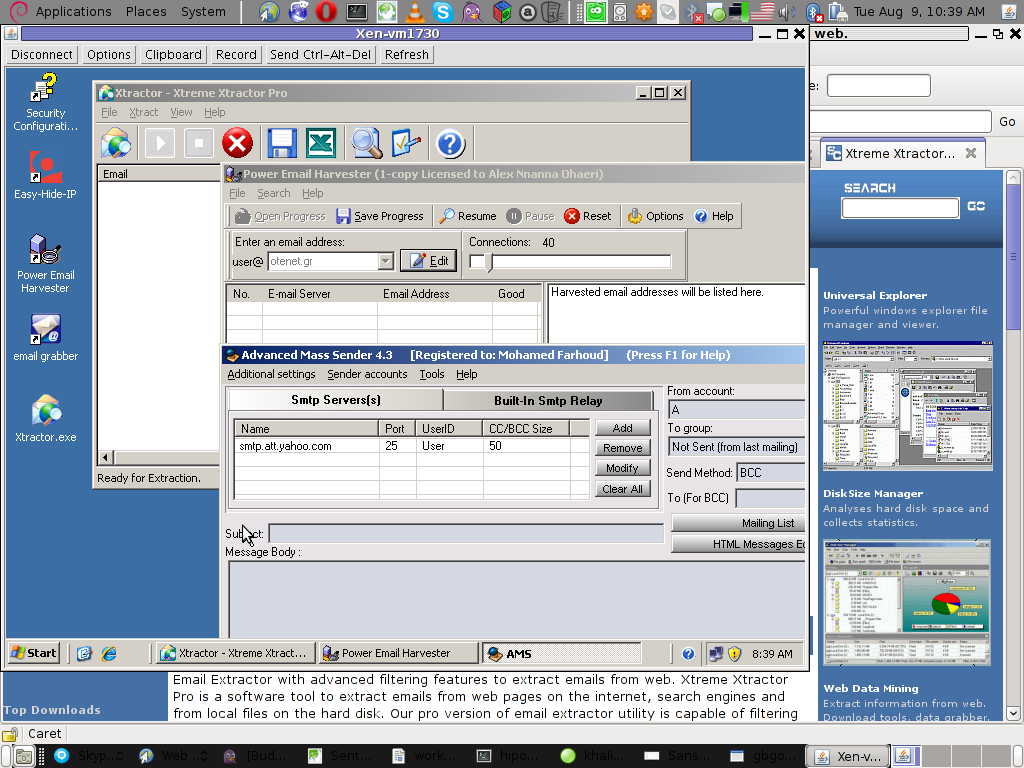
Few days ago, I’ve catch some Spammers on some of the servers running Windows inside Virtual Private Servers.
I was doubting if I want to write an article to mention about this 3 piece of software as it might be a bit boury however eventually I thought the goods of it will be better so I just took minutes and wrote it.
Back to the topic the three programs which the spammer was installed and prepare to do his spamming job on the VPS server was:
1. Xtractor Extreme
2. Power Email Harvester
3. Advanced Mass Sender
In order to hide his real IP address and prevent the IP he was spamming, he has also installed some anonyous proxy like Windows software called Hide My IP
The first program Xtractor is basicly an Email collector, the program crawls the net and searches to match email string on web pages.
It get target websites from major search engines.
You put an email like @gmail.com inside it and it starts spidering and grabs all email strings under the domain @gmail.com. Besides that Xtractor Extreme Pro is freeware and can be easily downloaded from many locations online.
Power Email Harvester‘s program name is also quite self-explanatory, what it does is it digs the net for email addresses and generates spam lists … This is the ultimate tool for a spammer, however the guys who create this piece of disruptive software has branded it as “a marketing tool” and even sold and advertised as a tool to help an e-marketing campaign.
This is of course just a word play and in fact in my viewe these program should be prohibited by international law.
Advanced Mass Sender is another piece of Spammer software which officially is tagged as marketing software and is sold and recommended as an useful tool for e-marketing.
I’ve take the time to take a quick and test the spammer installed AMS , honestly I’ve been amazed how far spamming has went during the last 5 years.
This AMS shit is capable of creating a target groups which could easily be spammed whether each group can contain up to 200000+ ! target emails
Advanced Mass Sender can even check if a certain email is present on the remote mail server and only then tries to deliver.
Besides that it even supports sending the spam mails via multiple mail servers (simultaneously) to increase the thoroughput as well as supports proxy servers…
I decided to write this few lines article to raise some awareness about this shitty sofware in a hope that somebody who is Administrating / Supporting client owned Windows servers or Virtual Private Servers will be able to read about this 3 ones and stop spammers before they succeed to create mail havoc with their ugly spam stuff.
Tags: AMS, awareness, com, course, email addresses, email collector, extreme power, freeware, Gmail, grabs, Harvester, IPThe, job, major search engines, marketing campaign, marketing software, marketing tool, piece, power, power email harvester, Search, software, spammer, Spammers, spidering, targe, target websites, three windows, time, tool, topic, Virtual, virtual private servers, VPS, windows programs, windows software, word play
Posted in Computer Security, Everyday Life, System Administration | 1 Comment »
Monday, July 18th, 2011 Recently I had the task to add a range of few IP addresses to as a virtual interface IPs.
The normal way to do that is of course using the all well known ifconfig eth0:0, ifconfig eth0:1 or using a tiny shell script which does it and set it up to run through /etc/rc.local .
However the Redhat guys could omit all this mambo jambo and do it The Redhat way TM 😉 by using a standard method documented in CentOS and RHEL documentation.
Here is how:
# go to network-script directory[root@centos ~]# cd /etc/sysconfig/network-scripts

# create ifcfg-eth0-range (if virtual ips are to be assigned on eth0 lan interface[root@centos network-scripts]# touch ifcfg-eth0-range
Now inside ifcfg-eth0-range, open up with a text editor or use the echo command to put inside:
IPADDR_START=192.168.1.120

IPADDR_END=192.168.1.250

NETMASK=255.255.255.25

CLONENUM_START=0
Now save the /etc/sysconfig/network-scripts/ifcfg-eth0-range file and finally restart centos networking via the network script:
[root@centos network-scripts]# service network restart
That’s all now after the network gets reinitialized all the IPs starting with 192.168.1.120 and ending in 192.168.1.250< will get assigned as virtual IPs for eth0 interface
Cheers 😉
Tags: CentOS, CLONENUM, command, course, directory root, echo, echo command, eth, fedora linux, file, ifconfig eth0, ip addresses, ips, jambo, lan, lan interface, Linux, mambo jambo, Netmask, network, network scripts, Networking, range, rangeNow, Redhat, root, script directory, Shell, shell script, sysconfig, task, text, tiny shell, virtual interface, way
Posted in Linux and FreeBSD Desktop, System Administration | No Comments »
Wednesday, July 13th, 2011 One server with a broken Raid array was having troubles with it’s software raid.
I tried to scan the raid array via a rescue cd like so:
server:~# mdadm --assemble --scan /dev/md1
just to be suprised by the message:
mdadm: /dev/md1 assembled from 2 drives – not enough to start the array.
In /proc/mdstat respectively the raid was showing inactive, e.g.:
server:~# cat /proc/mdstat

Personalities : [raid10] [raid1]

md1 : inactive sda2[0] sdc2[2] sdb2[1]

12024384 blocks
Respectively trying to activate the software Linux raid array with:
server:~# mdadm -A -s
Couldn’t be completed because of the same annoying error:
/dev/md1 assembled from 2 drives – not enough to start the array.
Thanksfully finally thanks to some Russian, who posted having same issues reported to be able to active his software RAID with mdadm’s –force option.
Thus enabling the problematic RAID 5 array was possible with:
server:~# mdadm -A -s --force
This solution of course is temporary and will have to further check what’s wrong with the array, however at least now I can chroot to the server’s / directory. 😉
Tags: annoying error, cat, check, course, dev, drive, ERROR, force option, Linux, md1, mdstat, option, Personalities, proc, Raid, raid 5 array, raid array, rescue, rescue cd, sCould, sda, sdb, sdc, software, software linux, software raid, solution, Thanksfully, way
Posted in Linux, System Administration | 1 Comment »
Saturday, July 9th, 2011 
These days, I’m managing many, many servers. The servers are ordered in few groups. Each of the servers in the server groups contains identical hardware, identical Linux distribution as well as identical configuration.
Since managing multiple servers normally, takes a lot of time, applying changes to every single host loosing time in looking for the password is not a a good idea.
Thus I was forced to start managing the servers in a cluster like fashion, by executing commands on a server group using a simple for bash loop etc.
To be able to use this mass execution of course I needed away either to pass on the server group password just once and issue a command on the whole server group or use a passwordless authentication ssh key pair.
Before I switched to using SSH keys to authenticate passwordless, I first tried to use a bit of tools which were claimed to be helpful in the task of executing the same commands to a group of servers. I have tested the tools pssh, sudossh and dsh but none of them was capable of logging in and executing a bunch of commands to the group of remote servers.
I gave my best to make pssh work on Debian and CentOS distributions, but even though all my experiemnts and efforts to make the so much talked about pssh to work were bad!
I’ve seen also another tool called Cluster SSH which was said to be capable of issuing commands simultaneously on a number of hosts.
Cluster SSH looked promising, however the only problem was it’s supposed to run under xterm or some kind of X graphics based terminal and therefore it did not matched my desired.
Finally I got pissed of trying these mostly useless mass command linux server administration tools and decided to come COME BACK TO THE PRIMITIVE 😉 and use the good all known, well established method of Passwordless SSH server login with ssh public/private DSA key auth.
Therefore here the problem come to this to generate one single DSA ssh authenticatoin key and replicate/copy it to the whole group of 50 servers.
These task initially seemed quite complex, but with the help of a one liner bash shell script, it seemed to be a piece of cake 😉
To achieve this task, all I had to do is:
a. Generate an SSH key with ssh-keygen command
and
b. Use a one liner shell script to copy the generated id_rsa.pub file, to each server.
and
c. Create a file containig all server IP addresses to pass to the shell script.
Here are the two lines of code you will have to use to achieve these tasks:
1. Generate a DSA ssh key
linux:~# ssh-keygen -t dsa
Generating public/private dsa key pair.
Enter file in which to save the key (/home/hipo/.ssh/id_dsa): y
Enter passphrase (empty for no passphrase):
Enter same passphrase again:
Your identification has been saved in y.
Your public key has been saved in y.pub.
The key fingerprint is:
b0:28:48:a2:60:65:5a:ed:1b:9d:6c:ff:5f:37:03:e3 hipo@www.pc-freak.net
Here press enter few times and be sure not to fill in any passphrase when asked ’bout it.
2. Create a file containing all server IPs
Just create a file let’s say server-list.txt and make sure you include all the server IPs, one per line.
3. Use the following little script to upload the newly generated id_dsa.pub to the server list
linux:~# while read line; do ssh-copy-id -i ~/.ssh/id_dsa.pub root@"$line"; done < server-list.txt
Now you will have to paste the server password for about 50 times (if you have a file with 50 servers), however the good news is it will be just a wait and paste 50 times, if the servers are all configured to have the same root administrator pass (which was the case with me).
So until you do the boring pasting part, you can start up a nice music and enjoy 😉
Cheers 😉
Tags: administration tools, authentication, BACK, CentOS, course, distributions, DSA, dsh, fashion, file, hipo, host, hosts, Linux, linux distribution, mass, mass execution, none, passphrase, password, PRIMITIVE, pssh, root, server administration, server group, server groups, server login, servers, Shell, ssh server, terminal, time, tool, work, xterm
Posted in Linux, Linux and FreeBSD Desktop, Programming, System Administration | 2 Comments »
Monday, June 20th, 2011 After my Debit VISA card has been declined by my Bank (had to issue a new one), which of course had a new card number and a new secret code.
Therefore to continue be able paying for domains in Godaddy I had to Update my Credit Card information in Godaddy‘s website.
Here is how I updated my Credit card details:
1. Login to Godaddy
My Account -> Payments and Renewing Items
2. Click on Update Payment Options
Here is a screenshot with pointers of where one should go to change the payment method or update number and type of his Debit/Credit card:

After clicking on Update Payment Options, on the right side a window pane will appear titled Change Payment Type
For a newly issued bank card, to update the recent input bank card credentials, one should click on the:
Add New Payment Type:.

Change Payment Type Godaddy Menu
Further on in my case I had to select Credit Card , even though I’m using a VISA Debit card, as see in above’s screenshot, there is no option of Debit card visa :).
Filling in the data and saving the changes with Save Changes completes the new bank card inclusion, I can now use my new valid card with Godaddy once again.
Tags: Account, Bank, card visa, change, Click, course, credentials, Credit, credit card details, credit card information, debit credit card, debit visa card, godaddy, inclusion, information, login, menu, New, number, option, payment, payment options, pointers, Renewing, screenshot, side, type, update, VISA, visa debit card, website, window pane
Posted in Various | 1 Comment »
Wednesday, June 1st, 2011 On Debian Linux I’m used to configure the networking via /etc/network/interfaces , however on Redhat based distributions to do a manual configuration of network interfaces is a bit different.
In order to configure networking in CentOS there is a special file for each interface and some values one needs to fill in to enable networking.
These network adapters configuration files for Redhat based distributions are located in the files:
/etc/sysconfig/network-scripts/ifcfg-*
Just to give you and idea on the content of this network configuration file, here is how it looks like:
[root@centos:~ ]# cat /etc/sysconfig/network-scripts/ifcfg-eth0

# Broadcom Corporation NetLink BCM57780 Gigabit Ethernet PCIe

DEVICE=eth0

BOOTPROTO=static

DHCPCLASS=

HWADDR=00:19:99:9C:08:3A

IPADDR=192.168.0.1

NETMASK=255.255.252.0

ONBOOT=yes
This configuration is of course just for eth0 for other network card names and devices, one needs to look up for the proper file name which corresponds to the network interface visible with the ifconfig command.
For instance to list all network interfaces via ifconfig use:
[root@centos:~ ]# /sbin/ifconfig |grep -i 'Link encap'|awk '{ print $1 }'

eth0

eth1

lo
In this case there are only two network cards on my host.
The configuration files for the ethernet network devices eth0 and eth1 from below example are located in files /etc/sysconfig/network-scripts/ifcfg-eth{1,2}
/etc/sysconfig/network-scripts/ directory contains plenty of shell scripts related to Fedora networking.
This directory contains actually the networking boot time load up rules for fedora and CentOS hosts.
The complete list of options available which can be used in /etc/sysconfig/network-scripts/ifcfg-ethx is located in:
/usr/share/doc/initscripts-*/sysconfig.txt
, to quickly observe the documentation:
[root@centos:~ ]# less /usr/share/doc/initscripts-*/sysconfig.txt
One typical example of configuring a CentOS based host to possess a static IP address (192.168.1.5) and a gateway (192.168.1.1), which will be assigned in boot time during the /etc/init.d/network is loaded is:
[root@centos:~ ]# cat /etc/sysconfig/network-scripts/ifcfg-eth0

# Broadcom Corporation NetLink BCM57780 Gigabit Ethernet PCIe

IPV6INIT=no

BOOTPROTO=static

ONBOOT=yes

USERCTL=yes

TYPE=Ethernet

DEVICE=eth0

IPADDR=192.168.1.5

NETWORK=192.168.1.0

GATEWAY=192.168.1.1

BROADCAST=192.168.1.255

NETMASK=255.255.255.0
After some changes to the network configuration files are made, to load up the new rules a /etc/init.d/network script restart is necessery with the command:
[root@centos:~ ]# /etc/init.d/network restart
Of course one can always use /etc/rc.local script as universal way to configure network rules on a Redhat based host, however using methods like rc.local to load up, ifconfig or route rules in a Fedora would break the distribution logic and therefore is not recommended.
There is also a serious additional reason against using /etc/rc.local post init commands load up script.
If one uses rc.local to load up and configure the networing, the network will get initialized only after all the other scripts in /etc/init.d/ gets started.
Therefore using /etc/rc.local might also be DANGEROUS!, if used remotely via (ssh), supposedly it might completely fail to load the networking, if all bringing the server interfaces relies on it.
Here is an example, imagine that some of the script set in to load up during a CentOS boot up hangs and does continue to load forever (for example after some crucial software upate), as a consequence the /etc/rc.local script will never get executed as it only starts up after all the rest init scripts had succesfully completed execution.
A network eth1 interface configuration for a Fedora host which has to fetch it’s network settings automatically via DHCP is as follows:
[root@fedora:/etc/network:]# cat /etc/sysconfig/network-scripts/ifcfg-eth1

# Intel Corporation 82557/8/9 [Ethernet Pro 100]DEVICE=eth1

BOOTPROTO=dhcp

HWADDR=00:0A:E4:C9:7B:51

ONBOOT=yes
To sum it up I think Fedora’s /etc/sysconfig/network-scripts methodology to configure ethernet devices is a way inferior if compared to Debian.
In GNU/Debian Linux configuration of all networking is (simpler)!, everything related to networking is in one single file ( /etc/network/interfaces ), moreover getting all the thorough documentation for the network configurations options for the interfaces is available as a system wide manual (e.g. man interfaces).
Partially Debian interfaces configuration is a bit more complicated in terms of syntax if matched against Redhat’s network-scripts/ifcfg-*, lest that generally I still find Debian’s manual network configuration interface to be easier to configure networking manually vicommand line.
Tags: AIPADDR, bit, boot time, broadcom, broadcom corporation, card, card names, CentOS, Configuration, configuration files, configuration of network, configure, content, course, Debian, distributions, distros, etc network, eth, ethernet network, fedora, file, gateway, gigabit ethernet, host, ifcfg, init, instance, interface, Linux, loIn, manual configuration, network, network adapters, network configuration, network interface, network interfaces, network scripts, Networking, ONBOOT, order, Redhat, root, script, shell scripts, static ip address, sysconfig, time, time load, two network cards, typical example
Posted in Linux, System Administration | 1 Comment »
Saturday, May 28th, 2011 
I don’t know how many of you have realized but today our societies, especially in the Developed and the second world are suffering from a serious problem that not-many still realize.
I’m talking about the problem of NO IDENTITY !
In this dynamic world, where technological changes happens every second and we are required to change our lifes and behaviour too rapidly suddenly this problem is becoming to become a real society peril.
Let me explain what I mean. Everyday, more and more people are using the Internet and all kind of technological gadgets (IPhones, Ipads, Tablets, Notebooks, desktop computers, E-readers you name it).
While we do constantly and daily are forced to adopt and become part of this virtual realities, be it social networks like Facebook , Xing , micro blogging online services like Twitter or even a simple user blog, most of the times we interact with this puvlic services or technology, we are supposed to come with a new identity.
Each of this services urge us to have a new login account attached to some kind of a new virtual reality one has to build.
Therefore the fake online identities, we constantly build which often are established around our dreams and wanna bees (something we’re not in real life) is constantly growing for each of us in every single day.
Most of the middle or hardcore Internet users today has already built an imaginary online image of ourselfs (in this number including myself).
To give an example I’ll again take facebook, as it is one of the most heavily used online fake identity generators today.
If one enters facebook and finds, some of his old a real life buddies from the past and matches the online identity the person has built for himself with the person we used to know, very often the difference is quite shocking.
Online almost everybody want to look cool the coolest to attract other people to himself. As people online look and does “judge” on one’s self competencies, qualities and goodness simply based on the outlook of how one presents himself.
Suddenly from normal sane persons million of persons are getting into the “self-presenting” competition which is getting, more and more severe with every new person that gets into a certain online community.
Most people online today in building this multiple false images of themselves, try to present only the their good positive sides, while the bad sides are often left behind.
Of course the definition of what is good and what is bad is dictated by the opinion of the masses, as most people prefer to be like the rest in order to escape of the terrible reality of being isolated from the society mass.
With all said if we consider that today’s families are highly disfunctional and the people’s relations are already quite fake and people are building this multiple-fale faced images even in real life makes things even more tragic.
Now to put everything above in order, let me go back to the NO IDENTITY ISSUE and what I mean by that.
Let me settle it down, during our interatction with technology and the Internet, little by little as a consequence of being exposed to all this identities and to our multiple newly created virtual identities one starts to loose his own self-established identity and starts constantly looking to have newer and newer identities.
The tendency is instead of look in yourself and be what you’re, that you follow some fake vague virtual dreams of million of people online who try to share and expose mostly things which are not created just to catch the attention.
The whole things with technology and Internet and the heavy use of it as a logical consequence, learns people to put multiple masks and hide behind the masks their own natural-self.
The story of masks is so bad that nowdays, many people put the masks of themselves created in the virtual reality pleading that this is their new self.
Many people today act without having any core philosophy, rules or a stable reason to step into.
Money, human lust, wordly vanity and popularity are the main drives for the masses.
Our Christian faith who has sustained us through the centuries and helped us grow a sane societies is starting to get into the back-stage, moved by some openly anti-christian hollywood super stars.
I believe the story of NO-IDENTITY corresponds well with buddhistic ideas (highly embraced by modern societies).
This buddhistic ideas preach that one must loose his identity to join the state of Nirvana (yet another anti-chrisitian philisophy).
The story of NO-IDENTITY is a story of constant unceasing change and lookup for something that never can be found. It’s like a endless prizeless race.
If many of us take the time and ask themselves the question “Who am I?”, I’m quite sure rarely there will be persons able to answer.
As I mentioned facebook earlier I would also suggest you to read Why open social networks like facebook and twitter are big evil
as it also quite much relates to the whole problem of people little by little loosing their identity.
Today many businesses and companies are trying to preach some cohesion through a shared people identity. From a normal sane person perspective this kind of ideology is seriously flawed, it even contradicts basic science.
Yet there is hope, I believe many people will realize sooner or later that this fakeness and a fake face images that we build daily doesn’t lead us anywhere and will stop the ideotism of trying to pretend different on the net.
Tags: bees, buddies, consequence, course, Desktop, desktop computers, dynamic world, everybody, fake identity, generators, goodness, hardcore, hardcore internet, identity, internet users, IPhones, login, mass, middle, new identity, notebooks, opinion, ourselfs, outlook, peril, person, single day, social networks, something, story, Tablets, technological changes, technological gadgets, technology, twitter, virtual realities, virtual reality, wanna, Xing
Posted in Everyday Life, Various | No Comments »
Monday, May 2nd, 2011 On each and every newly installed Linux or FreeBSD server. I’m always very cautious about three configuration directives for the ssh server.
This are X11Forwarding , Protocol and PermitRootLogin
One needs to be very watchful about this three ones, as tuning the right values surely prevents the server from many of the security issues that might rise up with the SSH server.
Many Linuxes like Debian and Ubuntu comes with X11Forwarding yes e.g. (X11Forwarding) enabled by default, this is an useless option in most of the cases as the servers I do administrate does not run a X environment.
Some older Linux distributions I have dealt with has the ssh Protocol 1 enabled by default and therefore, whether I do inherit an old server I have to start administrating the first thing I do is to check if the /etc/ssh/sshd_config‘s Protocol 1 option is enabled and if it is enabled I disable it.
PermitRootLogin is also an option which I often turn off as logging in via remote ssh is potentially dangerous as root password might get sniffed.
In overall the 3 sshd option’s I do check out in /etc/sshd/sshd_config on each newly installed Linux server are:
X11Forwarding yes

PermitRootLogin yes

Protocol 1
I always change this three options in my /etc/sshd/sshd_config
to:
X11Forwarding no

PermitRootLogin no

Protocol 2
One other options sshd server options which is good to be tuned is:
LoginGraceTime 120
Decreasing it to:
LoginGraceTime 60
is generally a good idea.
Of course after the changes I do restart the ssh daemon in order for the new configuration to take place:
linux:~# /etc/init.d/sshd restart

...
Tags: administrate, config, configuration directives, course, Debian, Forwarding, freebsd, idea, init, Linux, linux distributions, linuxes, noProtocol, old server, option, order, password, PermitRootLogin, PermitRootLoginOne, place, Protocol, root, root password, security, security issues, security tips, server options, server security, servers, ssh, ssh daemon, ssh protocol, ssh server, sshd server, Ubuntu, yesPermitRootLogin
Posted in FreeBSD, Linux, System Administration | No Comments »
Tuesday, April 12th, 2011 
From my previous two articles How to install nginx webserver from source on Debian Linux / Install Latest Nginx on Debian and How to enable output compression (gzipfile content compression) in nginx webserver , I have explained how the Nginx server can be installed and configured easily.
As I’m continuing my nginx adventures this days, by trying to take the best out of the installed nginx server, I’ve found few configuration options, which does improve nginx’s server performance and thought it might be nice to share it here in hope that some other nginx novice might benefit out if them.
To setup and start using the options you will have of course to place the conf directives in /usr/local/nginx/conf/nginx.conf or wherever your nginx.conf is located.
The configuration options should be placed in nginx’s conf section which starts up with:
http {
Here are the configuration options useful in hastening my nginx’s performance:
1. General options nginx settings
## General Options

ignore_invalid_headers on;

keepalive_requests 2000;

recursive_error_pages on;

server_name_in_redirect off;

server_tokens off;
2. Connection timeout nginx settings
## Timeouts

client_body_timeout 60;

client_header_timeout 60;

keepalive_timeout 60 60;

send_timeout 60;

expires 24h;
3. server options for better nginx tcp/ip performance
## TCP options

tcp_nodelay on;

tcp_nopush on;
4. Increase the number of nginx worker processes
Somewhere near the beginning of nginx.conf file you should have the directive option:
worker_processes 1;
Make sure you change this option to:
worker_processes 4;
This will increase the number of spawned nginx worker processes in a way that more spawned threaded servers will await for client connections:
Being done with all the above settings, as a next step you have to restart the nginx server, in my case via the init script:
debian:~# /etc/init.d/nginx restart

Restarting nginx: nginx.
Now to check everything is fine with nginx and more specific that the worker_processes 4 options has taken place issue the command:
debian:~# ps axu |grep -i nginx|grep -v grep

root 20456 0.0 0.0 25280 816 ? Ss 10:35 0:00 nginx: master process /usr/local/nginx/sbin/nginx

nobody 20457 0.0 0.0 25844 1820 ? S 10:35 0:00 nginx: worker process

nobody 20458 0.0 0.0 25624 1376 ? S 10:35 0:00 nginx: worker process

nobody 20459 0.0 0.0 25624 1376 ? S 10:35 0:00 nginx: worker process

nobody 20460 0.0 0.0 25624 1368 ? S 10:35 0:00 nginx: worker process
Above you notice the 4 nginx processes running with user nobody, they’re the same configured worker_processes I just pointed out above.
Tags: body, client, client connections, compression, configuration options, connection timeout, content, course, directive, everything, file, gzipfile, header, init, init script, Install, keepalive, Linux, nginx, nobody, nopush, novice, number, option, output compression, place, script, server name, server options, server performance, servers, Timeouts, tokens, worker processes
Posted in Linux, System Administration | 2 Comments »
Thursday, April 7th, 2011 The previous semester in Arnhem Business School, I’ve followed a module called Strategic Human Resources Management
as a part of the so called G-cluster (Grand Cluster) (the 3rd year second semester).
The Stragic HR subject (module) is a completely meaningless one and the best short way to describe it is with the word (an insanity!).
In reality there is no aim of this module, and it’s content is vague and irrelevant.
If you’re a student in Arnhem Business School (ABS) and you have as oligitory to follow this course you’re seriously in trouble.
The whole subject is a lot of bla, bla, the teachers attitude towards you is like they’re invincible and you’re a victim and you have to always obey the teacher or you’re out (fear based)
Anyways I would skip to describe how the Strategic HRM went through as it was a complete nightmare ..
As a part of the Strategic HRM course It was necessery to write the so called Strategic Paper, the paper was required as a proof to the teachers that the student has realized what Strategic HRM is.
I believe my paper became quite good and thus I decided to share it here on my blog in hope that some other students might benefit from my Strategic Human Resources and Management research paper.
Here is the strategic paper assignment document and the paper itself:
1. Assignment Strategic Paper for semester 2010-2011
2. Strategic Human Resources Research Paper in DOC format
3. Strategic Human Resources Research Paper in PDF format
As I passed the Strategic HRM and it was one of the weighting factors for the subject end mark, it appears my research paper was found to be a good one by the teachers and therefore I assume other students from HAN might like to read it as a sample if they have to write something similar.
Tags: aim, Arnhem, assignment document, attitude, bla bla, blog, Business, business school, Cluster, content, course, DOC, doc format, format, HAN, HRM, hrm course, human resources management, human resources research, insanity, irrelevantIf, management research, mark, necessery, nightmare, Paper, paper assignment, proof, reality, Research, research paper, School, second semester, SHR, something, strategic hrm, strategic human resources, student, subject module, victim, year
Posted in Business Management | No Comments »


