One of the QMAIL mail servers, setup-uped on a Debian host has been creating some auto configuration issues. Every-time a new mail user tries to use the embedded Thunderbird client auto configuration, the auto config fails leaving the client unable to use his Mailbox through POP3 or IMAP protocols.
Since about 2 years Thunderbird and many other modern pop3 and imap mail desktop and mobile clients are by default using the auto configuration and hence it was unthinkable to manually change settings for new clients with the QMAIl install; Besides that most of the Office users are always confused, whether they have to manually change SMTP or POP3 host for a server.
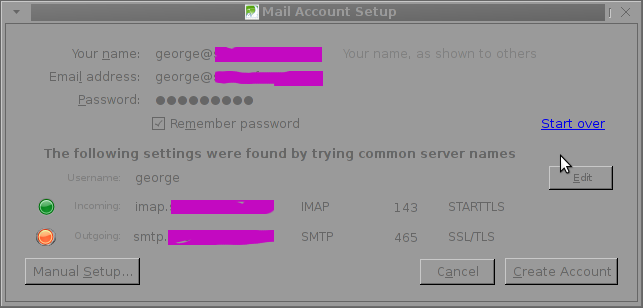
Below is a screenshot displaying the warning during email auto-configuration:
The orange color in the button for the newly auto-detected smtp.mail-domain.com indicates, something is not right with the SMTP host.
Obviously, something was wrong with smtp.mail-domain.com, hence I checked where smtp.mail.domain.com resolves with host command. What I found was actually smtp.mail-domain.comActive ( A ) DNS records was pointing to an IP address, our company previously used for the mail server. At present time the correct mail server host name is mx.mail-domain.com and the QMAIL installation on mx.soccerfame.com is configured to be the actual SMTP server.
By default Thunderbird and many other POP3, IMAP mail clients, however automatically assume the default SMTP host for a mail server is to be configured under a host name smtp.mail-domain.com. This is really strange, especially when the primary MX record for mail-domain.com domain is pointing to mx.mail-domain.com, e.g.:
qmail:~# host -t MX mail-domain.com

soccerfame.com mail is handled by 10 mx.mail-domain.com.

soccerfame.com mail is handled by 20 mail.mail-domain.com.

soccerfame.com mail is handled by 30 mail-domain.com.
The whole warning was caused due to the fact mx.mail-domain.com was resolving to an IP like xxx.xxx.xxx.xxx, whether smtp.mail-domain.com was resolving to yyy.yyy.yyy.yyy
Both xxx.xxx.xxx.xxx and yyy.yyy.yyy.yyy hosts were configured to have a different qmail SMTP host i.e.:
The server under IP xxx.xxx.xxx.xxx – (mx.mail-domain.com) was configured in /var/qmail/control/me to be mx.mail-domain.com and the other old one yyy.yyy.yyy.yyy – (mail.mail-domain.com) had (mail.mail-domain.com) in /var/qmail/control/me
As smtp.mail-domain.com was actually being still resolved to mail.mail-domain.com, the EMAILs were improperly trying to be sent with a configured DNS hostname of smtp.mail-domain.com, where the actual one on the server was mail.mail-domain
It took, me about an hour of pondering what is causing the oddities until I got the here explained issue. As the DNS recors for the domain the sample mail-domain.com were handled by Godaddy, to fix the mess, I logged in to Godaddy and;
a)deleted – DNS record for smtp.mail-domain.com. b) Created new CNAME record for smtp.mail-domain.com to be a domain alias for mx.soccerfame.com
A few minutes, afterwards I tried configuring once again the same email account in Thunderbird and this time both imap.mail-domain.com and smtp.mail-domain.comturned green; indicating everything is configured fine.
To be 100% sure all is working fine I first fetched, all email via the IMAP protocol without hassles and onwards sent a test email to my Gmail account; thanksfully the sent email was delivered to Gmail indicating both Get Mail and Send Mail functions worked now fine.
On FreeBSD the default kernel is compiled to support ACPI. Most of the modern PCs has already embedded support for ACPI power saving instructions. Therefore a default installed FreeBSD is trying to take advantage of this at cases and is trying to save energy. This is not too useful on servers, because saving energy could have at times a bad impact on server performance if the server is heavy loaded at times and not so loaded at other times of the day.
Besides that on servers saving energy shouldn't be the main motivator but server stability and productivity is. Therefore in my personal view on FreeBSD used on servers it is better to disable complete the ACPI in order to disable CPU fan control to change rotation speeds all the time from low to high rotation cycles and vice versa at times of low / high server load.
Another benefit of removing the ACPI support on a server is this would probably increase the CPU fan life span and possibly prevent the CPU to be severely heated at times.
Moreover, some piece of hardware might have troubles in properly supporting ACPI specifications and thus ACPI could be a reason for unexpected machine hang ups.
With all said I would recommend to anyone willing to use BSD for a server to disable the ACPI (Advanced Configuration and Power Interface), just like I did.
Here is how;
1. Quick review on how ACPI is handled on FreeBSD
acpi support is being handled on FreeBSD by a number of loadable kernel modules, here is a complete list of all the kernel modules dealins with acpi:
By default on FreeBSD, if hardware has some support for ACPI the acpi gets activated by acpi.ko kernel module. The specific type of vendors specific ACPI like IBM, ASUS, Fujitsu are controlled by the respective kernel module from the list …
Hence, to control if ACPI is loaded or not on a FreeBSD system with no need to reboot one can use kldload, kldunload module management BSD cmds.
############################################################## ### ACPI settings ########################################## ############################################################## acpi_dsdt_load="NO" # DSDT Overriding acpi_dsdt_type="acpi_dsdt" # Don't change this acpi_dsdt_name="/boot/acpi_dsdt.aml" # Override DSDT in BIOS by this file acpi_video_load="NO" # Load the ACPI video extension driver
d) disable ACPI thermal monitoring
It is generally a good idea to disable the ACPI thermal monitoring, as many machines hardware does not support it.
To do so in /boot/loader.conf add
debug.acpi.disabled="thermal"
If you want to learn more on on how ACPI is being handled on BDSs check out:
freebsd# man acpi
Other alternative method to permanently wipe out ACPI support is by not compiling ACPI support in the kernel. If that's the case in /usr/obj/usr/src/sys/GENERIC make sure device acpi is commented, e.g.:
This post will be short as I'm starting to think long posts are mostly non-sense. Have you people all wondered of barcoding? All world stores around the world have now barcoding. Barcode numbers regulations are being orchestrated by certain bodies, we people have no control over. Barcoding makes us dependent on technology as only technology can be used to read and store barcodes. It is technology that issues the barcodes. We have come to a point, where we humans trust more technology than our physical fellows. Trusting technology more than the close people to us is very dangerous. What if technology is not working as we expect it to? What if there are hidden ways to control technology that we're not aware of?
Technology concepts are getting more and more crazy and abstract. Thinks about the virtualization for a while. Virtualuzation is being praised loudly these days and everyone is turnning to it thinking it is cheap and realiable? The facts I've seen and the little of experience I had with it were way less than convicable. Who came with this stupid idea, oh yes I remember IBM came with this insane idea some about 40 years ago … We had sanity for a while not massively adopting IBM's virtualization bulk ideas and now people got crazy again to use a number of virtualization technologies. If you think for a while Virtualization is unreality (unexistence) of matter over another unreality. The programs that makes computers "runs" are not existent in practice, they only exist in some electricity form. Its just a sort of electric field if you think on it on a conceptual level … As we trust all our lives nowdays on technology, how do we know this technological stored information is not altered by other fields, how we can be sure it always acts as we think it does and should? Was it tested for at least 40 years before adoption as any new advancement should be. Well Of course not! Everything new is just placed in our society without too much thinking. Someone gives the money for production, someone else buys it and installs it and its ready to go. Or at least that's how the consumers thinks and we have become all consumers. This is a big LIE we're constantly being convinced in! It is not ready to work, it is not tested and we don't know what the consequence of it will be! Technology and Genetically Modified Food are not so different in this that they both can produce unexpected results in our lives. And they're already producing the bad fruits as you should have surely seen. You can see more and more people are getting sick, more people go to doctor more people have to live daily with medication to live a miserable dishealthy I wouldn't say live but "poor" existence … Next time they tell you new technology is good for you and will make your life better, Don't believe them! This is not necessery true. Though todays technology can do you good, In my view the harm seriously exceeds the good.
Accidently I've removed the Gnome Volume Control while trying to remove an applet nearby from the GNOME main menu panel. Unfortunately in GNOME 2, I couldn't find a way to to return back (restore) Gnome Volume Control to the main panel. After a bit of pondering, I've managed to find a way.
Here is how I managed to restore it back:
1. Navigate to:
System > Preference > Startup Applications
2. Click on Add, then add and type the following:
 Name: Volume control

Command: gnome-volume-control-applet

Comment: Launch volume control applet
Adding the gnome-volume-control-applet will launch it every time a new gnome session (with the same user) is initiated. On next gnome login you will see the icon to appear again in the notification area. Cheers 😉
I needed to enable automatic passwordless login in my Debian GNU/Linux … GNOME and GDM desktop environments developed a lot through the last few years, achieving these simple task was doable only through gdm manual configurations. Nowdays creatiion of user to login without any password is easy via easy to use GUI program.
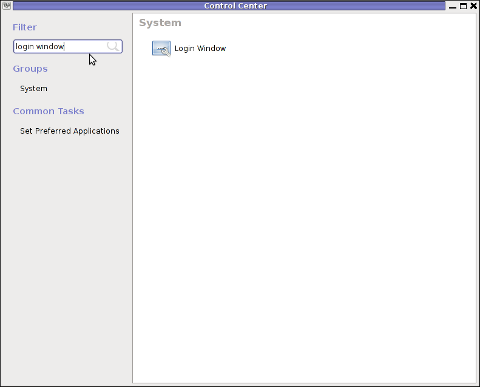
In this article I'll explain, few ways to enable automatic login in GNOMEThe quickest way is to navigate in GNOMEs gnome-control-center -> Login Window submenu
To do so launch gnome-control-center – press (ALT+F2) keys and type in gnome-control-center, or launch via command line in gnome-terminal or xterm:
hipo@debian:~$ gnome-control-center
While inside the control center find en launch the Login Window as in the screenshot below:
Login Window configuration can be also done directly by launching gdmsetup from command line e.g.:
hipo@debian:~$ /usr/sbin/gdmsetup

...
gdmsetup will further pop up a window asking to type in the root password to allow you to customize, how gdm will deal with user logins.
For who might not know gnome well architecture, gdmsetup is part of the gdm (Gnome Display Manager) package and is the default login program used to login the end user in most of the modern Linux based distributions as well as BSDs. gdm logins the users on many of the free software OS desktop environments like GNOME, LXDE, XFCE… Just to name a few of the many Linuces counting on GDM to handle the user logins: Ubuntu, Xubuntu, Fedora, Debian, Linux Mint, OpenSUSE etc.
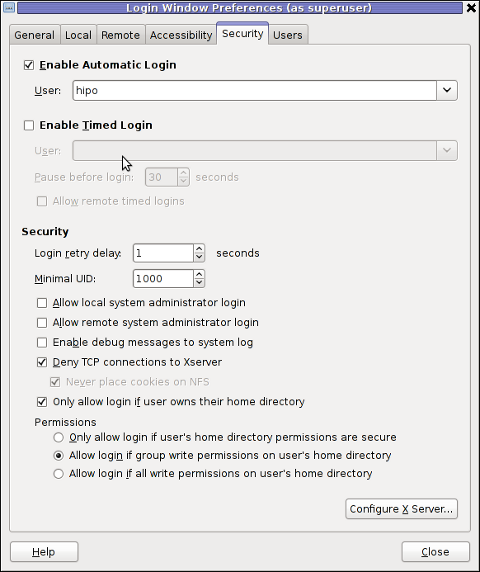
Once the Login Windows Prefences appears go to the Security tab.
As you can see in the screenshot, what you can do with gdmsetup it is pretty self-explanatory:
The two options of interests for user authorization without pass are:
a. Enable Automatic Login
To enable:- put a tick on Enable Automatic Login
– from user dropdown menu, choose the user which has to be configured
b. Enable Timed Login
Enable Automatic Login lets the user login without any user password input, immediately after the configured username is typed in (if gdm is with type username prompt). In case where the usernames are represented by Avatars, (like its in most user friendly Linux distributions), once clicked avatar the user is logged in.
When Enable Timed Login is ticked and a username is choosen or typed, instead of immediately logging the user on click or username input, the user logging is delayed with a number of set seconds .
Enabling the Automatic and / or Timed Login is doable also using few simple configurations directives in /etc/gdm/custom.conf. In many distros /etc/gdm/custom.conf will be not existing and hence the file has to be created. To enable delayed autologin without password for a user using gdm config:
Create the file with a text editor ( vim, joe, nano )whatever your favourity and place inside:
Where hipo is my desired username that will autolog, and as you see the LoginDelay is 0 (e.g. no gdm login delay) I attempted to also allow autologin for several users with some cinfigurations like:
In gdm3, the location of GDM config files should be /etc/gdm3/ directory, anyways the configurations directives should be working just like in gdm2 After any configuration changes to gdm.conf or custom.conf to load the new settings in gdm a gdm daemon restart is necessery with cmd:
root@debian:~# /etc/init.d/gdm restart

...
Note that, weirdly not using the gdm init script and trying to kill -HUP $(pidof gdm) / killall -9 gdm will not make gdm to load its new configurations. So always restart via /etc/init.d/gdm restart after gdm conf change.
Another alternative method to achieve login without a password input is by creating a passwordless user account on the system. This method is not recommended though, especially for machines with real IP addresses visible from the Internet (with lets say enabled) SSHD access. Using a passwordless system account can expose the system to a severe security risk!!! Anyways, for systems not running telnet/sshd or any other system remote access service creating a user without an empty password might be not such a bad idea.
To make a user auto login without any password input /etc/shadow file (storing all user account information) needs an edit.
This is an example user entry taken from /etc/shadow:
test:$6$OPdvXArZ$ktujC6bBh9JNaCz8E9v61yNeWcJHqQiuNk8eBzevcwcIl8KFvQzJ6aBCvVpIs0Lf5MAbHjjqftUeN9crWUfxs.:15275:0:99999:7:::Now to make the test user login directly without any pass input, one can just remove his encrypted password string. After the change the user line in /etc/shadow, should be:
test::15275:0:99999:7:::
If the user is created just from scratch e.g. (a new user) that needs to login passwordless in GDM, create it without password:
root@debian:~# adduser -d newusername
To sum it up the good thing about the remove password hash method to auto login a user is that it will allow user or users login across all Display Managers (not only GDM specific). The bad side is it is very insecure and therefore in most times a really bad practice.
I guess the described ways to login without password in Gdm on FreeBSD should similar, unfortunately right now I have not access to BSD running desktop to test it. If someone has tested it and can confirm it works it will be great to drop a comment.
The Return Path variable on one of the qmail mail servers I manage was improperly set. New newsletter mails initiated by the php scripts on the mail server had the improper return path set in the mail headers, like so:
Return-Path: <anonymous@mail.mymailserver.com>
Therefore many mail servers dropped messages as the set Return Path variable in the headers was incorrectly set to the domain mail.mymailserver.com
Thus to change the Return Path to the correct one that should have been mymailserver.com I had to include mymailserver.com in qmail’s control file /var/qmail/control/bouncehost, e.g.
After setupping a brand new Qmail installation following the QmailRocks Thibs Qmail Debian install guide , I’ve come across unexpected re-occuring error message in /var/log/qmail/qmail-smtpdssl/ , here is the message:
I was completely puzzled initially by the error as the sertificate file /var/qmail/control/servercert.pem was an existing and properly self generated one. Besides that qmail daemontools init script /service/qmail-smtpd/run was loading the file just fine, where the same file failed to get loaded when sslserver command with the cert argument was invoked via /service/qmail-smtpdssl/run
It took me quite a while to thoroughfully investigate on what’s wrong with the new qmail install. Thanksfully after almost an hour of puzzling I found it out and I was feeling as a complete moron to find that the all issues was caused by incorrect permissions of the /var/qmail/control/servercert.pem file. Here are the incorrect permissions the file possessed:
One of my friends Windows 7 started returning errors while trying to open from My Computer the local Windows C, D and E drives. This error appeared immediately, after malware and registry fix up programs were run on the PC. The exact programs that lead his PC into the state of returning an error:
This file does not have a program associated with it for performing this action. Create an association in the Set Associations control panel
are:
a-squared
Registry Booster
This two programs by the way are doing quite a good job on fixing Windows XP and Windows Vista PCs which were cleaned up earlier with Malware Bytes and Avira , however it seems they’re not 100% still compatible with the Windows 7 registry database or some uncleaned malware or virus on the PC has post-messed up the registry file associations. As its always the case with Windows you don’t have a clear idea what’s going …
Anyways as said the PC was in a bad situation, where neither Windows Explorer nor in any mean the disk drives can be opened or red, hence there was need for a quick way to revert back the default Windows file association registry settings After some quick research online, I’ve found an archive containing default Windows registry values for file associations
Therefore to revert back all Windows 7 file extensions from Windows install time, I had to download the file All_Default_File_Extensions.zip , extract the archive with WinZip or WinRar and run each of archive contained .reg extension files. The .reg files had to be run with Administrator account. It takes a while and its a bit irritating until all of the .reg files are run and all the file association default Windows settings are reverted back but thankfully in the end the C drive opening error:
This file does not have a program associated with it for performing this action … is resolved. Cheers 😉
A friend of mine has sent me a link to awesome videos produced with an open source tool called Gource
The tool is really awesome as its capable of producing amazing graphical visualizations from source tree repositories obtained from software SVN or GIT repositories
Someone used it to create a wonderful videos and relate the graphical visualization with wondeful music to show graphically the Software development for the main Free Software Projects. 😉
The points which move around in videos are graphical representation of the repository source, the nodes which buzzle around are users who commit source in the project repositories. The whole graphical representation is being generated based on all the latest source hold inside the software repository, on top of the videos its visible the date of each of the source commits. Below are few of the nice videos, the rest are available for checkout in Youtube, Enjoy! 😉
OpenOffice Development – Graphical representation
PHP Development – Graphical representation
History of Python development since 1990 with Gource
Development of MySQL 2000-2010 – Graphical representation
Perl development history in less then 4 minutes. Visualized with gource.
If you have used KVM, before you certainly have faced the requirement asked by many Dedicated Server Provider, for establishment of a PPTP (mppe / mppoe) or the so called Microsoft VPN tunnel to be able to later access via the tunnel through a Private IP address the web based Java Applet giving control to the Physical screen, monitor and mouse on the server.
This is pretty handy as sometimes the server is not booting and one needs a further direct access to the server physical Monitor. Establishing the Microsoft VPN connection on Windows is a pretty trivial task and is easily achieved by navigating to:
However achiving the same task on Linux seemed to be not such a trivial, task and it seems I cannot find anywhere information or precise procedure how to establish the necessery VPN (ptpt) ms encrypted tunnel.
Thanksfully I was able to find a way to do the same tunnel on my Debian Linux, after a bunch of experimentation with the ppp linux command.
To be able to establish the IPMI VPN tunnel, first I had to install a couple of software packages, e.g.:
I’ve also enabled the modules to be loading up during my next Linux boot with /etc/modules to not be bother to load up the same modules after reboot manually:
This command, brings up the ppp interface and makes the tunnel between my IP and the remote VPN target host.
Info about the tunnel could be observed with command:
ifconfig -a ppp

ppp0 Link encap:Point-to-Point Protocol

inet addr:10.20.254.32 P-t-P:10.20.0.1 Mask:255.255.255.255

UP POINTOPOINT RUNNING NOARP MULTICAST MTU:1496 Metric:1

RX packets:7 errors:0 dropped:0 overruns:0 frame:0

TX packets:12 errors:0 dropped:0 overruns:0 carrier:0

collisions:0 txqueuelen:3

RX bytes:70 (70.0 B) TX bytes:672 (672.0 B)
One more thing before I could finally access the IPMI’s web interface via the private IP was to add routing to the private IP address via the tunnel other side IP address:
# 10.20.0.1 P-t-P IP address

ip route add 10.20.1.124/32 dev ppp0
Now logically one would thing the Web interface to login and use the Java Applet to connect to the server would be accessible but no IT wasn’t !
It took me a while to figure out what is the problem and if not the guys in irc.freenode.net ##networking helped me I would never really find out why http://10.20.1.124/ and https://10.20.1.124/ were inaccessible.
Strangely enough both ports 80 and 443 were opened on 10.20.1.124 and it seems like working, however though I can ping both 10.20.1.124 and 10.20.0.1 there was no possible way to access 10.20.1.124 with TCP traffic.
Routing to the Microsoft Tunnel was fine as I’ve double checked all was fine except whether I tried accessing the IPMI web interface the browser was trying to open the URL and keeps opening like forever.
Thanksfully after a long time of futile try outs, a tip was suggested by a good guy in freenode nick named ne2k
To make the TCP connection in the Microsoft Tunnel work and consequently be able to access the webserver on the remote IPMI host, one needs to change the default MTU set for the ppp0 tunnel interface. Here is how:
ip link set ppp0 mtu 1438
And tadam! It’s done now IPKVM is accessible via http://10.20.1.124 or https://10.20.1.124 web interface. Horay ! 🙂
 The orange color in the button for the newly auto-detected smtp.mail-domain.com indicates, something is not right with the SMTP host.
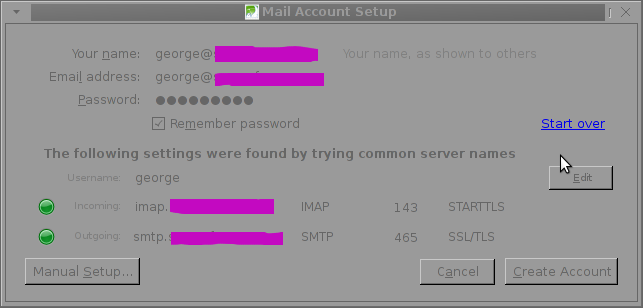


How to restore accidently removed Gnome volume control in GNOME in GNU / Linux
Sunday, January 22nd, 2012Accidently I've removed the Gnome Volume Control while trying to remove an applet nearby from the GNOME main menu panel. Unfortunately in GNOME 2, I couldn't find a way to to return back (restore) Gnome Volume Control to the main panel. After a bit of pondering, I've managed to find a way.
Here is how I managed to restore it back:
1. Navigate to:
System > Preference > Startup Applications
2. Click on Add, then add and type the following:Name: Volume control
Command: gnome-volume-control-applet
Comment: Launch volume control applet
Adding the gnome-volume-control-applet will launch it every time a new gnome session (with the same user) is initiated. On next gnome login you will see the icon to appear again in the notification area. Cheers 😉
Tags: applet, area, Auto, Cheers, Click, command, Comment, control, Draft, Gnome, gnu linux, icon, launch, Linux, login, menu, menu panel, Navigate, notification, notification area, panel, preference, startup, startup applications, system, time, type, volume control, way
Posted in FreeBSD, Gnome, Linux, Linux and FreeBSD Desktop | No Comments »