Posts Tagged ‘command’

How to create SD Card DATA dump image to .ISO with dd and mount it with imdisk from command line on Windows CygWin with MobaXterm

Saturday, September 18th, 2021

dd-command-logo
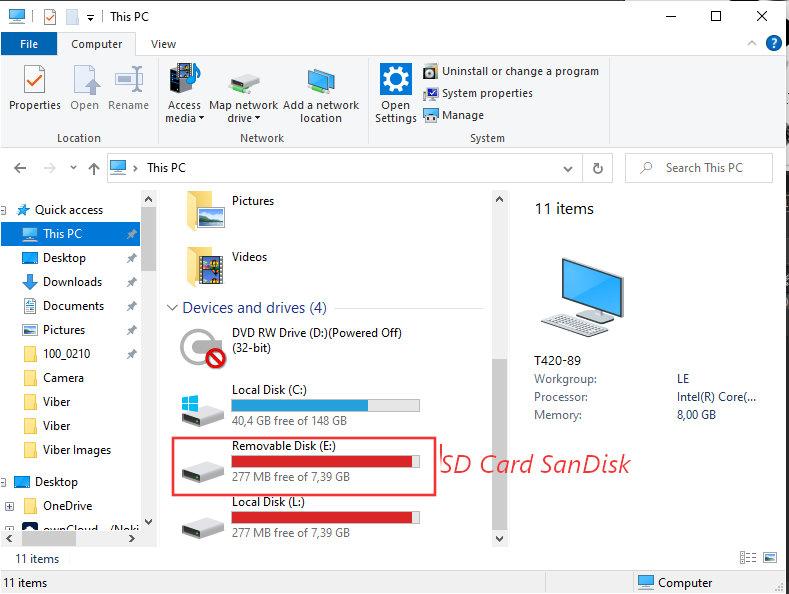
I'm forced to use Windows every now and then and do some ordinary things which I do usually on Linux such as dumping the content of my Android phone SD Card SanDisk, Kingston etc. to .ISO image etc.

On Linux creating and mounting a data copy of a whole SD Card is a relatively simple thing and there are plenty of ways to do it such as using the dd ( command-line utility for Unix and Unix-like operating systems whose primary purpose is to convert and copy files as said in the command manual .- e.g. ''man dd'. ). On Microsoft Windows environment perhaps one of easiest ways is to use WinCDEmu (which is relatively free under LGPL License).
WinCDEmu is capable of doing plenty of things such as:
 

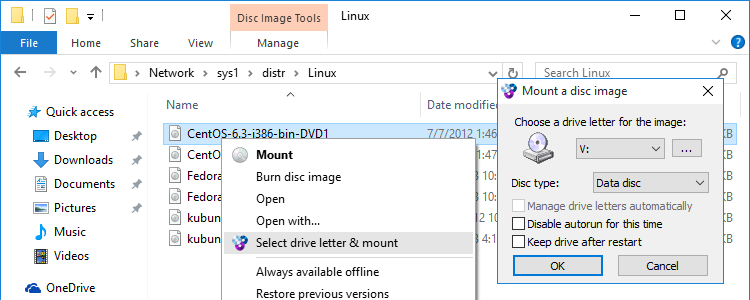
  • One-click mounting of ISO, CUE, NRG, MDS/MDF, CCD, IMG images.

  • Supports unlimited amount of virtual drives.

  • Runs on 32-bit and 64-bit Windows versions from XP to Windows 10.

  • Allows creating ISO images through a context menu in Explorer.

  • Small installer size – less than 2MB!

  • Have a portable version

WinCDEmu is a nice piece of software that perhaps every Win poweruser can enjoy, plus it has a nice Graphical frontend:

wincdemu-graphical-create-iso-and-mount-so-ms-windows-software

But what if you're a console geek, like me and you end up forced to be using Windows on your Work PC and you still need to create .iso dump of your Mobile SD Card or external attached Hard Drive, without the graphical mambo jumbo in the old fashioned way with dd?

Luckily Windows advanced command lined users could massively benefit from Cygwin + Mobaxterm (if you don't know or used MobaXterm and you still use things like Putty / SuperPutty or SecureCRT – perhaps you can reconsider and make your sysadmin life easier with MobaXerm gnome-terminal like SSH tabbed Windows alternative.

Once having mobaxterm + cygwin you have dd installed on the Windows host as it is part of the busybox minimal environment and you can use it in the same manner as your used in Linux environment.

sdcard-sandisk-drive-my-computer-windows-screenshot
 

1. Using dd to copy files on Linux / UNIX OS with a dialog status bar

To use dd the usual syntax on Linux / BSD / Unix is:
 

dd if=/dev/dev-name_ID of=/path/to/directory/dump/location.iso bs=2048


As 2048 BS (Bytes) per second is quite a low value usually on Modern operating systems, this bytesize is usually increased to some MBs  ( Megabytes).

For example if the reading from carrier  is Solid State Drive Disk (SSD) supporting 100 MBs per second and the output SD Card is a 32 Bit Kingston Plus+ drive with whose write speed is up to 50 ~ 100 MBs, you can use cmd as:

dd if=/dev/dev-name_ID of=/path/to/directory/dump/location.iso bs=100M


If you need to have a progress on the dd copy (in case if you copy some large SD Card 128 GB or 256GB or a full copy of a hard drive partition that is really big lets say 8 Terabytes of data, dialog and pv comes quite handy.

To use them install them first:

# apt-get install –yes pv dialog


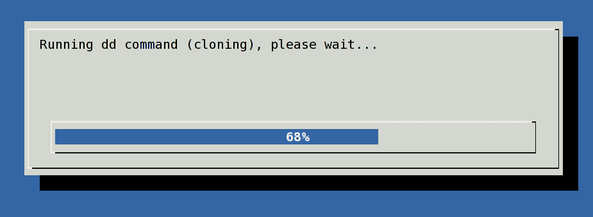
Next to have a beautiful ncurses dialog box with the status (very useful if you're shell scripting), use:
 

(pv -n /dev/sda | dd of=/dev/sdb bs=128M conv=notrunc,noerror) 2>&1 | dialog –gauge "Running dd command (cloning), please wait…" 10 70 0

pv-dialog-dd-command-ncurses-status-screenshot-gnu-linux
 

2. Listing the avaialble copy drives /dev/sda /dev/sdb1 … etc. disk locations on Windows 7 / 10 / 11 OS

[User.T420-89] ➤ for F in /dev/s* ; do echo "$F    $(cygpath -w $F)" ; done

check-drives-loop-on-cygwin-to-be-used-later-with-dd-copy-iso-creating-imageCheck drives device naming on WIndows PC – Screenshot extract from Mobaxterm

As you can see the drive location we've seen in Windows Explorer is located at drive E: above bash for loop reveals us this is located and readable from CygWin / MobaxTerm at /dev/sdb1


3. Create .iso image file on WIndows OS with dd command
 

To create a full data copy dump of to .iso (image file) with dd on Windows , I had to run:

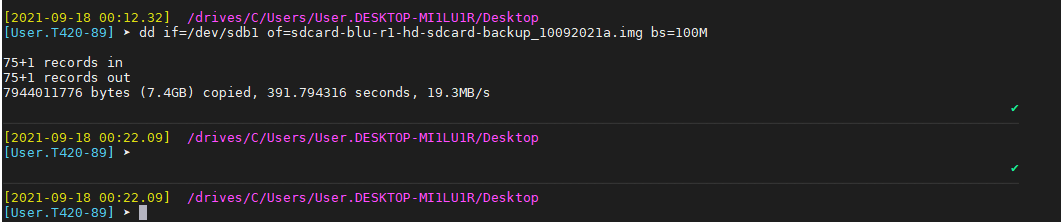
[User.T420-89] ➤ dd if=/dev/sdb1 of=sdcard-blu-r1-hd-sdcard-backup_10092021a.img bs=100M

75+1 records in
75+1 records out
7944011776 bytes (7.4GB) copied, 391.794316 seconds, 19.3MB/s


dd-copy-drive-data-screenshot-100mb-bitesize-windows-mobaxterm


4. Mount the newly create dd Image with imdisk

In order to test the image is properly created, you can attempt to mount it from command line on Linux, mounting it is quite easy and is up to mounting the just created .img file as a loopback (loop) device, like so: 

# mount -o loop file.iso /mnt/dir

Unfortunately cygwin and mobaxterm's embedded mount command on Win OS does not support the loopback device so to have it you have to install and use some additional program  such as the upmentioned WinCDEmu or if you prefer to do it fully from command line and further on automate the process of creating a dump of images of attached drives out of a multiple computers (lets say belonging to a Windows Active Directory domain). You might install and use something like:


imdisk 

imdisk-gui-interface-ms-windows-screenshot

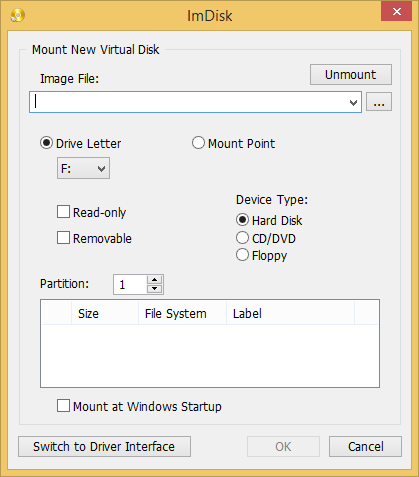
imdisk handy tool is  created by Olof Lagerkvist. It is free and open-source software, which  will let you mount image files of hard drive, cd-rom or floppy, and create one or several ramdisks with various parameters either from a command line or via its Graphical interface.

To use imdisk download it from its home page on sourceforge extract and install it, pretty much as any other software it has both 32 bit version as a legacy for old computers as well as 64 bit exe installer.
The general command line use of it follows a cmd syntax like:

  • Mounting .iso image files from command line on WIndows host with imdisk


[User.T420-89] ➤ ImDisk.exe -a -f "sdcard-blu-r1-hd-sdcard-backup_10092021.img" -m #:

Where:
 

  • #: – is the actual drive you would like to mount to.
     
  • -a option stands for attach to, it will configure and attach a virtual disk with the parameters specified and attach it to the system.
     
  • -f – is self explanatory, provides the iso image file naming 

If you want to attach the newly created image to lets say  L:\ windows new mapped drive

ImDisk.exe -a -f "sdcard-blu-r1-hd-sdcard-backup_10092021.img" -m l:

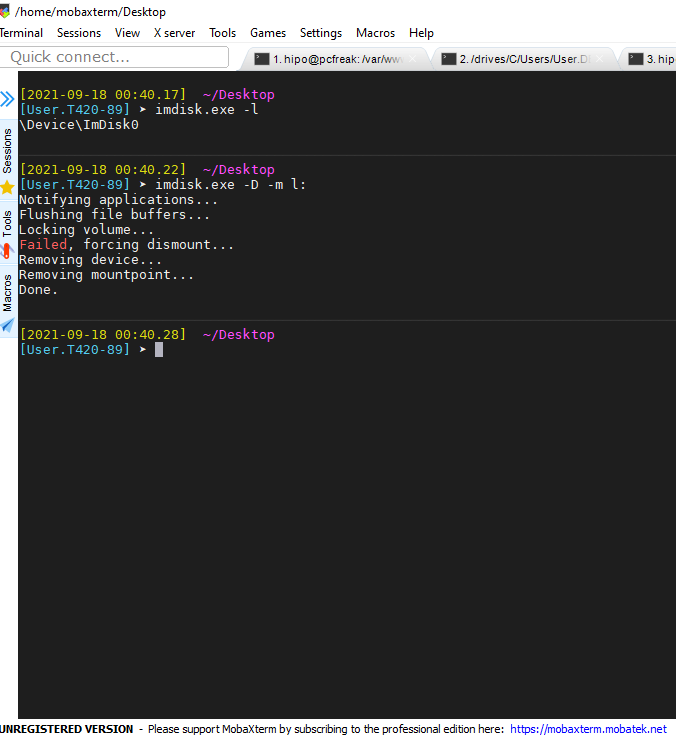
  • Unmount mounted .img image with imdisk from cmd line

[User.T420-89] ➤ imdisk.exe -l
\Device\ImDisk0
                                                                                                                              ✘

[User.T420-89] ➤ imdisk.exe -D -m l:
Notifying applications…
Flushing file buffers…
Locking volume…
Failed, forcing dismount…
Removing device…
Removing mountpoint…
Done.

imdisk-detach-attached-drive-mobaxterm-windows-screenshot


What we learned ?

What we have learned in this article is how to use Mobaxterm embedded dd Data Convert and Copy command to prepare full image backups of SD card or external drives on Windows OS. Also few alternative ways were entions such as using WinCDEmu free  open source alternative to DaemonTools program to create / mount or convert the image for the GUI lovers. Also for hard core sysadmins as me was shown how to list drives devices attached to the Win PC {/dev/sda,/dev/sdb} etc. and how to copy partition data with dd just like one would do on Linux OS. Finally to test the created image, I've shown you how to use the imdisk free software tool to attach and detach image to a mapped local Windows drive.

Hope this article learned you something new.

Fix Out of inodes on Postfix Linux Mail Cluster. How to clean up filesystem running out of Inodes, Filesystem inodes on partition is 100% full

Wednesday, August 25th, 2021

Inode_Entry_inode-table-content

Recently we have faced a strange issue with with one of our Clustered Postfix Mail servers (the cluster is with 2 nodes that each has configured Postfix daemon mail servers (running on an OpenVZ virtualized environment).
A heartbeat that checks liveability of clusters and switches nodes in case of one of the two gets broken due to some reason), pretty much a standard SMTP cluster.

So far so good but since the cluster is a kind of abondoned and is pretty much legacy nowadays and used just for some Monitoring emails from different scripts and systems on servers, it was not really checked thoroughfully for years and logically out of sudden the alarming email content sent via the cluster stopped working.

The normal sysadmin job here  was to analyze what is going on with the cluster and fix it ASAP. After some very basic analyzing we catched the problem is caused by a  "inodes full" (100% of available inodes were occupied) problem, e.g. file system run out of inodes on both machines perhaps due to a pengine heartbeat process  bug  leading to producing a high number of .bz2 pengine recovery archive files stored in /var/lib/pengine>

Below are the few steps taken to analyze and fix the problem.
 

1. Finding out about the the system run out of inodes problem


After logging on to system and not finding something immediately is wrong with inodes, all I can see from crm_mon is cluster was broken.
A plenty of emails were left inside the postfix mail queue visible with a standard command

[root@smtp1: ~ ]# postqueue -p

It took me a while to find ot the problem is with inodes because a simple df -h  was showing systems have enough space but still cluster quorum was not complete.
A bit of further investigation led me to a  simple df -i reporting the number of inodes on the local filesystems on both our SMTP1 and SMTP2 got all occupied.

[root@smtp1: ~ ]# df -i
Filesystem            Inodes   IUsed   IFree IUse% Mounted on
/dev/simfs            500000   500000  0   100% /
none                   65536      61   65475    1% /dev

As you can see the number of inodes on the Virual Machine are unfortunately depleted

Next step was to check directories occupying most inodes, as this is the place from where files could be temporary moved to a remote server filesystem or moved to another partition with space on a server locally attached drives.
Below command gives an ordered list with directories locally under the mail root filesystem / and its respective occupied number files / inodes,
the more files under a directory the more inodes are being occupied by the files on the filesystem.


run-out-if-inodes-what-is-inode-find-out-which-filesystem-or-directory-eating-up-all-your-system-inodes-linux_inode_diagram.gif
1.1 Getting which directory consumes most of the inodes on the systems


[root@smtp1: ~ ]# { find / -xdev -printf '%h\n' | sort | uniq -c | sort -k 1 -n; } 2>/dev/null
….
…..

…….
    586 /usr/lib64/python2.4
    664 /usr/lib64
    671 /usr/share/man/man8
    860 /usr/bin
   1006 /usr/share/man/man1
   1124 /usr/share/man/man3p
   1246 /var/lib/Pegasus/prev_repository_2009-03-10-1236698426.308128000.rpmsave/root#cimv2/classes
   1246 /var/lib/Pegasus/prev_repository_2009-05-18-1242636104.524113000.rpmsave/root#cimv2/classes
   1246 /var/lib/Pegasus/prev_repository_2009-11-06-1257494054.380244000.rpmsave/root#cimv2/classes
   1246 /var/lib/Pegasus/prev_repository_2010-08-04-1280907760.750543000.rpmsave/root#cimv2/classes
   1381 /var/lib/Pegasus/prev_repository_2010-11-15-1289811714.398469000.rpmsave/root#cimv2/classes
   1381 /var/lib/Pegasus/prev_repository_2012-03-19-1332151633.572875000.rpmsave/root#cimv2/classes
   1398 /var/lib/Pegasus/repository/root#cimv2/classes
   1696 /usr/share/man/man3
   400816 /var/lib/pengine

Note, the above command orders the files from bottom to top order and obviosuly the bottleneck directory that is over-eating Filesystem inodes with an exceeding amount of files is
/var/lib/pengine
 

2. Backup old multitude of files just in case of something goes wrong with the cluster after some files are wiped out


The next logical step of course is to check what is going on inside /var/lib/pengine just to find a very ,very large amount of pe-input-*NUMBER*.bz2 files were suddenly produced.


[root@smtp1: ~ ]# ls -1 pe-input*.bz2 | wc -l
 400816


The files are produced by the pengine process which is one of the processes that is controlling the heartbeat cluster state, presumably it is done by running process:

[root@smtp1: ~ ]# ps -ef|grep -i pengine
24        5649  5521  0 Aug10 ?        00:00:26 /usr/lib64/heartbeat/pengine


Hence in order to fix the issue, to prevent some inconsistencies in the cluster due to the file deletion,  copied the whole directory to another mounted parition (you can mount it remotely with sshfs for example) or use a local one if you have one:

[root@smtp1: ~ ]# cp -rpf /var/lib/pengine /mnt/attached_storage


and proceeded to clean up some old multitde of files that are older than 2 years of times (720 days):


3. Clean  up /var/lib/pengine files that are older than two years with short loop and find command


First I made a list with all the files to be removed in external text file and quickly reviewed it by lessing it like so

[root@smtp1: ~ ]#  cd /var/lib/pengine
[root@smtp1: ~ ]# find . -type f -mtime +720|grep -v pe-error.last | grep -v pe-input.last |grep -v pe-warn.last -fprint /home/myuser/pengine_older_than_720days.txt
[root@smtp1: ~ ]# less /home/myuser/pengine_older_than_720days.txt


Once reviewing commands I've used below command to delete the files you can run below command do delete all older than 2 years that are different from pe-error.last / pe-input.last / pre-warn.last which might be needed for proper cluster operation.

[root@smtp1: ~ ]#  for i in $(find . -type f -mtime +720 -exec echo '{}' \;|grep -v pe-error.last | grep -v pe-input.last |grep -v pe-warn.last); do echo $i; done


Another approach to the situation is to simply review all the files inside /var/lib/pengine and delete files based on year of creation, for example to delete all files in /var/lib/pengine from 2010, you can run something like:
 

[root@smtp1: ~ ]# for i in $(ls -al|grep -i ' 2010 ' | awk '{ print $9 }' |grep -v 'pe-warn.last'); do rm -f $i; done


4. Monitor real time inodes freeing

While doing the clerance of old unnecessery pengine heartbeat archives you can open another ssh console to the server and view how the inodes gets freed up with a command like:


# check if inodes is not being rapidly decreased

[root@csmtp1: ~ ]# watch 'df -i'


5. Restart basic Linux services producing pid files and logs etc. to make then workable (some services might not be notified the inodes on the Hard drive are freed up)

Because the hard drive on the system was full some services started to misbehaving and /var/log logging was impacted so I had to also restart them in our case this is the heartbeat itself
that  checks clusters nodes availability as well as the logging daemon service rsyslog


# restart rsyslog and heartbeat services
[root@csmtp1: ~ ]# /etc/init.d/heartbeat restart
[root@csmtp1: ~ ]# /etc/init.d/rsyslog restart

The systems had been a data integrity legacy service samhain so I had to restart this service as well to reforce the /var/log/samhain log file to again continusly start writting data to HDD.

# Restart samhain service init script 
[root@csmtp1: ~ ]# /etc/init.d/samhain restart


6. Check up enough inodes are freed up with df

[root@smtp1 log]# df -i
Filesystem Inodes IUsed IFree IUse% Mounted on
/dev/simfs 500000 410531 19469 91% /
none 65536 61 65475 1% /dev


I had to repeat the same process on the second Postfix cluster node smtp2, and after all the steps like below check the status of smtp2 node and the postfix queue, following same procedure made the second smtp2 cluster member as expected 🙂


7. Check the cluster node quorum is complete, e.g. postfix cluster is operating normally


# Test if email cluster is ok with pacemaker resource cluster manager – lt-crm_mon
 

[root@csmtp1: ~ ]# crm_mon -1
============
Last updated: Tue Aug 10 18:10:48 2021
Stack: Heartbeat
Current DC: smtp2.fqdn.com (bfb3d029-89a8-41f6-a9f0-52d377cacd83) – partition with quorum
Version: 1.0.12-unknown
2 Nodes configured, unknown expected votes
4 Resources configured.
============

Online: [ smtp2.fqdn.com smtp1.fqdn.com ]

failover-ip (ocf::heartbeat:IPaddr2): Started csmtp1.ikossvan.de
Clone Set: postfix_clone
Started: [ smtp2.fqdn.com smtp1fqdn.com ]
Clone Set: pingd_clone
Started: [ smtp2.fqdn.com smtp1.fqdn.com ]
Clone Set: mailto_clone
Started: [ smtp2.fqdn.com smtp1.fqdn.com ]


8.  Force resend a few hundred thousands of emails left in the email queue


After some inodes gets freed up due to the file deletion, i've reforced a couple of times the queued mail servers to be immediately resent to remote mail destinations with cmd:


# force emails in queue to be resend with postfix

[root@smtp1: ~ ]# sendmail -q


– It was useful to watch in real time how the queued emails are quickly decreased (queued mails are successfully sent to destination addresses) with:


# Monitor  the decereasing size of the email queue
[root@smtp1: ~ ]# watch 'postqueue -p|grep -i '@'|wc -l'

Linux: Howto Fix “N: Repository ‘http://deb.debian.org/debian buster InRelease’ changed its ‘Version’ value from ‘10.9’ to ‘10.10’” error to resolve apt-get release update issue

Friday, August 13th, 2021

Linux's surprises and disorganization is continuously growing day by day and I start to realize it is becoming mostly impossible to support easily this piece of hackware bundled together.
Usually so far during the last 5 – 7 years, I rarely had any general issues with using:

 apt-get update && apt-get upgrade && apt-get dist-upgrade 

to raise a server's working stable Debian Linux version packages e.g. version X.Y to verzion X.Z (for example up the release from Debian Jessie from 8.1 to 8.2). 

Today I just tried to follow this well known and established procedure that, of course nowdays is better to be done with the newer "apt" command instead with the legacy "apt-get"
And the set of 


# apt-get update && apt-get upgrade && apt-get dist-upgrade


has triggered below shitty error:
 

root@zabbix:~# apt-get update && apt-get upgrade
Get:1 http://security.debian.org buster/updates InRelease [65.4 kB]
Get:2 http://deb.debian.org/debian buster InRelease [122 kB]
Get:3 http://security.debian.org buster/updates/non-free Sources [688 B]
Get:4 http://repo.zabbix.com/zabbix/5.0/debian buster InRelease [7096 B]
Get:5 http://security.debian.org buster/updates/main Sources [198 kB]
Get:6 http://security.debian.org buster/updates/main amd64 Packages [300 kB]
Get:7 http://security.debian.org buster/updates/main Translation-en [157 kB]
Get:8 http://security.debian.org buster/updates/non-free amd64 Packages [556 B]
Get:9 http://deb.debian.org/debian buster/main Sources [7836 kB]
Get:10 http://repo.zabbix.com/zabbix/5.0/debian buster/main Sources [1192 B]
Get:11 http://repo.zabbix.com/zabbix/5.0/debian buster/main amd64 Packages [4785 B]
Get:12 http://deb.debian.org/debian buster/non-free Sources [85.7 kB]
Get:13 http://deb.debian.org/debian buster/contrib Sources [42.5 kB]
Get:14 http://deb.debian.org/debian buster/main amd64 Packages [7907 kB]
Get:15 http://deb.debian.org/debian buster/main Translation-en [5968 kB]
Get:16 http://deb.debian.org/debian buster/main amd64 Contents (deb) [37.3 MB]
Get:17 http://deb.debian.org/debian buster/contrib amd64 Packages [50.1 kB]
Get:18 http://deb.debian.org/debian buster/non-free amd64 Packages [87.7 kB]
Get:19 http://deb.debian.org/debian buster/non-free Translation-en [88.9 kB]
Get:20 http://deb.debian.org/debian buster/non-free amd64 Contents (deb) [861 kB]
Fetched 61.1 MB in 22s (2774 kB/s)
Reading package lists… Done
N: Repository 'http://deb.debian.org/debian buster InRelease' changed its 'Version' value from '10.9' to '10.10'


As I used to realize nowdays, as Linux started originally as 'Hackers' operating system, its legacy is just one big hack and everything from simple maintenance up to the higher and more sophisticated things requires a workaround 'hack''.


This time the hack to resolve error:
 

N: Repository 'http://deb.debian.org/debian buster InRelease' changed its 'Version' value from '10.9' to '10.10'


is up to running cmd:
 

debian-server:~# apt-get update –allow-releaseinfo-change
Поп:1 http://ftp.de.debian.org/debian buster-backports InRelease
Поп:2 http://ftp.debian.org/debian stable InRelease
Поп:3 http://security.debian.org stable/updates InRelease
Изт:5 https://packages.sury.org/php buster InRelease [6837 B]
Изт:6 https://download.docker.com/linux/debian stretch InRelease [44,8 kB]
Изт:7 https://packages.sury.org/php buster/main amd64 Packages [317 kB]
Игн:4 https://attic.owncloud.org/download/repositories/production/Debian_10  InRelease
Изт:8 https://download.owncloud.org/download/repositories/production/Debian_10  Release [964 B]
Изт:9 https://packages.sury.org/php buster/main i386 Packages [314 kB]
Изт:10 https://download.owncloud.org/download/repositories/production/Debian_10  Release.gpg [481 B]
Грш:10 https://download.owncloud.org/download/repositories/production/Debian_10  Release.gpg
  Следните подписи са невалидни: DDA2C105C4B73A6649AD2BBD47AE7F72479BC94B
Грш:11 https://ookla.bintray.com/debian generic InRelease
  403  Forbidden [IP: 52.39.193.126 443]
Четене на списъците с пакети… Готово
N: Repository 'https://packages.sury.org/php buster InRelease' changed its 'Suite' value from '' to 'buster'
W: An error occurred during the signature verification. The repository is not updated and the previous index files will be used. GPG error: https://download.owncloud.org/download/repositories/production/Debian_10  Release: 

apt-get-update-allow-releaseinfo-change-debian-linux-screenshot

Onwards to upgrade the system up to the latest .deb packages, as usual run:

# apt-get -y update && apt-get upgrade -y


and updates should be applied as usual with some prompts on whether you prefer to keep or replace existing service configuration and some information on some general changes that might affect your installed services. In a few minutes and few prompts hopefully your Debian OS should be up to the latest stable.

Get dmesg command kernel log report with human date / time timestamp on older Linux distributions

Friday, June 18th, 2021

how-to-get-dmesg-human-readable-timestamp-kernel-log-command-linux-logo

If you're a sysadmin you surely love to take a look at dmesg kernel log output. Usually on many Linux distributions there is a setup that dmesg keeps logging to log files /var/log/dmesg or /var/log/kern.log. But if you get some inherited old Linux servers it is quite possible that the previous machine maintainer did not enable the output of syslog to get logged in /var/log/{dmesg,kern.log,kernel.log}  or even have disabled the kernel log for some reason. Even though that in dmesg output you might find some interesting events reporting issues with Hard drives on its way to get broken / a bad / reads system processes crashing or whatever of other interesting information that could help you prevent severe servers downtimes or problems earlier but due to an old version of Linux distribution lets say Redhat 5 / Debian 6 or old CentOS / Fedora, the version of dmesg command shipped does not support the '-T' option that is present in util-linux package shipped with newer versions of  Redhat 7.X  / 8.X / SuSEs etc.  

 -T, –ctime
              Print human readable timestamps.  The timestamp could be inaccurate!

To illustrate better what I mean, here is an example from the non-human readable timestamp provided by older dmesg command

root@web-server~:# dmesg |tail -n 5
[4505913.361095] hid-generic 0003:1C4F:0002.000E: input,hidraw1: USB HID v1.10 Device [SIGMACHIP USB Keyboard] on usb-0000:00:1d.0-1.3/input1
[4558251.034024] Process accounting resumed
[4615396.191090] r8169 0000:03:00.0 eth1: Link is Down
[4615397.856950] r8169 0000:03:00.0 eth1: Link is Up – 100Mbps/Full – flow control rx/tx
[4644650.095723] Process accounting resumed

Thanksfully using below few lines of shell or perl scripts the dmesg -T  functionality could be added to the system , so you can easily get the proper timestamp out of the obscure default generated timestamp in the same manner as on newer distros.

Here is how to do with it with bash script:

#!/bin/sh paste in .bashrc and use dmesgt to get human readable timestamp
dmesg_with_human_timestamps () {
    FORMAT="%a %b %d %H:%M:%S %Y"


    now=$(date +%s)
    cputime_line=$(grep -m1 "\.clock" /proc/sched_debug)

    if [[ $cputime_line =~ [^0-9]*([0-9]*).* ]]; then
        cputime=$((BASH_REMATCH[1] / 1000))
    fi

    dmesg | while IFS= read -r line; do
        if [[ $line =~ ^\[\ *([0-9]+)\.[0-9]+\]\ (.*) ]]; then
            stamp=$((now-cputime+BASH_REMATCH[1]))
            echo "[$(date +”${FORMAT}” –date=@${stamp})] ${BASH_REMATCH[2]}"
        else
            echo "$line"
        fi
    done
}

Copy the script somewhere under lets say /usr/local/bin or wherever you like on the server and add into your HOME ~/.bashrc some alias like:
 

alias dmesgt=dmesg_with_timestamp.sh


You can get a copy dmesg_with_timestamp.sh of the script from here

Or you can use below few lines perl script to get the proper dmeg kernel date / time


#!/bin/perl
# on old Linux distros CentOS 6.0 etc. with dmesg (part of util-linux-ng-2.17.2-12.28.el6_9.2.x86_64) etc. dmesg -T not available
# workaround is little pl script below
dmesg_with_human_timestamps () {
    $(type -P dmesg) "$@" | perl -w -e 'use strict;
        my ($uptime) = do { local @ARGV="/proc/uptime";<>}; ($uptime) = ($uptime =~ /^(\d+)\./);
        foreach my $line (<>) {
            printf( ($line=~/^\[\s*(\d+)\.\d+\](.+)/) ? ( “[%s]%s\n", scalar localtime(time – $uptime + $1), $2 ) : $line )
        }'
}


Again to make use of the script put it under /usr/local/bin/check_dmesg_timestamp.pl

alias dmesgt=dmesg_with_human_timestamps

root@web-server:~# dmesgt | tail -n 20

[Sun Jun 13 15:51:49 2021] usb 2-1.3: USB disconnect, device number 9
[Sun Jun 13 15:51:50 2021] usb 2-1.3: new low-speed USB device number 10 using ehci-pci
[Sun Jun 13 15:51:50 2021] usb 2-1.3: New USB device found, idVendor=1c4f, idProduct=0002, bcdDevice= 1.10
[Sun Jun 13 15:51:50 2021] usb 2-1.3: New USB device strings: Mfr=1, Product=2, SerialNumber=0
[Sun Jun 13 15:51:50 2021] usb 2-1.3: Product: USB Keyboard
[Sun Jun 13 15:51:50 2021] usb 2-1.3: Manufacturer: SIGMACHIP
[Sun Jun 13 15:51:50 2021] input: SIGMACHIP USB Keyboard as /devices/pci0000:00/0000:00:1d.0/usb2/2-1/2-1.3/2-1.3:1.0/0003:1C4F:0002.000D/input/input25
[Sun Jun 13 15:51:50 2021] hid-generic 0003:1C4F:0002.000D: input,hidraw0: USB HID v1.10 Keyboard [SIGMACHIP USB Keyboard] on usb-0000:00:1d.0-1.3/input0
[Sun Jun 13 15:51:50 2021] input: SIGMACHIP USB Keyboard Consumer Control as /devices/pci0000:00/0000:00:1d.0/usb2/2-1/2-1.3/2-1.3:1.1/0003:1C4F:0002.000E/input/input26
[Sun Jun 13 15:51:50 2021] input: SIGMACHIP USB Keyboard System Control as /devices/pci0000:00/0000:00:1d.0/usb2/2-1/2-1.3/2-1.3:1.1/0003:1C4F:0002.000E/input/input27
[Sun Jun 13 15:51:50 2021] hid-generic 0003:1C4F:0002.000E: input,hidraw1: USB HID v1.10 Device [SIGMACHIP USB Keyboard] on usb-0000:00:1d.0-1.3/input1
[Mon Jun 14 06:24:08 2021] Process accounting resumed
[Mon Jun 14 22:16:33 2021] r8169 0000:03:00.0 eth1: Link is Down
[Mon Jun 14 22:16:34 2021] r8169 0000:03:00.0 eth1: Link is Up – 100Mbps/Full – flow control rx/tx

Adding custom user based host IP aliases load custom prepared /etc/hosts from non root user on Linux – Script to allow define IPs that doesn’t have DNS records to user preferred hostname

Wednesday, April 14th, 2021

adding-custom-user-based-host-aliases-etc-hosts-logo-linux

Say you have access to a remote Linux / UNIX / BSD server, i.e. a jump host and you have to remotely access via ssh a bunch of other servers
who have existing IP addresses but the DNS resolver recognized hostnames from /etc/resolv.conf are long and hard to remember by the jump host in /etc/resolv.conf and you do not have a way to include a new alias to /etc/hosts because you don't have superuser admin previleges on the hop station.
To make your life easier you would hence want to add a simplistic host alias to be able to easily do telnet, ssh, curl to some aliased name like s1, s2, s3 … etc.


The question comes then, how can you define the IPs to be resolvable by easily rememberable by using a custom User specific /etc/hosts like definition file? 

Expanding /etc/hosts predefined host resolvable records is pretty simple as most as most UNIX / Linux has the HOSTALIASES environment variable
Hostaliases uses the common technique for translating host names into IP addresses using either getaddrinfo(3) or the obsolete gethostbyname(3). As mentioned in hostname(7), you can set the HOSTALIASES environment variable to point to an alias file, and you've got per-user aliases

create ~/.hosts file

linux:~# vim ~/.hosts

with some content like:
 

g google.com
localhostg 127.0.0.1
s1 server-with-long-host1.fqdn-whatever.com 
s2 server5-with-long-host1.fqdn-whatever.com
s3 server18-with-long-host5.fqdn-whatever.com

linux:~# export HOSTALIASES=$PWD/.hosts

The caveat of hostaliases you should know is this will only works for resolvable IP hostnames.
So if you want to be able to access unresolvable hostnames.
You can use a normal alias for the hostname you want in ~/.bashrc with records like:

alias server-hostname="ssh username@10.10.10.18 -v -o stricthostkeychecking=no -o passwordauthentication=yes -o UserKnownHostsFile=/dev/null"
alias server-hostname1="ssh username@10.10.10.19 -v -o stricthostkeychecking=no -o passwordauthentication=yes -o UserKnownHostsFile=/dev/null"
alias server-hostname2="ssh username@10.10.10.20 -v -o stricthostkeychecking=no -o passwordauthentication=yes -o UserKnownHostsFile=/dev/null"

then to access server-hostname1 simply type it in terminal.

The more elegant solution is to use a bash script like below:

# include below code to your ~/.bashrc
function resolve {
        hostfile=~/.hosts
        if [[ -f “$hostfile” ]]; then
                for arg in $(seq 1 $#); do
                        if [[ “${!arg:0:1}” != “-” ]]; then
                                ip=$(sed -n -e "/^\s*\(\#.*\|\)$/d" -e "/\<${!arg}\>/{s;^\s*\(\S*\)\s*.*$;\1;p;q}" "$hostfile")
                                if [[ -n “$ip” ]]; then
                                        command "${FUNCNAME[1]}" "${@:1:$(($arg-1))}" "$ip" "${@:$(($arg+1)):$#}"
                                        return
                                fi
                        fi
                done
        fi
        command "${FUNCNAME[1]}" "$@"
}

function ping {
        resolve "$@"
}

function traceroute {
        resolve "$@"
}

function ssh {
        resolve "$@"
}

function telnet {
        resolve "$@"
}

function curl {
        resolve "$@"
}

function wget {
        resolve "$@"
}


Now after reloading bash login session $HOME/.bashrc with:

linux:~# source ~/.bashrc

ssh / curl / wget / telnet / traceroute and ping will be possible to the defined ~/.hosts IP addresses just like if it have been defined global wide on System in /etc/hosts.

Enjoy
 

Howto install Google Chrome web browser on CentOS Linux 7

Friday, December 11th, 2020

After installing CentOS 7 Linux testing Virtual Machine in Oracle Virtualbox 6.1 to conduct some testing with php / html / javascript web script pages and use the VM for other work stuff that I later plan to deploy on production CentOS systems, I came to requirement of having a working Google Chrome browser.

In that regards, next to Firefox, I needed to test the web applications in commercial Google Chrome to see what its usercan expect. For those who don't know it Google Chrome is based on Chromium Open source browser (https://chromium.org) which is available by default via default CentOS EPEL repositories.

One remark to make here is before installing Google Chrome, I've also test my web scripts first with chromium, to install Chromium free browser on CentOS:

[root@localhost mozilla_test0]# yum install chromium
Loaded plugins: fastestmirror, langpacks
Loading mirror speeds from cached hostfile
 * base: mirror.wwfx.net
 * epel: mirror.t-home.mk
 * extras: mirror.wwfx.net
 * updates: mirror.wwfx.net
Resolving Dependencies
–> Running transaction check
—> Package chromium.x86_64 0:85.0.4183.121-1.el7 will be installed
–> Processing Dependency: chromium-common(x86-64) = 85.0.4183.121-1.el7 for package: chromium-85.0.4183.121-1.el7.x86_64
–> Processing Dependency: nss-mdns(x86-64) for package: chromium-85.0.4183.121-1.el7.x86_64
–> Processing Dependency: libminizip.so.1()(64bit) for package: chromium-85.0.4183.121-1.el7.x86_64
–> Running transaction check
—> Package chromium-common.x86_64 0:85.0.4183.121-1.el7 will be installed
—> Package minizip.x86_64 0:1.2.7-18.el7 will be installed
—> Package nss-mdns.x86_64 0:0.14.1-9.el7 will be installed
–> Finished Dependency Resolution


Dependencies Resolved

============================================================================================================================================
 Package                              Arch                        Version                                   Repository                 Size
============================================================================================================================================
Installing:
 chromium                             x86_64                      85.0.4183.121-1.el7                       epel                       97 M
Installing for dependencies:
 chromium-common                      x86_64                      85.0.4183.121-1.el7                       epel                       16 M
 minizip                              x86_64                      1.2.7-18.el7                              base                       34 k
 nss-mdns                             x86_64                      0.14.1-9.el7                              epel                       43 k

Transaction Summary
============================================================================================================================================
Install  1 Package (+3 Dependent packages)

Total download size: 113 M
Installed size: 400 M
Is this ok [y/d/N]: y
Downloading packages:
(1/4): minizip-1.2.7-18.el7.x86_64.rpm                                                                               |  34 kB  00:00:00     
(2/4): chromium-common-85.0.4183.121-1.el7.x86_64.rpm                                                                |  16 MB  00:00:08     
(3/4): chromium-85.0.4183.121-1.el7.x86_64.rpm                                                                       |  97 MB  00:00:11     
(4/4): nss-mdns-0.14.1-9.el7.x86_64.rpm                                                                              |  43 kB  00:00:00     
——————————————————————————————————————————————–
Total                                                                                                       9.4 MB/s | 113 MB  00:00:12     
Running transaction check
Running transaction test
Transaction test succeeded
Running transaction
  Installing : minizip-1.2.7-18.el7.x86_64                                                                                              1/4
  Installing : chromium-common-85.0.4183.121-1.el7.x86_64                                                                               2/4
  Installing : nss-mdns-0.14.1-9.el7.x86_64                                                                                             3/4
  Installing : chromium-85.0.4183.121-1.el7.x86_64                                                                                      4/4
  Verifying  : chromium-common-85.0.4183.121-1.el7.x86_64                                                                               1/4
  Verifying  : minizip-1.2.7-18.el7.x86_64                                                                                              2/4
  Verifying  : chromium-85.0.4183.121-1.el7.x86_64                                                                                      3/4
  Verifying  : nss-mdns-0.14.1-9.el7.x86_64                                                                                             4/4

Installed:
  chromium.x86_64 0:85.0.4183.121-1.el7                                                                                                     

Dependency Installed:
  chromium-common.x86_64 0:85.0.4183.121-1.el7            minizip.x86_64 0:1.2.7-18.el7            nss-mdns.x86_64 0:0.14.1-9.el7           

Complete!

Chromium browser worked however it is much more buggy than Google Chrome and the load it puts on the machine as well as resources it consumes is terrible if compared to Proprietary G. Chrome.

Usually I don't like google chrome as it is a proprietary product and I don't even install it on my Linux Desktops, neither use as using is against any secure wise practice and but I needed this time ..

Thus to save myself some pains therefore proceeded and installed Google Chromium.
Installion  of Google Chrome is a straight forward process you download the latest rpm run below command to resolve all library dependencies and you're in:

chromium-open-source-browser-on-centos-7-screenshot


[root@localhost mozilla_test0]# rpm -ivh google-chrome-stable_current_x86_64.rpm
warning: google-chrome-stable_current_x86_64.rpm: Header V4 DSA/SHA1 Signature, key ID 7fac5991: NOKEY
error: Failed dependencies:
    liberation-fonts is needed by google-chrome-stable-87.0.4280.88-1.x86_64
    libvulkan.so.1()(64bit) is needed by google-chrome-stable-87.0.4280.88-1.x86_64
[root@localhost mozilla_test0]# wget https://dl.google.com/linux/direct/google-chrome-stable_current_x86_64.rpm
–2020-12-11 07:03:02–  https://dl.google.com/linux/direct/google-chrome-stable_current_x86_64.rpm
Resolving dl.google.com (dl.google.com)… 172.217.17.238, 2a00:1450:4017:802::200e
Connecting to dl.google.com (dl.google.com)|172.217.17.238|:443… connected.
HTTP request sent, awaiting response… 200 OK
Length: 72280700 (69M) [application/x-rpm]
Saving to: ‘google-chrome-stable_current_x86_64.rpm


100%[==================================================================================================>] 72,280,700  11.0MB/s   in 6.6s   

2020-12-11 07:03:09 (10.4 MB/s) – ‘google-chrome-stable_current_x86_64.rpm’ saved [72280700/72280700]

[root@localhost mozilla_test0]# yum localinstall google-chrome-stable_current_x86_64.rpm
Loaded plugins: fastestmirror, langpacks
Examining google-chrome-stable_current_x86_64.rpm: google-chrome-stable-87.0.4280.88-1.x86_64
Marking google-chrome-stable_current_x86_64.rpm to be installed
Resolving Dependencies
–> Running transaction check
—> Package google-chrome-stable.x86_64 0:87.0.4280.88-1 will be installed
–> Processing Dependency: liberation-fonts for package: google-chrome-stable-87.0.4280.88-1.x86_64
Loading mirror speeds from cached hostfile
 * base: mirror.wwfx.net
 * epel: mirrors.uni-ruse.bg
 * extras: mirror.wwfx.net
 * updates: mirror.wwfx.net
–> Processing Dependency: libvulkan.so.1()(64bit) for package: google-chrome-stable-87.0.4280.88-1.x86_64
–> Running transaction check
—> Package liberation-fonts.noarch 1:1.07.2-16.el7 will be installed
–> Processing Dependency: liberation-narrow-fonts = 1:1.07.2-16.el7 for package: 1:liberation-fonts-1.07.2-16.el7.noarch
—> Package vulkan.x86_64 0:1.1.97.0-1.el7 will be installed
–> Processing Dependency: vulkan-filesystem = 1.1.97.0-1.el7 for package: vulkan-1.1.97.0-1.el7.x86_64
–> Running transaction check
—> Package liberation-narrow-fonts.noarch 1:1.07.2-16.el7 will be installed
—> Package vulkan-filesystem.noarch 0:1.1.97.0-1.el7 will be installed
–> Finished Dependency Resolution

Dependencies Resolved

============================================================================================================================================
 Package                             Arch               Version                      Repository                                        Size
============================================================================================================================================
Installing:
 google-chrome-stable                x86_64             87.0.4280.88-1               /google-chrome-stable_current_x86_64             227 M
Installing for dependencies:
 liberation-fonts                    noarch             1:1.07.2-16.el7              base                                              13 k
 liberation-narrow-fonts             noarch             1:1.07.2-16.el7              base                                             202 k
 vulkan                              x86_64             1.1.97.0-1.el7               base                                             3.6 M
 vulkan-filesystem                   noarch             1.1.97.0-1.el7               base                                             6.3 k

Transaction Summary
============================================================================================================================================
Install  1 Package (+4 Dependent packages)

Total size: 231 M
Total download size: 3.8 M
Installed size: 249 M
Is this ok [y/d/N]: y
Downloading packages:
(1/4): liberation-fonts-1.07.2-16.el7.noarch.rpm                                                                     |  13 kB  00:00:00     
(2/4): liberation-narrow-fonts-1.07.2-16.el7.noarch.rpm                                                              | 202 kB  00:00:00     
(3/4): vulkan-filesystem-1.1.97.0-1.el7.noarch.rpm                                                                   | 6.3 kB  00:00:00     
(4/4): vulkan-1.1.97.0-1.el7.x86_64.rpm                                                                              | 3.6 MB  00:00:01     
——————————————————————————————————————————————–
Total                                                                                                       1.9 MB/s | 3.8 MB  00:00:02     
Running transaction check
Running transaction test
Transaction test succeeded
Running transaction
Warning: RPMDB altered outside of yum.
  Installing : vulkan-filesystem-1.1.97.0-1.el7.noarch                                                                                  1/5
  Installing : vulkan-1.1.97.0-1.el7.x86_64                                                                                             2/5
  Installing : 1:liberation-narrow-fonts-1.07.2-16.el7.noarch                                                                           3/5
  Installing : 1:liberation-fonts-1.07.2-16.el7.noarch                                                                                  4/5
  Installing : google-chrome-stable-87.0.4280.88-1.x86_64                                                                               5/5
Redirecting to /bin/systemctl start atd.service
  Verifying  : vulkan-1.1.97.0-1.el7.x86_64                                                                                             1/5
  Verifying  : 1:liberation-narrow-fonts-1.07.2-16.el7.noarch                                                                           2/5
  Verifying  : 1:liberation-fonts-1.07.2-16.el7.noarch                                                                                  3/5
  Verifying  : google-chrome-stable-87.0.4280.88-1.x86_64                                                                               4/5
  Verifying  : vulkan-filesystem-1.1.97.0-1.el7.noarch                                                                                  5/5

Installed:
  google-chrome-stable.x86_64 0:87.0.4280.88-1                                                                                              

Dependency Installed:
  liberation-fonts.noarch 1:1.07.2-16.el7         liberation-narrow-fonts.noarch 1:1.07.2-16.el7       vulkan.x86_64 0:1.1.97.0-1.el7      
  vulkan-filesystem.noarch 0:1.1.97.0-1.el7      

Complete!
 

Once Chrome is installed you can either run it from gnome-terminal
 

[test@localhost ~]$ gnome-terminal &


Google-chrome-screenshot-on-centos-linux

Or find it in the list of CentOS programs:

Applications → Internet → Google Chrome

google-chrome-programs-list-internet-cetnos

Last step to do is to make Google Chrome easily updatable to keep up VM level on high security and let it get updated every time when apply security updates with yum check-update && yum upgrade
for that its necessery to create new custom repo file
/etc/yum.repos.d/google-chrome.repo

[root@localhost mozilla_test0]# vim /etc/yum.repos.d/google-chrome.repo
[google-chrome]
name=google-chrome
baseurl=http://dl.google.com/linux/chrome/rpm/stable/x86_64
enabled=1
gpgcheck=1
gpgkey=https://dl.google.com/linux/linux_signing_key.pub

Now letes import the gpg checksum key

[root@localhost mozilla_test0]# rpmkeys –import https://dl.google.com/linux/linux_signing_key.pub

That's all folks google-chrome is at your disposal.

Add Zabbix time synchronization ntp userparameter check script to Monitor Linux servers

Tuesday, December 8th, 2020

Zabbix-logo-how-to-make-ntpd-time-server-monitoring-article


How to add Zabbix time synchronization ntp userparameter check script to Monitor Linux servers?

We needed to set on some servers at my work an elementary check with Zabbix monitoring to check whether servers time is correctly synchronized with ntpd time service as well report if the ntp daemon is correctly running on the machine. For that a userparameter script was developed called userparameter_ntp.conf the script is simplistic and few a lines of bash shell scripting 
stuff is based on gresping information required from ntpq and ntpstat common ntp client commands to get information about the status of time synchronization on the servers.
 

[root@linuxserver ]# ntpstat
synchronised to NTP server (10.80.200.30) at stratum 3
   time correct to within 47 ms
   polling server every 1024 s


[root@linuxserver ]# ntpq -c peers
     remote           refid      st t when poll reach   delay   offset  jitter
==============================================================================
+timeserver1 10.26.239.41     2 u  319 1024  377   15.864    1.270   0.262
+timeserver2 10.82.239.41     2 u  591 1024  377   16.287   -0.334   1.748
*timeserver3 10.82.239.43     2 u   47 1024  377   15.613   -0.553   0.251
 timeserver4 .INIT.          16 u    – 1024    0    0.000    0.000   0.000


Below is Zabbix UserParameter script that does report us 3 important values we monitor to make sure time server synchronization works as expected the zabbix keys we set are ntp.offset, ntp.sync, ntp.exact in attempt to describe what we're fetching from ntp client:

[root@linuxserver ]# cat /etc/zabbix/zabbix-agent.d/userparameter_ntp.conf

UserParameter=ntp.offset,(/usr/sbin/ntpq -pn | /usr/bin/awk 'BEGIN { offset=1000 } $1 ~ /\*/ { offset=$9 } END { print offset }')
#UserParameter=ntp.offset,(/usr/sbin/ntpq -pn | /usr/bin/awk 'FNR==4{print $9}')
UserParameter=ntp.sync,(/usr/bin/ntpstat | cut -f 1 -d " " | tr -d ' \t\n\r\f')
UserParameter=ntp.exact,(/usr/bin/ntpstat | /usr/bin/awk 'FNR==2{print $5,$6}')

In Zabbix the monitored ntpd parameters set-upped looks like this:


ntp_time_synchronization_check-zabbix-screenshot.


!Note that in above userparameter example, the commented userparameter script is a just another way to do an ntpd offset returned value which was developed before the more sophisticated with more regular expression checks from the /usr/sbin/ntpd via ntpq, perhaps if you want to extend it you can also use another script to report more verbose information to Zabbix if that is required like ouput from ntpq -c peers command:
 

UserParameter=ntp.verbose,(/usr/sbin/ntpq -c peers)

Of course to make the Zabbix fetch necessery data from monitored hosts, we need to set-up further new Zabbix Template with the respective Trigger and Items.

Below are few screenshots including the triggers used.

ntpd_server-time_synchronization_check-zabbix-screenshot-triggers

  • ntpd.trigger

{NTP:net.udp.service[ntp].last(0)}<1

  • NTP Synchronization trigger

{NTP:ntp.sync.iregexp(unsynchronised)}=1


As you can see from history we have setup our items to Store history of reported data to Zabbix from parameter script for 90 days and update our monitor check, every 30 seconds from the monitored hosts to which Tempate is applied.

Well that's all folks, time synchronization issues we'll be promptly triggering a new Alarm in Zabbix !

Postfix copy every email to a central mailbox (send a copy of every mail sent via mail server to a given email)

Wednesday, October 28th, 2020

Postfix-logo-always-bcc-email-option-send-all-emails-to-a-single-address-with-postfix.svg

Say you need to do a mail server migration, where you have a local configured Postfix on a number of Linux hosts named:

Linux-host1
Linux-host2
Linux-host3

etc.


all configured to send email via old Email send host (MailServerHostOld.com) in each linux box's postfix configuration's /etc/postfix/main.cf.
Now due to some infrastructure change in the topology of network or anything else, you need to relay Mails sent via another asumably properly configured Linux host relay (MailServerNewHost.com).

Usually such a migrations has always a risk that some of the old sent emails originating from local running scripts on Linux-host1, Linux-Host2 … or some application or anything else set to send via them might not properly deliver emails to some external Internet based Mailboxes via the new relayhost MailServerNewHost.com.

E.g. in /etc/postfix/main.cf Linux-Host* machines, you have below config after the migration:

relayhost = [MailServerNewHost.com]

Lets say that you want to make sure, that you don't end up with lost emails as you can't be sure whether the new email server will deliver correctly to the old repicient emails. What to do then?

To make sure will not end up in undelivered state and get lost forever after a week or so (depending on the mail queue configuration retention period made on Linux sent MTAs and mailrelay MailServerNewHost.com, it is a very good approach to temprorary set all email communication that will be sent via MailServerNewHost.com a BCC emaills (A Blind Carbon Copy) of each sent mail via relay that is set on your local configured Postfix-es on Linux-Host*.

In postfix to achieve that it is very easy all you have to do is set on your MailServerNewHost.com a postfix config variable always_bcc smartly included by postfix Mail Transfer Agent developers for cases exactly like this.

To forward all passed emails via the mail server just place in the end of /etc/postfix/mail.conf after login via ssh on MailServerNewHost.com

always_bcc=All-Emails@your-diresired-redirect-email-address.com


Now all left is to reload the postfix to force the new configuration to get loaded on systemd based hosts as it is usually today do:

# systemctl reload postfix


Finally to make sure all works as expected and mail is sent do from do a testing via local MTAs. 
 

Linux-Host:~# echo -e "Testing body" | mail -s "testing subject" -r "testing@test.com" georgi.stoyanov@remote-user-email-whatever-address.com

Linux-Host:~# echo -e "Testing body" | mail -s "testing subject" -r "testing@test.com" georgi.stoyanov@sample-destination-address.com


As you can see I'm using the -r to simulate a sender address, this is a feature of mailx and is not available on older Linux Os hosts that are bundled with mail only command.
Now go to and open the All-Emails@your-diresired-redirect-email-address.com in Outlook (if it is M$ Office 365 MX Shared mailbox), Thunderbird or whatever email fetching software that supports POP3 or IMAP (in case if you configured the common all email mailbox to be on some other Postfix / Sendmail / Qmail MTA). and check whether you started receiving a lot of emails 🙂

That's all folks enjoy ! 🙂

How to restart Microsoft IIS with command via Windows command line

Friday, August 19th, 2011

I'm tuning a Windows 2003 for better performance and securing it against DoS of service attacks. After applying all the changes I needed to restart the WebServer for the new configurations to take effect.
As I'm not a GUI kind of guy I found it handy there is a fast command to restart the Microsoft Internet Information Server. The command to restart IIS is:

c:> iisreset

Start Stop Restart Microsoft IIS Webserver from command line and GUI

Thursday, April 17th, 2014

start-stop-restart-microsoft-iis-howto-iis-server-logo
For a decomissioning project just recently I had the task to stop Microsoft IIS  on Windows Server system.
If you have been into security for a while you know well how many vulnerabilities Microsoft (Internet Information Server) Webserver used to be. Nowadays things with IIS are better but anyways it is better not to use it if possible …

Nomatter what the rason if you need to make IIS stop serving web pages here is how to do it via command line:

At Windows Command Prompt, type:

net stop WAS

If the command returns error message to stop it type:

net stop W3SVC

stop-microsoft-IIS-webservice
Just in case you have to start it again run:

net start W3SVC

start-restart-IIS-webserver-screenshot

For those who prefer to do it from GUI interface, launch services.msc command from Windows Run:

> services.msc

services-msc-stop-microsoft-iis-webserver

In list of services lookup for
IIS Admin Service and HTTP SSL
a) (Click over it with right mouse button -> Properties)
b) Set Startup type to Manual
c) Click Stop Button

You're done now IIS is stopped to make sure it is stopped you can run from cmd.exe:

telnet localhost 80

when not working you should get 'Could not open connection to the host. on port 80: Connection failed' like shown up in screenshot.