Posts Tagged ‘checked’

Monitor service log is continously growing with Zabbix on Windows with batch userparameter script and trigger Alert if log is unchanged

Thursday, March 17th, 2022

monitor-if-log-file-is-growing-with-zabbix-zabbix-userparameter-script-howto

Recently we had an inteteresting Monitoring work task to achieve. We have an Application that is constantly simulating encrypted connections traffic to a remote side machine and sending specific data on TCP/IP ports.
Communiucation between App Server A -> App Server B should be continous and if all is working as expected App Server A messages output are logged in the Application log file on the machine which by the way Runs
Windows Server 2020.

Sometimes due to Network issues this constant reconnections from the Application S. A to the remote checked machine TCP/IP ports gets interrupted due to LAN issues or a burned Network Switch equipment, misconfiguration on the network due to some Network admin making stoopid stuff etc..

Thus it was important to Monitor somehow whether the log is growing or not and feed the output of whether Application log file is growing or it stuck to a Central Zabbix Server. 
To be able to better understand the task, lets divide the desired outcome in few parts on required:

1. Find The latest file inside a folder C:\Path-to-Service\Monitoring\Log\
2. Open the and check it is current logged records and log the time
3. Re-open file in a short while and check whether in few seconds new records are written
4. Report the status out to Zabbix
5. Make Zabbix Item / Trigger / Action in case if monitored file is not growing

In below article I'll briefly explain how Monitoring a Log on a Machine for growing was implemented using a pure good old WIN .BAT (.batch) script and Zabbix Userparameter key


1. Enable userparameter script for Local Zabbix-Agent on the Windows 10 Server Host


Edit Zabbix config file usually on Windows Zabbix installs file is named:

zabbix_agentd.win ]


Uncomment the following lines to enable userparameter support for zabbix-agentd:


# Include=c:\zabbix\zabbix_agentd.userparams.conf

Include=c:\zabbix\zabbix_agentd.conf.d\

# Include=c:\zabbix\zabbix_agentd.conf.d\*.conf


2. Create folders for userparameter script and for the userparameter.conf

Before creating userparameter you can to create the folder and grant permissions

Folder name under C:\Zabbix -> zabbix_agentd.conf.d

If you don't want to use Windows Explorer) but do it via cmd line:

C:\Users\LOGUser> mkdir \Zabbix\zabbix_agentd.conf\
C:\User\LOGUser> mkdir \Zabbix\zabbix_scripts\


3. Create Userparameter with some name file ( Userparameter-Monitor-Grow.conf )

In the directory C:\Zabbix\zabbix_agentd.conf.d you should create a config file like:
Userparameter-Monitor-Grow.conf and in it you should have a standard userparameter key and script so file content is:

UserParameter=service.check,C:\Zabbix\zabbix_scripts\GROW_LOG_MONITOR-USERPARAMETER.BAT


4. Create the Batch script that will read the latest file in the service log folder and will periodically check and report to zabbix that file is changing

notepad C:\Zabbix\zabbix_scripts\GROW_LOG_MONITOR-USERPARAMETER.BAT

REM "SCRIPT MONITOR IF FILE IS GROWING OR NOT"
@echo off

set work_dir=C:\Path-to-Service\Monitoring\Log\

set client=client Name

set YYYYMMDD=%DATE:~10,4%%DATE:~4,2%%DATE:~7,2%

set name=csv%YYYYMMDD%.csv

set mytime=%TIME:~0,8%

for %%I in (..) do set CurrDirName=%%~nxI


setlocal EnableDelayedExpansion

set "line1=findstr /R /N "^^" %work_dir%\output.csv | find /C ":""


for /f %%a in ('!line1!') do set number1=%%a

set "line2=findstr /R /N "^^" %work_dir%\%name% | find /C ":""


for /f %%a in ('!line2!') do set number2=%%a


IF  %number1% == %number2% (

echo %YYYYMMDD% %mytime% MAJOR the log is not incrementing for %client%

echo %YYYYMMDD% %mytime% MAJOR the log is not incrementing for %client% >> monitor-grow_err.log

) ELSE (

echo %YYYYMMDD% %mytime% NORMAL the log is incrementing for %client%

SETLOCAL DisableDelayedExpansion

del %work_dir%\output.csv

FOR /F "usebackq delims=" %%a in (`"findstr /n ^^ %work_dir%\%name%"`) do (

    set "var=%%a"

    SETLOCAL EnableDelayedExpansion

    set "var=!var:*:=!"

    echo(!var! >> %work_dir%\output.csv

    ENDLOCAL

)

)


To download GROW_LOG_MONITOR-USERPARAMETER.BAT click here.
The script needs to have configured the path to directory containing multiple logs produced by the Monitored Application.
As prior said it will, list the latest created file based on DATE timestamp in the folder will output a simple messages:

If the log file is being fed with data the script will output to output.csv messages continuously, either:

%%mytime%% NORMAL the log is incrementing for %%client%%

Or if the Monitored application log is not writting anything for a period it will start writting messages

%%mytime%%mytime MAJOR the log is not incrementing for %client%

The messages will also be sent in Zabbix.

Before saving the script make sure you modify the Full Path location to the Monitored file for growing, i.e.:

set work_dir=C:\Path-to-Service\Monitoring\Log\


5. Create The Zabbix Item

Set whatever service.check name you would like and a check interval to fetch the info from the userparameter (if you're dealing with very large log files produced by Monitored log of application, then 10 minutes might be too frequent, in most cases 10 minutes should be fine)
monitor-if-log-grows-windows-zabbix-item-service-check-screenshot
 

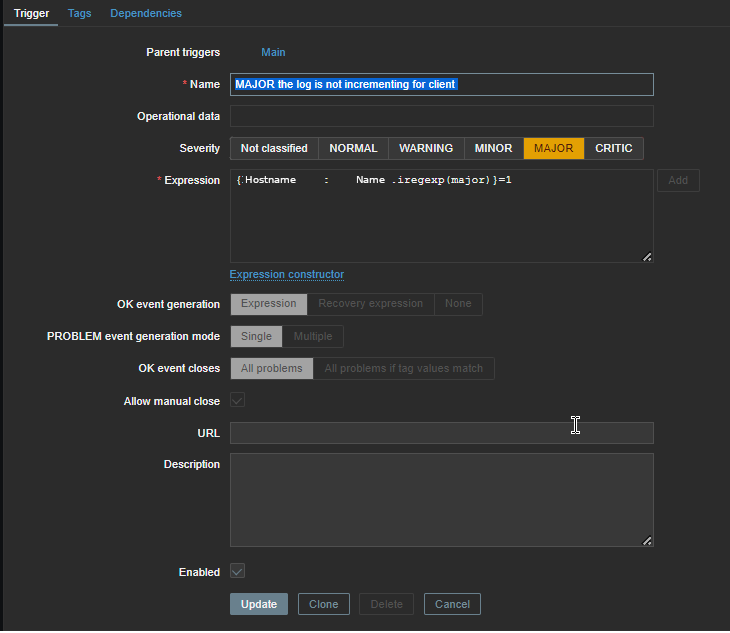
6. Create Zabbix Trigger


You will need a Trigger something similar to below:

Now considering that zabbix server receives correctly data from the client and the monitored log is growing you should in Zabbix:

%%mytime%% NORMAL the log is incrementing for %%client%%


7. Lastly create an Action to send Email Alert if log is not growing

Changing ’33 days has gone without being checked’ automated fsck filesystem check on Debian Linux Desktops – Reduce FS check waiting on Linux notebooks

Saturday, November 17th, 2012

Increasing default setting of automatic disk scheck on Debian Linux to get rid of annoying fsck waiting on boot / Less boot waiting by disabling automated fsck root FS checks

The periodic scheduled file system check that is set as a default behavior in Debian GNU / Linux is something very wise in terms of data security. However in terms of Desktop usability (especially for highly mobile users wtih notebooks like me) it's very inconvenient.

If you're a Linux laptop user with Debian GNU / Linux or other Linux distro, you certainly many times have experienced the long waiting on boot because of the routine scheduled fsck check:

/dev/sda5 has gone 33 days without being checked, check forced
/dev/sda5 |====== .....

In this little article, I will explain how to change the 33 mount times automated fsck filesystem  check on Debian GNU / Linux to avoid frequent fsck waitings. As long as I know this behaviour is better tailored on Ubuntu as Ubuntu developers, make Ubuntu to be targeting users and they have realized the 33 mounts auto check is quite low for 'em.

1. Getting information about current file system partitions with fdisk and mount

a) First it is good practice to check out all present system mountable ex3 / reiserfs file systems, just to give you an idea what you're doing:

noah:~#  fdisk -l

Disk /dev/sda: 160.0 GB, 160041885696 bytes
255 heads, 63 sectors/track, 19457 cylinders
Units = cylinders of 16065 * 512 = 8225280 bytes
Sector size (logical/physical): 512 bytes / 512 bytes
I/O size (minimum/optimal): 512 bytes / 512 bytes
Disk identifier: 0x2d92834c

   Device Boot      Start         End      Blocks   Id  System
/dev/sda1               1         721     5786624   27  Unknown
Partition 1 does not end on cylinder boundary.
/dev/sda2   *         721        9839    73237024    7  HPFS/NTFS
/dev/sda3            9839       19457    77263200    5  Extended
/dev/sda5            9839       12474    21167968+  83  Linux
/dev/sda6           12474       16407    31593208+  83  Linux
/dev/sda7           16407       16650     1950448+  82  Linux swap / Solaris
/dev/sda8           16650       19457    22551448+  83  Linux


Second, find out which one is your primary root filesystem, and  whether the system is partitioned to have /usr , /var and /home in separate partitions or not.

b) finding the root directory mount point ( / ):

noah:~ # mount |head -n 1
/dev/sda8 on / type ext3 (rw,errors=remount-ro)

c) looking up if /usr /var and /home in separate partitions exist or all is on the / partition

noah:~# mount |grep -i -E '/usr|/var/|/home'
/dev/sda5 on /home type ext3 (rw,errors=remount-ro)

2. Getting information about Linux mounted partitions filesystem parameters ( tune2fs )
 

noah:~# /sbin/tune2fs -l /dev/sda8

tune2fs 1.41.12 (17-May-2010)
Filesystem volume name:   <none>
Last mounted on:          <not available>
Filesystem UUID:          8e0901b1-d569-45b2-902d-e159b104e330
Filesystem magic number:  0xEF53
Filesystem revision #:    1 (dynamic)
Filesystem features:      has_journal ext_attr resize_inode dir_index filetype needs_recovery sparse_super large_file
Filesystem flags:         signed_directory_hash
Default mount options:    (none)
Filesystem state:         clean
Errors behavior:          Continue
Filesystem OS type:       Linux
Inode count:              1411680
Block count:              5637862
Reserved block count:     281893
Free blocks:              578570
Free inodes:              700567
First block:              0
Block size:               4096
Fragment size:            4096
Reserved GDT blocks:      1022
Blocks per group:         32768
Fragments per group:      32768
Inodes per group:         8160
Inode blocks per group:   510
Filesystem created:       Sun Jun 22 16:47:48 2008
Last mount time:          Thu Nov 15 14:13:10 2012
Last write time:          Tue Nov 13 13:39:56 2012
Mount count:              6
Maximum mount count:      33
Last checked:             Tue Nov 13 13:39:56 2012
Check interval:           15552000 (6 months)
Next check after:         Sun May 12 14:39:56 2013
Reserved blocks uid:      0 (user root)
Reserved blocks gid:      0 (group root)
First inode:              11
Inode size:              256
Journal inode:            8
First orphan inode:       595996
Default directory hash:   tea
Directory Hash Seed:      2f96db3d-9134-492b-a361-a873a0c8c3c4
Journal backup:           inode blocks


noah:~# /sbin/tune2fs /dev/sda5

tune2fs 1.41.12 (17-May-2010)
Filesystem volume name:   <none>
Last mounted on:          <not available>
Filesystem UUID:          26aa6017-e675-4029-af28-7d346a7b6b00
Filesystem magic number:  0xEF53
Filesystem revision #:    1 (dynamic)
Filesystem features:      has_journal ext_attr resize_inode dir_index filetype needs_recovery sparse_super large_file
Filesystem flags:         signed_directory_hash
Default mount options:    (none)
Filesystem state:         clean
Errors behavior:          Continue
Filesystem OS type:       Linux
Inode count:              1324512
Block count:              5291992
Reserved block count:     264599
Free blocks:              412853
Free inodes:              1247498
First block:              0
Block size:               4096
Fragment size:            4096
Reserved GDT blocks:      1022
Blocks per group:         32768
Fragments per group:      32768
Inodes per group:         8176
Inode blocks per group:   511
Filesystem created:       Thu Jul 15 18:46:03 2010
Last mount time:          Thu Nov 15 14:13:12 2012
Last write time:          Thu Nov 15 14:13:12 2012
Mount count:              12
Maximum mount count:      27
Last checked:             Sat Nov 10 22:43:33 2012
Check interval:           15552000 (6 months)
Next check after:         Thu May  9 23:43:33 2013
Reserved blocks uid:      0 (user root)
Reserved blocks gid:      0 (group root)
First inode:              11
Inode size:              256
Required extra isize:     28
Desired extra isize:      28
Journal inode:            8
First orphan inode:       1032306
Default directory hash:   half_md4
Directory Hash Seed:      8ef0fe5a-43e3-42bf-a1b9-ae6e1606ecd4
Journal backup:           inode blocks
 

As you see from above paste from my notebook, there is a plenty of options you can tweak in a filesystem.. However as the aim of my article is not to be a FS tweaking guide I will stick only to the important for me  which is Mount Count:

noah:~#  tune2fs -l /dev/sda5|grep -i -E 'mount count|Last checked'
Mount count:              12
Maximum mount count:      27
Last checked:             Sat Nov 10 22:43:33 2012

As you see 'Mount Count: 12', indicates there are 12 mounts of filesystem /dev/sda5 since the last time it was fsck-ed.
'Maximum mount count: 27' set for this filesystem indicates that after 27 times mount is done more than 27 times, a fsck check has to be issued. In other words after 27 mounts or re-mounts of /dev/sda5 which mostly occur after system reboot on system boot time.

Restarting system is not a common on servers but with the increased number of mobile devices like notebooks Android tablets whatever 27 restarts until fsck is too low. On the other hand filesystem check every now and then is a necessity as mobility increases the possibility for a physical damage of the Hard Disk Drive.

Thus my person view is increasing 'Maximum mount count:' 27 to 80 is much better for people who move a lot and restart laptop at least few times a day. Increasing to 80 or 100 times, means you will not have to wait for a file system fsck every week (6, 7 days),. for about at 8-10 minutes (whether on newer hard disks notebooks with 500 GB space and more), it might even take 15 – 20 minutes.
I switch on and off my computer 2 to 3 times a day, because I move from location to location. Whether maximum mount count is 80, this means a FSCK will be ensued every 40/2 = 40 days or so which is quite a normal timing for a Scheduled filesystem integrity check.

noah:~# tune2fs -c 80 -i 80 /dev/sda8
tune2fs 1.41.12 (17-May-2010)
Setting maximal mount count to 80
Setting interval between checks to 6912000 seconds
 

-c argument sets (-c max-mount-counts)

-i sets interval betweenchecks (-i  interval-between-checks[d|m|w] - days, months, weeks)

You can consequentially, check approximately, when the next ext3 FS check will happen with:

noah:~# tune2fs -l /dev/sda8 |grep -i 'check'
Last checked:             Tue Nov 13 13:39:56 2012
Check interval:           6912000 (2 months, 2 weeks, 6 days)
Next check after:         Fri Feb  1 13:39:56 2013
 

For people, who want to completely disable periodic Linux FSCK chcks and already use some kind of Backup automated solution (Dropbox, Ubuntu One …), that makes a backup copy of their data on a Cluster / Cloud – as Clusters are fuzzy called nowadays):

noah:~# tune2fs -c 0 -i 0 /dev/sda8
tune2fs 1.41.12 (17-May-2010)
Setting maximal mount count to -1
Setting interval between checks to 0 seconds

Again if you don't do a regular backup of your filesystem NEVER EVER do this BEWARE !

To be 100% sure, /dev/sda8 periodic filesystem will not happen again issue:

tune2fs -l /dev/sda8 |grep -i -E 'mount|check'
Last mounted on:          <not available>
Default mount options:    (none)
Last mount time:          Thu Nov 15 14:13:10 2012
Mount count:              6
Maximum mount count:      -1
Last checked:             Tue Nov 13 13:39:56 2012
Check interval:           0 (<none>)
 

By the way it is intestesting to mention Mount Count and Maximum Mount Count FS variables are set during initial creation of the filesystem with mkfs.ext3, in Debian and derivative distros this is done by the Debian Installer program. On Fedora and CentOS and most of other RPM based distros except SuSE by Anaconda Installer prog.

As of time of writing this article, for custom created filesystems with mkfs.ext3 Maximum mount count is     27.

BTW on CentOS, developers has by default set the Maximum mount count to beset to infinitive value:

/sbin/tune2fs -l /dev/sda1|grep -i 'mount count'
Mount count:              39

Maximum mount count:      -1
The same 'deskop wise' behavior of Maximum mount count: -1 is set by default also on Fedora and RHEL. Meaning RPM distro users are free of this annoyance.

3. Remove fsck filesystem check on boot in /etc/fstab
 

Usually Desktop and laptop Linux users, would not need do that but it is a good information to know.

/etc/fstab by default sets  the filesystems to be checked for bad blocks in case  if the system was shutdown due to electricity failure or hang-up, left without proper un-mounting. Though, sometimes this is very helpful as it fixes improperly complete writing on the HDD, those who administrate servers knows how annoying it is to be asked for a root password input on the physical console, whether the system fails to boot waiting for password input.
In remotely administrated servers it makes things even worser as you have to bother a tech support guy to go to the system and input the root password and type fsck /dev/whatever command manually. With notebooks and other Desktops like my case it is not such a problem to just enter root password but it still takes time. Thus it is much better to just make this fsck test filesystem on errors to be automatically invoked on filesystem errors.

A standard default records in /etc/fstab concerning root filesystem and others is best to be something like this:

/dev/sda8       /               ext3    errors=remount-ro 0       1
UUID=26aa6017-e675-4029-af28-7d346a7b6b00       /home           ext3    errors=remount-ro 0     1

The 1's in the end of each line instruct filesystems to be automatically checked with no need for user interaction in case of FS mount errors.

Some might want to completely disable, remount read only and drop into single user mode though this is usually not a good idea, to do so:

/dev/sda8       /               ext3    errors=remount-ro 0       0
UUID=26aa6017-e675-4029-af28-7d346a7b6b00       /home           ext3    errors=remount-ro 0     0


4. Forcing check on next reboot in case you suspect (bad blocks) or inode problems with filesystem

If you're on Linux hosts which for some reason you have disabled routine fsck it is useful to know about the existence of:

 /forcefcsk file

Scheduling a reboot nomatter, what settings you have for FS can be achieved by simply creating forcefsck in / i.e.:

noah:~# touch /forcefsck


5. Force the server to not fsck on next reboot

noah:~# /sbin/shutdown -rf now

The -f flag  tells to skip the fsck for all file systems defined in /etc/fstab during the next reboot.Unlike using tune2fs to set permanent reboot behavior it only takes effect during next boot.