Posts Tagged ‘change’

Change default new created Debian users insecure (all users read) permissons to secure

Tuesday, September 11th, 2012

In older versions of Debian, the directory permnissions of /home/ directory used to be secure. As of time of writing this post in Debian GNU / Linux Squeeze (6.0.5), default permissions are set to such, that all permissions are set readable for all users. e.g.:

debian:~$ ls -al /home/test
drwxr-xr-x 3 test test 4096 Jul 24 10:51 test

This kind of permissions are probably set like this because of Apache configuration to display every user custom file content in web via /home/[users]/public_html through http://website-url.com/~test … (whatever) ~username.

This is great for machines which are supposed to be used for hosting, but for mail server or SQL Database host such permissions of new created users is quite insecure practice. Also such a /home directory settings are not good even for Webserver hosting servers, which did not display any web content via /home/ users directories.

Therefore on each new configured Debian server it is a wonderful practice to change default new created user to only readable, writable and executable by the user itself ….

To do so;

1. Edit /etc/adduser.conf

Change the variable:

DIR_MODE=755

to

DIR_MODE=700

This will not affect the permissions of current existing directories in /home/, i.e. /home/user1 , /home/user2 etc. but any new created one with adduser or useradd cmd will get permissions of 700

Here are permissions of recent created user syrma:

debian:~# useradd syrma
debian:~# ls -ld /home/syrma
drwxr-xr-x 98 syrma syrma 12288 7 ceâ—ˆ 13,56 hipo/

In /etc/adduserconf, there are plenty of other useful options, you might want to tune (depending on the type of new configured server). Few worthy to change sometimes are:

FIRST_UID=1000, LAST_UID=29999
FIRST_GID=1000, LAST_GID=29999

This two controls how the USER IDSs (UID) and GROUP IDs (GID)s will get assigned. In some cases it might be useful to assign new users from 1000 onwards.

Another helpful variable to tune for creating new users from there is DSHELL, on Linux defaulting to DSHELL=bash shell.

If there is a necessity to set a GLOBAL new created user quota, this is easily done also via adduser.conf. The file allows you to disable certain strings in username from present in new user logins, configure if new users will have their separate directory or belong to a system wide (user group – like in Slackware) and few others. I suggest anyone new to Linux who hears it for a first time check it.

It is maybe worthy to mention in present moment on Ubuntu Linux, by default /etc/adduser.conf, DIR_HOME=700 (is restrictive).
For some new users, who try to configure Apache read /home/[user_dir]/public_html. This could lead to unexplainable errors like:

[Tue Sep 11 10:20:17 2012] [crit] [client 127.0.0.1] (13) Permission denied:/home/syrma/.htaccess pcfg_openfile: unable to check htaccess file, ensure it is readable

This error is due to /home/syrma, improper permissions (Apache) server user (www-data) fails to read /home/syrma directory content and the Apache forked child exits with the respective error.log critical err.

If you get some errors like this, the fix is to just make the directory with readable and executable flag for all users:

# chmod -R 0755 /home/syrma

Selecting Best Wireless channel / Choosing Best Wi-FI channel for Wireless Routers or (How to improve Wireless Network performance)

Monday, February 22nd, 2010

Wireless AP
Below are some valuable advices on Wireless Access Point initial install and configuration to better off your Wireless connection.It’s worthy to note that the 2.4 GHz

Wi-Fi signal range is divided into a number of smaller bands or “channels,” similar to television channels. I decided to run my wireless on channel 12 since this there was no other wireless routers operating on that frequency, though most routers are preconfigured to spread it’s signal on channel 6.

There is a difference in channels available for setup for 802.11b and 802.11g wireless networks in the United States and the European Union. In the USA the wireless channels available are from (1 to 11) whether in the EU it’s in the range of (1-13). Each of the Wireless channels run on a different frequency.

The lower the number of the channel is the lowest the radiating frequence band on which data is transmitted .Subsequently, increasing the channel increases the frequency slightly. Therefore the higher the channel you select on your AP the lesser the overlap with other devices running on the same channel and thus the lesser the possibility to overlap and interference.
It’s quite likely that you experience problems, if you use the default wireless channel which is 6.
If that’s the case it’s recommended to use either channel 1 or channel 11. In case of interference, i.e. overlap with other wireless networks, cellphones etc., there are 2 possible ways to approach the situation. In case of smaller interference, any change in channel on which there is no wireless device running could fix it up. The second way is to choose a wireless channel for your router in between 1,6 or 11 in (The USA) or 1,7,13 in Europe.
Up to 3 networks can run on the same space with minimum interference, therefore it would be a wise idea to check the list of wireless routers in your and check if there are others running on the same frequency.
As I mentioned in the beginning of the post I initially started running my wireless on channel 12, however after I discovered it is recommended to run your wireless router either on channel 1 7 or 13 in Europe I switched my D-Link DI-524 wireless router to transmit it’s signal on Channel 13.

I should testify that after changing the wireless channel, there was quite an improvement in my wireless connection.For instance before I change to Channel 13 (when my wireless internet was still streamed on channel 12) my wireless had constantly issues with disconnects because of low wireless signal.

Back then My wireless located physically in like 35 meters away set in another room, I can see my wireless router hardly connected on like 35%, changing to channel 13 enhanced my connection to the current 60% wireless router availability.

It’s also an interesting fact that Opened Wireless networks had better network thoroughput, so if you’re living in a house with a neighbors a bit distant from your place then you might consider it as a good idea to completely wipe out Wireless Router security encryption and abandon the use of WEP or WPA network encryption.

In case if all of the above is not working for you, you might consider take a close look at your Wireless Wireless LAN pc card and see if there are no any kind of bumps there. Another really interesting fact to know is that many people here in Bulgaria tend to configure there Wireless Access Points on channels either 1,6 or 11 which is quite inadequate considering that we’re in the EU and we should use a wireless channel between 1, 7 or 13 as prescribed for EU citizens.

Another thing not to forget is to place your wireless in a good way and prevent it from interferences with other computer equipment. For example keep the router at least few meters away from PC equipment, printers, scanners, cellphones, microwaves. Also try to put your wireless router on some kind of central place in your home, if you want to have the wireless signal all around your place.

At my place I have a microwave in the Kitchen which is sometimes an obstacle for the Wireless signal to flow properly to my notebook, fortunately this kind of interference happens rare (only when the Microwove is used to warm-up food etc.).Upgrading 802.11b wireless card / router to a better one as 802.11g is a wise idea too. 802.11g are said to be like 5 times faster than 802.11b.

You can expect 802.11b wireless network to transfer maximum between 2-5 Mbp/s whether 802.11g is claimed to transfer at approximately (12 to 23 Mbp/s). If even though the above prescriptions there is no wireless signal at some remote place at your home, you might consider adding a wireless repeater or change the AP router antenna.

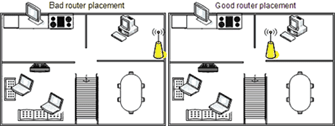
By default wireless Routers are designed to be omni-directional (in other terms they broadcast the wireless signal all around the place. Thus is quite unhandy if you intend to use your Wireless net only in certain room or location at your place. If that’s the case for you, you might consider upgrading to a hi-gain antenna that will focus the wireless signal to an exact direction. Let me close this article with a small diagram taken from the net which illustrates a good router placement that will enable you to have a wwireless connection all over your place.

improve wireless router placement diagram

Improve default picture viewing on Slackware Linux with XFCE as Desktop environment

Saturday, March 17th, 2012

Default XFce picture viewer on Slackware Linux is GIMP (GNU Image Manipulation Program). Though GIMP is great for picture editting, it is rather strange why Patrick Volkerding compiled XFCE to use GIMP as a default picture viewer? The downsides of GIMP being default picture viewing program for Slackware's XFCE are the same like Xubuntu's XFCE risterroro, you can't switch easily pictures back and forward with some keyboard keys (left, right arrow keys, backspace or space etc.). Besides that another disadvantage of using GIMP are;
a) picture opening time in GIMP loading is significantly higher if compared to a simple picture viewer program like Gnome's default, eye of the gnomeeog.

b) GIMP is more CPU intensive and puts high load on each picture opening

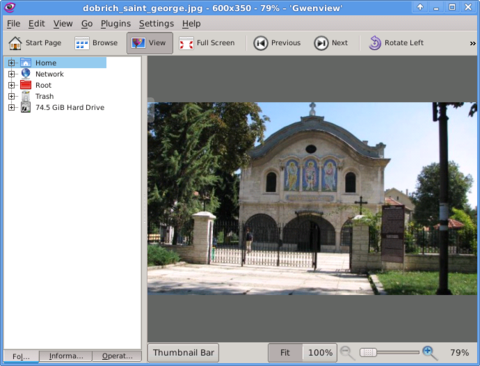
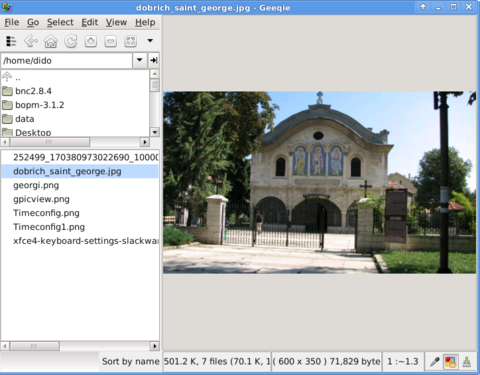
A default Slackware install comes with two good picture viewing programs substitute for GIMP:
 

  • Gwenview

    Gwenview on Slackware Linux picture screenshot XFCE

  •  
  • Geeqie
  • Geeqie Slackware Linux Screenshot XFCE

    Both of the programs support picture changing, so if you open a picture you can switch to the other ones in the same directory as the first opened one.
    I personally liked more Gwenview because it has more intutive picture switching controls. With it you can switch with keyboard keys space and backspace

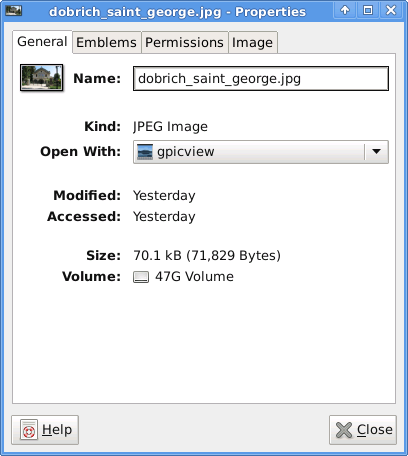
    To change GIMP's default PNG, JPEG opening I had with mouse right button over a pic and in properties change, Open With: program.

    XFCE4 Slackware Linux picture file properties window

    If you're curious about the picture on on all screenshots, this is Church – Saint George (situated in the city center of Dobrich, Bulgaria).
    St. Georgi / St. George Church is built in 1842 and is the oldest Orthodox Church in Dobrich.
    In the Crimean War (1853-1856) the church was burned down and was restored to its present form in 1864.

    gpicview is another cool picture viewing program, I like. Unfortunately on Slackware, there is no prebuild package and the only option is either to convert it with alien from deb package or to download source and compile as usual with ./configure && make && make install .
    Downloading and compiling from source went just fine on Slackware Linux 13.37gpicview has more modern looking interface, than gwenview and geeqie. and is great for people who want to be in pace with desktop fashion 🙂

FreeBSD Jumbo Frames network configuration short how to

Wednesday, March 14th, 2012

FreeBSD Jumbo Frames Howto configure FreeBSD

Recently I wrote a post on how to enable Jumbo Frames on GNU / Linux , therefore I thought it will be useful to write how Jumbo Frames network boost can be achieved on FreeBSD too.

I will skip the details of what is Jumbo Frames, as in the previous article I have thoroughfully explained. Just in short to remind you what is Jumbo Frames and why you might need it? – it is a way to increase network MTU transfer frames from the MTU 1500 to MTU of 9000 bytes

It is interesting to mention that according to specifications, the maximum Jumbo Frames MTU possible for assignment are of MTU=16128
Just like on Linux to be able to take advantage of the bigger Jumbo Frames increase in network thoroughput, you need to have a gigabyt NIC card/s on the router / server.

1. Increasing MTU to 9000 to enable Jumbo Frames "manually"

Just like on Linux, the network tool to use is ifconfig. For those who don't know ifconfig on Linux is part of the net-tools package and rewritten from scratch especially for GNU / Linux OS, whether BSD's ifconfig is based on source code taken from 4.2BSD UNIX

As you know, network interface naming on FreeBSD is different, as there is no strict naming like on Linux (eth0, eth1, eth2), rather the interfaces are named after the name of the NIC card vendor for instance (Intel(R) PRO/1000 NIC is em0), RealTek is rl0 etc.

To set Jumbro Frames Maximum Transmission Units of 9000 on FreeBSD host with a Realtek and Intel gigabyt ethernet cards use: freebsd# /sbin/ifconfig em0 192.168.1.2 mtu 9000
freebsd# /sbin/ifconfig rl0 192.168.2.2 mtu 9000

!! Be very cautious here, as if you're connected to the system remotely over ssh you might loose connection to it because of broken routing.

To prevent routing loss problems, if you're executing the above two commands remotely, you better run them in GNU screen session:

freebsd# screen
freebsd# /sbin/ifconfig em0 192.168.1.2 mtu 9000; /sbin/ifconfig rl0 192.168.1.2 mtu 9000; \
/etc/rc.d/netif restart; /etc/rc.d/routed restart

2. Check MTU settings are set to 9000

If everything is fine the commands will return empty output, to check further the MTU is properly set to 9000 issue:

freebsd# /sbin/ifconfig -a|grep -i em0em0: flags=8843<UP,BROADCAST,RUNNING,SIMPLEX,MULTICAST> metric 0 mtu 9000freebsd# /sbin/ifconfig -a|grep -i rl0
rl0: flags=8843<UP,BROADCAST,RUNNING,SIMPLEX,MULTICAST> metric 0 mtu 9000

3. Reset routing for default gateway

If you have some kind of routing assigned for em0 and rl0, network interfaces they will be affected by the MTU change and the routing will be gone. To reset the routing to the previously properly assigned routing, you have to restart the BSD init script taking care for assigning routing on system boot time:

freebsd# /etc/rc.d/routing restart
default 192.168.1.1 done
add net default: gateway 192.168.1.1
Additional routing options: IP gateway=YES.

4. Change MTU settings for NIC card with route command

There is also a way to assign higher MTU without "breaking" the working routing, e.g. avoiding network downtime with bsd route command:

freebsd# grep -i defaultrouter /etc/rc.conf
defaultrouter="192.168.1.1"
freebsd# /sbin/route change 192.168.1.1 -mtu 9000
change host 192.168.1.1

5. Finding the new MTU NIC settings on the FreeBSD host

freebsd# /sbin/route -n get 192.168.1.1
route to: 192.168.1.1
destination: 192.168.1.1
interface: em0
flags: <UP,HOST,DONE,LLINFO,WASCLONED>
recvpipe sendpipe ssthresh rtt,msec rttvar hopcount mtu expire
0 0 0 0 0 0 9000 1009

6. Set Jumbo Frames to load automatically on system load

To make the increased MTU to 9000 for Jumbo Frames support permanent on a FreeBSD system the /etc/rc.conf file is used:

The variable for em0 and rl0 NICs are ifconfig_em0 and ifconfig_rl0.
The lines to place in /etc/rc.conf should be similar to:

ifconfig_em0="inet 192.168.1.1 netmask 255.255.255.0 media 1000baseTX mediaopt half-duplex mtu 9000"

Change in the above lines the gateway address 192.168.1.1 and the netmask 255.255.255.0 to yours corresponding gw and netmask.
Also in the above example you see the half-duplex ifconfig option is set insetad of full-duplex in order to prevent some duplex mismatches. A full-duplex could be used instead, if you're completely sure on the other side of the host is configured to support full-duplex connections. Otherwise if you try to set full-duplex with other side set to half-duplex or auto-duplex a duplex mismatch will occur. If this happens insetad of taking the advantage of the Increase Jumbo Frames MTU the network connection could become slower than originally with standard ethernet MTU of 1500. One other bad side if you end up with duplex-mismatch could be a high number of loss packets and degraded thoroughout …

7. Setting Jumbo Frames for interfaces assigning dynamic IP via DHCP

If you need to assign an MTU of 9000 for a gigabyt network interfaces, which are receiving its TCP/IP network configuration over DHCP server.
First, tell em0 and rl0 network interfaces to dynamically assign IP addresses via DHCP proto by adding in /etc/rc.conf:

ifconfig_em0="DHCP"
ifconfig_rl0="DHCP"

Secondly make two files /etc/start_if.em0 and /etc/start_if.rl0 and include in each file:

ifconfig em0 media 1000baseTX mediaopt full-duplex mtu 9000
ifconfig rl0 media 1000baseTX mediaopt full-duplex mtu 9000

Copy / paste in root console:

echo 'ifconfig em0 media 1000baseTX mediaopt full-duplex mtu 9000' >> /etc/start_if.em0
echo 'ifconfig rl0 media 1000baseTX mediaopt full-duplex mtu 9000' >> /etc/start_if.rl0

Finally, to load the new MTU for both interfaces, reload the IPs with the increased MTUs:

freebsd# /etc/rc.d/routing restart
default 192.168.1.1 done
add net default: gateway 192.168.1.1

8. Testing if Jumbo Frames is working correctly

To test if an MTU packs are transferred correctly through the network you can use ping or tcpdumpa.) Testing Jumbo Frames enabled packet transfers with tcpdump

freebsd# tcpdump -vvn | grep -i 'length 9000'

You should get output like:

16:40:07.432370 IP (tos 0x0, ttl 50, id 63903, offset 0, flags [DF], proto TCP (6), length 9000) 192.168.1.2.80 > 192.168.1.1.60213: . 85825:87285(1460) ack 668 win 14343
16:40:07.432588 IP (tos 0x0, ttl 50, id 63904, offset 0, flags [DF], proto TCP (6), length 9000) 192.168.1.2.80 > 192.168.1.1.60213: . 87285:88745(1460) ack 668 win 14343
16:40:07.433091 IP (tos 0x0, ttl 50, id 63905, offset 0, flags [DF], proto TCP (6), length 9000) 192.168.1.2.80 > 192.168.1.1.60213: . 23153:24613(1460) ack 668 win 14343
16:40:07.568388 IP (tos 0x0, ttl 50, id 63907, offset 0, flags [DF], proto TCP (6), length 9000) 192.168.1.2.80 > 192.168.1.1.60213: . 88745:90205(1460) ack 668 win 14343
16:40:07.568636 IP (tos 0x0, ttl 50, id 63908, offset 0, flags [DF], proto TCP (6), length 9000) 192.168.1.2.80 > 192.168.1.1.60213: . 90205:91665(1460) ack 668 win 14343
16:40:07.569012 IP (tos 0x0, ttl 50, id 63909, offset 0, flags [DF], proto TCP (6), length 9000) 192.168.1.2.80 > 192.168.1.1.60213: . 91665:93125(1460) ack 668 win 14343
16:40:07.569888 IP (tos 0x0, ttl 50, id 63910, offset 0, flags [DF], proto TCP (6), length 9000) 192.168.1.2.80 > 192.168.1.1.60213: . 93125:94585(1460) ack 668 win 14343

b.) Testing if Jumbo Frames are enabled with ping

Testing Jumbo Frames with ping command on Linux

linux:~# ping 192.168.1.1 -M do -s 8972
PING 192.168.1.1 (192.168.1.1) 8972(9000) bytes of data.
9000 bytes from 192.168.1.1: icmp_req=1 ttl=52 time=43.7 ms
9000 bytes from 192.168.1.1: icmp_req=2 ttl=52 time=43.3 ms
9000 bytes from 192.168.1.1: icmp_req=3 ttl=52 time=43.5 ms
9000 bytes from 192.168.1.1: icmp_req=4 ttl=52 time=44.6 ms
--- 192.168.0.1 ping statistics ---
4 packets transmitted, 4 received, 0% packet loss, time 3003ms
rtt min/avg/max/mdev = 2.397/2.841/4.066/0.708 ms

If you get insetad an an output like:

From 192.168.1.2 icmp_seq=1 Frag needed and DF set (mtu = 1500)

--- 192.168.1.1 ping statistics ---
0 packets transmitted, 0 received, +4 errors

This means a packets with maximum MTU of 1500 could be transmitted and hence something is not okay with the Jumbo Frames config.
Another helpful command in debugging MTU and showing which host in a hop queue support jumbo frames is Linux's traceroute

To debug a path between host and target, you can use:

linux:~# traceroute --mtu www.google.com
...

If you want to test the Jumbo Frames configuration from a Windows host use ms-windows ping command like so:

C:\>ping 192.168.1.2 -f -l 8972
Pinging 192.168.1.2 with 8972 bytes of data:
Reply from 192.168.1.2: bytes=8972 time=2ms TTL=255
Ping statistics for 192.168.1.2:
Packets: Sent = 4, Received = 4, Lost = 0 (0% loss),
Approximate round trip times in milli-seconds:
Minimum = 2ms, Maximum = 2ms, Average = 2ms

Here -l 8972 value is actually equal to 9000. 8972 = 9000 – 20 (20 byte IP header) – 8 (ICMP header)
Recommended logrorate practices on heavy loaded (busy) Apache Linux servers

Wednesday, March 7th, 2012

Apache logrotate Debian good configuration for heavy loaded servers

If you are sys admin of Apache Webserver running on Debian Linux relying on logrorate to rorate logs, you might want to change the default way logroration is done.

Little changes in the way Apache log files are served on busy servers can have positive outcomes on the overall way the server CPU units burden. A good logrotation strategy can also prevent your server from occasional extra overheads or downtimes.

The way Debian GNU / Linux process logs is well planned for small servers, however the default logroration Apache routine doesn't fit well for servers which process millions of client requests each day.

I happen to administrate, few servers which are constantly under a heavy load and have occasionally overload troubles because of Debian's logrorate default mechanism.

To cope with the situation I have made few modifications to /etc/logrorate.d/apache2 and decided to share it here hoping, this might help you too.

1. Rotate Apache acccess.log log file daily instead of weekly

On Debian Apache's logrorate script is in /etc/logrotate.d/apache2

The default file content will be like so like so:

debian:~# cat /etc/logrotate.d/apache2
/var/log/apache2/*.log {
weekly
missingok
rotate 52
size 1G
compress
delaycompress
notifempty
create 640 root adm
sharedscripts
postrotate
if [ -f "`. /etc/apache2/envvars ; echo ${APACHE_PID_FILE:-/var/run/apache2.pid}`" ]; then
/etc/init.d/apache2 reload > /dev/null
fi
endscript
}

To change the rotation from weekly to daily change:

weekly

to

#weekly

2. Disable access.log log file gzip compression

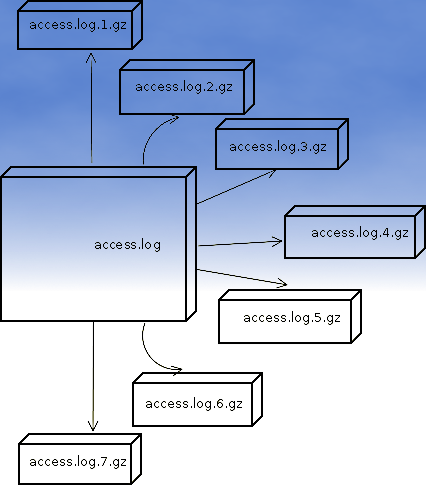
By default apache2 logrotate script is tuned ot make compression of rotated file (exmpl: copy access.log to access.log.1 and gzip it, copy access.log to access.log.2 and gzip it etc.). On servers where logs are many gigabytes, once logrotate initiates its scheduled work it will have to compress an enormous log record of apache requests. On very busy Apache servers from my experience, just for a day the log could grow up to approximately 8 / 10 Gigabytes.
I'm sure there are more busy servers out there, which log files are growing to over 100GB for just a single day.
Gzipping a 100GB file piece takes an enormous load on the CPU, as well as often takes long time. When this logrotation gzipping occurs at a moment where the servers CPU cores are already heavy loaded from Apache serving HTTP requests, Apache server becomes inaccessible to most of the clients.
Then for end clients various oddities are experienced, for example Apache dropped connection errors, webserver returning empty pages, or simply inability to respond to the client browser.
Sometimes as a result of the overload, even secure shell connection to SSHD to the server is impossible …

To prevent your server from this roration overloads remove logrorate's default access.log gzipping by commenting:

compress

to

#comment

3. Change maximum log roration by logrorate to be up to 30

By default logrorate is configured to create and keep up to 52 rotated and gzipped access.log files, changing this to a lower number is a good practice (in my view), in cases where log files grow daily to 10 or more GBs. Doing so will save a lot of disk space and reduce the chance the hard disk gets filled in because of the multiple rorated ungzipped enormous access.log files.

To tune the default keep max rorated logs to 30, change:

rotate 52

to rotate 30

The way logrorate's apache log processing on RHEL / CentOS Linux is working better on high load servers, by default on CentOS logrorate is not configured to do log gzipping at all.

Here is the default /etc/logrorate.d/httpd script for
CentOS release 5.6 (Final)

[hipo@centos httpd]$ cat /etc/logrotate.d/httpd /var/log/httpd/*log {
missingok
notifempty
sharedscripts
postrotate
/bin/kill -HUP `cat /var/run/httpd.pid 2>/dev/null` 2> /dev/null || true
endscript
}


Knowing Not! :]

Monday, January 22nd, 2007

Today I have Marketing exam. Ofcourse as usual when I have exams I haven’t studied enough, and again I’m in the situation realizing I don’t know anything. I depend 100% on God’s grace to take that exam. Why I’m so dumb never study when

I have what I have. I can’t change my self I can’t study something I’m not interested into. Marketing is a subject which is simple but for Jerks IMHO :]. The logic of marketing is too abstract.

And yes what’s happening with me the last days. Well I’m feeling good now Praise the Lord. I’ve no idea what I should do with my life. I have 2 re-exams for now or maybe 3 ( I don’t know the results from the Research & Statistics Exam ).

The last few days I ran FreeDOS and Windows 2000 Pro SP4 under FreeBSD 6.2 with qemu. FreeDOS’s performance is very nice despite the fact it is emulated. The Windows is running a little laggish although I ran it with kqemu ( Experimental Module for qemu which enhances the typical qemu speed ). Yesterday we drink a dark beer with Nomen into the “Happy Person” Pub. My passion for computers is starting to come back again.

Cheated on the International Law Exam

Friday, January 26th, 2007

Well Praise the LORD. I was able to cheat today on the International Law exam. I know this is not very christian but you know. I was ill and in the end why should I know by heart things that I don’t know in my daily life. The exam continued for 2 hours. After that I went home, because I had to upload the file data and sql data of one new domain we started hosting today http://eurohold.bg. Everything in uploading file data and sql data went smoothly. After that I did a change in the DNS for the planex.bg domain to use their own mail server. And right now I’m trying to emulate some sort of DEC machine with homerx, but I can’t find out the password for it. Will google around to check about it. Today I feel much better than yesterday, well thanks God you rule! Blessings in the name of Jesus Christ 😛