Posts Tagged ‘CentOS’

Fix eth changing network interface names from new Linux naming scheme ens, eno, em1 to legacy eth0, eth1, eth2 on CentOS Linux

Thursday, January 16th, 2020

Change-systemd-Linux-servers-network-interface-name-ensxx-to-eth0-copy

On CentOS / RHEL 7 / Fedora 19+ and other Linux distributions, the default network eth0, eth1 .. interface naming scheme has been changed and in newer Linux kernels OS-es to names such as – ens3 , eno1, enp5s2, em1 etc.,  well known old scheme for eth* is now considered a legacy.
This new Network card naming in Linux OS is due to changes made in Kernel / modules and udev  rules which resembles how Ethernet ifaces are named on other UNIX like systems.
The weird name is taken depending on the Hardware Network card vendor name and is a standard for years in FreeBSD and Mac OSX, however this was not so over the years,
so for old school sysadmins that's pretty annoying as, we're much used to the eth0 / eth1 / eth2 / eth3 naming standard which brought some clearness on the network card naming.

Also for systems which are upgraded from old Linux OS distro releases to a newer ones, that includes this great new "cool" feature, that fits so well the New age-of computing Cloud craziness.
That behaviour could create a number of problems, especially if the already Production working servers due to failure to bring up some of the network devices after the upgrade or, even if you fix that by editting the /etc/network* / etc/sysconfig/networking/* by hand still there is even more stuff that won't work properly, such as any custom made iptables / ipset firewalls rules, or any kind of custom used third party Shell / Perl scripts that depend on the old-school conventional and (convenient easy to remember!!!) eth0, eth2 etc. naming


For sysadmins who are using some kind of Application Clustering with something like corosync / pacemaker this new fuzzy improvement makes things even worse as having a changed interface name of the card will break the cluster …


1. Get list of the LAN Card Server hardware


To get a better view on the server installed and recognized LAN Cards use lspci / dmidecode commands:

 lspci |grep -i Ether -A1 -B1
01:00.4 USB controller: Hewlett-Packard Company Integrated Lights-Out Standard Virtual USB Controller (r                                                                                                           ev 03)
02:00.0 Ethernet controller: Broadcom Inc. and subsidiaries NetXtreme BCM5719 Gigabit Ethernet PCIe (rev                                                                                                            01)
02:00.1 Ethernet controller: Broadcom Inc. and subsidiaries NetXtreme BCM5719 Gigabit Ethernet PCIe (rev                                                                                                            01)
02:00.2 Ethernet controller: Broadcom Inc. and subsidiaries NetXtreme BCM5719 Gigabit Ethernet PCIe (rev                                                                                                            01)
02:00.3 Ethernet controller: Broadcom Inc. and subsidiaries NetXtreme BCM5719 Gigabit Ethernet PCIe (rev                                                                                                            01)
03:00.0 RAID bus controller: Hewlett-Packard Company Smart Array Gen9 Controllers (rev 01)
05:00.0 Ethernet controller: Broadcom Inc. and subsidiaries NetXtreme BCM5719 Gigabit Ethernet PCIe (rev                                                                                                            01)
05:00.1 Ethernet controller: Broadcom Inc. and subsidiaries NetXtreme BCM5719 Gigabit Ethernet PCIe (rev                                                                                                            01)
05:00.2 Ethernet controller: Broadcom Inc. and subsidiaries NetXtreme BCM5719 Gigabit Ethernet PCIe (rev                                                                                                            01)
05:00.3 Ethernet controller: Broadcom Inc. and subsidiaries NetXtreme BCM5719 Gigabit Ethernet PCIe (rev                                                                                                            01)
7f:08.0 System peripheral: Intel Corporation Xeon E7 v3/Xeon E5 v3/Core i7 QPI Link 0 (rev 02)


lspci reports all attached LAN Cards to server which are plugged in on the Motherbord, since that specific server has a Motherboard integrated LAN Adapters too, we can see this one
via dmidecode.

# dmidecode |grep -i Ether -A 5 -B 5

Handle 0x00C5, DMI type 41, 11 bytes
Onboard Device
        Reference Designation: Embedded LOM 1 Port 3
        Type: Ethernet
        Status: Enabled
        Type Instance: 3
        Bus Address: 0000:XX:00.X

Handle 0x00C6, DMI type 41, 11 bytes
Onboard Device
        Reference Designation: Embedded LOM 1 Port 4
        Type: Ethernet
        Status: Enabled
        Type Instance: 4
        Bus Address: 0000:0X:00.X

Handle 0x00C7, DMI type 41, 11 bytes


       Strings:
                PciRoot(0x0)/Pci(0x2,0x0)/Pci(0x0,0x0)
                NIC.Slot.2.1
                HP Ethernet 1Gb 4-port 331T Adapter – NIC
                Slot 2

Handle 0x00E3, DMI type 203, 34 bytes
OEM-specific Type
        Header and Data:


The illustrate the eth0 changing name issue, here is example taken from server on how eth1 interface is named on a new CentOS install:
 

# ip addr show

…..
eno1: [BROADCAST,MULTICAST,UP,LOWER_UP] mtu 1500 qdisc pfifo_fast state UP qlen 1000
link/ether 6c:0b:84:6c:48:1c brd ff:ff:ff:ff:ff:ff
inet 10.10.9.5/24 brd 10.10.9.255 scope global eno1
inet6 2606:b400:c00:48:6e0b:84ff:fe6c:481c/128 scope global dynamic
valid_lft 2326384sec preferred_lft 339184sec
inet6 fe80::6e0b:84ff:fe6c:481c/64 scope link
valid_lft forever preferred_lft forever


2. Disable Network Manager on the server


To prevent potential problems for future with randomly changing Network card names order on reboots and other mess,
it is generally a good idea to disable Network Manager.


# systemctl disable NetworkManager
rm '/etc/systemd/system/multi-user.target.wants/NetworkManager.service'
rm '/etc/systemd/system/dbus-org.freedesktop.NetworkManager.service'
rm '/etc/systemd/system/dbus-org.freedesktop.nm-dispatcher.service'


3. Check and correct network configuration if necessery in  /etc/sysconfig/network-scripts/ifcfg-*


Either fix the naming across all files ifcfg-* to match eth0 / eth1 / ethXX or even better both change the NAME and DEVICE in files and completely rename the files ifcfg-eno1 to ifcfg-eth1 ..
ifcfg-enoXX to ifcfg-ethXX
 

server:~# cat /etc/sysconfig/network-scripts/ifcfg-eno1
……
NAME=eth0
DEVICE=eth0
……


4. Fix the interface scheme naming through passing a GRUB boot parameter to Kernel


a. Create backup of /etc/default/grub
 

cp -rpf /etc/default/grub /etc/default/grub_bak_date +"%Y_%m_%Y"


b. Edit /etc/default/grub

c. Find config parameter GRUB_CMDLINE_LINUX

d. Add net.ifnames=0 biosdevname=0 to the line


net.ifnames=0 biosdevname=0


After the change the line should look like

GRUB_CMDLINE_LINUX=" crashkernel=auto net.ifnames=0 biosdevname=0 rhgb quiet"


e. Regenerate GRUB loader to have included the new config

server:~# grub2-mkconfig -o /boot/grub2/grub.cfg

f. Reboot the sytem
 

server:~# shutdown -r now


5. Fix auto-generated inconvenient naming by modifying udev rules

The Mellanox Ehternet server card vendor's workaround to the ever changing eth names is modify udev rules to be able to have the ordinary eth0 / eth1 / eth2 … Lan card name scheme.
In short this is recommended for Mellanox but should work on any other Lan card device attached on a Linux powered server.
 

# cat /etc/sysconfig/network-scripts/ifcfg-eth1
DEVICE="eth1"
BOOTPROTO="static"
HWADDR="7c:fe:90:cb:76:02"
IPADDR=10.10.9.2
NETMASK=255.255.255.0
ONBOOT="yes"


# cat /etc/sysconfig/network-scripts/ifcfg-eth2
DEVICE="eth1"
BOOTPROTO="static"
HWADDR="7c:fe:90:cb:76:02"
IPADDR=10.10.99.99
NETMASK=255.255.255.0
ONBOOT="yes"


# vi /etc/udev/rules.d/70-persistent-net.rules

SUBSYSTEM=="net", ACTION=="add", DRIVERS=="?*", ATTR{address}=="7c:fe:90:cb:76:02", ATTR{dev_id}=="0x0", ATTR{type}=="1", KERNEL=="eth*", NAME="eth1"

SUBSYSTEM=="net", ACTION=="add", DRIVERS=="?*", ATTR{address}=="7c:fe:90:cb:76:03", ATTR{dev_id}=="0x0", ATTR{type}=="1", KERNEL=="eth*", NAME="eth2"


Next step is to reboot.
 

# /sbin/reboot


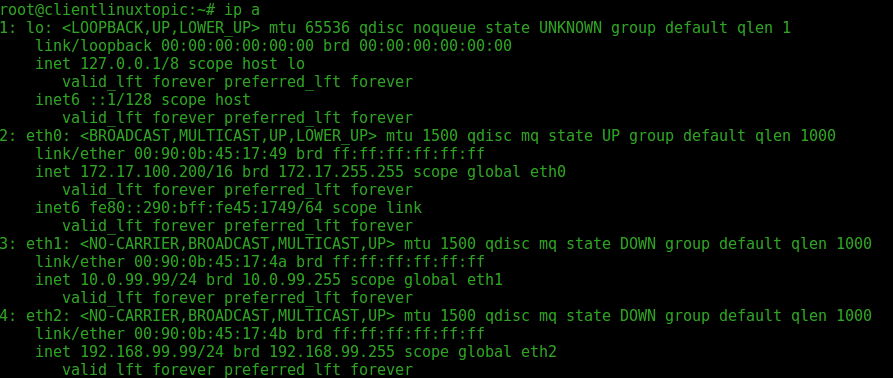
After a while when the server boots check with ip or ifconfig the configuration to make sure the ethXX ordering is proper again.

interface-list-eth1-eth2-screenshot

# /sbin/ifconfig eth1
eth1: flags=4163<UP,BROADCAST,RUNNING,MULTICAST> mtu 1500
inet 10.0.99.99 netmask 255.255.255.0 broadcast 10.10.9.255
inet6 fe80::7efe:90ff:fecb:7602 prefixlen 64 scopeid 0x20<link>
ether 7c:fe:90:cb:76:02 txqueuelen 1000 (Ethernet)
RX packets 0 bytes 0 (0.0 B)
RX errors 0 dropped 0 overruns 0 frame 0
TX packets 23 bytes 3208 (3.1 KiB)
TX errors 0 dropped 0 overruns 0 carrier 0 collisions 0
eth2: flags=4099<UP,BROADCAST,MULTICAST> mtu 1500
ether 7c:fe:90:cb:76:03 txqueuelen 1000 (Ethernet)
RX packets 0 bytes 0 (0.0 B)
RX errors 0 dropped 0 overruns 0 frame 0
TX packets 0 bytes 0 (0.0 B)
TX errors 0 dropped 0 overruns 0 carrier 0 collisions 0

On some Linux distributions, if it happens this udev extra configuration is not venerated, use net.ifnames=0 biosdevname=0 grub configuration.

6. Verify eth interfaces are present    

# ip addr show

…..

eth0: [BROADCAST,MULTICAST,UP,LOWER_UP] mtu 1500 qdisc pfifo_fast state UP qlen 1000

link/ether 6c:0b:84:6c:48:1c brd ff:ff:ff:ff:ff:ff

inet 10.10.9.5/24 brd 10.10.9.255 scope global eno1

inet6 2606:b400:c00:48:6e0b:84ff:fe6c:481c/128 scope global dynamic

valid_lft 2326384sec preferred_lft 339184sec

inet6 fe80::6e0b:84ff:fe6c:481c/64 scope link

valid_lft forever preferred_lft forever

That's all this should put an end to the annoying auto generated naming lan device naming.


Summary


So what was explained up was how to resolve problems caused by autogenerated ethernet interface cards by a new functionality in the Linux kernel, so Network cards are again visible via ip address show / ifconfig again in a proper order eth0 / eth1 / eth2 / eth3 etc. instead of a vendor generated cryptic names as ens / eno / em etc. This is possible via either by editing udev rules or grub configuration. Doing so saves nerves and makes sysadmin life better, at least it did mine.
That's all this should put an end to the annoying auto generated naming.
 

How to install jcmd on CentOS 7 to diagnose running Java Virtual Machine crashing applications

Tuesday, January 14th, 2020

how-to-install-jcmd-centos-jcdm-java-logo-1

jcmd utility is well known in the Brane New wonderful world of Java but if you're like me a classical old school sysadmins and non-java developer you probably never heard it hence before going straight into how to install it on CentOS 7 Linux servers, I'll shortly say few words on what it is.
jcmd is used to send diagnostic requests to running Java Virtual Machine (JVM) it is available in both in Oracle Java as well as OpenJDK.
The requests jcmd sends to VM are based on the running Java PID ID and are pretty useful for controlling Java Flight Recordings, troubleshoot, and diagnose JVM and Java Applications. It must be used on the same machine where the JVM is running.

 Used without arguments or with the -l option, jcmd prints the list of running Java processes with their process id, their main class and their command line arguments.
When a main class is specified on the command line, jcmd sends the diagnostic command request to all Java processes for which the command line argument is a substring of the Java process' main class.
jcmd could be useful if the JConsoleJMX (Java Management Extensions) can't be used for some reason on the server or together with Java Visual VM (visual interface for viewing detailed info about Java App).

In most Linux distributionsas as  of year 2020 jcmd is found in  java-*-openjdk-headless.

To have jcmd on lets say Debian GNU / Linux, you're up to something like:


apt-get install –yes openjdk-12-jdk-headless
 

or

apt-get install openjdk-11-jdk-headless
however in CentOS
7 jcmd is not found in java*openjdk*headless but instead to have it on server, thus it take me a while to look up where it is foundso after hearing
from some online post it is part of package java*openjdk*devel* to make sure this so true, I've used the  –download-only option
 

 yum install –downloadonly –downloaddir=/tmp java-1.8.0-openjdk-devel


So the next question was how to inspect the downloaded rpm package into /tmp usually, this is possible via Midnight Commander (mc) easily to view contents, however as this
server did not have installed mc due to security policies I had to do it differently after pondering a while on how to to list the RPM package file content come up using following command


 rpm2cpio java-1.8.0-openjdk-devel-1.8.0.232.b09-0.el7_7.x86_64.rpm |cpio -idmv|grep -i jcmd|less


To then install  java-1.8.0-openjdk-devel-1.8.0.232.b09-0.el7_7.x86_64.rpm to do so run:


yum -y install  java-1.8.0-openjdk-devel-1.8.0*


Once the jcmd, I've created the following bash script  that was set that was tracking for application errors and checking whether the JBoss application server pool-available-count is not filled up and hence jboss refuses to serve connections  through jboss-cli.sh query automatically launching jcmd to get various diagnostic data about Java Virtual Machine (e.g. a running snapshot) – think of it like the UNIX top for debugging or Windows System Monitor but run one time. 


# PID_OF_JAVA=$(pgrep -l java)
# jcmd $PID_OF_JAVA GC.heap_dump GC.heap_dump_file-$(date '+%Y-%m-%d_%H-%M-%S').jfr
# jcmd $PID_OF_JAVA Thread.print > Thread.print-$(date '+%Y-%m-%d_%H-%M-%S').jfr


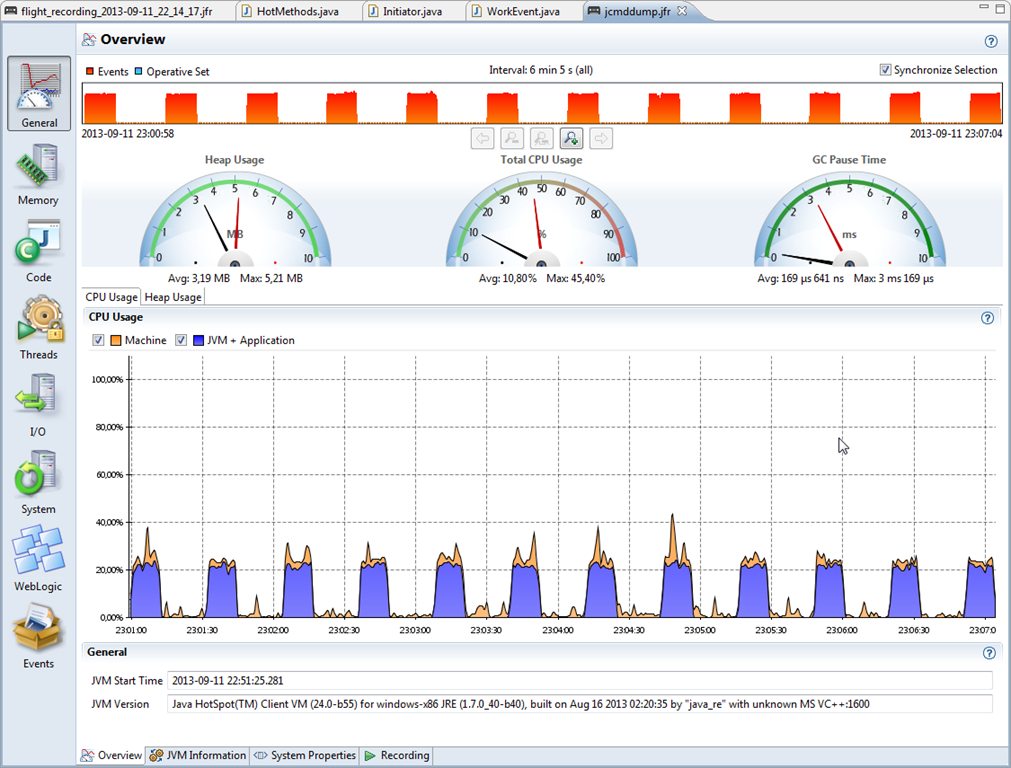
The produced log files can then be used by the developer to visualize some Java specific stuff "Flight recordings" like in below screenshot:

jcmd-java-tool-dump-jfr-flight-recordings-visualized-java 

If you're interested on some other interesting tools that can be used to Monitor  and Debug a Running Java VM take a look at Java's official documentation Monitoring Tools.
So that's all Mission Accomplished 🙂 Now the Java Application developer could observe the log and tell why exactly the application crashed after the multitude of thrown Exceptions in the JBoss server.log.

Ansible Quick Start Cheatsheet for Linux admins and DevOps engineers

Wednesday, October 24th, 2018

ansible-quick-start-cheetsheet-ansible-logo

Ansible is widely used (Configuration management, deployment, and task execution system) nowadays for mass service depoyments on multiple servers and Clustered environments like, Kubernetes clusters (with multiple pods replicas) virtual swarms running XEN / IPKVM virtualization hosting multiple nodes etc. .

Ansible can be used to configure or deploy GNU / Linux tools and services such as Apache / Squid / Nginx / MySQL / PostgreSQL. etc. It is pretty much like Puppet (server / services lifecycle management) tool , except its less-complecated to start with makes it often a choose as a tool for mass deployment (devops) automation.

Ansible is used for multi-node deployments and remote-task execution on group of servers, the big pro of it it does all its stuff over simple SSH on the remote nodes (servers) and does not require extra services or listening daemons like with Puppet. It combined with Docker containerization is used very much for later deploying later on inside Cloud environments such as Amazon AWS / Google Cloud Platform / SAP HANA / OpenStack etc.

Ansible-Architechture-What-Is-Ansible-Edureka

0. Instaling ansible on Debian / Ubuntu Linux


Ansible is a python script and because of that depends heavily on python so to make it running, you will need to have a working python installed on local and remote servers.

Ansible is as easy to install as running the apt cmd:


# apt-get install –yes ansible
 

The following additional packages will be installed:
  ieee-data python-jinja2 python-kerberos python-markupsafe python-netaddr python-paramiko python-selinux python-xmltodict python-yaml
Suggested packages:
  sshpass python-jinja2-doc ipython python-netaddr-docs python-gssapi
Recommended packages:
  python-winrm
The following NEW packages will be installed:
  ansible ieee-data python-jinja2 python-kerberos python-markupsafe python-netaddr python-paramiko python-selinux python-xmltodict python-yaml
0 upgraded, 10 newly installed, 0 to remove and 1 not upgraded.
Need to get 3,413 kB of archives.
After this operation, 22.8 MB of additional disk space will be used.

apt-get install –yes sshpass


Installing Ansible on Fedora Linux is done with:


# dnf install ansible –yes sshpass


On CentOS to install:
 

# yum install ansible –yes sshpass

sshpass needs to be installed only if you plan to use ssh password prompt authentication with ansible.

Ansible is also installable via python-pip tool, if you need to install a specific version of ansible you have to use it instead, the package is available as an installable package on most linux distros.

Ansible has a lot of pros and cons and there are multiple articles already written on people for and against it in favour of Chef or Puppet As I recently started learning Ansible. The most important thing to know about Ansible is though many of the things can be done directly using a simple command line, the tool is planned for remote installing of server services using a specially prepared .yaml format configuration files. The power of Ansible comes of the use of Ansible Playbooks which are yaml scripts that tells ansible how to do its activities step by step on remote server. In this article, I'm giving a quick cheat sheet to start quickly with it.
 

1. Remote commands execution with Ansible
 

First thing to do to start with it is to add the desired hostnames ansible will operate with it can be done either globally (if you have a number of remote nodes) to deploy stuff periodically by using /etc/ansible/hosts or use a custom host script for each and every ansible custom scripts developed.

a. Ansible main config files

A common ansible /etc/ansible/hosts definition looks something like that:


# cat /etc/ansible/hosts
[mysqldb]
10.69.2.185
10.69.2.186
[master]
10.69.2.181
[slave]
10.69.2.187
[db-servers]
10.69.2.181
10.69.2.187
[squid]
10.69.2.184

Host to execute on can be also provided via a shell variable $ANSIBLE_HOSTS
b) is remote hosts reachable / execute commands on all remote host

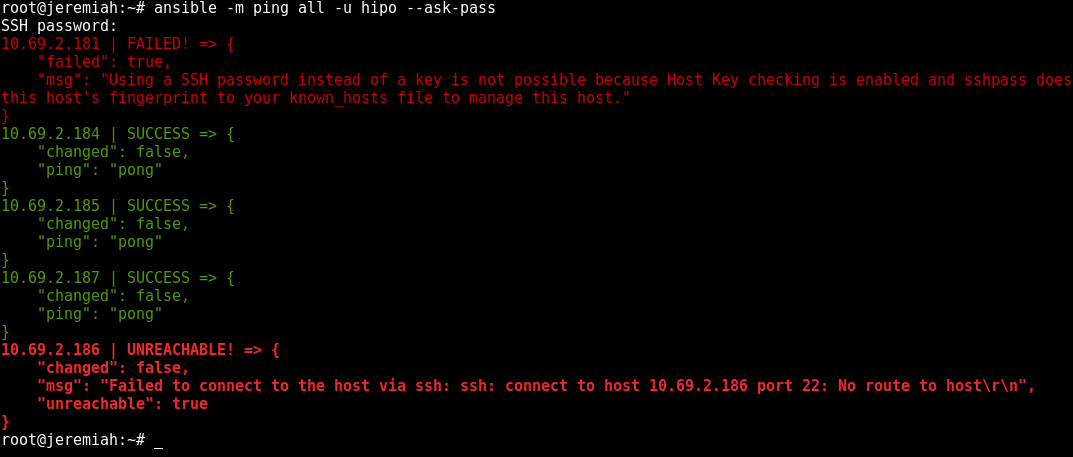
To test whether hour hosts are properly configure from /etc/ansible/hosts you can ping all defined hosts with:


ansible all -m ping

ansible-check-hosts-ping-command-screenshot

This makes ansible try to remote to remote hosts (if you have properly configured SSH public key authorization) the command should return success statuses on every host.


ansible all -a "ifconfig -a"


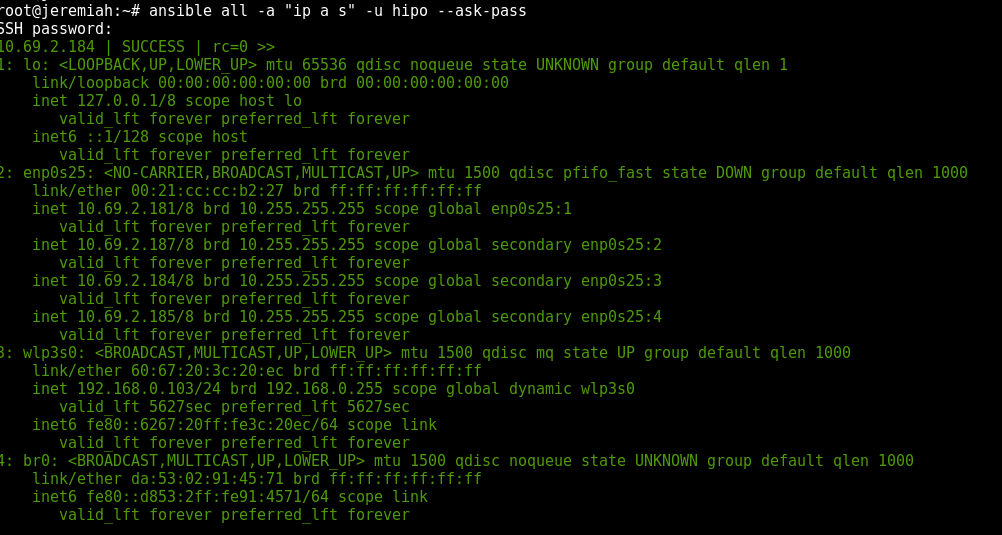
If you don't have SSH keys configured you can also authenticate with an argument (assuming) all hosts are configured with same password with:


ansible all –ask-pass -a "ip all show" -u hipo –ask-pass

ansible-show-ips-ip-a-command-screenshot-linux

If you have configured group of hosts via hosts file you can also run certain commands on just a certain host group, like so:


ansible <host-group> -a <command>

It is a good idea to always check /etc/ansible/ansible.cfg which is the system global (main red ansible config file).

c) List defined host groups
 

ansible localhost -m debug -a 'var=groups.keys()'
ansible localhost -m debug -a 'var=groups'

d) Searching remote server variables


# Search remote server variables
ansible localhost -m setup -a 'filter=*ipv4*'


ansible localhost -m setup -a 'filter=ansible_domain'


ansible all -m setup -a 'filter=ansible_domain'


# uninstall package on RPM based distros
ansible centos -s -m yum -a "name=telnet state=absent"
# uninstall package on APT distro
ansible localhost -s -m apt -a "name=telnet state=absent"


2. Debugging – Listing information about remote hosts (facts) and state of a host


# All facts for one host
ansible -m setup
  # Only ansible fact for one host
ansible
-m setup -a 'filter=ansible_eth*'
# Only facter facts but for all hosts
ansible all -m setup -a 'filter=facter_*'


To Save outputted information per-host in separate files in lets say ~/ansible/host_facts


ansible all -m setup –tree ~/ansible/host_facts


3. Playing with Playbooks deployment scripts


a) Syntax Check of a playbook yaml


ansible-playbook –syntax-check


b) Run General Infos about a playbook such as get what a playbook would do on remote hosts (tasks to run) and list-hosts defined for a playbook (like above pinging).


ansible-playbook –list-hosts
ansible-playbook
–list-tasks


To get the idea about what an yaml playbook looks like, here is example from official ansible docs, that deploys on remote defined hosts a simple Apache webserver.


– hosts: webservers
  vars:
    http_port: 80
    max_clients: 200
  remote_user: root
  tasks:
  – name: ensure apache is at the latest version
    yum:
      name: httpd
      state: latest
  – name: write the apache config file
    template:
      src: /srv/httpd.j2
      dest: /etc/httpd.conf
    notify:
    – restart apache
  – name: ensure apache is running
    service:
      name: httpd
      state: started
  handlers:
    – name: restart apache
      service:
        name: httpd
        state: restarted

To give it a quick try save the file as webserver.yml and give it a run via ansible-playbook command
 

ansible-playbook -s playbooks/webserver.yml


The -s option instructs ansible to run play on remote server with super user (root) privileges.

The power of ansible is its modules, which are constantly growing over time a complete set of Ansible supported modules is in its official documenation.
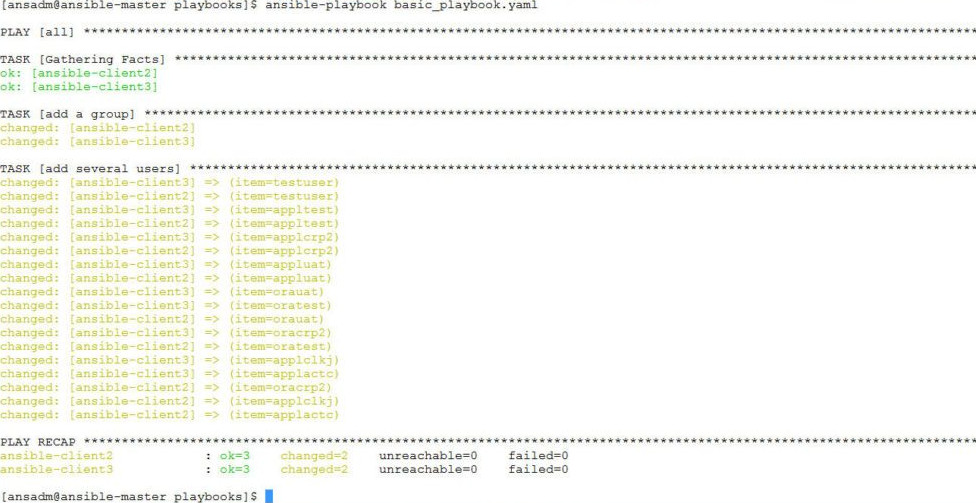
Ansible-running-playbook-Commands-Task-script-Successful-output-1024x536

There is a lot of things to say about playbooks, just to give the brief they have there own language like a  templates, tasks, handlers, a playbook could have one or multiple plays inside (for instance instructions for deployment of one or more services).

The downsides of playbooks are they're so hard to write from scratch and edit, because yaml syntaxing is much more stricter than a normal oldschool sysadmin configuration file.
I've stucked with problems with modifying and writting .yaml files and I should say the community in #ansible in irc.freenode.net was very helpful to help me debug the obscure errors.

yamllint (The YAML Linter tool) comes handy at times, when facing yaml syntax errors, to use it install via apt:
 

# apt-get install –yes yamllint


a) Running ansible in "dry mode" just show what ansible might do but not change anything
 

ansible-playbook playbooks/PLAYBOOK_NAME.yml –check


b) Running playbook with different users and separate SSH keys


ansible-playbook playbooks/your_playbook.yml –user ansible-user
 
ansible -m ping hosts –private-key=~/.ssh/keys/custom_id_rsa -u centos


c) Running ansible playbook only for certain hostnames part of a bigger host group


ansible-playbook playbooks/PLAYBOOK_NAME.yml –limit "host1,host2,host3"


d) Run Ansible on remote hosts in parallel

To run in raw of 10 hosts in parallel
 

# Run 10 hosts parallel
ansible-playbook <File.yaml> -f 10            


e) Passing variables to .yaml scripts using commandline

Ansible has ability to pre-define variables from .yml playbooks. This variables later can be passed from shell cli, here is an example:

# Example of variable substitution pass from command line the var in varsubsts.yaml if present is defined / replaced ansible-playbook playbooks/varsubst.yaml –extra-vars "myhosts=localhost gather=yes pkg=telnet"


4. Ansible Galaxy (A Docker Hub) like large repository with playbook (script) files


Ansible Galaxy has about 10000 active users which are contributing ansible automation playbooks in fields such as Development / Networking / Cloud / Monitoring / Database / Web / Security etc.

To install from ansible galaxy use ansible-galaxy

# install from galaxy the geerlingguy mysql playbook
ansible-galaxy install geerlingguy.mysql


The available packages you can use as a template for your purpose are not so much as with Puppet as Ansible is younger and not corporate supported like Puppet, anyhow they are a lot and does cover most basic sysadmin needs for mass deployments, besides there are plenty of other unofficial yaml ansible scripts in various github repos.

Install TeamViewer on latest Debian, Ubuntu, Fedora, CentOS Linux quick how to

Tuesday, October 31st, 2017

teamviewer-howto-install-on-gnu-linux-teamviewer-and-tux-penguin-logo

If you're a sysadmin who uses GNU / Linux as a Desktop as me you will certainly need to have TeamViewer installed and ready for use on your Linux desktop.

Even though TeamViewer is a proprietary application and I prefer not to use it I'm forced to have it installed because of every now and then a friend or customer would require you to login remotely to his Windows server and clean up the system either from spyware or viruses or just deploy some new software.

Nowdays most of people are running 64 bit ( amd64 ) built operating system and the problem with TeamViewer on Linux 64bit is that it doesn't have an actual full featured 64 port of the application but only have a 32 bits install, besides that big part of components of TeamViewer are running using wine windows emulation and hencing making it work on Linux is sometimes not so trivial as we might have desired.

Because TeamViewer is a 32 bit application, it has a number of dependency libraries that are 32 bit in Linux that's the so called (i386) built libraries (packages).

Hence to make TeamViewer work on modern GNU / Linux operating systems such as Debian / Ubuntu / Mint Linux / Fedora / CentOS etc. it is necessery to have some i386 libraries and other 32 bit things pre-installed and only then you can have a working copy of teamviewer on your Linux.

1. Installing i386 applications required for TeamViewer operation

– On Debian / Ubuntu / Kubuntu / Xubuntu Linux run below commands:

First we need to add the i386 architecture to be supported by Linux


dpkg –add-architecture i386
apt update


Then on Debian and other deb based Linux we need to install following libraries
 

# apt install libjpeg62-turbo:i386 wget gdebi-core


2. Download latest teamviewer version from TeamViewer website

– On Debian, Ubuntu and other deb based Linux distros.

Download latest teamviewer version and install it:


# wget https://download.teamviewer.com/download/teamviewer_i386.deb


On CentOS, Fedora, OpenSuSE other RPM based distros:

Download the Teamviewer package and package signature using wget


# wget https://download.teamviewer.com/download/linux/signature/TeamViewer2017.asc
# wget https://download.teamviewer.com/download/teamviewer.i686.rpm


3. Insteall teamviewer with gdebi (Simple Tool to install deb files)


# gdebi teamviewer_i386.deb


Remote control and meeting solution.
 TeamViewer provides easy, fast and secure remote access and meeting solutions
 to Linux, Windows PCs, Apple PCs and various other platforms,
 including Android and iPhone.
 .
 TeamViewer is free for personal use.
 You can use TeamViewer completely free of charge to access your private
 computers or to help your friends with their computer problems.
 .
 To buy a license for commercial use, please visit http://www.teamviewer.com
 .
 This package contains Free Software components.
 For details, see /opt/teamviewer/doc/license_foss.txt
Do you want to install the software package? [y/N]:y


On Fedora, CentOS, SuSE RPM based ones:


# rpm –import TeamViewer_Linux_PubKey.asc


# rpm -i teamviewer_12.0.xxxxx.i686.rpm


or if you face some failed dependencies you better use zypper that will download any missing teamviewer dependencies.


# zypper install teamviewer_12.0.xxxxx.i686.rpm


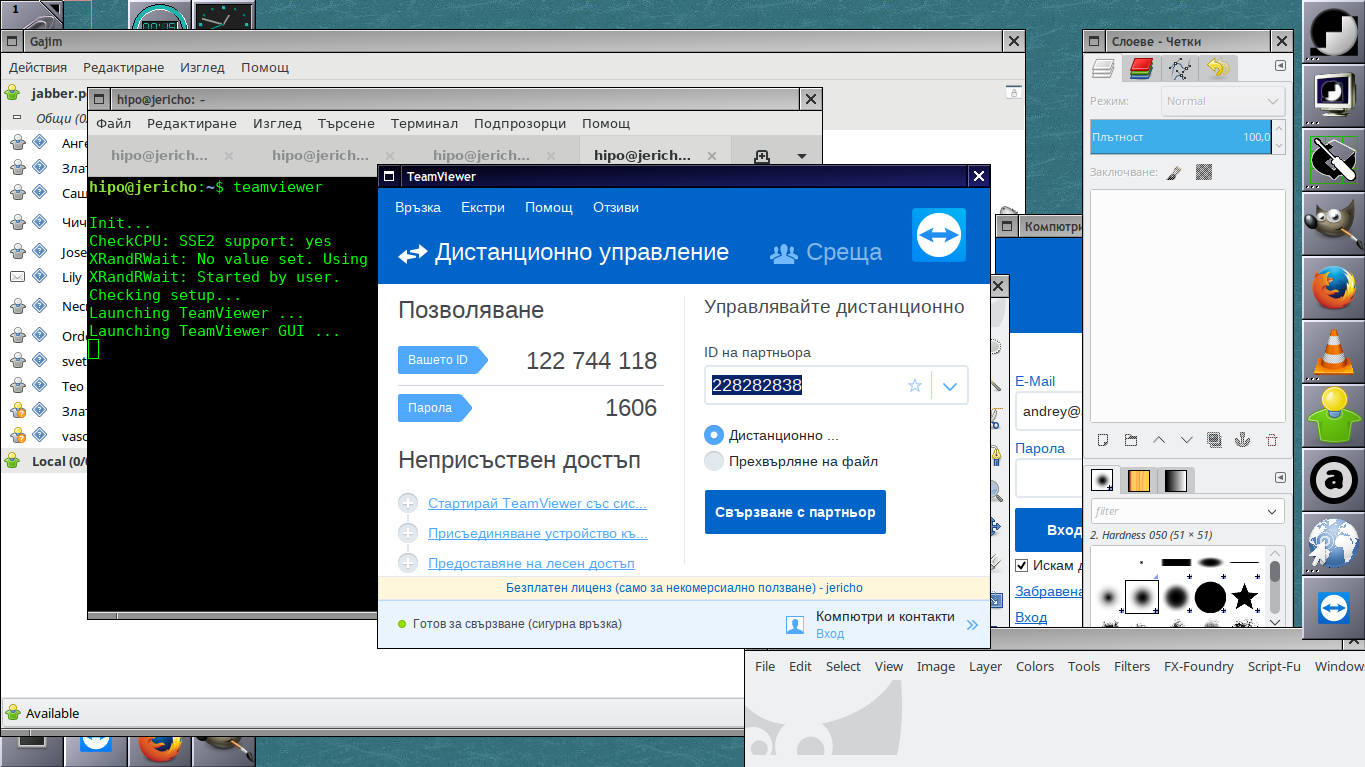
4. Start Teamviewer


teamviewer-running-on-linux-screenshot


linux:~$ teamviewer
Init…
CheckCPU: SSE2 support: yes
XRandRWait: No value set. Using default.
XRandRWait: Started by user.
Checking setup…
wine: configuration in '/home/hipo/.local/share/teamviewer12' has been updated.
Launching TeamViewer …
Launching TeamViewer GUI …


How to Increase virtualbox Linux install machine VM .VDI hard disk size to free space on root partition – Move /usr to a new partition

Tuesday, October 10th, 2017

extend-vdi-virtual-machine-partition-with-virtualbox-howto-virtualbox-logo
 

How to Increse Hard Disk size of VirtualBox Virtual Machine .VDI file to Free Space on root Partition or Howto move /usr large partition to separate new partition?


I just wondered how to increase hard disk size of Virtualbox Virtual Machine image .VDI, because for some stupid reason I've created my initial hard disk size for Linux partition to be the default 10 Gigabytes.

The problem is the packages I need to have installed on the Virtual Machine which will be a testbed for future tests of a production website applications are taking up too much space, once installed so I'm left with no space
in /var/lib/mysql for the database import. So what can I do in that case is to simply free up disk space or Merge ROOT partition with another partition.

Since merging the partition is not a trivial job and would require me to have installable CD with the Linux distro (in my case that's Debian Linux) or have a bootable USB flash drive, I preferred second approach to problem e.g. to free up disk space on ROOT partition by creating a second partition and move the /usr folder to reside there.

Before that it is of course necessery to  have extended the .VDI file using VirtualBox, so more space than the default 10GB preconfigured are available, this is easily done on Windows OS as, VBox is provided with GUI clickable option to do it, but for who knows what reason that is not the case with Linux, so Linux users only option to increase VDI file is to manually run command part of the virtualbox package, that is not a hard task really but it requires some typing and basic knowledge on how to run commands in terminal.


To .VDI resize (extend), we first go to default location where VirtualBox stores its image .VDI files (by default as of moment of writting this article – this is ~/"VrtualBox VMs"  (or home directory of logged in user dir VirtualBox VMs), the command to use is VBoxManage


root@jericho:/home/hipo# cd VirtualBox VMs/
root@jericho:/home/hipo/VirtualBox VMs# ls
Debian 6  Debian 9  Windows 10
root@jericho:/home/hipo/VirtualBox VMs# cd Debian 6/
r
oot@jericho:/home/hipo/VirtualBox VMs/Debian 6# ls
Debian 6.vbox  Debian 6.vbox-prev  Debian 6.vdi  Logs  NewVirtualDisk1.vdi  Snapshots

root@jericho:/home/hipo/VirtualBox VMs/Debian 6# VBoxManage modifyhd Debian 6.vdi –resize 20000
0%…10%…20%…30%…40%…50%…60%…70%…80%…90%…100%
root@jericho:/home/hipo/VirtualBox VMs/Debian 6#


Above command does resize the 10GB default created partition for Linux, where I have installed Linux which was 99% full of data, because of the many packages I installed to 20GB size, to make it bigger just use the respective size, be it 30000 (for 30GB) or 100000 (for 100GB) etc.

Even though in this example VBoxManage virtual partition resize command was done for GNU / Linux Operating System, it can be done for any other Operating as well to resize the size of the Virtual .VDI file (Virtual Machine) partition, be it Windows 7 / 8 / 10 or the rest of Free Operating systems FreeBSD / OpenBSD / BSD that are installed in a VM etc.

Next Launch the Virtual Machine with VBox Server client Program and install there Gparted (GNU Parted), as we'll need it to create a new Hard Disk Partition:


$ VirtualBox


Inside virtualmachine's in gnome-terminal / xterm etc. depending on the graphical environment used do install with apt-get:


debian:# apt-get install –yes gparted


debian~:# gparted


Notice that gparted has to be ran as a root superuser.


Run GParted and create new EXT3 filesystem that is 10GB (the size of the new created partition).

If you have installed Debian to place all partitions under / (root directory /dev/sda1) then the fresh new partition to create should be
/dev/sda3, anyways just look closely in EXT3 and in your case if the partiition is named differently create according to proper partition /dev/ naming.

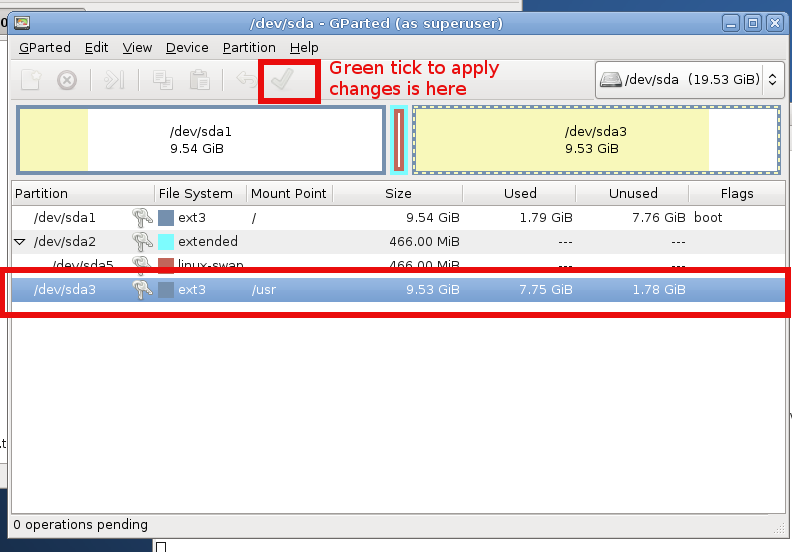
I'll not run into details on how to create the partition with GParted as the program interface is very self-explanatory, the only thing is to apply the update to create partition and the ext3 filesystem, that's being done
with a green tick:

gparted-create-ext3-partition-howto-linux

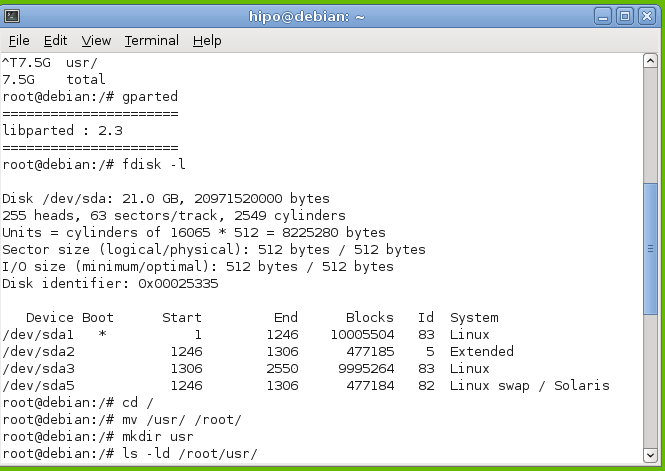
Next step is to check with fdisk whether, we have ext3 properly created  filesystem as we've done already with GPARTED:

Once we have the partition created with EXT3 filesystem, we're ready to move /usr temporary to other folder, I use usually /root for the move but you can create anywhere a new folder for that and move to there.

To move to /root directory run again in terminal:


debian:~# mv /usr /root
debian:~# mkdir /usr


howto-extend-root-filesystem-disk-space-linux-move-usr-folder-to-root-temporary-debian-gnu-linux


Note that during the move operations, your Desktop icons will become without (with broken) pictures and the default Debian background picture is to disappear, that's because the GUI environment will soon realize /usr/ libraries that're periodically reloaded in memory are missing and will be unable to reload them as it does in a cycle.

That should take a few minutes, so grab a coffee or if you're a smoker (hope not as smoking kills 🙂 ), in 5 / 10 minutes time depending on your computer / server configuration, it will be over, so we're ready to create new /usr dir and mount the  new partition:


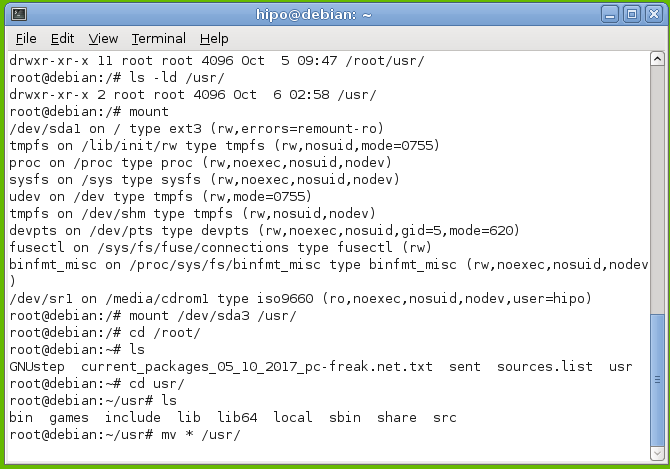
debian:~# mount /dev/sda3 /usr


howto-extend-root-filesystem-disk-space-linux-move-usr-folder-to-root-temporary-debian-gnu-linux1


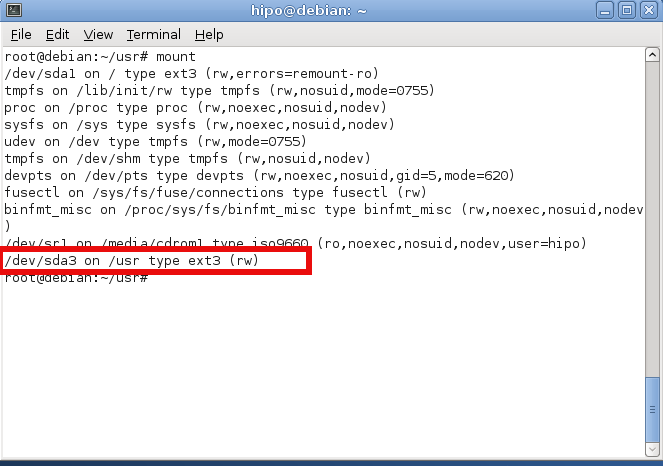
Now we check with mount command whether mount is fine:


check-if-filesystem-is-properly-mounted-linux-debian-screenshot


Now  /dev/sda3 is mounted under /usr  and we have to move back /root/usr directory content back to the newly mounted /usr so we run command:
 

debian:~#  mv /root/usr/* /usr/*


Finally we need to create proper records for the new partition inside /etc/fstab (fstab –FileSystem Tab file – the file which describes instructs the Linux OS what partition to boot where, what)

HOW TO CHECK LINUX UUID FOR A PARTITION??

Before adding anything to /etc/fstab you need to check the UUID of /dev/sda3 (or whatever the partition is called), without proper UUID, the system might fail to boot.
So here is how to check the UUID we'll need for config:


hipo@debian:~$ /sbin/blkid /dev/sda3
/dev/sda3: UUID="2273db4b-3069-4f78-90fc-e7483c0305bd" SEC_TYPE="ext2" TYPE="ext3"

hipo@debian:~$ ls -al /dev/disk/by-uuid/
total 0
drwxr-xr-x 2 root root 100 Oct  6 05:16 .
drwxr-xr-x 6 root root 120 Oct  6 05:16 ..
lrwxrwxrwx 1 root root  10 Oct  6 05:16 2273db4b-3069-4f78-90fc-e7483c0305bd -> ../../sda3
lrwxrwxrwx 1 root root  10 Oct  6 05:16 b98d92cd-41aa-4e18-a474-9b8df445dbe5 -> ../../sda1
lrwxrwxrwx 1 root root  10 Oct  6 05:16 f27f7448-f200-4983-b54f-b9e5206f77ac -> ../../sda5

As you can see our /dev/sda3 UUID is 2273db4b-3069-4f78-90fc-e7483c0305bd

Further on lets view and edit /etc/fstab you can also download a copy of my Virtual Machine fstab here


debian:~# cat /etc/fstab

# /etc/fstab: static file system information.
#
# Use 'blkid' to print the universally unique identifier for a
# device; this may be used with UUID= as a more robust way to name devices
# that works even if disks are added and removed. See fstab(5).
#
# <file system> <mount point>   <type>  <options>       <dump>  <pass>
proc            /proc           proc    defaults        0       0
# / was on /dev/sda1 during installation
UUID=b98d92cd-41aa-4e18-a474-9b8df445dbe5 /               ext3    errors=remount-ro 0       1
# swap was on /dev/sda5 during installation
UUID=f27f7448-f200-4983-b54f-b9e5206f77ac none            swap    sw              0       0
/dev/scd0       /media/cdrom0   udf,iso9660 user,noauto     0       0
/dev/scd1       /media/cdrom1   udf,iso9660 user,noauto     0       0


We need to add following line to  /etc/fstab:
 

UUID=2273db4b-3069-4f78-90fc-e7483c0305bd    /usr        ext3 error=remount-ro    0    1


Open the file with your favourite text editor (gedit / nano / pico / vim / joe) etc.

debian:~# vim /etc/fstab


# /etc/fstab: static file system information.
#
# Use 'blkid' to print the universally unique identifier for a
# device; this may be used with UUID= as a more robust way to name devices
# that works even if disks are added and removed. See fstab(5).
#
# <file system> <mount point>   <type>  <options>       <dump>  <pass>
proc            /proc           proc    defaults        0       0
# / was on /dev/sda1 during installation
UUID=b98d92cd-41aa-4e18-a474-9b8df445dbe5 /               ext3    errors=remount-ro 0       1
# swap was on /dev/sda5 during installation
UUID=f27f7448-f200-4983-b54f-b9e5206f77ac none            swap    sw              0       0
/dev/scd0       /media/cdrom0   udf,iso9660 user,noauto     0       0
/dev/scd1       /media/cdrom1   udf,iso9660 user,noauto     0       0

UUID=2273db4b-3069-4f78-90fc-e7483c0305bd     /usr        ext3 error=remount-ro    0    1    

Basicly it should be possible to add (for historic reasons) also instead of UUID=2273db4b-3069-4f78-90fc-e7483c0305bd  /dev/sda3
So it looks like so but, the better practice is to use UUID line given.

Well that's all folks now /usr directory will contain all your heavy root partition (disk filling) libraries and files, so you can happily use /var/lib/mysql or /var/lib/postgresql /var/www to store your web application files and import your databases.

Big thanks to Ubuntu Forums article – How do I increase the hard disk size of the Virtual Machine article for inspiring this post.

Hope that helps anyone and thanks and other comments are always welcome ! 🙂

How to get rid of “PHP Warning: PHP Startup: Unable to load dynamic library ‘/usr/lib/php5/20090626/suhosin.so'” on Debian GNU / Linux

Tuesday, October 25th, 2011

PHP-warning-how-to-fix-warnings-and-errors-php-logo

After a recent new Debian Squeeze Apache+PHP server install and moving a website from another server host running on CentOS 5.7 Linux server, some of the PHP scripts running via crontab started displaying the following annoying PHP Warnings :

debian:~# php /home/website/www/cron/update.php

PHP Warning: PHP Startup: Unable to load dynamic library '/usr/lib/php5/20090626/suhosin.so' – /usr/lib/php5/20090626/suhosin.so: cannot open shared object file: No such file or directory in Unknown on line 0

Obviously the error revealed that PHP cli is not happy that, I've previously removes the suhosin php5-suhosin module from the system.
I wouldn't have removed php5-suhosin if sometimes it doesn't produced some odd experiences with the Apache webserver.
To fix the PHP Warning, I used first grep to see, where exactly the suhosin module gets included in debian's php.ini config files. debian:~# cd /etc/php5
debian:/etc/php5# grep -rli suhosin *
apache2/conf.d/suhosin.ini
cgi/conf.d/suhosin.ini
cli/conf.d/suhosin.ini
conf.d/suhosin.ini

Yeah that's right Debian has three php.ini php config files. One for the php cli/usr/bin/php, another for the Apache webserver loaded php library/usr/lib/apache2/modules/libphp5.so and one for Apache's cgi module/usr/lib/apache2/modules/mod_fcgid.so .

I was too lazy to edit all the above found declarations trying to include the suhosin module in PHP, hence I remembered that probably all this obsolete suhosin module declaration are still present because probably the php5-suhosin package is still not purged from the system.

A quick check with dpkg , further strenthened my assumption as the php5-suhosin module was still hanging around as an (rc – remove candidate);

debian:~# dpkg -l |grep -i suhosin
rc php5-suhosin 0.9.32.1-1 advanced protection module for php5

Hence to remove the obsolete package config and directories completely out of the system and hence solve the PHP Warning I used dpkg –purge, like so:

debian:~# dpkg --purge php5-suhosin
(Reading database ... 76048 files and directories currently installed.)
Removing php5-suhosin ...
Purging configuration files for php5-suhosin ...
Processing triggers for libapache2-mod-php5 ...
Reloading web server config: apache2.

Further on to make sure the PHP Warning is solved I did the cron php script another go and it produced no longer errors:

debian:~# php /home/website/www/cron/update.php
debian:~#

Optimizing Linux TCP/IP Networking to increase Linux Servers Performance

Tuesday, April 8th, 2008

optimize-linux-servers-for-network-performance-to-increase-speed-and-decrease-hardware-costs-_tyan-exhibits-hpc-optimized-server-platforms-featuring-intel-xeon-processor-e7-4800-v3-e5-2600-supercomputing-15_full

Some time ago I thought of ways to optimize my Linux Servers network performance.

Even though there are plenty of nice articles on the topic on how to better optimize Linux server performance by tunning up the kernel sysctl (variables).

Many of the articles I found was not structed in enough understandable way so I decided togoogle around and  found few interesting websites which gives a good overview on how one can speed up a bit and decrease overall server loads by simply tuning few basic kernel sysctl variables.

Below article is a product of my research on the topic on how to increase my GNU / Linux servers performance which are mostly running LAMP (Linux / Apache / MySQL / PHP) together with Qmail mail servers.

The article is focusing on Networking as networking is usual bottleneck for performance.
Below are the variables I found useful for optimizing the Linux kernel Network stack.

Implementing the variables might reduce your server load or if not decrease server load times and CPU utilization, they would at lease increase thoroughput so more users will be able to access your servers with (hopefully) less interruptions.
That of course would save you some Hardware costs and raise up your Servers efficiency.

Here are the variables themselves and some good example:
 

# values.net.ipv4.ip_forward = 0 ( Turn off IP Forwarding )

net.ipv4.conf.default.rp_filter = 1

# ( Control Source route verification )
net.ipv4.conf.default.accept_redirects = 0

# ( Disable ICMP redirects )
net.ipv4.conf.all.accept_redirects = 0 ( same as above )
net.ipv4.conf.default.accept_source_route = 0

# ( Disable IP source routing )
net.ipv4.conf.all.accept_source_route = 0
( - || - )net.ipv4.tcp_fin_timeout = 40

# ( Decrease FIN timeout ) - Useful on busy/high load
serversnet.ipv4.tcp_keepalive_time = 4000 ( keepalive tcp timeout )
net.core.rmem_default = 786426 - Receive memory stack size ( a good idea to increase it if your server receives big files )
net.ipv4.tcp_rmem = "4096 87380 4194304"
net.core.wmem_default = 8388608 ( Reserved Memory per connection )
net.core.wmem_max = 8388608
net.core.optmem_max = 40960
( maximum amount of option memory buffers )

# like a homework investigate by yourself what the variables below stand for :)
net.ipv4.tcp_max_tw_buckets = 360000
net.ipv4.tcp_reordering = 5
net.core.hot_list_length = 256
net.core.netdev_max_backlog = 1024


# Below are newly added experimental
#net.core.rmem_max = 16777216
#net.core.wmem_max = 16777216
##kernel.msgmni = 1024
##kernel.sem = 250 256000 32 1024
##vm.swappiness=0
kernel.sched_migration_cost=5000000


Also a good sysctl.conf file which one might want to substitite or use as a skele for some productive server is ready for download here


Even if you can't reap out great CPU reduction benefits from integrating above values or similar ones, your overall LAMP performance to end customers should increase – at some occasions dramatically, at others little bit but still noticable.

If you're unsure on exact kernel variable values to use check yourself what should be the best values that fits you according to your server Hardware – usually this is done by experimenting and reading the kernel documentation as provided for each one of uplisted variables.

Above sysctl.conf is natively created to run on Debian and on other distributions like CentOS, Fedora Slackware some values might either require slight modifications.

Hope this helps and gives you some idea of how network optimization in Linux is usually done. Happy (hacking) tweakening !

rc.local missing in Debian 8 Jessie and Debian 9 Stretch and newer Ubuntu 16, Fedora, CentOS Linux – Why is /etc/rc.local not working and how to make it work again

Monday, September 11th, 2017

rc.local-not-working-solve-fix-linux-startup-with-rc.local-explained-how-to-make-rc.local-working-again-on-newer-linux-distributions

If you have installed a newer version of Debian GNU / Linux such as Debian Jessie or Debian  9 Stretch or Ubuntu 16 Xenial Xerus either on a server or on a personal Desktop laptop and you want tto execute a number of extra commands next to finalization of system boot just like we GNU / Linux users used to do already for the rest 25+ years you will be surprised that /etc/rc.local is no longer available (file is completely missing!!!).

This kind of behaviour (to avoid use of /etc/rc.local and make the file not present by default right after Linux OS install) was evident across many RedHack (Redhat) distributions such as Fedora and CentOS Linux for the last number of releases and the tendency was to also happen in Debian based distros too as it often does, however there was a possibility on this RPM based distros as well as rest of Linux distros to have the /etc/rc.local manually created to work around the missing file.

But NOoooo, the smart new generation GNU / Linux architects with large brains decided to completely wipe out the execution on Linux boot of /etc/rc.local from finalization stage, SMART isn't it??

For instance If you used to eat certain food for the last 25+ years and they suddenly prohibit you to eat it because they say this is not necessery anymore how would you feel?? Crazy isn't it??

Yes I understand the idea to wipe out /etc/rc.local did have a reason as the developers are striving to constanly improve the boot speed process (and the introduction of systemd (system and service manager) in Debian 8 Jessie over the past years did changed significantly on how Linux boots (earlier used SysV boot and LSB – linux standard based init scripts), but come on guys /etc/rc.local
doesn't stone the boot process with minutes, including it will add just 2, 3 seconds extra to boot runtime, so why on earth did you decided to remove it??

What I really loved about Linux through the years was the high level of consistency and inter-operatibility, most things worked just the same way across distributions and there was some logic upgrade, but lately this kind of behaviour is changing so in many of the new things in both GUI and text mode (console) way to interact with a GNU / Linux PC all becomes messy sadly …

So the smart guys who develop Gnu / Linux distros said its time to depreciate /etc/rc.local to prevent the user to be able to execute his set of finalization commands at the end of each booted multiuser runlevel.

The good news is you can bring back (resurrect) /etc/rc.local really easy:

To so, just execute the following either in Physical /dev/tty Console or in Gnome-Terminal (for GNOME users) or for KDE GUI environment users in KDE's terminal emulator konsole:


cat <<EOF >/etc/rc.local
#!/bin/sh -e
#
# rc.local
#
# This script is executed at the end of each multiuser runlevel.
# Make sure that the script will "exit 0" on success or any other
# value on error.
#
# In order to enable or disable this script just change the execution
# bits.
#
# By default this script does nothing.
exit 0
EOF
chmod +x /etc/rc.local
systemctl start rc-local
systemctl status rc-local


I think above is self-explanatory /etc/rc.local file is being created and then to enable it we run systemctl start rc-local and then to check the just run rc-local service status systemctl status

You will get an output similar to below:


root@jericho:/home/hipo# systemctl start rc-local
root@jericho:/home/hipo# systemctl status rc-local
● rc-local.service – /etc/rc.local Compatibility
   Loaded: loaded (/lib/systemd/system/rc-local.service; static; vendor preset:
  Drop-In: /lib/systemd/system/rc-local.service.d
           └─debian.conf
   Active: active (exited) since Mon 2017-09-11 13:15:35 EEST; 6s ago
  Process: 5008 ExecStart=/etc/rc.local start (code=exited, status=0/SUCCESS)
    Tasks: 0 (limit: 4915)
   CGroup: /system.slice/rc-local.service
sep 11 13:15:35 jericho systemd[1]: Starting /etc/rc.local Compatibility…
setp 11 13:15:35 jericho systemd[1]: Started /etc/rc.local Compatibility.

To test /etc/rc.local is working as expected you can add to print any string on boot, right before exit 0 command in /etc/rc.local

you can add for example:
 

echo "YES, /etc/rc.local IS NOW AGAIN WORKING JUST LIKE IN EARLIER LINUX DISTRIBUTIONS!!! HOORAY !!!!";


On CentOS 7 and Fedora 18 codename (Spherical Cow) or other RPM based Linux distro if /etc/rc.local is missing you can follow very similar procedures to have it enabled, make sure

/etc/rc.d/rc.local

is existing

and /etc/rc.local is properly symlined to /etc/rc.d/rc.local

Also don't forget to check whether /etc/rc.d/rc.local is set to be executable file with ls -al /etc/rc.d/rc.local

If it is not executable, make it be by running cmd:
 

chmod a+x /etc/rc.d/rc.local


If file /etc/rc.d/rc.local happens to be missing just create it with following content:


#!/bin/sh

# Your boot time rc.commands goes somewhere below and above before exit 0

exit 0


That's all folks rc.local not working is solved,
enjoy /etc/rc.local working again 🙂


Monitor General Server / Desktop system health in console on Linux and FreeBSD

Tuesday, October 4th, 2011

slurm-output-monitoring-networking
saidar
is a text based ncurses program to display live statistics about general system health.

It displays in one refreshable screen (similar to top) statistics about server state of:
CPU, Load, Memory, Swap, Network, I/O disk operations
Besides that saidar supports a ncurses console colors, which makes it more funny to look at.
Saidar extracts the statistics for system state based on libgstrap cross platform statistics library about pc system health.

On Debian, Ubuntu, Fedora, CentOS Linuxes saider is available for install straight from distribution repositories.
On Debian and Ubuntu saidar is installed with cmd:

debian:~# apt-get install saidar
...

On CentOS and Fedora saidar is bundled as a part of statgrab-tools rpm package.
Installing it on 64 bit CentOS with yum is with command:

[root@centos ~]# yum install statgrab-tools.x86_64

Saidar is also available on FreeBSD as a part of the /usr/ports/devel/libgstrab, hence to use on my FreeBSD I had to install the libgstrab port:

freebsd# cd /usr/ports/devel/libstatgrab
freebsd# make install clean

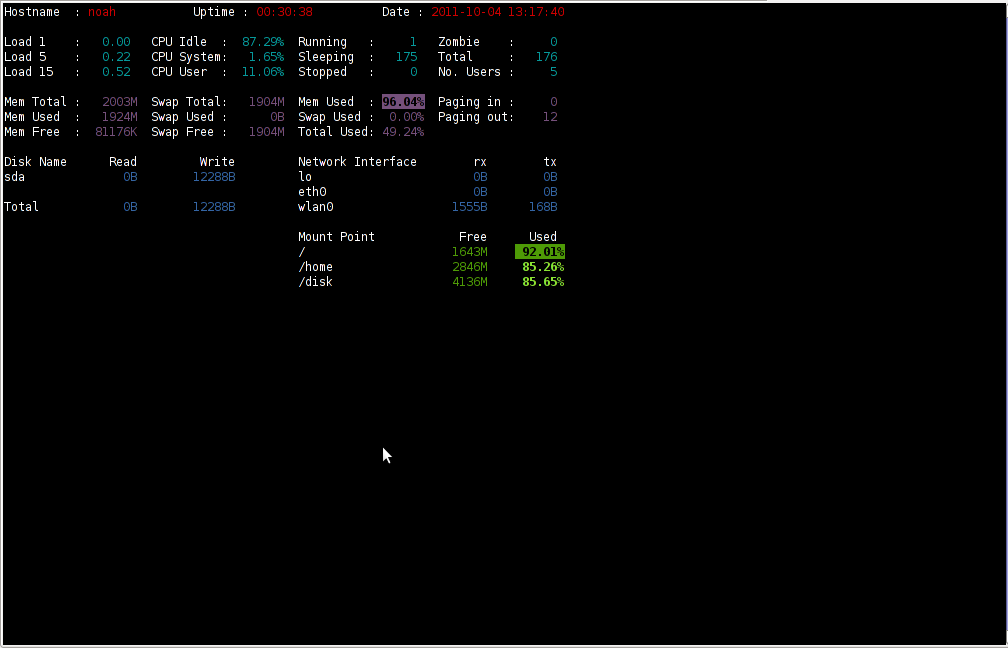
Here is saidar running on my Desktop Debian on Thinkpad in color output:

debian:~# saidar -c

Saidar Linux General statistics Screenshot

I've seen many people, who use various shell scripts to output system monitoring information, this scripts however are often written to just run without efficiency in mind and they put some let's say 1% extra load on the system CPU. This is not the case with saidar which is written in C and hence the program is optimized well for what it does.

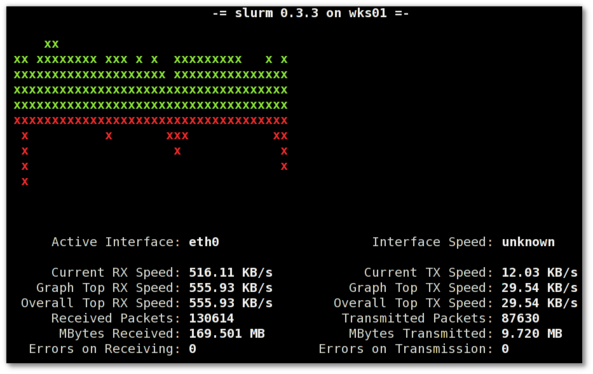
Update: Next to saidar I recommend you check out Slurm (Real Time Network Interface Monitor) it can visualizes network interface traffic using ascii graph such as on top of the article. On Debian and Ubuntu Slurm is available and easily installable via simple:
 

apt-get install –yes slurm