Posts Tagged ‘case’

Block Web server over loading Bad Crawler Bots and Search Engine Spiders with .htaccess rules

Monday, September 18th, 2017

howto-block-webserver-overloading-bad-crawler-bots-spiders-with-htaccess-modrewrite-rules-file

In last post, I've talked about the problem of Search Index Crawler Robots aggressively crawling websites and how to stop them (the article is here) explaning how to raise delays between Bot URL requests to website and how to completely probhit some bots from crawling with robots.txt.

As explained in article the consequence of too many badly written or agressive behaviour Spider is the "server stoning" and therefore degraded Web Server performance as a cause or even a short time Denial of Service Attack, depending on how well was the initial Server Scaling done.

The bots we want to filter are not to be confused with the legitimate bots, that drives real traffic to your website, just for information

 The 10 Most Popular WebCrawlers Bots as of time of writting are:
 

1. GoogleBot (The Google Crawler bots, funnily bots become less active on Saturday and Sundays :))

2. BingBot (Bing.com Crawler bots)

3. SlurpBot (also famous as Yahoo! Slurp)

4. DuckDuckBot (The dutch search engine duckduckgo.com crawler bots)

5. Baiduspider (The Chineese most famous search engine used as a substitute of Google in China)

6. YandexBot (Russian Yandex Search engine crawler bots used in Russia as a substitute for Google )

7. Sogou Spider (leading Chineese Search Engine launched in 2004)

8. Exabot (A French Search Engine, launched in 2000, crawler for ExaLead Search Engine)

9. FaceBot (Facebook External hit, this crawler is crawling a certain webpage only once the user shares or paste link with video, music, blog whatever  in chat to another user)

10. Alexa Crawler (la_archiver is a web crawler for Amazon's Alexa Internet Rankings, Alexa is a great site to evaluate the approximate page popularity on the internet, Alexa SiteInfo page has historically been the Swift Army knife for anyone wanting to quickly evaluate a webpage approx. ranking while compared to other pages)

Above legitimate bots are known to follow most if not all of W3C – World Wide Web Consorium (W3.Org) standards and therefore, they respect the content commands for allowance or restrictions on a single site as given from robots.txt but unfortunately many of the so called Bad-Bots or Mirroring scripts that are burning your Web Server CPU and Memory mentioned in previous article are either not following /robots.txt prescriptions completely or partially.

Hence with the robots.txt unrespective bots, the case the only way to get rid of most of the webspiders that are just loading your bandwidth and server hardware is to filter / block them is by using Apache's mod_rewrite through


.htaccess


file

Create if not existing in the DocumentRoot of your website .htaccess file with whatever text editor, or create it your windows / mac os desktop and transfer via FTP / SecureFTP to server.

I prefer to do it directly on server with vim (text editor)


vim /var/www/sites/your-domain.com/.htaccess


RewriteEngine On

IndexIgnore .htaccess */.??* *~ *# */HEADER* */README* */_vti*

SetEnvIfNoCase User-Agent "^Black Hole” bad_bot
SetEnvIfNoCase User-Agent "^Titan bad_bot
SetEnvIfNoCase User-Agent "^WebStripper" bad_bot
SetEnvIfNoCase User-Agent "^NetMechanic" bad_bot
SetEnvIfNoCase User-Agent "^CherryPicker" bad_bot
SetEnvIfNoCase User-Agent "^EmailCollector" bad_bot
SetEnvIfNoCase User-Agent "^EmailSiphon" bad_bot
SetEnvIfNoCase User-Agent "^WebBandit" bad_bot
SetEnvIfNoCase User-Agent "^EmailWolf" bad_bot
SetEnvIfNoCase User-Agent "^ExtractorPro" bad_bot
SetEnvIfNoCase User-Agent "^CopyRightCheck" bad_bot
SetEnvIfNoCase User-Agent "^Crescent" bad_bot
SetEnvIfNoCase User-Agent "^Wget" bad_bot
SetEnvIfNoCase User-Agent "^SiteSnagger" bad_bot
SetEnvIfNoCase User-Agent "^ProWebWalker" bad_bot
SetEnvIfNoCase User-Agent "^CheeseBot" bad_bot
SetEnvIfNoCase User-Agent "^Teleport" bad_bot
SetEnvIfNoCase User-Agent "^TeleportPro" bad_bot
SetEnvIfNoCase User-Agent "^MIIxpc" bad_bot
SetEnvIfNoCase User-Agent "^Telesoft" bad_bot
SetEnvIfNoCase User-Agent "^Website Quester" bad_bot
SetEnvIfNoCase User-Agent "^WebZip" bad_bot
SetEnvIfNoCase User-Agent "^moget/2.1" bad_bot
SetEnvIfNoCase User-Agent "^WebZip/4.0" bad_bot
SetEnvIfNoCase User-Agent "^WebSauger" bad_bot
SetEnvIfNoCase User-Agent "^WebCopier" bad_bot
SetEnvIfNoCase User-Agent "^NetAnts" bad_bot
SetEnvIfNoCase User-Agent "^Mister PiX" bad_bot
SetEnvIfNoCase User-Agent "^WebAuto" bad_bot
SetEnvIfNoCase User-Agent "^TheNomad" bad_bot
SetEnvIfNoCase User-Agent "^WWW-Collector-E" bad_bot
SetEnvIfNoCase User-Agent "^RMA" bad_bot
SetEnvIfNoCase User-Agent "^libWeb/clsHTTP" bad_bot
SetEnvIfNoCase User-Agent "^asterias" bad_bot
SetEnvIfNoCase User-Agent "^httplib" bad_bot
SetEnvIfNoCase User-Agent "^turingos" bad_bot
SetEnvIfNoCase User-Agent "^spanner" bad_bot
SetEnvIfNoCase User-Agent "^InfoNaviRobot" bad_bot
SetEnvIfNoCase User-Agent "^Harvest/1.5" bad_bot
SetEnvIfNoCase User-Agent "Bullseye/1.0" bad_bot
SetEnvIfNoCase User-Agent "^Mozilla/4.0 (compatible; BullsEye; Windows 95)" bad_bot
SetEnvIfNoCase User-Agent "^Crescent Internet ToolPak HTTP OLE Control v.1.0" bad_bot
SetEnvIfNoCase User-Agent "^CherryPickerSE/1.0" bad_bot
SetEnvIfNoCase User-Agent "^CherryPicker /1.0" bad_bot
SetEnvIfNoCase User-Agent "^WebBandit/3.50" bad_bot
SetEnvIfNoCase User-Agent "^NICErsPRO" bad_bot
SetEnvIfNoCase User-Agent "^Microsoft URL Control – 5.01.4511" bad_bot
SetEnvIfNoCase User-Agent "^DittoSpyder" bad_bot
SetEnvIfNoCase User-Agent "^Foobot" bad_bot
SetEnvIfNoCase User-Agent "^WebmasterWorldForumBot" bad_bot
SetEnvIfNoCase User-Agent "^SpankBot" bad_bot
SetEnvIfNoCase User-Agent "^BotALot" bad_bot
SetEnvIfNoCase User-Agent "^lwp-trivial/1.34" bad_bot
SetEnvIfNoCase User-Agent "^lwp-trivial" bad_bot
SetEnvIfNoCase User-Agent "^Wget/1.6" bad_bot
SetEnvIfNoCase User-Agent "^BunnySlippers" bad_bot
SetEnvIfNoCase User-Agent "^Microsoft URL Control – 6.00.8169" bad_bot
SetEnvIfNoCase User-Agent "^URLy Warning" bad_bot
SetEnvIfNoCase User-Agent "^Wget/1.5.3" bad_bot
SetEnvIfNoCase User-Agent "^LinkWalker" bad_bot
SetEnvIfNoCase User-Agent "^cosmos" bad_bot
SetEnvIfNoCase User-Agent "^moget" bad_bot
SetEnvIfNoCase User-Agent "^hloader" bad_bot
SetEnvIfNoCase User-Agent "^humanlinks" bad_bot
SetEnvIfNoCase User-Agent "^LinkextractorPro" bad_bot
SetEnvIfNoCase User-Agent "^Offline Explorer" bad_bot
SetEnvIfNoCase User-Agent "^Mata Hari" bad_bot
SetEnvIfNoCase User-Agent "^LexiBot" bad_bot
SetEnvIfNoCase User-Agent "^Web Image Collector" bad_bot
SetEnvIfNoCase User-Agent "^The Intraformant" bad_bot
SetEnvIfNoCase User-Agent "^True_Robot/1.0" bad_bot
SetEnvIfNoCase User-Agent "^True_Robot" bad_bot
SetEnvIfNoCase User-Agent "^BlowFish/1.0" bad_bot
SetEnvIfNoCase User-Agent "^JennyBot" bad_bot
SetEnvIfNoCase User-Agent "^MIIxpc/4.2" bad_bot
SetEnvIfNoCase User-Agent "^BuiltBotTough" bad_bot
SetEnvIfNoCase User-Agent "^ProPowerBot/2.14" bad_bot
SetEnvIfNoCase User-Agent "^BackDoorBot/1.0" bad_bot
SetEnvIfNoCase User-Agent "^toCrawl/UrlDispatcher" bad_bot
SetEnvIfNoCase User-Agent "^WebEnhancer" bad_bot
SetEnvIfNoCase User-Agent "^TightTwatBot" bad_bot
SetEnvIfNoCase User-Agent "^suzuran" bad_bot
SetEnvIfNoCase User-Agent "^VCI WebViewer VCI WebViewer Win32" bad_bot
SetEnvIfNoCase User-Agent "^VCI" bad_bot
SetEnvIfNoCase User-Agent "^Szukacz/1.4" bad_bot
SetEnvIfNoCase User-Agent "^QueryN Metasearch" bad_bot
SetEnvIfNoCase User-Agent "^Openfind data gathere" bad_bot
SetEnvIfNoCase User-Agent "^Openfind" bad_bot
SetEnvIfNoCase User-Agent "^Xenu’s Link Sleuth 1.1c" bad_bot
SetEnvIfNoCase User-Agent "^Xenu’s" bad_bot
SetEnvIfNoCase User-Agent "^Zeus" bad_bot
SetEnvIfNoCase User-Agent "^RepoMonkey Bait & Tackle/v1.01" bad_bot
SetEnvIfNoCase User-Agent "^RepoMonkey" bad_bot
SetEnvIfNoCase User-Agent "^Zeus 32297 Webster Pro V2.9 Win32" bad_bot
SetEnvIfNoCase User-Agent "^Webster Pro" bad_bot
SetEnvIfNoCase User-Agent "^EroCrawler" bad_bot
SetEnvIfNoCase User-Agent "^LinkScan/8.1a Unix" bad_bot
SetEnvIfNoCase User-Agent "^Keyword Density/0.9" bad_bot
SetEnvIfNoCase User-Agent "^Kenjin Spider" bad_bot
SetEnvIfNoCase User-Agent "^Cegbfeieh" bad_bot


<Limit GET POST>
order allow,deny
allow from all
Deny from env=bad_bot
</Limit>


Above rules are Bad bots prohibition rules have RewriteEngine On directive included however for many websites this directive is enabled directly into VirtualHost section for domain/s, if that is your case you might also remove RewriteEngine on from .htaccess and still the prohibition rules of bad bots should continue to work
Above rules are also perfectly suitable wordpress based websites / blogs in case you need to filter out obstructive spiders even though the rules would work on any website domain with mod_rewrite enabled.

Once you have implemented above rules, you will not need to restart Apache, as .htaccess will be read dynamically by each client request to Webserver

2. Testing .htaccess Bad Bots Filtering Works as Expected


In order to test the new Bad Bot filtering configuration is working properly, you have a manual and more complicated way with lynx (text browser), assuming you have shell access to a Linux / BSD / *Nix computer, or you have your own *NIX server / desktop computer running
 

Here is how:


lynx -useragent="Mozilla/5.0 (compatible; MegaIndex.ru/2.0; +http://megaindex.com/crawler)" -head -dump http://www.your-website-filtering-bad-bots.com/


Note that lynx will provide a warning such as:

Warning: User-Agent string does not contain "Lynx" or "L_y_n_x"!

Just ignore it and press enter to continue.

Two other use cases with lynx, that I historically used heavily is to pretent with Lynx, you're GoogleBot in order to see how does Google actually see your website?
 

  • Pretend with Lynx You're GoogleBot


lynx -useragent="Mozilla/5.0 (compatible; Googlebot/2.1; +http://www.google.com/bot.html)" -head -dump http://www.your-domain.com/


  • How to Pretend with Lynx Browser You are GoogleBot-Mobile


lynx -useragent="Mozilla/5.0 (iPhone; U; CPU iPhone OS 4_1 like Mac OS X; en-us) AppleWebKit/532.9 (KHTML, like Gecko) Version/4.0.5 Mobile/8B117 Safari/6531.22.7 (compatible; Googlebot-Mobile/2.1; +http://www.google.com/bot.html)" -head -dump http://www.your-domain.com/


Or for the lazy ones that doesn't have Linux / *Nix at disposal you can use WannaBrowser website

Wannabrowseris a web based browser emulator which gives you the ability to change the User-Agent on each website req1uest, so just set your UserAgent to any bot browser that we just filtered for example set User-Agent to CheeseBot

The .htaccess rule earier added once detecting your browser client is coming in with the prohibit browser agent will immediately filter out and you'll be unable to access the website with a message like:
 

HTTP/1.1 403 Forbidden


Just as I've talked a lot about Index Bots, I think it is worthy to also mention three great websites that can give you a lot of Up to Date information on exact Spiders returned user-agent, common known Bot traits as well as a a current updated list with the Bad Bots etc.

Bot and Browser Resources information user-agents, bad-bots and odd Crawlers and Bots specifics

1. botreports.com
2. user-agents.org
3. useragentapi.com


An updated list with robots user-agents (crawler-user-agents) is also available in github here regularly updated by Caia Almeido

There are also a third party plugin (modules) available for Website Platforms like WordPress / Joomla / Typo3 etc.

Besides the listed on these websites as well as the known Bad and Good Bots, there are perhaps a hundred of others that might end up crawling your webdsite that might or might not need  to be filtered, therefore before proceeding with any filtering steps, it is generally a good idea to monitor your  HTTPD access.log / error.log, as if you happen to somehow mistakenly filter the wrong bot this might be a reason for Website Indexing Problems.

Hope this article give you some valueable information. Enjoy ! 🙂


The American Dream Film – How American Economy works

Thursday, March 7th, 2013

money-as-debt-iii-american-dream-and-how-economy-works-american-way

All of us Americans strive for the American Dream,and this film shows you why your dream is getting farther and farther away.

Do you know how your money is created?

Or how banking works?

Why did housing prices skyrocket and then plunge?Do you really know what the Federal Reserve System is and how it affects you every single day?

The movie is pretty much similar in spirit to Money as Debt and to American Debt Explained for Dummies. Just like every movie there is a high element of manipulation in the movie. But anyways the general things explained are sadly very true. The trend of Borrowing to generate new money was embraced by Western European civilization and now is slowly starting to be adopted by Eastern Civilization and Ex-communist countries and newest members of EU like Bulgaria, Romania etc. A whole bunch of nations are pursueing after the "American Dream", non realizing they're destroying there national country and sovereignty and selling their citizens to Private Banking self-issuing structures like America's Federal Reserve. By taking the loans, in case of dying or unabling to pay the loan this loan is transferred to relatives and by taking loans those who do so leave a bad heritage to future generations. Hopefully those watching this little video will take moral and keep their ass away from credits. Enjoy 🙂


The American Dream Film-Full Length

Enable printing from Windows and Macs remotely through Linux Print server – Share Brother Printer DCP-1610W with Linux CUPS and Samba Windows Share

Thursday, March 23rd, 2017

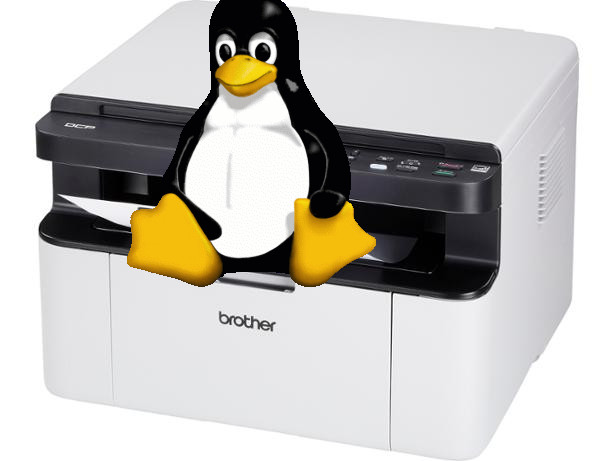
Brother-Printer-model-DCP-1610W-printer-scanner-and-copier-in-one-picture
I've recently bought a new Printer model Brother DCP 1610W and as in my home I have already a small Linux router and a web server where this blog and a couple of other websites runs and I need multiple PC / notebook / mobile phone enabled people to print on the Printer easily pretty much like a Printing server for a Small Office environment.

To do that of course I needed it configured to be accessible remotely for print via LAN and Wireless network. The task is not a complex one and printing remotely over the network is a standard thing many company organizations / universities and univerities does for quite some time and hence nowadays most printers are network connect ready so you just have to place them inside your home or corporate network and use the time to configure them via their web configuration interface or even some have their own embedded wifi adapter, as well as many printers nowdays can even be ready to print directly by just connecting the Printer to the Wi-Fi network and installing its drivers on a Win host.

Anyhow the most common way for both home printer configurations and corporate I'm aware of still is to Share the printer via Windows Server or Win Server Domain so anyone connected to the Network to be able to Add the printer via Winblows.

In the case i'm going to describe below my home the Wi-Fi router is connected to an 5 Port Network Switch (HUB) which on its hand is connected to the Linux router which serves multiple things (a Linux router, a hosting server (web server and a database server hosted, a mail server, traffic proxy server, a firewall and a NAT router), I decided to Share the printer to Wi-Fi connected and LAN clients directly switched via an UTP cable to the switch by using the good old Linux Samba Sharing server.

I did not actually do that for a really long time hence before I started I did some quick research to get an idea on the general steps to partake to succeed in Sharing the Printer over the network of this Debian's Wiki SystemPrinting Guide was mostly helpful.


1. Downloading and Installing necessery Brother Printer deb packages
 

A small remark to make here is my Linux server is running Debian GNU / Linux and hence this article is giving details on how Printer can be Shared on Debian though a minor adaptation of the article should make it possible to install also on any RHEL / CentOS / SuSE etc. Redhat based RPM Linux distribution.)

First step to do is to download Brother printer vendor provided drivers as of moment of writting this article they're here

To download the drivers get the proper links and use wget or curl to download all the necessery .deb archives in lets say in /root/brother-printer-drivers e.g. before that create the folder with:
 

root@linux:/root# mkdir /root/brother-printer-drivers

Also it might be helpful for those who need some other Brother Printer Linux driver complete list of Brother Printer all Linux drivers as of time of writting this post is found on this URL here

Next you need to install following Brother printer driver deb packages brscan-skey brscan4 dcp1610wcupswrapper dcp1610wlpr

root@linux:/root# cd brother-printer-drivers
root@linux:/root/brother-printer-drivers# dpkg -i –force-all brscan-skey-0.2.4-1.amd64.deb

root@linux:/root# dpkg -i –force-all brscan4-0.4.4-1.amd64.deb

root@linux:/root# dpkg -i –force-all dcp1610wcupswrapper-3.0.1-1.i386.deb

root@linux:/root# dpkg -i –force-all dcp1610wlpr-3.0.1-1.i386.deb

root@linux/root# cd  ../


Once installed dpkg -l should show like so:
 

root@linux:/root# dpkg -l |grep -i brother
ii  brscan-skey                                0.2.4-1                      Brother Linux scanner S-KEY tool
ii  brscan4                                    0.4.4-1                      Brother Scanner Driver
ii  dcp1610wcupswrapper                        3.0.1-1                      Brother DCP-1610W CUPS wrapper driver
ii  dcp1610wlpr                                3.0.1-1                      Brother DCP-1610W LPR driver

Brother's vendor provided packages will install drivers under /opt/brother
 

root@linux:/root# ls -al /opt/brother/
общо 16
drwxr-xr-x 4 root root 4096 яну 26 13:58 ./
drwxr-xr-x 3 root root 4096 яну 26 13:55 ../
drwxr-xr-x 3 root root 4096 яну 26 13:58 Printers/
drwxr-xr-x 4 root root 4096 яну 26 13:58 scanner/


2. Installing CUPS Printing Service and related Filters and Postscript packages necessery for PDF processing on CUPS server side


root@linux:/root#  apt-get install –yes cups cups-client cups-common cups-pdf cups-ppdc foomatic-db foomatic-db-engine foomatic-filters foomatic-filters-ppds openprinting-ppds lpr hp-ppd hpijs cups-pdf ghostscript-cups

Your printing should work normally without cups-pdf and ghostscript-cups packages installed but I install them just in case if PDF processing is problematic you can skip that.

It is also useful to install sane and sane-utils packages if you're going to use the brother's scanner capabilities.

root@linux:/root# apt-get install –yes sane sane-utils

Note that considering that all packages installed fine and the CUPS service is running, this should have set a proper printer into /etc/printcap a short database used to describe printers. printcap file is being used by UNIX's spooling system and allows you to dynamic addition and deletion of printers, for Linux / *Nix hosts which have more than one printer connected and added in CUPs records for the various printer goes there.
With a single Brother DCP-1610W Printer like my case is you should have records similar to these:

root@linux:~/brother-printer-drivers# cat /etc/printcap
DCP1610W:\
        :mx=0:\
        :sd=/var/spool/lpd/DCP1610W:\
        :sh:\
        :lp=/dev/usb/lp0:\
        :if=/opt/brother/Printers/DCP1610W/lpd/filter_DCP1610W:


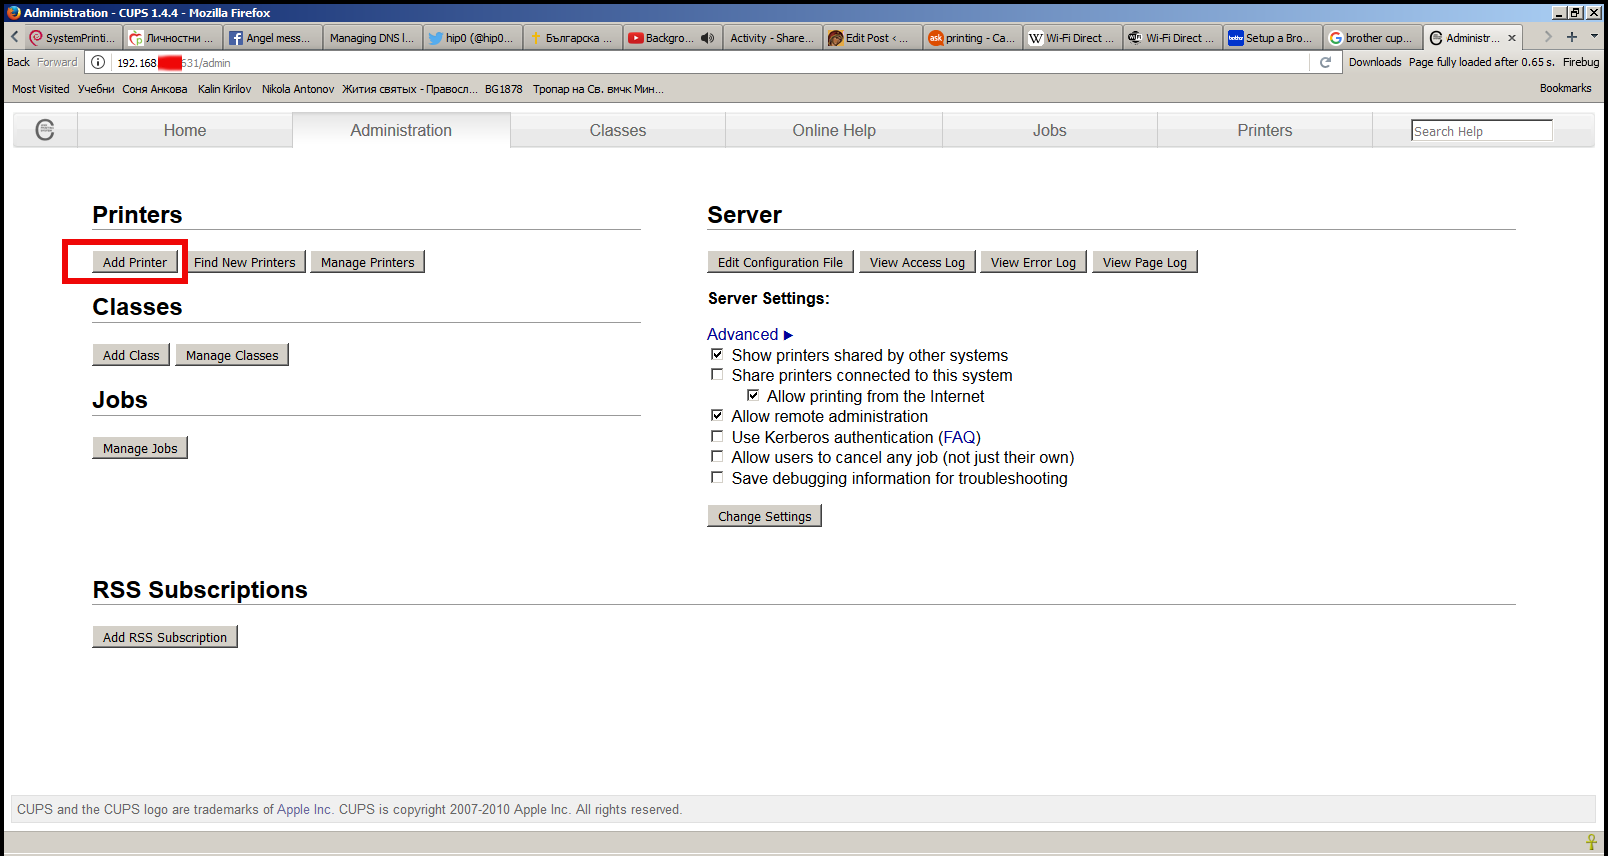
3. Adding a Printer in CUPS the easy way through CUPS Printing System Web Interface


CUPS has a nice web interface for setting up and administering printers and print queues.

Below is a selfexplanatory screenshot of Add Printer screen 

add-a-new-printer-cups-web-admin-interface-screenshot-in-a-firefox-browser  .


Use your favourite browser (Firefox, Opera, Chromium, lynx, elinks – yes the great news is console / terminal browsers are also supported well by cups web iface) to display interface and add a printer via the Administration screen. If you are asked for a username and password see here.

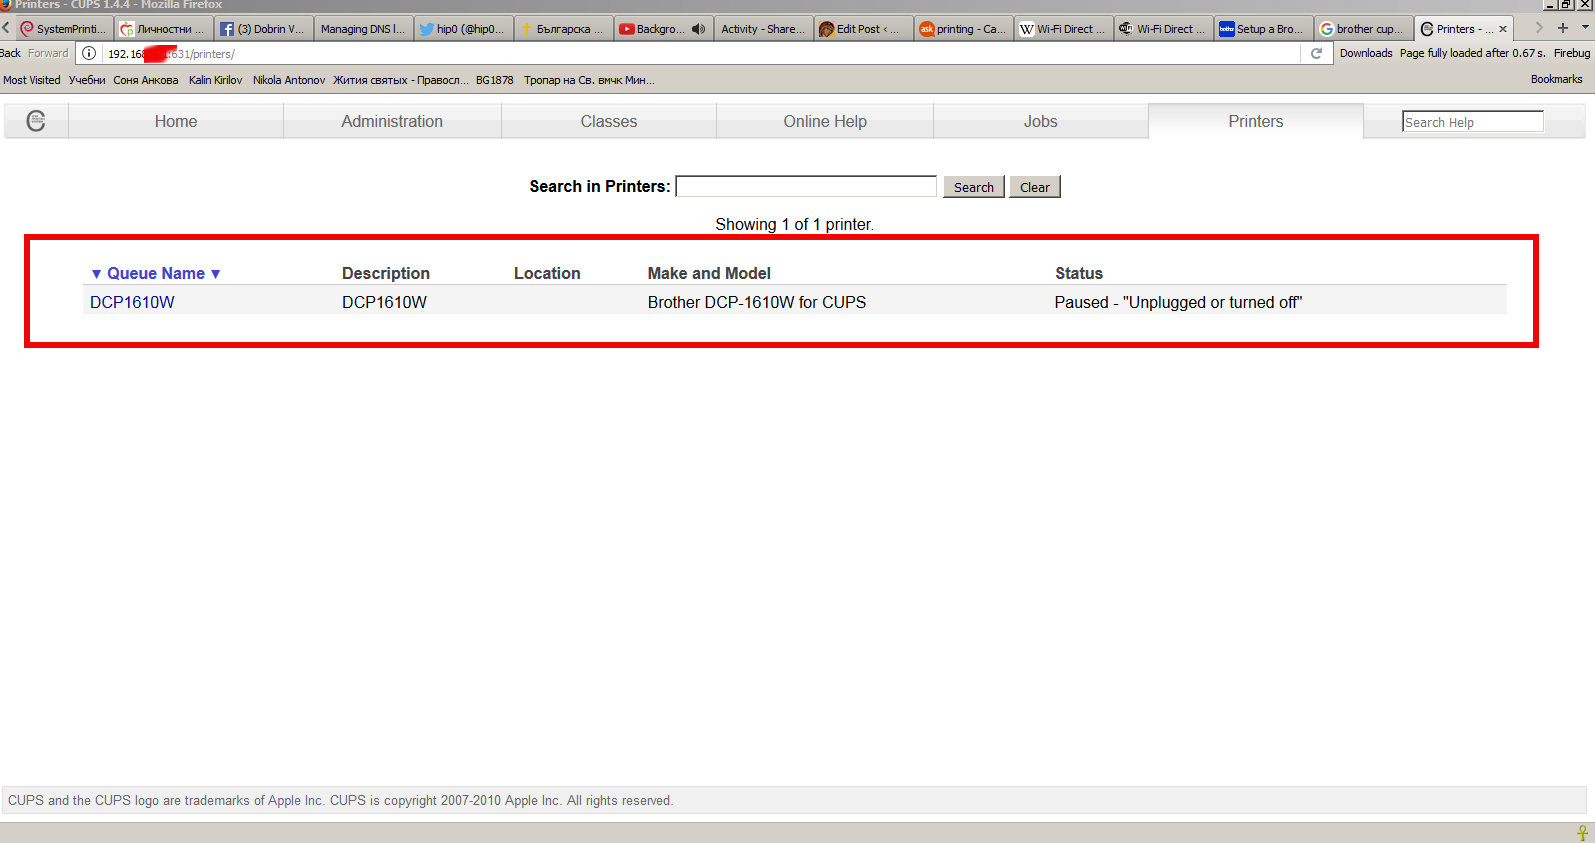
cups-web-admin-interface-accessed-in-browser-listing-brother-dcp1610w-printer-screenshot

There are three sections. The first is for local printers; that is, printers which are usually attached to the machine you are using. These are very often printers using a USB connection but can be parallel or serial port printers.

Adding a USB printer is a common occurance and one should automatically be detected as a local printer and a URI (Unified Resource Indicator) for its connection displayed on the next page.
 

The Other Network Printers section requires you to specify the destination for the remote print queue/printer, which could be on the local network or many kilometres away. AppSocket is almost always available on a network printer and other devices and requires only the IP address of the printer and a port number. An Internet Printing Protocol (IPP) URI is the preferrred choice for connecting to another CUPS server because it is CUPS' native protocol. ipp14 is the ipp backend from CUPS 1.4 and Debian-specific. It is provided because some devices do not work with the current ipp backend, which has a stricter adherence to the IPP standard. A Line Printer Daemon (LPD) URI could be considered if the remote printing service does not support IPP satisfactorily or at all. As before, when a remote print queue is doing the filtering choose RAW as the Make/Manufacturer.


4. Printer Status and Control testing whether CUPS printing is up and running


Once cups is installed and hopefully up and running you should see the cups process up and running to check it do:

root@linux:/root# /etc/init.d/cups status; ps axuwwf|grep -i cups|grep -v grep
Status of Common Unix Printing System: cupsd is running.
root      2815  0.0  0.0  75364  2912 ?        Ss   Mar17   0:00 /usr/sbin/cupsd -C /etc/cups/cupsd.conf

To get some further testing you can also use lpstat command and should get ouput similar to belows:
 

root@linux:/root# lpstat -t
scheduler is running
no system default destination
device for DCP1610W: usb://Brother/DCP-1610W%20series
DCP1610W accepting requests since Fri Mar 17 23:03:37 2017
printer DCP1610W disabled since Fri Mar 17 23:03:37 2017 –
        Unplugged or turned off

At the moment of issuing above command it shows printer is disabled because of moment of execution the printer was turned off for a while cause I was not needing it you should get usually an output of enabled and ready to print.

lpstat is also about to report whether a queue is accepting jobs and what is yet to be printed you can do


5. Install and Configure Samba Sharing Server on the Linux server


You can setup CUPS to allow Windows machines to print to a CUPS server using an http address.

First, install the samba package. When you are asked to use WINS, say yes.

root@linux:/root#  apt-get install samba

Next you might want to set setup your /etc/cups/cupsd.conf file by default CUPS would listen to LPD's port 631 if you don't have a strong firewall isolating you from the Internet on port 631 you might want to change that port to another one lets say to Port 49651.


I personally prefer keep the default port 631 and do use a robust firewall. If you want to change it modify config to something like:

# Our private connection we listen to Listen *:49651 # Allow machines on local network to use printers <Location /printers> Order allow,deny Allow 192.168.0.* Allow 192.168.1.* </Location>

If you like to filter access to CUPs daemon to receive Printing requests to be originating only from the local network place in smb.conf also something with your private network ranges:

# Allow machines on local network to use printers

<Location /printers>
Order allow,deny
Allow 192.168.0.*
Allow 192.168.1.*
Allow 192.168.2.*
</Location>
<Location />
  # Allow remote administration…
  Order allow,deny
##  Allow all
Allow 192.168.0.*
Allow 192.168.1.*
Allow 192.168.2.*
</Location>
<Location />
  # Allow remote administration…
  Order allow,deny
##  Allow all
Allow 192.168.0.*
Allow 192.168.1.*
Allow 192.168.2.*
</Location>
<Location /admin>
  # Allow remote administration…
  Order allow,deny
##  Allow all
Allow 192.168.0.*
Allow 192.168.1.*
Allow 192.168.2.*
</Location>


This will listen on port 49651 from any network. You may use some other port number besides 631. Note that the dynamic and/or private ports as specified by the IANA are in the range 49152 through 65535. Also, this will only allow computers from the local network to print to the CUPS printers.
 

6. Use CUPS Printing server to print over the network directly


Next you need to restart the CUPS daemon once again as it will be used for samba printing


# service cups restart


Now on each Windows machine, Choose that you want to install a network printer and that you want to install a printer on the Internet or home/office network. The URL you will use should be smth like:


http://<cups_server_hostname>:49651/printers/DCP1610W


Lastly, select the Brother downloaded from Internet or the one that's available on the Install CD, for any other vendor printer if it is lets say HP Printer or Canon to install use the respective provided driver or as a last resort use the Generic section driver labeled MS Publisher Color Printer.


7. Configure Samba to Share CUPS network enabled printer


I've done a minor changes in default installed /etc/samba/smb.conf to make the printer accessible from The Samba server here is the main things to consider changing:
 

# Change this to the workgroup/NT-domain name your Samba server will part of
   workgroup = WORKGROUP

#   security = user
security = share

[printers]
   comment = PC Freak Printer
   browseable = yes
   path = /var/spool/samba
   printable = yes
   guest ok = yes
   read only = yes
   create mask = 0700

# Windows clients look for this share name as a source of downloadable
# printer drivers
[print$]
   comment = Printer Drivers
   path = /var/lib/samba/printers
   browseable = yes
   read only = yes
   guest ok = yes


Next restart Samba server to make the new setting take affect:
 

root@linux:/# /etc/init.d/samba restart
Stopping Samba daemons: nmbd smbd.
Starting Samba daemons: nmbd smbd.
root@linux:/# ps axu|grep -E "smb|nmb"
root     21887  0.0  0.0 169588  1904 ?        Ss   16:53   0:00 /usr/sbin/nmbd -D
root     21892  0.0  0.0 197560  3272 ?        Ss   16:53   0:00 /usr/sbin/smbd -D
root     21894  0.0  0.0 197560  1564 ?        S    16:53   0:00 /usr/sbin/smbd -D
root     21899  0.0  0.0 112368   840 pts/6    S+   16:53   0:00 grep -E smb|nmb

root@linux:/#

Complete current smb.conf configuration I use to make the Brother Printer DCP 1610W accesible via network share is here

This section needs updating as you can setup print server via samba print sharing just by uploading drivers.

When printing to windows printers in an NT domain using SMB the Device URI should use similar to:


smb://username:password@domain/server/printername


This allows Samba to authenticate against a domain controller for acces to the printer queue.

In my case as you can see in below smb.conf configuration I've configured Samba security = share which will allow anyone to access the samba server without authentication so you can omit  username:password@ part

One good way to determine the printername  (in case you are not sure of) is to use smbclient command line tool. computername refers to the name of the machine that shares the printer:


smbclient -L copmputername


computername is the name of the samba server machine or its IP address


E.g.
 

hipo@linux:~$ smbclient -L //192.168.0.1/
Enter Attitude's password:
Domain=[WORKGROUP] OS=[Unix] Server=[Samba 3.5.6]

        Sharename       Type      Comment
        ———       —-      ——-
        print$          Disk      Printer Drivers
        IPC$            IPC       IPC Service (pcfreak server)
        DCP1610W        Printer   DCP1610W
Domain=[WORKGROUP] OS=[Unix] Server=[Samba 3.5.6]

        Server               Comment
        ———            ——-
        PCFREAK              pcfreak server

        Workgroup            Master
        ———            ——-
        WORKGROUP            WORKGROUP


Check the ouput for entries of Type "Printer":


The resulting (Linux / Mac OS) Samba Share access URL from the output above would be

smb://192.168.0.1/DCP1610W


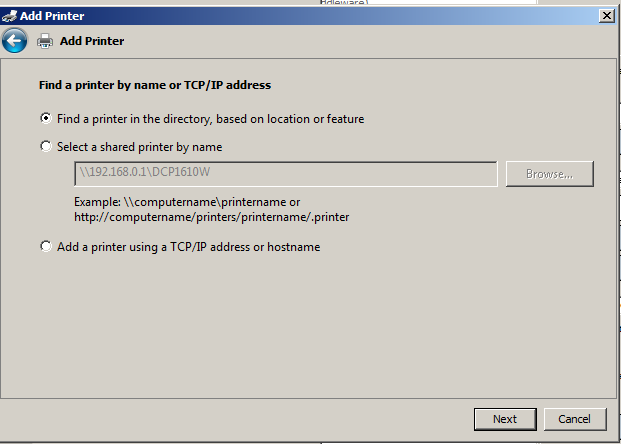
8. Adding Printer to your Windows machines to enable actual Remote Samba Sharing printing

Assuming you already know the Printer share name, here is what I needed to do to have the Printer Added on each of Windows Desktop PCs and Notebooks


Control Panel -> Devices and Printers -> Add a printer -> (Add a Network wireless or bluetooth printer)

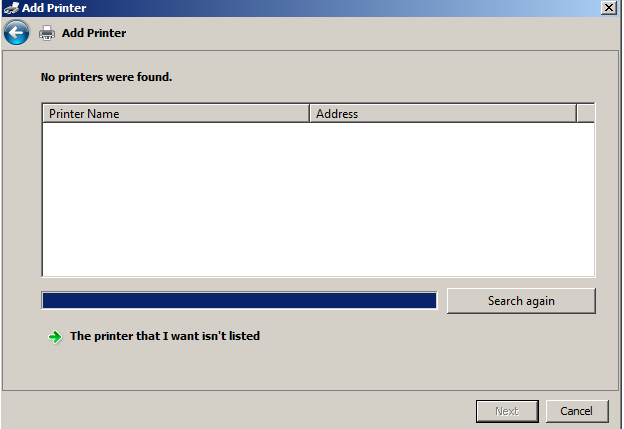
Then instead of Searching the printer to click on:

The printer that I wasn't listed

add-samba-network-share-brother-dcp-1610w-printer-to-windows-7-machine-no-printer-found-from-add-printer

Then type in the URL or IP (as in my case) leading to the printer as you see in below screenshot:


9. Printer Samba Sharing Using Macintosh notebook as the Client and Debian as the Server


1. Assuming you have cups to set up the printer on Debian as described above.

2. On the Mac (OS X 10.4+) start Print and Fax from System Preferences. Use the + button to add a printer.

3. Look first in the "Default" tab. If the automagic printer-sharing has worked, and your Mac is connected to the local network properly, then the Debian-based printer should already be visible in the list.

Just select it and use the recommended print driver. If you face problems you can try to play with
Gutenprint Printer drivers to make it printing.

4. If your printer is not visible in the Default tab, then try adding it on the "IP" tab.

Pick IPP as the protocol, give the plain IP address of the server in the address box (in my case that's 192.168.0.1, and in the Queue box put
"printers/DCP1610W

Put whatever helps you identify the printer in the Name and Location boxes (fields), and choose a printer driver than matches Brother DCP1610W or with another printer installed whatever you used to set up the printer on Debian .
Finally Pray that God help you to make it work and press the Add button. If you prayed honestly and repenting for your sins perhaps you will have mercy and it will work, of course if not try to research online on how to fix it further by God's grace.

Note that making printing work on Mac is a little bit of tricky and it might cause you some extra effort / nerves to complete.


10. Some other Useful maintanance commands you might need in future CUPS Printer queue jobs maintance


For displaying or setting print queue options and defaults:

lpoptions -p <print_queue_name> -l

Stopping and starting print queues. Acceptance and rejection of jobs sent to a destination:
 

cupsdisable <print_queue_name>
cupsenable <print_queue_name>
cupsaccept <print_queue_name>
cupsreject <print_queue_name>


To Cancel all jobs on a destination and additionally delete job data files:

cancel -a <print_queue_name>
cancel -a -x <print_queue_name>

That's all folks, Thanks God the printer should be working. Enjoy!

Word 2011 Check spelling for Mac OS X 2011 – Word check text in Mac OS X Office

Monday, February 29th, 2016

office-for-mac-2011-logo
 

If you happen to be running Mac OS X powered notebook and have recently installed Microsoft Office 2011 for Mac OS because you used to migrate from a Windows PC, you will probably suprrised that your Native Language Dictionary check you used heavily on Windows might be not performing on Mac.
This was exactly the case with my wife Svetlana and as she is not a computer expert and I'm the IT support at home I had to solve it somehow.

Luckily Office 2011 for Mac OS X which I have installed earlier comes with plenty of foreign-languages such as Russian, Bulgarian, Czech, French, German, UK English, US English etc.
Proofing tools is very handy especially for people like my wife who is natively Belarusian and is in process of learning Bulgarian, thus often in need to check Bulgarian words spelling.

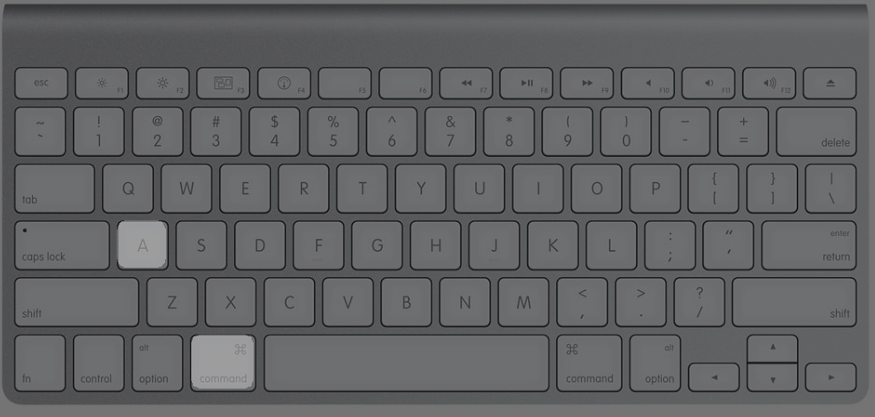
By Default the Check spelling on Office package was set to English, there is a quick way to change this to a certain text without changing the check-spelling default from English, the key shortcut to use is:

I. Press Mac command (key) + A – To select All text in opened document (in our case text was in Bulgarian)

command-a-mac-os-x

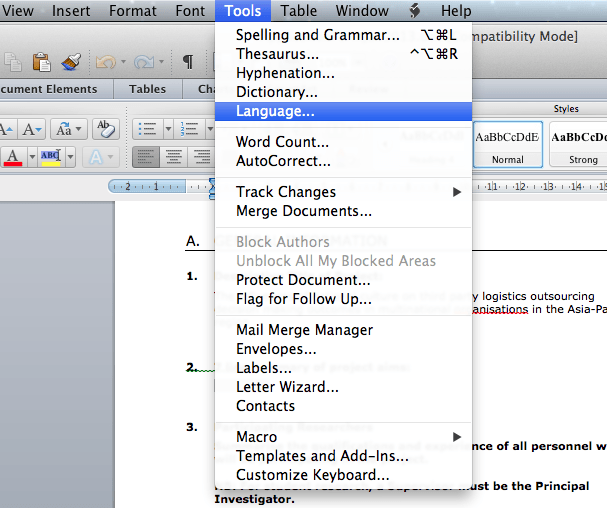
Click Word window menu and:
 

Choose Tools→Language


and select Bulgarian (or whatever language you need check spelling for.

If you need to change the Language default for all time, again you can do it from Tools


 Tools→Language


language-menu-on-mac-os-x-microsoft-word-office-2011-package-screenshot

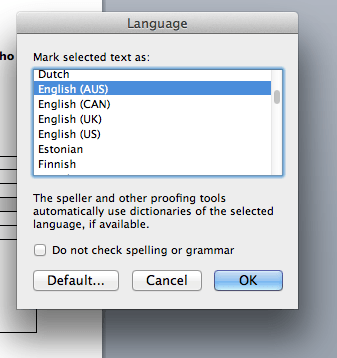
II. The Language dialog will appear and you'll see a list of languages to choose. 

select-language-menu-screenshot-ms-word-2011-on-mac-os-x

III. Next a Pop-up Dialog will ask you whether you're sure you want to change the default language to the language of choice in my case this was Russian.

language-default-dialog-mac-osx-word-2011-office-on-mac-change-default-spelling-language

That's it check spelling default will be aplpied now to Word normal template, so next time you open a document your default spelling choice will set

How to mount NFS network filesystem to remote server via /etc/fstab on Linux

Friday, January 29th, 2016

mount-nfs-in-linux-via--etc-fstab-howto-mount-remote-partitions-from-application-server-to-storage-server
If you have a server topology part of a project where 3 (A, B, C) servers need to be used to deliver a service (one with application server such as Jboss / Tomcat / Apache, second just as a Storage Server holding a dozens of LVM-ed SSD hard drives and an Oracle database backend to provide data about the project) and you need to access server A (application server) to server B (the Storage "monster") one common solution is to use NFS (Network FileSystem) Mount. 
NFS mount is considered already a bit of obsoleted technology as it is generally considered unsecre, however if SSHFS mount is not required due to initial design decision or because both servers A and B are staying in a serious firewalled (DMZ) dedicated networ then NTS should be a good choice.
Of course to use NFS mount should always be a carefully selected Environment Architect decision so remote NFS mount, imply  that both servers are connected via a high-speed gigabyte network, e.g. network performance is calculated to be enough for application A <-> to network storage B two sides communication not to cause delays for systems end Users.

To test whether the NFS server B mount is possible on the application server A, type something like:


mount -t nfs -o soft,timeo=900,retrans=3,vers=3, proto=tcp remotenfsserver-host:/home/nfs-mount-data /mnt/nfs-mount-point


If the mount is fine to make the mount permanent on application server host A (in case of server reboot), add to /etc/fstab end of file, following:

1.2.3.4:/application/local-application-dir-to-mount /application/remote-application-dir-to-mount nfs   rw,bg,nolock,vers=3,tcp,timeo=600,rsize=32768,wsize=32768,hard,intr 1 2


If the NTFS server has a hostname you can also type hostname instead of above example sample IP 1.2.3.4, this is however not recommended as this might cause in case of DNS or Domain problems.
If you want to mount with hostname (in case if storage server IP is being commonly changed due to auto-selection from a DHCP server):

server-hostA:/application/local-application-dir-to-mount /application/remote-application-dir-to-mount nfs   rw,bg,nolock,vers=3,tcp,timeo=600,rsize=32768,wsize=32768,hard,intr 1 2

In above example you need to have the /application/local-application-dir-to-mount (dir where remote NFS folder will be mounted on server A) as well as the /application/remote-application-dir-to-mount
Also on server Storage B server, you have to have running NFS server with firewall accessibility from server A working.

The timeou=600 (is defined in) order to make the timeout for remote NFS accessibility 1 hour in order to escape mount failures if there is some minutes network failure between server A and server B, the rsize and wsize
should be fine tuned according to the files that are being red from remote NFS server and the network speed between the two in the example are due to environment architecture (e.g. to reflect the type of files that are being transferred by the 2)
and the remote NFS server running version and the Linux kernel versions, these settings are for Linux kernel branch 2.6.18.x which as of time of writting this article is obsolete, so if you want to use the settings check for your kernel version and
NTFS and google and experiment.

Anyways, if you're not sure about wsize and and rise, its perfectly safe to omit these 2 values if you're not familiar to it.

To finally check the NFS mount is fine,  grep it:


# mount|grep -i nfs
sunrpc on /var/lib/nfs/rpc_pipefs type rpc_pipefs (rw)
server-hostA:/application/remote-application-dir-to-mount on /application/remote-application-dir-to-mount type nfs (rw,bg,nolock,nfsvers=3,tcp,timeo=600,rsize=32768,wsize=32768,hard,intr,addr=1.2.3.4)


That's all enjoy 🙂


Redirect www to non www with .htaccess Apache rewrite rule

Thursday, July 2nd, 2015

https://www.pc-freak.net/images/redirect_domain_name_without_changing_url_apache_rewrite_rule_preventing_host_in_ip_mod_rewrite_
Sometimes it happens that some websites are indexed in Search Engines (Google, Yandex, Yahoo, Bing, Ask Jeeves etc.) with www.website-name.com and you want to get rid of the www in the hostname in favour of just the hostname in terms of Apache .htaccess redirect. I knwo redirect www to non-www, might seem a bit weird as usually people want to redirect their website domain without www to point to www but there is a good reason for that weirdness, if you're a Christian and you dislike the fact that WWW is being red as Waw Waw Waw's or Vav / Vav Vav letters in Hebrew which represents in hebrew 666 or the mark of the beast prophecised in last book of Holy Bible (Revelation) written by saint John, the book is also called often Apocalypse.

Using Apache mod_rewrite's .htaccess is a good way to do the redirect especially if you're in a shared hosting, where you don't have direct access to edit Apache Virtualhost httpd.conf file but have only access to your user's home public_html directory via lets say FTP or SFTP.

To achieve the www to non-www domain URL redirect, just edit .htaccess with available hosting editor (in case if shell SSH access is available) or web interface or download the .htaccess via FTP / SFTP modify it and upload it back to server.

You need to include following mod_rewrite RewriteCond rules to .htaccess (preferrably somewhere near beginning of file):
 

RewriteEngine On
RewriteCond %{HTTP_HOST} ^www.Your-Website.org [NC]
RewriteRule ^(.*)$ http://Your-Website.org/$1 [L,R=301]


As .htaccess is being dynamically red by Apache's mod_rewrite module no Apache webserver restart is required and you should see immediately the affect, hopefully if the webhosting doesn't imply some caching with mod_cache or there is no some cache expiry setting preventing the new .htaccess to be properly redable by webserver.
Also in case of troubles make sure the new uploaded .htaccess file is properly readable e.g. has some permissions such as 755. Also in case if it doesn't immediately works out, make sure to clean up your browser cache and assure your browser is not configured to use some caching proxy host (be it visible or transparent).
Besides this would work and your Search Engines in future will hopefully stop indexing your site with WWW. in front of domain name, there is a downside of using .htaccess instead of including it straight into Apache's VirtualHost configuration is that this will cause a bit of degraded performance and add some milliseconds slowness to serve requests to your domain, thus if you're on your own dedicated server and have access to Apache configuration implement the www to non www hostname redirect directly using VirtualHost as explained in my prior article here


Apache Webserver: No space left on device: Couldn’t create accept lock /var/lock/apache2/accept.lock – Fix

Wednesday, April 8th, 2015

Apache-http-server-no-space-left-on-device-semaphores-quotes-hard-disk-space-resolve-fix-howto
If out of a sudden your Apache webserver crashes and is refusing to start up by manually trying to restart it through its init script on Debian Linux servers – /etc/init.d/apache2 and RPM based ones: /etc/init.d/httpd

Checking in php_error.log there was no shown errors related to loading PHP modules, however apache's error.log show following errors:

[Wed Apr 08 14:20:14 2015] [error] [client 180.76.5.149] client denied by server configuration: /var/www/sploits/info/trojans_info/tr_data/y3190.html
[Wed Apr 08 14:20:39 2015] [warn] pid file /var/run/apache2.pid overwritten — Unclean shutdown of previous Apache run?
[Wed Apr 08 14:20:39 2015] [emerg] (28)No space left on device: Couldn't create accept lock (/var/lock/apache2/accept.lock.15974) (5)
[Wed Apr 08 14:25:39 2015] [warn] pid file /var/run/apache2.pid overwritten — Unclean shutdown of previous Apache run?
[Wed Apr 08 14:25:39 2015] [emerg] (28)No space left on device: Couldn't create accept lock (/var/lock/apache2/accept.lock.16790) (5)
[Wed Apr 08 14:27:03 2015] [warn] pid file /var/run/apache2.pid overwritten — Unclean shutdown of previous Apache run?
[Wed Apr 08 14:27:03 2015] [emerg] (28)No space left on device: Couldn't create accept lock (/var/lock/apache2/accept.lock.16826) (5)
[Wed Apr 08 14:27:53 2015] [warn] pid file /var/run/apache2.pid overwritten — Unclean shutdown of previous Apache run?
[Wed Apr 08 14:27:53 2015] [emerg] (28)No space left on device: Couldn't create accept lock (/var/lock/apache2/accept.lock.16852) (5)
[Wed Apr 08 14:30:48 2015] [warn] pid file /var/run/apache2.pid overwritten — Unclean shutdown of previous Apache run?
[Wed Apr 08 14:30:48 2015] [emerg] (28)No space left on device: Couldn't create accept lock (/var/lock/apache2/accept.lock.17710) (5)
[Wed Apr 08 14:31:21 2015] [warn] pid file /var/run/apache2.pid overwritten — Unclean shutdown of previous Apache run?
[Wed Apr 08 14:31:21 2015] [emerg] (28)No space left on device: Couldn't create accept lock (/var/lock/apache2/accept.lock.17727) (5)
[Wed Apr 08 14:32:40 2015] [warn] pid file /var/run/apache2.pid overwritten — Unclean shutdown of previous Apache run?
[Wed Apr 08 14:32:40 2015] [emerg] (28)No space left on device: Couldn't create accept lock (/var/lock/apache2/accept.lock.17780) (5)
[Wed Apr 08 14:38:32 2015] [warn] pid file /var/run/apache2.pid overwritten — Unclean shutdown of previous Apache run?

As you can read the most likely reason behind above errors preventing for apache to start is /var/run/apache2.pid  unable to be properly written due to lack of disk space or due to disk quota set for users including for userID with which Apache is running.

First thing I did is of course to see how much free space is on the server:

df -h
Filesystem                     Size  Used Avail Use% Mounted on
/dev/mapper/vg00-rootvol       4.0G  1.7G  2.2G  44% /
udev                           7.8G  204K  7.8G   1% /dev
tmpfs                           24G     0   24G   0% /dev/shm
/dev/sda1                      486M   40M  422M   9% /boot
/dev/mapper/vg00-lv_crashdump 1008M   34M  924M   4% /crashdump
/dev/mapper/vg00-homevol       496M   26M  445M   6% /home
/dev/mapper/vg00-lv_opt         12G  1.4G  9.9G  13% /opt
/dev/mapper/vg00-tmpvol        2.0G   68M  1.9G   4% /tmp
/dev/mapper/vg00-varvol        7.9G  609M  6.9G   8% /var
/dev/mapper/vg00-crashvol      1.9G   35M  1.8G   2% /var/crash
/dev/mapper/vg00-auditvol      124M  5.6M  113M   5% /var/log/audit
/dev/mapper/vg00-webdienste     60G   12G   48G  19% /webservice


As visible from above df command output , there is enough disk on HDD, so this is definitely not the issue:

Then I Checked whether there is Quota enabled on the Linux server with repquota command shows there are no quotas enabled:

# repquota / var/
repquota: Mountpoint (or device) / not found or has no quota enabled.
repquota: Mountpoint (or device) /var not found or has no quota enabled.
repquota: Not all specified mountpoints are using quota.


So obviously the only few left possible reason for Apache failing to start after invoked via init script is  either due to left tainted semaphores or due to some server hardware  RAM problem / or a dying  hard disk with bad blocks.

So what are Semaphores? Generally speaking Semaphores are apparatus for conveying information by means of visual signals between applications (something like sockets).They're used for communicating between the active processes of a certain application. In the case of Apache, they’re used to communicate between the parent and child processes, hence if Apache can’t properly write and coordinate these things down, then it can’t communicate properly with all of the processes it starts and hence the Main HTTPD process can't spawn probably its childs preventing Webserver to enter "started mode" and write its PID file.

To check general information about system semaphore arrays there is the ipcs -s command, however my experience is that ipcs -a is more useful (because it lists generally all kind of semaphores) including Semaphore Shared Memory Signals which are the most likely to cause you the problem.

ipcs -a

—— Shared Memory Segments ——–
key        shmid      owner      perms      bytes      nattch     status

—— Semaphore Arrays ——–
key        semid      owner      perms      nsems
0x00000000 22970368   www-data   600        1

—— Message Queues ——–
key        msqid      owner      perms      used-bytes   messages

As you see in my case there is a Semaphore Arrays which had to be cleaned to make Apache2 be able to start again.
 

To clean all left semaphores (arrays) preventing Apache from start properly, use below for one liner bash loop:
 

for i in `ipcs -s | awk '/www-data/ {print $2}'`; do (ipcrm -s $i); done
ipcrm -m 0x63637069


Note that above for loop is specific to Debian on CentOS / Fedora / RHEL and other Linuxes the username with which stucked semaphores might stay will be apache or httpd

Depending on the user with which the Apache Webserver is running, run above loop like so:

For RPM based distros (CentOS / RHEL):


for i in `ipcs -s | awk '/apache/ {print $2}'`; do (ipcrm -s $i); done
ipcrm -m 0x63637069


For other distros such as Slackware or FreeBSD or any custom compiled Apache webserver:

for i in `ipcs -s | awk '/httpd/ {print $2}'`; do (ipcrm -s $i); done
ipcrm -m 0x63637069


If there is also Shared Memory Segments you can remove them with ipcrm i.e.:

ipcrm -m 0x63637069


An alternative way to get rid of left uncleaned semaphores is with xargs:
 

ipcs -s | grep nobody | awk ‘ { print $2 } ‘ | xargs ipcrm


Even though this fixes the issue I understood my problems were due to exceeding semaphores, to check default number of set semaphores on Linux Kernel level as well as few Semaphore related values run below sysctl:

sysctl -a | egrep kernel.sem\|kernel.msgmni
kernel.msgmni = 15904

kernel.sem = 250        32000   32      128


As you can see the number of maximum semaphores is quite large so in my case the failure because of left semaphores was most likely due to some kind of Cracker / Automated bot scanner attack or someone trying malicious against the webserver or simply because of some kind of Apache bug or enormous high load the server faced.

Fix MySQL ibdata file size – ibdata1 file growing too large, preventing ibdata1 from eating all your server disk space

Thursday, April 2nd, 2015

fix-solve-mysql-ibdata-file-size-ibdata1-file-growing-too-large-and-preventing-ibdata1-from-eating-all-your-disk-space-innodb-vs-myisam

If you're a webhosting company hosting dozens of various websites that use MySQL with InnoDB  engine as a backend you've probably already experienced the annoying problem of MySQL's ibdata1 growing too large / eating all server's disk space and triggering disk space low alerts. The ibdata1 file, taking up hundreds of gigabytes is likely to be encountered on virtually all Linux distributions which run default MySQL server <= MySQL 5.6 (with default distro shipped my.cnf). The excremental ibdata1 raise appears usually due to a application software bug on how it queries the database. In theory there are no limitation for ibdata1 except maximum file size limitation set for the filesystem (and there is no limitation option set in my.cnf) meaning it is quite possible that under certain conditions ibdata1 grow over time can happily fill up your server LVM (Storage) drive partitions.

Unfortunately there is no way to shrink the ibdata1 file and only known work around (I found) is to set innodb_file_per_table option in my.cnf to force the MySQL server create separate *.ibd files under datadir (my.cnf variable) for each freshly created InnoDB table.
 

1. Checking size of ibdata1 file

On Debian / Ubuntu and other deb based Linux servers datadir is /var/lib/mysql/ibdata1

server:~# du -hsc /var/lib/mysql/ibdata1
45G     /var/lib/mysql/ibdata1
45G     total


2. Checking info about Databases and Innodb storage Engine

server:~# mysql -u root -p
password:

mysql> SHOW DATABASES;
+——————–+
| Database           |
+——————–+
| information_schema |
| bible              |
| blog               |
| blog-sezoni        |
| blogmonastery      |
| daniel             |
| ezmlm              |
| flash-games        |


Next step is to get some understanding about how many existing InnoDB tables are present within Database server:


mysql> SELECT COUNT(1) EngineCount,engine FROM information_schema.tables WHERE table_schema NOT IN ('information_schema','performance_schema','mysql') GROUP BY engine;
+————-+——–+
| EngineCount | engine |
+————-+——–+
|         131 | InnoDB |
|           5 | MEMORY |
|         584 | MyISAM |
+————-+——–+
3 rows in set (0.02 sec)

To get some more statistics related to InnoDb variables set on the SQL server:
 

mysqladmin -u root -p'Your-Server-Password' var | grep innodb


Here is also how to find which tables use InnoDb Engine

mysql> SELECT table_schema, table_name
    -> FROM INFORMATION_SCHEMA.TABLES
    -> WHERE engine = 'innodb';

+————–+————————–+
| table_schema | table_name               |
+————–+————————–+
| blog         | wp_blc_filters           |
| blog         | wp_blc_instances         |
| blog         | wp_blc_links             |
| blog         | wp_blc_synch             |
| blog         | wp_likes                 |
| blog         | wp_wpx_logs              |
| blog-sezoni  | wp_likes                 |
| icanga_web   | cronk                    |
| icanga_web   | cronk_category           |
| icanga_web   | cronk_category_cronk     |
| icanga_web   | cronk_principal_category |
| icanga_web   | cronk_principal_cronk    |


3. Check and Stop any Web / Mail / DNS service using MySQL

server:~# ps -efl |grep -E 'apache|nginx|dovecot|bind|radius|postfix'

Below cmd should return empty output, (e.g. Apache / Nginx / Postfix / Radius / Dovecot / DNS etc. services are properly stopped on server).

4. Create Backup dump all MySQL tables with mysqldump

Next step is to create full backup dump of all current MySQL databases (with mysqladmin):

server:~# mysqldump –opt –allow-keywords –add-drop-table –all-databases –events -u root -p > dump.sql
server:~# du -hsc /root/dump.sql
940M    dump.sql
940M    total


If you have free space on an external backup server or remotely mounted attached (NFS or SAN Storage) it is a good idea to make a full binary copy of MySQL data (just in case something wents wrong with above binary dump), copy respective directory depending on the Linux distro and install location of SQL binary files set (in my.cnf).
To check where are MySQL binary stored database data (check in my.cnf):

server:~# grep -i datadir /etc/mysql/my.cnf
datadir         = /var/lib/mysql

If server is CentOS / RHEL Fedora RPM based substitute in above grep cmd line /etc/mysql/my.cnf with /etc/my.cnf

if you're on Debian / Ubuntu:

server:~# /etc/init.d/mysql stop
server:~# cp -rpfv /var/lib/mysql /root/mysql-data-backup

Once above copy completes, DROP all all databases except, mysql, information_schema (which store MySQL existing user / passwords and Access Grants and Host Permissions)

5. Drop All databases except mysql and information_schema

server:~# mysql -u root -p
password:


mysql> SHOW DATABASES;

DROP DATABASE blog;
DROP DATABASE sessions;
DROP DATABASE wordpress;
DROP DATABASE micropcfreak;
DROP DATABASE statusnet;

          etc. etc.

ACHTUNG !!! DON'T execute!DROP database mysql; DROP database information_schema; !!! – cause this might damage your User permissions to databases

6. Stop MySQL server and add innodb_file_per_table and few more settings to prevent ibdata1 to grow infinitely in future

server:~# /etc/init.d/mysql stop

server:~# vim /etc/mysql/my.cnf
[mysqld]
innodb_file_per_table
innodb_flush_method=O_DIRECT
innodb_log_file_size=1G
innodb_buffer_pool_size=4G

Delete files taking up too much space – ibdata1 ib_logfile0 and ib_logfile1

server:~# cd /var/lib/mysql/
server:~#  rm -f ibdata1 ib_logfile0 ib_logfile1
server:~# /etc/init.d/mysql start
server:~# /etc/init.d/mysql stop
server:~# /etc/init.d/mysql start
server:~# ps ax |grep -i mysql


You should get no running MySQL instance (processes), so above ps command should return blank.
 

7. Re-Import previously dumped SQL databases with mysql cli client

server:~# cd /root/
server:~# mysql -u root -p < dump.sql

Hopefully import should went fine, and if no errors experienced new data should be in.

Altearnatively if your database is too big and you want to import it in less time to mitigate SQL downtime, instead import the database with:

server:~# mysql -u root -p
password:
mysql>  SET FOREIGN_KEY_CHECKS=0;
mysql> SOURCE /root/dump.sql;
mysql> SET FOREIGN_KEY_CHECKS=1;


If something goes wrong with the import for some reason, you can always copy over sql binary files from /root/mysql-data-backup/ to /var/lib/mysql/
 

8. Connect to mysql and check whether databases are listable and re-check ibdata file size

Once imported login with mysql cli and check whther databases are there with:

server:~# mysql -u root -p
SHOW DATABASES;

Next lets see what is currently the size of ibdata1, ib_logfile0 and ib_logfile1
 

server:~# du -hsc /var/lib/mysql/{ibdata1,ib_logfile0,ib_logfile1}
19M     /var/lib/mysql/ibdata1
1,1G    /var/lib/mysql/ib_logfile0
1,1G    /var/lib/mysql/ib_logfile1
2,1G    total

Now ibdata1 will grow, but only contain table metadata. Each InnoDB table will exist outside of ibdata1.
To better understand what I mean, lets say you have InnoDB table named blogdb.mytable.
If you go into /var/lib/mysql/blogdb, you will see two files
representing the table:

  •     mytable.frm (Storage Engine Header)
  •     mytable.ibd (Home of Table Data and Table Indexes for blogdb.mytable)

Now construction will be like that for each of MySQL stored databases instead of everything to go to ibdata1.
MySQL 5.6+ admins could relax as innodb_file_per_table is enabled by default in newer SQL releases.


Now to make sure your websites are working take few of the hosted websites URLs that use any of the imported databases and just browse.
In my case ibdata1 was 45GB after clearing it up I managed to save 43 GB of disk space!!!

Enjoy the disk saving! 🙂

How to check Apache Webserver and MySQL server uptime – Check uptime of a running daemon with PS (process) command

Tuesday, March 10th, 2015

check_Apache_Webserver_and_MySQL_server_uptime_-_Check-uptime-of-running-daemon-service-with-PS-process-command

Something very useful that most Apache LAMP (Linux Apache MySQL PHP) admins should know is how to check Apache Webserver uptime and MySQL server running (uptime).
Checking Apache / MySQL uptime is primary useful for scripting purposes – creating auto Apache / MySQL service restart scripts, or just as a quick console way to check what is the status and uptime of Webserver / SQL.

My experience as a sysadmin shows that lack of Periodic Apache and MySQL restart every week or every month often creates sys-admin a lot of a headaches cause (Apache / NGINX / SQL  server) starts eating too much memory or under some circumstances leads to service or system crashes. Periodic system main services restart is especially helpful in case if Website's backend programming code is writetn in a bad and buggy uneffient way by unprofessional (novice) programmers.
While I was still working as Senior SysAdmin in Design.BG, I've encountered many such Crappy Web applications developed by dozen of different programmers (because company's programmers changed too frequently and many of the hired Web Developers ,were still learning to program, I guess same is true also for other Start-UP Web / IT Company where crappy programming code is developed you will certainly need to keep an eye on Apache / MYSQL uptime.  If that's the case below 2 quick one liners with PS command will help you keep an eye on Apache / MYSQL uptime


ps -eo "%U %c %t"| grep apache2 | grep -v grep|grep root
root     apache2            02:30:05

Note that above example is Debian specific on RPM based distributions you will have to grep for httpd instead of apache2
 

ps -eo "%U %c %t"| grep http| grep -v grep|grep root

root     apache2            10:30:05

To check MySQL uptine:
 

ps -eo "%U %c %t"| grep mysqld
root     mysqld_safe        20:42:53
mysql    mysqld             20:42:53


Though example is for mysql and Apache you can easily use ps cmd in same way to check any other Linux service uptime such as Java / Qmail / PostgreSQL / Postfix etc.
 

ps -eo "%U %c %t"|grep qmail
qmails   qmail-send      19-01:10:48
qmaill   multilog        19-01:10:48
root     qmail-lspawn    19-01:10:48
qmailr   qmail-rspawn    19-01:10:48
qmailq   qmail-clean     19-01:10:48
qmails   qmail-todo      19-01:10:48
qmailq   qmail-clean     19-01:10:48
qmaill   multilog        40-18:02:53


 ps -eo "%U %c %t"|grep -i nginx|grep -v root|uniq
nobody   nginx           55-01:22:44


ps -eo "%U %c %t"|grep -i java|grep -v root |uniq
hipo   java            27-22:02:07