IS THERE A GRAPHIC ( GUI ) TOOL TO VIEW HARDWARE INFORMATION ON LINUX?
If you are a console maniac like myself, perhaps you never think that you might need anything graphical besides to view hardware information on Linux, but as we're growing older sometimes it becomes much less easier to just use a graphical tool that can show us all the information we need regarding a Notebook / Desktop PC with Linux or even Server machine with enabled Graphical Environment with a brand new installed GNU / Linux whatever version (I hope you don't own server with running Xorg / Gnome / Mate / Xfce etc. as that's pretty much a waste of hardware resource and opens a dozen of other security risks for the server running services ).
There are at least 2 ways to quickly check hardware on both PC WorkStation or Server, the easiest and quickest for PC / Notebook Linux users if you have installed GTK libraries or Gnome Desktop Environment is with;
LSHW-GTK
LSHW-GTK is simply a GTK frontend over the command line tool for hardware information gathering LSHW
HardiInfo
HardInfo – is a small application that displays information about your hardware and operating system. Currently it knows about PCI, ISA PnP, USB, IDE, SCSI, Serial and parallel port devices.
1. Howto Install LSHW-GTK / HardInfo on Debian / Ubuntu / Mint GNU / Linux to easy view hardware information
To install both of them on Debian / Ubuntu GNU / Linux, run:
apt-get install –yes lshw lshw-gtk hardinfo
2. Howto install LSHW-GTK on Fedora, CentOS and OpenSuSE Linux to view easy hardware information
On RedHat RPM based Linux distributions, the package to install is called lshw-gui
Install with yum RPM package manager:
yum install –yes lshw lshw-gui hardinfo
3. Run lshw-gtk / hardinfo
Again, find them and run from GUI environment menus or run manually like in below example:
$ lshw-gtk
$ hardinfo
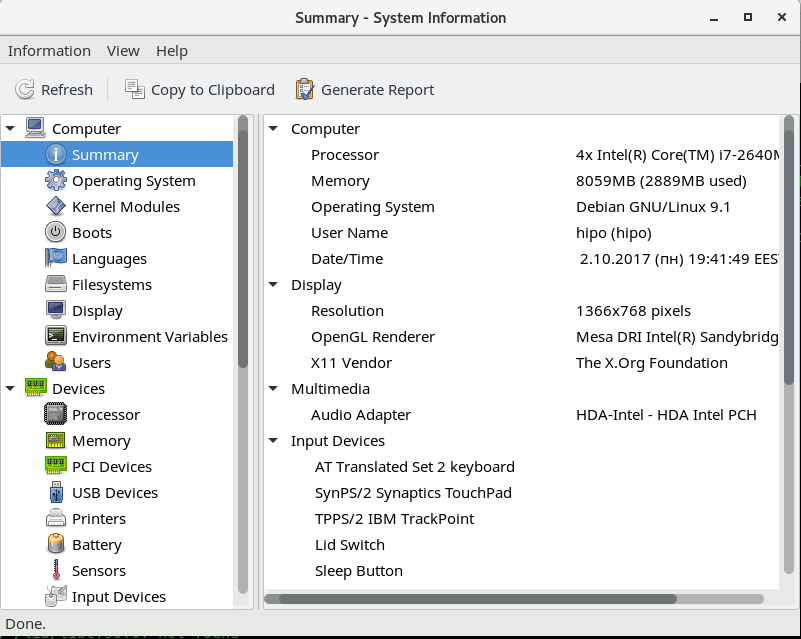
As you see hardinfo is really interactive and it gives you pretty much all the information, you might need, the only information that was missing at my case and I guess, that would happen to others is information about the SSD Hard Disk, which 180GB
HardInfo is really amazing program as it even includes various common Benchmark Tests and comparison with other Computers:
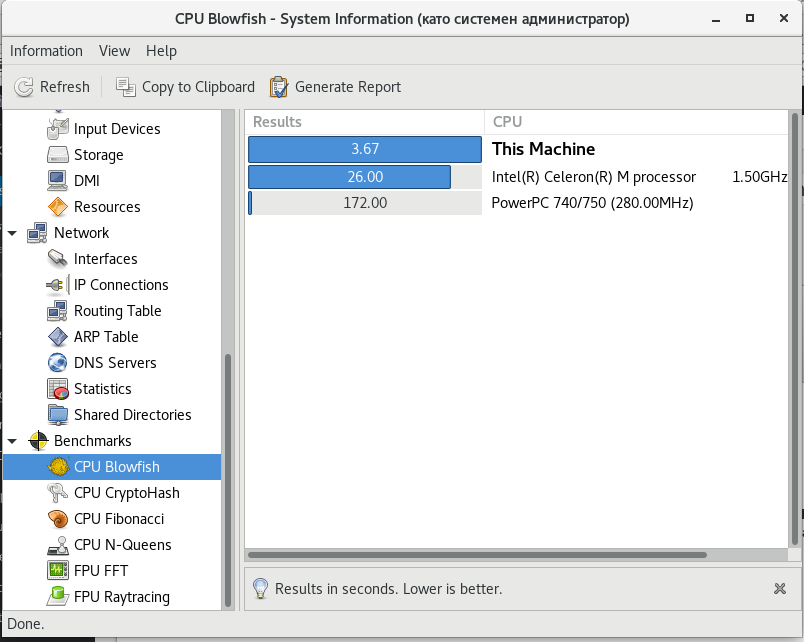
True that the tests, are pretty simple but still could be useful.
Now run it either from GNOME / Cinnamon (The default graphical environment of Debian Linux) or PLASMA (The new name for the second most popular Linux Graphical Environment – KDE desktop environment)
$ lshw
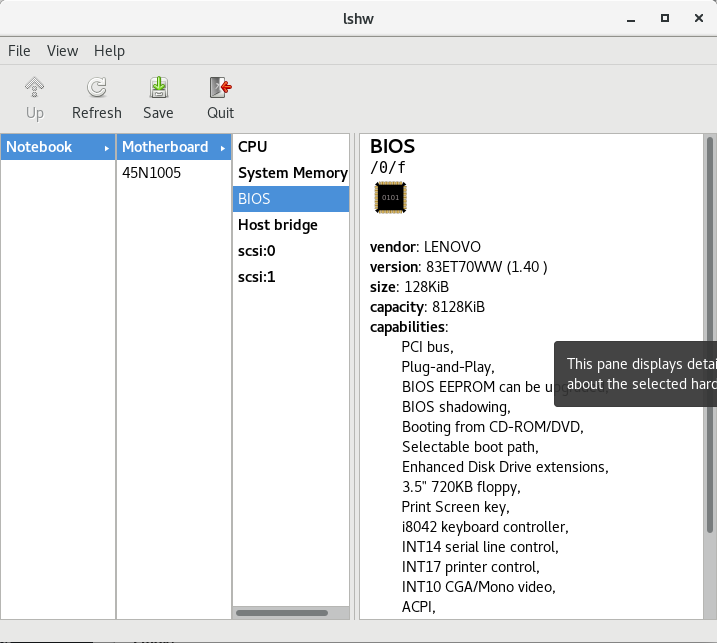
Here is few more screenshots from hardware info reported from my ThinkPad T410 Laptop Running Debian 9 Stretch at the moment.
MotherBoard -> BIOS Information
(thatnks God this old but gold Thinkpad T420 business notebook does not run UEFI substitute for BIOS 🙂
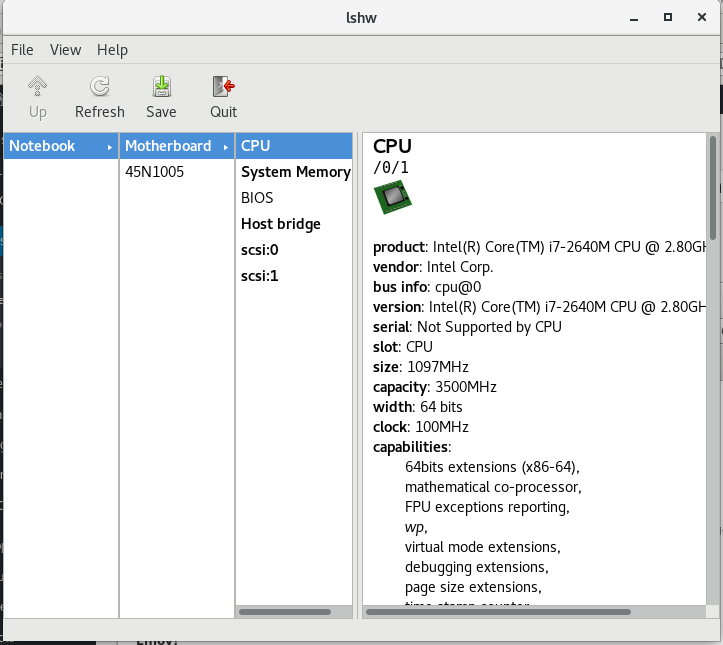
CPU Information (with all the supported CPU capabilities (extensions)
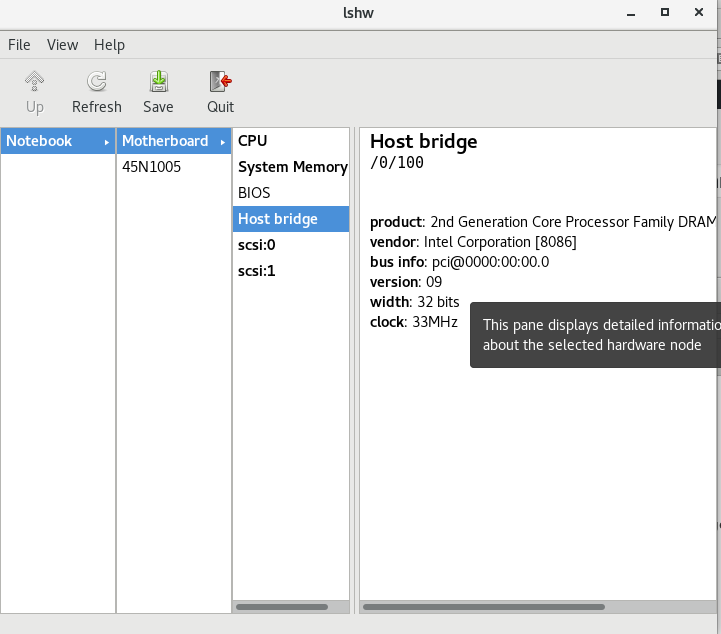
Host Bridge Info
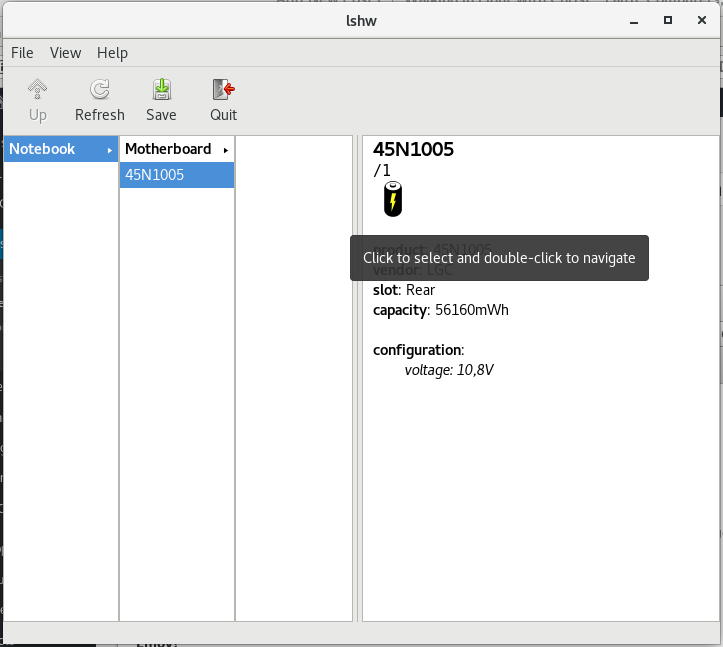
Thinkpad BATTERY (45N1005) Info
By the way another Way to GUI View your Computer is to just generate HTML from lshw command line tool (as it supports export to HTML), here is how:
$ lshw -html > ~/hardware-specs.html
Then just open it with Browser, for example I like GNOME Epiphany browser, so I'll read HTML with it:
$ epiphany ~/hardware-specs.html
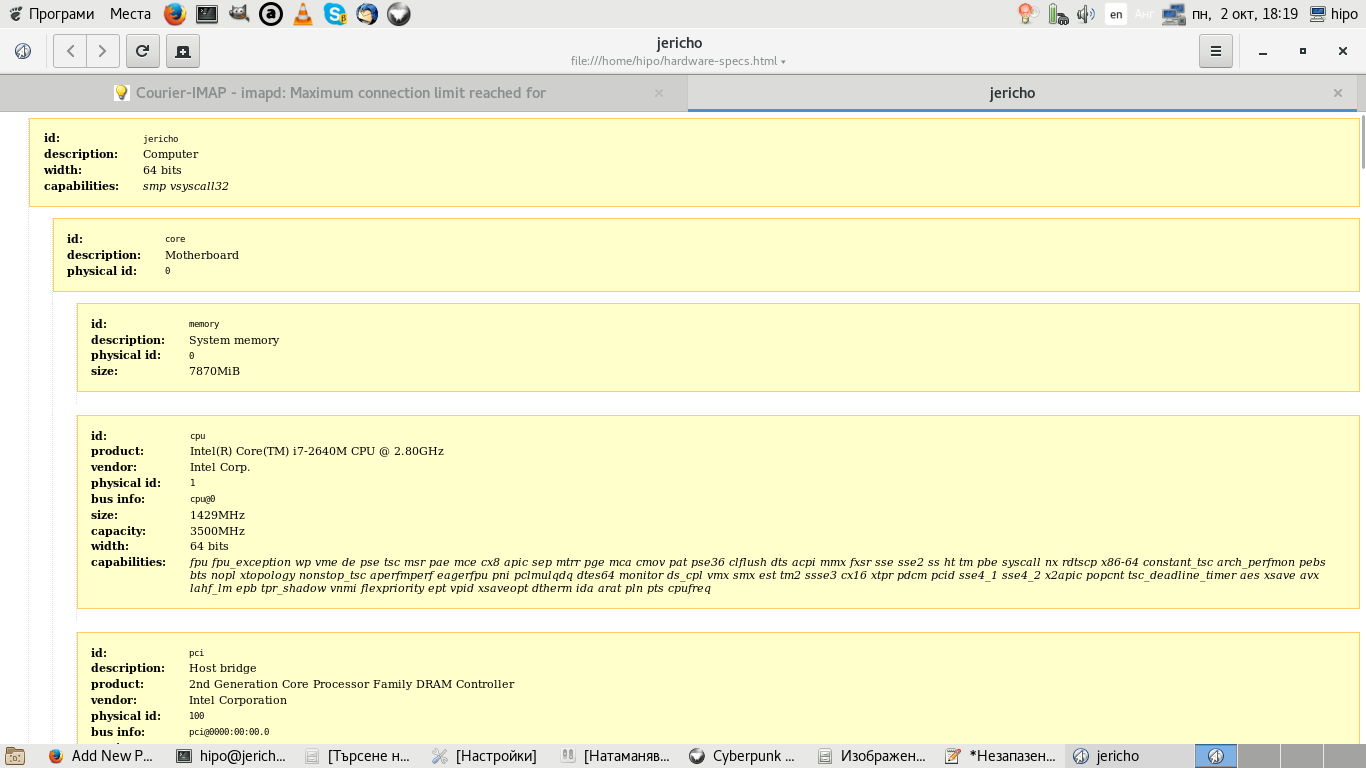
The great thing about generating HTML report for hardware is that on Staging / Production / Development servers which you inherited from some other administrator who for some reason (laziness 🙂 ) didn't left necessery documentation, you can easily map the machine hardware and even if it is a group of machines, you can automate report generation for all of them write a short script that parses the data on each of the HTML reports and finally creates a merged document with main important information about hardware of a cluster of computers etc.
If you still want to stick to console run the console version of lshw or use dmidecode or lshw:
$ lshw
hipo@jericho:~$ lshw
WARNING: you should run this program as super-user.
jericho
description: Computer
width: 64 bits
capabilities: smp vsyscall32
*-core
description: Motherboard
physical id: 0
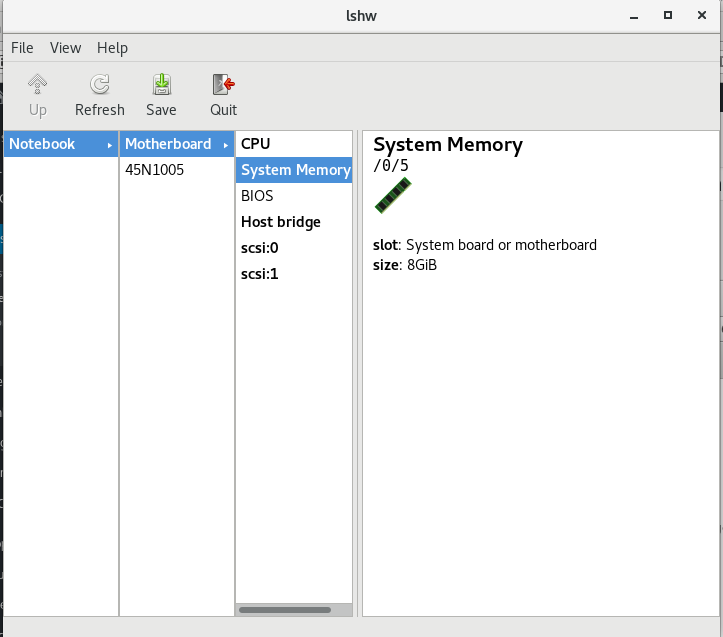
*-memory
description: System memory
physical id: 0
size: 7870MiB
*-cpu
product: Intel(R) Core(TM) i7-2640M CPU @ 2.80GHz
vendor: Intel Corp.
physical id: 1
bus info: cpu@0
size: 891MHz
capacity: 3500MHz
width: 64 bits
capabilities: fpu fpu_exception wp vme de pse tsc msr pae mce cx8 apic sep mtrr pge mca cmov pat pse36 clflush dts acpi mmx fxsr sse sse2 ss ht tm pbe syscall nx rdtscp x86-64 constant_tsc arch_perfmon pebs bts nopl xtopology nonstop_tsc aperfmperf eagerfpu pni pclmulqdq dtes64 monitor ds_cpl vmx smx est tm2 ssse3 cx16 xtpr pdcm pcid sse4_1 sse4_2 x2apic popcnt tsc_deadline_timer aes xsave avx lahf_lm epb tpr_shadow vnmi flexpriority ept vpid xsaveopt dtherm ida arat pln pts cpufreq
*-pci
description: Host bridge
product: 2nd Generation Core Processor Family DRAM Controller
vendor: Intel Corporation
physical id: 100
bus info: pci@0000:00:00.0
version: 09
width: 32 bits
clock: 33MHz
*-pci:0
description: PCI bridge
product: Xeon E3-1200/2nd Generation Core Processor Family PCI Express Root Port
vendor: Intel Corporation
physical id: 1
bus info: pci@0000:00:01.0
version: 09
width: 32 bits
clock: 33MHz
capabilities: pci normal_decode bus_master cap_list
configuration: driver=pcieport
resources: irq:24 ioport:5000(size=4096) memory:f0000000-f10fffff ioport:c0000000(size=301989888)
*-generic UNCLAIMED
description: Unassigned class
product: Illegal Vendor ID
vendor: Illegal Vendor ID
physical id: 0
bus info: pci@0000:01:00.0
version: ff
width: 32 bits
clock: 66MHz
capabilities: bus_master vga_palette cap_list
configuration: latency=255 maxlatency=255 mingnt=255
resources: memory:f0000000-f0ffffff memory:c0000000-cfffffff memory:d0000000-d1ffffff ioport:5000(size=128) memory:f1000000-f107ffff
*-display
description: VGA compatible controller
product: 2nd Generation Core Processor Family Integrated Graphics Controller
vendor: Intel Corporation
physical id: 2
bus info: pci@0000:00:02.0
version: 09
width: 64 bits
clock: 33MHz
capabilities: vga_controller bus_master cap_list rom
configuration: driver=i915 latency=0
resources: irq:30 memory:f1400000-f17fffff memory:e0000000-efffffff ioport:6000(size=64) memory:c0000-dffff
*-communication:0
description: Communication controller
product: 6 Series/C200 Series Chipset Family MEI Controller #1
vendor: Intel Corporation
physical id: 16
bus info: pci@0000:00:16.0
version: 04
width: 64 bits
clock: 33MHz
capabilities: bus_master cap_list
configuration: driver=mei_me latency=0
resources: irq:27 memory:f3925000-f392500f
*-communication:1
description: Serial controller
product: 6 Series/C200 Series Chipset Family KT Controller
vendor: Intel Corporation
physical id: 16.3
bus info: pci@0000:00:16.3
version: 04
width: 32 bits
clock: 66MHz
capabilities: 16550 bus_master cap_list
configuration: driver=serial latency=0
resources: irq:19 ioport:60b0(size=8) memory:f392c000-f392cfff
*-network
description: Ethernet interface
product: 82579LM Gigabit Network Connection
vendor: Intel Corporation
physical id: 19
bus info: pci@0000:00:19.0
logical name: enp0s25
version: 04
serial: 00:21:cc:cc:b2:27
capacity: 1Gbit/s
width: 32 bits
clock: 33MHz
capabilities: bus_master cap_list ethernet physical tp 10bt 10bt-fd 100bt 100bt-fd 1000bt-fd autonegotiation
configuration: autonegotiation=on broadcast=yes driver=e1000e driverversion=3.2.6-k firmware=0.13-3 latency=0 link=no multicast=yes port=twisted pair
resources: irq:25 memory:f3900000-f391ffff memory:f392b000-f392bfff ioport:6080(size=32)
*-usb:0
description: USB controller
product: 6 Series/C200 Series Chipset Family USB Enhanced Host Controller #2
vendor: Intel Corporation
physical id: 1a
bus info: pci@0000:00:1a.0
version: 04
width: 32 bits
clock: 33MHz
capabilities: ehci bus_master cap_list
configuration: driver=ehci-pci latency=0
resources: irq:16 memory:f392a000-f392a3ff
*-multimedia
description: Audio device
product: 6 Series/C200 Series Chipset Family High Definition Audio Controller
vendor: Intel Corporation
physical id: 1b
bus info: pci@0000:00:1b.0
version: 04
width: 64 bits
clock: 33MHz
capabilities: bus_master cap_list
configuration: driver=snd_hda_intel latency=0
resources: irq:29 memory:f3920000-f3923fff
*-pci:1
description: PCI bridge
product: 6 Series/C200 Series Chipset Family PCI Express Root Port 1
vendor: Intel Corporation
physical id: 1c
bus info: pci@0000:00:1c.0
version: b4
width: 32 bits
clock: 33MHz
capabilities: pci normal_decode cap_list
configuration: driver=pcieport
resources: irq:16
*-pci:2
description: PCI bridge
product: 6 Series/C200 Series Chipset Family PCI Express Root Port 2
vendor: Intel Corporation
physical id: 1c.1
bus info: pci@0000:00:1c.1
version: b4
width: 32 bits
clock: 33MHz
capabilities: pci normal_decode bus_master cap_list
configuration: driver=pcieport
resources: irq:17 memory:f3800000-f38fffff
*-network
description: Wireless interface
product: Centrino Advanced-N 6205 [Taylor Peak]
vendor: Intel Corporation
physical id: 0
bus info: pci@0000:03:00.0
logical name: wlp3s0
version: 34
serial: 26:ad:26:50:f1:db
width: 64 bits
clock: 33MHz
capabilities: bus_master cap_list ethernet physical wireless
configuration: broadcast=yes driver=iwlwifi driverversion=4.9.0-3-amd64 firmware=18.168.6.1 ip=192.168.0.102 latency=0 link=yes multicast=yes wireless=IEEE 802.11
resources: irq:28 memory:f3800000-f3801fff
*-pci:3
description: PCI bridge
product: 6 Series/C200 Series Chipset Family PCI Express Root Port 4
vendor: Intel Corporation
physical id: 1c.3
bus info: pci@0000:00:1c.3
version: b4
width: 32 bits
clock: 33MHz
capabilities: pci normal_decode bus_master cap_list
configuration: driver=pcieport
resources: irq:19 ioport:4000(size=4096) memory:f3000000-f37fffff ioport:f1800000(size=8388608)
*-pci:4
description: PCI bridge
product: 6 Series/C200 Series Chipset Family PCI Express Root Port 5
vendor: Intel Corporation
physical id: 1c.4
bus info: pci@0000:00:1c.4
version: b4
width: 32 bits
clock: 33MHz
capabilities: pci normal_decode bus_master cap_list
configuration: driver=pcieport
resources: irq:16 ioport:3000(size=4096) memory:f2800000-f2ffffff ioport:f2000000(size=8388608)
*-generic
description: System peripheral
product: MMC/SD Host Controller
vendor: Ricoh Co Ltd
physical id: 0
bus info: pci@0000:0d:00.0
version: 08
width: 32 bits
clock: 33MHz
capabilities: bus_master cap_list
configuration: driver=sdhci-pci latency=0
resources: irq:16 memory:f2800000-f28000ff
*-usb:1
description: USB controller
product: 6 Series/C200 Series Chipset Family USB Enhanced Host Controller #1
vendor: Intel Corporation
physical id: 1d
bus info: pci@0000:00:1d.0
version: 04
width: 32 bits
clock: 33MHz
capabilities: ehci bus_master cap_list
configuration: driver=ehci-pci latency=0
resources: irq:23 memory:f3929000-f39293ff
*-isa
description: ISA bridge
product: QM67 Express Chipset Family LPC Controller
vendor: Intel Corporation
physical id: 1f
bus info: pci@0000:00:1f.0
version: 04
width: 32 bits
clock: 33MHz
capabilities: isa bus_master cap_list
configuration: driver=lpc_ich latency=0
resources: irq:0
*-storage
description: SATA controller
product: 6 Series/C200 Series Chipset Family 6 port SATA AHCI Controller
vendor: Intel Corporation
physical id: 1f.2
bus info: pci@0000:00:1f.2
version: 04
width: 32 bits
clock: 66MHz
capabilities: storage ahci_1.0 bus_master cap_list
configuration: driver=ahci latency=0
resources: irq:26 ioport:60a8(size=8) ioport:60bc(size=4) ioport:60a0(size=8) ioport:60b8(size=4) ioport:6060(size=32) memory:f3928000-f39287ff
*-serial
description: SMBus
product: 6 Series/C200 Series Chipset Family SMBus Controller
vendor: Intel Corporation
physical id: 1f.3
bus info: pci@0000:00:1f.3
version: 04
width: 64 bits
clock: 33MHz
configuration: driver=i801_smbus latency=0
resources: irq:18 memory:f3924000-f39240ff ioport:efa0(size=32)
*-scsi
physical id: 2
logical name: scsi1
capabilities: emulated
*-cdrom
description: DVD-RAM writer
product: DVDRAM GT50N
vendor: HL-DT-ST
physical id: 0.0.0
bus info: scsi@1:0.0.0
logical name: /dev/cdrom
logical name: /dev/cdrw
logical name: /dev/dvd
logical name: /dev/dvdrw
logical name: /dev/sr0
version: LT20
capabilities: removable audio cd-r cd-rw dvd dvd-r dvd-ram
configuration: ansiversion=5 status=nodisc
WARNING: output may be incomplete or inaccurate, you should run this program as super-user.
Enjoy Life ! 🙂