Posts Tagged ‘better security’

KVM Virtual Machine RHEL 8.3 Linux install on Redhat 8.3 Linux Hypervisor with custom tailored kickstart.cfg

Friday, January 22nd, 2021

kvm_virtualization-logo-redhat-8.3-install-howto-with-kickstart

If you don't have tried it yet Redhat and CentOS and other RPM based Linux operationg systems that use anaconda installer is generating a kickstart file after being installed under /root/{anaconda-ks.cfg,initial-setup- ks.cfg,original-ks.cfg} immediately after the OS installation completes. Using this Kickstart file template you can automate installation of Redhat installation with exactly the same configuration as many times as you like by directly loading your /root/original-ks.cfg file in RHEL installer.

Here is the official description of Kickstart files from Redhat:

"The Red Hat Enterprise Linux installation process automatically writes a Kickstart file that contains the settings for the installed system. This file is always saved as /root/anaconda-ks.cfg. You may use this file to repeat the installation with identical settings, or modify copies to specify settings for other systems."


Kickstart files contain answers to all questions normally asked by the text / graphical installation program, such as what time zone you want the system to use, how the drives should be partitioned, or which packages should be installed. Providing a prepared Kickstart file when the installation begins therefore allows you to perform the installation automatically, without need for any intervention from the user. This is especially useful when deploying Redhat based distro (RHEL / CentOS / Fedora …) on a large number of systems at once and in general pretty useful if you're into the field of so called "DevOps" system administration and you need to provision a certain set of OS to a multitude of physical servers or create or recreate easily virtual machines with a certain set of configuration.
 

1. Create /vmprivate storage directory where Virtual machines will reside

First step on the Hypervisor host which will hold the future created virtual machines is to create location where it will be created:

[root@redhat ~]#  lvcreate –size 140G –name vmprivate vg00
[root@redhat ~]#  mkfs.ext4 -j -b 4096 /dev/mapper/vg00-vmprivate
[root@redhat ~]# mount /dev/mapper/vg00-vmprivate /vmprivate

To view what is the situation with Logical Volumes and  VG group names:

[root@redhat ~]# vgdisplay -v|grep -i vmprivate -A7 -B7
  Segments               1
  Allocation             inherit
  Read ahead sectors     auto
  – currently set to     8192
  Block device           253:0


  — Logical volume —
  LV Path                /dev/vg00/vmprivate
  LV Name                vmprivate
  VG Name                vg00
  LV UUID                VVUgsf-FXq2-TsMJ-QPLw-7lGb-Dq5m-3J9XJJ
  LV Write Access        read/write
  LV Creation host, time main.hostname.com, 2021-01-20 17:26:11 +0100
  LV Status              available
  # open                 1
  LV Size                150.00 GiB


Note that you'll need to have the size physically available on a SAS / SSD Hard Drive physically connected to Hypervisor Host.

To make the changes Virtual Machines storage location directory permanently mounted add to /etc/fstab

/dev/mapper/vg00-vmprivate  /vmprivate              ext4    defaults,nodev,nosuid 1 2

[root@redhat ~]# echo '/dev/mapper/vg00-vmprivate  /vmprivate              ext4    defaults,nodev,nosuid 1 2' >> /etc/fstab


2. Second we need to install the following set of RPM packages on the Hypervisor Hardware host

[root@redhat ~]# yum install qemu-kvm qemu-img libvirt virt-install libvirt-client virt-manager libguestfs-tools virt-install virt-top -y

3. Enable libvirtd on the host

[root@redhat ~]#  lsmod | grep -i kvm
[root@redhat ~]#  systemctl enable libvirtd

4. Configure network bridging br0 interface on Hypervisor


In /etc/sysconfig/network-scripts/ifcfg-eth0 you need to include:

NM_CONTROLED=NO

Next use nmcli redhat configurator to create the bridge (you can use ip command instead) but since the tool is the redhat way to do it lets do it their way ..

[root@redhat ~]# nmcli connection delete eno3
[root@redhat ~]# nmcli connection add type bridge autoconnect yes con-name br0 ifname br0
[root@redhat ~]# nmcli connection modify br0 ipv4.addresses 10.80.51.16/26 ipv4.method manual
[root@redhat ~]# nmcli connection modify br0 ipv4.gateway 10.80.51.1
[root@redhat ~]# nmcli connection modify br0 ipv4.dns 172.20.88.2
[root@redhat ~]# nmcli connection add type bridge-slave autoconnect yes con-name eno3 ifname eno3 master br0
[root@redhat ~]# nmcli connection up br0

5. Prepare a working kickstart.cfg file for VM


Below is a sample kickstart file I've used to build a working fully functional Virtual Machine with Red Hat Enterprise Linux 8.3 (Ootpa) .

#version=RHEL8
#install
# Run the Setup Agent on first boot
firstboot --enable
ignoredisk --only-use=vda
# Use network installation
#url --url=http://hostname.com/rhel/8/BaseOS
##url --url=http://171.23.8.65/rhel/8/os/BaseOS
# Use text mode install
text
#graphical
# System language
#lang en_US.UTF-8
keyboard --vckeymap=us --xlayouts='us'
# Keyboard layouts
##keyboard us
lang en_US.UTF-8
# Root password
rootpw $6$gTiUCif4$YdKxeewgwYCLS4uRc/XOeKSitvDJNHFycxWVHi.RYGkgKctTMCAiY2TErua5Yh7flw2lUijooOClQQhlbstZ81 --iscrypted
# network-stuff
# place ip=your_VM_IP, netmask, gateway, nameserver hostname 
network --bootproto=static --ip=10.80.21.19 --netmask=255.255.255.192 --gateway=10.80.21.1 --nameserver=172.30.85.2 --device=eth0 --noipv6 --hostname=FQDN.VMhost.com --onboot=yes
# if you need just localhost initially configured uncomment and comment above
##network В --device=lo --hostname=localhost.localdomain
# System authorization information
authconfig --enableshadow --passalgo=sha512 --enablefingerprint
# skipx
skipx
# Firewall configuration
firewall --disabled
# System timezone
timezone Europe/Berlin
# Clear the Master Boot Record
##zerombr
# Repositories
## Add RPM repositories from KS file if necessery
#repo --name=appstream --baseurl=http://hostname.com/rhel/8/AppStream
#repo --name=baseos --baseurl=http://hostname.com/rhel/8/BaseOS
#repo --name=inst.stage2 --baseurl=http://hostname.com ff=/dev/vg0/vmprivate
##repo --name=rhsm-baseos В  В --baseurl=http://172.54.8.65/rhel/8/rhsm/x86_64/BaseOS/
##repo --name=rhsm-appstream --baseurl=http://172.54.8.65/rhel/8/rhsm/x86_64/AppStream/
##repo --name=os-baseos В  В  В --baseurl=http://172.54.9.65/rhel/8/os/BaseOS/
##repo --name=os-appstream В  --baseurl=http://172.54.8.65/rhel/8/os/AppStream/
#repo --name=inst.stage2 --baseurl=http://172.54.8.65/rhel/8/BaseOS
# Disk partitioning information set proper disk sizing
##bootloader --location=mbr --boot-drive=vda
bootloader --append=" crashkernel=auto tsc=reliable divider=10 plymouth.enable=0 console=ttyS0 " --location=mbr --boot-drive=vda
# partition plan
zerombr
clearpart --all --drives=vda --initlabel
part /boot --size=1024 --fstype=ext4 --asprimary
part swap --size=1024
part pv.01 --size=30000 --grow --ondisk=vda
##part pv.0 --size=80000 --fstype=lvmpv
#part pv.0 --size=61440 --fstype=lvmpv
volgroup s pv.01
logvol / --vgname=s --size=15360 --name=root --fstype=ext4
logvol /var/cache/ --vgname=s --size=5120 --name=cache --fstype=ext4 --fsoptions="defaults,nodev,nosuid"
logvol /var/log --vgname=s --size=7680 --name=log --fstype=ext4 --fsoptions="defaults,nodev,noexec,nosuid"
logvol /tmp --vgname=s --size=5120 --name=tmp --fstype=ext4 --fsoptions="defaults,nodev,nosuid"
logvol /home --vgname=s --size=5120 --name=home --fstype=ext4 --fsoptions="defaults,nodev,nosuid"
logvol /opt --vgname=s --size=2048 --name=opt --fstype=ext4 --fsoptions="defaults,nodev,nosuid"
logvol /var/log/audit --vgname=s --size=3072 --name=audit --fstype=ext4 --fsoptions="defaults,nodev,nosuid"
logvol /var/spool --vgname=s --size=2048 --name=spool --fstype=ext4 --fsoptions="defaults,nodev,nosuid"
logvol /var --vgname=s --size=7680 --name=var --fstype=ext4 --fsoptions="defaults,nodev,nosuid"
# SELinux configuration
selinux --disabled
# Installation logging level
logging --level=debug
# reboot automatically
reboot
###
%packages
@standard
python3
pam_ssh_agent_auth
-nmap-ncat
#-plymouth
#-bpftool
-cockpit
#-cryptsetup
-usbutils
#-kmod-kvdo
#-ledmon
#-libstoragemgmt
#-lvm2
#-mdadm
-rsync
#-smartmontools
-sos
-subscription-manager-cockpit
# Tune Linux vm.dirty_background_bytes (IMAGE-439)
# The following tuning causes dirty data to begin to be background flushed at
# 100 Mbytes, so that it writes earlier and more often to avoid a large build
# up and improving overall throughput.
echo "vm.dirty_background_bytes=100000000" >> /etc/sysctl.conf
# Disable kdump
systemctl disable kdump.service
%end

Important note to make here is the MD5 set root password string in (rootpw) line this string can be generated with openssl or mkpasswd commands :

Method 1: use openssl cmd to generate (md5, sha256, sha512) encrypted pass string

[root@redhat ~]# openssl passwd -6 -salt xyz test
$6$xyz$rjarwc/BNZWcH6B31aAXWo1942.i7rCX5AT/oxALL5gCznYVGKh6nycQVZiHDVbnbu0BsQyPfBgqYveKcCgOE0

Note: passing -1 will generate an MD5 password, -5 a SHA256 encryption and -6 SHA512 encrypted string (logically recommended for better security)

Method 2: (md5, sha256, sha512)

[root@redhat ~]# mkpasswd –method=SHA-512 –stdin

The option –method accepts md5, sha-256 and sha-512
Theoretically there is also a kickstart file generator web interface on Redhat's site here however I never used it myself but instead use above kickstart.cfg
 

6. Install the new VM with virt-install cmd


Roll the new preconfigured VM based on above ks template file use some kind of one liner command line  like below:
 

[root@redhat ~]# virt-install -n RHEL8_3-VirtualMachine –description "CentOS 8.3 Virtual Machine" –os-type=Linux –os-variant=rhel8.3 –ram=8192 –vcpus=8 –location=/vmprivate/rhel-server-8.3-x86_64-dvd.iso –disk path=/vmprivate/RHEL8_3-VirtualMachine.img,bus=virtio,size=70 –graphics none –initrd-inject=/root/kickstart.cfg –extra-args "console=ttyS0 ks=file:/kickstart.cfg"

7. Use a tiny shell script to automate VM creation


For some clarity and better automation in case you plan to repeat VM creation you can prepare a tiny bash shell script:
 

#!/bin/sh
KS_FILE='kickstart.cfg';
VM_NAME='RHEL8_3-VirtualMachine';
VM_DESCR='CentOS 8.3 Virtual Machine';
RAM='8192';
CPUS='8';
# size is in Gigabytes
VM_IMG_SIZE='140';
ISO_LOCATION='/vmprivate/rhel-server-8.3-x86_64-dvd.iso';
VM_IMG_FILE_LOC='/vmprivate/RHEL8_3-VirtualMachine.img';

virt-install -n "$VMNAME" –description "$VM_DESCR" –os-type=Linux –os-variant=rhel8.3 –ram=8192 –vcpus=8 –location="$ISO_LOCATION" –disk path=$VM_IMG_FILE,bus=virtio,size=$IMG_VM_SIZE –graphics none –initrd-inject=/root/$KS_FILE –extra-args "console=ttyS0 ks=file:/$KS_FILE"


A copy of virt-install.sh script can be downloaded here

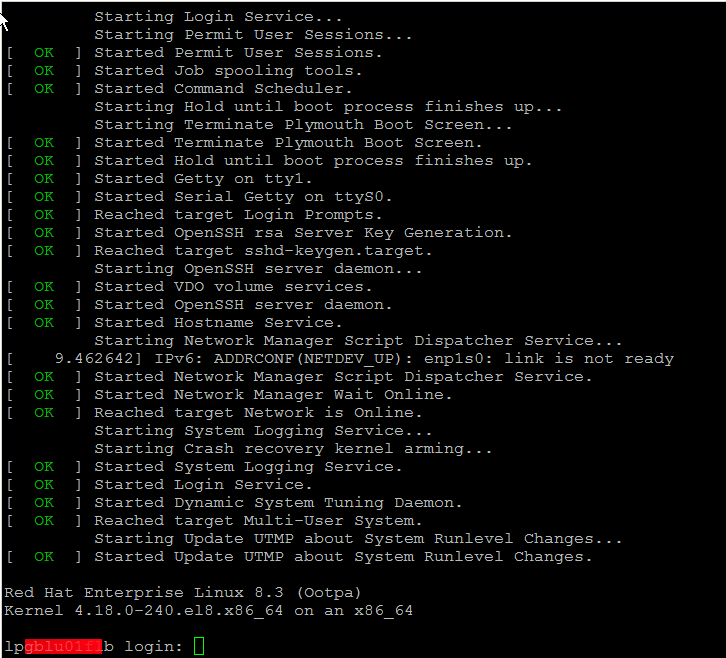
Wait for the installation to finish it should be visualized and if all installation is smooth you should get a login prompt use the password generated with openssl tool and test to login, then disconnect from the machine by pressing CTRL + ] and try to login via TTY with

[root@redhat ~]# virst list –all
 Id   Name        State
—————————
 2    
RHEL8_3-VirtualMachine   running

[root@redhat ~]#  virsh console RHEL8_3-VirtualMachine


redhat8-login-prompt

One last thing I recommend you check the official documentation on Kickstart2 from CentOS official website

In case if you later need to destroy the VM and the respective created Image file you can do it with:
 

[root@redhat ~]#  virsh destroy RHEL8_3-VirtualMachine
[root@redhat ~]#  virsh undefine RHEL8_3-VirtualMachine

Don't forget to celebreate the success and give this nice article a credit by sharing this nice tutorial with a friend or by placing a link to it from your blog 🙂


Enjoy !

How to configure mutual Apache WebServer SSL authentication – Two Way SSL mutual authentication for better security and stronger encryption

Tuesday, September 12th, 2017

how-to-configure-one-way-and-two-way-handshake-authentication-apache-one-and-two-way-ssl-handshake-authentication-explained-diagram

In this post I'm about to explain how to configure Apache Web server for Two Way SSL Authentication alone and how to configure Two Way SSL Authentication for a Certain Domain URL Locations and the mixture of both One Way standar SSL authentication and Two Way Handshake Authentication .
 

Generally before starting I have to say most Web sites does not require a Mutual SSL  Authentication (the so called Two-Way SSL).

In most configurations Apache Web server is configured for One Way Basic authentication where The Web server authenticates to the Client usuall that's Browser program such as Mozilla  Firefox / Chrome / IE / Epiphany whatever presenting certificate signed by Trustable Certificate Authority such as VeriSign.

1WaySSL-clien-to-server-illustrated
 

The authority then autneticates to the browser that the Installed certificate on the Apache Web Server is trustable and the website is not a fraudulant, that is especially important for websites where sensitive data is being transferred, lets say Banks (Doing Money Transfers online), Hospitals (Transfelling your Medical results data) or purchasing something from Amazon.com, Ebay.Com, PayPal etc.

Once client validates the certificate the communication line gets encrypted based on Public Key, below diagram illustrates this.

Public Ke Cryptography diagram how it works

However in some casis where an additional Security Hardening is required, the Web Server might be configured to require additional certificate so the authentication between Client -> Server doesn't work by certificating with just a Server provided certificate but to work Two Ways, e.g. the Client might be setup to also have a Trusted Authority Certificate and to present it to server and send back this certificate to the Server as well for a mutual authentication and only once the certificate handshake between;

client -> server and server -> client

2WaySSL-client-to-server-and-server-to-client-mutual-authentication-illustration

is confirmed as successful the two could establish a trustable encypted SSL channel over which they can talk securely this is called
Two way SSL Authentication.


1. Configure Two Way SSL Authentication on Apache HTTPD
 

To be able to configure Two Way SSL Authentication handshake on Apache HTTPD just like with One way standard one, the mod_ssl Apache module have to enabled.

Enabling two-way SSL is usually not done on normal clients but is done with another server acting as client that is using some kind of REST API to connect to the server


The Apache directive used for Mutual Authentication is SSLVerifyClient directive (this is provided by mod_ssl)

the options that SSLVerifyClient receives are:

none: instructs no client Certificate is required
optional: the client is allowed to present a valid certificate but optionally
require: the client is always required to present a valid Certificate for mutual Authenticaton
optional_no_ca: the client is asked to present a valid Certificate however it has to be successfully verified.

In most of Apache configuratoins the 2 ones that are used are either none or require
because optional is reported to not behave properly with some of the web browsers and
optional_no_ca is not restrictive and is usually used just for establishing basic SSL test pages.

At some cases when configuring Apache HTTPD it is required to have a mixture of both One Way and Two Way Authentication, if that is your case the SSLVerifyClient none is to be used inside the virtual host configuration and then include SSLVerifyClient require to each directory (URL) location that requires a client certificate with mutual auth.

Below is an example VirtualHost configuration as a sample:


The SSLVerifyClient directive from mod_ssl dictates whether a client certificate is required for a given location:
 

<VirtualHost *:443>

SSLVerifyClient none
<Location /whatever_extra_secured_location/dir>
            …
            SSLVerifyClient require
</Location>
</VirtualHost>


Because earlier in configuration the SSLVerifyClient none is provided, the client will not be doing a Two Way Mutual Authentication for the whole domain but just the selected Location the client certificate will be not requested by the server for a 2 way mutual auth, but only when the client requests the Location setupped resouce a renegotiation will be done and client will be asked to provide certificate for the two way handshake authentication.

Keep in mind that on a busy servers with multitudes of connections this renegotiation might put an extra load on the server and this even can turn into server scaling issue on a high latency networks, because of the multiple client connects. Every new SSL renegotiation is about to assign new session ID and that could have a negative impact on overall performance and could eat you a lot of server memory.
To avoid this often it i suseful to use SSLRenegBufferSize directive which by default is set in Apache 2.2.X to 128 Kilobytes and for multiple connects it might be wise to raise this.

A mutual authentication that is done on a Public Server that is connected to the Internet without any DMZ might be quite dangerous thing as due to to the multiple renegotiations the server might end up easily a victim of Denial of Service (DOS) attack, by multiple connects to the server trying to consume all its memory …
Of course the security is not dependent on how you have done the initial solution design but also on how the Client software that is doing the mutual authentication is written to make the connections to the Web Server.


2. Configure a Mixture of One Way Standard (Basic) SSL Authentication together with Two Way Client Server Handshake SSL Authentication


Below example configuring is instructing Apache Webserver to listen for a mixture of One Way standard Client to browser authentication and once the client browser establishes the session it asks for renegotiation for every location under Main Root / to be be authenticated with a Mutual Two Way Handshake Authentication, then the received connection is proxied by the Reverse Proxy to the end host which is another proxy server listening on the same host on (127.0.0.1 or localhost) on port 8080.


<VirtualHost *:8001>
  ServerAdmin name@your-server.com
  SSLEngine on
  SSLCertificateFile /etc/ssl/server-cert.pem
  SSLCertificateKeyFile /etc/ssl/private/server-key.pem

  SSLVerifyClient require
  SSLVerifyDepth 10
  SSLCACertificateFile /home/etc/ssl/cacert.pem
  <location />
    Order allow,deny
    allow from all
    SSLRequire (%{SSL_CLIENT_S_DN_CN} eq "clientcn")
 </location>
  ProxyPass / http://127.0.0.1:8080/
  ProxyPassReverse / http://127.0.0.1:8080/
</VirtualHost>


3. So what other useful options do we have?


Keep Connections Alive

This is a good option but it may consume significant amount of memory. If Apache is using the prefork MPM (as many Webservers still do instead of Apache Threading), keeping all connections alive means multiple live processes. For example, if Apache has to support 1000 concurrent connections, each process consuming 2.7MB, an additional 2700MB should be considered. This may be of lesser significance when using other MPMs. This option will mitigate the problem but will still require SSL renegotiation when the SSL sessions will time out.

Another better approach in terms of security to the mixture of requirement for both One Side Basic SSL Authentication to a Webserver and Mutual Handshake SSL Auth is just to set different Virtualhosts one or more configuration to serve the One Way SSL authentication and others that are configured just to do the Mutual Two Way Handshake SSL to specified Locations.

4. So what if you need to set-up multiple Virtualhosts with SSL authentication on the Same IP address Apache (SNI) ?


For those who did not hear still since some time Apache Web Server has been rewritten to support SNI (Server Name Indication), SNI is really great feature as it can give to the webserver the ability to serve multiple one and two way handshake authentications on the same IP address. For those older people you might remember earlier before SNI was introduced, in order to support a VirtualHost with SSL encryption authentication the administrator had to configure a separate IP address for each SSL certificate on each different domian name.  

SNI feature can also be used here with both One Way standard Apache SSL auth or Two Way one the only downside of course is SNI could be a performance bottleneck if improperly scaled. Besides that some older browsers are not supporting SNI at all, so possibly for public services SNI is less recommended but it is better to keep-up to the good old way to have a separate IP address for each :443 set upped VirtualHost.
One more note to make here is SNI works by checking the Host Header send by the Client (browser) request
SSL with Virtual Hosts Using SNI.

SNI (Server Name Indication) is a cool feature. Basically it allows multiple virtual hosts with different configurations to listen to the same port. Each virtual host should specify a unique server name identification using the SeverName directive. When accepting connections, Apache will select a virtual host based on the host header that is part of the request (must be set on both HTTP and SSL levels). You can also set one of the virtual hosts as a default to serve clients that don’t support SNI. You should bear in mind that SNI has different support levels in Java. Java 1.7 was the first version to support SNI and therefore it should be a minimum requirement for Java clients.

5. Overall list of useful Options for Mutual Two Way And Basic SSL authentication
 

Once again the few SSL options for Apache Mutual Handhake Authentication

SSLVerifyClient -> to enable the two-way SSL authentication

SSLVerifyDepth -> to specify the depth of the check if the certificate has an approved CA

SSLCACertificateFile -> the public key that will be used to decrypt the data recieved

SSLRequire -> Allows only requests that satisfy the expression


Below is another real time example for a VirtualHost Apache configuration configured for a Two Way Handshake Mutual Authentication


For the standard One way Authentication you need the following Apache directives


SSLEngine on -> to enable the single way SSL authentication

SSLCertificateFile -> to specify the public certificate that the WebServer will show to the users

SSLCertificateKeyFIle -> to specify the private key that will be used to encrypt the data sent


6. Configuring Mutual Handshake SSL Authentication on Apache 2.4.x

Below guide is focusing on Apache HTTPD 2.2.x nomatter that it can easily be adopted to work on Apache HTTPD 2.4.x branch, if you're planning to do a 2 way handshake auth on 2.4.x I recommend you check SSL / TLS Apache 2.4.x Strong Encryption howto official Apache documentation page.

In meantime here is one working configuration for SSL Mutual Auth handshake for Apache 2.4.x:


<Directory /some-directory/location/html>
    RedirectMatch permanent ^/$ /auth/login.php
    Options -Indexes +FollowSymLinks

    # Anything which matches a Require rule will let us in

    # Make server ask for client certificate, but not insist on it
    SSLVerifyClient optional
    SSLVerifyDepth  2
    SSLOptions      +FakeBasicAuth +StrictRequire

    # Client with appropriate client certificate is OK
    <RequireAll>
        Require ssl-verify-client
        Require expr %{SSL_CLIENT_I_DN_O} eq "Company_O"
    </RequireAll>

    # Set up basic (username/password) authentication
    AuthType Basic
    AuthName "Password credentials"
    AuthBasicProvider file
    AuthUserFile /etc/apache2/htaccess/my.passwd

    # User which is acceptable to basic authentication is OK
    Require valid-user

    # Access from these addresses is OK
    Require ip 10.20.0.0/255.255.0.0
    Require ip 10.144.100
</Directory>

Finally to make the new configurations working depending you need to restart Apache Webserver depending on your GNU / Linux / BSD or Windows distro use the respective script to do it.

Enjoy!

Linux PHP Disable chmod() and chown() functions for better Apache server security

Monday, July 15th, 2013

php_tighten_security_by_enabling_safe_mode-php-ini-function-prevent-crackers-break-in-your-server
I have to administer few inherited Linux servers with Ubuntu and Debian Linux. The servers hosts mainly websites with regularly un-updated Joomlas and some custom developed websites which were developed pretty unsecure. To mitigate hacked websites I already disabled some of most insecure functions like system(); eval etc. – I followed literally my previous tutorial PHP Webhosting security disable exec();, system();, open(); and eval();
Still in logs I see shits like:
 

[error] [client 66.249.72.100] PHP Warning:  mkdir(): No such file or directory in /var/www/site/plugins/system/jfdatabase/intercept.jdatabasemysql.php on line 161

Hence to prevent PHP mkdir(); and chown(); functiosn being active, I had to turn on in /etc/php5/apache2/php.ini – safe_mode . For some reason whoever configured Apache leave it off.

safe_mode = on

Hopefully by disabling this functions will keep cracker bot scripts to not create some weird directory structures on HDD or use it as mean to DoS overflow servers filesystem.

Hope this help others stabilize their servers too. Enjoy ! 🙂

PHP: Better Webhosting Security – Disable exec(), exec_shell(), system(), popen(), eval() … shell fork functions

Sunday, June 23rd, 2013

increase php security better php security by disabling fork shell system and eval functions

If you work as System Administrator of WebHosting company, you definitely know how often it is that some automated cracker scripts (working as worms) intrude through buggy old crappy custom coded sites or unupdated obsolete Joomla / WordPress etc. installs. and run themselves trying to harvest for other vulnerable hosts. By default PHP enables running commands via shell with PHP functions like exec();, shell_exec(); , system();. and those script kiddie scripts use mainly this functions to spawn shell via vulnerable PHP app. Then scripts use whether php curl support is installed (i.e. php5-curl) to download and replicate itself to next vulnerable hop.

With that said it is a must after installing new Linux based server for hosting to disable this functions, to save yourself from future hassles …
Earlier, I blogged how to disable PHP system system(); and exec(); functions to raise Apache security using suhosin however this method requires php suhosin being used.

Yesterday, I had to configure new web hosting server with Debian 7, so I tried installing suhosin to use it to protect PHP from having enabled dangerous system();, eval(); exec(); .
I remember disabling system(); using suhosin php extension was working fine on older Debian releases, however in Debian 6.0, php5-suhosin package was causing severe Apache crashes and probably that's why in latest Debian Wheezy 7.0, php suhosin extension is no longer available. Therefore using suhosin method to disable system();, exec(); and other fork functions is no longer possible in Debian.

Since, suhosin is no longer there, I decided to use conventional PHP method via php.ini.

Here is how to do it

Edit:

/etc/php5/apache2/php.ini

debian:~# vim /etc/php5/apache2/php.ini
And near end of file placed:

disable_functions =exec,passthru,shell_exec,system,proc_open,
popen,curl_exec, curl_multi_exec,parse_ini_file,show_source

allow_url_fopen Off
allow_url_include Off

It is good to explain few of above functions – shell_exec, proc_open, popen, allow_url_fopen, show_source  and allow_url_include.

Disabling shell_exec – disables from PHP scripts executing commands with bash slash ` `, i.e. `ls`. proc_open and popen allows reading files from file system.

show_source – makes possible also reading other PHP source files or can be used to display content of other files from fs.

To read newly placed config vars in php.ini usual apache restart is necessary:

debian:~# /etc/init.d/apache2 restart
[….] Restarting web server: apache2
. ok

Further on tо test whether system();, exec();, passthru(); … etc. are disabled. Make new PHP file with content:

<?php
error_reporting(E_ALL);
$disabled_functions = ini_get('disable_functions');
if ($disabled_functions!='')
{
    $arr = explode(',', $disabled_functions);
    sort($arr);
    echo 'Disabled Functions:
        ';
    for ($i=0; $i<count($arr); $i++)
    {
        echo $i.' - '.$arr[$i].'<br />';
    }
}
else
{
    echo 'No functions disabled';
}
?>

php show disabled functions screenshot improve php security by disabling shell spawn functions

Copy of above source code show_disabled_php_functions.php is here for download
. To test your Apache PHP configuration disabled functions download it with wget or curl and rename it to .php:

# cd /var/www # wget -q https://www.pc-freak.net/files/show_disabled_php_functions.php.txt
mv show_disabled_php_functions.php.txt show_disabled_php_functions.php

After disabling functions on those newly setup Debian hosting Apache webserver, I remembered, same functions were still active on another CentOS Linux server.

To disable it there as well, had to edit:

/etc/php.ini

[root@centos:~]# vim /etc/php.ini

And again place after last file line;

disable_functions =exec,passthru,shell_exec,system,proc_open,popen,
curl_exec, curl_multi_exec,parse_ini_file,show_source

allow_url_fopen Off
allow_url_include Off

Finally on CentOS host, had to restart Apache:

[root@centos:~]# /etc/init.d/httpd restart

For Security paranoids, there are plenty of other PHP functions to disable including, basic functions like ln, mv, mkdir, cp, cat etc.

Below is list of all functions to disable – only disable this whether you you're a PHP security freak and you're 100% some server hosted website will not use it:

disable_functions = "ln, cat, popen, pclose, posix_getpwuid, posix_getgrgid, posix_kill, parse_perms, system, dl, passthru, exec, shell_exec, popen, proc_close, proc_get_status, proc_nice, proc_open, escapeshellcmd, escapeshellarg, show_source, posix_mkfifo, mysql_list_dbs, get_current_user, getmyuid, pconnect, link, symlink, pcntl_exec, ini_alter, pfsockopen, leak, apache_child_terminate, posix_kill, posix_setpgid, posix_setsid, posix_setuid, proc_terminate, syslog, fpassthru, stream_select, socket_select, socket_create, socket_create_listen, socket_create_pair, socket_listen, socket_accept, socket_bind, socket_strerror, pcntl_fork, pcntl_signal, pcntl_waitpid, pcntl_wexitstatus, pcntl_wifexited, pcntl_wifsignaled, pcntl_wifstopped, pcntl_wstopsig, pcntl_wtermsig, openlog, apache_get_modules, apache_get_version, apache_getenv, apache_note, apache_setenv, virtual, chmod, file_upload, delete, deleted, edit, fwrite, cmd, rename, unlink, mkdir, mv, touch, cp, cd, pico"

How to install OpenNTPD NTP server to synchronize system clock on FreeBSD for better security

Sunday, February 12th, 2012

FreeBSD, OpenBSD, NetBSD and Linux ntpd alternative server to synchronize server system time

Lately I've been researching on ntpd and wrote a two articles on how to install ntpd on CentOS, Fedora and how to install ntpd on FreeBSD and during my research on ntpd, I've come across OpenNTPD and decided to give it a go on my FreeBSD home router.
OpenBSD project is well known for it is high security standards and historically has passed the test of time for being a extraordinary secure UNIX like free operating system.
OpenBSD is developed in parallel with FreeBSD, however the development model of the two free operating systems are way different.

As a part of the OpenBSD to be independant in its basis of software from other free operating systems like GNU / Linux and FreeBSD. They develop the all around free software realm known OpenSSH. Along with OpenSSH, one interesting project developed for the main purpose of OpenBSD is OpenNTPD.

Here is how openntpd.org describes OpenNTPD:

"a FREE, easy to use implementation of the Network Time Protocol. It provides the ability to sync the local clock to remote NTP servers and can act as NTP server itself, redistributing the local clock."

OpenNTPD's accent just like OpenBSD's accent is security and hence for FreeBSD installs which targets security openntpd might be a good choice. Besides that the so popular classical ntpd has been well known for being historically "insecure", remote exploits for it has been released already at numerous times.

Another reason for someone to choose run openntpd instead of ntpd is its great simplicity. openntpd configuration is super simple.

Here are the steps I followed to have openntpd time server synchronize clock on my system using other public accessible openntpd servers on the internet.

1. Install openntpd through pkg_add -vr openntpd or via ports tree

a) For binar install with pkg_add issue:

freebsd# pkg_add -vr openntpd
...

b) if you prefer to compile it from source

freebsd# cd /usr/ports/net/openntpd
freebsd# make install clean
...

2. Enable OpenNTPD to start on system boot:

freebsd# echo 'openntpd_enable="YES"' >> /etc/rc.conf

3. Create openntpd ntpd.conf configuration file

There is a default sample ntpd.conf configuration which can be straight use as a conf basis:

freebsd# cp -rpf /usr/local/share/examples/openntpd/ntpd.conf /usr/local/etc/ntpd.conf

Default ntpd.conf works just fine without any modifications, if however there is a requirement the openntpd server to listen and accept time synchronization requests from only certain hosts add to conf something like:

listen on 192.168.1.2
listen on 192.168.1.3
listen on 2607:f0d0:3001:0009:0000:0000:0000:0001
listen on 127.0.0.1

This configuration will enable only 192.168.1.2 and 192.168.1.3 IPv4 addresses as well as the IPv6 2607:f0d0:3001:0009:0000:0000:0000:0001 IP to communicate with openntpd.

4. Start OpenNTPD service

freebsd# /usr/local/etc/rc.d/openntpd

5. Verify if openntpd is up and running

freebsd# ps axuww|grep -i ntp
root 31695 0.0 0.1 3188 1060 ?? Ss 11:26PM 0:00.00 ntpd: [priv] (ntpd)
_ntp 31696 0.0 0.1 3188 1140 ?? S 11:26PM 0:00.00 ntpd: ntp engine (ntpd)
_ntp 31697 0.0 0.1 3188 1088 ?? S 11:26PM 0:00.00 ntpd: dns engine (ntpd)
root 31700 0.0 0.1 3336 1192 p2 S+ 11:26PM 0:00.00 grep -i ntp

Its also good idea to check if openntpd has succesfully established connection with its peer remote openntpd time servers. This is necessery to make sure pf / ipfw firewall rules are not preventing connection to remote 123 UDP port:

freebsd# sockstat -4 -p 123
USER COMMAND PID FD PROTO LOCAL ADDRESS FOREIGN ADDRESS
_ntp ntpd 31696 4 udp4 83.228.93.76:54555 212.70.148.15:123
_ntp ntpd 31696 6 udp4 83.228.93.76:56666 195.69.120.36:123
_ntp ntpd 31696 8 udp4 83.228.93.76:49976 217.75.140.188:123

By default openntpd is also listening to IPv6 if IPv6 support is enabled in freebsd kernel.

6. Resolve openntpd firewall filtering issues

If there is a pf firewall blocking UDP requests to in/out port 123 within /etc/pf.conf rule like:

block in log on $EXT_NIC proto udp all

Before the blocking rule you will have to add pf rules:

# Ipv4 Open outgoing port TCP 123 (NTP)
pass out on $EXT_NIC proto tcp to any port ntp
# Ipv6 Open outgoing port TCP 123 (NTP)
pass out on $EXT_NIC inet6 proto tcp to any port ntp
# Ipv4 Open outgoing port UDP 123 (NTP)
pass out on $EXT_NIC proto udp to any port ntp
# Ipv6 Open outgoing port UDP 123 (NTP)
pass out on $EXT_NIC inet6 proto udp to any port ntp

where $EXT_NIC is defined to be equal to the external lan NIC interface, for example:
EXT_NIC="ml0"

Afterwards to load the new pf.conf rules firewall has to be flushed and reloaded:

freebsd# /sbin/pfctl -f /etc/pf.conf -d
...
freebsd# /sbin/pfctl -f /etc/pf.conf -e
...

In conclusion openntpd should be more secure than regular ntpd and in many cases is probably a better choice.
Anyhow bear in mind on FreeBSD openntpd is not part of the freebsd world and therefore security updates will not be issued directly by the freebsd dev team, but you will have to regularly update with the latest version provided from the bsd ports to make sure openntpd is 100% secure.

For anyone looking for more precise system clock synchronization and not so focused on security ntpd might be still a better choice. The OpenNTPD's official page states it is designed to reach reasonable time accuracy, but is not after the last microseconds.