Posts Tagged ‘admin’

List all existing local admin users belonging to admin group and mail them to monitoring mail box

Monday, February 8th, 2021

local-user-account-creation-deletion-change-monitor-accounts-and-send-them-to-central-monitoring-mail

If you have a bunch of servers that needs to have a tight security with multiple Local users superuser accounts that change over time and you need to frequently keep an have a long over time if some new system UNIX local users in /etc/passwd /etc/group has been added deleted e.g. the /etc/passwd /etc/group then you might have the task to have some primitive monitoring set and the most primitive I can think of is simply routinely log users list for historical purposes to a common mailbox over time (lets say 4 times a month or even more frequently) you might send with a simple cron job a list of all existing admin authorized users to a logging sysadmin mailbox like lets say:
 

Local-unix-users@yourcompanydomain.com


A remark to make here is the common sysadmin practice scenario to have local existing non-ldap admin users group members of whom are authorized to use sudo su – root via /etc/sudoers  is described in my previous article how to add local users to admin group superuser access via sudo I thus have been managing already a number of servers that have user setup using the above explained admin group.

Thus to have the monitoring at place I've developed a tiny shell script that does check all users belonging to the predefined user group dumps it to .csv format that starts with a simple timestamp on when user admin list was made and sends it to a predefined email address as well as logs sent mail content for further reference in a local directory.

The task is a relatively easy but since nowadays the level of competency of system administration across youngsters is declinging -that's of course in my humble opinion (just like it happens in every other profession), below is the developed list-admin-users.sh


#!/bin/bash
# dump all users belonging to a predefined admin user / group in csv format 
# with a day / month year timestamp and mail it to a predefined admin
# monitoring address
TO_ADDRESS="Local-unix-users@yourcompanydomain.com";
HOSTN=$(hostname);
# root@server:/# grep -i 1000 /etc/passwd
# username:x:username:1000:username,,,:/home/username:/bin/bash
# username1:x:username1:1000:username1,,,:/home/username1:/bin/bash
# username5:x:username1:1000:username5,,,:/home/username5:/bin/bash

ADMINS_ID='4355';
#
# root@server # group_id_ID='4355'; grep -i group_id_ID /etc/passwd
# …
# username1:x:1005:4355:username1,,,:/home/username1:/bin/bash
# username5:x:1005:4355,,,:/home/username5:/bin/bash


group_id_ID='215';
group_id='group_id';
FIL="/var/log/userlist-log-dir/userlist_$(date +"%d_%m_%Y_%H_%M").txt";
CUR_D="$HOSTN: Current admin users $(date)"; >> $FIL; echo -e "##### $CUR_D #####" >> $FIL;
for i in $(cat /etc/passwd | grep -i /home|grep /bin/bash|grep -e "$ADMINS_ID" -e "$group_id_ID" | cut -d : -f1); do \
if [[ $(grep $i /etc/group|grep $group_id) ]]; then
f=$(echo $i); echo $i,group_id,$(id -g $i); else  echo $i,admin,$(id -g $i);
fi
done >> $FIL; mail -s "$CUR_D" $TO_ADDRESS < $FIL


list-admin-users.sh is ready for download also here

To make the script report you will have to place it somewhere for example in /usr/local/bin/list-admin-users.sh ,  create its log dir location /var/log/userlist-log-dir/ and set proper executable and user/group script and directory permissions to it to be only readable for root user.

root@server: # mkdir /var/log/userlist-log-dir/
root@server: # chmod +x /usr/local/bin/list-admin-users.sh
root@server: # chmod -R 700 /var/log/userlist-log-dir/


To make the script generate its admin user reports and send it to the central mailbox  a couple of times in the month early in the morning (assuming you have a properly running postfix / qmail / sendmail … smtp), as a last step you need to set a cron job to routinely invoke the script as root user.

root@server: # crontab -u root -e
12 06 5,10,15,20,25,1 /usr/local/bin/list-admin-users.sh


That's all folks now on 5th 10th, 15th, 20th 25th and 1st at 06:12 you'll get the admin user list reports done. Enjoy 🙂

How to add local user to admin access via /etc/sudoers with sudo su – root / Create a sudo admin group to enable users belonging to group become superuser

Friday, January 15th, 2021

sudo_logo-how-to-add-user-to-sysadmin-group

Did you had to have a local users on a server and you needed to be able to add Admins group for all system administrators, so any local user on the system that belongs to the group to be able to become root with command lets say sudo su – root / su -l root / su – root?
If so below is an example /etc/sudoers file that will allow your users belonging to a group local group sysadmins with some assigned group number

Here is how to create the sysadmins group as a starter

linux:~# groupadd -g 800 sysadmins

Lets create a new local user georgi and append the user to be a member of sysadmins group which will be our local system Administrator (superuser) access user group.

To create a user with a specific desired userid lets check in /etc/passwd and create it:

linux:~# grep :811: /etc/passwd || useradd -u 811 -g 800 -c 'Georgi hip0' -d /home/georgi -m georgi

Next lets create /etc/sudoers (if you need to copy paste content of file check here)and paste below configuration:

linux:~# mcedit /etc/sudoers

## Updating the locate database
# Cmnd_Alias LOCATE = /usr/bin/updatedb


## Storage
# Cmnd_Alias STORAGE = /sbin/fdisk, /sbin/sfdisk, /sbin/parted, /sbin/partprobe, /bin/mount, /bin/umount

## Delegating permissions
# Cmnd_Alias DELEGATING = /usr/sbin/visudo, /bin/chown, /bin/chmod, /bin/chgrp

## Processes
# Cmnd_Alias PROCESSES = /bin/nice, /bin/kill, /usr/bin/kill, /usr/bin/killall

## Drivers
# Cmnd_Alias DRIVERS = /sbin/modprobe

Cmnd_Alias PASSWD = /usr/bin/passwd [a-zA-Z][a-zA-Z0-9_-]*, \\
!/usr/bin/passwd root

Cmnd_Alias SU_ROOT = /bin/su root, \\
                     /bin/su – root, \\
                     /bin/su -l root, \\
                     /bin/su -p root


# Defaults specification

#
# Refuse to run if unable to disable echo on the tty.
#
Defaults   !visiblepw

#
# Preserving HOME has security implications since many programs
# use it when searching for configuration files. Note that HOME
# is already set when the the env_reset option is enabled, so
# this option is only effective for configurations where either
# env_reset is disabled or HOME is present in the env_keep list.
#
Defaults    always_set_home
Defaults    match_group_by_gid

Defaults    env_reset
Defaults    env_keep =  "COLORS DISPLAY HOSTNAME HISTSIZE KDEDIR LS_COLORS"
Defaults    env_keep += "MAIL PS1 PS2 QTDIR USERNAME LANG LC_ADDRESS LC_CTYPE"
Defaults    env_keep += "LC_COLLATE LC_IDENTIFICATION LC_MEASUREMENT LC_MESSAGES"
Defaults    env_keep += "LC_MONETARY LC_NAME LC_NUMERIC LC_PAPER LC_TELEPHONE"
Defaults    env_keep += "LC_TIME LC_ALL LANGUAGE LINGUAS _XKB_CHARSET XAUTHORITY"

#
# Adding HOME to env_keep may enable a user to run unrestricted
# commands via sudo.
#
# Defaults   env_keep += "HOME"
Defaults    secure_path = /sbin:/bin:/usr/sbin:/usr/bin

## Next comes the main part: which users can run what software on
## which machines (the sudoers file can be shared between multiple
## systems).
## Syntax:
##
##      user    MACHINE=COMMANDS
##
## The COMMANDS section may have other options added to it.
##
## Allow root to run any commands anywhere
root    ALL=(ALL)       ALL

## Allows members of the 'sys' group to run networking, software,
## service management apps and more.
# %sys ALL = NETWORKING, SOFTWARE, SERVICES, STORAGE, DELEGATING, PROCESSES, LOCATE, DRIVERS

## Allows people in group wheel to run all commands
%wheel  ALL=(ALL)       ALL

## Same thing without a password
# %wheel        ALL=(ALL)       NOPASSWD: ALL

## Allows members of the users group to mount and unmount the
## cdrom as root
# %users  ALL=/sbin/mount /mnt/cdrom, /sbin/umount /mnt/cdrom
## Allows members of the users group to shutdown this system
# %users  localhost=/sbin/shutdown -h now

%sysadmins            ALL            = SU_ROOT, \\
                                   NOPASSWD: PASSWD

## Read drop-in files from /etc/sudoers.d (the # here does not mean a comment)
#includedir /etc/sudoers.d

zabbix  ALL=(ALL) NOPASSWD:/usr/bin/grep


Save the config and give it a try now to become root with sudo su – root command

linux:~$ id
uid=811(georgi) gid=800(sysadmins) groups=800(sysadmins)
linux:~$ sudo su – root
linux~#

w00t Voila your user is with super rights ! Enjoy 🙂


Improve wordpress admin password encryption authentication keys security with WordPress Unique Authentication Keys and Salts

Friday, October 9th, 2020

wordpress-improve-security-logo-linux

Having a wordpress blog or website with an admistrator and access via a Secured SSL channel is common nowadays. However there are plenty of SSL encryption leaks already out there and many of which are either slow to be patched or the hosting companies does not care enough to patch on time the libssl Linux libraries / webserver level. Taking that in consideration many websites hosted on some unmaintained one-time run not-frequently updated Linux servers are still vulneable and it might happen that, if you paid for some shared hosting in the past and someone else besides you hosted the website and forget you even your wordpress installation is still living on one of this SSL vulnerable hosts. In situations like that malicious hackers could break up the SSL security up to some level or even if the SSL is secured use MITM (MAN IN THE MIDDLE) attack to simulate your well secured and trusted SSID Name WIFi network to  redirects the network traffic you use (via an SSL transparent Proxy) to connect to WordPress Administrator Dashbiard via https://your-domain.com/wp-admin. Once your traffic is going through the malicious hax0r even if you haven't used the password to authenticate every time, e.g. you have saved the password in browser and WordPress Admin Panel authentication is achieved via a Cookie the cookies generated and used one time by Woddpress site could be easily stealed one time and later from the vicious 1337 h4x0r and reverse the hash with an interceptor Tool and login to your wordpress …

Therefore to improve the wordpress site security it very important to have configured WordPress Unique Authentication Keys and Salts (known also as the WordPress security keys).

They're used by WordPress installation to have a uniquely generated different key and Salt from the default one to the opened WordPress Blog / Site Admin session every time.

So what are the Authentication Unique Keys and Salts and why they are Used?

Like with almost any other web application, when PHP session is opened to WordPress, the code creates a number of Cookies stored locally on your computer.

Two of the cookies created are called:

 wordpress_[hash]
wordpress_logged_in_[hash]

First  cookie is used only in the admin pages (WordPress dashboard), while the second cookie is used throughout WordPress to determine if you are logged in to WordPress or not. Note: [hash] is a random hashed value typically assigned to your session, therefore in reality the cookies name would be named something like wordpress_ffc02f68bc9926448e9222893b6c29a9.

WordPress session stores your authentication details (i.e. WordPress username and password) in both of the above mentioned cookies.

The authentication details are hashed, hence it is almost impossible for anyone to reverse the hash and guess your password through a cookie should it be stolen. By almost impossible it also means that with today’s computers it is practically unfeasible to do so.

WordPress security keys are made up of four authentication keys and four hashing salts (random generated data) that when used together they add an extra layer to your cookies and passwords. 

The authentication details in these cookies are hashed using the random pattern specified in the WordPress security keys. I will not get into too much details but as you might have heard in Cryptography Salts and Keys are important – an indepth explanation on Salts Cryptography (here). A good reading for those who want to know more on how does the authentication based and salts work is on stackexchange.

How to Set up Salt and Key Authentication on WordPress
 

To be used by WP Salts and Key should be configured under wp-config.php usually they look like so:

wordpress-website-blog-salts-keys-wp-config-screenshot-linux

!!! Note !!!  that generating (manually or generated via a random generator program), the definition strings you have to use a random string value of more than 60 characters to prevent predictability 

The default on any newly installed WordPress Website is to have the 4 definitions with _KEY and the four _SALTs to be unconfigured strings looks something like:

default-WordPress-security-keys-and-salts-entries-in-wordPress-wp-config-php-file

Most people never ever take a look at wp-config.php as only the Web GUI Is used for any maintainance, tasks so there is a great chance that if you never heard specifically by some WordPress Security Expert forum or some Security plugin (such as WP Titan Anti Spam & Security) installed to report the WP KEY / SALT you might have never noticed it in the config.

There are 8 WordPress security keys in current WP Installs, but not all of them have been introduced at the same time.
Historically they were introduced in WP versions in below order:

WordPress 2.6: AUTH_KEY, SECURE_AUTH_KEY, LOGGED_IN_KEY
WordPress 2.7: NONCE_KEY
WordPress 3.0: AUTH_SALT, SECURE_AUTH_SALT, LOGGED_IN_SALT, NONCE_SALT

Setting a custom random generated values is an easy task as there is already online Wordpress Security key Random generator.
You can visit above address and you will get an automatic randomly generated values which could be straight copy / pasted to your wp-config.php.

Howeever if you're a paranoic on the guessability of the random generator algorithm, I would advice you use the generator and change some random values yourself on each of the 8 line, the end result in the configuration should be something similar to:


define('AUTH_KEY',         '|w+=W(od$V|^hy$F5w)g6O-:e[WI=NHY/!Ez@grd5=##!;jHle_vFPqz}D5|+87Q');
define('SECURE_AUTH_KEY',  'rGReh.<%QBJ{DP )p=BfYmp6fHmIG~ePeHC[MtDxZiZD;;_OMp`sVcKH:JAqe$dA');
define('LOGGED_IN_KEY',    '%v8mQ!)jYvzG(eCt>)bdr+Rpy5@t fTm5fb:o?@aVzDQw8T[w+aoQ{g0ZW`7F-44');
define('NONCE_KEY',        '$o9FfF{S@Z-(/F-.6fC/}+K 6-?V.XG#MU^s?4Z,4vQ)/~-[D.X0<+ly0W9L3,Pj');
define('AUTH_SALT',        ':]/2K1j(4I:DPJ`(,rK!qYt_~n8uSf>=4`{?LC]%%KWm6@j|aht@R.i*ZfgS4lsj');
define('SECURE_AUTH_SALT', 'XY{~:{P&P0Vw6^i44Op*nDeXd.Ec+|c=S~BYcH!^j39VNr#&FK~wq.3wZle_?oq-');
define('LOGGED_IN_SALT',   '8D|2+uKX;F!v~8-Va20=*d3nb#4|-fv0$ND~s=7>N|/-2]rk@F`DKVoh5Y5i,w*K');
define('NONCE_SALT',       'ho[<2C~z/:{ocwD{T-w+!+r2394xasz*N-V;_>AWDUaPEh`V4KO1,h&+c>c?jC$H');


Wordpress-auth-key-secure-auth-salt-Linux-wordpress-admin-security-hardening

Once above defines are set, do not forget to comment or remove old AUTH_KEY / SECURE_AUTH_KEY / LOGGED_IN_KEY / AUTH_SALT / SECURE_AUTH_SALT / LOGGED_IN_SALT /NONCE_SALT keys.

The values are configured one time and never have to be changed, WordPress installation automatic updates or Installed WP Plugins will not tamper the value with time.
You should never expand or show your private generated keys to anyone otherwise this could be used to hack your website site.
It is also a good security practice to change this keys, especially if you have some suspects someone has somehow stolen your wp-onfig keys. 
 

Closure

Having AUTH KEYs and Properly configured is essential step to improve your WordPress site security. Anytime having any doubt for a browser hijacked session (or if you have logged in) to your /wp-admin via unsecured public Computer with a chance of a stolen site cookies you should reset keys / salts to a new random values. Setting the auth keys is not a panacea and frequent WP site core updates and plugins should be made to secure your install. Always do frequent audits to WP owned websites with a tool such as WPScan is essential to keep your WP Website unhacked.


How to enable HaProxy logging to a separate log /var/log/haproxy.log / prevent HAProxy duplicate messages to appear in /var/log/messages

Wednesday, February 19th, 2020

haproxy-logging-basics-how-to-log-to-separate-file-prevent-duplicate-messages-haproxy-haproxy-weblogo-squares
haproxy  logging can be managed in different form the most straight forward way is to directly use /dev/log either you can configure it to use some log management service as syslog or rsyslogd for that.

If you don't use rsyslog yet to install it: 

# apt install -y rsyslog

Then to activate logging via rsyslogd we can should add either to /etc/rsyslogd.conf or create a separte file and include it via /etc/rsyslogd.conf with following content:
 

Enable haproxy logging from rsyslogd


Log haproxy messages to separate log file you can use some of the usual syslog local0 to local7 locally used descriptors inside the conf (be aware that if you try to use some wrong value like local8, local9 as a logging facility you will get with empty haproxy.log, even though the permissions of /var/log/haproxy.log are readable and owned by haproxy user.

When logging to a local Syslog service, writing to a UNIX socket can be faster than targeting the TCP loopback address. Generally, on Linux systems, a UNIX socket listening for Syslog messages is available at /dev/log because this is where the syslog() function of the GNU C library is sending messages by default. To address UNIX socket in haproxy.cfg use:

log /dev/log local2 


If you want to log into separate log each of multiple running haproxy instances with different haproxy*.cfg add to /etc/rsyslog.conf lines like:

local2.* -/var/log/haproxylog2.log
local3.* -/var/log/haproxylog3.log


One important note to make here is since rsyslogd is used for haproxy logging you need to have enabled in rsyslogd imudp and have a UDP port listener on the machine.

E.g. somewhere in rsyslog.conf or via rsyslog include file from /etc/rsyslog.d/*.conf needs to have defined following lines:

$ModLoad imudp
$UDPServerRun 514


I prefer to use external /etc/rsyslog.d/20-haproxy.conf include file that is loaded and enabled rsyslogd via /etc/rsyslog.conf:

# vim /etc/rsyslog.d/20-haproxy.conf

$ModLoad imudp
$UDPServerRun 514​
local2.* -/var/log/haproxy2.log


It is also possible to produce different haproxy log output based on the severiy to differentiate between important and less important messages, to do so you'll need to rsyslog.conf something like:
 

# Creating separate log files based on the severity
local0.* /var/log/haproxy-traffic.log
local0.notice /var/log/haproxy-admin.log


Prevent Haproxy duplicate messages to appear in /var/log/messages

If you use local2 and some default rsyslog configuration then you will end up with the messages coming from haproxy towards local2 facility producing doubled simultaneous records to both your pre-defined /var/log/haproxy.log and /var/log/messages on Proxy servers that receive few thousands of simultanous connections per second.
This is a problem since doubling the log will produce too much data and on systems with smaller /var/ partition you will quickly run out of space + this haproxy requests logging to /var/log/messages makes the file quite unreadable for normal system events which are so important to track clearly what is happening on the server daily.

To prevent the haproxy duplicate messages you need to define somewhere in rsyslogd usually /etc/rsyslog.conf local2.none near line of facilities configured to log to file:

*.info;mail.none;authpriv.none;cron.none;local2.none     /var/log/messages

This configuration should work but is more rarely used as most people prefer to have haproxy log being written not directly to /dev/log which is used by other services such as syslogd / rsyslogd.

To use /dev/log to output logs from haproxy configuration in global section use config like:
 

global
        log /dev/log local2 debug
        chroot /var/lib/haproxy
        stats socket /run/haproxy/admin.sock mode 660 level admin
        stats timeout 30s
        user haproxy
        group haproxy
        daemon

The log global directive basically says, use the log line that was set in the global section for whole config till end of file. Putting a log global directive into the defaults section is equivalent to putting it into all of the subsequent proxy sections.

Using global logging rules is the most common HAProxy setup, but you can put them directly into a frontend section instead. It can be useful to have a different logging configuration as a one-off. For example, you might want to point to a different target Syslog server, use a different logging facility, or capture different severity levels depending on the use case of the backend application. 

Insetad of using /dev/log interface that is on many distributions heavily used by systemd to store / manage and distribute logs,  many haproxy server sysadmins nowdays prefer to use rsyslogd as a default logging facility that will manage haproxy logs.
Admins prefer to use some kind of mediator service to manage log writting such as rsyslogd or syslog, the reason behind might vary but perhaps most important reason is  by using rsyslogd it is possible to write logs simultaneously locally on disk and also forward logs  to a remote Logging server  running rsyslogd service.

Logging is defined in /etc/haproxy/haproxy.cfg or the respective configuration through global section but could be also configured to do a separate logging based on each of the defined Frontend Backends or default section. 
A sample exceprt from this section looks something like:

#———————————————————————
# Global settings
#———————————————————————
global
    log         127.0.0.1 local2

    chroot      /var/lib/haproxy
    pidfile     /var/run/haproxy.pid
    maxconn     4000
    user        haproxy
    group       haproxy
    daemon

    # turn on stats unix socket
    stats socket /var/lib/haproxy/stats

#———————————————————————
defaults
    mode                    tcp
    log                     global
    option                  tcplog
    #option                  dontlognull
    #option http-server-close
    #option forwardfor       except 127.0.0.0/8
    option                  redispatch
    retries                 7
    #timeout http-request    10s
    timeout queue           10m
    timeout connect         30s
    timeout client          20m
    timeout server          10m
    #timeout http-keep-alive 10s
    timeout check           30s
    maxconn                 3000


# HAProxy Monitoring Config
#———————————————————————
listen stats 192.168.0.5:8080                #Haproxy Monitoring run on port 8080
    mode http
    option httplog
    option http-server-close
    stats enable
    stats show-legends
    stats refresh 5s
    stats uri /stats                            #URL for HAProxy monitoring
    stats realm Haproxy\ Statistics
    stats auth hproxyauser:Password___          #User and Password for login to the monitoring dashboard


#———————————————————————
# frontend which proxys to the backends
#———————————————————————
frontend ft_DKV_PROD_WLPFO
    mode tcp
    bind 192.168.233.5:30000-31050
    option tcplog
    log-format %ci:%cp\ [%t]\ %ft\ %b/%s\ %Tw/%Tc/%Tt\ %B\ %ts\ %ac/%fc/%bc/%sc/%rc\ %sq/%bq
    default_backend Default_Bakend_Name


#———————————————————————
# round robin balancing between the various backends
#———————————————————————
backend bk_DKV_PROD_WLPFO
    mode tcp
    # (0) Load Balancing Method.
    balance source
    # (4) Peer Sync: a sticky session is a session maintained by persistence
    stick-table type ip size 1m peers hapeers expire 60m
    stick on src
    # (5) Server List
    # (5.1) Backend
    server Backend_Server1 10.10.10.1 check port 18088
    server Backend_Server2 10.10.10.2 check port 18088 backup


The log directive in above config instructs HAProxy to send logs to the Syslog server listening at 127.0.0.1:514. Messages are sent with facility local2, which is one of the standard, user-defined Syslog facilities. It’s also the facility that our rsyslog configuration is expecting. You can add more than one log statement to send output to multiple Syslog servers.

Once rsyslog and haproxy logging is configured as a minumum you need to restart rsyslog (assuming that haproxy config is already properly loaded):

# systemctl restart rsyslogd.service

To make sure rsyslog reloaded successfully:

systemctl status rsyslogd.service


Restarting HAproxy

If the rsyslogd logging to 127.0.0.1 port 514 was recently added a HAProxy restart should also be run, you can do it with:
 

# /usr/sbin/haproxy -f /etc/haproxy/haproxy.cfg -D -p /var/run/haproxy.pid -sf $(cat /var/run/haproxy.pid)


Or to restart use systemctl script (if haproxy is not used in a cluster with corosync / heartbeat).

# systemctl restart haproxy.service

You can control how much information is logged by adding a Syslog level by

    log         127.0.0.1 local2 info


The accepted values are the standard syslog security level severity:

Value Severity Keyword Deprecated keywords Description Condition
0 Emergency emerg panic System is unusable A panic condition.
1 Alert alert   Action must be taken immediately A condition that should be corrected immediately, such as a corrupted system database.
2 Critical crit   Critical conditions Hard device errors.
3 Error err error Error conditions  
4 Warning warning warn Warning conditions  
5 Notice notice   Normal but significant conditions Conditions that are not error conditions, but that may require special handling.
6 Informational info   Informational messages  
7 Debug debug   Debug-level messages Messages that contain information normally of use only when debugging a program.


Logging only errors / timeouts / retries and errors is done with option:

Note that if the rsyslog is configured to listen on different port for some weird reason you should not forget to set the proper listen port, e.g.:
 

  log         127.0.0.1:514 local2 info

option dontlog-normal

in defaults or frontend section.

You most likely want to enable this only during certain times, such as when performing benchmarking tests.

(or log-format-sd for structured-data syslog) directive in your defaults or frontend
 

Haproxy Logging shortly explained


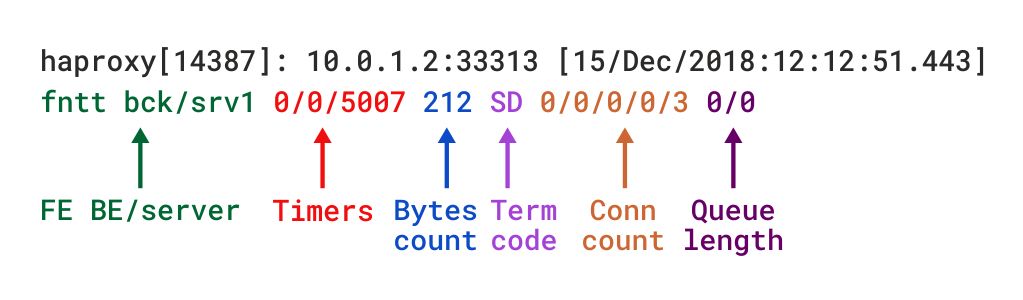
The type of logging you’ll see is determined by the proxy mode that you set within HAProxy. HAProxy can operate either as a Layer 4 (TCP) proxy or as Layer 7 (HTTP) proxy. TCP mode is the default. In this mode, a full-duplex connection is established between clients and servers, and no layer 7 examination will be performed. When in TCP mode, which is set by adding mode tcp, you should also add option tcplog. With this option, the log format defaults to a structure that provides useful information like Layer 4 connection details, timers, byte count and so on.

Below is example of configured logging with some explanations:

Log-format "%ci:%cp [%t] %ft %b/%s %Tw/%Tc/%Tt %B %ts %ac/%fc/%bc/%sc/%rc %sq/%bq"

haproxy-logged-fields-explained
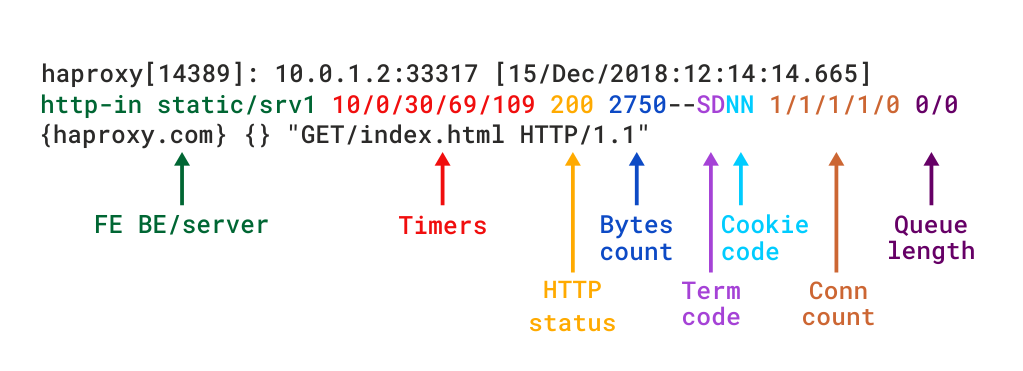
Example of Log-Format configuration as shown above outputted of haproxy config:

Log-format "%ci:%cp [%tr] %ft %b/%s %TR/%Tw/%Tc/%Tr/%Ta %ST %B %CC %CS %tsc %ac/%fc/%bc/%sc/%rc %sq/%bq %hr %hs %{+Q}r"

haproxy_http_log_format-explained1

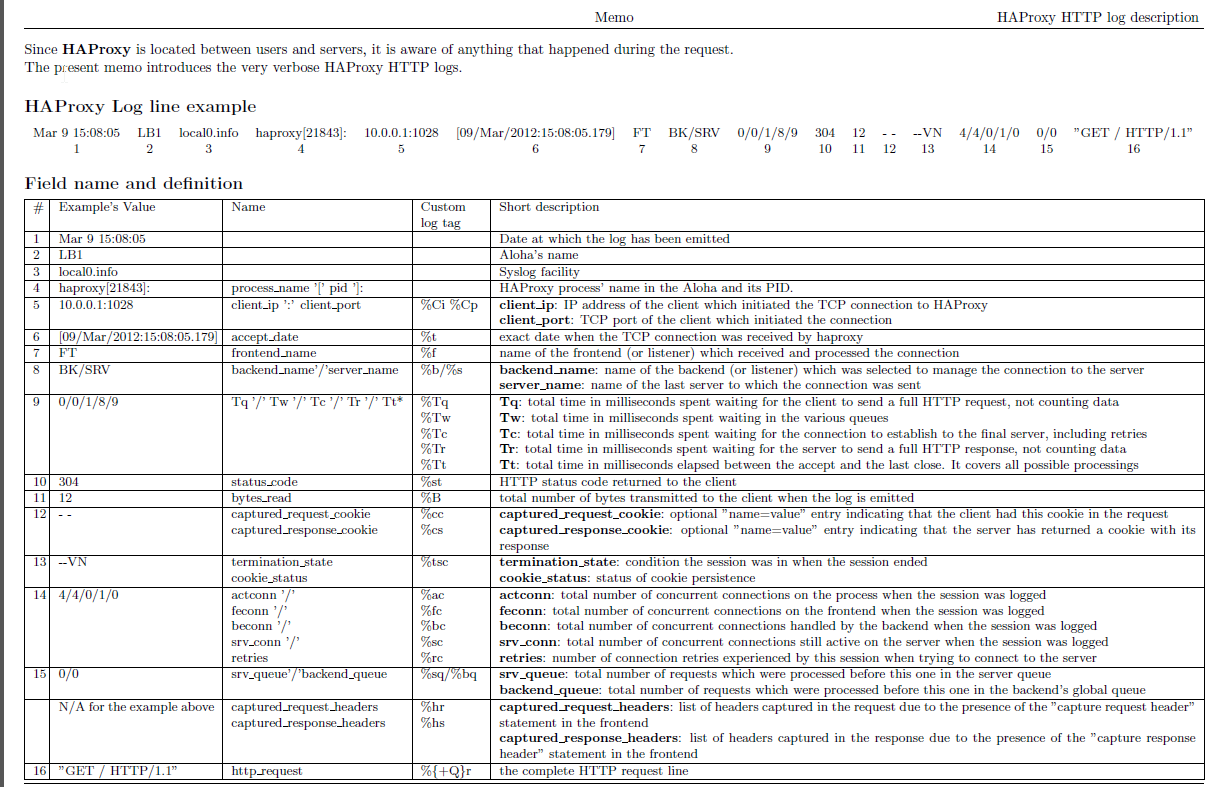
To understand meaning of this abbreviations you'll have to closely read  haproxy-log-format.txt. More in depth info is to be found in HTTP Log format documentation


haproxy_logging-explained

Logging HTTP request headers

HTTP request header can be logged via:
 

 http-request capture

frontend website
    bind :80
    http-request capture req.hdr(Host) len 10
    http-request capture req.hdr(User-Agent) len 100
    default_backend webservers


The log will show headers between curly braces and separated by pipe symbols. Here you can see the Host and User-Agent headers for a request:

192.168.150.1:57190 [20/Dec/2018:22:20:00.899] website~ webservers/server1 0/0/1/0/1 200 462 – – —- 1/1/0/0/0 0/0 {mywebsite.com|Mozilla/5.0 (X11; Linux x86_64) AppleWebKit/537.36 (KHTML, like Gecko) Ubuntu Chromium/71.0.3578.80 } "GET / HTTP/1.1"


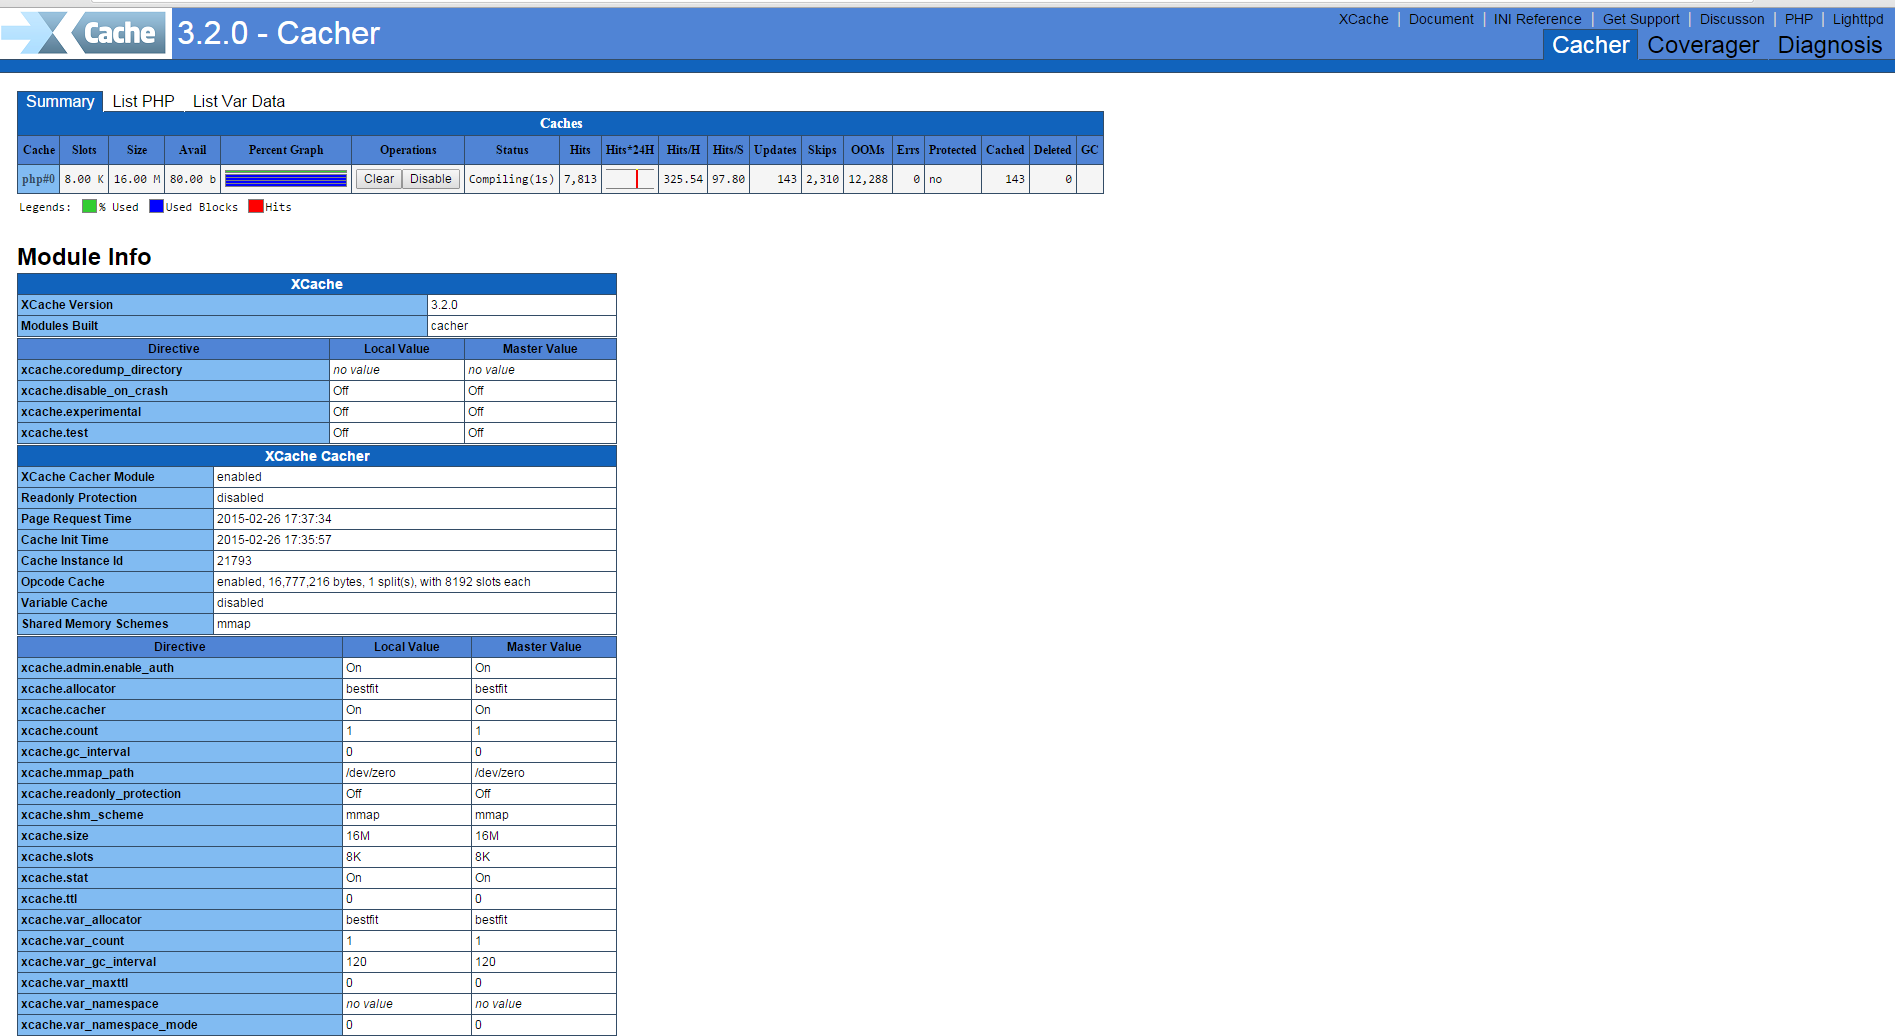
Haproxy Stats Monitoring Web interface


Haproxy is having a simplistic stats interface which if enabled produces some general useful information like in above screenshot, through which
you can get a very basic in browser statistics and track potential issues with the proxied traffic for all configured backends / frontends incoming outgoing
network packets configured nodes
 experienced downtimes etc.

haproxy-statistics-report-picture

The basic configuration to make the stats interface accessible would be like pointed in above config for example to enable network listener on address
 

https://192.168.0.5:8080/stats


with hproxyuser / password config would be:

# HAProxy Monitoring Config
#———————————————————————
listen stats 192.168.0.5:8080                #Haproxy Monitoring run on port 8080
    mode http
    option httplog
    option http-server-close
    stats enable
    stats show-legends
    stats refresh 5s
    stats uri /stats                            #URL for HAProxy monitoring
    stats realm Haproxy\ Statistics
    stats auth hproxyauser:Password___          #User and Password for login to the monitoring dashboard


Sessions states and disconnect errors on new application setup

Both TCP and HTTP logs include a termination state code that tells you the way in which the TCP or HTTP session ended. It’s a two-character code. The first character reports the first event that caused the session to terminate, while the second reports the TCP or HTTP session state when it was closed.

Here are some essential termination codes to track in for in the log:
 

Here are some termination code examples most commonly to see on TCP connection establishment errors:

Two-character code    Meaning
—    Normal termination on both sides.
cD    The client did not send nor acknowledge any data and eventually timeout client expired.
SC    The server explicitly refused the TCP connection.
PC    The proxy refused to establish a connection to the server because the process’ socket limit was reached while attempting to connect.


To get all non-properly exited codes the easiest way is to just grep for anything that is different from a termination code –, like that:

tail -f /var/log/haproxy.log | grep -v ' — '


This should output in real time every TCP connection that is exiting improperly.

There’s a wide variety of reasons a connection may have been closed. Detailed information about all possible termination codes can be found in the HAProxy documentation.
To get better understanding a very useful reading to haproxy Debug errors with  is in haproxy-logging.txt in that small file are collected all the cryptic error messages codes you might find in your logs when you're first time configuring the Haproxy frontend / backend and the backend application behind.

Another useful analyze tool which can be used to analyze Layer 7 HTTP traffic is halog for more on it just google around.

Fix staled NFS on server with dmesg error log nfs: server nfs-server not responding, still trying

Saturday, March 16th, 2019

NFS_Filesystem-fix-staled-NFS-System-dmesg-error-nfs-server-not-responding-still-trying

On a server today I've found to have found a number of NFS mounts mounted through /etc/fstab file definitions that were hanging;
 

nfs-server:~# df -hT


 command kept hanging as well as any attempt to access the mounted NFS directory was not possible.
The server with the hanged Network File System is running SLES (SuSE Enterprise Linux 12 SP3) a short investigation in the kernel logs (dmesg) as well as /var/log/messages reveales following errors:


nfs-server:~# dmesg
[3117414.856995] nfs: server nfs-server OK
[3117595.104058] nfs: server nfs-server not responding, still trying
[3117625.032864] nfs: server nfs-server OK
[3117805.280036] nfs: server nfs-server not responding, still trying
[3117835.209110] nfs: server nfs-server OK
[3118015.456045] nfs: server nfs-server not responding, still trying
[3118045.384930] nfs: server nfs-server OK
[3118225.568029] nfs: server nfs-server not responding, still trying
[3118255.560536] nfs: server nfs-server OK
[3118435.808035] nfs: server nfs-server not responding, still trying
[3118465.736463] nfs: server nfs-server OK
[3118645.984057] nfs: server nfs-server not responding, still trying
[3118675.912595] nfs: server nfs-server OK
[3118886.098614] nfs: server nfs-server OK
[3119066.336035] nfs: server nfs-server not responding, still trying
[3119096.274493] nfs: server nfs-server OK
[3119276.512033] nfs: server nfs-server not responding, still trying
[3119306.440455] nfs: server nfs-server OK
[3119486.688029] nfs: server nfs-server not responding, still trying
[3119516.616622] nfs: server nfs-server OK
[3119696.864032] nfs: server nfs-server not responding, still trying
[3119726.792650] nfs: server nfs-server OK
[3119907.040037] nfs: server nfs-server not responding, still trying
[3119936.968691] nfs: server nfs-server OK
[3120117.216053] nfs: server nfs-server not responding, still trying
[3120147.144476] nfs: server nfs-server OK
[3120328.352037] nfs: server nfs-server not responding, still trying
[3120567.496808] nfs: server nfs-server OK
[3121370.592040] nfs: server nfs-server not responding, still trying
[3121400.520779] nfs: server nfs-server OK
[3121400.520866] nfs: server nfs-server OK


It took me a short while to investigate and check the NetApp remote NFS storage filesystem and investigate the Virtual Machine that is running on top of OpenXen Hypervisor system.
The NFS storage permissions of the exported file permissions were checked and they were in a good shape, also a reexport of the NFS mount share was re-exported and on the Linux
mount host the following commands ran to remount the hanged Filesystems:


nfs-server:~# umount -f /mnt/nfs_share
nfs-server:~# umount -l /mnt/nfs_share
nfs-server:~# umount -lf /mnt/nfs_share1
nfs-server:~# umount -lf /mnt/nfs_share2
nfs-server:~# mount -t nfs -o remount /mnt/nfs_share


that fixed one of the hanged mount, but as I didn't wanted to manually remount each of the NFS FS-es, I've remounted them all with:

nfs-server:~# mount -a -t nfs


This solved it but, the fix seemed unpermanent as in a time while the issue started reoccuring and I've spend some time
in further investigation on the weird NFS hanging problem has led me to the following blog post where the same problem was described and it was pointed the root cause of it lays
in parameter for MTU which seems to be quite high MTU 9000 and this over the years has prooven to cause problems with NFS especially due to network router (switches) configurations
which seem to have a filters for MTU and are passing only packets with low MTU levels and using rsize / wzise custom mount NFS values in /etc/fstab could lead to this strange NFS hangs.

Below is a list of Maximum Transmission  Unit (MTU) for Media Transport excerpt taken from wikipedia as of time of writting this article.

https://www.pc-freak.net/images/Maximum-Transmission-Unit-for-Media-Transport-diagram-3.png

In my further research on the issue I've come across this very interesting article which explains a lot on "Large Internet" and Internet Performance

I've used tracepath command which is doing basicly the same as traceroute but could be run without root user and discovers hops (network routers) and shows MTU between path -> destionation.

Below is a sample example

nfs-server:~# tracepath bergon.net
 1?: [LOCALHOST]                      pmtu 1500
 1:  192.168.6.1                                           0.909ms
 1:  192.168.6.1                                           0.966ms
 2:  192.168.222.1                                         0.859ms
 3:  6.192.104.109.bergon.net                              1.138ms reached
     Resume: pmtu 1500 hops 3 back 3


Optiomal pmtu for this connection is to be 1500 .traceroute in some cases might return hops with 'no reply' if there is a router UDP  packet filtering implemented on it.

The high MTU value for the Storage network connection interface on eth1 was evident with a simple:


 nfs-server:~# /sbin/ifconfig |grep -i eth -A 2
eth0      Link encap:Ethernet  HWaddr 00:16:3E:5C:65:74
          inet addr:100.127.108.56  Bcast:100.127.109.255  Mask:255.255.254.0
          UP BROADCAST RUNNING MULTICAST  MTU:1500  Metric:1

eth1      Link encap:Ethernet  HWaddr 00:16:3E:5C:65:76
          inet addr:100.96.80.94  Bcast:100.96.83.255  Mask:255.255.252.0
          UP BROADCAST RUNNING MULTICAST  MTU:9000  Metric:1


The fix was as simple to lower MTU value for eth1 Ethernet interface to 1500 which is the value which most network routers are configured too.

To apply the new MTU to the eth1 interface without restarting the SuSE SLES networking , I first used ifconfig one time with:


 nfs-server:~# /sbin/ifconfig eth1 mtu 1500
 nfs-server:~# ip addr show
 …


To make the setting permanent on next  SuSE boot:

I had to set the MTU=1500 value in


nfs-server:~#/etc/sysconfig/network/ifcfg-eth1
nfs-server:~#  ip address show eth1
3: eth1: <BROADCAST,MULTICAST,UP,LOWER_UP> mtu 1500 qdisc pfifo_fast state UP group default qlen 1000
    link/ether 8c:89:a5:f2:e8:d8 brd ff:ff:ff:ff:ff:ff
    inet 192.168.0.1/24 brd 192.168.0.255 scope global eth1
       valid_lft forever preferred_lft forever


Then to remount the NFS mounted hanged filesystems once again ran:
 

nfs-server:~# mount -a -t nfs


Many network routers keeps the MTU to low as 1500 also because a higher values causes IP packet fragmentation when using NFS over UDP where IP packet fragmentation and packet
reassembly requires significant amount of CPU at both ends of the network connection.
Packet fragmentation also exposes network traffic to greater unreliability, since a complete RPC request must be retransmitted if a UDP packet fragment is dropped for any reason.
Any increase of RPC retransmissions, along with the possibility of increased timeouts, are the single worst impediment to performance for NFS over UDP.
This and many more is very well explained in Optimizing NFS Performance page (which is a must reading) for any sys admin that plans to use NFS frequently.

Even though lowering MTU (Maximum Transmission Union) value does solved my problem at some cases especially in a modern local LANs with Jumbo Frames, allowing and increasing the MTU to 9000 bytes
might be a good idea as this will increase the amount of packet size.and will raise network performance, however as always on distant networks with many router hops keeping MTU value as low as 1492 / 5000 is always a good idea.


How to change / reset lost or forgot TightVNC administrator password

Tuesday, May 24th, 2011

how-to-change-reset-lost-TightVNC-administrator-password

I have installed TightVNC to a Windows host just a few weeks ago in order to be able to manage remotely a Windows host and forgot to write down the administrator password 🙂 (stoopid!)

I had to explain to a friend remotely how to change the TightVNC admin password and it was a complete nightmare!

Shortly here is the exact menus one who wants to reset the password of a TigthVNC server after forgotten:

Start -> All Programs -> TightVNC
-> TightVNC Server (Service Mode) ->
TightVNC Service - Offline Configuration.

In the configuration dialog to popup there are the Server and Administration tabs through which a new password can be set.

After the password is change either a restart of the TightVNC server is necessery or a restart of the Windows PC.

Howto install XCache Debian on GNU / Linux to accelerate Apache Webserver – XCache Best alternative to outdated PHP cacher EAccelerator

Thursday, February 26th, 2015

xcache_install-and-enable-best-alternative-php-cacher-to-eaccelerator-logo
I was using Eaccelerator until recently on all Apache / PHP / MySQL  (LAMP) web-servers as a caching engine (Webserver accelerator) across all Debian GNU / Linux Lenny / Squeeze / Etch servers.
However recently, I've noticed in phpinfo output on some of the Debian hosts, that eaccelerator was loaded but showed:

 Caching Enabled false

eaccelerator_caching_enabled_false-phpinfo-screenshot-apache-debian-linux.


Our servers are quite busy serving about 50 000 to 100 000 requests and thus not having enabled caching puts a lot of extra load on the CPU and eats a lot of memory which were usually saved by eAccelerator.
Logically I tried fixing the issues following some Stackoverflow threads recommendations such as this one but didn't work I tried playing manually spending hours trying to make eaccelerator run again and as a final mean, I even tried to upgrade eaccelerator to newer version but noticed the latest available eaccelerator version 0.9.6 was 2.5 years old (from 03.09.2012). Thus while there is no new release, just make s so just to make sure I didn't break the module with (default Debian bundled distribution package which is also installed on the servers)  re-installed eAccelerator from source 

This didn't worked either and since I was totally pissed off by the worsened systems performance (CPU load increased with to 10-30%) per server, I looked for some alternatives I can use and in the mean time I learned a bit more about history of PHP Accelerators, I learned some interesting things such as that  ionCube (PHPA) was the  first PHP Accelerator Apache like module (encoding PHP code),  created in 2001, later it become inspirational for  birth to PHP-APC (Alternative PHP Cache) Apache module. 
There is also Zend Opcache PHP accelerator (available since PHP 5.5 onwards)  but since Zend OpCache caches well PHP Zend written PHP code and servers run PHP 5.4 + sites are not using Zend PHP Framewosk  this was an option.
Further investigation lead me to MMCache which is already too obsolete (latest release is from 2013), PHPExpress – PHP Encoder which  was said to run on Windows, Linux, FreeBSD, NetBSD, Mac OS X, and Solaris) but already looks dead as there were no new releases since January 2012) and finally Lighttpd's XCache.

To give you an idea on what exactly is the difference between Apache Webserver with PHP-APC Caching or other PHP Cacher enabled and the Standard way PHP Interprets PHP scripts below is a diagram:

php-apc-cache-how-php-caching-works-with-and-without-encoding-php-code-diagram

Obviously my short research shows that from all the available PHP Cache Encoder / Accelerators only ones that seemed to be recently updated (under active development) are APC and XCache.
I've already used PHP-APC earlier on some servers and was having having some random Apache Webservers crashes and weird empty pages with some PHP pages and besides that APC is known to give lower speed in PHP caching than Eaccelerator and XCache, leaving me with the only and logical choise to use XCACHE.

Here is how Xcache developers describe their opcacher:
 

XCache is a free, open source operation code cacher, it is designed to enhance the performance of PHP scripts execution on servers. It optimizes the performance by eliminating the compilation time of PHP code by caching the compiled version of code into the memory and this way the compiled version loads the PHP script directly from the memory. This will surety accelerate the page generation time by up to 5 times faster and also optimizes and increases many other aspects of php scripts and reduce website/server load.


Thanksfully XCache is shipped by default with all Debians (Etch /Lenny / Squeeze / Wheezy)  Linuces so to install it just run the standard apt cmd:
 

apt-get install –yes php5-xcache


Then to enable XCache all I had to do is edit /etc/php5/apache2/php.ini and place below code
 

debian-server:~# vim /etc/php5/apache2/php.ini


[xcache-common]
;; install as zend extension (recommended), normally "$extension_dir/xcache.so"
;;zend_extension = /usr/lib/php5/20100525/xcache.so


[xcache.admin]
xcache.admin.enable_auth = On
; Configure this to use admin pages
; xcache.admin.user = "mOo"
; xcache.admin.pass = md5($your_password)
; xcache.admin.pass = ""

[xcache]
; ini only settings, all the values here is default unless explained

; select low level shm/allocator scheme implemenation
xcache.shm_scheme =        "mmap"
; to disable: xcache.size=0
; to enable : xcache.size=64M etc (any size > 0) and your system mmap allows
xcache.size  =                16M
; set to cpu count (cat /proc/cpuinfo |grep -c processor)
xcache.count =                 1
; just a hash hints, you can always store count(items) > slots
xcache.slots =                8K
; ttl of the cache item, 0=forever
xcache.ttl   =                 0
; interval of gc scanning expired items, 0=no scan, other values is in seconds
xcache.gc_interval =           0
; same as aboves but for variable cache

Note that Debian location which instructs xcache to load in Apache as a module is xcache.ini – e.g. /usr/share/php5/xcache/xcache.ini, so instead of placing above configuration right into php.ini you might prefer to place it in xcache.ini (though I personally prefer php.ini) because it is easier for me to later control how PHP behaves from single location.

To test whether XCache is enabled for Apache Webserver:

Create phpinfo.php somewhere in DocumentRoot (in my case this was /var/www/php_info.php)

debian-server:~# vim /var/www/php_info.php


<php?
phpinfo()
?>


When you access the php_info.php in browser you will get XCache loaded as in below screenshot:


xcache_loaded-in-php-apache-phpinfo-output-debian-gnu-linux-server

To Test whether Xcache is enabled also for PHP CLI (applications set to run as a crontab – cronjob) :
 

debian-server:~# php -v
PHP 5.4.37-1~dotdeb.0 (cli) (built: Feb  2 2015 05:03:00)
Copyright (c) 1997-2014 The PHP Group
Zend Engine v2.4.0, Copyright (c) 1998-2014 Zend Technologies
    with XCache v3.2.0, Copyright (c) 2005-2014, by mOo
    with XCache Cacher v3.2.0, Copyright (c) 2005-2014, by mOo


Once it is tested as successful install you might want to enable the XCache admin (which is disabled by default), to enable XCache Admin on Debian you need to generate new password for it first like so:


echo -n "xcache_rulez" | md5sum
acbf5ba4a44f03058aa0ad11e0a6b645


Then you need to add in /etc/php5/mods-available/xcache.ini

debian-server:~# vim /etc/php5/mods-available/xcache.ini
[xcache.admin]
xcache.admin.enable_auth = On
; Configure this to use admin pages
 xcache.admin.user = "admin"
; xcache.admin.pass = md5($your_password)
 xcache.admin.pass = "change_with_above_generated_password_here"


To enable admin and be able to access it in a browser (if you're using as a documentroot /var/www/ and docroot supports interpretting php scripts and (has AllowOverride All) enabled to also support htaccess authentication do:
 

debian-server:~# cd /var/www/
debian-server:~# ln -sf /usr/share/xcache/htdocs/ xcache

When you access http://your-url-address.com/xcache/ you should see in browser some statistics along with all configured xcache options:

xcacher-admin-on-debian-gnu-linux-in-chrome-browser-screenshot-enable-xcacher-admin-howto

If you have time you can play with the options and get some speed minor speed improvements. The overall increase in page opening XCache should give you is between 100% – 190% !

Enjoy 🙂

Windows batch read variable – equivalent of Linux read line command

Wednesday, March 12th, 2014

bat-file-icon-windows-read-variable
If you need to do some basic batch scripting sooner or later you will have to insert input from command line to a variable. In Linux this is done with read command, i.e.:
$ echo -n "Type a password for admin:";
$ read line;
$ echo $line;

So here is how to do the same if you need it for a Windows Batch (.BAT) file

C:\\Users\\> Set /p string='What do you want to ask?:'
'What do you want to ask?:'

This will define the string variable, to later print out the variable use:
> echo %string%
variable input output