Posts Tagged ‘adding’

Webserver farm behind Load Balancer Proxy or how to preserve incoming internet IP to local net IP Apache webservers by adding additional haproxy header with remoteip

Monday, April 18th, 2022

logo-haproxy-apache-remoteip-configure-and-check-to-have-logged-real-ip-address-inside-apache-forwarded-from-load-balancer

Having a Proxy server for Load Balancing is a common solutions to assure High Availability of Web Application service behind a proxy.
You can have for example 1 Apache HTTPD webservers serving traffic Actively on one Location (i.e. one city or Country) and 3 configured in the F5 LB or haproxy to silently keep up and wait for incoming connections as an (Active Failure) Backup solution

Lets say the Webservers usually are set to have local class C IPs as 192.168.0.XXX or 10.10.10.XXX and living in isolated DMZed well firewalled LAN network and Haproxy is configured to receive traffic via a Internet IP 109.104.212.13 address and send the traffic in mode tcp via a NATTed connection (e.g. due to the network address translation the source IP of the incoming connections from Intenet clients appears as the NATTed IP 192.168.1.50.

The result is that all incoming connections from haproxy -> webservers will be logged in Webservers /var/log/apache2/access.log wrongly as incoming from source IP: 192.168.1.50, meaning all the information on the source Internet Real IP gets lost.

load-balancer-high-availailibility-haproxy-apache
 

How to pass Real (Internet) Source IPs from Haproxy "mode tcp" to Local LAN Webservers  ?
 

Usually the normal way to work around this with Apache Reverse Proxies configured is to use HTTP_X_FORWARDED_FOR variable in haproxy when using HTTP traffic application that is proxied (.e.g haproxy.cfg has mode http configured), you have to add to listen listener_name directive or frontend Frontend_of_proxy

option forwardfor
option http-server-close

However unfortunately, IP Header preservation with X_FORWADED_FOR  HTTP-Header is not possible when haproxy is configured to forward traffic using mode tcp.

Thus when you're forced to use mode tcp to completely pass any traffic incoming to Haproxy from itself to End side, the solution is to
 

  • Use mod_remoteip infamous module that is part of standard Apache installs both on apache2 installed from (.deb) package  or httpd rpm (on redhats / centos).


1. Configure Haproxies to send received connects as send-proxy traffic


The idea is very simple all the received requests from outside clients to Haproxy are to be send via the haproxy to the webserver in a PROXY protocol string, this is done via send-proxy

             send-proxy  – send a PROXY protocol string

Rawly my current /etc/haproxy/haproxy.cfg looks like this:
 

global
        log /dev/log    local0
        log /dev/log    local1 notice
        chroot /var/lib/haproxy
        user haproxy
        group haproxy
        daemon
        maxconn 99999
        nbproc          1
        nbthread 2
        cpu-map         1 0
        cpu-map         2 1


defaults
        log     global
       mode    tcp


        timeout connect 5000
        timeout connect 30s
        timeout server 10s

    timeout queue 5s
    timeout tunnel 2m
    timeout client-fin 1s
    timeout server-fin 1s

                option forwardfor

    retries                 15


frontend http-in
                mode tcp

                option tcplog
        log global

                option logasap
                option forwardfor
                bind 109.104.212.130:80
    fullconn 20000
default_backend http-websrv
backend http-websrv
        balance source
                maxconn 3000

stick match src
    stick-table type ip size 200k expire 30m
        stick on src


        server ha1server-1 192.168.0.205:80 check send-proxy weight 254 backup
        server ha1server-2 192.168.1.15:80 check send-proxy weight 255
        server ha1server-3 192.168.2.30:80 check send-proxy weight 252 backup
        server ha1server-4 192.168.1.198:80 check send-proxy weight 253 backup
                server ha1server-5 192.168.0.1:80 maxconn 3000 check send-proxy weight 251 backup


frontend https-in
                mode tcp

                option tcplog
                log global

                option logasap
                option forwardfor
        maxconn 99999
           bind 109.104.212.130:443
        default_backend https-websrv
                backend https-websrv
        balance source
                maxconn 3000
        stick on src
    stick-table type ip size 200k expire 30m


                server ha1server-1 192.168.0.205:443 maxconn 8000 check send-proxy weight 254 backup
                server ha1server-2 192.168.1.15:443 maxconn 10000 check send-proxy weight 255
        server ha1server-3 192.168.2.30:443 maxconn 8000 check send-proxy weight 252 backup
        server ha1server-4 192.168.1.198:443 maxconn 10000 check send-proxy weight 253 backup
                server ha1server-5 192.168.0.1:443 maxconn 3000 check send-proxy weight 251 backup

listen stats
    mode http
    option httplog
    option http-server-close
    maxconn 10
    stats enable
    stats show-legends
    stats refresh 5s
    stats realm Haproxy\ Statistics
    stats admin if TRUE


After preparing your haproxy.cfg and reloading haproxy in /var/log/haproxy.log you should have the Real Source IPs logged in:
 

root@webserver:~# tail -n 10 /var/log/haproxy.log
Apr 15 22:47:34 pcfr_hware_local_ip haproxy[2914]: 159.223.65.16:58735 [15/Apr/2022:22:47:34.586] https-in https-websrv/ha1server-2 1/0/+0 +0 — 7/7/7/7/0 0/0
Apr 15 22:47:34 pcfr_hware_local_ip haproxy[2914]: 20.113.133.8:56405 [15/Apr/2022:22:47:34.744] https-in https-websrv/ha1server-2 1/0/+0 +0 — 7/7/7/7/0 0/0
Apr 15 22:47:35 pcfr_hware_local_ip haproxy[2914]: 54.36.148.248:15653 [15/Apr/2022:22:47:35.057] https-in https-websrv/ha1server-2 1/0/+0 +0 — 7/7/7/7/0 0/0
Apr 15 22:47:35 pcfr_hware_local_ip haproxy[2914]: 185.191.171.35:26564 [15/Apr/2022:22:47:35.071] https-in https-websrv/ha1server-2 1/0/+0 +0 — 8/8/8/8/0 0/0
Apr 15 22:47:35 pcfr_hware_local_ip haproxy[2914]: 213.183.53.58:42984 [15/Apr/2022:22:47:35.669] https-in https-websrv/ha1server-2 1/0/+0 +0 — 6/6/6/6/0 0/0
Apr 15 22:47:35 pcfr_hware_local_ip haproxy[2914]: 159.223.65.16:54006 [15/Apr/2022:22:47:35.703] https-in https-websrv/ha1server-2 1/0/+0 +0 — 7/7/7/7/0 0/0
Apr 15 22:47:36 pcfr_hware_local_ip haproxy[2914]: 192.241.113.203:30877 [15/Apr/2022:22:47:36.651] https-in https-websrv/ha1server-2 1/0/+0 +0 — 4/4/4/4/0 0/0
Apr 15 22:47:36 pcfr_hware_local_ip haproxy[2914]: 185.191.171.9:6776 [15/Apr/2022:22:47:36.683] https-in https-websrv/ha1server-2 1/0/+0 +0 — 5/5/5/5/0 0/0
Apr 15 22:47:36 pcfr_hware_local_ip haproxy[2914]: 159.223.65.16:64310 [15/Apr/2022:22:47:36.797] https-in https-websrv/ha1server-2 1/0/+0 +0 — 6/6/6/6/0 0/0
Apr 15 22:47:36 pcfr_hware_local_ip haproxy[2914]: 185.191.171.3:23364 [15/Apr/2022:22:47:36.834] https-in https-websrv/ha1server-2 1/1/+1 +0 — 7/7/7/7/0 0/0


2. Enable remoteip proxy protocol on Webservers

Login to each Apache HTTPD and to enable remoteip module run:
 

# a2enmod remoteip


On Debians, the command should produce a right symlink to mods-enabled/ directory
 

# ls -al /etc/apache2/mods-enabled/*remote*
lrwxrwxrwx 1 root root 31 Mar 30  2021 /etc/apache2/mods-enabled/remoteip.load -> ../mods-available/remoteip.load


3. Modify remoteip.conf file and allow IPs of haproxies or F5s


Configure RemoteIPTrustedProxy for every Source IP of haproxy to allow it to send X-Forwarded-For header to Apache,

Here are few examples, from my apache working config on Debian 11.2 (Bullseye):
 

webserver:~# cat remoteip.conf
RemoteIPHeader X-Forwarded-For
RemoteIPTrustedProxy 192.168.0.1
RemoteIPTrustedProxy 192.168.0.205
RemoteIPTrustedProxy 192.168.1.15
RemoteIPTrustedProxy 192.168.0.198
RemoteIPTrustedProxy 192.168.2.33
RemoteIPTrustedProxy 192.168.2.30
RemoteIPTrustedProxy 192.168.0.215
#RemoteIPTrustedProxy 51.89.232.41

On RedHat / Fedora other RPM based Linux distrubutions, you can do the same by including inside httpd.conf or virtualhost configuration something like:
 

<IfModule remoteip_module>
      RemoteIPHeader X-Forwarded-For
      RemoteIPInternalProxy 192.168.0.0/16
      RemoteIPTrustedProxy 192.168.0.215/32
</IfModule>


4. Enable RemoteIP Proxy Protocol in apache2.conf / httpd.conf or Virtualhost custom config
 

Modify both haproxy / haproxies config as well as enable the RemoteIP module on Apache webservers (VirtualHosts if such used) and either in <VirtualHost> block or in main http config include:

RemoteIPProxyProtocol On


5. Change default configured Apache LogFormat

In Domain Vhost or apache2.conf / httpd.conf

Default logging Format will be something like:
 

LogFormat "%h %l %u %t \"%r\" %>s %O \"%{Referer}i\" \"%{User-Agent}i\"" combined


or
 

LogFormat "%v:%p %h %l %u %t \"%r\" %>s %O \"%{Referer}i\" \"%{User-Agent}i\"" combined


Once you find it in /etc/apache2/apache2.conf / httpd.conf or Vhost, you have to comment out this by adding shebang infont of sentence make it look as follows:
 

LogFormat "%v:%p %a %l %u %t \"%r\" %>s %O \"%{Referer}i\" \"%{User-Agent}i\"" vhost_combined
LogFormat "%a %l %u %t \"%r\" %>s %O \"%{Referer}i\" \"%{User-Agent}i\"" combined
LogFormat "%a %l %u %t \"%r\" %>s %O" common
LogFormat "%{Referer}i -> %U" referer
LogFormat "%{User-agent}i" agent


The Changed LogFormat instructs Apache to log the client IP as recorded by mod_remoteip (%a) rather than hostname (%h). For a full explanation of all the options check the official HTTP Server documentation page apache_mod_config on Custom Log Formats.

and reload each Apache server.

on Debian:

# apache2ctl -k reload

On CentOS

# systemctl restart httpd


6. Check proxy protocol is properly enabled on Apaches


remoteip module will enable Apache to expect a proxy connect header passed to it otherwise it will respond with Bad Request, because it will detect a plain HTML request instead of Proxy Protocol CONNECT, here is the usual telnet test to fetch the index.htm page.

root@webserver:~# telnet localhost 80
Trying 127.0.0.1…
Connected to localhost.
Escape character is '^]'.
GET / HTTP/1.1

HTTP/1.1 400 Bad Request
Date: Fri, 15 Apr 2022 19:04:51 GMT
Server: Apache/2.4.51 (Debian)
Content-Length: 312
Connection: close
Content-Type: text/html; charset=iso-8859-1

<!DOCTYPE HTML PUBLIC "-//IETF//DTD HTML 2.0//EN">
<html><head>
<title>400 Bad Request</title>
</head><body>
<h1>Bad Request</h1>
<p>Your browser sent a request that this server could not understand.<br />
</p>
<hr>
<address>Apache/2.4.51 (Debian) Server at grafana.pc-freak.net Port 80</address>
</body></html>
Connection closed by foreign host.


root@webserver:~# telnet localhost 80
Trying 127.0.0.1…
Connected to localhost.
Escape character is '^]'.
HEAD / HTTP/1.1

HTTP/1.1 400 Bad Request
Date: Fri, 15 Apr 2022 19:05:07 GMT
Server: Apache/2.4.51 (Debian)
Connection: close
Content-Type: text/html; charset=iso-8859-1

Connection closed by foreign host.


To test it with telnet you can follow the Proxy CONNECT syntax and simulate you're connecting from a proxy server, like that:
 

root@webserver:~# telnet localhost 80
Trying 127.0.0.1…
Connected to localhost.
Escape character is '^]'.
CONNECT localhost:80 HTTP/1.0

HTTP/1.1 301 Moved Permanently
Date: Fri, 15 Apr 2022 19:13:38 GMT
Server: Apache/2.4.51 (Debian)
Location: https://zabbix.pc-freak.net
Cache-Control: max-age=900
Expires: Fri, 15 Apr 2022 19:28:38 GMT
Content-Length: 310
Connection: close
Content-Type: text/html; charset=iso-8859-1

<!DOCTYPE HTML PUBLIC "-//IETF//DTD HTML 2.0//EN">
<html><head>
<title>301 Moved Permanently</title>
</head><body>
<h1>Moved Permanently</h1>
<p>The document has moved <a href="https://zabbix.pc-freak.net">here</a>.</p>
<hr>
<address>Apache/2.4.51 (Debian) Server at localhost Port 80</address>
</body></html>
Connection closed by foreign host.

You can test with curl simulating the proxy protocol CONNECT with:

root@webserver:~# curl –insecure –haproxy-protocol https://192.168.2.30

<!DOCTYPE HTML PUBLIC "-//W3C//DTD HTML 4.01 Transitional//EN"
"http://w3.org/TR/html4/loose.dtd">
<html>
<head>
<meta name="generator" content="pc-freak.net tidy">
<script src="https://ssl.google-analytics.com/urchin.js" type="text/javascript">
</script>
<script type="text/javascript">
_uacct = "UA-2102595-3";
urchinTracker();
</script>
<script type="text/javascript">
var gaJsHost = (("https:" == document.location.protocol) ? "https://ssl." : "http://");
document.write(unescape("%3Cscript src='" + gaJsHost + "google-analytics.com/ga.js' type='text/javascript'%3E%3C/script%3E"));
</script>
<script type="text/javascript">
try {
var pageTracker = _gat._getTracker("UA-2102595-6");
pageTracker._trackPageview();
} catch(err) {}
</script>


      –haproxy-protocol
              (HTTP) Send a HAProxy PROXY protocol v1 header at the beginning of the connection. This is used by some load balancers and reverse proxies
              to indicate the client's true IP address and port.

              This option is primarily useful when sending test requests to a service that expects this header.

              Added in 7.60.0.


7. Check apache log if remote Real Internet Source IPs are properly logged
 

root@webserver:~# tail -n 10 /var/log/apache2/access.log

213.183.53.58 – – [15/Apr/2022:22:18:59 +0300] "GET /proxy/browse.php?u=https%3A%2F%2Fsteamcommunity.com%2Fmarket%2Fitemordershistogram%3Fcountry HTTP/1.1" 200 12701 "https://www.pc-freak.net" "Mozilla/5.0 (Windows NT 10.0; Win64; x64; rv:98.0) Gecko/20100101 Firefox/98.0"
88.198.48.184 – – [15/Apr/2022:22:18:58 +0300] "GET /blog/iq-world-rank-country-smartest-nations/?cid=1330192 HTTP/1.1" 200 29574 "-" "Mozilla/5.0 (compatible; DataForSeoBot/1.0; +https://dataforseo.com/dataforseo-bot)"
213.183.53.58 – – [15/Apr/2022:22:19:00 +0300] "GET /proxy/browse.php?u=https%3A%2F%2Fsteamcommunity.com%2Fmarket%2Fitemordershistogram%3Fcountry
HTTP/1.1" 200 9080 "https://www.pc-freak.net" "Mozilla/5.0 (Windows NT 10.0; Win64; x64; rv:98.0) Gecko/20100101 Firefox/98.0"
159.223.65.16 – – [15/Apr/2022:22:19:01 +0300] "POST //blog//xmlrpc.php HTTP/1.1" 200 5477 "-" "Mozilla/5.0 (Windows NT 10.0; Win64; x64) AppleWebKit/537.36 (KHTML, like Gecko) Chrome/89.0.4389.114 Safari/537.36"
159.223.65.16 – – [15/Apr/2022:22:19:02 +0300] "POST //blog//xmlrpc.php HTTP/1.1" 200 5477 "-" "Mozilla/5.0 (Windows NT 10.0; Win64; x64) AppleWebKit/537.36 (KHTML, like Gecko) Chrome/89.0.4389.114 Safari/537.36"
213.91.190.233 – – [15/Apr/2022:22:19:02 +0300] "POST /blog/wp-admin/admin-ajax.php HTTP/1.1" 200 1243 "https://www.pc-freak.net/blog/wp-admin/post.php?post=16754&action=edit" "Mozilla/5.0 (Windows NT 6.1; Win64; x64; rv:89.0) Gecko/20100101 Firefox/89.0"
46.10.215.119 – – [15/Apr/2022:22:19:02 +0300] "GET /images/saint-Paul-and-Peter-holy-icon.jpg HTTP/1.1" 200 134501 "https://www.google.com/" "Mozilla/5.0 (Windows NT 10.0; Win64; x64) AppleWebKit/537.36 (KHTML, like Gecko) Chrome/100.0.4896.75 Safari/537.36 Edg/100.0.1185.39"
185.191.171.42 – – [15/Apr/2022:22:19:03 +0300] "GET /index.html.latest/tutorials/tutorials/penguins/vestnik/penguins/faith/vestnik/ HTTP/1.1" 200 11684 "-" "Mozilla/5.0 (compatible; SemrushBot/7~bl; +http://www.semrush.com/bot.html)"

116.179.37.243 – – [15/Apr/2022:22:19:50 +0300] "GET /blog/wp-content/cookieconsent.min.js HTTP/1.1" 200 7625 "https://www.pc-freak.net/blog/how-to-disable-nginx-static-requests-access-log-logging/" "Mozilla/5.0 (compatible; Baiduspider-render/2.0; +http://www.baidu.com/search/spider.html)"
116.179.37.237 – – [15/Apr/2022:22:19:50 +0300] "GET /blog/wp-content/plugins/google-analytics-dashboard-for-wp/assets/js/frontend-gtag.min.js?ver=7.5.0 HTTP/1.1" 200 8898 "https://www.pc-freak.net/blog/how-to-disable-nginx-static-requests-access-log-logging/" "Mozilla/5.0 (compatible; Baiduspider-render/2.0; +http://www.baidu.com/search/spider.html)"


You see from above output remote Source IPs in green are properly logged, so haproxy Cluster is correctly forwarding connections passing on in the Haproxy generated Initial header the Real IP of its remote connect IPs.


Sum it up, What was done?


HTTP_X_FORWARD_FOR is impossible to set, when haproxy is used on mode tcp and all traffic is sent as received from TCP IPv4 / IPv6 Network stack, e.g. modifying any HTTP sent traffic inside the headers is not possible as this might break up the data.

Thus Haproxy was configured to send all its received data by sending initial proxy header with the X_FORWARDED usual Source IP data, then remoteip Apache module was used to make Apache receive and understand haproxy sent Header which contains the original Source IP via the send-proxy functionality and example was given on how to test the remoteip on Webserver is working correctly.

Finally you've seen how to check configured haproxy and webserver are able to send and receive the End Client data with the originator real source IP correctly and those Internet IP is properly logged inside both haproxy and apaches.

Fix “init: Id “ad” respawning too fast: disabled for 5 minutes” – Reload /etc/inittab changes in memory apply without rebooting Linux server

Thursday, April 15th, 2021

inittab-logo-reload-inittab-without-reboot

During my daily sysadmin tasks I've been contacted by a colleague, reporting issues with missing logs in rsyslog on a very old Redhat Server release 5.11.
Exact version is:

root@linux-server:~# cat /etc/redhat-release
Red Hat Enterprise Linux Server release 5.11 (Tikanga)

After checking the logs, I have confirmed his finding that in reality since about more than a year logs were not produced and al I could find multiple messages in /var/log/messages reading like:

init: Id "ad" respawning too fast: disabled for 5 minutes

I've checked the status of rsyslog which seemed to be fine

root@linux-server:~# /etc/init.d/rsyslog status
rsyslogd (pid  13709) is running…

The redhat version on the system was

root@linux-server:~# rpm -qa |grep -i rsyslog
rsyslog-3.22.1-7.el5


root@linux-server:~# tail -n 16 /var/log/messages
Apr 15 17:21:25 linux-server init: Id "ad" respawning too fast: disabled for 5 minutes
Apr 15 17:26:26 linux-server init: Id "ad" respawning too fast: disabled for 5 minutes
Apr 15 17:31:27 linux-server init: Id "ad" respawning too fast: disabled for 5 minutes
Apr 15 17:36:28 linux-server init: Id "ad" respawning too fast: disabled for 5 minutes
Apr 15 17:41:29 linux-server init: Id "ad" respawning too fast: disabled for 5 minutes
Apr 15 17:46:30 linux-server init: Id "ad" respawning too fast: disabled for 5 minutes
Apr 15 17:51:31 linux-server init: Id "ad" respawning too fast: disabled for 5 minutes
Apr 15 17:56:32 linux-server init: Id "ad" respawning too fast: disabled for 5 minutes
Apr 15 18:01:33 linux-server init: Id "ad" respawning too fast: disabled for 5 minutes
Apr 15 18:06:34 linux-server init: Id "ad" respawning too fast: disabled for 5 minutes
Apr 15 18:11:35 linux-server init: Id "ad" respawning too fast: disabled for 5 minutes
Apr 15 18:16:38 linux-server init: Id "ad" respawning too fast: disabled for 5 minutes
Apr 15 18:21:39 linux-server init: Id "ad" respawning too fast: disabled for 5 minutes


root@linux-server:~# /etc/init.d/rsyslog status
rsyslogd (pid  13709) is running…

Since the system is so old and I've seen this message and experienced this "respawning too fast: disabled for 5 minutes" myself in the past on some old Redhat 6.0 before RHEL was born as well as on Slackware Linux. The /etc/inittab which is nowadays obsoleted in newer Linux distributions was used to keep respawing a processes which have the chance to die out for some reason. 

For those unfamiliar with inittab there is a short extract from man inittab to get idea what it is.


NAME
       inittab  –  format of the inittab file used by the sysv-compatible init
       process

DESCRIPTION
       The inittab file describes which processes are started  at  bootup  and
       during  normal  operation  (e.g. /etc/init.d/boot, /etc/init.d/rc, get-
       tys…).  Init(8) distinguishes multiple runlevels, each of  which  can
       have  its  own  set of processes that are started.  Valid runlevels are
       0-6 plus A, B, and C for ondemand entries.  An  entry  in  the  inittab
       file has the following format:

              id:runlevels:action:process
 

So for example the use of /etc/inittab was very handy to configure a separate TTY12 (physical console) in the text environment of Linux to log all your messages. Another good use if you had a bash / perl / python script that you wanted to respawn (resurrect itself if it does out) on OS level without adding additional software like Dan Bernstein's all famous daemontools inittab was the right thing to use. It is a pity nowadays inittab is obsoleted in modern Linux OSes but the most likely reason to remove it is if you put some broken script that overeats CPU or memory if it runs multiple times you can easily get into a hung system.

Thus the logical thing to do is to check /etc/inittab content for any strange issues with less /etc/inittab and near the end of file found the problematic process which was triggering a never ending error messages to rsyslog and the module to protect from such messages in rsyslog by values $SystemLogRateLimitInterval and $SystemLogRateLimitBurst

# configure rsyslog rate limiting
# Rate-limiting
$SystemLogRateLimitInterval 5
$SystemLogRateLimitBurst 50000

The problem causing respawning too fast: disabled for 5 minutes

Was an old version of TivSM IBM Tivoli Service Manager /opt/tivoli/tsm/client/ba/bin/dsmc, set in the past in /etc/inittab it seems some colleague after updating to a more recent version has either changed the location of dsmc binary either the architecture of old tsm itself required a record in /etc/inittab in case if for some reasons or bugs the dsmc during backup creation was dying.

root@linux-server:~# tail -8 /etc/inittab
6:2345:respawn:/sbin/mingetty tty6

# Run xdm in runlevel 5
x:5:respawn:/etc/X11/prefdm -nodaemon

#ad:2345:respawn:/opt/tivoli/tsm/client/ba/bin/dsmc sched >/dev/null 2>&1

root@linux-server:~# rpm -qa |grep -i tivsm
TIVsm-API-5.3.4-0
TIVsm-stagent-5.3.4-0
TIVsm-BA-5.3.4-0
TIVsm-API64-5.3.4-0


The logical thing to do was to check whether this binary exist at all here is the result:

root@linux-server:~$ ls -al /opt/tivoli/tsm/client/ba/bin/dsmc
ls: /opt/tivoli/tsm/client/ba/bin/dsmc: No such file or directory

Obviously someone decided to comment out the inittab support for /opt/tivoli/tsm/client/ba/bin/dsmc as the binary was not present and the dsmc backup was executed via a separate one time cron job or the service itself was configured to run continue, but forgot to reread its configuration so in the kernel memory inittab was still having the instruction to loop over the dsmc binary, since the Linux machine was not rebooted ages (1472 days) or 4.8 years time.

root@linux-server:~#  uname -a; echo; uptime
Linux linux-server2.6.18-419.el5 #1 SMP Wed Feb 22 22:40:57 EST 2017 x86_64 x86_64 x86_64 GNU/Linux

 19:04:34 up 1472 days,  5:20,  1 user,  load average: 0.12, 0.07, 0.06


So what really happens is <b>inittab</b> is trying to kind of re-run all the time dsmc process in a similar way like it would in a bash never ending loop;


while [ 1 ]; do 
/opt/tivoli/tsm/client/ba/bin/dsmc sched
done

Since the $PATH location to the binary returns 'No such file or directory' message this message floods up the rsyslog every second which triggers the LimitBurst protection of rsyslog causing rsyslog to disable completely logging for 5 minutes. The next 5 minutes when the time expires for blocking out logging due to reached limit burst.
dsmc binary sends again few ten thousand of messages for few seconds which are already waiting in a queue of rsyslog and the LimitBurst anti DDoS protection activates again. The reason for the LimitBurst is simply because if it logging is not disabled quickly the repeating message is going to fill the hard drive of the system and noone will be able to login. So rsyslog activated the good protection.

It seems noone from support colleagues, never ever noticed this init: Id "ad" respawning too fast: disabled for 5 minutes in /var/log/messages. So since the syslog was continuesly blocked by overflow of non-sense messages, systems  normal logging was interruped and respectively prevented any other meaningful error messages and warnings from the system to get properly logged  and perhaps flooed the remote rsyslog logging servers @logging-servers:514 in /etc/rsyslog.conf


Fix to respawning too fast: disabled for 5 minutes

Very simply make /etc/inittab get reloaded in memory with:

root@linux-server:~# /sbin/init q

or with the linked telnet, which was so much used by us sys admins in the past

root@linux-server:~# /sbin/telinit q

To make the rsyslog suspension disabled of course we need to restart it again.

root@linux-server:~# /etc/init.d/rsyslog restart

root@linux-server:~# /etc/init.d/rsyslog status
rsyslogd (pid  13710) is running…

And Voila logs from services are being delivered normally via configured stuff in /etc/rsyslog.conf, to make sure this is so:

root@linux-server:~# tail -8 /var/log/messages
Apr 15 14:36:29 linux-serverinit: Id "ad" respawning too fast: disabled for 5 minutes
Apr 15 14:41:37 linux-serverinit: Id "ad" respawning too fast: disabled for 5 minutes
Apr 15 14:51:22 linux-serverinit: Id "ad" respawning too fast: disabled for 5 minutes
Apr 15 14:56:30 linux-serverinit: Id "ad" respawning too fast: disabled for 5 minutes
Apr 15 15:01:38 linux-serverinit: Id "ad" respawning too fast: disabled for 5 minutes
Apr 15 15:06:45 linux-serverinit: Id "ad" respawning too fast: disabled for 5 minutes
Apr 15 18:21:49 linux-server init: Re-reading inittab
Apr 15 18:21:54 linux-server kernel: imklog 3.22.1, log source = /proc/kmsg started.
Apr 15 18:21:54 linux-server rsyslogd: [origin software=”rsyslogd” swVersion=”3.22.1″ x-pid=”13709″ x-info=”http://www.rsyslog.com”] (re)start
Apr 15 18:41:54 linux-server rsyslogd: — MARK —
Apr 15 19:01:54 linux-server rsyslogd: — MARK —
Apr 15 19:21:54 linux-server rsyslogd: — MARK —
Apr 15 19:41:54 linux-server rsyslogd: — MARK —
Apr 15 20:01:54 linux-server rsyslogd: — MARK —

Adding custom user based host IP aliases load custom prepared /etc/hosts from non root user on Linux – Script to allow define IPs that doesn’t have DNS records to user preferred hostname

Wednesday, April 14th, 2021

adding-custom-user-based-host-aliases-etc-hosts-logo-linux

Say you have access to a remote Linux / UNIX / BSD server, i.e. a jump host and you have to remotely access via ssh a bunch of other servers
who have existing IP addresses but the DNS resolver recognized hostnames from /etc/resolv.conf are long and hard to remember by the jump host in /etc/resolv.conf and you do not have a way to include a new alias to /etc/hosts because you don't have superuser admin previleges on the hop station.
To make your life easier you would hence want to add a simplistic host alias to be able to easily do telnet, ssh, curl to some aliased name like s1, s2, s3 … etc.


The question comes then, how can you define the IPs to be resolvable by easily rememberable by using a custom User specific /etc/hosts like definition file? 

Expanding /etc/hosts predefined host resolvable records is pretty simple as most as most UNIX / Linux has the HOSTALIASES environment variable
Hostaliases uses the common technique for translating host names into IP addresses using either getaddrinfo(3) or the obsolete gethostbyname(3). As mentioned in hostname(7), you can set the HOSTALIASES environment variable to point to an alias file, and you've got per-user aliases

create ~/.hosts file

linux:~# vim ~/.hosts

with some content like:
 

g google.com
localhostg 127.0.0.1
s1 server-with-long-host1.fqdn-whatever.com 
s2 server5-with-long-host1.fqdn-whatever.com
s3 server18-with-long-host5.fqdn-whatever.com

linux:~# export HOSTALIASES=$PWD/.hosts

The caveat of hostaliases you should know is this will only works for resolvable IP hostnames.
So if you want to be able to access unresolvable hostnames.
You can use a normal alias for the hostname you want in ~/.bashrc with records like:

alias server-hostname="ssh username@10.10.10.18 -v -o stricthostkeychecking=no -o passwordauthentication=yes -o UserKnownHostsFile=/dev/null"
alias server-hostname1="ssh username@10.10.10.19 -v -o stricthostkeychecking=no -o passwordauthentication=yes -o UserKnownHostsFile=/dev/null"
alias server-hostname2="ssh username@10.10.10.20 -v -o stricthostkeychecking=no -o passwordauthentication=yes -o UserKnownHostsFile=/dev/null"

then to access server-hostname1 simply type it in terminal.

The more elegant solution is to use a bash script like below:

# include below code to your ~/.bashrc
function resolve {
        hostfile=~/.hosts
        if [[ -f “$hostfile” ]]; then
                for arg in $(seq 1 $#); do
                        if [[ “${!arg:0:1}” != “-” ]]; then
                                ip=$(sed -n -e "/^\s*\(\#.*\|\)$/d" -e "/\<${!arg}\>/{s;^\s*\(\S*\)\s*.*$;\1;p;q}" "$hostfile")
                                if [[ -n “$ip” ]]; then
                                        command "${FUNCNAME[1]}" "${@:1:$(($arg-1))}" "$ip" "${@:$(($arg+1)):$#}"
                                        return
                                fi
                        fi
                done
        fi
        command "${FUNCNAME[1]}" "$@"
}

function ping {
        resolve "$@"
}

function traceroute {
        resolve "$@"
}

function ssh {
        resolve "$@"
}

function telnet {
        resolve "$@"
}

function curl {
        resolve "$@"
}

function wget {
        resolve "$@"
}


Now after reloading bash login session $HOME/.bashrc with:

linux:~# source ~/.bashrc

ssh / curl / wget / telnet / traceroute and ping will be possible to the defined ~/.hosts IP addresses just like if it have been defined global wide on System in /etc/hosts.

Enjoy
 

Christ is Risen Eastern Orthodox Resurrection Paschal Greeting in Different Languages

Friday, April 24th, 2020

Resurrection-of-Christ-holy-orthodox-icon-Voskresenie-Hristovo

Happy Easter to All Orthodox Christians worldwide ! 
We are the the bright week –  this is the week after The Feast of Feasts Resurrection of Christ. This year in 2020, we Orthodox Christians celebrated this feast on 19th, 20th and 21st of April. The celebrations of the Feast of Christians and the Paschal joy continues for the whole week, so I found some time to quickly blog to share the Joy of the Resurrection of the Savior Jesus Christ who has freed all People from the Fear of the Death by Manifestating Death has been overtaken by Life Eternally.
Earlier years, I've blogged shortly on the Christ is risen in many languages. But this time I decided to extend my previous blog by adding some more details on which are the Member Churches consisting the Christ body of Holy Orthodoxy, What is the Creed of Faith (Symbol of Faith) difference Between Orthodox Christians and Roman Catholics and why we're not catholics and do celebrate Easter on a different date from Roman Catholics. Finally I will post the Paschal Greeting translated to as many languages I could find.

In the Eastern Orthodox Christian world which is the True Church of Christ consists of 15 National Churches each traced back to the Holy Apostles of Christ, each of Churches is in eucharistic Communion with the other. 

Canonical Orthodox Christ Churches as of year 2020 are the following:

1. Orthodox Church of Constantinople
2. Orthodox Church of Alexandria
3. Orthodox Church of Antiochia
4. Jerusalem Patriarchal Orthodox Church
5. Bulgarian Orthodox Church
6. Georgian Orthodox Church
7. Serbian Orthodox Church
8. Russian Orthodox Church
9. Romanian Orthodox Church
10. Orthodox Church of Cyprus (archibishopship)
11. Greek Orthodox Church
12. Albanian Orthodox Church
13. Polish Orthodox Church
14. Orthodox Church of Chech Lands and Slovakia
15. American Orthodox Church


Historically Christ Church was one before the Great Schism that was perhaps the greatest tragedy of mankind after Christ's Crucifix it occured in 1054 A.D. About this saddening events, the manuscripts and contemporary saints says with this terrible event, the whole world shaked its basis. The result of the Bulla brought by Pope's messangers in Hagia Sophia Cathedral in Constantinople in the Holy Alter of the Church putting in document of official schism and the Church of the east condeming the Western Church Cuhrch action headed by the pope due to the false Creed of faith inclusion legallized by the pope with the so called 'Filioque' word formula that changed the original agreement of Church fathers decisions on the First Ecumenical Council of Constantinople in 381 A.D. (which by the way puts Anathemas on anyone who dares to change the Creed of Faith as well change by the Popes in the well known ancient Baptism Formulas like oilment (receving the sign of the holy spirit during baptism).

The historical number of Orthodox Churche dioceses were much more numerous but with the time and the hardships this are the only ones that left as official Churches, many dioceses were destroyed by the Muslims Conquests and Roman Catholics orders like the Jesuits whose fight against orthodoxy has been severe in their attempt to make the whole world to turn to the pope, this is very well known by the many remains of Uniates around Europe, especially in nowadays Ukraine. There is a lot of nations like Chechz and Hungarians whose for many centuries confessed orthodoxy but due to the economic relations with the West and the converion of their rulers (princes / Kings) etc. to Roman Catholicism has gradually converted their Eastern Churches to Roman Catholics.

The origional Nicean Creed (Nicea-Constantinople) creed of faith reads as this:

Nicean Creed of Faith ( Agreed on 381 Anno Dommini in Emperor Constantine City of Byzantine Empire Constantinople)

We believe in one God, the Father Almighty, Maker of heaven and earth, and of all things visible and invisible.

And in one Lord Jesus Christ, the only-begotten Son of God, begotten of the Father before all worlds (æons), Light of Light, very God of very God, begotten, not made, consubstantial with the Father;

by whom all things were made;

who for us men, and for our salvation, came down from heaven, and was incarnate by the Holy Ghost and of the Virgin Mary, and was made man;

he was crucified for us under Pontius Pilate, and suffered, and was buried, and the third day he rose again, according to the Scriptures, and ascended into heaven, and sitteth on the right hand of the Father;

from thence he shall come again, with glory, to judge the quick and the dead. ;

whose kingdom shall have no end.

* And in the Holy Ghost, the Lord and Giver of life, who proceedeth from the Father, who with the Father and the Son together is worshiped and glorified, who spake by the prophets.

In one Holy Catholic and apostolic Church; we acknowledge one baptism for the remission of sins; we look for the resurrection of the dead, and the life of the world to come. Amen.

The Western Church head Bishop the Pope and local priests due to some historical regions of Spain and other parts of Western Europe's aim to fight heresies included the word Latin word Filioque in above translated text (Word which is translated as "And from the Son") in above starred line 'And in te Holy Ghost, The Lord Giver of Life who proceedeth from the Father' become 'And in the Holy Ghost, The Lord Giver of Life who proceedeth from the Father (Filioque) = and from the Son.' this was acceptable for the Eastern Churches until the moment when this Confession of Faith has been legalized for the Whole Western Church with a decree so called pope 'Bulla' with which it become the official confession of faith for the whole Catholic Church. The Eastern Church of course was following the accepted Canon rules from the first Ecumenical Council in 381 A.D. and rejected to accept the definition of the Pope at first in the Face of Saint Patriarch Photios I of Constantinople (year 810 –  893) and become official in 1054 by the rule of Pope Leo whose legates tried to claim Headship of the Pope over the whole Church and questioned the title of the Constantinople Ecumenical Patriarch Michael I Cerularius.
Along with the chages of the Creed of Faith the West, the years during centuries VII and IX centuries has already put a lot of differences in the East and West Church along doctrinal, theological, linguistic, political, and geographical lines so the split was a reflection of all this. The Latin Church was much more power hungry and more progressive for its time and authoritarian, trying to combine the Worldly power with the Spiritual one given by the line of Apostoles from Christ Ceasaris-Papism, where the Eastern Church was governed in the ancient model of the Worldly power in face of Eastern Roman empire Emperor and the Patriarch who was a governor of the Spiritual power. The schism was worsened also by the many Latins raids in the Eastern Empire Christian brothers and the sacking of Constantinople in 8-13 April year 1204. Of course both Wester and Eastern Roman Empire had an appetite for a conquest over the other and often this has lead the secular rulers on both sides to try to manipulate activities of the spiritual leaders of both to work for their interests, but the schism would never occur if the spiritual establishment of the Church which are the Holy Canons (decision of the Ecumenical Councils) were not breached by the Western Church.
One of this breaches of the Ancient canons is the Celebration of Eastern Pascha which says the Christian Pascha should never coincide with Jewish Pascha. However in the Western Church this rule was breached and nowadays The Eastern (The Day of the Resurrection of Christ) in the Roman Catholic Church (Western Church) coincides most of the years with Jewish Pascha (both Roman Catholics and the executors of Christ who never accepted him the Jews celebrate together … a sad fact).

Nowadays most of the Ancient Churches of the East together with the Eastern Orthodox Churches, who are confessing the Faith of Christ such as it was handed by the Saint Fathers has a very specific ancient way of confession of faith similar to the Creed of Faith which was a very common short ancient way to confess the faith when two Christians met it is perhaps originating from the times of the Heresies in the 1st century right after the Christ Crucifix, when the pupil of Christ used it to confirm the Glorious and unexplainable Miracle of the Resurrection of the Lord Jesus Christ from the Death in Real Body in the 3rd day from the Grave in the Cave where his body was buried.

Resurrection-of-Christ-Anastasis-Greek-orthodox-icon

The Greeting Formula is the well known in the Eastern Orthodox Churches such as in Bulgaria / Greece / Russia / Serbia etc. Christ is Risen.
On every easter Almost everyone in the Orthodox Christian Countires greats everyone else both in homes on the street at work or anywhere relatives friends and even unfamiliar people who has to do business deeds with the immersely joyful greeting.

ХРИСТОС ВОСКРЕСЕ / CHRIST IS RISEN !!!!! !!!

Then the greeted Person answers back

ВОЙСТИНУ ВОСКРЕСЕ / TRULY HE IS RISEN (INDEED HE IS RISEN) !!!!!!!!

In the Orthodox Churches, believers do greet themselves with this heartful joyful greeting for the whole 40 days after the Feast of Resurrection of Christ.

In Russia, Ukrain, Belarus and the surrounding Slavonic lands there is this tradition that the greeting is repeated 3 times as an interaction between person A and person B, for example.

Person A (3 times) greets:
ХРИСТОС ВОСКРЕСЕ = CHRIST IS RISEN !!!
Person B (3 times) answers:
ВОЙСТИНУ ВОСКРЕСЕ = TRULY HE IS RISEN !!!

Resurrection-of-Christ-Velikden-orthodox-holy-icon

Below is a good list with Paschal Resurrection Greeting in multiple languages, for those who has curious polyglot minds who want to learn few words in different languages.

Indo-European languages

Greek: Χριστὸς ἀνέστη! Ἀληθῶς ἀνέστη! (Khristós anésti! Alithós anésti!)

Voskresenie-Gospoda-Nashego-Iisusa-Hrista-Mosaic

Slavic languages

Church Slavonic: Хрїсто́съ воскре́се! Вои́стинꙋ воскре́се! (Xristósŭ voskrése! Voístinu voskrése!)

Belarusian: Хрыстос уваскрос! Сапраўды ўваскрос! (Chrystos uvaskros! Sapraŭdy ŭvaskros!)

Bulgarian: Христос воскресе! Воистину воскресе! (Khristos voskrese! Voistinu voskrese!), as if in Church Slavonic; Христос възкресе! Наистина възкресе! (Khristos vâzkrese! Naistina vâzkrese!) in Modern Bulgarian

Croatian: Krist uskrsnu! Uistinu uskrsnu!

: Kristus vstal z mrtvých! Vpravdě vstal z mrtvých!

Macedonian: Христос воскресе! Навистина воскресе! (Hristos voskrese! Navistina voskrese!), traditional; or Христос воскресна! Навистина воскресна! (Hristos voskresna! Navistina voskresna!)

Polish: Chrystus zmartwychwstał! Prawdziwie zmartwychwstał!

Russian: Христос воскрес(-е)! Воистину воскрес(-е)! (Khristos voskres(-е)! Voistinu voskres(-е)!) (the version with -e is in Church Slavonic, one without it is in modern Russian; both are widely used)

Rusyn: Хрістос воскрес! Воістину воскрес! (Hristos voskres! Voistynu voskres!)

Serbian: Христос васкрсе! Ваистину васкрсе! (Hristos vaskrse! Vaistinu vaskrse!) or Христос воскресе! Ваистину воскресе! (Hristos voskrese! Vaistinu voskrese!)

Slovak: Kristus vstal z mŕtvych! Skutočne vstal (z mŕtvych)! (though the Church Slavonic version is more often used)

Slovene: Kristus je vstal! Zares je vstal!

Ukrainian: Христос воскрес! Воістину воскрес! (Khrystos voskres! Voistynu voskres!)

Tosk Albanian: Krishti u ngjall! Vërtet u ngjall!

Armenian

Western Armenian: Քրիստոս յարեա՜ւ ի մեռելոց: Օրհնեա՜լ է Յարութիւնն Քրիստոսի: (Krisdos haryav i merelotz! Orhnyal e Haroutyunen Krisdosi!)

eastern dialect, Քրիստոս հարյա՜վ ի մեռելոց: Օրհնյա՜լ է Հարությունը Քրիստոսի: (Khristos haryav i merelotz! Orhnyal e Harouthyoune Khristosi!); literally "Christ is risen! Blessed is the resurrection of Christ!")
 

Christus-Resurrexit-Latin-icon-Christ_Resurrection


Germanic languages


Anglic languages

Scots: Christ has ryssyn! Hech aye, he his ain sel!

English: Christ is risen! He is risen indeed! Or Christ is risen! Truly, he is risen!

Old English: Crist is ārisen! Hē is sōþlīċe ārisen!

Middle English: Crist is arisen! Arisen he sothe!

Danish: Kristus er opstanden! Sandelig Han er Opstanden!

West Frisian: Kristus is opstien! Wis is er opstien!

German: Christus ist auferstanden! Er ist wahrhaft auferstanden! or Der Herr ist auferstanden! Er ist wahrhaftig auferstanden!

Icelandic: Kristur er upprisinn! Hann er sannarlega upprisinn!

Faroese: Kristus er upprisin! Hann er sanniliga upprisin!

Low Franconian languages

Dutch: Christus is opgestaan! Hij is waarlijk opgestaan! (Netherlands) or Christus is verrezen! Hij is waarlijk verrezen! (Belgium)

Afrikaans: Christus het opgestaan! Hy het waarlik opgestaan!

Norwegian

Bokmål: Kristus er oppstanden! Han er sannelig oppstanden!

Nynorsk: Kristus er oppstaden! Han er sanneleg oppstaden!

Swedish: Kristus är uppstånden! Han är sannerligen uppstånden!

Italic languages

Latin: Christus resurrexit! Resurrexit vere!

Romance languages

Aromanian: Hristolu anyie! Di alihea anyie!

Resurrection-of-Christ-Coptic-christian-icon

Catalan: Crist ha ressuscitat! Veritablement ha ressuscitat!

French: Le Christ est ressuscité ! En vérité il est ressuscité! Or Le Christ est ressuscité ! Vraiment il est ressuscité !

Galician: Cristo resucitou! De verdade resucitou!

Italian: Cristo è risorto! È veramente risorto!

Portuguese: Cristo ressuscitou! Em verdade ressuscitou! or Cristo ressuscitou! Ressuscitou verdadeiramente!

Arpitan: Lo Crist es ressuscitat! En veritat es ressuscitat!

Romanian: Hristos a înviat! Adevărat a înviat!

Romansh: Cristo es rinaschieu! In varded, el es rinaschieu!

Sardinian: Cristu est resuscitadu! Aberu est resuscitadu!

Sicilian: Cristu arrivisciutu esti! Pibbiru arrivisciutu esti!

Spanish: ¡Cristo resucitó! ¡En verdad resucitó!

Walloon: Li Crist a raviké! Il a raviké podbon!

Baltic languages

Latvian: Kristus (ir) augšāmcēlies! Patiesi (viņš ir) augšāmcēlies!

Lithuanian: Kristus prisikėlė! Tikrai prisikėlė!
 

Celtic languages

Goidelic languages

Old Irish: Asréracht Críst! Asréracht Hé-som co dearb!

Irish: Tá Críost éirithe! Go deimhin, tá sé éirithe!

Manx: Taw Creest Ereen! Taw Shay Ereen Guhdyne!

Scottish Gaelic: Tha Crìosd air èiridh! Gu dearbh, tha e air èiridh!


Brythonic languages


Breton:Dassoret eo Krist! E wirionez dassoret eo!

Cornish: Thew Creest dassorez! En weer thewa dassorez!

Welsh: Atgyfododd Crist! Yn wir atgyfododd!

Indo-Iranian languages

Ossetian:Чырысти райгас! Æцæгæй райгас! Or бæлвырд райгас! (Ḱyrysti rajgas! Æcægæj rajgas or bælvyrd rajgas!)

Persian: مسیح برخاسته است! به راستی برخاسته است!‎ (Masih barkhaste ast! Be rasti barkhaste ast!)

Hindi: येसु मसीह ज़िन्दा हो गया है! हाँ यक़ीनन, वोह ज़िन्दा हो गय یسوع مسیح زندہ ہو گیا ہے! ہاں یقیناً، وہ زندہ ہو گیا ہے!‎ (Yesu Masīh zindā ho gayā hai! Hā̃ yaqīnan, voh zindā ho gayā hai!)

Marathi: Yeshu Khrist uthla ahe! Kharokhar uthla ahe!

Abkhazian: Kyrsa Dybzaheit! Itzzabyrgny Dybzaheit!
 

Jesus-Christ-Resurrected-arabic-coptic-icon

Afro-Asiatic languages


Semitic languages


Standard Arabic: المسيح قام! حقا قام!‎ (al-Masīḥ qām! Ḥaqqan qām!) or المسيح قام! بالحقيقة قام! (al-Masīḥ qām! Bi-l-ḥaqīqati qām!)

Aramaic languages


Classical Syriac: ܡܫܝܚܐ ܩܡ! ܫܪܝܪܐܝܬ ܩܡ!‎ (Mshiḥa qām! sharīrāīth qām! or Mshiḥo Qom! Shariroith Qom!)

Assyrian Neo-Aramaic: ܡܫܝܚܐ ܩܡܠܗ! ܒܗܩܘܬܐ ܩܡܠܗ!‎ (Mshikha qimlih! bhāqota qimlih!)

Turoyo: ܡܫܝܚܐ ܩܝܡ! ܫܪܥܪܐܝܬ ܩܝܡ!‎ (Mshiḥo qāyem! Shariroith qāyem!)


East African languages


Tigrinya: Christos tensiou! Bahake tensiou!

Amharic: Kristos Tenestwal! Bergit Tenestwal!

Hebrew: המשיח קם! באמת קם!‎ (Hameshiach qam! Be'emet qam!)

Maltese: Kristu qam! Huwa qam tassew! or Kristu qam mill-mewt! Huwa qam tassew!

Egyptian

Coptic: (Pi'Christos aftonf! Khen oumetmi aftonf!)

Judeo-Berber: Lmasih yahye-d ger lmeytin! Stidet yahye-d ger lmeytin!


Dravidian languages

Tamil: கிறிஸ்து உயிர்த்தெழுந்தார், மெய்யாகவே அவர் உயிர்த்தெழுந்தார்.

Malayalam: ക്രിസ്തു ഉയിര്ത്തെഴുന്നേറ്റു! തീര്ച്ചയായും ഉയിര്ത്തെഴുന്നേറ്റു! (Christu uyirthezhunnettu! Theerchayayum uyirthezhunnettu!)
 

Eskimo–Aleut languages

Aleut: Kristusaaq Aglagikuk! Angangulakan Aglagikuk!

Pacific Gulf Yupik: Kristusaq ungwektaq! Pichinuq ungwektaq!

Central Yupik: Kristuussaaq unguirtuq! Ilumun unguirtuq!

Mayan languages

Tzotzil: Icha'kuxi Kajvaltik Kristo! Ta melel icha'kuxi!

Tzeltal: Cha'kuxaj Kajwaltik Kristo! Ta melel cha'kuxaj!

Christ-resurrection-Anastasis


Austronesian languages

Malayo-Polynesian

Batak: Tuhan nunga hehe! Tutu do ibana hehe!

Carolinian: Lios a melau sefal! Meipung, a mahan sefal!

Cebuano: Nabanhaw Si Kristo! Nabanhaw gayud!

Waray: Hi Kristo nabanwaw! Matuod nga Hiya nabanhaw!

Chamorro: La'la'i i Kristo! Magahet na luma'la' i Kristo!

Fijian: Na Karisito tucake tale! Io sa tucake tale!

Filipino: Nabuhay muli Si Kristo! Nabuhay talaga!

Hawaiian: Ua ala hou ʻo Kristo! Ua ala ʻiʻo nō ʻo Ia!

Indonesian: Kristus telah bangkit! Dia benar-benar telah bangkit!

Kapampangan: Y Kristû sinûbli yáng mèbié! Sinûbli ya pin mèbié!

Malagasy: Nitsangana tamin'ny maty i Kristy! Nitsangana marina tokoa izy!

Cook Islands Māori: Kuo toetu’u ‘ae Eiki! ‘Io kuo toetu’u mo’oni!

 Austroasiatic languages: Mon-Khmer

: Preah Christ mean preah choan rous leong vinh! trung mean preah choan rous leong vinh men!

 Vietnamese

: Chúa Ki-tô đã sống lại! Ngài đã sống lại thật!

 Thai

Thai: พระคริสต์เป็นขึ้นจากความตาย! or พระคริสต์ทรงกลับคืนพระชนม์ชีพ!

Basque

Basque: Cristo Berbiztua! Benetan Berbiztua!

Japanese

Japanese: ハリストス復活!実に復活! (Harisutosu fukkatsu! Jitsu ni fukkatsu!)

 Korean

Korean 그리스도 부활하셨네! 참으로 부활하셨네! (Geuriseudo buhwalhasyeonne! Chameuro buhwalhasyeonne!)

 Na-Dené languages

Athabaskan languages

Navajo: Christ daaztsą́ą́dę́ę́ʼ náádiidzáá! Tʼáá aaníí daaztsą́ą́dę́ę́ʼ náádiidzáá!

Tlingit: Xristos Kuxwoo-digoot! Xegaa-kux Kuxwoo-digoot!

Niger–Congo languages

: Kristo Ajukkide! Kweli Ajukkide!

Swahili: Kristo Amefufuka! Amefufuka kweli kweli!

Gikuyu: Kristo ni muriuku! Ni muriuku nema!

Quechuan languages

Quechua: Cristo causarimpunña! Ciertopuni causarimpunña!

Mongolic languages

Classical Mongolian: Есүс дахин амилсан, Тэр үнэхээр амилсан! (Yesus dahin amilsan, ter uneheer amilsan)

Turkic languages

Turkish: Mesih dirildi! Hakikaten dirildi!

Uyghur: ‫ئەيسا تىرىلدى! ھەقىقەتىنلا تىرىلدى!‬‎ (Əysa tirildi! Ⱨəⱪiⱪətinla tirildi!)

Azerbaijani: Məsih dirildi! Həqiqətən dirildi!

Chuvash: Христос чĕрĕлнĕ! Чăн чĕрĕлнĕ! (Hristos čĕrĕlnĕ! Čyn čĕrĕlnĕ!)

Khakas: Христос тірілді! Сыннаң тірілді! (Hristos tíríldí! Sınnañ tíríldí!)

Uzbek: Масих тирилди! Хақиқатдан тирилди! (Masih tirildi! Haqiqatdan tirildi!)

Sino-Tibetan languages

Chinese: 基督復活了!他確實復活了! (Jīdū fùhuó-le! Tā quèshí fùhuó-le!) or 耶穌復活了,真的他復活了! (Yēsū fùhuó-le, Zhēnde tā fùhuó-le!)

Uralic languages

Estonian: Kristus on üles tõusnud! Tõesti on üles tõusnud!

Finnish: Kristus nousi kuolleista! Totisesti nousi!

Hungarian: Krisztus feltámadt! Valóban feltámadt!

Karelian: Hristos nouzi kuollielois! Tovessah nouzi!

Glorious-Resurrection-of-Jesus-Christ-icon

Constructed languages

International auxiliary languages

Esperanto: Kristo leviĝis! Vere Li leviĝis!

Ido: Kristo riviveskabas! Ya Il rivivesakabas!

Interlingua: Christo ha resurgite! Vermente ille ha resurgite! or Christo ha resurrecte! Vermente ille ha resurrecte!

Quenya: (Hristo Ortane! Anwave Ortanes!)

Klingon: Hu'ta' QISt! Hu'bejta'!


How to enable HaProxy logging to a separate log /var/log/haproxy.log / prevent HAProxy duplicate messages to appear in /var/log/messages

Wednesday, February 19th, 2020

haproxy-logging-basics-how-to-log-to-separate-file-prevent-duplicate-messages-haproxy-haproxy-weblogo-squares
haproxy  logging can be managed in different form the most straight forward way is to directly use /dev/log either you can configure it to use some log management service as syslog or rsyslogd for that.

If you don't use rsyslog yet to install it: 

# apt install -y rsyslog

Then to activate logging via rsyslogd we can should add either to /etc/rsyslogd.conf or create a separte file and include it via /etc/rsyslogd.conf with following content:
 

Enable haproxy logging from rsyslogd


Log haproxy messages to separate log file you can use some of the usual syslog local0 to local7 locally used descriptors inside the conf (be aware that if you try to use some wrong value like local8, local9 as a logging facility you will get with empty haproxy.log, even though the permissions of /var/log/haproxy.log are readable and owned by haproxy user.

When logging to a local Syslog service, writing to a UNIX socket can be faster than targeting the TCP loopback address. Generally, on Linux systems, a UNIX socket listening for Syslog messages is available at /dev/log because this is where the syslog() function of the GNU C library is sending messages by default. To address UNIX socket in haproxy.cfg use:

log /dev/log local2 


If you want to log into separate log each of multiple running haproxy instances with different haproxy*.cfg add to /etc/rsyslog.conf lines like:

local2.* -/var/log/haproxylog2.log
local3.* -/var/log/haproxylog3.log


One important note to make here is since rsyslogd is used for haproxy logging you need to have enabled in rsyslogd imudp and have a UDP port listener on the machine.

E.g. somewhere in rsyslog.conf or via rsyslog include file from /etc/rsyslog.d/*.conf needs to have defined following lines:

$ModLoad imudp
$UDPServerRun 514


I prefer to use external /etc/rsyslog.d/20-haproxy.conf include file that is loaded and enabled rsyslogd via /etc/rsyslog.conf:

# vim /etc/rsyslog.d/20-haproxy.conf

$ModLoad imudp
$UDPServerRun 514​
local2.* -/var/log/haproxy2.log


It is also possible to produce different haproxy log output based on the severiy to differentiate between important and less important messages, to do so you'll need to rsyslog.conf something like:
 

# Creating separate log files based on the severity
local0.* /var/log/haproxy-traffic.log
local0.notice /var/log/haproxy-admin.log


Prevent Haproxy duplicate messages to appear in /var/log/messages

If you use local2 and some default rsyslog configuration then you will end up with the messages coming from haproxy towards local2 facility producing doubled simultaneous records to both your pre-defined /var/log/haproxy.log and /var/log/messages on Proxy servers that receive few thousands of simultanous connections per second.
This is a problem since doubling the log will produce too much data and on systems with smaller /var/ partition you will quickly run out of space + this haproxy requests logging to /var/log/messages makes the file quite unreadable for normal system events which are so important to track clearly what is happening on the server daily.

To prevent the haproxy duplicate messages you need to define somewhere in rsyslogd usually /etc/rsyslog.conf local2.none near line of facilities configured to log to file:

*.info;mail.none;authpriv.none;cron.none;local2.none     /var/log/messages

This configuration should work but is more rarely used as most people prefer to have haproxy log being written not directly to /dev/log which is used by other services such as syslogd / rsyslogd.

To use /dev/log to output logs from haproxy configuration in global section use config like:
 

global
        log /dev/log local2 debug
        chroot /var/lib/haproxy
        stats socket /run/haproxy/admin.sock mode 660 level admin
        stats timeout 30s
        user haproxy
        group haproxy
        daemon

The log global directive basically says, use the log line that was set in the global section for whole config till end of file. Putting a log global directive into the defaults section is equivalent to putting it into all of the subsequent proxy sections.

Using global logging rules is the most common HAProxy setup, but you can put them directly into a frontend section instead. It can be useful to have a different logging configuration as a one-off. For example, you might want to point to a different target Syslog server, use a different logging facility, or capture different severity levels depending on the use case of the backend application. 

Insetad of using /dev/log interface that is on many distributions heavily used by systemd to store / manage and distribute logs,  many haproxy server sysadmins nowdays prefer to use rsyslogd as a default logging facility that will manage haproxy logs.
Admins prefer to use some kind of mediator service to manage log writting such as rsyslogd or syslog, the reason behind might vary but perhaps most important reason is  by using rsyslogd it is possible to write logs simultaneously locally on disk and also forward logs  to a remote Logging server  running rsyslogd service.

Logging is defined in /etc/haproxy/haproxy.cfg or the respective configuration through global section but could be also configured to do a separate logging based on each of the defined Frontend Backends or default section. 
A sample exceprt from this section looks something like:

#———————————————————————
# Global settings
#———————————————————————
global
    log         127.0.0.1 local2

    chroot      /var/lib/haproxy
    pidfile     /var/run/haproxy.pid
    maxconn     4000
    user        haproxy
    group       haproxy
    daemon

    # turn on stats unix socket
    stats socket /var/lib/haproxy/stats

#———————————————————————
defaults
    mode                    tcp
    log                     global
    option                  tcplog
    #option                  dontlognull
    #option http-server-close
    #option forwardfor       except 127.0.0.0/8
    option                  redispatch
    retries                 7
    #timeout http-request    10s
    timeout queue           10m
    timeout connect         30s
    timeout client          20m
    timeout server          10m
    #timeout http-keep-alive 10s
    timeout check           30s
    maxconn                 3000


# HAProxy Monitoring Config
#———————————————————————
listen stats 192.168.0.5:8080                #Haproxy Monitoring run on port 8080
    mode http
    option httplog
    option http-server-close
    stats enable
    stats show-legends
    stats refresh 5s
    stats uri /stats                            #URL for HAProxy monitoring
    stats realm Haproxy\ Statistics
    stats auth hproxyauser:Password___          #User and Password for login to the monitoring dashboard


#———————————————————————
# frontend which proxys to the backends
#———————————————————————
frontend ft_DKV_PROD_WLPFO
    mode tcp
    bind 192.168.233.5:30000-31050
    option tcplog
    log-format %ci:%cp\ [%t]\ %ft\ %b/%s\ %Tw/%Tc/%Tt\ %B\ %ts\ %ac/%fc/%bc/%sc/%rc\ %sq/%bq
    default_backend Default_Bakend_Name


#———————————————————————
# round robin balancing between the various backends
#———————————————————————
backend bk_DKV_PROD_WLPFO
    mode tcp
    # (0) Load Balancing Method.
    balance source
    # (4) Peer Sync: a sticky session is a session maintained by persistence
    stick-table type ip size 1m peers hapeers expire 60m
    stick on src
    # (5) Server List
    # (5.1) Backend
    server Backend_Server1 10.10.10.1 check port 18088
    server Backend_Server2 10.10.10.2 check port 18088 backup


The log directive in above config instructs HAProxy to send logs to the Syslog server listening at 127.0.0.1:514. Messages are sent with facility local2, which is one of the standard, user-defined Syslog facilities. It’s also the facility that our rsyslog configuration is expecting. You can add more than one log statement to send output to multiple Syslog servers.

Once rsyslog and haproxy logging is configured as a minumum you need to restart rsyslog (assuming that haproxy config is already properly loaded):

# systemctl restart rsyslogd.service

To make sure rsyslog reloaded successfully:

systemctl status rsyslogd.service


Restarting HAproxy

If the rsyslogd logging to 127.0.0.1 port 514 was recently added a HAProxy restart should also be run, you can do it with:
 

# /usr/sbin/haproxy -f /etc/haproxy/haproxy.cfg -D -p /var/run/haproxy.pid -sf $(cat /var/run/haproxy.pid)


Or to restart use systemctl script (if haproxy is not used in a cluster with corosync / heartbeat).

# systemctl restart haproxy.service

You can control how much information is logged by adding a Syslog level by

    log         127.0.0.1 local2 info


The accepted values are the standard syslog security level severity:

Value Severity Keyword Deprecated keywords Description Condition
0 Emergency emerg panic System is unusable A panic condition.
1 Alert alert   Action must be taken immediately A condition that should be corrected immediately, such as a corrupted system database.
2 Critical crit   Critical conditions Hard device errors.
3 Error err error Error conditions  
4 Warning warning warn Warning conditions  
5 Notice notice   Normal but significant conditions Conditions that are not error conditions, but that may require special handling.
6 Informational info   Informational messages  
7 Debug debug   Debug-level messages Messages that contain information normally of use only when debugging a program.


Logging only errors / timeouts / retries and errors is done with option:

Note that if the rsyslog is configured to listen on different port for some weird reason you should not forget to set the proper listen port, e.g.:
 

  log         127.0.0.1:514 local2 info

option dontlog-normal

in defaults or frontend section.

You most likely want to enable this only during certain times, such as when performing benchmarking tests.

(or log-format-sd for structured-data syslog) directive in your defaults or frontend
 

Haproxy Logging shortly explained


The type of logging you’ll see is determined by the proxy mode that you set within HAProxy. HAProxy can operate either as a Layer 4 (TCP) proxy or as Layer 7 (HTTP) proxy. TCP mode is the default. In this mode, a full-duplex connection is established between clients and servers, and no layer 7 examination will be performed. When in TCP mode, which is set by adding mode tcp, you should also add option tcplog. With this option, the log format defaults to a structure that provides useful information like Layer 4 connection details, timers, byte count and so on.

Below is example of configured logging with some explanations:

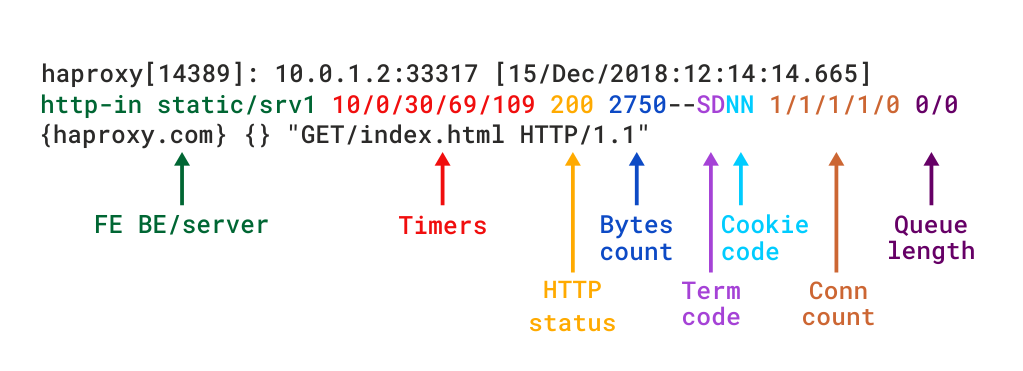
Log-format "%ci:%cp [%t] %ft %b/%s %Tw/%Tc/%Tt %B %ts %ac/%fc/%bc/%sc/%rc %sq/%bq"

haproxy-logged-fields-explained
Example of Log-Format configuration as shown above outputted of haproxy config:

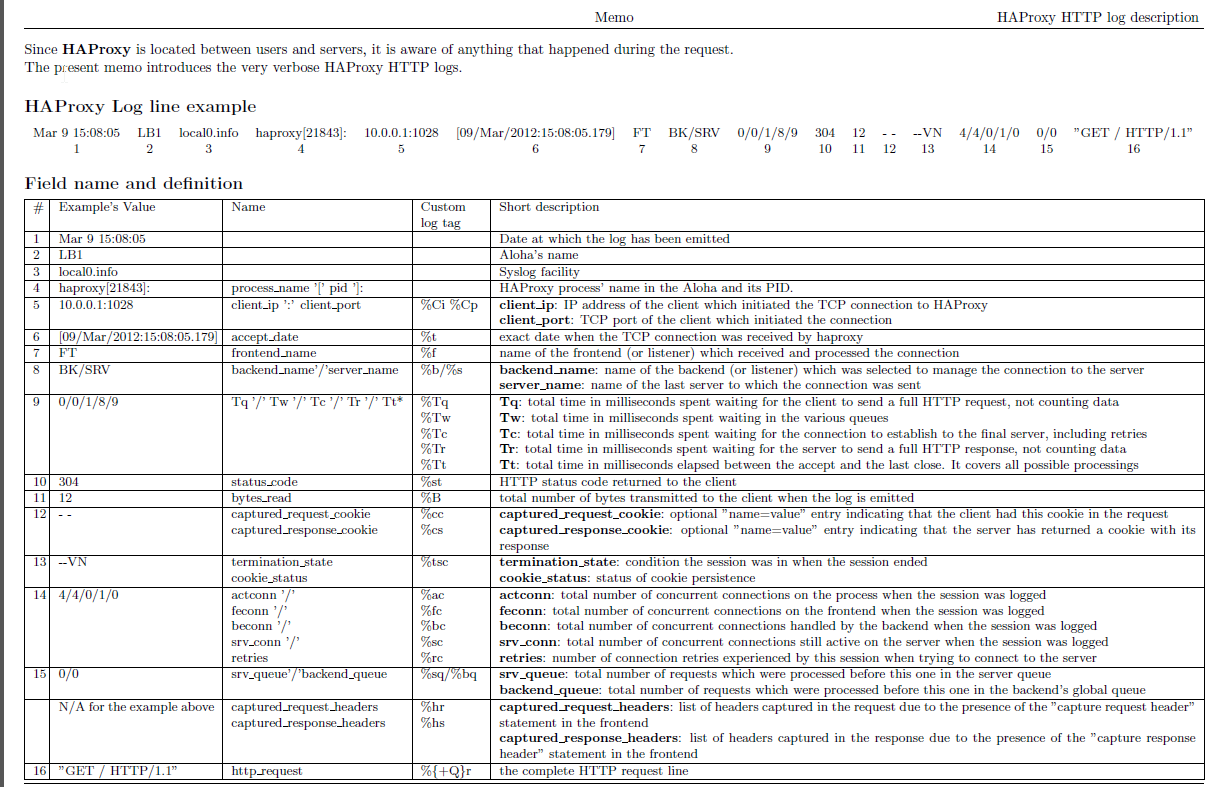
Log-format "%ci:%cp [%tr] %ft %b/%s %TR/%Tw/%Tc/%Tr/%Ta %ST %B %CC %CS %tsc %ac/%fc/%bc/%sc/%rc %sq/%bq %hr %hs %{+Q}r"

haproxy_http_log_format-explained1

To understand meaning of this abbreviations you'll have to closely read  haproxy-log-format.txt. More in depth info is to be found in HTTP Log format documentation


haproxy_logging-explained

Logging HTTP request headers

HTTP request header can be logged via:
 

 http-request capture

frontend website
    bind :80
    http-request capture req.hdr(Host) len 10
    http-request capture req.hdr(User-Agent) len 100
    default_backend webservers


The log will show headers between curly braces and separated by pipe symbols. Here you can see the Host and User-Agent headers for a request:

192.168.150.1:57190 [20/Dec/2018:22:20:00.899] website~ webservers/server1 0/0/1/0/1 200 462 – – —- 1/1/0/0/0 0/0 {mywebsite.com|Mozilla/5.0 (X11; Linux x86_64) AppleWebKit/537.36 (KHTML, like Gecko) Ubuntu Chromium/71.0.3578.80 } "GET / HTTP/1.1"


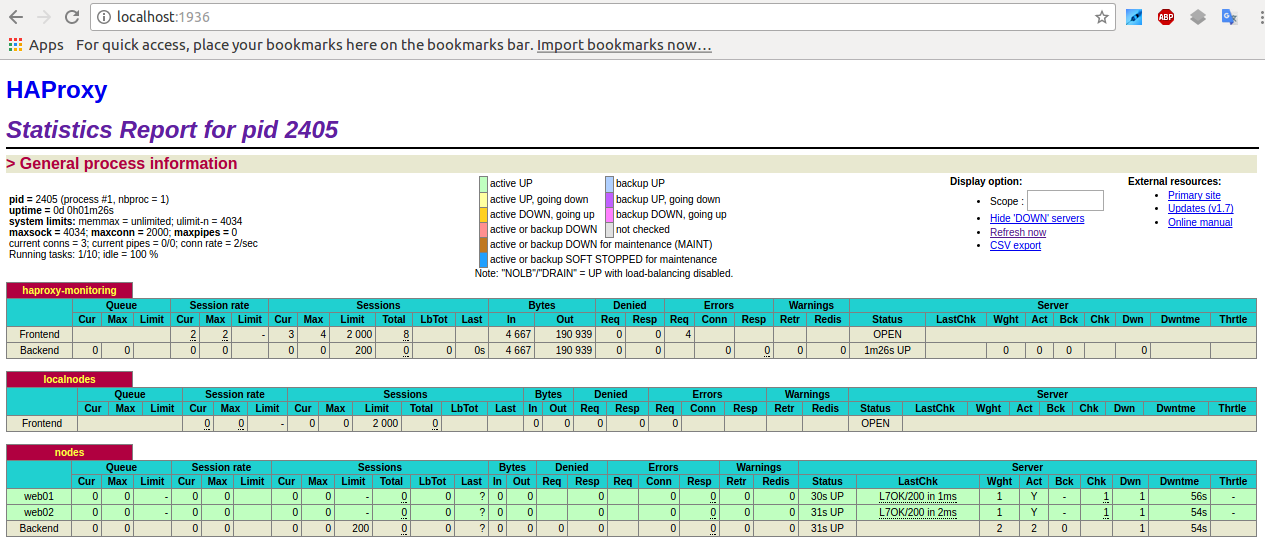
Haproxy Stats Monitoring Web interface


Haproxy is having a simplistic stats interface which if enabled produces some general useful information like in above screenshot, through which
you can get a very basic in browser statistics and track potential issues with the proxied traffic for all configured backends / frontends incoming outgoing
network packets configured nodes
 experienced downtimes etc.

haproxy-statistics-report-picture

The basic configuration to make the stats interface accessible would be like pointed in above config for example to enable network listener on address
 

https://192.168.0.5:8080/stats


with hproxyuser / password config would be:

# HAProxy Monitoring Config
#———————————————————————
listen stats 192.168.0.5:8080                #Haproxy Monitoring run on port 8080
    mode http
    option httplog
    option http-server-close
    stats enable
    stats show-legends
    stats refresh 5s
    stats uri /stats                            #URL for HAProxy monitoring
    stats realm Haproxy\ Statistics
    stats auth hproxyauser:Password___          #User and Password for login to the monitoring dashboard


Sessions states and disconnect errors on new application setup

Both TCP and HTTP logs include a termination state code that tells you the way in which the TCP or HTTP session ended. It’s a two-character code. The first character reports the first event that caused the session to terminate, while the second reports the TCP or HTTP session state when it was closed.

Here are some essential termination codes to track in for in the log:
 

Here are some termination code examples most commonly to see on TCP connection establishment errors:

Two-character code    Meaning
—    Normal termination on both sides.
cD    The client did not send nor acknowledge any data and eventually timeout client expired.
SC    The server explicitly refused the TCP connection.
PC    The proxy refused to establish a connection to the server because the process’ socket limit was reached while attempting to connect.


To get all non-properly exited codes the easiest way is to just grep for anything that is different from a termination code –, like that:

tail -f /var/log/haproxy.log | grep -v ' — '


This should output in real time every TCP connection that is exiting improperly.

There’s a wide variety of reasons a connection may have been closed. Detailed information about all possible termination codes can be found in the HAProxy documentation.
To get better understanding a very useful reading to haproxy Debug errors with  is in haproxy-logging.txt in that small file are collected all the cryptic error messages codes you might find in your logs when you're first time configuring the Haproxy frontend / backend and the backend application behind.

Another useful analyze tool which can be used to analyze Layer 7 HTTP traffic is halog for more on it just google around.

Howto Configure Linux shell Prompt / Setup custom Terminal show Prompt using default shell variables PS1, PS2, PS3, PS4

Tuesday, August 27th, 2019

how-to-configure-lunux-bsd-shell-prompt-ps1-howto-make-your-terminal-console-shell-nice-and-shiny-1

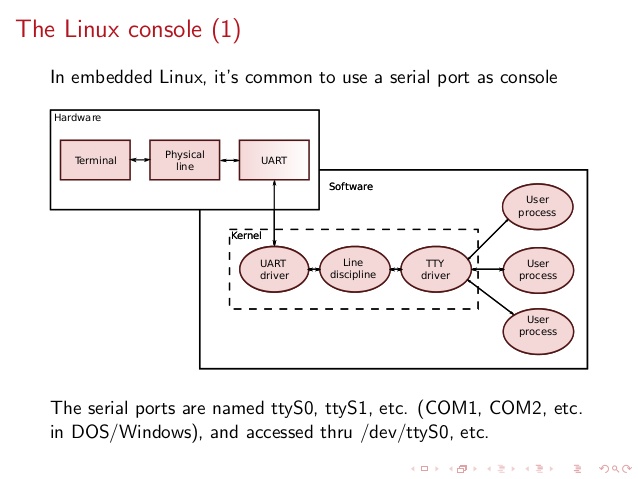
System Console, Command Operation Console  or Terminal is a Physical device for text (command) input from keyboard, getting the command output and monitoring the status of a shell or programs I/O operations generated traditionally with attached screen. With the development of Computers, physical consoles has become emulated and the input output is translated on the monitor usually via a data transfer  protocol historically mostly over TCP/IP connection to remote IP with telnet or rsh, but due to security limitations Consoles are now accessed over data (encrypted) network protocols with SHA2 / MD5 cryptography algorithm enabled such as over SSH (Secure Shell) network protocol..
The ancestors of physical consoles which in the past were just a Terminal (Monitoring / Monitor device attached to a MainFrame system computer).

Mainframe-physical-terminal-monitor-Old-Computer

What is Physical Console
A classical TTY (TeleTYpewriter) device looked like so and served the purpose of being just a communication and display deivce, whether in reality the actual computing and storage tape devices were in a separate room and communicating to Terminal.

mainframe-super-computer-computing-tape-machine
TTYs are still present in  modern UNIX like GNU / Linux distrubions OSes and the BSD berkley 4.4 code based FreeBSD / NetBSD / OpenBSD if you have installed the OS on a physical computer in FreeBSD and Solaris / SunOS there is also tty command. TTY utility in *nix writes the name of the terminal attached to standard input to standard output, in Linux there is a GNU remake of same program part called GNU tty of coreutils package (try man tty) for more.

The physical console is recognizable in Linux as it is indicated with other tree letters pts – (pseudo terminal device) standing for a terminal device which is emulated by an other program (example: xterm, screen, or ssh are such programs). A pts is the slave part of a pts is pseudo there is no separate binary program for it but it is dynamically allocated in memory.
PTS is also called Line consle in Cisco Switches / Router devices, VTY is the physical Serial Console connected on your Cisco device and the network connection emulation to network device is creates with a virtual console session VTL (Virtual Terminal Line). In freebsd the actual /dev/pts* /dev/tty* temporary devices on the OS are slightly different and have naming such as /dev/ttys001.
But the existence of tty and pts emulator is not enough for communicating interrupts to Kernel and UserLand binaries of the Linux / BSD OS, thus to send the commands on top of it is running a System Shell as CSH / TSH / TCSH or BASH which is usually the first program set to run after user logs in over ptty or pseudo tty virtual terminal.

linux-tty-terminal-explained-brief-intro-to-linux-device-drivers-20-638


Setting the Bash Prompt in Terminal / Console on GNU / Linux

Bash has system environments to control multiple of variables, which are usually visible with env command, one important variable to change in the past was for example USER / USERNAME which was red by IRC Chat clients  such as BitchX / irssi and could be displayed publicly so if not changed to a separate value, one could have known your Linux login username by simple /whois query to the Nickname in question (if no inetd / xinetd service was running on the Linux box and usually inetd was not running).

Below is my custom set USER / USERNAME to separate

hipo@pcfreak:~$ env|grep USER
USERNAME=Attitude
USER=Attitude

There is plenty of variables to  tune email such as MAIL store directory, terminal used TERM, EDITOR etc. but there are some
variables that are not visible with env query as they're not globally available for all users but just for the single user, to show this ones you need to use declare command instead, to get a full list of All Single and System Wide defined variables and functions type declare in the bash shell, for readability, below is last 10 returned results:


hipo@pcfreak:~$ declare | tail -10
{
    local quoted=${1//\'/\'\\\'\'};
    printf "'%s'" "$quoted"
}
quote_readline ()
{
    local quoted;
    _quote_readline_by_ref "$1" ret;
    printf %s "$ret"
}


PS1 is present there virtually on any modern Linux distribution and is installed through user home's directory $HOME/.bashrc , ~/.profile or .bash_profile or System Wide globally for all existing users in /etc/passwd (password database file) from /etc/bash.bashrc
In Debian / Ubuntu / Mint GNU / Linux this system variable is set in user home's .bashrc but in Fedora / RHEL Linux distro,
PS1 is configured from /home/username/.bash_profile to find out where PS1 is located for ur user:

cd ~
grep -Rli PS1 .bash*

Here is one more example:

hipo@pcfreak:~$ declare|grep -i PS1|head -1
PS1='\[\e]0;\u@\h: \w\a\]${debian_chroot:+($debian_chroot)}\u@\h:\w\$ '
 

hipo@pcfreak:~$ grep PS1 /etc/bash.bashrc
[ -z “$PS1” ] && return
# but only if not SUDOing and have SUDO_PS1 set; then assume smart user.
if ! [ -n “${SUDO_USER}” -a -n “${SUDO_PS1}” ]; then
  PS1='${debian_chroot:+($debian_chroot)}\u@\h:\w\$ '


Getting current logged in user shell configured PS1 variable can be done with echo:

hipo@pcfreak:~$ echo $PS1
\[\e]0;\u@\h: \w\a\]${debian_chroot:+($debian_chroot)}\u@\h:\w\$

So lets observe a little bit the meaning of this obscure line of (code) instructions code which are understood by BASH when being red from PS1 var to do so, I'll give a list of meaning of main understood commands, each of which is defined with \.

The ${debian_chroot} shell variable is defined from /etc/bash.bashrc

Easiest way to change PS1 is to export the string you like with the arguments like so:


root@linux:/home/hipo# export PS1='My-Custom_Server-Name# '
My-Custom_Server-Name# echo $PS1
My-Custom_Server-Name#


  •     \a : an ASCII bell character (07)
  •     \d : the date in “Weekday Month Date” format (e.g., “Tue May 26”)
  •     \D{format} : the format is passed to strftime(3) and the result is inserted into the prompt string; an empty format results in a locale-specific time representation. The braces are required
  •     \e : an ASCII escape character (033)
  •     \h : the hostname up to the first ‘.’
  •     \H : the hostname
  •     \j : the number of jobs currently managed by the shell
  •     \l : the basename of the shell's terminal device name
  •     \n : newline
  •     \r : carriage return
  •     \s : the name of the shell, the basename of $0 (the portion following the final slash)
  •     \t : the current time in 24-hour HH:MM:SS format
  •     \T : the current time in 12-hour HH:MM:SS format
  •     \@ : the current time in 12-hour am/pm format
  •     \A : the current time in 24-hour HH:MM format
  •     \u : the username of the current user
  •     \v : the version of bash (e.g., 2.00)
  •     \V : the release of bash, version + patch level (e.g., 2.00.0)
  •     \w : the current working directory, with $HOME abbreviated with a tilde
  •     \W : the basename of the current working directory, with $HOME abbreviated with a tilde
  •     \! : the history number of this command
  •     \# : the command number of this command
  •     \$ : if the effective UID is 0, a #, otherwise a $
  •     \nnn : the character corresponding to the octal number nnn
  •     \\ : a backslash
  •     \[ : begin a sequence of non-printing characters, which could be used to embed a terminal control sequence into the prompt
  •     \] : end a sequence of non-printing characters

The default's PS1 set prompt on Debian Linux is:
 

echo $PS1
\[\e]0;\u@\h: \w\a\]${debian_chroot:+($debian_chroot)}\u@\h:\w\$


As you can see \u (print username) \h (print hostname)  and \W (basename of current working dir) or \w (print $HOME/current working dir)
are the most essential, the rest are bell character, escape character etc.

A very good way to make your life easier and learn the abbreviations / generate exactly the PS1 PROMPT you want to have is with Easy Bash PS1 Generator Web Utility
with which you can just click over buttons that are capable to produce all of the PS1 codes.
 

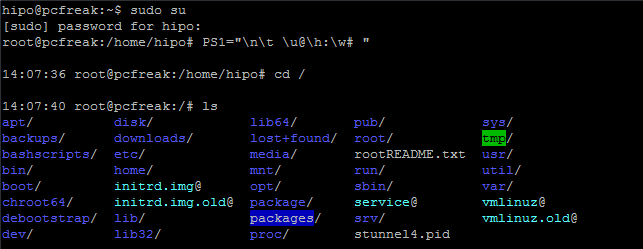
1. How to show current hour:minute:seconds / print full date in Prompt Shell (PS)


Here is an example with setting the Bash Shell prompt  to include also the current time in format hour:minute:seconds (very useful if you're executing commands on a critical servers and you run commands in some kind of virtual terminal like screen or tmux.
 

root@pcfreak:~# PS1="\n\t \u@\h:\w# "
14:03:51 root@pcfreak:/home#


PS1-how-to-setup-date-time-hour-minutes-and-seconds-in-bash-shell-prompt


export PS1='\u@\H \D{%Y-%m-%d %H:%M;%S%z}] \W ] \$ '


export-PS1-Linux-set-full-date-time-clock-prompt-screenshot-console


Make superuser appear in RED color (adding PS1 prompt custom color for a User)
 

root@pcfreak:~$  PS1="\\[$(tput setaf 1)\\]\\u@\\h:\\w #\\[$(tput sgr0)\\]"


how-to-change-colors-in-bash-prompt-shell-on-linux-shell-environment

In above example the Shell Prompt Color changed is changed for administrator (root) to shebang symbol # in red, green, yellow and blue for the sake to show you how it is done, however this example can be adapted for any user on the system. Setting different coloring for users is very handy if you have to administer Mail Server service like Qmail or other Application that consists of multiple small ones of multiple daemons such as qmail + vpopmail + clamd + mysql etc. Under such circumstances, coloring each of the users in different color like in the example for debugging is very useful.

Coloring the PS1 system prompt on Linux to different color has been a standard practice in Linux Server environments running Redhat Enterprise Linux (RHEL) and SuSE Enterprise Linux and some Desktop distributions such as Mint Linux.

To make The Root prompt Red colored only for system super user (root) on any Linux distribution
, add the following to /etc/bashrc, e.g.

vim /etc/bashrc


# If id command returns zero, you've root access.
if [ $(id -u) -eq 0 ];
then # you are root, set red colour prompt
  PS1="\\[$(tput setaf 1)\\]\\u@\\h:\\w #\\[$(tput sgr0)\\]"
else # normal
  PS1="[\\u@\\h:\\w] $"
fi


2. How to make the prompt of a System user appear Green


Add to ~/.bashrc  following line


PS1="\\[$(tput setaf 2)\\]\\u@\\h:\\w #\\[$(tput sgr0)\\]"


3. Print New line, username@hostname, base PTY, shell level, history (number), newline and full working directory $PWD


export PS1='\n[\u@\h \l:$SHLVL:\!]\n$PWD\$ '


4. Showing the numbert of jobs the shell is currently managing.


This is useful if you run and switch with fg / bg (foreground / background) commands
to switch between jobs and forget some old job.


export PS1='\u@\H \D{%Y-%m-%d %H:%M;%S%z}] \W \$]'


Multi Lines Prompt / Make very colorful Shell prompt full of stats info

PS1="\n\[\033[35m\]\$(/bin/date)\n\[\033[32m\]\w\n\[\033[1;31m\]\u@\h: \[\033[1;34m\]\$(/usr/bin/tty | /bin/sed -e ‘s:/dev/::’): \[\033[1;36m\]\$(/bin/ls -1 | /usr/bin/wc -l | /bin/sed ‘s: ::g’) files \[\033[1;33m\]\$(/bin/ls -lah | /bin/grep -m 1 total | /bin/sed ‘s/total //’)b\[\033[0m\] -> \[\033[0m\]"


prompt-show-how-many-files-and-virtual-pts-ps1-linux
 

5. Set color change on command failure


If you have a broken command or the command ended with non zero output with some kind of bad nasty message and you want to make, that more appearing making it red heighlighted, here is how:


PROMPT_COMMAND='PS1="\[\033[0;33m\][\!]\`if [[ \$? = “0” ]]; then echo “\\[\\033[32m\\]”; else echo “\\[\\033[31m\\]”; fi\`[\u.\h: \`if [[ `pwd|wc -c|tr -d ” “` > 18 ]]; then echo “\\W”; else echo “\\w”; fi\`]\$\[\033[0m\] “; echo -ne “\033]0;`hostname -s`:`pwd`\007"'


6. Other beautiful PS1 Color Prompts with statistics


PS1="\n\[\e[32;1m\](\[\e[37;1m\]\u\[\e[32;1m\])-(\[\e[37;1m\]jobs:\j\[\e[32;1m\])-(\[\e[37;1m\]\w\[\e[32;1m\])\n(\[\[\e[37;1m\]! \!\[\e[32;1m\])-> \[\e[0m\]"


another-very-beuatiful-bash-colorful-prompt


7. Add Muliple Colors to Same Shell prompt


function prompt { local BLUE="\[\033[0;34m\]” local DARK_BLUE=”\[\033[1;34m\]” local RED=”\[\033[0;31m\]” local DARK_RED=”\[\033[1;31m\]” local NO_COLOR=”\[\033[0m\]” case $TERM in xterm*|rxvt*) TITLEBAR=’\[\033]0;\u@\h:\w\007\]’ ;; *) TITLEBAR=”” ;; esac PS1=”\u@\h [\t]> ” PS1=”${TITLEBAR}\ $BLUE\u@\h $RED[\t]>$NO_COLOR " PS2='continue-> ' PS4='$0.$LINENO+ ' }

colorful-prompt-blue-and-red-linux-console-PS1
 

8. Setting / Change Shell background Color


changing-background-color-of-bash-shell-prompt-linux


export PS1="\[$(tput bold)$(tput setb 4)$(tput setaf 7)\]\u@\h:\w $ \[$(tput sgr0)\]"


tput Color Capabilities:

  • tput setab [1-7] – Set a background color using ANSI escape
  • tput setb [1-7] – Set a background color
  • tput setaf [1-7] – Set a foreground color using ANSI escape
  • tput setf [1-7] – Set a foreground color

tput Text Mode Capabilities:

  • tput bold – Set bold mode
  • tput dim – turn on half-bright mode
  • tput smul – begin underline mode
  • tput rmul – exit underline mode
  • tput rev – Turn on reverse mode
  • tput smso – Enter standout mode (bold on rxvt)
  • tput rmso – Exit standout mode
  • tput sgr0 – Turn off all attributes

Color Code for tput:

  • 0 – Black
  • 1 – Red
  • 2 – Green
  • 3 – Yellow
  • 4 – Blue
  • 5 – Magenta
  • 6 – Cyan
  • 7 – White


9. Howto Use bash shell function inside PS1 variable

If you administrate Apache or other HTTPD servers or any other server whose processes are forked and do raise drastically at times to keep an eye while actively working on the server.


function httpdcount { ps aux | grep apache2 | grep -v grep | wc -l } export PS1="\u@\h [`httpdcount`]> "

10. PS2, PS3, PS4 little known variables
 

I'll not get much into detail to PS2, PS3, PS4 but will mention them as perhaps many people are not even aware they exist.
They're rarely used in the daily system administrator's work but useful for Shell scripting purposes of Dev Ops and Shell Scripting Guru Programmers.

  • PS2 – Continuation interactive prompt

A very long unix command can be broken down to multiple line by giving \ at the end of the line. The default interactive prompt for a multi-line command is “> “.  Let us change this default behavior to display “continue->” by using PS2 environment variable as shown below.

hipo@db-host :~$ myisamchk –silent –force –fast –update-state \
> –key_buffer_size=512M –sort_buffer_size=512M \
> –read_buffer_size=4M –write_buffer_size=4M \
> /var/lib/mysql/bugs/*.MYI
[Note: This uses the default “>” for continuation prompt]

  • PS3 – Prompt used by “select” inside shell script (usefulif you write scripts with user prompts)


  • PS4 – Used by “set -x” to prefix tracing output
    The PS4 shell variable defines the prompt that gets displayed.

You can find  example with script demonstrating PS2, PS3, PS4 use via small shell scripts in thegeekstuff's article Take control of PS1, PS2, PS3, PS4 read it here


Summary


In this article, I've shortly reviewed on what is a TTY, how it evolved into Pseudo TTY and how it relates to current shells which are the interface communicating with the modern UNIX like Operating systems's userland and kernel.
Also it was reviewed shortly how the current definitions of shell variables could be viewed with declare cmd. Also I went through on how to display the PS1 variable and  on how to modify PS1 and make the prompt different statistics and monitoring parameters straight into the command shell. I've shown some common PS1 strings that report on current date hour, minute, seconds, modify the coloring of the bash prompt shell, show processes count, and some PS1 examples were given that combines beuatiful shell coloring as well as how the Prompt background color can be changed.
Finally was shown how a combination of commands can be executed by exporting to PS1 to update process counf of Apache on every shell prompt iteration.
Other shell goodies are mostly welcome


Adding multiple VirtualHosts hosting on fresh installed Debian GNU / Linux

Monday, September 10th, 2012

Nowdays most of my new (fresh) Linux server configurations are installed with Debian Linux.

Through the years I worked with most major GNU / Linux distributions. Though intalling Apache for multiple domain VirtualHost-ing is almost equally easier to set up on all distros I tried, (Slackware, Redhat, Fedora) etc., I found Debian to be most convenient in terms of freqeuent easy updates and general security.

Every time I configure a new host which is supposed to host a dozen of websites with Apache webserver and a DB backend, it is of course necessery to enable the server to have support multiple domain VirtualHosts.

I thought there are people out who look to configure Multiple domains on fresh installed Apache webserver and this how this short post get born.

I will explain hereby in short how I configure VirtualHosts on new Debian Linux servers with fresh installed Apache.

All required to have a working many domains hosted VirtualHosts on Debian is:

1. Have installed Apache serve package

# apt-get --yes install apache2

This would install all packages necessery for VirtualHost-ing.
After apache2 installed the system should have at least this packages present.

# dpkg -l |grep -i apache2
ii apache2-mpm-prefork 2.2.16-6+squeeze7 Apache HTTPServer - traditional non-threaded model
ii apache2-utils 2.2.16-6+squeeze7 utility programs for webservers
ii apache2.2-bin 2.2.16-6+squeeze7 Apache HTTPServer common binary files
ii apache2.2-common 2.2.16-6+squeeze7 Apache HTTPServer common files
ii libapache2-mod-php5 5.3.3-7+squeeze14 server-side, HTML-embedded scripting language (Apache 2 module)

Nowadays, having enabled mod_rewrite is necessery in almost any website, so the next thing I usually do is enable mod_rewrite webserver module.

# ln -sf /etc/apache2/mods-available/rewrite.load /etc/apache2/mods-enabled/rewrite.load
# apache2ctl -k restart

By default there is an index.html page containing the annoying phrase It Works!

I really dislike this default page and many times I start configuring a server, I wonder how to remove it; if you’re like me before doing anything other I advice you edit /var/www/index.html to change it to Coming Soon or just substitute the file with some nice looking Coming Soon page (custom page) …

Once this is done, I proceed adding as many Virtualhosts as I need with the respective Virtualhost names. To Do so on Debian, just create new Vhost config files in files /etc/apache2/sites-available/yoursite.com, /etc/apache2/sites-available/yoursite1.com etc.br />
Before creating any other VHosts, I usually edit the main webserver VirtualHost which is located in /etc/apache2/sites-available/000-default, there in the VirtualHost section normally need to add proper:

ServerName and ServerAlias variables as well as change DocumentRoot to whatever the default server host Virtualhost directory will be.

An example of 000-default Vhost config I do looks like so:

<VirtualHost *>ServerName server-main-host-name.com
ServerAlias www.server-main-host-name.com server-main-host-name.com
DocumentRoot /var/www
....
</Virtualhost>

Onwards add the same ServerName server-main-host-name.com as a new line in /etc/apache2/apache2.conf config

Now for those not too unfamiliar with VirtualHost types, it is useful to say there are two ways of VirtualHosts:

  • IP Based VirtualHost
  • and

  • Host Based VirtualHosts

IP Based VirtualHosts are added by using Apache directive syntax:

<VirtualHost 192.168.0.2:80>
ServerName ....
ServerAlias ....
</VirtualHost>

whether Host Based VirutalHosts are added by using in config file, the IP address on which the respective Vhost will reside:

<VirtualHost *>
ServerName ....
ServerAlias ....
</VirtualHost>

Host Based VirtualHosts directive syntax can be either in form:

a)Virtualhost *
or
b) Virtualhost port_number (Virtualhost 80, VirtualHost 90) etc.

If a host is configured with directive <VirtualHost *>, this means it will listen for incoming connections on any port Apache is configured to listen on, whether if used with a concrete port number it will only enable VirtualHosts for whole Apache server on the concrete port.

Based on the configuration, VirtualHost 80 or Virtualhost *, the variable which will enable globally on the Apache server multiple VirtualHosts has to be modified e.g.:
Whether VirtualHost with port number is configured <VirtualHost 80>, NameVirtualHost 80 should be used or otherwise NameVirtualHost *

Once you choose the type of Virtualhost-ing, just continue on adding the VirtualHosts …
In the first created VirtualHost config file, let’s say /etc/apache2/sites-available/first-virtualhost.com

NameVirtualHost * has to be added as first line in file; in other words the file content should look similar to:

NameVirtualHost *
<VirtualHost*>
ServerAdmin hipo_aT_www.pc-freak.net AddDefaultCharset UTF-8 DocumentRoot /var/www/ ServerName www.pc-freak.net ServerAlias www.pc-freak.net....
</VirtualHost>

The same steps has to go for all domain names in separate files except the variable NameVirtualHost * should not be added in the rest of new created Vhosts.

Many of the new configured Debian + Apache servers does not require support for SSL, therefore where SSL support is not necessery I prefer disabling it.
To do so it is necessery to comment out everything dealing with Secure Socket Layer in /etc/apache2/ports.conf, as of time of writting lines to comment are:

<IfModule mod_ssl.c>
# If you add NameVirtualHost *:443 here, you will also have to change
# the VirtualHost statement in /etc/apache2/sites-available/default-ssl
# to <VirtualHost *:443>
# Server Name Indication for SSL named virtual hosts is currently not
# supported by MSIE on Windows XP.
Listen 443
</IfModule>
<IfModule mod_gnutls.c>
Listen 443
</IfModule>