Howto install Google Chrome web browser on CentOS Linux 7


December 11th, 2020

After installing CentOS 7 Linux testing Virtual Machine in Oracle Virtualbox 6.1 to conduct some testing with php / html / javascript web script pages and use the VM for other work stuff that I later plan to deploy on production CentOS systems, I came to requirement of having a working Google Chrome browser.

In that regards, next to Firefox, I needed to test the web applications in commercial Google Chrome to see what its usercan expect. For those who don't know it Google Chrome is based on Chromium Open source browser (https://chromium.org) which is available by default via default CentOS EPEL repositories.

One remark to make here is before installing Google Chrome, I've also test my web scripts first with chromium, to install Chromium free browser on CentOS:

[root@localhost mozilla_test0]# yum install chromium
Loaded plugins: fastestmirror, langpacks
Loading mirror speeds from cached hostfile
 * base: mirror.wwfx.net
 * epel: mirror.t-home.mk
 * extras: mirror.wwfx.net
 * updates: mirror.wwfx.net
Resolving Dependencies
–> Running transaction check
—> Package chromium.x86_64 0:85.0.4183.121-1.el7 will be installed
–> Processing Dependency: chromium-common(x86-64) = 85.0.4183.121-1.el7 for package: chromium-85.0.4183.121-1.el7.x86_64
–> Processing Dependency: nss-mdns(x86-64) for package: chromium-85.0.4183.121-1.el7.x86_64
–> Processing Dependency: libminizip.so.1()(64bit) for package: chromium-85.0.4183.121-1.el7.x86_64
–> Running transaction check
—> Package chromium-common.x86_64 0:85.0.4183.121-1.el7 will be installed
—> Package minizip.x86_64 0:1.2.7-18.el7 will be installed
—> Package nss-mdns.x86_64 0:0.14.1-9.el7 will be installed
–> Finished Dependency Resolution


Dependencies Resolved

============================================================================================================================================
 Package                              Arch                        Version                                   Repository                 Size
============================================================================================================================================
Installing:
 chromium                             x86_64                      85.0.4183.121-1.el7                       epel                       97 M
Installing for dependencies:
 chromium-common                      x86_64                      85.0.4183.121-1.el7                       epel                       16 M
 minizip                              x86_64                      1.2.7-18.el7                              base                       34 k
 nss-mdns                             x86_64                      0.14.1-9.el7                              epel                       43 k

Transaction Summary
============================================================================================================================================
Install  1 Package (+3 Dependent packages)

Total download size: 113 M
Installed size: 400 M
Is this ok [y/d/N]: y
Downloading packages:
(1/4): minizip-1.2.7-18.el7.x86_64.rpm                                                                               |  34 kB  00:00:00     
(2/4): chromium-common-85.0.4183.121-1.el7.x86_64.rpm                                                                |  16 MB  00:00:08     
(3/4): chromium-85.0.4183.121-1.el7.x86_64.rpm                                                                       |  97 MB  00:00:11     
(4/4): nss-mdns-0.14.1-9.el7.x86_64.rpm                                                                              |  43 kB  00:00:00     
——————————————————————————————————————————————–
Total                                                                                                       9.4 MB/s | 113 MB  00:00:12     
Running transaction check
Running transaction test
Transaction test succeeded
Running transaction
  Installing : minizip-1.2.7-18.el7.x86_64                                                                                              1/4
  Installing : chromium-common-85.0.4183.121-1.el7.x86_64                                                                               2/4
  Installing : nss-mdns-0.14.1-9.el7.x86_64                                                                                             3/4
  Installing : chromium-85.0.4183.121-1.el7.x86_64                                                                                      4/4
  Verifying  : chromium-common-85.0.4183.121-1.el7.x86_64                                                                               1/4
  Verifying  : minizip-1.2.7-18.el7.x86_64                                                                                              2/4
  Verifying  : chromium-85.0.4183.121-1.el7.x86_64                                                                                      3/4
  Verifying  : nss-mdns-0.14.1-9.el7.x86_64                                                                                             4/4

Installed:
  chromium.x86_64 0:85.0.4183.121-1.el7                                                                                                     

Dependency Installed:
  chromium-common.x86_64 0:85.0.4183.121-1.el7            minizip.x86_64 0:1.2.7-18.el7            nss-mdns.x86_64 0:0.14.1-9.el7           

Complete!

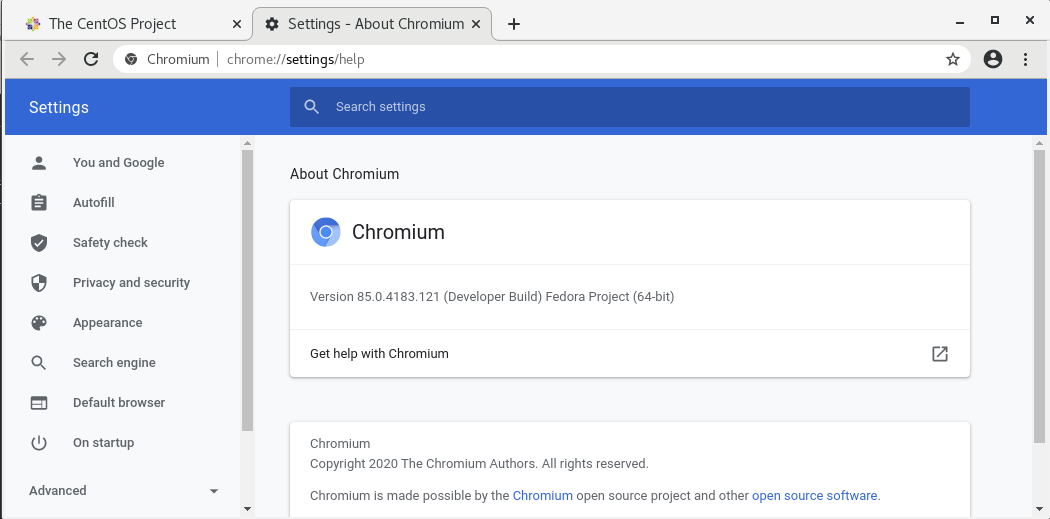
Chromium browser worked however it is much more buggy than Google Chrome and the load it puts on the machine as well as resources it consumes is terrible if compared to Proprietary G. Chrome.

Usually I don't like google chrome as it is a proprietary product and I don't even install it on my Linux Desktops, neither use as using is against any secure wise practice and but I needed this time ..

Thus to save myself some pains therefore proceeded and installed Google Chromium.
Installion  of Google Chrome is a straight forward process you download the latest rpm run below command to resolve all library dependencies and you're in:

chromium-open-source-browser-on-centos-7-screenshot


[root@localhost mozilla_test0]# rpm -ivh google-chrome-stable_current_x86_64.rpm
warning: google-chrome-stable_current_x86_64.rpm: Header V4 DSA/SHA1 Signature, key ID 7fac5991: NOKEY
error: Failed dependencies:
    liberation-fonts is needed by google-chrome-stable-87.0.4280.88-1.x86_64
    libvulkan.so.1()(64bit) is needed by google-chrome-stable-87.0.4280.88-1.x86_64
[root@localhost mozilla_test0]# wget https://dl.google.com/linux/direct/google-chrome-stable_current_x86_64.rpm
–2020-12-11 07:03:02–  https://dl.google.com/linux/direct/google-chrome-stable_current_x86_64.rpm
Resolving dl.google.com (dl.google.com)… 172.217.17.238, 2a00:1450:4017:802::200e
Connecting to dl.google.com (dl.google.com)|172.217.17.238|:443… connected.
HTTP request sent, awaiting response… 200 OK
Length: 72280700 (69M) [application/x-rpm]
Saving to: ‘google-chrome-stable_current_x86_64.rpm


100%[==================================================================================================>] 72,280,700  11.0MB/s   in 6.6s   

2020-12-11 07:03:09 (10.4 MB/s) – ‘google-chrome-stable_current_x86_64.rpm’ saved [72280700/72280700]

[root@localhost mozilla_test0]# yum localinstall google-chrome-stable_current_x86_64.rpm
Loaded plugins: fastestmirror, langpacks
Examining google-chrome-stable_current_x86_64.rpm: google-chrome-stable-87.0.4280.88-1.x86_64
Marking google-chrome-stable_current_x86_64.rpm to be installed
Resolving Dependencies
–> Running transaction check
—> Package google-chrome-stable.x86_64 0:87.0.4280.88-1 will be installed
–> Processing Dependency: liberation-fonts for package: google-chrome-stable-87.0.4280.88-1.x86_64
Loading mirror speeds from cached hostfile
 * base: mirror.wwfx.net
 * epel: mirrors.uni-ruse.bg
 * extras: mirror.wwfx.net
 * updates: mirror.wwfx.net
–> Processing Dependency: libvulkan.so.1()(64bit) for package: google-chrome-stable-87.0.4280.88-1.x86_64
–> Running transaction check
—> Package liberation-fonts.noarch 1:1.07.2-16.el7 will be installed
–> Processing Dependency: liberation-narrow-fonts = 1:1.07.2-16.el7 for package: 1:liberation-fonts-1.07.2-16.el7.noarch
—> Package vulkan.x86_64 0:1.1.97.0-1.el7 will be installed
–> Processing Dependency: vulkan-filesystem = 1.1.97.0-1.el7 for package: vulkan-1.1.97.0-1.el7.x86_64
–> Running transaction check
—> Package liberation-narrow-fonts.noarch 1:1.07.2-16.el7 will be installed
—> Package vulkan-filesystem.noarch 0:1.1.97.0-1.el7 will be installed
–> Finished Dependency Resolution

Dependencies Resolved

============================================================================================================================================
 Package                             Arch               Version                      Repository                                        Size
============================================================================================================================================
Installing:
 google-chrome-stable                x86_64             87.0.4280.88-1               /google-chrome-stable_current_x86_64             227 M
Installing for dependencies:
 liberation-fonts                    noarch             1:1.07.2-16.el7              base                                              13 k
 liberation-narrow-fonts             noarch             1:1.07.2-16.el7              base                                             202 k
 vulkan                              x86_64             1.1.97.0-1.el7               base                                             3.6 M
 vulkan-filesystem                   noarch             1.1.97.0-1.el7               base                                             6.3 k

Transaction Summary
============================================================================================================================================
Install  1 Package (+4 Dependent packages)

Total size: 231 M
Total download size: 3.8 M
Installed size: 249 M
Is this ok [y/d/N]: y
Downloading packages:
(1/4): liberation-fonts-1.07.2-16.el7.noarch.rpm                                                                     |  13 kB  00:00:00     
(2/4): liberation-narrow-fonts-1.07.2-16.el7.noarch.rpm                                                              | 202 kB  00:00:00     
(3/4): vulkan-filesystem-1.1.97.0-1.el7.noarch.rpm                                                                   | 6.3 kB  00:00:00     
(4/4): vulkan-1.1.97.0-1.el7.x86_64.rpm                                                                              | 3.6 MB  00:00:01     
——————————————————————————————————————————————–
Total                                                                                                       1.9 MB/s | 3.8 MB  00:00:02     
Running transaction check
Running transaction test
Transaction test succeeded
Running transaction
Warning: RPMDB altered outside of yum.
  Installing : vulkan-filesystem-1.1.97.0-1.el7.noarch                                                                                  1/5
  Installing : vulkan-1.1.97.0-1.el7.x86_64                                                                                             2/5
  Installing : 1:liberation-narrow-fonts-1.07.2-16.el7.noarch                                                                           3/5
  Installing : 1:liberation-fonts-1.07.2-16.el7.noarch                                                                                  4/5
  Installing : google-chrome-stable-87.0.4280.88-1.x86_64                                                                               5/5
Redirecting to /bin/systemctl start atd.service
  Verifying  : vulkan-1.1.97.0-1.el7.x86_64                                                                                             1/5
  Verifying  : 1:liberation-narrow-fonts-1.07.2-16.el7.noarch                                                                           2/5
  Verifying  : 1:liberation-fonts-1.07.2-16.el7.noarch                                                                                  3/5
  Verifying  : google-chrome-stable-87.0.4280.88-1.x86_64                                                                               4/5
  Verifying  : vulkan-filesystem-1.1.97.0-1.el7.noarch                                                                                  5/5

Installed:
  google-chrome-stable.x86_64 0:87.0.4280.88-1                                                                                              

Dependency Installed:
  liberation-fonts.noarch 1:1.07.2-16.el7         liberation-narrow-fonts.noarch 1:1.07.2-16.el7       vulkan.x86_64 0:1.1.97.0-1.el7      
  vulkan-filesystem.noarch 0:1.1.97.0-1.el7      

Complete!
 

Once Chrome is installed you can either run it from gnome-terminal
 

[test@localhost ~]$ gnome-terminal &


Google-chrome-screenshot-on-centos-linux

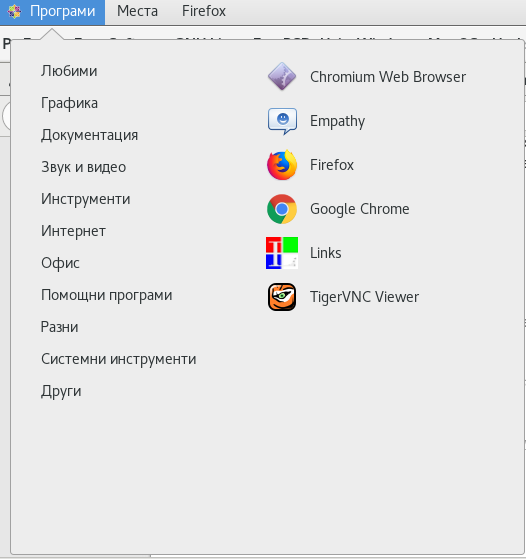
Or find it in the list of CentOS programs:

Applications → Internet → Google Chrome

google-chrome-programs-list-internet-cetnos

Last step to do is to make Google Chrome easily updatable to keep up VM level on high security and let it get updated every time when apply security updates with yum check-update && yum upgrade
for that its necessery to create new custom repo file
/etc/yum.repos.d/google-chrome.repo

[root@localhost mozilla_test0]# vim /etc/yum.repos.d/google-chrome.repo
[google-chrome]
name=google-chrome
baseurl=http://dl.google.com/linux/chrome/rpm/stable/x86_64
enabled=1
gpgcheck=1
gpgkey=https://dl.google.com/linux/linux_signing_key.pub

Now letes import the gpg checksum key

[root@localhost mozilla_test0]# rpmkeys –import https://dl.google.com/linux/linux_signing_key.pub

That's all folks google-chrome is at your disposal.

Add Zabbix time synchronization ntp userparameter check script to Monitor Linux servers


December 8th, 2020

Zabbix-logo-how-to-make-ntpd-time-server-monitoring-article


How to add Zabbix time synchronization ntp userparameter check script to Monitor Linux servers?

We needed to set on some servers at my work an elementary check with Zabbix monitoring to check whether servers time is correctly synchronized with ntpd time service as well report if the ntp daemon is correctly running on the machine. For that a userparameter script was developed called userparameter_ntp.conf the script is simplistic and few a lines of bash shell scripting 
stuff is based on gresping information required from ntpq and ntpstat common ntp client commands to get information about the status of time synchronization on the servers.
 

[root@linuxserver ]# ntpstat
synchronised to NTP server (10.80.200.30) at stratum 3
   time correct to within 47 ms
   polling server every 1024 s


[root@linuxserver ]# ntpq -c peers
     remote           refid      st t when poll reach   delay   offset  jitter
==============================================================================
+timeserver1 10.26.239.41     2 u  319 1024  377   15.864    1.270   0.262
+timeserver2 10.82.239.41     2 u  591 1024  377   16.287   -0.334   1.748
*timeserver3 10.82.239.43     2 u   47 1024  377   15.613   -0.553   0.251
 timeserver4 .INIT.          16 u    – 1024    0    0.000    0.000   0.000


Below is Zabbix UserParameter script that does report us 3 important values we monitor to make sure time server synchronization works as expected the zabbix keys we set are ntp.offset, ntp.sync, ntp.exact in attempt to describe what we're fetching from ntp client:

[root@linuxserver ]# cat /etc/zabbix/zabbix-agent.d/userparameter_ntp.conf

UserParameter=ntp.offset,(/usr/sbin/ntpq -pn | /usr/bin/awk 'BEGIN { offset=1000 } $1 ~ /\*/ { offset=$9 } END { print offset }')
#UserParameter=ntp.offset,(/usr/sbin/ntpq -pn | /usr/bin/awk 'FNR==4{print $9}')
UserParameter=ntp.sync,(/usr/bin/ntpstat | cut -f 1 -d " " | tr -d ' \t\n\r\f')
UserParameter=ntp.exact,(/usr/bin/ntpstat | /usr/bin/awk 'FNR==2{print $5,$6}')

In Zabbix the monitored ntpd parameters set-upped looks like this:


ntp_time_synchronization_check-zabbix-screenshot.


!Note that in above userparameter example, the commented userparameter script is a just another way to do an ntpd offset returned value which was developed before the more sophisticated with more regular expression checks from the /usr/sbin/ntpd via ntpq, perhaps if you want to extend it you can also use another script to report more verbose information to Zabbix if that is required like ouput from ntpq -c peers command:
 

UserParameter=ntp.verbose,(/usr/sbin/ntpq -c peers)

Of course to make the Zabbix fetch necessery data from monitored hosts, we need to set-up further new Zabbix Template with the respective Trigger and Items.

Below are few screenshots including the triggers used.

ntpd_server-time_synchronization_check-zabbix-screenshot-triggers

  • ntpd.trigger

{NTP:net.udp.service[ntp].last(0)}<1

  • NTP Synchronization trigger

{NTP:ntp.sync.iregexp(unsynchronised)}=1


As you can see from history we have setup our items to Store history of reported data to Zabbix from parameter script for 90 days and update our monitor check, every 30 seconds from the monitored hosts to which Tempate is applied.

Well that's all folks, time synchronization issues we'll be promptly triggering a new Alarm in Zabbix !

Howto Upgrade IBM Spectrum Protect Backup Client TSM 7.X to 8.1.8, Update Tivoli 8.1.8 to 8.1.11 on CentOS and Redhat Linux


December 3rd, 2020


IBM-spectrum-protect-backup-logo-tivoli-tsm-logo

Having another day of a system administrator boredom, we had a task to upgrade some Tivoli TSM Backup clients running on a 20+ machines powered by CentOS and RHEL Linux to prepare the systems to be on the latest patched IBM Spectrum Backup client version available from IBM. For the task of patching I've used a central server where, I've initially downloaded the provided TSM client binaries archives. From this machine, we have copied TivSM*.tar to each and every system that needs to be patched and then patched. The task is not too complex as the running TSM in the machines are all at the same version and all running a recent patched version of Linux. Hence to make sure all works as expected we have tested TSM is upgraded from 7.X.X to 8.X.X on one machine and then test 8.1.8 to 8.1.11 upgrade on another one. Once having confirmed that Backups works as expected after upgrade. We have proceeded to do it massively on each of the rest 20+ hosts.
Below article's goal is to help some lazy sysadmin with the task to prepare an TSM Backup upgrade procedure to standartize TSM Upgrade, which as many of the IBM's softwares is very specific and its upgrade requires, a bit of manual work and extra cautious as there seems to be no easy way (or at least I don't know it), to do the upgrade by simply adding an RPM repository and doing, something like yum install tivsm*.


0. Check if there is at least 2G free of space

According to documentation the minimum space you need to a functional install without having it half installed or filling up your filesystem is 2 Gigabytes of Free Memory on a filesystem where the .tar and rpms will be living.

Thus check what is the situation with your filesystem where you wills store the .tar archice and extract .RPM files / install the RPM files.

# df -h

1. Download the correct tarball with 8.1 Client

On one central machine you would need to download the Tivoli you can do that via wget / curl / lynx whatever is at hand on the Linux server.

As of time of writting this article TSM's 8.1.11 location is at
URL:

http://public.dhe.ibm.com/storage/tivoli-storage-management/maintenance/client/v8r1/Linux/LinuxX86/BA/v8111/

I've made a local download mirror of Tivoli TSM 8.1.11 here.
In case you need to install IBM Spectrum Backup Client to a PCI secured environment to a DMZ-ed LAN network from a work PC you can Download it first from your local PC and via Citrix client upload program or WinSCP upload it to a central replication host from where you will later copy to each of the other server nodes that needs to be upgraded.

Lets Copy archive to all Server hosts where you want it later installed, using a small hack

Assuming you already have an Excel document or a Plain text document with all the IPs of the affected hosts where you will need to get TSM upgraded. Extract this data and from it create a plain text file /home/user/hosts.txt containing all the machine IPs lined up separated with carriage return separations (\n), so you can loop over each one and use scp to send the files.

– Replicate Tivoli tar to all machine hosts where you want to get IBM Spectrum installed or upgraded.
Do it with a loop like this:

# for i in $(cat hosts.txt); do scp 8.1.11.0-TIV-TSMBAC-LinuxX86.tar user@$i:/home/user/; done

 Copy to a Copy buffer temporary your server password assuming all your passwords to each machine are identical and paste your login user pass for each host to initiate transfer
 

2. SSH to each of the Machine hosts IPs

Once you login to the host you want to upgrade
Go to your user $HOME /home/user and create files where we'll temporary store Tivoli archive files and extract RPMs

[root@linux-server user]# mkdir -p ~/tsm/TSM_BCK/
[root@linux-server user]# mv 8.1.11.0-TIV-TSMBAC-LinuxX86.tar ~/tsm
[root@linux-server user]# cd tsm
[root@linux-server user]# tar -xvvf 8.1.11.0-TIV-TSMBAC-LinuxX86.tar
gskcrypt64-8.0.55.17.linux.x86_64.rpm
GSKit.pub.pgp
gskssl64-8.0.55.17.linux.x86_64.rpm
README_api.htm
README.htm
RPM-GPG-KEY-ibmpkg
TIVsm-API64.x86_64.rpm
TIVsm-APIcit.x86_64.rpm
TIVsm-BAcit.x86_64.rpm
TIVsm-BAhdw.x86_64.rpm
TIVsm-BA.x86_64.rpm
TIVsm-filepath-source.tar.gz
TIVsm-JBB.x86_64.rpm
TIVsm-WEBGUI.x86_64.rpm
update.txt

3. Create backup of old backup files

It is always a good idea to keep old backup files

[root@linux-server tsm]# cp -av /opt/tivoli/tsm/client/ba/bin/dsm.opt ~/tsm/TSM_BCK/dsm.opt_bak_$(date +'%Y_%M_%H')
[root@linux-server tsm]# cp -av /opt/tivoli/tsm/client/ba/bin/dsm.sys ~/tsm/TSM_BCK/dsm.sys_bak_$(date +'%Y_%M_%H')

[root@linux-server tsm]# [[ -f /etc/adsm/TSM.PWD ]] && cp -av /etc/adsm/TSM.PWD ~/TSM_BCK/ || echo 'file doesnt exist'

/etc/adsm/TSM.PWD this file is only there as legacy for TSM it contained encrypted passwords inver 7 for updates. In TSM v.8 encryption file is not there as new mechanism for sensitive data was introduced.
Be aware that from Tivoli 8.X it will return error
exist'

!! Note – if dsm.opt , dsm.sys files are on different locations – please use correct full path locations !!

4. Stop  dsmcad – TSM Service daemon

[root@linux-server tsm]# systemctl stop dsmcad

5. Locate and deinstall all old Clients

Depending on the version to upgrade if you're upgrading from TSM version 7 to 8, you will get output like.

[root@linux-server tsm]# rpm -qa | grep 'TIVsm-'
TIVsm-BA-7.1.6-2.x86_64
TIVsm-API64-7.1.6-2.x86_64

If you're one of this paranoid admins you can remove TIVsm packs  one by one.

[root@linux-server tsm]# rpm -e TIVsm-BA-7.1.6-2.x86_64
[root@linux-server tsm]# rpm -e TIVsm-API64-7.1.6-2.x86_64

Instead if upgrading from version 8.1.8 to 8.1.11 due to the Security CVE advisory recently published by IBM e.g. (IBM Runtime Vulnerability affects IBM Spectrum Backup archive Client) and  vulnerability in Apache Commons Log4J affecting IBM Spectrum Protect Backup Archive Client.

[root@linux-server tsm]# rpm -qa | grep 'TIVsm-'
TIVsm-API64-8.1.8-0.x86_64
TIVsm-BA-8.1.8-0.x86_64

Assuming you're not scared of a bit automation you can straight do it with below one liner too 🙂

# rpm -e $(rpm -qa | grep TIVsm)

[root@linux-server tsm]# rpm -qa | grep gsk
[root@linux-server tsm]# rpm -e gskcrypt64 gskssl64

6. Check uninstallation success:

[root@linux-server tsm]# rpm -qa | grep TIVsm
[root@linux-server tsm]# rpm -qa | grep gsk

Here you should an Empty output, if packages are not on the system, e.g. Empty output is good output ! 🙂

7. Install new client IBM Spectrum Client (Tivoli Storage Manager) and lib dependencies

[root@linux-server tsm]# rpm -ivh gskcrypt64-8.0.55.4.linux.x86_64.rpm
[root@linux-server tsm]# rpm -ivh gskssl64-8.0.55.4.linux.x86_64.rpm

 If you're lazy to type you can do as well

[root@linux-server tsm]# rpm -Uvh gsk*

Next step is to install main Tivoli SM components the the API files and BA (The Backup Archive Client)

[root@linux-server tsm]# rpm -ivh TIVsm-API64.x86_64.rpm
[root@linux-server tsm]# rpm -ivh TIVsm-BA.x86_64.rpm

If you have to do it on multiple servers and you do it manually following a guide like this, you might instead want to install them with one liner.

[root@linux-server tsm]# rpm -ivh TIVsm-API64.x86_64.rpm TIVsm-BA.x86_64.rpm

There are some Not mandatory "Common Inventory Technology" components (at some cases if you're using the API install it we did not need that), just for the sake if you need them on your servers due to backup architecture, install also below commented rpm files.

## rpm -ivh TIVsm-APIcit.x86_64.rpm

## rpm -ivh TIVsm-BAcit.x86_64.rpm

These packages not needed only for operation WebGUI TSM GUI management, (JBB) Journal Based Backup, BAhdw (the ONTAP library)


— TIVsm-WEBGUI.x86_64.rpm
— TIVsm-JBB.x86_64.rpm
— TIVsm-BAhdw.x86_64.rpm

8. Start and enable dsmcad service

[root@linux-server tsm]# systemctl stop dsmcad

You will get

##Warning: dsmcad.service changed on disk. Run 'systemctl daemon-reload' to reload units.

[root@linux-server tsm]# systemctl daemon-reload

[root@linux-server tsm]# systemctl start dsmcad


## enable dsmcad – it is disabled by default after install

[root@linux-server ~]# systemctl enable dsmcad

[root@linux-server tsm]# systemctl status dsmcad

9. Check dmscad service is really running

Once enabled IBM TSM will spawn a process in the bacground dmscad if it started properly you should have the process backgrounded.

[root@linux-server tsm]# ps -ef|grep -i dsm|grep -v grep
root      2881     1  0 18:05 ?        00:00:01 /usr/bin/dsmcad

If process is not there there might be some library or something not at place preventing the process to start …

10. Check DSMCAD /var/tsm logs for errors

After having dsmcad process enabled and running in background

[root@linux-server tsm]# grep -i Version /var/tsm/sched.log|tail -1
12/03/2020 18:06:29   Server Version 8, Release 1, Level 10.000


[root@linux-server tsm]# cat /var/tsm/dsmerror.log

To see the current TSM configuration files we can  grep out comments *

[root@linux-server tsm]# grep -v '*' /opt/tivoli/tsm/client/ba/bin/dsm.sys

Example Configuration of the agent:
—————————————————-
   *TSM SERVER NODE Location
   Servername           tsm_server
   COMMmethod           TCPip
   TCPPort              1400
   TCPServeraddress     tsmserver2.backuphost.com
   NodeName             NODE.SERVER-TO-BACKUP-HOSTNAME.COM
   Passwordaccess       generate
   SCHEDLOGNAME         /var/tsm/sched.log
   SCHEDLOGRETENTION    21 D
   SCHEDMODE            POLLING
   MANAGEDServices      schedule
   ERRORLOGNAME         /var/tsm/dsmerror.log
   ERRORLOGRETENTION    30 D
   INCLEXCL             /opt/tivoli/tsm/client/ba/bin/inclexcl.tsm

11. Remove tsm install directory tar ball and rpms to save space on system

The current version of Tivoli service manager is 586 Megabytes.

[root@linux-server tsm]# du -hsc 8.1.11.0-TIV-TSMBAC-LinuxX86.tar
586M    8.1.11.0-TIV-TSMBAC-LinuxX86.tar

Some systems are on purpose configured to have less space under their /home directory,
hence it is a good idea to clear up unnecessery files after completion.

Lets get rid of all the IBM Spectrum archive source files and the rest of RPMs used for installation.

[root@linux-server tsm]# rm -rf ~/tsm/{*.tar,*.rpm,*.gpg,*.htm,*.txt}

12. Check backups are really created on the configured remote Central backup server

To make sure after the upgrade the backups are continuously created and properly stored on the IBM Tivoly remote central backup server, either manually initiate a backup or wait for lets say a day and run dsmc client to show all created backups from previous day. To make sure you'll not get empty output you can on purpose modify some file by simply opening it and writting over without chaning anything e.g. modify your ~/.bashrc or ~/.bash_profile

## List all backups for '/' root directory from -fromdate='DD/MM/YY'

[root@linux-server tsm]# dsmc
Protect>
IBM Spectrum Protect
Command Line Backup-Archive Client Interface
  Client Version 8, Release 1, Level 11.0
  Client date/time: 12/03/2020 18:14:03
(c) Copyright by IBM Corporation and other(s) 1990, 2020. All Rights Reserved.

Node Name: NODE.SERVER-TO-BACKUP-HOSTNAME.COM
Session established with server TSM2_SERVER: AIX
  Server Version 8, Release 1, Level 10.000
  Server date/time: 12/03/2020 18:14:04  Last access: 12/03/2020 18:06:29
 
Protect> query backup -subdir=yes "/" -fromdate=12/3/2020
           Size        Backup Date                Mgmt Class           A/I File
           —-        ———–                ———-           — —-
         6,776  B  12/03/2020 01:26:53             DEFAULT              A  /etc/freshclam.conf
         6,685  B  12/03/2020 01:26:53             DEFAULT              A  /etc/freshclam.conf-2020-12-02
         5,602  B  12/03/2020 01:26:53             DEFAULT              A  /etc/hosts
         5,506  B  12/03/2020 01:26:53             DEFAULT              A  /etc/hosts-2020-12-02
           398  B  12/03/2020 01:26:53             DEFAULT              A  /opt/tivoli/tsm/client/ba/bin/tsmstats.ini
       114,328  B  12/03/2020 01:26:53             DEFAULT              A  /root/.bash_history
           403  B  12/03/2020 01:26:53             DEFAULT              A  /root/.lesshst

VIM Project (VI Improvied IDE Editor extension to facilitate web development with vi enhanced editor


August 25th, 2010

I use VIM as an editor of choice for many years already.
Yet it's until recently I use it for a PHP ZF (Zend Framework) web development.

Few days ago I've blogged How to configure vimrc for a php syntax highlightning (A Nicely pre-configured vimrc to imrpove the daily text editing experience

This enhancements significantly improves the overall PHP code editing with VIM. However I felt something is yet missing because I didn't have the power and functunality of a complete IDE like for instance The Eclipse IDE

I was pretty sure that VIM has to have a way to be used in a similar fashion to a fully functional IDE and looked around the net to find for any VIM plugins that will add vim an IDE like coding interface.

I then come accross a vim plugin called VIM Prokject : Organize/Navigate projects of files (like IDE/buffer explorer)

The latest VIM Project as of time of writting is 1.4.1 and I've mirrored it here

The installation of the VIM Project VIM extension is pretty straight forward to install it and start using it on your PC issue commands:

1. Install the project VIM add-on

debian:~$ wget https://www.pc-freak.net/files/project-1.4.1.tar.gz
debian:~$ mv project-1.4.1.tar.gz ~/.vim/
debian:~$ cd ~/.vim/
debian:~$ tar -zxvvf project-1.4.1.tar.gz

2. Load the plugin

Launch your vim editor and type : Project(without the space between : and P)
You will further see a screen like:

vim project entry screen

3. You will have to press C within the Project window to load a new project

Then you will have to type a directory to use to load a project sources files from:

vim project enter file source directory screen

You will be prompted with to type a project name like in the screenshot below:

vim project load test project

4. Next you will have to type a CD (Current Dir) parameter
To see more about the CD parameter consult vim project documentation by typing in main vim pane :help project

The appearing screen will be something like:

vim project extension cd parameter screen

5. Thereafter you will have to type a file filter

File filter is necessary and will instruct the vim project plugin to load all files with the specified extension within vim project pane window

You will experience a screen like:


vim project plugin file filter screen

Following will be a short interval in which all specified files by the filter type will get loaded in VIM project pane and your Zend Framework, PHP or any other source files will be listed in a directory tree structure like in the picture shown below:

vim project successful loaded project screen

6. Saving loaded project hierarchy state

In order to save a state of a loaded project within the VIM project window pane you will have to type in vim, let's say:

:saveas .projects/someproject

Later on to load back the saved project state you will have to type in vim :r .projects/someproject

You will now have almost fully functional development IDE on top of your simple vim text editor.

You can navigate within the Project files loaded with the Project extension pane easily and select a file you would like to open up, whenever a source file is opened and you work on it to switch in between the Project file listing pane and the opened source code file you will have to type twice CTRL+w or in vim language C-w

To even further sophisticate your web development in PHP with vim you can add within your ~/.vimrc file the following two lines:

" run file with PHP CLI (CTRL-M)
:autocmd FileType php noremap <C-M> :w!<CR>:!/usr/bin/php %<CR>
" PHP parser check (CTRL-L)
:autocmd FileType php noremap <C-L> :!/usr/bin/php -l %>CR>

In the above vim configuration directovies the " character is a comment line and the autocmd is actually vim declarations.
The first :autocmd … declaration will instruct vim to execute your current opened php source file with the php cli interpreter whenever a key press of CTRL+M (C-m) occurs.

The second :autocmd … will add to your vim a shortcut, so whenever a CTRL+L (C-l) key combination is pressed VIM editor will check your current edited source file for syntax errors.
Therefore this will enable you to very easily periodically check if your file syntax is correct.

Well this things were really helpful to me, so I hope they will be profitable for you as well.
Cheers 🙂

How to add colorful random ASCII art picture and a bible verse on each SSH server login, joyout sysadmins life with cowsay, fortune, caca-utils and others


November 24th, 2020

Jesus-Christ-loves-the-world-ascii-art

There are pleny of console ASCII stuff out there that can make your console sysadmin boring life a little bit more funny and cherish some memories from the old times of 8 bit computers :).

One of this as I blogged earlier is cowsay and cowthink to generate a ascii picture with a cow with your custom message.
I've earlier blogged about that in my previous article Create ASCII Art Text bannners in Linux console / terminal with figlet and toilet

One of this cool things I'm using daily on my servers  is a cowsay console goodie together with a bash shell script that does visualize a random ASCII picture from a preset of pictures on each and every ssh login to my server.
The script I use is cowrand below is code:

#!/bin/bash
# cowsay pix randomizer by hip0
# it shows random ascii from the cowsay prog during logging. :]
a=0
b=1
cowrand='/etc/cowrand';
dir='/usr/share/cowsay/cows';
var=`ls -1 $dir | wc -l | awk '{ print $1}'`
#RANGE=$var
number=$RANDOM
let "number %= $var"
var1=`ls -1 $dir | head -n $number | tail -n 1 | head -n 1`
if [ -z “$var1” ]; then
$cowrand;
else
/usr/bin/cowsay -f $var1 Welc0m3 t0 pC-fREAK … Enj0y.
fi


The script is set as executable under /etc/cowrand

hipo@pcfreak:~$ ls -al /etc/cowrand
-rwxr-xr-x 1 hipo hipo 432 Nov 24 19:21 /etc/cowrand*

I've set this script to my /etc/profile to auto start on every login on my Debian Linux systems right after the comments like so:

hipo@pcfreak:~$ grep -i cowrand -A 2 -B 3 /etc/profile
# /etc/profile: system-wide .profile file for the Bourne shell (sh(1))
# and Bourne compatible shells (bash(1), ksh(1), ash(1), …).
echo '';
/etc/cowrand | lolcat
echo '';
#/usr/bin/verse

As you can see to make my life even more funnier, I've installed another fun command lolcat

lolcat-screenshot

hipo@pcfreak:~$ apt-cache show lolcat |grep -i desc -A 3
Description-en: colorful `cat`
 lolcat concatenates files like the UNIX `cat` program, but colors it for the
 lulz in a rainbow animation. Terminals with 256 colors and animations are
 supported.

Description-md5: 86f992d66ac74197cda39e0bbfcb549d
Homepage: https://github.com/busyloop/lolcat
Ruby-Versions: all
Section: games


You can think of lolcat as a standard cat command that has been made to print in colors, this gives a funny results.

cowrand-script-lolcat-os-release-how-to-make-your-linux-login-prompt-funnier

To add some spice to everything nice as a recipee for thethe creation of powerpuff girls, I've come up with a way to use fortune
console tool that uses to print quotes out of a database to use as a source a big database containing the Holy Bible books of Old and New Testament Books. The fortune prints me out a quote extract from the bible on each and every remote SSH login to my machine. The content of this bible database for fortune bible_quotes_fortune.tar.gz can be downloaded and used from here.

The command used to print out a verse from the holy bible is:


hipo@pcfreak:~$ /usr/games/fortune -s /usr/local/fortune/
For if thou refuse to let them go, and wilt hold them still,
        — Exodus 9:2
hipo@pcfreak:~$ /usr/games/fortune -s /usr/local/fortune/
And when the queen of Sheba heard of the fame of Solomon concerning
the name of the LORD, she came to prove him with hard questions.
        — 1 Kings 10:1
hipo@pcfreak:~$ /usr/games/fortune -s /usr/local/fortune/
And Shelemiah, and Nathan, and Adaiah,
        — Ezra 10:39
hipo@pcfreak:~$ /usr/games/fortune -s /usr/local/fortune/
For by thee I have run through a troop: by my God have I leaped
over a wall.
        — 2 Samuel 22:30
hipo@pcfreak:~$ /usr/games/fortune -s /usr/local/fortune/
Unto the place of the altar, which he had make there at the first:
and there Abram called on the name of the LORD.
        — Genesis 13:4
hipo@pcfreak:~$ /usr/games/fortune -s /usr/local/fortune/
And there shall dwell in Judah itself, and in all the cities thereof
together, husbandmen, and they that go forth with flocks.
        — Jeremiah 31:24
hipo@pcfreak:~$ /usr/games/fortune -s /usr/local/fortune/
And he hath put a new song in my mouth, even praise unto our God:
many shall see it, and fear, and shall trust in the LORD.
        — Psalms 40:3
hipo@pcfreak:~$ /usr/games/fortune -s /usr/local/fortune/
And Jehoshaphat made peace with the king of Israel.
        — 1 Kings 22:44


The fortune is really awesome as it reminds me often of a verses from Holy Bible I often forget, the database is using the all famous King James Bible famous as (KJB) / (KJV) from 1611 this bible version that is like a protestant standard nowadays takes its name after James VI and I (James Charles Stuart; 19 June 1566 – 27 March 1625 – King of Scotland and Ireland) who was the sponsor of KJV collection and print.

Finally after adding the /usr/games/fortune -s /usr/local/fortune/ to the beginning of /etc/profile together with cowsay and cowrand I got this beautiful and educational result that combines fun with wisdom, below is example of what you will get after you  do a remote ssh login;


ssh your-machine.com

cowrand-script-lolcat-os-release-how-to-make-your-linux-login-prompt-funnier_1

cowrand-script-lolcat-os-release-how-to-make-your-linux-login-prompt-funnier_2

cowrand-script-lolcat-os-release-how-to-make-your-linux-login-prompt-funnier_3

Those who have a Linux Graphical Environment desktop might also enjoy xcowsay

Another must I recommend to the text geeks is the caca-utils package which contains cool things such as aafire (cacafire)

cacaview-fire-screenshot-ascii-art

Or (Image to text converter) img2txt / cacaview (a text console picture viewer) that could give you a raw idea on how a png / jpg picture looks like (or at least the picture shapes) without a need for a GUI picture viewer such as Eye of the Gnome.

bear-for-you-picture-rose

Here is a original bear

cacaview-a-bear-for-you-picture-in-plain-text-ascii

And here is the one you'll see in cacaview 🙂
To read more about cacaview I have and its uses, check my previous article Viewing JPEG,GIF and PNG in ASCII with cacaview in Linux.
If you want to show off even more as a '1337 h4x0r' you might also show your sysadm 1337 5K!11Z to colleagues by showng them how you check weather via console (i've a separate article for how to ASCII art check colorful weather forecast via console / terminal ).

If you're too bored in your daily sys admin job, you might make some fun and take some useless effort to install ASCII Art Aquarium ASCIIQUARIUM

asciiquarium1

asciiquarium2

asciiquarium3

If you're crazy enough and want to torture your other sysadmin colleagues and a get a nice prank, you might install and set asciiquarium to auto run for their specific account on each and every login to some server until they control C or if you're a bit evil you can even set a small auto load on account login via ~/.bashrc shell script to 'Disable CTRL + C' combination 🙂
 

Of course there is plenty of other cool ASCII games and stuff. I've collected some of them by launching the Play Cool Ascii games service on my machine for ASCII art geeks to test out some ASCII games here.


How to fix rkhunter checking dev for suspisiocus files, solve rkhunter checking if SSH root access is allowed warning


November 20th, 2020

rkhunter-logo

On a server if you have a rkhunter running and you suddenly you get some weird Warnings for suspicious files under dev, like show in in the screenshot and you're puzzled how comes this happened as so far it was not reported before the regular package patching update conducted …

root@haproxy-server ~]# rkhunter –check

rkhunter-warn-screenshot

To investigate further I've checked rkhunter produced log /var/log/rkhunter.log for a verobose message and found more specifics there on what is the exact files which rkhunter finds suspicious.
To further investigate what exactly are this suspicious files for or where, they're used for something on the system or in reality it is a hacker who hacked our supposibly PCI compliant system,
I've used the good old fuser command which is capable to show which system process is actively using a file. To have fuser report for each file from /var/log/rkhunter.log with below shell loop:

[root@haproxy-server ~]#  for i in $(tail -n 50 /var/log/rkhunter/rkhunter.log|grep -i /dev/shm|awk '{ print $2 }'|sed -e 's#:##g'); do fuser -v $i; done
                     BEN.        PID ZUGR.  BEFEHL
/dev/shm/qb-1783-1851-27-f1sTlC/qb-request-cpg-header:
                     root       1783 ….m corosync
                     hacluster   1851 ….m attrd
                     BEN.        PID ZUGR.  BEFEHL
/dev/shm/qb-1783-1844-26-Znk1UM/qb-event-quorum-data:
                     root       1783 ….m corosync
                     root       1844 ….m pacemakerd
                     BEN.        PID ZUGR.  BEFEHL
/dev/shm/qb-1783-1844-26-Znk1UM/qb-event-quorum-header:
                     root       1783 ….m corosync
                     root       1844 ….m pacemakerd
                     BEN.        PID ZUGR.  BEFEHL
/dev/shm/qb-1783-1844-26-Znk1UM/qb-response-quorum-data:
                     root       1783 ….m corosync
                     root       1844 ….m pacemakerd
                     BEN.        PID ZUGR.  BEFEHL
/dev/shm/qb-1783-1844-26-Znk1UM/qb-response-quorum-header:
                     root       1783 ….m corosync
                     root       1844 ….m pacemakerd
                     BEN.        PID ZUGR.  BEFEHL
/dev/shm/qb-1783-1844-26-Znk1UM/qb-request-quorum-data:
                     root       1783 ….m corosync
                     root       1844 ….m pacemakerd
                     BEN.        PID ZUGR.  BEFEHL
/dev/shm/qb-1783-1844-26-Znk1UM/qb-request-quorum-header:
                     root       1783 ….m corosync
                     root       1844 ….m pacemakerd
                     BEN.        PID ZUGR.  BEFEHL
/dev/shm/qb-1783-1844-25-oCdaKX/qb-event-cpg-data:
                     root       1783 ….m corosync
                     root       1844 ….m pacemakerd
                     BEN.        PID ZUGR.  BEFEHL
/dev/shm/qb-1783-1844-25-oCdaKX/qb-event-cpg-header:
                     root       1783 ….m corosync
                     root       1844 ….m pacemakerd
                     BEN.        PID ZUGR.  BEFEHL
/dev/shm/qb-1783-1844-25-oCdaKX/qb-response-cpg-data:
                     root       1783 ….m corosync
                     root       1844 ….m pacemakerd
                     BEN.        PID ZUGR.  BEFEHL
/dev/shm/qb-1783-1844-25-oCdaKX/qb-response-cpg-header:
                     root       1783 ….m corosync
                     root       1844 ….m pacemakerd
                     BEN.        PID ZUGR.  BEFEHL
/dev/shm/qb-1783-1844-25-oCdaKX/qb-request-cpg-data:
                     root       1783 ….m corosync
                     root       1844 ….m pacemakerd
                     BEN.        PID ZUGR.  BEFEHL
/dev/shm/qb-1783-1844-25-oCdaKX/qb-request-cpg-header:
                     root       1783 ….m corosync
                     root       1844 ….m pacemakerd
                     BEN.        PID ZUGR.  BEFEHL
/dev/shm/qb-1783-1844-24-GKyj3l/qb-event-cfg-data:
                     root       1783 ….m corosync
                     root       1844 ….m pacemakerd
                     BEN.        PID ZUGR.  BEFEHL
/dev/shm/qb-1783-1844-24-GKyj3l/qb-event-cfg-header:
                     root       1783 ….m corosync
                     root       1844 ….m pacemakerd
                     BEN.        PID ZUGR.  BEFEHL
/dev/shm/qb-1783-1844-24-GKyj3l/qb-response-cfg-data:
                     root       1783 ….m corosync
                     root       1844 ….m pacemakerd
                     BEN.        PID ZUGR.  BEFEHL
/dev/shm/qb-1783-1844-24-GKyj3l/qb-response-cfg-header:
                     root       1783 ….m corosync
                     root       1844 ….m pacemakerd
                     BEN.        PID ZUGR.  BEFEHL
/dev/shm/qb-1783-1844-24-GKyj3l/qb-request-cfg-data:
                     root       1783 ….m corosync
                     root       1844 ….m pacemakerd
                     BEN.        PID ZUGR.  BEFEHL
/dev/shm/qb-1783-1844-24-GKyj3l/qb-request-cfg-header:
                     root       1783 ….m corosync
                     root       1844 ….m pacemakerd


As you see from the output all the /dev/shm/qb/ files in question are currently opened by the corosync / pacemaker and necessery for proper work of the haproxy cluster processes running on the machines.
 

How to solve the /dev/ suspcisios files rkhunter warning?

To solve we need to tell rkhunter not check against this files this is done via  /etc/rkhunter.conf first I thought this is done by EXISTWHITELIST= but then it seems there is  a special option for rkhunter whitelisting /dev type of files only ALLOWDEVFILE.

Hence to resolve the warning for the upcoming planned early PCI audit and save us troubles we had to add on running OS which is CentOS Linux release 7.8.2003 (Core) in /etc/rkhunter.conf

ALLOWDEVFILE=/dev/shm/qb-*/qb-*

Re-run

# rkhunter –check

and Voila, the warning should be no more.

rkhunter-check-output

Another thing is on another machine the warnings produced by rkhunter were a bit different as rkhunter has mistakenly detected the root login is enabled where in reality PermitRootLogin was set to no in /etc/ssh/sshd_config

rkhunter-warning

As the problem was experienced on some machines and on others it was not.
I've done the standard boringconfig comparison we sysadmins do to tell
why stuff differs.
The result was on first machine where we had everything working as expected and
PermitRootLogin no was recognized the correct configuration was:

— SNAP —
#ALLOW_SSH_ROOT_USER=no
ALLOW_SSH_ROOT_USER=unset
— END —

On the second server where the problem was experienced the values was:

— SNAP —
#ALLOW_SSH_ROOT_USER=unset
ALLOW_SSH_ROOT_USER=no
— END —

Note that, the warning produced regarding the rsyslog remote logging is allowed is perfectly fine as, we had enabled remote logging to a central log server on the machines, this is done with:

This is done with config options under /etc/rsyslog.conf

# Configure Remote rsyslog logging server
*.* @remote-logging-server.com:514

How to backup Outlook Mailbox / Export Exchange Mail backup to .pst


November 17th, 2020

pst-outlook-exchange-windows-logo

In the corporate world most of us are forced to use as a desktop environment some kind of Windows version 7 / 8 / 10  version with Outlook configured to use Microsoft Exchange MailServer mailbox set to use POP3 or IMAP account.
Sometimes for new employees for Knowledge transfer purposes having a backup copy of some employee who was laid off or as most of the times has left the company for a better position or simply due to boredom.

Even just for backup purposes in case if by mistake you have deleted some mails out of your mailbox it is useful thing to create a Mailbox backup of whole mail address data especially as with time the amount of Emails grows to many, many thousand of emails year by year and under some circumstances where you have a Mailbox data Limit to up to lets say 4 Gigabytes per mailbox it is useful to periodically clean up old mails, but for the historical reference to create a backup of old email.

Even at some times it is useful to create a whole backup of mailbox every year and then delete the content of Mail data for this year from Outlook.

Export of mail data in Outlook configured email is exported to .PST file format – [ MS-PST ]: Outlook Personal Folders.

Each Personal Folders File (.PST) represents a Message store that contains an arbitrary hierarchy of Folder objects, which contains Message objects, which can contain Attachment objects. Information about Folder objects, Message objects, and Attachment objects are stored in properties, which collectively contain all of the information about the particular item.

If you want to back up the message folders locally to work PC (in addition to keeping them on the Exchange server), you can automatically move or delete older items with AutoArchive (feature of Outlook) or export the items to .pst file that you can restore later as needed and use by importing.

So how to backup / export your Email correspondence to .PTS?

1. Select File -> Open & Export -> Import/Export

outlook-backup-emails-to-pst-file-howto-1

2. Select Export to a file, and then select Next.

outlook-backup-emails-to-pst-file-howto-2

3. Select Outlook Data File (.pst), and select Next.

outlook-backup-emails-to-pst-file-howto-3

4. Select the mail folder you want to back up and select Next.

outlook-backup-emails-to-pst-file-howto-4

5. Choose a location and name for your backup file, and then select Finish.

outlook-backup-emails-to-pst-file-howto-7

To ensure no one has access to your .pst files, after finish you'll be prompted to enter and confirm a password (or if you don't want pass leave pass field as empty), and then select OK.

The produced .pst file will be stored by default under C:\Users\Username\Documents\Outlook Files.

The messages that you keep in a .pst file are no different from other standard messages in outlook. You can forward, reply, or search through the stored messages as you do with other messages.
 

How to install and use memcached on Debian GNU / Linux to share php sessions between DNS round robined Apache webservers


November 9th, 2020

apache-load-balancing-keep-persistent-php-sessions-memcached-logo

Recently I had to come up with a solution to make A bunch of websites hosted on a machine to be high available. For the task haproxy is one of logical options to use. However as I didn't wanted to set new IP addresses and play around to build a cluster. I decided the much more simplistic approach to use 2 separate Machines each running Up-to-date same version of Apache Webserver as front end and using a shared data running on Master-to-Master MySQL replication database as a backend. For the load balancing itself I've used a simple 2 multiple DNS 'A' Active records, configured via the Bind DNS name server an Round Robin DNS load balancing for each of the domains, to make them point to the the 2 Internet IP addresses (XXX.XXX.XXX.4 and YYY.YYY.YYY.5) each configured on the 2 Linux servers eth0.

So far so good, this setup worked but immediately, I've run another issue as I found out the WordPress and Joomla based websites's PHP sessions are lost, as the connectivity by the remote client browser reaches one time on XXX…4 and one time on YYY…4 configured listerner on TCP port 80 and TCP p. 443. In other words if request comes up to Front end Apache worker webserver 1 with opened channel data is sent back to Client Browser and the next request is sent due to the other IP resolved by the DNS server to come to Apache worker webserver 2 of course webserver 2 has no idea about this previous session data and it gets confused and returns soemething like a 404 or 500 or any other error … not exciting really huh …

I've thought about work around and as I didn't wanted to involve thirty party stuff as Privoxy / Squid  / Varnish / Polipo etc. just as that would add extra complexity as if I choose to use haproxy from the beginning, after short investigation came to a reason to use memcached as a central PHP sessions storage.

php-memcached-apache-workers-webbrowser-keep-sessions-diagram
 

Why I choose memcached ?


Well it is relatively easy to configure, it doesn't come with mambo-jambo unreadable over-complicated configuration and the time to configure everything is really little as well as the configuration is much straight forward, plus I don't need to occupy more IP addresses and I don't need to do any changes to the already running 2 WebServers on 2 separate Linux hosts configured to be reachable from the Internet.
Of course using memcached is not a rock solid and not the best solution out there, as there is risk that if a memcached dies out for some reason all sessions stored in are lost as they're stored only in volatile memory, as well as there is a drawback that if a communication was done via one of the 2 webservers and one of them goes down sessions that were known by one of Apache's workers disappears.

So let me proceed and explain you the steps to take to configure memcached as a central session storage system.
 

1. Install memcached and php-memcached packages


To enable support for memcached besides installing memcached daemon, you need to have the php-memcached which will provide the memcached.so used by Apache loaded php script interpretter module.

On a Debian / Ubuntu and other deb based GNU / Linux it should be:

webserver1:~# apt-get install memcached php-memcached

TO use php-memcached I assume Apache and its support for PHP is already installed with lets say:
 

webserver1:~# apt-get install php libapache2-mod-php php-mcrypt


On CentOS / RHEL / Fedora Linux it is a little bit more complicated as you'll need to install php-pear and compile the module with pecl


[root@centos ~]# yum install php-pear

[root@centos ~]# yum install php-pecl-memcache


Compile memcache

[root@centos ~]# pecl install memcache


2. Test if memcached is properly loaded in PHP


Once installed lets check if memcached service is running and memcached support is loaded as module into PHP core.


webserver1:~# ps -efa  | egrep memcached
nobody   14443     1  0 Oct23 ?        00:04:34 /usr/bin/memcached -v -m 64 -p 11211 -u nobody -l 127.0.0.1 -l 192.168.0.1

root@webserver1:/# php -m | egrep memcache
memcached


To get a bit more verbose information on memcache version and few of memcached variable settings:

root@webserver1:/# php -i |grep -i memcache
/etc/php/7.4/cli/conf.d/25-memcached.ini
memcached
memcached support => enabled
libmemcached version => 1.0.18
memcached.compression_factor => 1.3 => 1.3
memcached.compression_threshold => 2000 => 2000
memcached.compression_type => fastlz => fastlz
memcached.default_binary_protocol => Off => Off
memcached.default_connect_timeout => 0 => 0
memcached.default_consistent_hash => Off => Off
memcached.serializer => php => php
memcached.sess_binary_protocol => On => On
memcached.sess_connect_timeout => 0 => 0
memcached.sess_consistent_hash => On => On
memcached.sess_consistent_hash_type => ketama => ketama
memcached.sess_lock_expire => 0 => 0
memcached.sess_lock_max_wait => not set => not set
memcached.sess_lock_retries => 5 => 5
memcached.sess_lock_wait => not set => not set
memcached.sess_lock_wait_max => 150 => 150
memcached.sess_lock_wait_min => 150 => 150
memcached.sess_locking => On => On
memcached.sess_number_of_replicas => 0 => 0
memcached.sess_persistent => Off => Off
memcached.sess_prefix => memc.sess.key. => memc.sess.key.
memcached.sess_randomize_replica_read => Off => Off
memcached.sess_remove_failed_servers => Off => Off
memcached.sess_sasl_password => no value => no value
memcached.sess_sasl_username => no value => no value
memcached.sess_server_failure_limit => 0 => 0
memcached.store_retry_count => 2 => 2
Registered save handlers => files user memcached


Make sure /etc/default/memcached (on Debian is enabled) on CentOS / RHELs this should be /etc/sysconfig/memcached

webserver1:~# cat default/memcached 
# Set this to no to disable memcached.
ENABLE_MEMCACHED=yes

As assured on server1 memcached + php is ready to be used, next login to Linux server 2 and repeat the same steps install memcached and the module and check it is showing as loaded.

Next place under some of your webservers hosted websites under check_memcached.php below PHP code
 

<?php
if (class_exists('Memcache')) {
    $server = 'localhost';
    if (!empty($_REQUEST[‘server’])) {
        $server = $_REQUEST[‘server’];
    }
    $memcache = new Memcache;
    $isMemcacheAvailable = @$memcache->connect($server);

    if ($isMemcacheAvailable) {
        $aData = $memcache->get('data');
        echo '<pre>';
        if ($aData) {
            echo '<h2>Data from Cache:</h2>';
            print_r($aData);
        } else {
            $aData = array(
                'me' => 'you',
                'us' => 'them',
            );
            echo '<h2>Fresh Data:</h2>';
            print_r($aData);
            $memcache->set('data', $aData, 0, 300);
        }
        $aData = $memcache->get('data');
        if ($aData) {
            echo '<h3>Memcache seem to be working fine!</h3>';
        } else {
            echo '<h3>Memcache DOES NOT seem to be working!</h3>';
        }
        echo '</pre>';
    }
}

if (!$isMemcacheAvailable) {
    echo 'Memcache not available';
}

?>


Launch in a browser https://your-dns-round-robined-domain.com/check_memcached.php, the browser output should be as on below screenshot:

check_memcached-php-script-website-screenshot

3. Configure memcached daemons on both nodes

All we need to set up is the listen IPv4 addresses

On Host Webserver1
You should have in /etc/memcached.conf

-l 127.0.0.1
-l 192.168.0.1

webserver1:~# grep -Ei '\-l' /etc/memcached.conf 
-l 127.0.0.1
-l 192.168.0.1


On Host Webserver2

-l 127.0.0.1
-l 192.168.0.200


webserver2:~# grep -Ei '\-l' /etc/memcached.conf
-l 127.0.0.1
-l 192.168.0.200


4. Configure memcached in php.ini

Edit config /etc/php.ini (on CentOS / RHEL) or on Debians / Ubuntus etc. modify /etc/php/*/apache2/php.ini (where depending on the PHP version you're using your php location could be different lets say /etc/php/5.6/apache2/php.ini):

If you wonder where is the php.ini config in your case you can usually get it from the php cli:

webserver1:~# php -i | grep "php.ini"
Configuration File (php.ini) Path => /etc/php/7.4/cli
Loaded Configuration File => /etc/php/7.4/cli/php.ini


! Note: That on on PHP-FPM installations (where FastCGI Process Manager) is handling PHP requests,path would be rather something like:
 

/etc/php5/fpm/php.ini

in php.ini you need to change as minimum below 2 variables
 

session.save_handler =
session.save_path =


By default session.save_path would be set to lets say session.save_path = "

/var/lib/php7/sessions"


To make php use a 2 central configured memcached servers on webserver1 and webserver2 or even more memcached configured machines set it to look as so:

session.save_path="192.168.0.200:11211, 192.168.0.1:11211"


Also modify set

session.save_handler = memcache


Overall changed php.ini configuration on Linux machine 1 ( webserver1 ) and Linux machine 2 ( webserver2 ) should be:

session.save_handler = memcache
session.save_path="192.168.0.200:11211, 192.168.0.1:11211"


Below is approximately how it should look on both :

webserver1: ~# grep -Ei 'session.save_handler|session.save_path' /etc/php.ini
;; session.save_handler = files
session.save_handler = memcache
;     session.save_path = "N;/path"
;     session.save_path = "N;MODE;/path"
;session.save_path = "/var/lib/php7/sessions"
session.save_path="192.168.0.200:11211, 192.168.0.1:11211"
;       (see session.save_path above), then garbage collection does *not*


webserver2: ~# grep -Ei 'session.save_handler|session.save_path' /etc/php.ini
;; session.save_handler = files
session.save_handler = memcache
;     session.save_path = "N;/path"
;     session.save_path = "N;MODE;/path"
;session.save_path = "/var/lib/php7/sessions"
session.save_path="192.168.0.200:11211, 192.168.0.1:11211"
;       (see session.save_path above), then garbage collection does *not*


As you can see I have configured memcached on webserver1 to listen on internal local LAN IP 192.168.0.200 and on Local LAN eth iface 192.168.0.1 on TCP port 11211 (this is the default memcached connections listen port), for security or obscurity reasons you might choose another empty one. Make sure to also set the proper firewalling to that port, the best is to enable connections only between 192.168.0.200 and 192.168.0.1 on each of machine 1 and machine 2.

loadbalancing2-php-sessions-scheme-explained
 

5. Enable Memcached for session redundancy


Next step is to configure memcached to allow failover (e.g. use both memcached on 2 linux hosts) and configure session redundancy.
Configure /etc/php/7.3/mods-available/memcache.ini or /etc/php5/mods-available/memcache.ini or respectively to the right location depending on the PHP installed and used webservers version.
 

webserver1 :~#  vim /etc/php/7.3/mods-available/memcache.ini

; configuration for php memcached module
; priority=20
; settings to write sessions to both servers and have fail over
memcache.hash_strategy=consistent
memcache.allow_failover=1
memcache.session_redundancy=3
extension=memcached.so


webserver2 :~# vim /etc/php/7.3/mods-available/memcache.ini

; configuration for php memcached module
; priority=20
; settings to write sessions to both servers and have fail over
memcache.hash_strategy=consistent
memcache.allow_failover=1
memcache.session_redundancy=3
extension=memcached.so


memcache.session_redundancy directive must be equal to the number of memcached servers + 1 for the session information to be replicated to all the servers. This is due to a bug in PHP.
I have only 2 memcached configured that's why I set it to 3.
 

6. Restart Apache Webservers

Restart on both machines webserver1 and webserver2 Apache to make php load memcached.so
 

webserver1:~# systemctl restart httpd

webserver2:~# systemctl restart httpd


7. Restart memcached on machine 1 and 2


webserver1 :~# systemctl restart memcached

webserver2 :~# systemctl restart memcached


8. Test php sessions are working as expected with a php script

Copy to both website locations to accessible URL a file test_sessions.php:
 

<?php  
session_start();

if(isset($_SESSION[‘georgi’]))
{
echo "Sessions is ".$_SESSION[‘georgi’]."!\n";
}
else
{
echo "Session ID: ".session_id()."\n";
echo "Session Name: ".session_name()."\n";
echo "Setting 'georgi' to 'cool'\n";
$_SESSION[‘georgi’]='cool';
}
?>


Now run the test to see PHP sessions are kept persistently:
 

hipo@jeremiah:~/Desktop $ curl -vL -s https://www.pc-freak.net/session.php 2>&1 | grep 'Set-Cookie:'
< Set-Cookie: PHPSESSID=micir464cplbdfpo36n3qi9hd3; expires=Tue, 10-Nov-2020 12:14:32 GMT; Max-Age=86400; path=/

hipo@jeremiah:~/Desktop $ curl -L –cookie "PHPSESSID=micir464cplbdfpo36n3qi9hd3" http://83.228.93.76/session.php http://213.91.190.233/session.php
Session is cool!
Session is cool!


Copy to the locations that is resolving to both DNS servers some sample php script such as sessions_test.php  with below content:

<?php
    header('Content-Type: text/plain');
    session_start();
    if(!isset($_SESSION[‘visit’]))
    {
        echo "This is the first time you're visiting this server\n";
        $_SESSION[‘visit’] = 0;
    }
    else
            echo "Your number of visits: ".$_SESSION[‘visit’] . "\n";

    $_SESSION[‘visit’]++;

    echo "Server IP: ".$_SERVER[‘SERVER_ADDR’] . "\n";
    echo "Client IP: ".$_SERVER[‘REMOTE_ADDR’] . "\n";
    print_r($_COOKIE);
?>

Test in a Web Opera / Firefox / Chrome browser.

You should get an output in the browser similar to:
 

Your number of visits: 15
Server IP: 83.228.93.76
Client IP: 91.92.15.51
Array
(
    [_ga] => GA1.2.651288003.1538922937
    [__utma] => 238407297.651288003.1538922937.1601730730.1601759984.45
    [__utmz] => 238407297.1571087583.28.4.utmcsr=google|utmccn=(organic)|utmcmd=organic|utmctr=(not provided)
    [shellInABox] => 467306938:1110101010
    [fpestid] => EzkIzv_9OWmR9PxhUM8HEKoV3fbOri1iAiHesU7T4Pso4Mbi7Gtt9L1vlChtkli5GVDKtg
    [__gads] => ID=8a1e445d88889784-22302f2c01b9005b:T=1603219663:RT=1603219663:S=ALNI_MZ6L4IIaIBcwaeCk_KNwmL3df3Z2g
    [PHPSESSID] => mgpk1ivhvfc2d0daq08e0p0ec5
)

If you want to test php sessions are working with text browser or from another external script for automation use something as below PHP code:
 

<?php
// save as "session_test.php" inside your webspace  
ini_set('display_errors', 'On');
error_reporting(6143);

session_start();

$sessionSavePath = ini_get('session.save_path');

echo '<br><div style="background:#def;padding:6px">'
   , 'If a session could be started successfully <b>you should'
   , ' not see any Warning(s)</b>, otherwise check the path/folder'
   , ' mentioned in the warning(s) for proper access rights.<hr>';
echo "WebServer IP:" . $_SERVER[‘SERVER_ADDR’] . "\n<br />";
if (empty($sessionSavePath)) {
    echo 'A "<b>session.save_path</b>" is currently',
         ' <b>not</b> set.<br>Normally "<b>';
    if (isset($_ENV[‘TMP’])) {
        echo  $_ENV[‘TMP’], ‘” ($_ENV[“TMP”]) ';
    } else {
        echo '/tmp</b>" or "<b>C:\tmp</b>" (or whatever',
             ' the OS default "TMP" folder is set to)';
    }    
    echo ' is used in this case.';
} else {
    echo 'The current "session.save_path" is "<b>',
         $sessionSavePath, '</b>".';
}

echo '<br>Session file name: "<b>sess_', session_id()
   , '</b>".</div><br>';
?>

You can download the test_php_sessions.php script here.

To test with lynx:

hipo@jeremiah:~/Desktop $ lynx -source 'https://www.pc-freak.net/test_php_sessions.php'
<br><div style="background:#def;padding:6px">If a session could be started successfully <b>you should not see any Warning(s)</b>, otherwise check the path/folder mentioned in the warning(s) for proper access rights.<hr>WebServer IP:83.228.93.76
<br />The current "session.save_path" is "<b>tcp://192.168.0.200:11211, tcp://192.168.0.1:11211</b>".<br>Session file name: "<b>sess_5h18f809b88isf8vileudgrl40</b>".</div><br>

Find largest files on AIX system root / show biggest files and directories in AIX folder howto


November 6th, 2020

ibm-aix-logo-find-largest-files-and-directories-on-system-to-free-space-if-disk-is-full

On an AIX server if you get a root directory ( / ) to be completely full problem and the AIX running services are unable to write their pid files and logs for example in /tmp /admin /home /var/tmp /var/log/ and rest of directory structure or the system is almost full with mounted filesystems which shows it is 90% or 95%+ full on main partition,  the system is either already stuck or it is on the way to stop functiononing normally. Hence the only way to recover IBM AIX machine to a normal behavior is to clean up some files (if you can't extend the partition) or add more physical Hard drive, just as we usually do on Linux.

So How can we clean up largest files on AIX?


Lets say we want to find all files on AIX larger than 1 MB.

aix-system:/ $ find / -xdev -size 2048 -ls | sort -r +6
12579 1400 -rw-r—–  1 root      security   1433534 Jun 26  2019 /etc/security/tsd/tsd.dat
 9325 20361 -rw-r—–  1 root      system    20848752 Nov  6 16:02 /etc/security/failedlogin
21862 7105 -rwxr-xr-x  1 root      system     7274915 Aug 24  2017 /sbin/zabbix_agentd
   72 7005 -rw-rw—-  1 root      system     7172962 Nov  6 16:19 /audit/stream.out
24726 2810 -rw——-  1 root      system     2876944 Feb 29  2012 /etc/syslog-ng/core
29314 2391 -r-xr-xr-x  1 root      system     2447454 Jun 25  2019 /lpp/bos/bos.rte.filesystem/7.1.5.32.save/update.16
21844 2391 -r-xr-xr-x  1 root      system     2447414 Jun 25  2019 /sbin/helpers/jfs2/logredo64
21843 2219 -r-xr-xr-x  1 root      system     2271971 Jun 25  2019 /sbin/helpers/jfs2/logredo
29313 2218 -r-xr-xr-x  1 root      system     2270835 Jun 25  2019 /lpp/bos/bos.rte.filesystem/7.1.5.32.save/update.15
22279 1800 -rw-r–r–  1 root      system     1843200 Nov  4 08:03 /root/smit.log
12577 1399 -rw-r–r–  1 root      system     1431685 Jun 26  2019 /etc/security/tsd/.tsd.bk
21837 1325 -r-xr-xr-x  1 root      system     1356340 Jun 25  2019 /sbin/helpers/jfs2/fsck64
29307 1325 -r-xr-xr-x  1 root      system     1356196 Jun 25  2019 /lpp/bos/bos.rte.filesystem/7.1.5.32.save/update.9
   12 1262 -rw——-  1 root      system     1291365 Aug  8  2011 /core


Above finds all files greater than 1 MB and sort them in reverse
order with the largest files first.

To search all files larger than 64 Megabytes under root ( / )

aix-system:/ $ find / -xdev -size +131072 -ls | sort -r +6
65139 97019 -rw-r–r–  1 root      system    99347181 Mar 31  2017 /admin/archive.zip


Display 10 largest directories on system

aix-system:/ $ du -a /dir | sort -n -r | head -10


Show biggest files and directories in a directory


aix-system:/ $ du -sk * | sort -n
4       Mail
4       liste
4       my_user
4       syslog-ng.conf
140     smit.script
180     smit.transaction
1804    smit.log

Below du display the size of all files and directories in the current directory with the biggest being at the bottom.


List all largest files in dir decrasingly. If a directory is matches show all sub-dirs largest files.

aix-system:/ $ ls -A . | while read name; do du -sk $name; done | sort -nr

Below ls + while loop command sorts disk usage for all files in the current directory by size, in decreasing order. If the file we suspect happens to be a directory, we can then change into that directory, and re-run the preceding command to determine what is taking up space within that directory.

Continue these steps until you find the desired file or files, at which point you can take appropriate actions.

If the bottom-most item is a directory, then cd into that directory and run the du command again. Keep drilling down until you find the biggest files on your system and get rid of them to save some space.