Short SSL generate new and self-signed certificates PEM, view and convert to and from PKCS12 to java key store cookbook commands cheat sheet


January 12th, 2021

OpenSSL-logo

Below is a short compilation of common used openssl commands (a kind of cookbook) helpful for sysadmins who has to commonly deal with OpenSSL certificates.

Lets say you have to generate new certificate / key and a PEM files, prepare self-signed certificates, show CSR / PEM or KEY ssl file contents, get information about certificate such as expiry date a type of encryption algorithm or sign certificate with self-signed authority convert PEM to PKCS12, convert from PKCS12 file format to .PEM, convert java X509 to java key store SSL encryptionor convert java key store format certificate to PKCS12, then below will be of use to you.

1. Generate Private RSA Key with 2048 bits

# openssl genrsa -out $ (hostname -f) .key 2048

2. Create CSR file

# openssl req -new -key $ (hostname -f) .key -out $ (hostname -f) .csr

3. Create a Self Certified Certificate:

# openssl x509 -req -days 30 -in $ (hostname -f) .csr -signkey $ (hostname -f) .key -out $ (hostname -f) .crt
Enter password:

# openssl rsa -in key.pem -out newkey.pem


4. Show CSR file content

# openssl req -in newcsr.csr -noout -text


5. Get Certificate version / serial number / signature algorithm / RSA key lenght / modulus / exponent etc.

# openssl x509 -in newcert.pem -noout -text


6. Server certificate as CA self signeded

# openssl ca -in newcert.csr -notext -out newcert.pem


7. Generate a certificate signing request based on an existing certificate

# openssl x509 -x509toreq -in certificate.crt -out CSR.csr -signkey privateKey.key


8. Convert .pem / .key / .crt file format to pkcs12 format
 

# openssl pkcs12 -export -in newcert.pem -inkey newkey.key -certfile ca.crt -out newcert.p12


9. Convert pkcs12 pfx to common .pem

# openssl pkcs12 -in mycert.pfx -out mycert.pem


10. The Formats available

# openssl x509 -inform the -in certificate.cer -out certificate.crt


11. Convert a pkcs # 7 certificate into PEM format

# openssl pkcs7 -in cert.p7c -inform DER -outform PEM -out certificate.p7b
# openssl pkcs7 -print_certs -in certificate.p7b -out certificate.pem


12. Convert X509 to java keystore file

# java -cp not-yet-commons-ssl-0.3.11.jar org.apache.commons.ssl.KeyStoreBuilder pass_for_new_keystore key.key certificate.crt

13. Convert java keystore file to pkcs12

# keytool -importkeystore -srckeystore keystore.jks -destkeystore intermediate.p12 -deststoretype PKCS12

Listing installed RPMs by vendor installed on CentOS / RedHat Linux


January 8th, 2021

Listing installed RPMs by vendor installed on CentOS / RedHat Linux

Listing installed RPMs by vendor is useful sysadmin stuff if you have third party software installed that is not part of official CentOS / RedHat Linux and you want to only list this packages, here is how this is done


[root@redhat ~]# rpm -qa –qf '%{NAME} %{VENDOR} %{PACKAGER} \n' | grep -v 'CentOS' | sort

criu Virtuozzo Virtuozzo (http://www.virtuozzo.com/support/)
gskcrypt64 IBM IBM
gskssl64 IBM IBM
ipxe-roms-qemu Virtuozzo Virtuozzo (http://www.virtuozzo.com/support/)
libevent (none) (none)
libguestfs-appliance Virtuozzo Virtuozzo (http://www.virtuozzo.com/support/)
libguestfs-tools-c Virtuozzo Virtuozzo (http://www.virtuozzo.com/support/)
libguestfs Virtuozzo Virtuozzo (http://www.virtuozzo.com/support/)
libprlcommon Virtuozzo Virtuozzo (http://www.virtuozzo.com/support/)
libprlsdk-python Virtuozzo Virtuozzo (http://www.virtuozzo.com/support/)
libprlsdk Virtuozzo Virtuozzo (http://www.virtuozzo.com/support/)
libprlxmlmodel Virtuozzo Virtuozzo (http://www.virtuozzo.com/support/)
libtcmu Virtuozzo Virtuozzo (http://www.virtuozzo.com/support/)
libvcmmd Virtuozzo Virtuozzo (http://www.virtuozzo.com/support/)
libvirt-client Virtuozzo Virtuozzo (http://www.virtuozzo.com/support/)
libvirt-daemon-config-nwfilter Virtuozzo Virtuozzo (http://www.virtuozzo.com/support/)
libvirt-daemon-driver-interface Virtuozzo Virtuozzo (http://www.virtuozzo.com/support/)
libvirt-daemon-driver-network Virtuozzo Virtuozzo (http://www.virtuozzo.com/support/)
libvirt-daemon-driver-nodedev Virtuozzo Virtuozzo (http://www.virtuozzo.com/support/)
libvirt-daemon-driver-nwfilter Virtuozzo Virtuozzo (http://www.virtuozzo.com/support/)
libvirt-daemon-driver-qemu Virtuozzo Virtuozzo (http://www.virtuozzo.com/support/)
libvirt-daemon-driver-storage-core Virtuozzo Virtuozzo (http://www.virtuozzo.com/support/)
libvirt-daemon-driver-storage Virtuozzo Virtuozzo (http://www.virtuozzo.com/support/)
libvirt-daemon-kvm Virtuozzo Virtuozzo (http://www.virtuozzo.com/support/)
libvirt-daemon Virtuozzo Virtuozzo (http://www.virtuozzo.com/support/)
libvirt-libs Virtuozzo Virtuozzo (http://www.virtuozzo.com/support/)
libvirt-python Virtuozzo Virtuozzo (http://www.virtuozzo.com/support/)
libvirt Virtuozzo Virtuozzo (http://www.virtuozzo.com/support/)
libvzctl Virtuozzo Virtuozzo (http://www.virtuozzo.com/support/)
libvzevent Virtuozzo Virtuozzo (http://www.virtuozzo.com/support/)
openvz-logos Virtuozzo Virtuozzo (http://www.virtuozzo.com/support/)
p7zip-plugins Fedora Project Fedora Project
ploop-lib Virtuozzo Virtuozzo (http://www.virtuozzo.com/support/)
ploop Virtuozzo Virtuozzo (http://www.virtuozzo.com/support/)
prlctl Virtuozzo Virtuozzo (http://www.virtuozzo.com/support/)
prl-disk-tool Virtuozzo Virtuozzo (http://www.virtuozzo.com/support/)
prl-disp-service Virtuozzo Virtuozzo (http://www.virtuozzo.com/support/)
python2-lockfile Fedora Project Fedora Project
python2-psutil Fedora Project Fedora Project
python-daemon Fedora Project Fedora Project
python-subprocess32 Virtuozzo Virtuozzo (http://www.virtuozzo.com/support/)
qemu-img-vz Virtuozzo Virtuozzo (http://www.virtuozzo.com/support/)
qemu-kvm-common-vz Virtuozzo Virtuozzo (http://www.virtuozzo.com/support/)
qemu-kvm-vz Virtuozzo Virtuozzo (http://www.virtuozzo.com/support/)
qt Virtuozzo Virtuozzo (http://www.virtuozzo.com/support/)
rkhunter Fedora Project Fedora Project
seabios-bin Virtuozzo Virtuozzo (http://www.virtuozzo.com/support/)
seavgabios-bin Virtuozzo Virtuozzo (http://www.virtuozzo.com/support/)
spfs Virtuozzo Virtuozzo (http://www.virtuozzo.com/support/)
TIVsm-API64 IBM (none)
TIVsm-APIcit IBM (none)
TIVsm-BAcit IBM (none)
TIVsm-BA IBM (none)
vcmmd Virtuozzo Virtuozzo (http://www.virtuozzo.com/support/)
vmauth Virtuozzo Virtuozzo (http://www.virtuozzo.com/support/)
vzctl Virtuozzo Virtuozzo (http://www.virtuozzo.com/support/)
vzkernel Virtuozzo Virtuozzo (http://www.virtuozzo.com/support/)
vztt_checker Virtuozzo Virtuozzo (http://www.virtuozzo.com/support/)
vztt-lib Virtuozzo Virtuozzo (http://www.virtuozzo.com/support/)
vztt Virtuozzo Virtuozzo (http://www.virtuozzo.com/support/)
zabbix-agent (none) (none)


That instructs rpm to output each package's name and vendor, then we exclude those from "Red Hat, Inc." (which is the exact string Red Hat conveniently uses in the "vendor" field of all RPMs they pacakge).

By default, rpm -qa uses the format '%{NAME}-%{VERSION}-%{RELEASE}', and it's nice to see version and release, and on 64-bit systems, it's also nice to see the architecture since both 32- and 64-bit packages are often installed. Here's how I did that:

[root@redhat ~]# rpm -qa –qf '%{NAME}-%{VERSION}-%{RELEASE}.%{ARCH} %{VENDOR} %{PACKAGER} \n' | grep -v 'CentOS' | sort

criu-3.10.0.23-1.vz7.x86_64 Virtuozzo Virtuozzo (http://www.virtuozzo.com/support/)
gskcrypt64-8.0-55.17.x86_64 IBM IBM
gskssl64-8.0-55.17.x86_64 IBM IBM
ipxe-roms-qemu-20170123-1.git4e85b27.1.vz7.5.noarch Virtuozzo Virtuozzo (http://www.virtuozzo.com/support/)
libevent-2.0.22-1.rhel7.x86_64 (none) (none)
libguestfs-1.36.10-6.2.vz7.12.x86_64 Virtuozzo Virtuozzo (http://www.virtuozzo.com/support/)
libguestfs-appliance-1.36.10-6.2.vz7.12.x86_64 Virtuozzo Virtuozzo (http://www.virtuozzo.com/support/)
libguestfs-tools-c-1.36.10-6.2.vz7.12.x86_64 Virtuozzo Virtuozzo (http://www.virtuozzo.com/support/)
libprlcommon-7.0.162-1.vz7.x86_64 Virtuozzo Virtuozzo (http://www.virtuozzo.com/support/)
libprlsdk-7.0.226-2.vz7.x86_64 Virtuozzo Virtuozzo (http://www.virtuozzo.com/support/)
libprlsdk-python-7.0.226-2.vz7.x86_64 Virtuozzo Virtuozzo (http://www.virtuozzo.com/support/)
libprlxmlmodel-7.0.80-1.vz7.x86_64 Virtuozzo Virtuozzo (http://www.virtuozzo.com/support/)
libtcmu-1.2.0-16.2.vz7.x86_64 Virtuozzo Virtuozzo (http://www.virtuozzo.com/support/)
libvcmmd-7.0.22-3.vz7.x86_64 Virtuozzo Virtuozzo (http://www.virtuozzo.com/support/)
libvirt-3.9.0-14.vz7.38.x86_64 Virtuozzo Virtuozzo (http://www.virtuozzo.com/support/)
libvirt-client-3.9.0-14.vz7.38.x86_64 Virtuozzo Virtuozzo (http://www.virtuozzo.com/support/)
libvirt-daemon-3.9.0-14.vz7.38.x86_64 Virtuozzo Virtuozzo (http://www.virtuozzo.com/support/)
libvirt-daemon-config-nwfilter-3.9.0-14.vz7.38.x86_64 Virtuozzo Virtuozzo (http://www.virtuozzo.com/support/)
libvirt-daemon-driver-interface-3.9.0-14.vz7.38.x86_64 Virtuozzo Virtuozzo (http://www.virtuozzo.com/support/)
libvirt-daemon-driver-network-3.9.0-14.vz7.38.x86_64 Virtuozzo Virtuozzo (http://www.virtuozzo.com/support/)
libvirt-daemon-driver-nodedev-3.9.0-14.vz7.38.x86_64 Virtuozzo Virtuozzo (http://www.virtuozzo.com/support/)
libvirt-daemon-driver-nwfilter-3.9.0-14.vz7.38.x86_64 Virtuozzo Virtuozzo (http://www.virtuozzo.com/support/)
libvirt-daemon-driver-qemu-3.9.0-14.vz7.38.x86_64 Virtuozzo Virtuozzo (http://www.virtuozzo.com/support/)
libvirt-daemon-driver-storage-3.9.0-14.vz7.38.x86_64 Virtuozzo Virtuozzo (http://www.virtuozzo.com/support/)
libvirt-daemon-driver-storage-core-3.9.0-14.vz7.38.x86_64 Virtuozzo Virtuozzo (http://www.virtuozzo.com/support/)
libvirt-daemon-kvm-3.9.0-14.vz7.38.x86_64 Virtuozzo Virtuozzo (http://www.virtuozzo.com/support/)
libvirt-libs-3.9.0-14.vz7.38.x86_64 Virtuozzo Virtuozzo (http://www.virtuozzo.com/support/)
libvirt-python-3.9.0-1.vz7.1.x86_64 Virtuozzo Virtuozzo (http://www.virtuozzo.com/support/)
libvzctl-7.0.506-1.vz7.x86_64 Virtuozzo Virtuozzo (http://www.virtuozzo.com/support/)
libvzevent-7.0.7-5.vz7.x86_64 Virtuozzo Virtuozzo (http://www.virtuozzo.com/support/)
openvz-logos-70.0.13-1.vz7.noarch Virtuozzo Virtuozzo (http://www.virtuozzo.com/support/)
p7zip-plugins-16.02-10.el7.x86_64 Fedora Project Fedora Project
ploop-7.0.137-1.vz7.x86_64 Virtuozzo Virtuozzo (http://www.virtuozzo.com/support/)
ploop-lib-7.0.137-1.vz7.x86_64 Virtuozzo Virtuozzo (http://www.virtuozzo.com/support/)
prlctl-7.0.164-1.vz7.x86_64 Virtuozzo Virtuozzo (http://www.virtuozzo.com/support/)
prl-disk-tool-7.0.43-1.vz7.x86_64 Virtuozzo Virtuozzo (http://www.virtuozzo.com/support/)
prl-disp-service-7.0.925-1.vz7.x86_64 Virtuozzo Virtuozzo (http://www.virtuozzo.com/support/)
python2-lockfile-0.11.0-17.el7.noarch Fedora Project Fedora Project
python2-psutil-5.6.7-1.el7.x86_64 Fedora Project Fedora Project
python-daemon-1.6-4.el7.noarch Fedora Project Fedora Project
python-subprocess32-3.2.7-1.vz7.5.x86_64 Virtuozzo Virtuozzo (http://www.virtuozzo.com/support/)
qemu-img-vz-2.10.0-21.7.vz7.67.x86_64 Virtuozzo Virtuozzo (http://www.virtuozzo.com/support/)
qemu-kvm-common-vz-2.10.0-21.7.vz7.67.x86_64 Virtuozzo Virtuozzo (http://www.virtuozzo.com/support/)
qemu-kvm-vz-2.10.0-21.7.vz7.67.x86_64 Virtuozzo Virtuozzo (http://www.virtuozzo.com/support/)
qt-4.8.7-2.vz7.2.x86_64 Virtuozzo Virtuozzo (http://www.virtuozzo.com/support/)
rkhunter-1.4.6-2.el7.noarch Fedora Project Fedora Project
seabios-bin-1.10.2-3.1.vz7.3.noarch Virtuozzo Virtuozzo (http://www.virtuozzo.com/support/)
seavgabios-bin-1.10.2-3.1.vz7.3.noarch Virtuozzo Virtuozzo (http://www.virtuozzo.com/support/)
spfs-0.09.0010-1.vz7.x86_64 Virtuozzo Virtuozzo (http://www.virtuozzo.com/support/)
TIVsm-API64-8.1.11-0.x86_64 IBM (none)
TIVsm-APIcit-8.1.11-0.x86_64 IBM (none)
TIVsm-BA-8.1.11-0.x86_64 IBM (none)
TIVsm-BAcit-8.1.11-0.x86_64 IBM (none)
vcmmd-7.0.160-1.vz7.x86_64 Virtuozzo Virtuozzo (http://www.virtuozzo.com/support/)
vmauth-7.0.10-2.vz7.x86_64 Virtuozzo Virtuozzo (http://www.virtuozzo.com/support/)
vzctl-7.0.194-1.vz7.x86_64 Virtuozzo Virtuozzo (http://www.virtuozzo.com/support/)
vzkernel-3.10.0-862.11.6.vz7.64.7.x86_64 Virtuozzo Virtuozzo (http://www.virtuozzo.com/support/)
vzkernel-3.10.0-862.20.2.vz7.73.29.x86_64 Virtuozzo Virtuozzo (http://www.virtuozzo.com/support/)
vztt-7.0.63-1.vz7.x86_64 Virtuozzo Virtuozzo (http://www.virtuozzo.com/support/)
vztt_checker-7.0.2-1.vz7.i686 Virtuozzo Virtuozzo (http://www.virtuozzo.com/support/)
vztt_checker-7.0.2-1.vz7.x86_64 Virtuozzo Virtuozzo (http://www.virtuozzo.com/support/)
vztt-lib-7.0.63-1.vz7.x86_64 Virtuozzo Virtuozzo (http://www.virtuozzo.com/support/)
zabbix-agent-3.2.11-1.el7.x86_64 (none) (none)

Backup entire Live Linux Operating System bit by bit with dd, partimage, partclone clonezilla


January 7th, 2021


dd-create-server-hard-drive-identical-mirror-data-copy-backups

This is an old stuff that we UNIX / Linux sysadmins use frequently when we need to migrate operating system from a certain older machine server to another newer one.
However I decided to blog it as it an interesting to know to a new grown junior sysadmins.

To Create a bit to bit data backup with dd command,
the following command is used to create a backup with dd, which takes the entire data content (including partition table etc.) with it:

dd if = / dev / [hard disk 1] of = / dev / [hard disk 2] bs = 512 conv = noerror, sync


For explanation:


"if" stands for the hard drive to be read from.
"of" stands for the hard drive to be written to.
Important! if and of must not be interchanged under any circumstances! In the worst case, the data on the disk to be read will otherwise be irrevocably overwritten!

"bs = 512" defines the block size. The value can be increased (which in turn increases the speed of the backup), but you should be sure that the file system to be backed up does not contain any errors. If you were to use block size 64k, for example, the speed of the backup is increased considerably – but if read errors occur within this block, the entire data block that dd has written contains unusable data. Therefore, when choosing the block size, you should always weigh data integrity and time against each other.
"noerror" tells dd to continue the backup in case of errors. Without this option, dd would stop the backup by default.
"sync" commands dd to replace the unreadable blocks with zeros in the event of errors in order to keep the data offset synchronous.
When performing a backup (as with other things that a longer period can take advantage of, it is always recommended (if you SSH is logged in and no direct access to a real Shell), the process either for CTRL + followed from bg to the background (can later be brought back to the foreground with fg ) or to use virtual session managers such as screen or byobu before executing the command.This prevents the process from dying if the SSH session is unintentionally terminated and you have to start over.

Of course there are plenty of other ways to make a mirror backup  cloneof a hard disk to lets say migrate to a new data center  using easier to use tools with (ncurses) Text menu interfaces to avoid bothering a complex typing on the console.
One such tool is Partclon:

Partclone-screenshot,_partclone-linux-create-mirror-disk-backups

PartClone cloning in action

Another text menu interface data cloning Linux tool commonly used by sysadms is partimage

Partimage-linux-screenshot

Most sysadmins however prefer to use Clonezilla when something more cozy is required to do a bit to bit data copy.
Tthere is even a Live Linux CD distribution for that.

Clonezilla can mirror most types of filesystems and partiontions and could be used not only for UNIX / Linux / BSD filesystems Live OS data (backups) (EXT3 / EXT4 / XFS / ZFS etc)  migrations, but also for old NT4 Windows server partitions. One useful application of Clonezilla i can think of is if you want to configure or restore a whole office of Windows computers running on the same clean version of Windows and same hardware configurations PCs, after a Virus or trojan has striked it. By using it you can clone from a central well configured Windows release with the surrounding applications to all machines for up to an hour with Clonezilla and you can even do it over a network.

How to check Linux server power supply state is Okay / How to find out a Linux Power Supply is broken


January 6th, 2021

2U-power-supplies-get-status-if-Power-supply-broken-information-linux-ipmitool

If you're a sysadmin and managing remotely Linux servers, every now and then if a machine is hanging without a reason it useful to check the server Power Supply state. I say that because often if the machine is mysteriously hanging and a standard Root Cause Analysis (RCA) on /var/log/messages /var/log/dmesg /var/log/boot etc. did not bring you to any different conclusion. The next step after you send a technician to reboot the machine is to check on Linux OS level whether Power Supply Unit (PSU) hardware on the machine does not have some issues.
As blogged earlier on how to use ipmitool to manage remote ILO remote boards etc. the ipmitool can also be used to check status of Server PSUs.

Below is example output of 2 PSU server whose Power Supplies are functioning normally.
 

[root@linux-server ~]# ipmitool sdr type "Power Supply"

PS Heavy Load    | 2Bh | ok  | 19.1 | State Deasserted
Power Supply 1   | 70h | ok  | 10.1 | Presence detected
Power Supply 2   | 71h | ok  | 10.2 | Presence detected
PS Configuration | 72h | ok  | 19.1 |
PS 1 Therm Fault | 75h | ok  | 10.1 | Transition to OK
PS 2 Therm Fault | 76h | ok  | 10.2 | Transition to OK
PS1 12V OV Fault | 77h | ok  | 10.1 | Transition to OK
PS2 12V OV Fault | 78h | ok  | 10.2 | Transition to OK
PS1 12V UV Fault | 79h | ok  | 10.1 | Transition to OK
PS2 12V UV Fault | 7Ah | ok  | 10.2 | Transition to OK
PS1 12V OC Fault | 7Bh | ok  | 10.1 | Transition to OK
PS2 12V OC Fault | 7Ch | ok  | 10.2 | Transition to OK
PS1 12Vaux Fault | 7Dh | ok  | 10.1 | Transition to OK
PS2 12Vaux Fault | 7Eh | ok  | 10.2 | Transition to OK
Power Unit       | 7Fh | ok  | 19.1 | Fully Redundant

Now if you have a server lets say on an old ProLiant DL360e Gen8 whose Power Supply is damaged, you will get an from ipmitool similar to:

[root@linux-server  systemd]# ipmitool sdr type "Power Supply"
Power Supply 1   | 30h | ok  | 10.1 | 100 Watts, Presence detected
Power Supply 2   | 31h | ok  | 10.2 | 0 Watts, Presence detected, Failure detected, Power Supply AC lost
Power Supplies   | 33h | ok  | 10.3 | Redundancy Lost


If you don't have ipmitool installed due to security or whatever but you have the hardware detection software dmidecode you can use it too to get the Power Supply state

[root@linux-server  systemd]# dmidecode -t chassis
# dmidecode 3.2
Getting SMBIOS data from sysfs.
SMBIOS 2.8 present.


Handle 0x0300, DMI type 3, 21 bytes
Chassis Information
        Manufacturer: HP
        Type: Rack Mount Chassis
        Lock: Not Present
        Version: Not Specified
        Serial Number: CZJ38201ZH
        Asset Tag:
        Boot-up State: Critical
        Power Supply State: Critical

        Thermal State: Safe
        Security Status: Unknown
        OEM Information: 0x00000000
        Height: 1 U
        Number Of Power Cords: 2
        Contained Elements: 0

To find only Power Supply info status on a server with dmideode.

# dmidecode –type 39

monitoring-power-supply-hardware-information-linux-ipmitool

Plug between the power supply and the mainboard voltage / coms ATX specification

This can also be used on a normal Linux desktop PCs which usually have only 1U (one power supply) on many of Ubuntus and Linux desktops where lshw (list hardaware information) is installed to get the machine PSUs status with lshw 

 root@ubuntu:~# lshw -c power
  *-battery               
       product: 45N1111
       vendor: SONY
       physical id: 1
       slot: Front
       capacity: 23200mWh
       configuration: voltage=11.1V
        Thermal State: Safe
        Security Status: Unknown
        OEM Information: 0x00000000
        Height: 1 U
        Number Of Power Cords: 2
        Contained Elements: 0


Finally to get an extensive information on the voltages of the Power Supply you can use the good old lm_sensors.

# apt-get install lm-sensors
# sensors-detect 
# service kmod start

# sensors
# watch sensors


As manually monitoring Power Supplies and other various data is dubious, finally you might want to use some centralized monitoring. For one example on that you might want to check my prior Zabbix to Monitor Hardware Hard Drive / Temperature and Disk with lm_sensors / smartd on Linux with Zabbix.

Hack: Using ssh / curl or wget to test TCP port connection state to remote SSH, DNS, SMTP, MySQL or any other listening service in PCI environment servers


December 30th, 2020

using-curl-ssh-wget-to-test-tcp-port-opened-or-closed-for-web-mysql-smtp-or-any-other-linstener-in-pci-linux-logo

If you work on PCI high security environment servers in isolated local networks where each package installed on the Linux / Unix system is of importance it is pretty common that some basic stuff are not there in most cases it is considered a security hole to even have a simple telnet installed on the system. I do have experience with such environments myself and thus it is pretty daunting stuff so in best case you can use something like a simple ssh client if you're lucky and the CentOS / Redhat / Suse Linux whatever distro has openssh-client package installed.
If you're lucky to have the ssh onboard you can use telnet in same manner as netcat or the swiss army knife (nmap) network mapper tool to test whether remote service TCP / port is opened or not. As often this is useful, if you don't have access to the CISCO / Juniper or other (networ) / firewall equipment which is setting the boundaries and security port restrictions between networks and servers.

Below is example on how to use ssh client to test port connectivity to lets say the Internet, i.e.  Google / Yahoo search engines.
 

[root@pciserver: /home ]# ssh -oConnectTimeout=3 -v google.com -p 23
OpenSSH_7.9p1 Debian-10+deb10u2, OpenSSL 1.1.1g  21 Apr 2020
debug1: Connecting to google.com [172.217.169.206] port 23.
debug1: connect to address 172.217.169.206 port 23: Connection timed out
debug1: Connecting to google.com [2a00:1450:4017:80b::200e] port 23.
debug1: connect to address 2a00:1450:4017:80b::200e port 23: Cannot assign requested address
ssh: connect to host google.com port 23: Cannot assign requested address
root@pcfreak:/var/www/images# ssh -oConnectTimeout=3 -v google.com -p 80
OpenSSH_7.9p1 Debian-10+deb10u2, OpenSSL 1.1.1g  21 Apr 2020
debug1: Connecting to google.com [172.217.169.206] port 80.
debug1: connect to address 172.217.169.206 port 80: Connection timed out
debug1: Connecting to google.com [2a00:1450:4017:807::200e] port 80.
debug1: connect to address 2a00:1450:4017:807::200e port 80: Cannot assign requested address
ssh: connect to host google.com port 80: Cannot assign requested address
root@pcfreak:/var/www/images# ssh google.com -p 80
ssh_exchange_identification: Connection closed by remote host
root@pcfreak:/var/www/images# ssh google.com -p 80 -v -oConnectTimeout=3
OpenSSH_7.9p1 Debian-10+deb10u2, OpenSSL 1.1.1g  21 Apr 2020
debug1: Connecting to google.com [172.217.169.206] port 80.
debug1: connect to address 172.217.169.206 port 80: Connection timed out
debug1: Connecting to google.com [2a00:1450:4017:80b::200e] port 80.
debug1: connect to address 2a00:1450:4017:80b::200e port 80: Cannot assign requested address
ssh: connect to host google.com port 80: Cannot assign requested address
root@pcfreak:/var/www/images# ssh google.com -p 80 -v -oConnectTimeout=5
OpenSSH_7.9p1 Debian-10+deb10u2, OpenSSL 1.1.1g  21 Apr 2020
debug1: Connecting to google.com [142.250.184.142] port 80.
debug1: connect to address 142.250.184.142 port 80: Connection timed out
debug1: Connecting to google.com [2a00:1450:4017:80c::200e] port 80.
debug1: connect to address 2a00:1450:4017:80c::200e port 80: Cannot assign requested address
ssh: connect to host google.com port 80: Cannot assign requested address
root@pcfreak:/var/www/images# ssh google.com -p 80 -v
OpenSSH_7.9p1 Debian-10+deb10u2, OpenSSL 1.1.1g  21 Apr 2020
debug1: Connecting to google.com [172.217.169.206] port 80.
debug1: Connection established.
debug1: identity file /root/.ssh/id_rsa type 0
debug1: identity file /root/.ssh/id_rsa-cert type -1
debug1: identity file /root/.ssh/id_dsa type -1
debug1: identity file /root/.ssh/id_dsa-cert type -1
debug1: identity file /root/.ssh/id_ecdsa type -1
debug1: identity file /root/.ssh/id_ecdsa-cert type -1
debug1: identity file /root/.ssh/id_ed25519 type -1
debug1: identity file /root/.ssh/id_ed25519-cert type -1
debug1: identity file /root/.ssh/id_xmss type -1
debug1: identity file /root/.ssh/id_xmss-cert type -1
debug1: Local version string SSH-2.0-OpenSSH_7.9p1 Debian-10+deb10u2
debug1: ssh_exchange_identification: HTTP/1.0 400 Bad Request


debug1: ssh_exchange_identification: Content-Type: text/html; charset=UTF-8


debug1: ssh_exchange_identification: Referrer-Policy: no-referrer


debug1: ssh_exchange_identification: Content-Length: 1555


debug1: ssh_exchange_identification: Date: Wed, 30 Dec 2020 14:13:25 GMT


debug1: ssh_exchange_identification:


debug1: ssh_exchange_identification: <!DOCTYPE html>

debug1: ssh_exchange_identification: <html lang=en>

debug1: ssh_exchange_identification:   <meta charset=utf-8>

debug1: ssh_exchange_identification:   <meta name=viewport content="initial-scale=1, minimum-scale=1, width=device-width">

debug1: ssh_exchange_identification:   <title>Error 400 (Bad Request)!!1</title>

debug1: ssh_exchange_identification:   <style>

debug1: ssh_exchange_identification:     *{margin:0;padding:0}html,code{font:15px/22px arial,sans-serif}html{background:#fff;color:#222;padding:15px}body{margin:7% auto 0;max-width:390px;min-height:180px;padding:30px 0 15px}* > body{background:url(//www.google.com/images/errors/robot.png) 10
debug1: ssh_exchange_identification: 0% 5px no-repeat;padding-right:205px}p{margin:11px 0 22px;overflow:hidden}ins{color:#777;text-decoration:none}a img{border:0}@media screen and (max-width:772px){body{background:none;margin-top:0;max-width:none;padding-right:0}}#logo{background:url(//www.g
debug1: ssh_exchange_identification: oogle.com/images/branding/googlelogo/1x/googlelogo_color_150x54dp.png) no-repeat;margin-left:-5px}@media only screen and (min-resolution:192dpi){#logo{background:url(//www.google.com/images/branding/googlelogo/2x/googlelogo_color_150x54dp.png) no-repeat 0
debug1: ssh_exchange_identification: % 0%/100% 100%;-moz-border-image:url(//www.google.com/images/branding/googlelogo/2x/googlelogo_color_150x54dp.png) 0}}@media only screen and (-webkit-min-device-pixel-ratio:2){#logo{background:url(//www.google.com/images/branding/googlelogo/2x/googlelogo_
debug1: ssh_exchange_identification: color_150x54dp.png) no-repeat;-webkit-background-size:100% 100%}}#logo{display:inline-block;height:54px;width:150px}

debug1: ssh_exchange_identification:   </style>

debug1: ssh_exchange_identification:   <a href=//www.google.com/><span id=logo aria-label=Google></span></a>

debug1: ssh_exchange_identification:   <p><b>400.</b> <ins>That\342\200\231s an error.</ins>

debug1: ssh_exchange_identification:   <p>Your client has issued a malformed or illegal request.  <ins>That\342\200\231s all we know.</ins>

ssh_exchange_identification: Connection closed by remote host


Here is another example on how to test remote host whether a certain service such as DNS (bind) or telnetd is enabled and listening on remote local network  IP with ssh

[root@pciserver: /home ]# ssh 192.168.1.200 -p 53 -v -oConnectTimeout=5
OpenSSH_7.9p1 Debian-10+deb10u2, OpenSSL 1.1.1g  21 Apr 2020
debug1: Connecting to 192.168.1.200 [192.168.1.200] port 53.
debug1: connect to address 192.168.1.200 port 53: Connection timed out
ssh: connect to host 192.168.1.200 port 53: Connection timed out

[root@server: /home ]# ssh 192.168.1.200 -p 23 -v -oConnectTimeout=5
OpenSSH_7.9p1 Debian-10+deb10u2, OpenSSL 1.1.1g  21 Apr 2020
debug1: Connecting to 192.168.1.200 [192.168.1.200] port 23.
debug1: connect to address 192.168.1.200 port 23: Connection timed out
ssh: connect to host 192.168.1.200 port 23: Connection timed out


But what if Linux server you have tow work on is so paranoid that you even the ssh client is absent? Well you can use anything else that is capable of doing a connectivity to remote port such as wget or curl. Some web servers or application servers usually have wget or curl as it is integral part for some local shell scripts doing various operation needed for proper services functioning or simply to test locally a local or remote listener services, if that's the case we can use curl to connect and get output of a remote service simulating a normal telnet connection like this:

host:~# curl -vv 'telnet://remote-server-host5:22'
* About to connect() to remote-server-host5 port 22 (#0)
*   Trying 10.52.67.21… connected
* Connected to aflpvz625 (10.52.67.21) port 22 (#0)
SSH-2.0-OpenSSH_5.3

Now lets test whether we can connect remotely to a local net remote IP's Qmail mail server with curls telnet simulation mode:

host:~#  curl -vv 'telnet://192.168.0.200:25'
* Expire in 0 ms for 6 (transfer 0x56066e5ab900)
*   Trying 192.168.0.200…
* TCP_NODELAY set
* Expire in 200 ms for 4 (transfer 0x56066e5ab900)
* Connected to 192.168.0.200 (192.168.0.200) port 25 (#0)
220 This is Mail Pc-Freak.NET ESMTP

Fine it works, lets now test whether a remote server who has MySQL listener service on standard MySQL port TCP 3306 is reachable with curl

host:~#  curl -vv 'telnet://192.168.0.200:3306'
* Expire in 0 ms for 6 (transfer 0x5601fafae900)
*   Trying 192.168.0.200…
* TCP_NODELAY set
* Expire in 200 ms for 4 (transfer 0x5601fafae900)
* Connected to 192.168.0.200 (192.168.0.200) port 3306 (#0)
Warning: Binary output can mess up your terminal. Use "–output -" to tell
Warning: curl to output it to your terminal anyway, or consider "–output
Warning: <FILE>" to save to a file.
* Failed writing body (0 != 107)
* Closing connection 0
root@pcfreak:/var/www/images#  curl -vv 'telnet://192.168.0.200:3306'
* Expire in 0 ms for 6 (transfer 0x5598ad008900)
*   Trying 192.168.0.200…
* TCP_NODELAY set
* Expire in 200 ms for 4 (transfer 0x5598ad008900)
* Connected to 192.168.0.200 (192.168.0.200) port 3306 (#0)
Warning: Binary output can mess up your terminal. Use "–output -" to tell
Warning: curl to output it to your terminal anyway, or consider "–output
Warning: <FILE>" to save to a file.
* Failed writing body (0 != 107)
* Closing connection 0

As you can see the remote connection is returning binary data which is unknown to a standard telnet terminal thus to get the output received we need to pass curl suggested arguments.

host:~#  curl -vv 'telnet://192.168.0.200:3306' –output –
* Expire in 0 ms for 6 (transfer 0x55b205c02900)
*   Trying 192.168.0.200…
* TCP_NODELAY set
* Expire in 200 ms for 4 (transfer 0x55b205c02900)
* Connected to 192.168.0.200 (192.168.0.200) port 3306 (#0)
g


The curl trick used to troubleshoot remote port to remote host from a Windows OS host which does not have telnet installed by default but have curl instead.

Also When troubleshooting vSphere Replication, it is often necessary to troubleshoot port connectivity as common Windows utilities are not available.
As Curl is available in the VMware vCenter Server Appliance command line interface.

On servers where curl is not there but you have wget is installed you can use it also to test a remote port


# wget -vv -O /dev/null http://google.com:554 –timeout=5
–2020-12-30 16:54:22–  http://google.com:554/
Resolving google.com (google.com)… 172.217.169.206, 2a00:1450:4017:80b::200e
Connecting to google.com (google.com)|172.217.169.206|:554… failed: Connection timed out.
Connecting to google.com (google.com)|2a00:1450:4017:80b::200e|:554… failed: Cannot assign requested address.
Retrying.

–2020-12-30 16:54:28–  (try: 2)  http://google.com:554/
Connecting to google.com (google.com)|172.217.169.206|:554… ^C

As evident from output the port 554 is filtered in google which is pretty normal.

If curl or wget is not there either as a final alternative you can either install some perl, ruby, python or bash script etc. that can opens a remote socket to the remote IP.

SEO: Best day and time to write new articles and tweet to get more blog reads – Social Network Timing


June 17th, 2014

what-is-best-time-to-write-articles-to-increase-your-blog-traffic

I'm trying to regularly blog – as this gives me a roadmap what I'm into and how I spent my time. When have free time,  I blog almost daily except on weekends (as in weekends I'm trying to stay away from computers). So if you want to attract more readers to your blog the interesting question arises
 

What time is best to hit publish on your posts?

writing-in-the-mogning-on-the-internet-timing-morning-is-best-for-your-posts
Now there are different angles from where you can extract conclusions on best timing to blog post.One major thing to consider always when posting is that highest percentage of users read blogs in the morning with their morning coffee. Here are some more facts on when web content is more red:

  • 70% of users say they read blogs in the morning
  • More men read blogs at night than woman
  • Mondays are the highest traffic days for avarage blogs
  • 11 a.m. is normally the highest traffic hour for blogs
  • Usually most comments are put on Saturdays
  • Blogs with more than one post a day has higher chance of inbound links and usually get more unique visitors

As my blog is more technical oriented most of my visitors are men and therefore posting my blogs at night doesn't interfere much with my readers.
However, I've noticed that for me personally posting in time interval from 13:00 to 17:00 influence positively the amount of unique visitors the blog gets.

According to research done by Social Fresh – Thursday is the best day to publish an article if you want to get more Social SharesBest-Day-to-Blog-to-get-more-shares-in-social-networks

As a rule of thumb Thursday wins 10% more shares than all other days. In fact, 31% of the top 100 social share days in 2011 fell on Thursday.
My logical explanation on this phenomenon is that people tend to be more and more bored from their work and try to entertain more and more as the week progresses.

To get more attention on what I'm writting I use a bit of social networking but I prefer using only a micro blogging social networking.  I use Twitter to share what I'm into. When I write a new article on my blog I tweet its title with a link to my article, because this drives people attention to what I have to say.

In overall I am skeptical about social siting like Facebook and MySpace because it has negative impact on how people use their time and especially negative on youngsters Other reason why I don't like Friends Networks is because sharing what you have to say on sites like FB, Google+ or "The Russian Facebook" –  Vkontekte VK.com are not respecting privacy of your data.


You write free fresh content for their website for free and you get nothing!


Moreover by daily posting latest buzz you read / watched on Facebook etc. or simply saying what's happening with you, where you're situated now etc., you slowly get addicted to posting – yes for good or bad people tend to be maniacal).

By placing all of your pesronal or impersonal stuff online, you're making these sites better index their sites into Google / Yahoo / Yandex search engines and therefore making them profitable and high ranked websites on the internet and giving out your personal time for Facebook profit? + you loose control over your data (your data is not physically on your side but situated on some remote server, somewhere on the internet).
 

Best avarage time to post on Tweet Facebook, Google+ and Linkedin

best-time-and-day-to-write-new-articles-schedule-content-at-the-right-time-on-social-media-to-get-high-trafficrank

So What is Best Day timing to Post, Pin or Tweet?

Below is an infographic I fond on this blog (visual data is originalcompiled by SurePayRoll) and showing visualized results from some extensive research on the topic.

best-time-to-post-and-tweet-blog-articles-social-media-infographic


Here is most important facts this infographic reveals:


The avarage best time to post tweet and pin your new articles is about 15:00 h
 

  • Best timing to post on Twitter is on Mondays to Thursdays from 13:00 to 15:00 h
  • Best timing to post on facebook is between 13:00 and 16:00 h
  • For Linkedin it is best to place your publish between Tuesdays to Thursdays


Peak times on Facebook, Twitter and Linkedin

  • Peak times for use of Facebook is on Wednesdays about 15:00 h
  • Peak times for use of Twitter is from Monday to Thursdays from 9:00  to 15:00 h
  • Linkedin Peak time is from 17:00 to 18:00 h
  • Including images to your articles increases traffic, tweets with images increase visits, favorites and leads


Worst time (when users will probably not view your content) on FB, Twitter and Linkedin

  • Weekends before 08:00  and after 20:00 h
  • Everyday after 20:00 and Fridays after 15:00 noon
  • Mondays and Fridays from 22:00 to 06:00 morning

Facts about Google+
 

  • Google+ is the fastest growing demographic social network for people aged 45 to 54
  • Best time to share your posts on Google+ is from 09:00 to 10:00 in the morning
  • Including images to your articles increases traffic, tweets with images increase visits, favorites and leads
     

Images generate more traffic and engagement

  • Including images to your articles increases traffic, tweets with images increase visits, favorites and leads


I'm aware as every research above info on best time to tweet and post is just a generalization and according to field of information posted suggested time could be different from optiomal time for individual writer, however as a general direction, info is very useful and it gives you some idea.
Twitter engagement for brands is 17% higher on weekends according to Dan Zarrella’s research. Tweets posted on Friday, Saturday and Sunday had higher CTR (Click Through Rate) than those posted in the rest of the week.

tweet-on-the-weekends-is-better-for-high-click-through-rate

Other best day to tweet other than weekends is mid-week time Wednesday.
Whether your site or blog is using retweet to generate more traffic to website best time to retweet is said to be around 5 pm. CTR is higher

Install certbot on Debian, Ubuntu, CentOS, Fedora Linux 10 / Generate and use Apache / Nginx SSL Letsencrypt certificates


December 21st, 2020

letsencrypt certbot install on any linux distribution with apache or nginx webserver howto</a><p> Let's Encrypt is a free, automated, and open certificate authority brought to you by the nonprofit <a data-cke-saved-href=
Internet Security Research Group (ISRG). ISRG group gave initiative with the goal to "encrypt the internet", i.e. offer free alternative to the overpriced domani registrer sold certificates with the goal to make more people offer SSL / TSL Free secured connection line on their websites. 
ISRG group supported Letsencrypt non-profit certificate authority actrively by Internet industry standard giants such as Mozilla, Cisco, EFF (Electronic Frontier Foundation),  Facebook, Google Chrome, Amazon AWS, OVH Cloud, Redhat, VMWare, Github and many many of the leading companies in IT.

Letsencrpyt is aimed at automating the process designed to overcome manual creation, validation, signing, installation, and renewal of certificates for secure websites. I.e. you don't have to manually write on console complicated openssl command lines with passing on Certificate CSR /  KEY / PEM files etc and generate Self-Signed Untrusted Authority Certificates (noted in my previous article How to generate Self-Signed SSL Certificates with openssl or use similar process to pay money generate secret key and submit the key to third party authority through a their website webadmin  interface in order to Generate SSL brought by Godaddy or Other Certificate Authority.

But of course as you can guess there are downsides as you submit your private key automatically via letsencrypt set of SSL certificate automation domain scripts to a third party Certificate Authority which is at Letsencrypt.org. A security intrusion in their private key store servers might mean a catastrophy for your data as malicious stealer might be able to decrypt your data with some additional effort and see in plain text what is talking to your Apache / Nginx or Mail Server nevertheless the cert. Hence for a high standards such as PCI environments Letsencrypt as well as for the paranoid security freak admins,  who don't trust the mainstream letsencrypt is definitely not a choice. Anyways for most small and midsized businesses who doesn't hold too much of a top secret data and want a moderate level of security Letsencrypt is a great opportunity to try. But enough talk, lets get down to business.

How to install and use certbot on Debian GNU / Linux 10 Buster?
Certbot is not available from the Debian software repositories by default, but it’s possible to configure the buster-backports repository in your /etc/apt/sources.list file to allow you to install a backport of the Certbot software with APT tool.
 

1. Install certbot on Debian / Ubuntu Linux


root@webserver:/etc/apt# tail -n 1 /etc/apt/sources.list
deb http://ftp.debian.org/debian buster-backports main


If not there append the repositories to file:


  • Install certbot-nginx certbot-apache deb packages

root@webserver:/ # echo 'deb http://ftp.debian.org/debian buster-backports main' >> /etc/apt/sources.list


  • Install certbot-nginx certbot-apache deb packages

root@webserver:/ # apt update
root@webserver:/ # apt install certbot python-certbot-nginx python3-certbot-apache python-certbot-nginx-doc


This will install the /usr/bin/certbot python executable script which is used to register / renew / revoke / delete your domains certificates.
 

2. Install letsencrypt certbot client on CentOS / RHEL / Fedora and other Linux Distributions


For RPM based distributions and other Linux distributions you will have to install snap package (if not already installed) and use snap command :


[root@centos ~ :] # yum install snapd
systemctl enable –now snapd.socket

To enable classic snap support, enter the following to create a symbolic link between

[root@centos ~ :] # ln -s /var/lib/snapd/snap /snap

snap command lets you install, configure, refresh and remove snaps.  Snaps are packages that work across many different Linux distributions, enabling secure delivery and operation of the latest apps and utilities.

[root@centos ~ :] # snap install core; sudo snap refresh core

Logout from console or Xsession to make the snap update its $PATH definitions.

Then use snap universal distro certbot classic package

 [root@centos ~ :] # snap install –classic certbot
[root@centos ~ :] # ln -s /snap/bin/certbot /usr/bin/certbot


If you're having an XOrg server access on the RHEL / CentOS via Xming or other type of Xemulator you might check out also the snap-store as it contains a multitude of packages installable which are not usually available in RPM distros.

 [root@centos ~ :] # snap install snap-store


how-to-install-snap-applications-on-centos-rhel-linux-snap-store

snap-store is a powerful and via it you can install many non easily installable stuff on Linux such as eclipse famous development IDE, notepad++ , Discord, the so favourite for the Quality Assurance guy Protocol tester Postman etc.

  • Installing certbot to any distribution via acme.sh script

Another often preferred solution to Universally deploy  and upgrade an existing LetsEncrypt program to any Linux distribution (e.g. RHEL / CentOS / Fedora etc.) is the acme.sh script. To install acme you have to clone the repository and run the script with –install

P.S. If you don't have git installed yet do

root@webserver:/ # apt-get install –yes git


and then the usual git clone to fetch it at your side

# cd /root
# git clone https://github.com/acmesh-official/acme.sh
Cloning into 'acme.sh'…
remote: Enumerating objects: 71, done.
remote: Counting objects: 100% (71/71), done.
remote: Compressing objects: 100% (53/53), done.
remote: Total 12475 (delta 39), reused 38 (delta 18), pack-reused 12404
Receiving objects: 100% (12475/12475), 4.79 MiB | 6.66 MiB/s, done.
Resolving deltas: 100% (7444/7444), done.

# sh acme.sh –install


To later upgrade acme.sh to latest you can do

# sh acme.sh –upgrade


In order to renew a concrete existing letsencrypt certificiate

# sh acme.sh –renew domainname.com


To renew all certificates using acme.sh script

# ./acme.sh –renew-all


3. Generate Apache or NGINX Free SSL / TLS Certificate with certbot tool

Now lets generate a certificate for a domain running on Apache Webserver with a Website WebRoot directory /home/phpdev/public/www


root@webserver:/ # certbot –apache –webroot -w /home/phpdev/public/www/ -d your-domain-name.com -d your-domain-name.com

root@webserver:/ # certbot certonly –webroot -w /home/phpdev/public/www/ -d your-domain-name.com -d other-domain-name.com


As you see all the domains for which you will need to generate are passed on with -d option.

Once certificates are properly generated you can test it in a browser and once you're sure they work as expected usually you can sleep safe for the next 3 months ( 90 days) which is the default for TSL / SSL Letsencrypt certificates the reason behind of course is security.


4. Enable freshly generated letsencrypt SSL certificate in Nginx VirtualHost config

Go to your nginx VirtualHost configuration (i.e. /etc/nginx/sites-enabled/phpmyadmin.adzone.pro ) and inside chunk of config add after location { … } – 443 TCP Port SSL listener (as in shown in bolded configuration)
 

server {

….
   location ~ \.php$ {
      include /etc/nginx/fastcgi_params;
##      fastcgi_pass 127.0.0.1:9000;
      fastcgi_pass unix:/run/php/php7.3-fpm.sock;
      fastcgi_index index.php;
      fastcgi_param SCRIPT_FILENAME /usr/share/phpmyadmin$fastcgi_script_name;
   }


    listen 443 ssl; # managed by Certbot
    ssl_certificate /etc/letsencrypt/live/phpmyadmin.adzone.pro/fullchain.pem; # managed by Certbot
    ssl_certificate_key /etc/letsencrypt/live/phpmyadmin.adzone.pro/privkey.pem; # managed by Certbot
    include /etc/letsencrypt/options-ssl-nginx.conf; # managed by Certbot
    ssl_dhparam /etc/letsencrypt/ssl-dhparams.pem; # managed by Certbot


5. Enable new generated letsencrypt SSL certificate in Apache VirtualHost


In /etc/apache2/{sites-available,sites-enabled}/your-domain.com-ssl.conf you should have as a minimum a configuration setup like below:


NameVirtualHost *:443 <VirtualHost 123.123.123.12:443>
    ServerAdmin hipo@domain.com
    ServerName www.pc-freak.net
    ServerAlias www.your-domain.com wwww.your-domain.com your-domain.com
 
    HostnameLookups off
    DocumentRoot /var/www
    DirectoryIndex index.html index.htm index.php index.html.var


CheckSpelling on
SSLEngine on

    <Directory />
        Options FollowSymLinks
        AllowOverride All
        ##Order allow,deny
        ##allow from all
        Require all granted
    </Directory>
    <Directory /var/www>
        Options Indexes FollowSymLinks MultiViews
        AllowOverride All
##      Order allow,deny
##      allow from all
Require all granted
    </Directory>

Include /etc/letsencrypt/options-ssl-apache.conf
SSLCertificateFile /etc/letsencrypt/live/your-domain.com/fullchain.pem
SSLCertificateKeyFile /etc/letsencrypt/live/your-domain.com/privkey.pem
</VirtualHost>


6. Simulate a certificate regenerate with –dry-run

Soon before the 90 days period expiry approaches, it is a good idea to test how all installed Nginx webserver certficiates will be renewed and whether any issues are expected this can be done with the –dry-run option.

root@webserver:/ # certbot renew –dry-run


– – – – – – – – – – – – – – – – – – – – – – – – – – – – – – – – – – – – – – – –
** DRY RUN: simulating 'certbot renew' close to cert expiry
**          (The test certificates below have not been saved.)

Congratulations, all renewals succeeded. The following certs have been renewed:
  /etc/letsencrypt/live/adzone.pro/fullchain.pem (success)
  /etc/letsencrypt/live/cdn.natsr.pro/fullchain.pem (success)
  /etc/letsencrypt/live/mail.adzone.pro/fullchain.pem (success)
  /etc/letsencrypt/live/natsr.pro-0001/fullchain.pem (success)
  /etc/letsencrypt/live/natsr.pro/fullchain.pem (success)
  /etc/letsencrypt/live/phpmyadmin.adzone.pro/fullchain.pem (success)
  /etc/letsencrypt/live/www.adzone.pro/fullchain.pem (success)
  /etc/letsencrypt/live/www.natsr.pro/fullchain.pem (success)
** DRY RUN: simulating 'certbot renew' close to cert expiry
**          (The test certificates above have not been saved.)
– – – – – – – – – – – – – – – – – – – – – – – – – – – – – – – – – – – – – – – –


7. Renew a certificate from a multiple installed certificate list

In some time when you need to renew letsencrypt domain certificates you can list them and choose manually which one you want to renew.

root@webserver:/ # certbot –force-renewal
Saving debug log to /var/log/letsencrypt/letsencrypt.log

How would you like to authenticate and install certificates?
– – – – – – – – – – – – – – – – – – – – – – – – – – – – – – – – – – – – – – – –
1: Apache Web Server plugin (apache)
2: Nginx Web Server plugin (nginx)
– – – – – – – – – – – – – – – – – – – – – – – – – – – – – – – – – – – – – – – –
Select the appropriate number [1-2] then [enter] (press 'c' to cancel): 2
Plugins selected: Authenticator nginx, Installer nginx

Which names would you like to activate HTTPS for?
– – – – – – – – – – – – – – – – – – – – – – – – – – – – – – – – – – – – – – – –
1: adzone.pro
2: mail.adzone.pro
3: phpmyadmin.adzone.pro
4: www.adzone.pro
5: natsr.pro
6: cdn.natsr.pro
7: www.natsr.pro
– – – – – – – – – – – – – – – – – – – – – – – – – – – – – – – – – – – – – – – –
Select the appropriate numbers separated by commas and/or spaces, or leave input
blank to select all options shown (Enter 'c' to cancel): 3
Renewing an existing certificate
Deploying Certificate to VirtualHost /etc/nginx/sites-enabled/phpmyadmin.adzone.pro

Please choose whether or not to redirect HTTP traffic to HTTPS, removing HTTP access.
– – – – – – – – – – – – – – – – – – – – – – – – – – – – – – – – – – – – – – – –
1: No redirect – Make no further changes to the webserver configuration.
2: Redirect – Make all requests redirect to secure HTTPS access. Choose this for
new sites, or if you're confident your site works on HTTPS. You can undo this
change by editing your web server's configuration.
– – – – – – – – – – – – – – – – – – – – – – – – – – – – – – – – – – – – – – – –
Select the appropriate number [1-2] then [enter] (press 'c' to cancel): 2
Redirecting all traffic on port 80 to ssl in /etc/nginx/sites-enabled/phpmyadmin.adzone.pro

– – – – – – – – – – – – – – – – – – – – – – – – – – – – – – – – – – – – – – – –
Your existing certificate has been successfully renewed, and the new certificate
has been installed.

The new certificate covers the following domains: https://phpmyadmin.adzone.pro

You should test your configuration at:
https://www.ssllabs.com/ssltest/analyze.html?d=phpmyadmin.adzone.pro
– – – – – – – – – – – – – – – – – – – – – – – – – – – – – – – – – – – – – – – –

IMPORTANT NOTES:
 – Congratulations! Your certificate and chain have been saved at:
   /etc/letsencrypt/live/phpmyadmin.adzone.pro/fullchain.pem

   Your key file has been saved at:
   /etc/letsencrypt/live/phpmyadmin.adzone.pro/privkey.pem
   Your cert will expire on 2021-03-21. To obtain a new or tweaked
   version of this certificate in the future, simply run certbot again
   with the "certonly" option. To non-interactively renew *all* of
   your certificates, run "certbot renew"
 – If you like Certbot, please consider supporting our work by:

   Donating to ISRG / Let's Encrypt:   https://letsencrypt.org/donate
   Donating to EFF:                    https://eff.org/donate-le


8. Renew all present SSL certificates

root@webserver:/ # certbot renew

Processing /etc/letsencrypt/renewal/www.natsr.pro.conf
– – – – – – – – – – – – – – – – – – – – – – – – – – – – – – – – – – – – – – – –
Cert not yet due for renewal


– – – – – – – – – – – – – – – – – – – – – – – – – – – – – – – – – – – – – – – –

The following certs are not due for renewal yet:
  /etc/letsencrypt/live/adzone.pro/fullchain.pem expires on 2021-03-01 (skipped)
  /etc/letsencrypt/live/cdn.natsr.pro/fullchain.pem expires on 2021-02-28 (skipped)
  /etc/letsencrypt/live/mail.adzone.pro/fullchain.pem expires on 2021-02-28 (skipped)
  /etc/letsencrypt/live/natsr.pro-0001/fullchain.pem expires on 2021-03-01 (skipped)
  /etc/letsencrypt/live/natsr.pro/fullchain.pem expires on 2021-02-25 (skipped)
  /etc/letsencrypt/live/phpmyadmin.adzone.pro/fullchain.pem expires on 2021-03-21 (skipped)
  /etc/letsencrypt/live/www.adzone.pro/fullchain.pem expires on 2021-02-28 (skipped)
  /etc/letsencrypt/live/www.natsr.pro/fullchain.pem expires on 2021-03-01 (skipped)
No renewals were attempted.
– – – – – – – – – – – – – – – – – – – – – – – – – – – – – – – – – – – – – – – –


9. Renew all existing server certificates from a cron job


The certbot package will install a script under /etc/cron.d/certbot to be run that will attempt every 12 hours however from my experience
often this script is not going to work, the script looks similar to below:

# Upgrade all existing SSL certbot machine certificates


0 */12 * * * root test -x /usr/bin/certbot -a \! -d /run/systemd/system && perl -e 'sleep int(rand(43200))' && certbot -q renew

Another approach to renew all installed certificates if you want to have a specific options and keep log of what happened is using a tiny shell script like this:


10. Auto renew installed SSL / TSL Certbot certificates with a bash loop over all present certificates

#!/bin/sh
# update SSL certificates
# prints from 1 to 104 (according to each certbot generated certificate and triggers rewew and logs what happened to log file
# an ugly hack for certbot certificate renew
for i in $(seq 1 104); do echo "Updating $i SSL Cert" | tee -a /root/certificate-update.log; yes "$i" | certbot –force-renewal | tee -a /root/certificate-update.log 2>&1; sleep 5; done

Note: The seq 1 104 is the range depends on the count of installed SSL certificates you have installed on the machine, that can be seen and set the proper value according to your case when you run one time certbot –force-renewal.
 

How to Configure Nginx as a Reverse Proxy Load Balancer on Debian, CentOS, RHEL Linux


December 14th, 2020

set-up-nginx-reverse-proxy-howto-linux-logo

What is reverse Proxy?

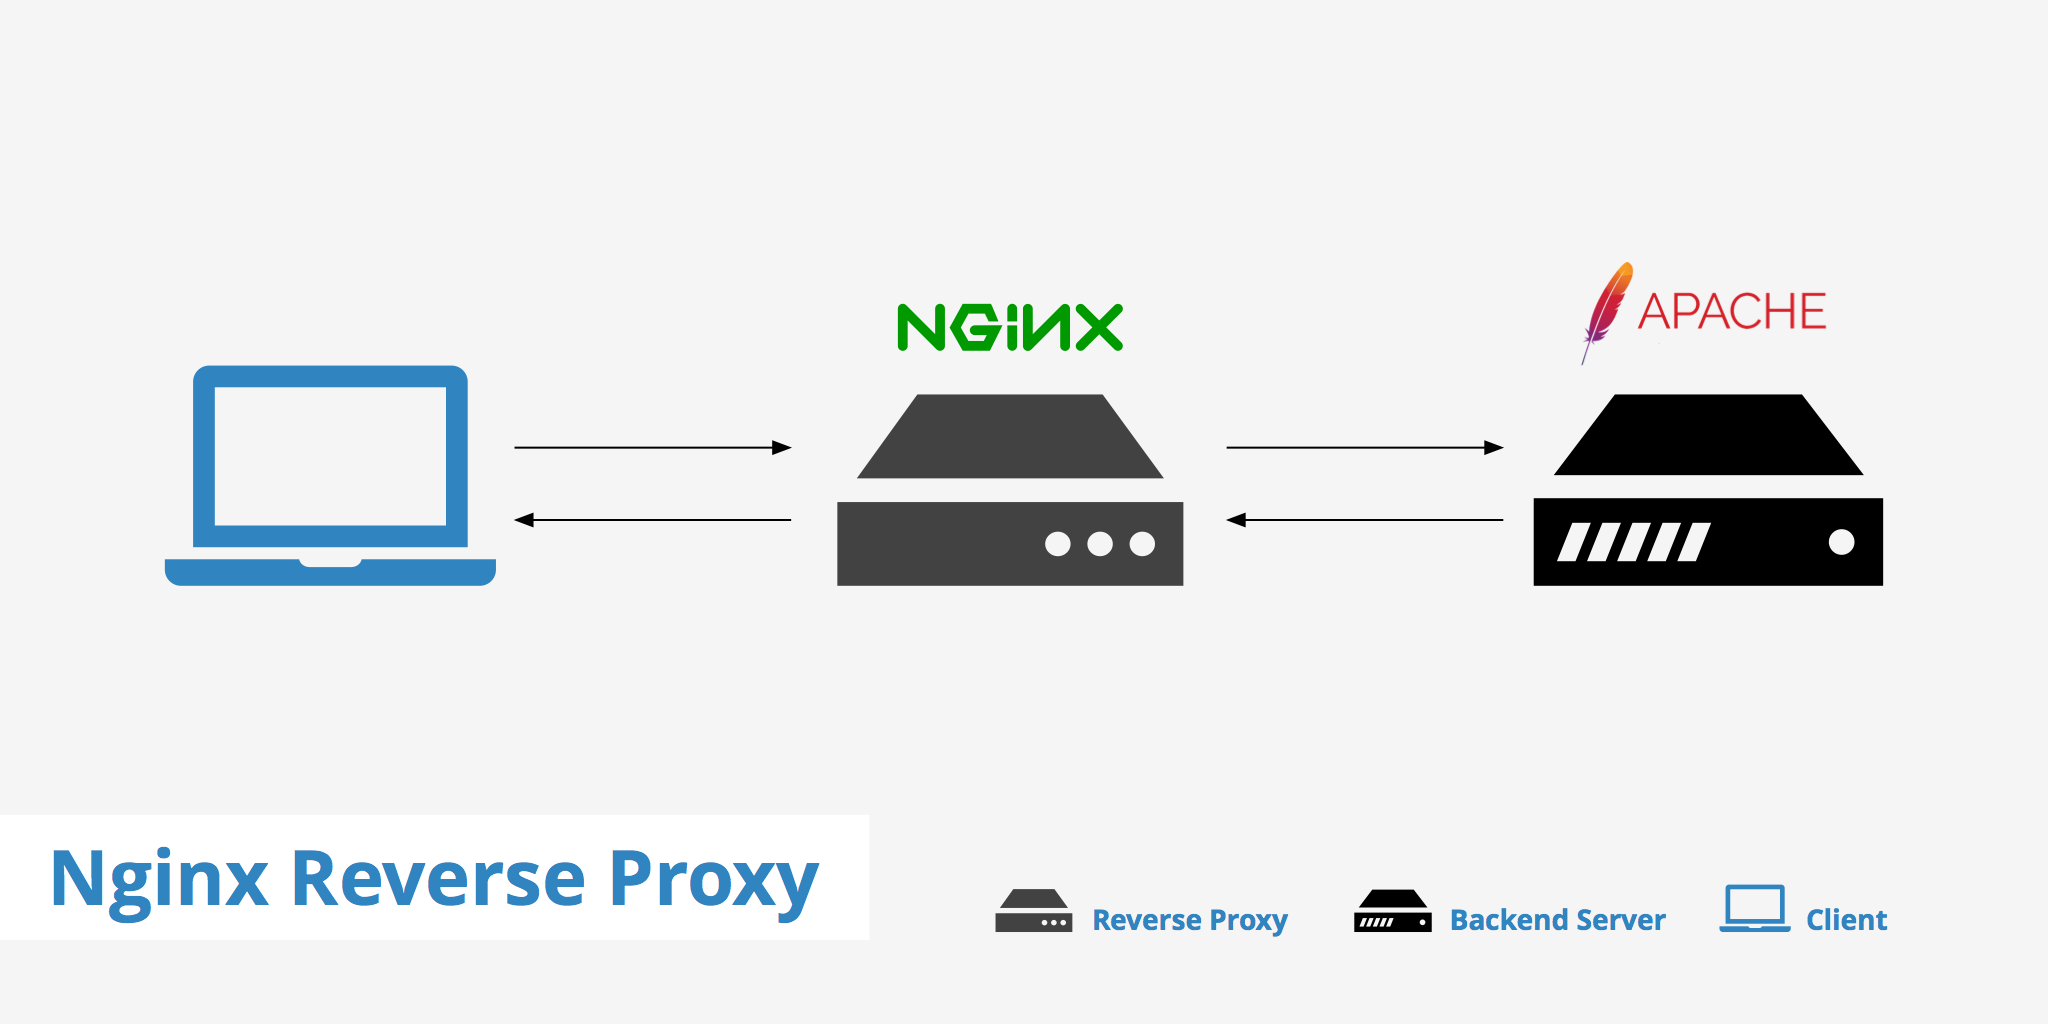
Reverse Proxy (RP) is a Proxy server which routes all incoming traffic to secondary Webserver situated behind the Reverse Proxy site.

Then all incoming replies from secondary webserver (which is not visible) from the internet gets routed back to Reverse Proxy service. The result is it seems like all incoming and outgoing HTTP requests are served from Reverse Proxy host where in reality, reverse proxy host just does traffic redirection. Problem with reverse proxies is it is one more point of failure the good side of it can protect and route only certain traffic to your webserver, preventing the behind reverse proxy located server from crackers malicious HTTP requests.

Treverse proxy, which accepts all traffic and forwards it to a specific resource, like a server or container.  Earlier I've blogged on how to create Apache reverse Proxy to Tomcat.
Having a reverse proxy with apache is a classical scenarios however as NGINX is taking lead slowly and overthrowing apache's use due to its easiness to configure, its high reliability and less consumption of resources.


One of most common use of Reverse Proxy is to use it as a software Load Balancer for traffic towards another webserver or directly to a backend server. Using RP as a to mitigate DDoS attacks from hacked computers Bot nets (coming from a network range) is very common Anti-DDoS protection measure.
With the bloom of VM and Contrainerizations technology such as docker. And the trend to switch services towards micro-services, often reverse proxy is used to seamessly redirect incoming requests traff to multiple separate OS docker running containers etc.


Some of the other security pros of using a Reverse proxy that could be pointed are:

  • Restrict access to locations that may be obvious targets for brute-force attacks, reducing the effectiveness of DDOS attacks by limiting the number of connections and the download rate per IP address. 
  • Cache pre-rendered versions of popular pages to speed up page load times.
  • Interfere with other unwanted traffic when needed.


what-is-reverse-proxy-explained-proxying-tubes


1. Install nginx webserver


Assuming you have a Debian at hand as an OS which will be used for Nginx RP host, lets install nginx.
 

[hipo@proxy ~]$ sudo su – root

[root@proxy ~]#  apt update

[root@proxy ~]# apt install -y nginx


Fedora / CentOS / Redhat Linux could use yum or dnf to install NGINX
 

[root@proxy ~]# dnf install -y nginx
[root@proxy ~]# yum install -y nginx


2. Launch nginx for a first time and test


Start nginx one time to test default configuration is reachable
 

systemctl enable –now nginx


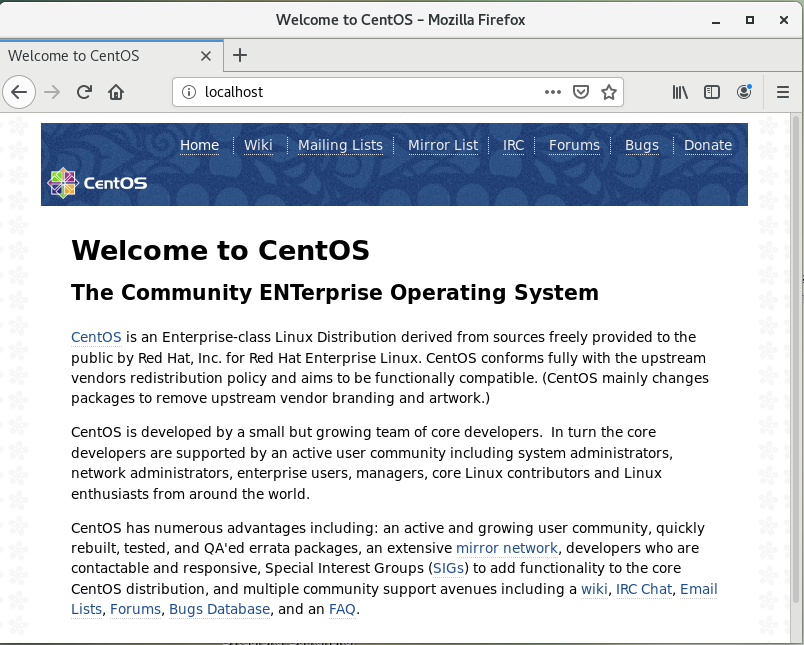
To test nginx works out of the box right after install, open a browser and go to http://localhost if you have X or use text based browser such as lynx or some web console fetcher as curl to verify that the web server is running as expected.

nginx-test-default-page-centos-linux-screenshot
 

3. Create Reverse proxy configuration file

Remove default Nginx package provided configuration

As of 2020 by default nginx does load configuration from file /etc/nginx/sites-enabled/default on DEB based Linuxes and in /etc/nginx/nginx.conf on RPM based ones, therefore to setup our desired configuration and disable default domain config to be loaded we have to unlink on Debian

[root@proxy ~]# unlink /etc/nginx/sites-enabled/default

or move out the original nginx.conf on Fedora / CentOS / RHEL:
 

[root@proxy ~]# mv /etc/nginx/nginx.conf /etc/nginx/nginx.conf-distro


Lets take a scenario where you have a local IP address that's NAT-ted ot DMZ-ed and and you want to run nginx to server as a reverse proxy to accelerate traffic and forward all traffic to another webserver such as LigHTTPD / Apache or towards java serving Application server Jboss / Tomcat etc that listens on the same host on lets say on port 8000 accessible via app server from /application/.

To do so prepare new /etc/nginx/nginx.conf to look like so
 

[root@proxy ~]# mv /etc/nginx/nginx.conf /etc/nginx.conf.bak
[root@proxy ~]# vim /etc/nginx/nginx.conf

user nginx;
worker_processes auto;
worker_rlimit_nofile 10240;
pid /run/nginx.pid;
include /etc/nginx/modules-enabled/*.conf;


events {
#       worker_connections 768;
        worker_connections 4096;
        multi_accept on;
        # multi_accept on;
}

http {

        ##
        # Basic Settings
        ##

        sendfile on;
        tcp_nopush on;
        tcp_nodelay on;
        #keepalive_timeout 65;
        keepalive_requests 1024;
        client_header_timeout 30;
        client_body_timeout 30;
        keepalive_timeout 30;
        types_hash_max_size 2048;
        # server_tokens off;

        # server_names_hash_bucket_size 64;
        # server_name_in_redirect off;

        include /etc/nginx/mime.types;
        default_type application/octet-stream;

        ##
        # SSL Settings
        ##

        ssl_protocols TLSv1 TLSv1.1 TLSv1.2; # Dropping SSLv3, ref: POODLE
        ssl_prefer_server_ciphers on;

        ##
        # Logging Settings
        ##

        access_log /var/log/nginx/domain.com/access.log;
        error_log /var/log/nginx/domain.com/error.log;

        ##
        # Gzip Settings
        ##

        gzip on;

        # gzip_vary on;
        # gzip_proxied any;
        # gzip_comp_level 6;
        # gzip_buffers 16 8k;
        # gzip_http_version 1.1;
        # gzip_types text/plain text/css application/json application/javascript text/xml application/xml application/xml+rss text/javascript;

        ##
        # Virtual Host Configs
        ##

        include /etc/nginx/conf.d/*.conf;
        include /etc/nginx/sites-enabled/*;

 include /etc/nginx/default.d/*.conf;

upstream myapp {
    server 127.0.0.1:8000 weight=3;
    server 127.0.0.1:8001;
    server 127.0.0.1:8002;
    server 127.0.0.1:8003;
# Uncomment and use Load balancing with external FQDNs if needed
#  server srv1.example.com;
#   server srv2.example.com;
#   server srv3.example.co

}

#mail {
#       # See sample authentication script at:
#       # http://wiki.nginx.org/ImapAuthenticateWithApachePhpScript
#
#       # auth_http localhost/auth.php;
#       # pop3_capabilities "TOP" "USER";
#       # imap_capabilities "IMAP4rev1" "UIDPLUS";
#
#       server {
#               listen     localhost:110;
#               protocol   pop3;
#               proxy      on;
#       }
#
#       server {
#               listen     localhost:143;
#               protocol   imap;
#               proxy      on;
#       }
#}


In the example above, there are 3 instances of the same application running on 3 IPs on different ports, just for the sake to illustrate Fully Qualified Domain Names (FQDNs) Load balancing is also supported you can see the 3 commented application instances srv1-srv3.
 When the load balancing method is not specifically configured, it defaults to round-robin. All requests are proxied to the server group myapp1, and nginx applies HTTP load balancing to distribute the requests.Reverse proxy implementation in nginx includes load balancing for HTTP, HTTPS, FastCGI, uwsgi, SCGI, memcached, and gRPC.
To configure load balancing for HTTPS instead of HTTP, just use “https” as the protocol.


To download above nginx.conf configured for High traffic servers and supports Nginx virtualhosts click here.

Now lets prepare for the reverse proxy nginx configuration a separate file under /etc/nginx/default.d/ all files stored there with .conf extension are to be red by nginx.conf as instructed by /etc/nginx/nginx.conf :

We'll need prepare a sample nginx

[root@proxy ~]# vim /etc/nginx/sites-available/reverse-proxy.conf

server {

        listen 80;
        listen [::]:80;


 server_name domain.com www.domain.com;
#index       index.php;
# fallback for index.php usually this one is never used
root        /var/www/domain.com/public    ;
#location / {
#try_files $uri $uri/ /index.php?$query_string;
#}

        location / {
                    proxy_pass http://127.0.0.1:8080;
  }


location /application {
proxy_pass http://domain.com/application/ ;

proxy_http_version                 1.1;
proxy_cache_bypass                 $http_upgrade;

# Proxy headers
proxy_set_header Upgrade           $http_upgrade;
proxy_set_header Connection        "upgrade";
proxy_set_header Host              $host;
proxy_set_header X-Real-IP         $remote_addr;
proxy_set_header X-Forwarded-For   $proxy_add_x_forwarded_for;
proxy_set_header X-Forwarded-Proto $scheme;
proxy_set_header X-Forwarded-Host  $host;
proxy_set_header X-Forwarded-Port  $server_port;

# Proxy timeouts
proxy_connect_timeout              60s;
proxy_send_timeout                 60s;
proxy_read_timeout                 60s;

        access_log /var/log/nginx/reverse-access.log;
        error_log /var/log/nginx/reverse-error.log;

}

##listen 443 ssl;
##    ssl_certificate /etc/letsencrypt/live/domain.com/fullchain.pem;
##    ssl_certificate_key /etc/letsencrypt/live/domain.com/privkey.pem;
##    include /etc/letsencrypt/options-ssl-nginx.conf;
##    ssl_dhparam /etc/letsencrypt/ssl-dhparams.pem;

}

Get above reverse-proxy.conf from here

As you see config makes all incoming traffic towards root ( / ) NGINX directory for domain http://domain.com on port 80 on Nginx Webserver to be passed on http://127.0.0.1:8000/application.

      location / {
                    proxy_pass http://127.0.0.1:8000;
  }


Another set of configuration has configuration domain.com/application to reverse proxy to Webserver on Port 8080 /application.


location /application {
proxy_pass http://domain.com/application/ ;

proxy_http_version                 1.1;
proxy_cache_bypass                 $http_upgrade;

# Proxy headers
proxy_set_header Upgrade           $http_upgrade;
proxy_set_header Connection        "upgrade";
proxy_set_header Host              $host;
proxy_set_header X-Real-IP         $remote_addr;
proxy_set_header X-Forwarded-For   $proxy_add_x_forwarded_for;
proxy_set_header X-Forwarded-Proto $scheme;
proxy_set_header X-Forwarded-Host  $host;
proxy_set_header X-Forwarded-Port  $server_port;

# Proxy timeouts
proxy_connect_timeout              60s;
proxy_send_timeout                 60s;
proxy_read_timeout                 60s;

        access_log /var/log/nginx/reverse-access.log;
        error_log /var/log/nginx/reverse-error.log;

}

– Enable new configuration to be active in NGINX


[root@proxy ~]# ln -s /etc/nginx/sites-available/reverse-proxy.conf /etc/nginx/sites-enabled/reverse-proxy.conf


4. Test reverse proxy nginx config for syntax errors


[root@proxy ~]# nginx -t


nginx: the configuration file /etc/nginx/nginx.conf syntax is ok
nginx: configuration file /etc/nginx/nginx.conf test is successful

Test connectivity to listen external IP address


5. Enable nginx SSL letsencrypt certificates support


[root@proxy ~]# apt-get update
[root@proxy ~]# apt-get install software-properties-common

[root@proxy ~]# apt-get update
[root@proxy ~]# apt-get install python-certbot-nginx


6. Generate NGINX Letsencrypt certificates


[root@proxy ~]# certbot –nginx

Saving debug log to /var/log/letsencrypt/letsencrypt.log
Plugins selected: Authenticator nginx, Installer nginx

Which names would you like to activate HTTPS for?
– – – – – – – – – – – – – – – – – – – – – – – – – – – – – – – – – – – – – – – –
1: your.domain.com
– – – – – – – – – – – – – – – – – – – – – – – – – – – – – – – – – – – – – – – –
Select the appropriate numbers separated by commas and/or spaces, or leave input
blank to select all options shown (Enter 'c' to cancel): 1
Obtaining a new certificate
Performing the following challenges:
http-01 challenge for your.domain.com
Waiting for verification…
Cleaning up challenges
Deploying Certificate to VirtualHost /etc/nginx/sites-enabled/reverse-proxy.conf

Please choose whether or not to redirect HTTP traffic to HTTPS, removing HTTP access.
– – – – – – – – – – – – – – – – – – – – – – – – – – – – – – – – – – – – – – – –
1: No redirect – Make no further changes to the webserver configuration.
2: Redirect – Make all requests redirect to secure HTTPS access. Choose this for
new sites, or if you're confident your site works on HTTPS. You can undo this
change by editing your web server's configuration.
– – – – – – – – – – – – – – – – – – – – – – – – – – – – – – – – – – – – – – – –
Select the appropriate number [1-2] then [enter] (press 'c' to cancel): 2
Redirecting all traffic on port 80 to ssl in /etc/nginx/sites-enabled/reverse-proxy.conf

– – – – – – – – – – – – – – – – – – – – – – – – – – – – – – – – – – – – – – – –
Congratulations! You have successfully enabled https://your.domain.com

You should test your configuration at:
https://www.ssllabs.com/ssltest/analyze.html?d=your.domain.com
– – – – – – – – – – – – – – – – – – – – – – – – – – – – – – – – – – – – – – – –


7. Set NGINX Reverse Proxy to auto-start on Linux server boot

On most modern Linux distros use systemctl for legacy machines depending on the Linux distribution use the addequate runlevel /etc/rc3.d/ symlink link on Debian based distros on Fedoras / CentOS / RHEL and other RPM based ones use chkconfig RedHat command.


[root@proxy ~]# systemctl start nginx
[root@proxy ~]# systemctl enable nginx


8. Fixing weird connection permission denied errors


If you get a weird permission denied errors right after you have configured the ProxyPass on Nginx and you're wondering what is causing it you have to know by default on CentOS 7 and RHEL you'll get this errors due to automatically enabled OS selinux security hardening.

If this is the case after you setup Nginx + HTTPD or whatever application server you will get errors in  /var/log/nginx.log like:

2020/12/14 07:46:01 [crit] 7626#0: *1 connect() to 127.0.0.1:8080 failed (13: Permission denied) while connecting to upstream, client: 127.0.0.1, server: , request: "GET / HTTP/1.1", upstream: "http://127.0.0.1:8080/", host: "localhost"
2020/12/14 07:46:02 [crit] 7626#0: *1 connect() to 127.0.0.1:8080 failed (13: Permission denied) while connecting to upstream, client: 127.0.0.1, server: , request: "GET / HTTP/1.1", upstream: "http://127.0.0.1:8080/", host: "localhost"


The solution to proxy_pass weird permission denied errors is to turn off selinux

[root@proxy ~]# setsebool -P httpd_can_network_connect 1

To permanently allow nginx and httpd

[root@proxy ~]# cat /var/log/audit/audit.log | grep nginx | grep denied | audit2allow -M mynginx
[root@proxy ~]# semodule -i mynginx.pp


[root@proxy ~]# cat /var/log/audit/audit.log | grep httpd | grep denied | audit2allow -M myhttpd
[root@proxy ~]# semodule -i myhttpd.pp


Then to let know nginx and httpd (or whatever else app you run) be aware of new settings restart both

[root@proxy ~]# systemctl restart nginx
[root@proxy ~]# systemctl restart httpd

Howto install Google Chrome web browser on CentOS Linux 7


December 11th, 2020

After installing CentOS 7 Linux testing Virtual Machine in Oracle Virtualbox 6.1 to conduct some testing with php / html / javascript web script pages and use the VM for other work stuff that I later plan to deploy on production CentOS systems, I came to requirement of having a working Google Chrome browser.

In that regards, next to Firefox, I needed to test the web applications in commercial Google Chrome to see what its usercan expect. For those who don't know it Google Chrome is based on Chromium Open source browser (https://chromium.org) which is available by default via default CentOS EPEL repositories.

One remark to make here is before installing Google Chrome, I've also test my web scripts first with chromium, to install Chromium free browser on CentOS:

[root@localhost mozilla_test0]# yum install chromium
Loaded plugins: fastestmirror, langpacks
Loading mirror speeds from cached hostfile
 * base: mirror.wwfx.net
 * epel: mirror.t-home.mk
 * extras: mirror.wwfx.net
 * updates: mirror.wwfx.net
Resolving Dependencies
–> Running transaction check
—> Package chromium.x86_64 0:85.0.4183.121-1.el7 will be installed
–> Processing Dependency: chromium-common(x86-64) = 85.0.4183.121-1.el7 for package: chromium-85.0.4183.121-1.el7.x86_64
–> Processing Dependency: nss-mdns(x86-64) for package: chromium-85.0.4183.121-1.el7.x86_64
–> Processing Dependency: libminizip.so.1()(64bit) for package: chromium-85.0.4183.121-1.el7.x86_64
–> Running transaction check
—> Package chromium-common.x86_64 0:85.0.4183.121-1.el7 will be installed
—> Package minizip.x86_64 0:1.2.7-18.el7 will be installed
—> Package nss-mdns.x86_64 0:0.14.1-9.el7 will be installed
–> Finished Dependency Resolution


Dependencies Resolved

============================================================================================================================================
 Package                              Arch                        Version                                   Repository                 Size
============================================================================================================================================
Installing:
 chromium                             x86_64                      85.0.4183.121-1.el7                       epel                       97 M
Installing for dependencies:
 chromium-common                      x86_64                      85.0.4183.121-1.el7                       epel                       16 M
 minizip                              x86_64                      1.2.7-18.el7                              base                       34 k
 nss-mdns                             x86_64                      0.14.1-9.el7                              epel                       43 k

Transaction Summary
============================================================================================================================================
Install  1 Package (+3 Dependent packages)

Total download size: 113 M
Installed size: 400 M
Is this ok [y/d/N]: y
Downloading packages:
(1/4): minizip-1.2.7-18.el7.x86_64.rpm                                                                               |  34 kB  00:00:00     
(2/4): chromium-common-85.0.4183.121-1.el7.x86_64.rpm                                                                |  16 MB  00:00:08     
(3/4): chromium-85.0.4183.121-1.el7.x86_64.rpm                                                                       |  97 MB  00:00:11     
(4/4): nss-mdns-0.14.1-9.el7.x86_64.rpm                                                                              |  43 kB  00:00:00     
——————————————————————————————————————————————–
Total                                                                                                       9.4 MB/s | 113 MB  00:00:12     
Running transaction check
Running transaction test
Transaction test succeeded
Running transaction
  Installing : minizip-1.2.7-18.el7.x86_64                                                                                              1/4
  Installing : chromium-common-85.0.4183.121-1.el7.x86_64                                                                               2/4
  Installing : nss-mdns-0.14.1-9.el7.x86_64                                                                                             3/4
  Installing : chromium-85.0.4183.121-1.el7.x86_64                                                                                      4/4
  Verifying  : chromium-common-85.0.4183.121-1.el7.x86_64                                                                               1/4
  Verifying  : minizip-1.2.7-18.el7.x86_64                                                                                              2/4
  Verifying  : chromium-85.0.4183.121-1.el7.x86_64                                                                                      3/4
  Verifying  : nss-mdns-0.14.1-9.el7.x86_64                                                                                             4/4

Installed:
  chromium.x86_64 0:85.0.4183.121-1.el7                                                                                                     

Dependency Installed:
  chromium-common.x86_64 0:85.0.4183.121-1.el7            minizip.x86_64 0:1.2.7-18.el7            nss-mdns.x86_64 0:0.14.1-9.el7           

Complete!

Chromium browser worked however it is much more buggy than Google Chrome and the load it puts on the machine as well as resources it consumes is terrible if compared to Proprietary G. Chrome.

Usually I don't like google chrome as it is a proprietary product and I don't even install it on my Linux Desktops, neither use as using is against any secure wise practice and but I needed this time ..

Thus to save myself some pains therefore proceeded and installed Google Chromium.
Installion  of Google Chrome is a straight forward process you download the latest rpm run below command to resolve all library dependencies and you're in:

chromium-open-source-browser-on-centos-7-screenshot


[root@localhost mozilla_test0]# rpm -ivh google-chrome-stable_current_x86_64.rpm
warning: google-chrome-stable_current_x86_64.rpm: Header V4 DSA/SHA1 Signature, key ID 7fac5991: NOKEY
error: Failed dependencies:
    liberation-fonts is needed by google-chrome-stable-87.0.4280.88-1.x86_64
    libvulkan.so.1()(64bit) is needed by google-chrome-stable-87.0.4280.88-1.x86_64
[root@localhost mozilla_test0]# wget https://dl.google.com/linux/direct/google-chrome-stable_current_x86_64.rpm
–2020-12-11 07:03:02–  https://dl.google.com/linux/direct/google-chrome-stable_current_x86_64.rpm
Resolving dl.google.com (dl.google.com)… 172.217.17.238, 2a00:1450:4017:802::200e
Connecting to dl.google.com (dl.google.com)|172.217.17.238|:443… connected.
HTTP request sent, awaiting response… 200 OK
Length: 72280700 (69M) [application/x-rpm]
Saving to: ‘google-chrome-stable_current_x86_64.rpm


100%[==================================================================================================>] 72,280,700  11.0MB/s   in 6.6s   

2020-12-11 07:03:09 (10.4 MB/s) – ‘google-chrome-stable_current_x86_64.rpm’ saved [72280700/72280700]

[root@localhost mozilla_test0]# yum localinstall google-chrome-stable_current_x86_64.rpm
Loaded plugins: fastestmirror, langpacks
Examining google-chrome-stable_current_x86_64.rpm: google-chrome-stable-87.0.4280.88-1.x86_64
Marking google-chrome-stable_current_x86_64.rpm to be installed
Resolving Dependencies
–> Running transaction check
—> Package google-chrome-stable.x86_64 0:87.0.4280.88-1 will be installed
–> Processing Dependency: liberation-fonts for package: google-chrome-stable-87.0.4280.88-1.x86_64
Loading mirror speeds from cached hostfile
 * base: mirror.wwfx.net
 * epel: mirrors.uni-ruse.bg
 * extras: mirror.wwfx.net
 * updates: mirror.wwfx.net
–> Processing Dependency: libvulkan.so.1()(64bit) for package: google-chrome-stable-87.0.4280.88-1.x86_64
–> Running transaction check
—> Package liberation-fonts.noarch 1:1.07.2-16.el7 will be installed
–> Processing Dependency: liberation-narrow-fonts = 1:1.07.2-16.el7 for package: 1:liberation-fonts-1.07.2-16.el7.noarch
—> Package vulkan.x86_64 0:1.1.97.0-1.el7 will be installed
–> Processing Dependency: vulkan-filesystem = 1.1.97.0-1.el7 for package: vulkan-1.1.97.0-1.el7.x86_64
–> Running transaction check
—> Package liberation-narrow-fonts.noarch 1:1.07.2-16.el7 will be installed
—> Package vulkan-filesystem.noarch 0:1.1.97.0-1.el7 will be installed
–> Finished Dependency Resolution

Dependencies Resolved

============================================================================================================================================
 Package                             Arch               Version                      Repository                                        Size
============================================================================================================================================
Installing:
 google-chrome-stable                x86_64             87.0.4280.88-1               /google-chrome-stable_current_x86_64             227 M
Installing for dependencies:
 liberation-fonts                    noarch             1:1.07.2-16.el7              base                                              13 k
 liberation-narrow-fonts             noarch             1:1.07.2-16.el7              base                                             202 k
 vulkan                              x86_64             1.1.97.0-1.el7               base                                             3.6 M
 vulkan-filesystem                   noarch             1.1.97.0-1.el7               base                                             6.3 k

Transaction Summary
============================================================================================================================================
Install  1 Package (+4 Dependent packages)

Total size: 231 M
Total download size: 3.8 M
Installed size: 249 M
Is this ok [y/d/N]: y
Downloading packages:
(1/4): liberation-fonts-1.07.2-16.el7.noarch.rpm                                                                     |  13 kB  00:00:00     
(2/4): liberation-narrow-fonts-1.07.2-16.el7.noarch.rpm                                                              | 202 kB  00:00:00     
(3/4): vulkan-filesystem-1.1.97.0-1.el7.noarch.rpm                                                                   | 6.3 kB  00:00:00     
(4/4): vulkan-1.1.97.0-1.el7.x86_64.rpm                                                                              | 3.6 MB  00:00:01     
——————————————————————————————————————————————–
Total                                                                                                       1.9 MB/s | 3.8 MB  00:00:02     
Running transaction check
Running transaction test
Transaction test succeeded
Running transaction
Warning: RPMDB altered outside of yum.
  Installing : vulkan-filesystem-1.1.97.0-1.el7.noarch                                                                                  1/5
  Installing : vulkan-1.1.97.0-1.el7.x86_64                                                                                             2/5
  Installing : 1:liberation-narrow-fonts-1.07.2-16.el7.noarch                                                                           3/5
  Installing : 1:liberation-fonts-1.07.2-16.el7.noarch                                                                                  4/5
  Installing : google-chrome-stable-87.0.4280.88-1.x86_64                                                                               5/5
Redirecting to /bin/systemctl start atd.service
  Verifying  : vulkan-1.1.97.0-1.el7.x86_64                                                                                             1/5
  Verifying  : 1:liberation-narrow-fonts-1.07.2-16.el7.noarch                                                                           2/5
  Verifying  : 1:liberation-fonts-1.07.2-16.el7.noarch                                                                                  3/5
  Verifying  : google-chrome-stable-87.0.4280.88-1.x86_64                                                                               4/5
  Verifying  : vulkan-filesystem-1.1.97.0-1.el7.noarch                                                                                  5/5

Installed:
  google-chrome-stable.x86_64 0:87.0.4280.88-1                                                                                              

Dependency Installed:
  liberation-fonts.noarch 1:1.07.2-16.el7         liberation-narrow-fonts.noarch 1:1.07.2-16.el7       vulkan.x86_64 0:1.1.97.0-1.el7      
  vulkan-filesystem.noarch 0:1.1.97.0-1.el7      

Complete!
 

Once Chrome is installed you can either run it from gnome-terminal
 

[test@localhost ~]$ gnome-terminal &


Google-chrome-screenshot-on-centos-linux

Or find it in the list of CentOS programs:

Applications → Internet → Google Chrome

google-chrome-programs-list-internet-cetnos

Last step to do is to make Google Chrome easily updatable to keep up VM level on high security and let it get updated every time when apply security updates with yum check-update && yum upgrade
for that its necessery to create new custom repo file
/etc/yum.repos.d/google-chrome.repo

[root@localhost mozilla_test0]# vim /etc/yum.repos.d/google-chrome.repo
[google-chrome]
name=google-chrome
baseurl=http://dl.google.com/linux/chrome/rpm/stable/x86_64
enabled=1
gpgcheck=1
gpgkey=https://dl.google.com/linux/linux_signing_key.pub

Now letes import the gpg checksum key

[root@localhost mozilla_test0]# rpmkeys –import https://dl.google.com/linux/linux_signing_key.pub

That's all folks google-chrome is at your disposal.

Add Zabbix time synchronization ntp userparameter check script to Monitor Linux servers


December 8th, 2020

Zabbix-logo-how-to-make-ntpd-time-server-monitoring-article


How to add Zabbix time synchronization ntp userparameter check script to Monitor Linux servers?

We needed to set on some servers at my work an elementary check with Zabbix monitoring to check whether servers time is correctly synchronized with ntpd time service as well report if the ntp daemon is correctly running on the machine. For that a userparameter script was developed called userparameter_ntp.conf the script is simplistic and few a lines of bash shell scripting 
stuff is based on gresping information required from ntpq and ntpstat common ntp client commands to get information about the status of time synchronization on the servers.
 

[root@linuxserver ]# ntpstat
synchronised to NTP server (10.80.200.30) at stratum 3
   time correct to within 47 ms
   polling server every 1024 s


[root@linuxserver ]# ntpq -c peers
     remote           refid      st t when poll reach   delay   offset  jitter
==============================================================================
+timeserver1 10.26.239.41     2 u  319 1024  377   15.864    1.270   0.262
+timeserver2 10.82.239.41     2 u  591 1024  377   16.287   -0.334   1.748
*timeserver3 10.82.239.43     2 u   47 1024  377   15.613   -0.553   0.251
 timeserver4 .INIT.          16 u    – 1024    0    0.000    0.000   0.000


Below is Zabbix UserParameter script that does report us 3 important values we monitor to make sure time server synchronization works as expected the zabbix keys we set are ntp.offset, ntp.sync, ntp.exact in attempt to describe what we're fetching from ntp client:

[root@linuxserver ]# cat /etc/zabbix/zabbix-agent.d/userparameter_ntp.conf

UserParameter=ntp.offset,(/usr/sbin/ntpq -pn | /usr/bin/awk 'BEGIN { offset=1000 } $1 ~ /\*/ { offset=$9 } END { print offset }')
#UserParameter=ntp.offset,(/usr/sbin/ntpq -pn | /usr/bin/awk 'FNR==4{print $9}')
UserParameter=ntp.sync,(/usr/bin/ntpstat | cut -f 1 -d " " | tr -d ' \t\n\r\f')
UserParameter=ntp.exact,(/usr/bin/ntpstat | /usr/bin/awk 'FNR==2{print $5,$6}')

In Zabbix the monitored ntpd parameters set-upped looks like this:


ntp_time_synchronization_check-zabbix-screenshot.


!Note that in above userparameter example, the commented userparameter script is a just another way to do an ntpd offset returned value which was developed before the more sophisticated with more regular expression checks from the /usr/sbin/ntpd via ntpq, perhaps if you want to extend it you can also use another script to report more verbose information to Zabbix if that is required like ouput from ntpq -c peers command:
 

UserParameter=ntp.verbose,(/usr/sbin/ntpq -c peers)

Of course to make the Zabbix fetch necessery data from monitored hosts, we need to set-up further new Zabbix Template with the respective Trigger and Items.

Below are few screenshots including the triggers used.

ntpd_server-time_synchronization_check-zabbix-screenshot-triggers

  • ntpd.trigger

{NTP:net.udp.service[ntp].last(0)}<1

  • NTP Synchronization trigger

{NTP:ntp.sync.iregexp(unsynchronised)}=1


As you can see from history we have setup our items to Store history of reported data to Zabbix from parameter script for 90 days and update our monitor check, every 30 seconds from the monitored hosts to which Tempate is applied.

Well that's all folks, time synchronization issues we'll be promptly triggering a new Alarm in Zabbix !