Archive for the ‘Windows’ Category

How to view WIFI Passwords for Profile from command line with netsh on Windows 10

Wednesday, May 29th, 2024

how-to-find-out-your-wifi-password-on-windows-10

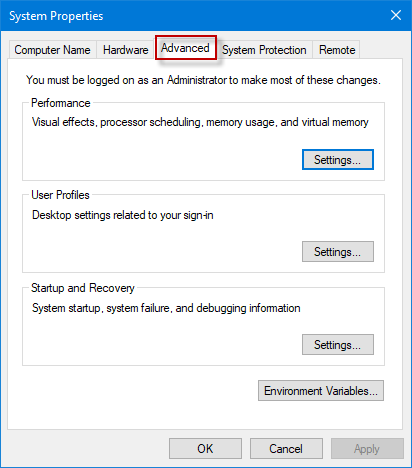
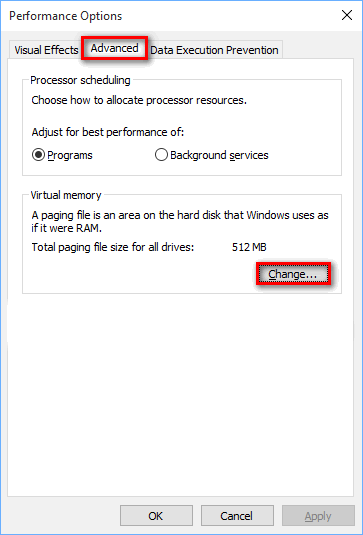
The common way, if you have connected to a Wireless Network Access Point and saved the password in Windows is to view the password via Windows GUI interface, via menus following few easy steps:

1. Settings -> Network and Internet -> Network and Sharing Center

network-and-sharing-center
2. Click on (Wifi Network name) for which you need password and 
3. In View your active networks section

select-wifi
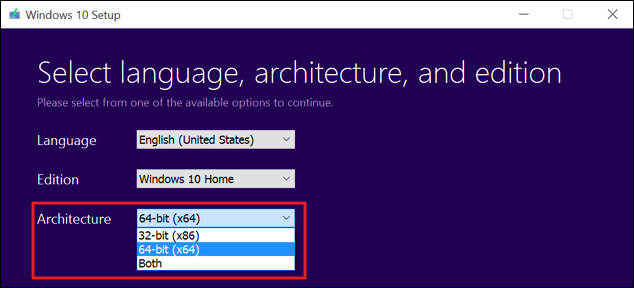
4. When the Wi-Fi network status window opens, click Wireless Properties

wireless-properties
5. Move to the Security Tab and check the checkbox, next to "Show Characters" to view the network password.

show-wifi-password-windows-10
 

Nevertheless as a system administrator you might have wondered, how you can easily review in plain text Saved Wireless Networks Wi-FI passwords, without using the Graphical Interface via a direct command line cmd.exe?
Such thing is helpful on maintaining multiple Windows 10 hosts, especially if you have a telnet or SSH remote administration enabled or you have a domain of PCs.
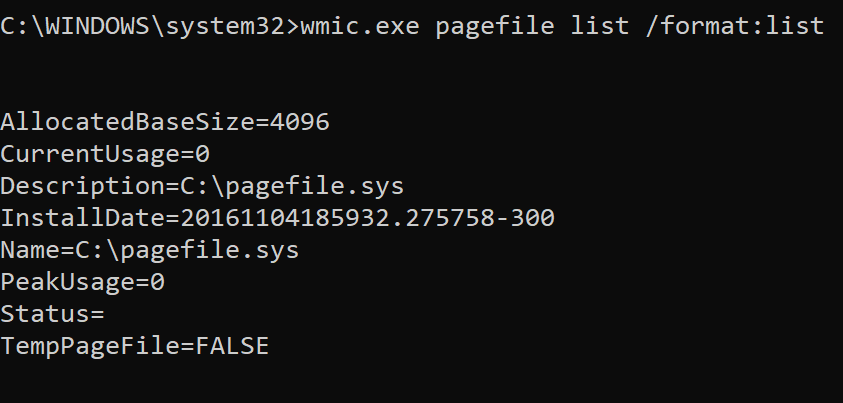
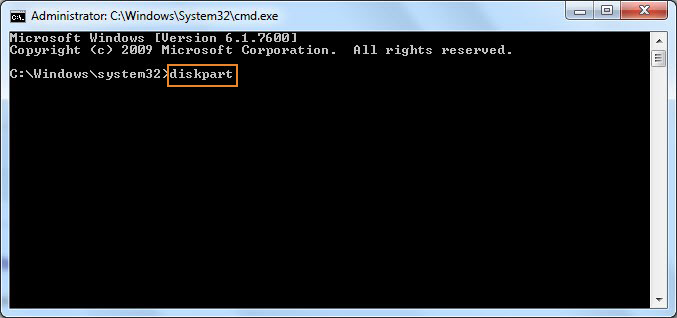
To do so open cmd.exe command prompt and run:

C:\Users> netsh

netsh>wlan show profile

Profiles on interface Wi-Fi:

Group policy profiles (read only)
———————————

User profiles
————-
All User Profile : WIFI_Pofile-name
All User Profile: Hotel stage 2
All User Profile: Home Wifi
All User Profile: HP_Custom

Now lets review the clear text password of the profile from netsh console:

netsh>wlan show profile "WIFI_Pofile-name" key=clear

Profile WIFI_Pofile-name on interface Wi-Fi:
===================================================

Applied: All User Profile

Profile information
——————-
Version : 1
Type : Wireless LAN
Name : WIFI_Pofile-name
Control options :
Connection mode : Connect automatically
Network broadcast : Connect only if this network is broadcasting
AutoSwitch : Do not switch to other networks
MAC Randomization : Disabled

Connectivity settings
———————
Number of SSIDs : 1
SSID name : "WIFI_Pofile-name"
Network type : Infrastructure
Radio type : [ Any Radio Type ]
Vendor extension : Not present

Security settings
—————–
Authentication : WPA2-Personal
Cipher : CCMP
Authentication : WPA2-Personal
Cipher : GCMP
Security key : Present
Key Content : Very-secret-password-for-WIFI-plain-text

TADADAM !

We see the password key text Saved WIFI Passwords plain text !

Note that sometimes, if you have a Hidden Wifi Network the command to use to reveal the plain text password with netsh would be:

C:\Users> netsh wlan show profile "name=SSID hidden WiFi Net" key=clear


This trick is very much used today by "hackers" e.g. script kiddies, who break up into others windows.
It is also useful if you want to have a quick way to review plain text passwords for WIFI accounts with organization, lets say if you're a security expert and doing some kind of periodic Security audits within a corporation on multiple Domain attached computers.

Thanks to Martin Petrov (Amridikon) for his trick as I've learned first time from his blog https://mpetrov.net, which is full of many computer geek goodies stuff.

Of course this approach can be easily scripted with a short PowerShell script:
 

netsh wlan show profile |
    Select-String '(?<=All User Profile\s+:\s).+' |
    ForEach-Object {
        $wlan = $_.Matches.Value
        $passw = netsh wlan show profile $wlan key=clear |
            Select-String '(?<=Key Content\s+:\s).+'

        [pscustomobject]@{
            Name     = $wlan
            Password = $passw.Matches.Value
        }
    }


If you need the script View-all-wifi-passwords-plaintext-windows10.ps1 to reuse it download it from here.
 

Windows-WiFi-PasswordRevealer-ScreenShot
There is also some freeware tools online which can help you reveal passwords, saving you any typing, that might be useful if you want to delegate the task to a non-sysadmin user, you can simply point him and ask him to install a GUI Win tool like Wifi Password revealer (that makes showing plain text passwords piece of cake) and let user reveal his passwords for himself, if needs the password to share it to a colleague 🙂
That's all folks, Happy hacking !

How to count number of ESTABLISHED state TCP connections to a Windows server

Wednesday, March 13th, 2024

count-netstat-established-connections-on-windows-server-howto-windows-logo-debug-network-issues-windows

Even if you have the background of a Linux system administrator, sooner or later you will have have to deal with some Windows hosts, thus i'll blog in this article shortly on how the established TCP if it happens you will have to administarte a Windows hosts or help a windows sysadmin noobie 🙂

In Linux it is pretty easy to check the number of established conenctions, because of the wonderful command wc (word count). with a simple command like:
 

$ netstat -etna |wc -l


Then you will get the number of active TCP connections to the machine and based on that you can get an idea on how busy the server is.

But what if you have to deal with lets say a Microsoft Windows 2012 /2019 / 2020 or 2022 Server, assuming you logged in as Administrator and you see the machine is quite loaded and runs multiple Native Windows Administrator common services such as IIS / Active directory Failover Clustering, Proxy server etc.
How can you identify the established number of connections via a simple command in cmd.exe?

1.Count ESTABLISHED TCP connections from Windows Command Line

Here is the answer, simply use netstat native windows command and combine it with find, like that and use the /i (ignores the case of characters when searching the string) /c (count lines containing the string) options

C:\Windows\system32>netstat -p TCP -n|  find /i "ESTABLISHED" /c
1268

Voila, here are number of established connections, only 1268 that is relatively low.
However if you manage Windows servers, and you get some kind of hang ups as part of the monitoring, it is a good idea to setup a script based on this simple command for at least Windows Task Scheduler (the equivallent of Linux's crond service) to log for Peaks in Established connections to see whether Server crashes are not related to High Rise in established connections.
Even better if company uses Zabbix / Nagios, OpenNMS or other  old legacy monitoring stuff like Joschyd even as of today 2024 used in some big of the TOP IT companies such as SAP (they were still using it about 4 years ago for their SAP HANA Cloud), you can set the script to run and do a Monitoring template or Alerting rules to draw you graphs and Trigger Alerts if your connections hits a peak, then you at least might know your Windows server is under a "Hackers" Denial of Service attack or there is something happening on the network, like Cisco Network Infrastructure Switch flappings or whatever.

Perhaps an example script you can use if you decide to implement the little nestat established connection checks Monitoring in Zabbix is the one i've writen about in the previous article "Calculate established connection from IP address with shell script and log to zabbix graphic".

2. Few Useful netstat options for the Windows system admin
 

C:\Windows\System32> netstat -bona


netstat-useful-arguments-for-the-windows-system-administrator

Cmd.exe will lists executable files, local and external IP addresses and ports, and the state in list form. You immediately see which programs have created connections or are listening so that you can find offenders quickly.

b – displays the executable involved in  creating the connection.
o – displays the owning process ID.
n – displays address and port numbers.
a – displays all connections and listening ports.

As you can see in the screenshot, by using netstat -bona you get which process has binded to which local address and the Process ID PID of it, that is pretty useful in debugging stuff.

3. Use a Third Party GUI tool to debug more interactively connection issues

If you need to keep an eye in interactive mode, sometimes if there are issues CurrPorts tool can be of a great help

currports-windows-network-connections-diagnosis-cports

CurrPorts Tool own Description

CurrPorts is network monitoring software that displays the list of all currently opened TCP/IP and UDP ports on your local computer. For each port in the list, information about the process that opened the port is also displayed, including the process name, full path of the process, version information of the process (product name, file description, and so on), the time that the process was created, and the user that created it.
In addition, CurrPorts allows you to close unwanted TCP connections, kill the process that opened the ports, and save the TCP/UDP ports information to HTML file , XML file, or to tab-delimited text file.
CurrPorts also automatically mark with pink color suspicious TCP/UDP ports owned by unidentified applications (Applications without version information and icons).

Sum it up

What we learned is how to calculate number of established TCP connections from command line, useful for scripting, how you can use netstat to display the process ID and Process name that relates to a used Local / Remote TCP connections, and how eventually you can use this to connect it to some monitoring tool to periodically report High Peaks with TCP established connections (usually an indicator of servere system issues).
 

Must have software on freshly installed windows – Essential Software after fresh Windows install

Friday, March 18th, 2016

Install-update-multiple-programs-applications-at-once-using-ninite

If you're into IT industry even if you don't like installing frequently Windows or you're completely Linux / BSD user, you will certainly have a lot of friends which will want help from you to re-install or fix their Windows 7 / 8 / 10 OS. At least this is the case with me every year, I'm kinda of obliged to install fresh windowses on new bought friends or relatives notebooks / desktop PCs.

Of course according to for whom the new Windows OS installed the preferrences of necessery software varies, however more or less there is sort of standard list of Windows Software which is used daily by most of Avarage Computer user, such as:
 

Not to forget a good candidate from the list to install on new fresh windows Installation candidates are:

  • Winrar
  • PeaZIP
  • WinZip
  • GreenShot (to be able to easily screenshot stuff and save pictures locally and to the cloud)
  • AnyDesk (non free but very functional alternative to TeamViewer) to be able to remotely access remote PC
  • TightVNC
  • ITunes / Spotify (for people who have also iPhone smart phone)
  • DropBox or pCloud (to have some extra cloud free space)
  • FBReader (for those reading a lot of books in different formats)
  • Rufus – Rufus is an efficient and lightweight tool to create bootable USB drives. It helps you to create BIOS or UEFI bootable devices. It helps you to create Windows TO Go drives. It provides support for various disk, format, and partition.
  • Recuva is a data recovery software for Windows 10 (non free)
  • EaseUS (for specific backup / restore data purposes but unfortunately (non free)
  • For designers
  • Adobe Photoshop
  • Adobe Illustrator
  • f.lux –  to control brightness of screen and potentially Save your eyes
  • ImDisk virtual Disk Driver
  • KeePass / PasswordSafe – to Securely store your passwords
  • Putty / MobaXterm / SecureCRT / mPutty (for system administrators and programmers that has to deal with Linux / UNIX)

I tend to install on New Windows installs and thus I have more or less systematized the process.

I try to usually stick to free software where possible for each of the above categories as a Free Software enthusiast and luckily nowadays there is a lot of non-priprietary or at least free as in beer software available out there.

For Windows sysadmins or College and other public institutions networks including multiple of Windows Computers which are not inside a domain and also for people in computer repair shops where daily dozens of windows pre-installs or a set of software Automatic updates are  necessery make sure to take a look at Ninite

ninite-automate-windows-program-deploy-and-update-on-new-windows-os-openoffice-screenshot

As official website introduces Ninite:

Ninite – Install and Update All Your Programs at Once

Of course as Ninite is used by organizations as NASA, Harvard Medical School etc. it is likely the tool might reports your installed list of Windows software and various other Win PC statistical data to Ninite developers and most likely NSA, but this probably doesn't much matter as this is probably by the moment you choose to have installed a Windows OS on your PC.

ninite-choises-to-build-an-install-package-with-useful-essential-windows-software-screenshot
 

For Windows System Administrators managing small and middle sized network PCs that are not inside a Domain Controller, Ninite could definitely save hours and at cases even days of boring install and maintainance work. HP Enterprise or HP Inc. Employees or ex-employees would definitely love Ninite, because what Ninite does is pretty much like the well known HP Internal Tool PC COE.

Ninite could also prepare an installer containing multiple applications based on the choice on Ninite's website, so that's also a great thing especially if you need to deploy a different type of Users PCs (Scientific / Gamers / Working etc.)

Perhaps there are also other useful things to install on a new fresh Windows installations, if you're using something I'm missing let me know in comments.

Create Bootable Windows installer USB from a MAC PC, MacBook host or Linux Desktop computer

Thursday, February 8th, 2024

Creating Windows bootable installer with Windows Media Creation tool is easy, but sometimes if you're a geek like me you don't have a Windows personal PC at home and your Work PC is so paranoidly restricted by its administrator through paranoid Domain Controller Policies, that you can only copy from a USB drive towards the Win PC but you cannot write to the USB. 

1. Preparing Linux installer USB via Mac's Boot Camp Assistant

If you're lucky you might have a MAC Book Air or some kind of other mac PC, if that is the case you can burn the Windows Installer iso, with the Native Mac tool called BootCamp Assistant, by simply downloading the Win Boot ISO, launching the app and burning it:

Finder > Applications > Utilities and open Boot Camp Assistant.

create-windows-10-bootable-installer-usb-mac-screenshot.png

2. Preparing Bootable Windows installer on Linux host machine

On DEBIAN / UBUNTU and other Deb based Linuxes

# apt install gddrescue 

On CENTOS / FEDORA :

# dnf install ddrescue

To install the Windows Image to the right USB drive, first find it out with fdisk and list it:

# fdisk -l
 

Disk /dev/sdb: 14.41 GiB, 15472047104 bytes, 30218842 sectors
Disk model: DataTraveler 3.0
Units: sectors of 1 * 512 = 512 bytes
Sector size (logical/physical): 512 bytes / 512 bytes
I/O size (minimum/optimal): 512 bytes / 512 bytes
Disklabel type: dos
Disk identifier: 0xc23dc587

Device     Boot    Start      End  Sectors  Size Id Type
/dev/sdb1           8192 30216793 30208602 14.4G  7 HPFS/NTFS/exFAT
/dev/sdb2       30216794 30218841     2048    1M  e W95 FAT16 (LBA)

Then Use ddrescue to create the bootable MS windows Installer USB disk.

# ddrescue windows10.iso /dev/sd1 –force -D

3. Using GUI Linux tool WoeUSB-ng to prepare Microsoft Windows start up USB drive

If you're a lazy Linux user and you plan to prepare up to date Windows image files regularly, perhaps the WoeUSB-ng Graphical tool will suit you better, to use it you will have to install a bunch of python libraries.
 

On Ubuntu Linux:

# apt install git p7zip-full python3-pip python3-wxgtk4.0 grub2-common grub-pc-bin
# pip3 install WoeUSB-ng

On Fedora Linux:

dnf install git p7zip p7zip-plugins python3-pip python3-wxpython4
# sudo pip3 install WoeUSB-ng

Launch the WoeUSB-ng program :


$ python3 /usr/local/bin/woeusbgui


Download, the latest Version of Windows Installer .ISO IMAGE file, plug in your USB flash disk and let the program burn the ISO and create the GRUB boot loader, that will make WIndows installer bootable on your PC.

WoeUSB-ng-python-burn-windows-installer.-tool-screenshot

With WoeUSB-ng you have to be patient, it will take some time to prepare and copy the Windows installer content and will take about 15 to 20 minutes from my experience to finalize the GRUB records required, that will make the new burnt ISO bootable.


Then just plug it in to your Desktop PC or laptop, virtual machine, whatever where you would like to install the Windows from its latest installation Source image and Go on with doing the necessery evil to have Microsoft Spy on you permanently.

P.S. I just learned, from colleagues from Kvant Serviz (a famous hardware second hand, shop and repair shop here in Bulgaria, that nowadays Windows has evolved to the points, they can and they actually do overwrite the PC BIOS / UEFI as part of updates without any asking the end user !!!
At first I disbelived that, but after a short investigation online it turned out this is true, 
there are discussions online from people complaining, that WIndows updates has ovewritten their current BIOS settings and people complaining BIOS versions are ovewritten.

Enjoy your new personal Spy OS ! 🙂

Improve MobaXterm Best Windows terminal client with some additional settings tune ups / Install extra Linux Cygwin tools on MobaXterm and various post install configuration goodies

Friday, January 20th, 2023

mobaxterm-logo_400x400-terminal-client-tune-up-howto-for-a-new-install

Earlier I've written a an article MobaXTerm: A good gnome-terminal like tabbed SSH client for Windows / Windows Putty Tabs Alternative in which I've introduced the best in my opinion SSH / Telnet / VNC / RDP / Xserver in one Terminal client emulator for Windows operating systems.

The client has been around for quite some time and it has been improving rapidly over the last 10 years, where it now more looks like a separate Operating System than a single terminal client. It's size is quite compact as well and my opinion and every self respectiving developer, system administrator, IT geek or a hacker would definitely
use the mobaxterm at home or at work place on a daily. I guess some of my readers, who have already migrated SuperPutty / SecureCRT or Putty / XMing or whatever kind of exotic Remote SSH Console terminal is used could validate this 🙂

Therefore as I've set up Mobaxterm on a multiple computers all around, I've found it useful to write a small article with some post-install hints (tune ups) one can do immediately once he has installed the Desktop or Portable Apps version of mobaxterm on desktop PC / notebook.
 

1. Set up your bashrc server / command aliases

Lets say you need to setup some rules for connectivity via a socks proxy to dig holes over a harsh company firewalls or add
custom options to every ssh client attempt to remote server, or simply alias some of your servers with custom connectivity options
and so on simply open vi / vim text editor from mobaxterm local terminal and place inside your rules, for example that could be anything like:


alias ssh='ssh -o stricthostkeychecking=no -o passwordauthentication=yes -o PreferredAuthentications=password  -v'
alias sftp='sftp -o stricthostkeychecking=no -o passwordauthentication=yes -o PreferredAuthentications=password'

alias work-server='ssh UserName@work-server -v -o passwordauthentication=yes -o PreferredAuthentications=password'

alias proxy='ssh -D 3128 UserName@proxyIP-host1 -o ConnectTimeout=80'
alias proxy1='ssh -D 3128 UserName@proxy-host2 -p 443 -o ConnectTimeout=60'
alias proxy3='ssh -D 3128 Username@proxy-host3 -p 443 -o ConnectTimeout=60'

Simply open the terminal and setup whatever you require
export ftp_proxy="http://proxy-host:8080"
export https_proxy="https://proxy-host:8080"
export http_proxy="http://proxy-host:8080"
export HTTP_PROXY="http://proxy-host:8080"
export HTTPS_PROXY="http://proxy-host:8080"


2. Set mobaxterm presistent directory / persistent root directory and default text editor

Make sure you have properly defined at least Persistent directory / Persistent directory if you want to keep the files under your /home/mobaxterm and root directory be able to save your data from local mobaxterm terminal work you have done.

To do so o to Configuration -> General

MobaXterm-persistent-home-directory
 

3. Change default settings for Opening / Closing Terminal tabs just like in gnome-terminal

MobaXterm is really awesome as the developer, followed pretty much the logic of some common GNU / Linux Terminal clients like Gnome-Terminal and KDE's default Konsole terminal.

One of the first things to do once Mobaxterm is installed on the PC is to set up nice key binds as default onces might be heard to learn at the beginning or you might have already the habit to use the certain set of key combinations on your Linux desktop:

Common once are:

1. Open tab / Close tab common once I bind to are (CTRL + T / CTRL + W)
2. Previous tab move / Next tab move keys common one I use are (ALT + LEFT / ALT + RIGHT)
3. Find in terminal (CTRL + F)

rebind-mobaxterm-standard-keys
 

4. Make MobaXterm to automatically open a terminal to not Start local terminal every time

By default mobaxterm it is really annoying cause every time you run it after system reboot you have to select
Start local terminal
Once you run the terminal you get this prompt and you have to press on Start local terminal

mobaxterm-start-local-terminal


How to make Mobaxterm automatically open local Terminal Tab on every boot?
 

To fix this so every time a local terminal is spawn on MobaXterm you have get to:
 

Settings -> Configuration -> Misc


Open the Following tab at startup by default it will be

<Home (Pinned)>

Change it to:

<Terminal>

mobaxterm-open-the-followintab-tab-in-startup

That's it on next login your Local Terminal with /bin/bash.exe will auto load !
 

[hipo.WINDOWS-PC] ➤ env|grep -i SHELL
SHELL=/bin/bash.exe
PATH=/bin:/drives/c/Users/hipo/DOCUME~1
/MobaXterm/slash/bin:/drives/c/Windows:/drives/c/Windows/system32:/drives/c/Windows/system32:/drives/c/Windows:/drives/c/Windows/System32/Wbem:
/drives/c/Windows/System32/WindowsPowerShell/v1.0:/drives/c/Windows/sysnative
PSModulePath=C:\Windows\system32\WindowsPowerShell\v1.0\Modules\
CMDPATH=C:\Windows\system32;C:\Windows;C:\Windows\System32\Wbem;
C:\Windows\System32\WindowsPowerShell\v1.0\;C:\Windows\sysnative\;
C:\Users\hipo\DOCUME~1\MobaXterm\slash\bin
WINPATH=C:\Windows\system32;C:\Windows;C:\Windows\System32\Wbem;C:\Windows\System32\WindowsPowerShell\v1.0\;C:\Windows\sysnative\


5. Make menu buttons to appear smaller


Go to menu and select
View -> (Small Buttons)

mobaxterm-select-small-buttons-screenshot

6. Disable auto start of XServer to prevent a port listener on the machine on TCP port

By default mobaxterm opens XServer listener, so you can immediately connect from a remote SSH servers missing Xserver and install software requiring an XServer, for example software such as Oracle Database or some MiddleWare WebLogig or IBM's Web Sphere. This is useful but if you want to have a good security only allow this server on a purpose. Otherwise the XServer will run in parallel with rest of your Moba and just load up your PC and eat up some RAM memory. To disable it go to:

mobaxterm-x11-automatically-start-X-server-disable-stop-at-startup

7. Change the mobaxterm Default theme to Dark

This is optional I like to set the Theme to Dark, also as a Theme for Windows as well as for MobaxTerm, the aim of that is simply to not put extra stress on my eye sight. Being on the PC around 8 to 10 hours and spending some 6 to 8 hours on console work is enough. If you want to do as well.

mobaxterm-change-default-theme-to-dark-theme

8. Install additional set of common Linux tools to mobaxterm to use on Windows
 

Tools such as:

1. Midnight Commander (mc)
2. Wget
3. Curl
4. Vim
5. Screen
6. Rsync
7. Perl
8. W3m
9. dosunix
10. unix2dos
11. gnupg
12. diffutils
13. mysql
14. mpg123
15. whois


If you want to have a set of packages pre-installed that are including above as well as the rest of mine, here is a dump of my installed mobapt manager packages:

For more simply use the experimental Mobaxterm  Graphical Package installer
 

[hipo.WINDOWS-PC] ➤  for i in $(cat Downloads/installed-packages-mobaxterm.txt ); do apt-cyg install $i; done
 

Found package GeoIP-database

Installing GeoIP-database
Downloading GeoIP-database-20180505-1.tar.xz…
Unpacking GeoIP-database-20180505-1.tar.xz…


Running postinstall scripts
Package GeoIP-database installed.

Rebasing new libraries

Found package adwaita-icon-theme

Installing adwaita-icon-theme
Downloading adwaita-icon-theme-3.26.1-1.tar.xz…


You will be prompted for a single Yes for the respository

MobApt Packages Manager

mobapt-pkg-manager-install-git-from-gui-mobaxterm-package-installer

Though it is said it is experimental, I have to say the MobApt Apt Manager works quite good, I never had any issues with it so far.

9. Mobaxterm.ini the settings storage file that can help you move your configurations

If you have to prepeare new MobaXterm on multiple PCs frequently perhaps it is best to just copy the Mobaxterm.ini file. 
Here is an example of my mobaxterm.ini for download.
 

10. Change terminal colors and curor type and enable blinking (customizations)


Settings -> Configuration -> Terminal -> (Default Terminal Color Settings)


mobaxterm-change-terminal-colors-and-blinking-cursor-setting-screenshot

11. Use very useful moba Tools
 

mobaxterm-terminal-great-useful-tools-screenshot
For sysadmins Moba has plenty of other jems such as:

  • Network Port scanner such as Nmap with GUI

  • list open network ports (GUI interface to netmap)

  • SSH tunnel tool

  • Moba Diff

  • Wake on Lan

  • Network Packet capturer (such as tcpdump)

  • List running processes (such as taskmgr in simple form)

  • List machine hardware devices (such as Windows Device manager)

 
12. Remote monitoring of opened ssh session


To enable remote monitoring for a Saved session simply use the "Remote monitoring" button on the down left corner of the terminal.

mobaxterm-remote-monitoring-of-remote-ssh-server-screenshot-button

Or to enable it for a new host, open:

1. "Saved sessions"
2. Click over "User sessions"
3. New Session -> (SSH)
4. Basic SSH Settings (Remote host) -> OK
5. Click over the new created session
6. Click on Remote monitoring for the opened session

remote-monitoring-from-mobaxterm-screenshot

13. Play some mobaxterm console games

As you might have pissed off of configuring go on and enjoy some of the great console games, some of which are also present on a normal Linux new distribution installation. 🙂

mobaxterm-list-of-games-screenshot

List of Moba Games

teamwalk-mobaxterm-console-connect-network-routers-game
TeamWalk (Use your mouse or keyboard to connect every server to the central router)

ctris-console-text-game-mobaxterm

Ctris Console tetris from Mobaxterm

solitaire-text-console-game-played-on-mobaxterm-screenshot

Text console Solitaire from Moba
 

Ninvaders-console-game-mobaxterm

Here is NinVaders (Text Version of Space Invaders Arcade Classic)
 

Enjoy ! 🙂

How to disable Windows pagefile.sys and hiberfil.sys to temporary or permamently save disk space if space is critically low

Monday, March 28th, 2022

howto-pagefile-hiberfil.sys-remove-reduce-increase-increase-size-windows-logo

Sometimes you have to work with Windows 7 / 8 / 10 PCs  etc. that has a very small partition C:\
drive or othertimes due to whatever the disk got filled up with time and has only few megabytes left
and this totally broke up the windows performance as Windows OS becomes terribly sluggish and even
simple things as opening Internet Browser (Chrome / Firefox / Opera ) or Windows Explorer stones the PC performance.

You might of course try to use something like Spacesniffer tool (a great tool to find lost data space on PC s short description on it is found in my previous article how to
delete temporary Internet Files and Folders to to speed up and free disk space
 ) or use CCleaner to clean up a bit the pc.
Sometimes this is not enough though or it is not possible to do at all the main
partition disk C:\ is anyhow too much low (only 30-50MB are available on HDD) or the Physical or Virtual Machine containing the OS is filled with important data
and you couldn't risk to remove anything including Internet Temporary files, browsing cookies … whatever.

Lets say you are the fate chosen guy as sysadmin to face this uneasy situation and have no easy
way to add disk space from another present free space partition or could not add a new SATA hard drive
SSD drive, what should you do?
 

The solution wipe off pagefile.sys and hiberfil.sys

Usually every Windows installation has a pagefile.sys and hiberfil.sys.

  • pagefile.sys – is the default file that is used as a swap file, immediately once the machine runs out of memory. For Unix / Linux users better understanding pagefile.sys is the equivallent of Linux's swap partition. Of course as the pagefile is in a file and not in separate partition the swapping in Windows is perhaps generally worse than in Linux.
  • hiberfil.sys – is used to store data from the machine on machine Hibernation (for those who use the feature)


Pagefile.sys which depending on the configured RAM memory on the OS could takes up up to 5 – 8 GB, there hanging around doing nothing but just occupying space. Thus a temporary workaround that could free you some space even though it will degrade performance and on servers and production machines this is not a good solution on just user machines, where you temporary need to free space any other important task you can free up space
by seriously reducing the preconfigured default size of pagefile.sys (which usually is 1.5 times the active memory on the OS – hence if you have 4GB you would have a 6Gigabytes of pagefile.sys).

Other possibility especially on laptop and movable devices running Win OS is to disable hiberfil.sys, read below how this is done.


The temporary solution here is to simply free space by either reducing the pagefile.sys or completely disabling it


1. Disable pagefile.sys on Windows XP, Windows 7 / 8 / 10 / 11


The GUI interface to disable pagefile across all NT based Windows OS-es is quite similar, the only difference is newer versions of Windows has slightly more options.


1.1 Disable pagefile on Windows XP


Quickest way is to find pagefile.sys settings from GUI menus

1. Computer (My Computer) – right click mouse
2. Properties (System Preperties will appear)
3. Advanced (tab) 
4. Settings
5. Advanced (tab)
6. Change button

windows-xp-pagefile-disable-screenshot

1.2 Disable pagefile on Windows 7


advanced-system-settings-control-panel-system-and-security-screenshot

windows-system-properties-screenshot-properties-advanced-change-Virtual-memory-pagefile-screenshot

system-properties-performance-options
 

Once applied you'll be required to reboot the PC

How-to-turn-off-Virtual-Memory-Paging_File-in-Windows-7-restart


1.3 Disable Increase / Decrease pagefile.sys on Windows 10 / Win 11
 

open-system-properties-advanced-win10

win10-performance-options-menu-screenshot

configure-virtual-memory-win-10-screenshot


1.4 Make Windows clear pagefile.sys on shutdown

On home PCs it might be useful thing to clear up ( nullify) pagefile.sys on shutdown, that could save you some disk space on every reboot, until file continuously grows to its configured Maximum.

Run

regedit

Modify registry key at location


HKEY_LOCAL_MACHINE\SYSTEM\CurrentControlSet\Control\Session Manager\Memory Management

windows-clean-up-pagefile-sys-file-on-shutdown-or-reboot-registry-editor-value-screenshot

You can apply the value also via a registry file you can get the Enable Clearpagefile at shutdown here .reg.
 

2. Manipulating pagefile.sys size and file delete from command line with wmic tool 

For scripting purposes you might want to use the wmic pagefile which can do increase / decrase or delete the file without GUI, that is very helpful if you have to admin a Windows Domain (Active Directory)
 

[hipo.WINDOWS-PC] ➤ wmic pagefile /?

PAGEFILE – Virtual memory file swapping management.

HINT: BNF for Alias usage.
(<alias> [WMIObject] | [] | [] ) [].

USAGE:

PAGEFILE ASSOC []
PAGEFILE CREATE <assign list>
PAGEFILE DELETE
PAGEFILE GET [] []
PAGEFILE LIST [] []


[hipo.WINDOWS-PC] ➤ wmic pagefile
AllocatedBaseSize  Caption          CurrentUsage  Description      InstallDate                Name             PeakUsage  Status  TempPageFile
4709               C:\pagefile.sys  499           C:\pagefile.sys  20200912061902.938000+180  C:\pagefile.sys  525                FALSE


[hipo.WINDOWS-PC] ➤ wmic pagefile list /format:list

AllocatedBaseSize=4709
CurrentUsage=499
Description=C:\pagefile.sys
InstallDate=20200912061902.938000+180
Name=C:\pagefile.sys
PeakUsage=525
Status=
TempPageFile=FALSE

wmic-pagefile-command-line-tool-for-windows-default-output-screenshot


  • To change the Initial Size or Maximum Size of Pagefile use:
     

➤ wmic pagefileset where name="C:\\pagefile.sys" set InitialSize=2048,MaximumSize=2048

  • To move the pagefile / change location of pagefile to less occupied disk drive partition (i.e. D:\ drive)


    Sometimes you might have multiple drives on the PC and some of them might be having multitudes of gigabytes while main drive C:\ could be fully occupied due to initial install bad drive organization, in that case a good work arount to save you space so you can work normally with the server is just to temporary or permanently move pagefile to another drive.

wmic pagefileset where name="D:\\pagefile.sys" set InitialSize=2048,MaximumSize=2048


!! CONSIDER !!! 

That if you have the option to move the pagefile.sys for best performance it is advicable to place the file inside another physical disk, preferrably a Solid State Drive one, SATA disks are too slow and reduced Input / Output disk operations will lead to degraded performance, if there is lack of memory (i.e. pagefile.sys is actively open read and wrote in).
 

  • To delete pagefile.sys 
     

➤ wmic pagefileset where name="C:\\pagefile.sys" delete


If for some reason you prefer to not use wmic but simple del command you can delete pagefile.sys also by:

Removing file default "Hidden" and "system" file attributes – set for security reasons as the file is a system file usually not touched by user. This will save you from "permission denied" errors:
 

➤ attrib -s -h %systemdrive%\pagefile.sys


Delete the file:
 

➤ del /a /q %systemdrive%\pagefile.sys


3. Disable hibernation on Windows 7 / 8 and Win 10 / 11

Disabling hibernation file hiberfil.sys can also free up some space, especially if the hibernation has been actively used before and the file is written with data. Of course, that is more common on notebooks.
Windows hibernation has significantly improved over time though i didn't have very pleasant experience in the past and I prefer to disable it just in case.
 

3.1 Disable Windows 7 / 8 / 10 / 11 hibernation from GUI 

Disable it through:

Control Panel -> All Control Panel Items -> Power Options -> Edit Plan Settings -> Change advanced power settings


 like shown in below screenshot:

Windqows-power-options-Advanced-settings-Allow-Hybrid-sleep-option-menu-screenshot


3.2 Disable Windows 7 / 8 / 10 / 11 hibernation from command line

Disable hibernation Is done in the same way through the powercfg.exe command, to disable it
if you're cut of disk space and you want to save space from it:

run as Administrator in Command Line Windows (cmd.exe)
 

powercfg.exe /hibernate off

If you later need to switch on hibernation
 

powercfg.exe /hibernate on


disable-hiberfile-windows-screenshot

3.3 Disable Windows hibernation on legacy Windows XP

On XP to disable hibernation open

1. Power Options Properties
2. Select Hibernate
3. Select Enable Hibernation to clear the checkbox and disable Hibernation mode. 
4. Select OK to apply the change.

Close the Power Options Properties box. 

enable-disable-hibernate-windows-xp-menu-screenshot

To sum it up

We have learned some basics on Windows swapping and hibernation and i've tried to give some insight on how thiese files if misconfigured could lead to degraded Win OS performance. In any case using SSD as of 2022 to store both files is a best practice for machines that has plenty of memory always try to completely disable / remove the files. It was shown how  to manage pagefile.sys and hiberfil.sys across Windows Operating Systems different versions both from GUI and via command line as well as how you can configure pagefile.sys to be cleared up on pc reboot.
 

How to Install ssh client / server on Windows 10, Windows Server 2019 and Windows Server 2022 using PowerShell commands

Wednesday, March 2nd, 2022

How-to-install-OpenSSH-Client-and-Server-on-Windows-10-Windows-Server-2022-Windows-2019-via-command-line-Powershell

Historically to have a running ssh client on Windows it was required to install CygWin or MobaXterm as told in my previous articles Some Standard software programs to install on Windows to make your Desktop feel  more Linux / Unix Desktop and Must have software on Freshly installed Windows OS.
Interesting things have been developed on the Windows scene since then and as of year 2022 on Windows 10 (build 1809 and later) and on Windows 2019, Windows Server 2022, the task to have a running ssh client to use from cmd.exe (command line) became trivial and does not need to have a CygWin Collection of GNU and Open Source tools installed but this is easily done via Windows embedded Apps & Features GUI tool:

To install it from there on 3 easy steps:


  1. Via  Settings, select Apps > Apps & Features, then select Optional Features.
  2. Find OpenSSH Client, then click Install
  3. Find OpenSSH Server, then click Install


For Windows domain administrators of a small IT company that requires its employees for some automated script to run stuff for example to tunnel encrypted traffic from Workers PC towards a server port for example to secure the 110 POP Email clients to communicate with the remote Office server in encrypted form or lets say because ssh client is required to be on multiple domain belonging PCs used as Windows Desktops by a bunch of developers in the company it also possible to use PowerShell script to install the client on the multiple Windows machines.

Install OpenSSH using PowerShell
 

To install OpenSSH using PowerShell, run PowerShell as an Administrator. To make sure that OpenSSH is available, run the following cmdlet in PowerShell

Get-WindowsCapability -Online | Where-Object Name -like 'OpenSSH*'


This should return the following output if neither are already installed:


Name  : OpenSSH.Client~~~~0.0.1.0
State : NotPresent

Name  : OpenSSH.Server~~~~0.0.1.0
State : NotPresent


Then, install the server or client components as needed:

Copy in PS cmd window

# Install the OpenSSH Client
Add-WindowsCapability -Online -Name OpenSSH.Client~~~~0.0.1.0

# Install the OpenSSH Server
Add-WindowsCapability -Online -Name OpenSSH.Server~~~~0.0.1.0


Both of these should return the following output:
 

Path          :
Online        : True
RestartNeeded : False


If you want to also allow remote access via OpenSSH sshd daemon, this is also easily possible without installing especially an openssh-server Windows variant !

Start and configure OpenSSH Server

To start and configure OpenSSH Server for initial use, open PowerShell as an administrator, then run the following commands to start the sshd service:

# Start the sshd service
Start-Service sshd

# OPTIONAL but recommended:
Set-Service -Name sshd -StartupType 'Automatic'

# Confirm the Firewall rule is configured. It should be created automatically by setup. Run the following to verify
if (!(Get-NetFirewallRule -Name "OpenSSH-Server-In-TCP" -ErrorAction SilentlyContinue | Select-Object Name, Enabled)) {
    Write-Output "Firewall Rule 'OpenSSH-Server-In-TCP' does not exist, creating it…"
    New-NetFirewallRule -Name 'OpenSSH-Server-In-TCP' -DisplayName 'OpenSSH Server (sshd)' -Enabled True -Direction Inbound -Protocol TCP -Action Allow -LocalPort 22
} else {
    Write-Output "Firewall rule 'OpenSSH-Server-In-TCP' has been created and exists."
}


Connect to OpenSSH Server
 

Once installed, you can connect to OpenSSH Server from a Windows 10 or Windows Server 2019 device with the OpenSSH client installed using PowerShell or Command Line tool as Administrator and use the ssh client like you would use it on any *NIX host.

C:\Users\User> ssh username@servername


The authenticity of host 'servername (10.10.10.1)' can't be established.
ECDSA key fingerprint is SHA256:(<a large string>).
Are you sure you want to continue connecting (yes/no)?
Selecting yes adds that server to the list of known SSH hosts on your Windows client.

You are prompted for the password at this point. As a security precaution, your password will not be displayed as you type.

Once connected, you will see the Windows command shell prompt:

Domain\username@SERVERNAME C:\Users\username>


How to Create New Windows 10 NTFS Drive partition from new empty ( Unallocated ) space with Windows Disk Management or diskpart command

Thursday, November 18th, 2021

Windows-10-paritioning-with-disk-management-diskmgmt.msc

As mentioned in previous article, I've been setting up a new PC that is a bit old a 11 years old Lenovo ThinkCentre model M90P with 8 GB of Memory, Intel(R) Core(TM) i5 CPU         650  @ 3.20GHz   3.19 GHz, Intel Q57 Express Chipset.

After the installation was successful on the new Desktop PC attached SSD, I was curious to see how Windows detects the 521 GB Solid State Drive Samsung  Disk, as well as to assign all the SSD Disk space, so I don't have unused parts of the drive hanging around.

To get the exact type of SSD installed on the Lenovo ThinkCentre, it comes to a simple PowerShell command (note that the PowerShell command has to be executed as Administrator).


Windows PowerShell
Copyright (C) Microsoft Corporation. All rights reserved.

Try the new cross-platform PowerShell https://aka.ms/pscore6

PS C:\Windows\system32> Get-PhysicalDisk

Number FriendlyName               SerialNumber   MediaType CanPool OperationalStatus HealthStatus Usage            Size
—— ————               ————   ——— ——- —————– ———— —–            —-
0      SAMSUNG MZ7LN512HAJQ-00000 S3TVNX0MC04330 SSD       True    OK                Healthy      Auto-Select 476.94 GB


PS C:\Windows\system32>


PowerShell-Get-PhysicalDisk-command-print-exact-SSD-type-attached-to-a-Windows-computer 

During the Windows installation, I did installed Windows on a 110GB partition that was left behind from my attempt to copy another 120GB ssd drive as, I've described in my previous article.
Cause of that big part of the SAMSUNG MZ7LN512HAJQ-00000 SSD was left unpartitioned ( unallocated ) and respectively the space did not show in Windows, hence to work around this I was supposed to 
create new Windows Drive and format it either in VFAT (FAT32) or NTFS. Through the years when I had to do such an operations I often either booted from some bootCD and did the desired partitioning or if
partitioning had to be done on a LivePC without reboot, I've used Windows Partitioning Software, such as:

  • The Industry Standard Partition Manager ( Acronis Disk Director ) 
     
  • EaseUS Partition Manager


Using a Good partition manager is a great thing if some complicated partitioning operations needs to be done,  however for such a trivial stuff such as mine in that case – Creating a new NTFS filesystem from unallocated space is a bit of nonsense, thus this time I've decided to use the Windows Standard tool for Partitioinng
 

  • Disk Management

To run the tool you need to run Computer Management tool first either by just looking it up in the Search bar near Start menu (Windows 10 flag icon) or by invoking command line start window, by pressing together

Windows Button + R and runnining command:

C:\Users\Emilian> compmgmt.msc


From there on navigate to

Storage -> Disk Management

windows-computer-management-screenshot

Go over box Unallocated (365.15 GB) and Press Right Mouse Button and select

-> New Simple Volume

new-simple-volume-screenshot

Next steps are quite self explanatory, had to just follow the New Simple Volme Wizard steps

windows-computer-management-screenshot

windows-computer-management-screenshot-3

windows-computer-management-screenshot-4

I Prefer to use NTFS because it is quicker and kinda of a standard since Windows 8+ onwards, besides that this computer will be used as a simple web browsing station and there is no plans the disk will ever have to be attached to a different OS like UNIX / LInux..However always keep in mind for compitability reasons VFAT Filesystem is usually not a bad idea. 

windows-computer-management-screenshot-5

https://www.pc-freak.net/images/new-ntfs-volume-F-drive-windows-10-screenshot

As you can see the drive is prepared and now accessible from Windows Explorer under Drive F:\. If you wonder why the drive is not D:\, it seems to create the D:\ the unallocated space is supposed to be be on a separate Disk which waas not the case with this PC setup.

After installing the SSD drive and setting the proper partitions another good practice is to use Disk Defragmenter Win tool to optimize the Drives for speed. Another useful feature of disk degragmenter is you can use it to check what kind of hard drive you have installed e.g. SATA or SSD, as well as check if the installed SSD is NVME (Non-Volatile-Memory-Express), e.g. of a faster type.

To run Disk Degrafmenter do  Win key + R


C:\Users\Emilian> dfrgui


dfrgui-command-screenshot-windows-1

Below is what dfrgui reports on the ThinkCentre after running Disk Optimize for each Drive – (Optimize All) option.

dfrgui-partitions-on-lenovo-thinkcentre-windows-screeshot

Just to show you what you can see with dfrgui, here is the dfrgui screenshot from another PC that has attached both SATA disk and NVME SSD Drive.

dfrgui-command-screenshot-windows-2


How to do partitioning from Windows console with diskpart command (useful for scripting)


If you're coming from Linux world and you're pretty used to fdisk / cfdisk etc. to do partitioning daily, then you'll be most happy to hear about existence of the diskpart command in Windows, which is a kinda of an equivalent tool.
The tool is perfect for domain administrators which need to do some dynamic partitioning operations on multiple computers at once.

 To use diskpart you need Administrator command prompt, there is much you can do with diskpart, below is how to create another NTFS partition on a secondary

C:\Windows\System32> diskpart

diskpart-win-screenshot-1

DISKPART> list disk

diskpart-win-screenshot-2

DISKPART> select disk 2

diskpart-win-screenshot-3

To clean all the content (e.g. delete everything on hard drive) e.g. all files and directories

!!! BEWARE NOT TO DELETE BY MISTAKE YOUR DATA DON'T BLAME ME IF YOU JUST COPY PASTE IRRESPONSIBLY WITHOUT THINKING.
AFTER ALL IT IS YOUR COMPUTER !!!

DISKPART> clean


diskpart-win-screenshot-4

Next lets, create a partition, in below screenshot you can see how to use help and what are the supported partition types in Windows 10 as of year 2021.


/diskpart-help-create-partition-type-screenshot
 

DISKPART> create partition primary

diskpart-win-screenshot-6

To format new assigned primary partition as NTFS

DISKPART> format fs=ntfs

diskpart-win-screenshot-7

Once formatted to assign Drive letter that is the next available free one in order

DISKPART> assign


diskpart-win-screenshot-8

If instead of auto assigning a letter to new formatted partition, you would want to assign a specific Drive letter, lets say F:\> as it was in our case with the Graphical Windows Disk Management tool earlier in article.

DISKPART> assign letter=F


Using diskpart it is pretty easy to do much stuff from command line such as formatting a new attached empty unallocated drive, or formatting and setting a desired filesysteem of external attached Hard Drive. Note that the disk list arguments will list any externally attached Supported Storage and you can use disklist similarly to do quick format / repartition / wipe out data or whatever.

Further on just for fun I've run CPUID which is a great Windows freeware tool to report System Information, pretty much like the good old Everest such as exact CPU type, MainBoard, Graphics Card and Mainboard type of the certain hardware you have on running.

cpuid-screenshot-windows-10
 
That's all folks Hope this article, helped you learn something new.

Cheers 😉


How to fresh Upgrade mistakenly installed 32-bit Windows 10 Professional to 64-bit Windows / A failure to Disk Clone old SSD 120GB to 512GB HDD due to failed Solid State Drive

Wednesday, November 17th, 2021

upgrade-windows-10-32-bit-to-64-bit-howto-picture

I've been Setting up a new PC with Windows OS that is a bit old a 11 years old Lenovo ThinkCentre model M90P with 8 GB of Memory, Intel(R) Core(TM) i5 CPU         650  @ 3.20GHz   3.19 GHz, Intel Q57 Express Chipset. The machine came to me with Windows 7 preinstalled and the intial goal was to migrate Windows as it is with its data from the old 120GB SSD to new 512 SSD and then to keep the machine at least a bit more up to date to upgrade the old Windows 7 to Windows 10.

This as usual seemed like a very trivial task for a System Administrator, and even if you haven't touched much of Windows as me it makes it look a piece of cake, however as always with computers, once you think you'll be done in 2 hours usually it takes 20+ . Some call it Murphy's law "If something could go wrong then it will go wrong". But putting this situation that I thought all well that's easy lets do it is a kind of a proud Thought for man and the to save us from this Passion of Proudness which according to Church fathers is the worst passion one can have and humiliate us a bit.

God allows some unforseen stuff to happen   🙂 The case with this machine whose original idea I had is to OK I Simply Duplicate the Old Hard Drive to the New one and Place the new one on the ThinkCentre is not a big deal turned to a small adventure 🙂

For this machine hardware I have to say, the old English saying "Old but Gold" is pretty true, especially after I've attached the Samsung 512GB NVME SSD Drive, which my dear friend and brother in Christ "Uncle Emilian" had received as a gift from another friend called Angel. To put even more rant, here name Emilian stems from the Greek Emilianos which translated to English means Adversary.. But anyways The old Intel SSD 120 GB drive which besides being already completely Full of Data,  turned to have Memory DATA Chips (that perhaps burn out / wasted),  so parts of the Drive were Unreadable.
I've realized the fauly SSD fact after, 
trying to first clone the drives with my Hardware Disk Clone device Orico Dual Bay 2.5 6629US3-C device and then using a simple bit to bit copy with dd command.

orico-6629us3-c2-bay-usb3-type-b2.5-type3-5.inch-sata


At first for some weird reason the Cloning of 120GB SSD HDD towards -> 512 GB newer one was unsuccessful – one of the 2 lamp indicators on Source and Destination Drives was continuiously blinking orange as it seemed data could not be read, even though I tried few times and wait for about 1 hour of time for the cloning to complete, so I first suspected that might be an issue with my  last year bought Disk Clone hardware device. So I've attached the 2 Hard Drives towards my Debian GNU / Linux 10 as USB attached drives using the "Toaster" device  and tried a classical copy   from terminal with Disk Druid e.g.


# dd if=/dev/sdb2 of=/dev/sdbc2 bs=180M status=progress conv=noerror, sync

 
dd: error reading '/dev/sdb2': Input/output error
1074889+17746 records in
1092635+0 records out
559429120 bytes (559 MB, 534 MiB) copied, 502933 s, 1.1 kB/s
dd: writing to '/dev/dc2': Input/output error
1074889+17747 records in
1092635+0 records out
559429120 bytes (559 MB, 534 MiB) copied, 502933 s, 1.1 kB/s

Finally I did a manual copy of files from /dev/sdb2 /dev/sdc2 with rsync and part of the files managed to be succesfully copied, about 55Gigabytes out of 110 managed to copy.  Luckily the data on the broken Intel 320 Series 120GB was not top secret stuff so wasting some bits wasn't the end of the world 🙂

Next, I've removed the broken 120Gb SSD which perhaps was about at least 9+ years old and attached to the Lenovo ThinkCentre, the new drive and as my dear friend wanted to have Windows again (his computer has Microsoft "Certificate of Authenticity"), e.g. that OEM Registration Serial Key for Windows 7.

Lenovo-ThinkCentre-M90p-certificate-of-authenticity

I've jumped in and used some old Flash USB Stick Drive to place again Windows 7 (in order to use the same active license) and from there on, I've used another old Windows 10 Installation Bootable stick of mine to upgrade the Windows 7 to Windows 10 (by using this Win 7 to Win 10 upgrade trick it is possible to still continue use your old Windows 7 License Key on Windows 10). So far so good, now I've had Windows 10 Professional Edition installed on the machine, but faced another issue the Memory of the Machine which is 8GB did not get fully detected the machine had detected only 3.22 GB of Memory, for some weird reason.

only-2-80-gb-usable-windows-10-problem-32-bit-cpu-cause-screenshot

After few minutes of investigation online, I've realized, I've installed by mistake a 32 Bit version of Windows 10 Pro…So the next step was of course to upgrade to 64 bit to work around the unrecognized 5.2GB memory… To make sure my Windows 10 Installation is up-to-date I've downloaded the latest one from the Media Creation Installation Tool from Microsoft's website used the tool to burn the Downloaded Image to an Empty USB Stick (mine is 16GB but minimum required would be 4Gb) and proceeded to reboot the Lenovo Desktop machine and boot from the Windows 10 Install Flash Drive. From there on I've had to select I need to install a 64 Bit version of Windows and Skip the Licensing Key fill in Prompt Twice (act as I have no license) as Windows already could recognize the older OEM installed 32 bit install Windows key and automatically fetches the key from there.

Before proceeding to install the 64 Bit Windows, of course double check  that the Machine you have at hand has already the License Key recognized by Microsoft  is 64 Bit capable:

To check 32 bit version of Windows before attempted upgrade is Properly Licensed :

Settings > Update & security > Activation

check-if-windows-is-already-activated-settings-update-and-security-Activation-menus


To check whether Hardware is 64 Capable:

Settings -> System -> About


is-hardware-processor-64-bit-capable-windows-screenshot

32 bit Windows on x64based processor (Machine supports 64 bit OS)


windows10-OS-Installation-media-install-tool

Media Creation Tool Windows 10 MS Installer tool (make sure you select 64-bit (x86) instead of the default

From the Installer, I've installed Windows just like I install a brand new fersh Win OS and after asking the few trivial Installation Program questions landed to the new working OS and proceeded to install the usual software which are a must have on a freshly installed Windows for some of them check my previous article Essential Must have software to install on Fresh  new Windows installation host.