Archive for the ‘Security’ Category

How to set up Notify by email expiring local UNIX user accounts on Linux / BSD with a bash script

Thursday, August 24th, 2023

password-expiry-linux-tux-logo-script-picture-how-to-notify-if-password-expires-on-unix

If you have already configured Linux Local User Accounts Password Security policies Hardening – Set Password expiry, password quality, limit repatead access attempts, add directionary check, increase logged history command size and you want your configured local user accounts on a Linux / UNIX / BSD system to not expire before the user is reminded that it will be of his benefit to change his password on time, not to completely loose account to his account, then you might use a small script that is just checking the upcoming expiry for a predefined users and emails in an array with lslogins command like you will learn in this article.

The script below is written by a colleague Lachezar Pramatarov (Credit for the script goes to him) in order to solve this annoying expire problem, that we had all the time as me and colleagues often ended up with expired accounts and had to bother to ask for the password reset and even sometimes clearance of account locks. Hopefully this little script will help some other unix legacy admin systems to get rid of the account expire problem.

For the script to work you will need to have a properly configured SMTP (Mail server) with or without a relay to be able to send to the script predefined email addresses that will get notified. 

Here is example of a user whose account is about to expire in a couple of days and who will benefit of getting the Alert that he should hurry up to change his password until it is too late 🙂

[root@linux ~]# date
Thu Aug 24 17:28:18 CEST 2023

[root@server~]# chage -l lachezar
Last password change                                    : May 30, 2023
Password expires                                        : Aug 28, 2023
Password inactive                                       : never
Account expires                                         : never
Minimum number of days between password change          : 0
Maximum number of days between password change          : 90
Number of days of warning before password expires       : 14

Here is the user_passwd_expire.sh that will report the user

# vim  /usr/local/bin/user_passwd_expire.sh

#!/bin/bash

# This script will send warning emails for password expiration 
# on the participants in the following list:
# 20, 15, 10 and 0-7 days before expiration
# ! Script sends expiry Alert only if day is Wednesday – if (( $(date +%u)==3 )); !

# email to send if expiring
alert_email='alerts@pc-freak.net';
# the users that are admins added to belong to this group
admin_group="admins";
notify_email_header_customer_name='Customer Name';

declare -A mails=(
# list below accounts which will receive account expiry emails

# syntax to define uid / email
# [“account_name_from_etc_passwd”]="real_email_addr@fqdn";

#    [“abc”]="abc@fqdn.com"
#    [“cba”]="bca@fqdn.com"
    [“lachezar”]="lachezar.user@gmail.com"
    [“georgi”]="georgi@fqdn-mail.com"
    [“acct3”]="acct3@fqdn-mail.com"
    [“acct4”]="acct4@fqdn-mail.com"
    [“acct5”]="acct5@fqdn-mail.com"
    [“acct6”]="acct6@fqdn-mail.com"
#    [“acct7”]="acct7@fqdn-mail.com"
#    [“acct8”]="acct8@fqdn-mail.com"
#    [“acct9”]="acct9@fqdn-mail.com"
)

declare -A days

while IFS="=" read -r person day ; do
  days[“$person”]="$day"
done < <(lslogins –noheadings -o USER,GROUP,PWD-CHANGE,PWD-WARN,PWD-MIN,PWD-MAX,PWD-EXPIR,LAST-LOGIN,FAILED-LOGIN  –time-format=iso | awk '{print "echo "$1" "$2" "$3" $(((($(date +%s -d \""$3"+90 days\")-$(date +%s)))/86400)) "$5}' | /bin/bash | grep -E " $admin_group " | awk '{print $1 "=" $4}')

#echo ${days[laprext]}
for person in "${!mails[@]}"; do
     echo "$person ${days[$person]}";
     tmp=${days[$person]}

#     echo $tmp
# each person will receive mails only if 20th days / 15th days / 10th days remaining till expiry or if less than 7 days receive alert mail every day

     if  (( (${tmp}==20) || (${tmp}==15) || (${tmp}==10) || ((${tmp}>=0) && (${tmp}<=7)) )); 
     then
         echo "Hello, your password for $(hostname -s) will expire after ${days[$person]} days.” | mail -s “$notify_email_header_customer_name $(hostname -s) server password expiration”  -r passwd_expire ${mails[$person]};
     elif ((${tmp}<0));
     then
#          echo "The password for $person on $(hostname -s) has EXPIRED before{days[$person]} days. Please take an action ASAP.” | mail -s “EXPIRED password of  $person on $(hostname -s)”  -r EXPIRED ${mails[$person]};

# ==3 meaning day is Wednesday the day on which OnCall Person changes

        if (( $(date +%u)==3 ));
        then
             echo "The password for $person on $(hostname -s) has EXPIRED. Please take an action." | mail -s "EXPIRED password of  $person on $(hostname -s)"  -r EXPIRED $alert_email;
        fi
     fi  
done


To make the script notify about expiring user accounts, place the script under some directory lets say /usr/local/bin/user_passwd_expire.sh and make it executable and configure a cron job that will schedule it to run every now and then.

# cat /etc/cron.d/passwd_expire_cron

# /etc/cron.d/pwd_expire
#
# Check password expiration for users
#
# 2023-01-16 LPR
#
02 06 * * * root /usr/local/bin/user_passwd_expire.sh >/dev/null

Script will execute every day morning 06:02 by the cron job and if the day is wednesday (3rd day of week) it will send warning emails for password expiration if 20, 15, 10 days are left before account expires if only 7 days are left until the password of user acct expires, the script will start sending the Alarm every single day for 7th, 6th … 0 day until pwd expires.

If you don't have an expiring accounts and you want to force a specific account to have a expire date you can do it with:

# chage -E 2023-08-30 someuser


Or set it for new created system users with:

# useradd -e 2023-08-30 username


That's it the script will notify you on User PWD expiry.

If you need to for example set a single account to expire 90 days from now (3 months) that is a kind of standard password expiry policy admins use, do it with:

# date -d "90 days" +"%Y-%m-%d"
2023-11-22


Ideas for user_passwd_expire.sh script improvement
 

The downside of the script if you have too many local user accounts is you have to hardcode into it the username and user email_address attached to and that would be tedios task if you have 100+ accounts. 

However it is pretty easy if you already have a multitude of accounts in /etc/passwd that are from UID range to loop over them in a small shell loop and build new array from it. Of course for a solution like this to work you will have to have defined as user data as GECOS with command like chfn.
 

[georgi@server ~]$ chfn
Changing finger information for test.
Name [test]: 
Office []: georgi@fqdn-mail.com
Office Phone []: 
Home Phone []: 

Password: 

[root@server test]# finger georgi
Login: georgi                       Name: georgi
Directory: /home/georgi                   Shell: /bin/bash
Office: georgi@fqdn-mail.com
On since чт авг 24 17:41 (EEST) on :0 from :0 (messages off)
On since чт авг 24 17:43 (EEST) on pts/0 from :0
   2 seconds idle
On since чт авг 24 17:44 (EEST) on pts/1 from :0
   49 minutes 30 seconds idle
On since чт авг 24 18:04 (EEST) on pts/2 from :0
   32 minutes 42 seconds idle
New mail received пт окт 30 17:24 2020 (EET)
     Unread since пт окт 30 17:13 2020 (EET)
No Plan.

Then it should be relatively easy to add the GECOS for multilpe accounts if you have them predefined in a text file for each existing local user account.

Hope this script will help some sysadmin out there, many thanks to Lachezar for allowing me to share the script here.
Enjoy ! 🙂

How to log every Linux executed command by every running system program to separte log via rsyslog for better server Security and audit trails

Wednesday, March 15th, 2023

snoopy-log-all-commands-on-linux-server-tux-logo

To keep a good eye on installed Debian Linux server security if you have to be PCI compliant (e.g. follow a high security) standards or you work in a company, where system security is crucial and any kind of security breach is untorrelated and in case of unexpected security holes exploited on running system processess listening on network peripherals (that malicious crackers) does to be able to easily identify what really happened e.g. do a Security RCA (Root Cause Analysis) for how this hack happened in order to mitigate it for future if possible capture the crackers and close the security hole the better, some kind of paranoid running program logging is required.

For such higher security systems, Linux / BSD / UNIX sysadmins can benefit from;

Snoopy command logger – a small library that logs all program executions on your Linux/BSD system.

Embedding snoopy into a running uptodate system is relatively easy, you either have to download the respective distribution package (in this particular article that would be Debian GNU / Linux) or for Linux distributions, that doesn't have the package integrated into the existing package repositories or externally available package repos, the code can be easily git cloned and installed from github snoopy program page following the README.md


However consider that snoopy run and logging the executed commands, make sure that if you use it you have rsyslogd configured to log to external logging server to make sure (someone did not manipulate the running system to avoid their actions being logged by snoopy, this is pointed by snoopy security disclaimer on the FAQ of official github snoopy project page, the page reads as so:

Security disclaimer
WARNING: Snoopy is not a reliable auditing solution.
Rogue users can easily manipulate environment to avoid their actions being logged by Snoopy. Consult this FAQ entry for more information.                


Most likely this warning is pointed out by the tool authors, in order to set the logging Tool creators free for any liability in case if someone uses the snoopy tool for some unauthorized logging
and sniffing of systems etc.

Before we proceed with the tool, install first for some clarity it is a good idea to know on what kind of Debian Linux you're about to install Snoopy command logger.

root@linux:~ # cat /etc/os-release
PRETTY_NAME="Debian GNU/Linux 11 (bullseye)"
NAME="Debian GNU/Linux"
VERSION_ID="11"
VERSION="11 (bullseye)"
VERSION_CODENAME=bullseye
ID=debian
HOME_URL="https://www.debian.org/"
SUPPORT_URL="https://www.debian.org/support"
BUG_REPORT_URL="https://bugs.debian.org/"


1. Prepare separate log file for snoopy that will keep log of every system command run by running processes visible by (ps -ef)

Next check the permissions user / group and read / write / executable flags with which the default generated rsyslog will be writting and set snoopy to whatever you would like it to write with

root@linux:~ # cat /etc/rsyslog.conf | grep "^\$File\|\$Umask"~
$FileOwner root
$FileGroup adm
$FileCreateMode 0640


Create Rsyslog configuration for snoopy.log

root@linux:~ # cat << EOF | sudo tee /etc/rsyslog.d/01-snoopy.conf
# Send snoopy messages to a dedicated logfile
if (\$programname startswith "snoopy") then {
  action(type="omfile" fileOwner="root" fileGroup="root" fileCreateMode="0600" file="/var/log/snoopy.log")
  stop
}

EOF


To make sure that snoopy library will be preloaded after installation on next boot:

root@linux:~ # cat << EOF | sudo debconf-set-selections
snoopy snoopy/install-ld-preload boolean true
EOF


root@linux:~ # systemctl restart rsyslog


root@linux:~ # systemctl status rsyslog
● rsyslog.service – System Logging Service
     Loaded: loaded (/lib/systemd/system/rsyslog.service; enabled; vendor preset: enabled)
     Active: active (running) since Tue 2023-03-14 12:59:05 EET; 59min ago
TriggeredBy: ● syslog.socket
       Docs: man:rsyslogd(8)
             man:rsyslog.conf(5)
             https://www.rsyslog.com/doc/
   Main PID: 713745 (rsyslogd)
      Tasks: 6 (limit: 4654)
     Memory: 1.1M
        CPU: 548ms
     CGroup: /system.slice/rsyslog.service
             └─713745 /usr/sbin/rsyslogd -n -iNONE

мар 14 12:59:05 haproxy2 systemd[1]: Started System Logging Service.
мар 14 12:59:05 haproxy2 rsyslogd[713745]: warning: ~ action is deprecated, consider using the 'stop' statement instead [v8.210>
мар 14 12:59:05 haproxy2 rsyslogd[713745]: [198B blob data]
мар 14 12:59:05 haproxy2 rsyslogd[713745]: imuxsock: Acquired UNIX socket '/run/systemd/journal/syslog' (fd 3) from systemd.  [>
мар 14 12:59:05 haproxy2 rsyslogd[713745]: [origin software="rsyslogd" swVersion="8.2102.0" x-pid="713745" x-info="https://www.>
мар 14 13:19:05 haproxy2 rsyslogd[713745]: — MARK —
мар 14 13:39:05 haproxy2 rsyslogd[713745]: — MARK —


2. Install snoopy deb package and configure it

root@linux:~ # apt install snoopy
Четене на списъците с пакети… Готово
Изграждане на дървото със зависимости… Готово
Четене на информацията за състоянието… Готово
Следните пакети са били инсталирани автоматично и вече не са необходими:
  bsdmainutils cpp-8 geoip-database libasan5 libbind9-161 libcroco3 libdns1104 libdns1110 libevent-core-2.1-6
  libevent-pthreads-2.1-6 libgdk-pixbuf-xlib-2.0-0 libgdk-pixbuf2.0-0 libgeoip1 libicu63 libisc1100 libisc1105 libisccc161
  libisccfg163 libisl19 liblwres161 libmpdec2 libmpx2 libperl5.28 libpython2-stdlib libpython2.7-minimal libpython2.7-stdlib
  libpython3.7-minimal libpython3.7-stdlib libreadline7 netcat-traditional node-ansi-align node-arrify node-bluebird
  node-boxen node-builtin-modules node-call-limit node-camelcase node-cli-boxes node-cliui node-co node-concat-stream
  node-config-chain node-cross-spawn node-cyclist node-decamelize node-decompress-response node-deep-extend node-detect-indent
  node-detect-newline node-duplexer3 node-duplexify node-editor node-end-of-stream node-errno node-execa node-find-up
  node-flush-write-stream node-from2 node-fs-vacuum node-get-caller-file node-get-stream node-got node-has-symbol-support-x
  node-has-to-string-tag-x node-import-lazy node-invert-kv node-is-buffer node-is-builtin-module node-is-npm node-is-object
  node-is-plain-obj node-is-retry-allowed node-is-stream node-isurl node-json-buffer node-kind-of node-latest-version
  node-lazy-property node-lcid node-libnpx node-locate-path node-lowercase-keys node-mem node-merge-stream node-mimic-fn
  node-mimic-response node-minimist node-mississippi node-node-uuid node-npm-run-path node-os-locale node-p-cancelable
  node-p-finally node-p-limit node-p-locate node-p-timeout node-package-json node-parallel-transform node-path-exists
  node-path-is-inside node-prepend-http node-proto-list node-prr node-pump node-pumpify node-qw node-rc
  node-registry-auth-token node-registry-url node-require-directory node-require-main-filename node-semver-diff node-sha
  node-shebang-command node-shebang-regex node-slide node-sorted-object node-stream-each node-stream-iterate node-stream-shift
  node-strip-eof node-strip-json-comments node-term-size node-through2 node-timed-out node-typedarray node-uid-number
  node-unpipe node-url-parse-lax node-url-to-options node-which-module node-widest-line node-wrap-ansi node-xdg-basedir
  node-xtend node-y18n node-yargs node-yargs-parser perl-modules-5.28 python-pkg-resources python2 python2-minimal python2.7
  python2.7-minimal python3.7-minimal

Използвайте „apt autoremove“ за да ги премахнете.
Следните НОВИ пакети ще бъдат инсталирани:
  snoopy
0 актуализирани, 1 нови инсталирани, 0 за премахване и 1 без промяна.
Необходимо е да се изтеглят 46,0 kB архиви.
След тази операция ще бъде използвано 124 kB допълнително дисково пространство.
Изт:1 http://deb.debian.org/debian bullseye/main amd64 snoopy amd64 2.4.12-1 [46,0 kB]
Изтеглени 46,0 kB за 0с (93,2 kB/сек)
Предварително настройване на пакети …


Selecting previously unselected package snoopy.
(Reading database … 56067 files and directories currently installed.)
Preparing to unpack …/snoopy_2.4.12-1_amd64.deb ...
Unpacking snoopy (2.4.12-1) …
Setting up snoopy (2.4.12-1) …
Processing triggers for libc-bin (2.31-13+deb11u5) …

root@linux:/etc# ls -al /var/log/snoopy.log
-rw——- 1 root root 14472 14 мар 13:40 /var/log/snoopy.log

Any specific configuration for snoopy can be tuned through /etc/snoopy.ini

Now you will find all the commands executed by all monitored running processes in /var/log/snoopy.

root@linux:/etc# tail -30 /var/log/snoopy.log
Mar 14 12:59:32 haproxy2 snoopy[713804]: [login:root ssh:(192.168.0.1 62796 192.168.0.210 22) sid:713792 tty:/dev/pts/2 (0/root) uid:root(0)/root(0) cwd:/]: ldconfig
Mar 14 12:59:32 haproxy2 snoopy[713806]: [login:zabbix ssh:((undefined)) sid:682168 tty:(none) ((none)/(none)) uid:zabbix(108)/zabbix(108) cwd:/]: who
Mar 14 12:59:32 haproxy2 snoopy[713807]: [login:zabbix ssh:((undefined)) sid:682168 tty:(none) ((none)/(none)) uid:zabbix(108)/zabbix(108) cwd:/]: wc -l
Mar 14 13:00:07 haproxy2 snoopy[713815]: [login:root ssh:((undefined)) sid:713815 tty:(none) ((none)/(none)) uid:root(0)/root(0) cwd:/usr/lib/sysstat]: /usr/lib/sysstat/sadc -F -L -S DISK 1 1 /var/log/sysstat
Mar 14 13:00:32 haproxy2 snoopy[713823]: [login:zabbix ssh:((undefined)) sid:682168 tty:(none) ((none)/(none)) uid:zabbix(108)/zabbix(108) cwd:/]: who
Mar 14 13:00:32 haproxy2 snoopy[713824]: [login:zabbix ssh:((undefined)) sid:682168 tty:(none) ((none)/(none)) uid:zabbix(108)/zabbix(108) cwd:/]: wc -l
Mar 14 13:01:32 haproxy2 snoopy[713834]: [login:zabbix ssh:((undefined)) sid:682168 tty:(none) ((none)/(none)) uid:zabbix(108)/zabbix(108) cwd:/]: who
Mar 14 13:01:32 haproxy2 snoopy[713835]: [login:zabbix ssh:((undefined)) sid:682168 tty:(none) ((none)/(none)) uid:zabbix(108)/zabbix(108) cwd:/]: wc -l
Mar 14 13:02:32 haproxy2 snoopy[713843]: [login:zabbix ssh:((undefined)) sid:682168 tty:(none) ((none)/(none)) uid:zabbix(108)/zabbix(108) cwd:/]: who
Mar 14 13:02:32 haproxy2 snoopy[713844]: [login:zabbix ssh:((undefined)) sid:682168 tty:(none) ((none)/(none)) uid:zabbix(108)/zabbix(108) cwd:/]: wc -l
Mar 14 13:03:32 haproxy2 snoopy[713855]: [login:zabbix ssh:((undefined)) sid:682168 tty:(none) ((none)/(none)) uid:zabbix(108)/zabbix(108) cwd:/]: who
Mar 14 13:03:32 haproxy2 snoopy[713856]: [login:zabbix ssh:((undefined)) sid:682168 tty:(none) ((none)/(none)) uid:zabbix(108)/zabbix(108) cwd:/]: wc -l
Mar 14 13:04:32 haproxy2 snoopy[713868]: [login:zabbix ssh:((undefined)) sid:682168 tty:(none) ((none)/(none)) uid:zabbix(108)/zabbix(108) cwd:/]: who


3. Set up logrotation (archiving) for snoopy logs

root@linux:/etc# vim /etc/logrotate.d/snoopy    


/var/log/snoopy.log {
        daily
        rotate 30
        compress
        delaycompress
        notifempty
        create 640 root adm

}
 

If you want to test logrotation without actually rotating the file:               

root@linux:/etc# logrotate –debug –force /etc/logrotate.d/snoopy   
  log needs rotating
rotating log /var/log/snoopy.log, log->rotateCount is 30
dateext suffix '-20230314'
glob pattern '-[0-9][0-9][0-9][0-9][0-9][0-9][0-9][0-9]'
previous log /var/log/snoopy.log.1 does not exist
renaming /var/log/snoopy.log.30.gz to /var/log/snoopy.log.31.gz (rotatecount 30, logstart 1, i 30),


renaming /var/log/snoopy.log.1.gz to /var/log/snoopy.log.2.gz (rotatecount 30, logstart 1, i 1),
renaming /var/log/snoopy.log.0.gz to /var/log/snoopy.log.1.gz (rotatecount 30, logstart 1, i 0),
log /var/log/snoopy.log.31.gz doesn't exist — won't try to dispose of it
renaming /var/log/snoopy.log to /var/log/snoopy.log.1
creating new /var/log/snoopy.log mode = 0640 uid = 0 gid = 4


4. Monitoring only selected applications  executed commands with snoopy                                                                             

By default snoopy after installed will set itself to monitor all kind of running processes on the system is done by preloading the ldconfig's (libcld.so.preload

root@haproxy2:/etc# cat /etc/ld.so.preload
/lib/x86_64-linux-gnu/libsnoopy.so

If you want to monitor a concrete application and not log everything from the running processes in process list, comment this out this line run ldconfig command

Then to any concrete application you would like to monitor with snoopy add to its init script either /etc/init.d/app_init_script or to systemctl's start script before the application binary program run:

export LD_PRELOAD=/lib/snoopy.so


  As per the README states


 Snoopy is placed in /etc/ld.so.preload to trap all occurrences of exec, if 
 you wish to monitor only certain applications you can do so through the    
 LD_PRELOAD environment variable.
Simply set it to /lib/snoopy.so before  loading the application.

For example

 # export LD_PRELOAD=/lib/snoopy.so                                           
 # lynx http://example.com/                           


Switching from PasswordSafe to Keepass database, migrating .psafe3 to .kdbx format howto

Thursday, February 23rd, 2023

passwordsafe-to-keepass-migration-logo

I have been using PasswordSafe for many years within my job location as system administrator on the Windows computers I do use as dumb hosts to administrate remotely via ssh servers, develop code in bash / perl or just store different SysAdmin management tools and interfaces passwords. The reason behind was simply that I come out from a Linux background as I've used for daily Sysadmin job for many years GNU / Linux and there I always prefer GNOME (gnome GTK interface) in favour of KDE's (QT Library), and whence I came to work for the "Evil" Windows oriented world of corporations  for the sake of Outlook use and Office 365 as well as Citrix accessibility i've become forced by the circumstances to use Windows. 
Hence for a PasswordManager for Windows back in the years, I preferred the simplicity of interface of PasswordSafe instead of Keepass which always reminded me of the nasty KDE.
PasswordSafe is really cool and a handy program and it works well, but recetnly when I had to store many many passwords and easily navigate through each of it I realized, by observing colleagues, that KeePass as of time of writting this article is much more Powerful and easy to use, as I can see all records of a searched passwords on a Single screen, instead of scrolling like crazy with PasswordSafe through the passowrds.

I didn’t really feel like cutting and pasting every field for all my passwords (plus I started experiencing some PasswordSafe copy / paste passwords issues – maybe not related to PasswordSafe itself so this was the turning point I decided to migrate to Keepass.

For that, started looking at the import export functions for each program. 

After a quick search, I found few articles online explaining on how the migration of PasswordSafe to KeePass can be easily handled as the versions of Keepass and Password safe are moving all the time, of course usually some of the guides to be found online are never competely upto date, so I had to slightly modify one of the articles and come up with this one 🙂 .
 

  •  My PasswordSafe program that keeps my account password records and notes is version is
    V 3.59 built on May 28 2022 and is running on my Windows 10 OS 64 bit release
  • The installed KeePass version to where I have migrated the Pwsafe password database Successfully is 2.48 64 Bit
     
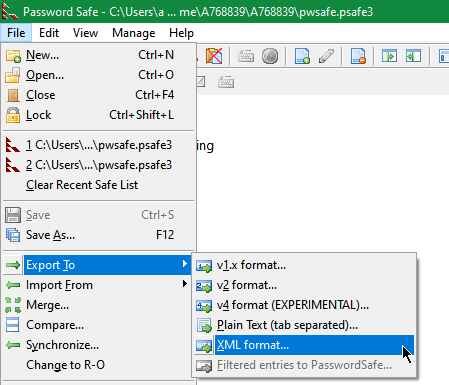
  1. Use the Password Safe function to export to XML file Format
    (File -> Export To -> XML Format )


    pwsafe.screenshot-export-password-psafe3
     

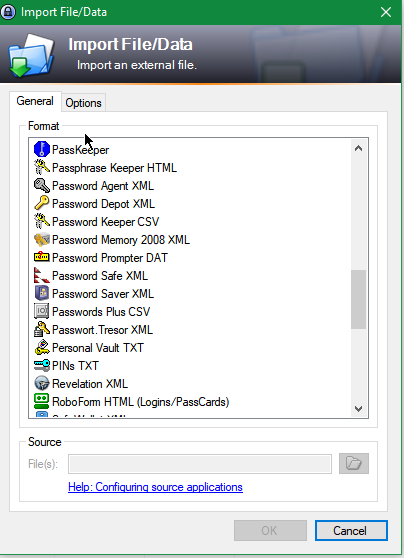
  2. Import the text file into KeePass
    (File->Import From-> Password Safe XML file)


    import-file-data-keepass-screenshot

This process worked quite fine. All of the passwords were imported .
Despite the importing (expected small glitches – please recheck that all was imported fine, before joy), the process is quicker than copy/pasting every field for each entry.

For those of you who are more worried about security than I am, you know this is a very insecure method to transfer passwords. For others, you may wish to export the (unencrypted) text file to a Veracrypt – that is a Truecypt fork (as nowadays obsolete unmaintaned and probably insecury) – a Free Open-Source On-The-Fly Disk Encryption Software to prepare  Veracrypt  partition and / or use Eraser on the text file once you’re finished with it or use another of the free Veracrypt open-source (free software) alternatives such DiskCryptor or even the proprietary Windows BitLocker / CipherShed / Axcrypt or some other encryption alternative software for Windows XP / 2000 / 7 10 that is out there.

NB! Please  don’t do this on a public computer or a PC that you don't administrate.
You never know who might find your passwords or might be sniffing on your OS, as today there are so many devices that perhaps are hacked and listening and collecting password datas  🙂

That's it now I enjoy my KeePass but I'm thankful to PasswordSafe developers, who have easified my password management Virtual life for years 🙂
Any hints on how you migrated PasswordSafe to Keepass are mostly welcome. Also will be nice to hear of hard-core PasswordSafe hints or plugins that can power-up the password storage, maybe I can get convinced back to return back to PasswordSafe 🙂
 

How to disable appArmor automatically installed and loaded after Linux Debian 10 to 11 Upgrade. Disable Apparmour on Deb based Linux

Friday, January 28th, 2022

check-apparmor-status-linux-howto-disable-Apparmor_on-debian-ubuntu-mint-and-other-deb-based-linux-distributions

I've upgraded recently all my machines from Debian Buster Linux 10 to Debian 11 Bullseye (if you wonder what Bullseye is) this is one of the heroes of Disneys Toy Stories which are used for a naming of General Debian Distributions.
After the upgrade most of the things worked expected, expect from some stuff like MariaDB (MySQL) and other weirdly behaving services. After some time of investigation being unable to find out what was causing the random issues observed on the machines. I finally got the strange daemon improper functioning and crashing was caused by AppArmor.

AppArmor ("Application Armor") is a Linux kernel security module that allows the system administrator to restrict programs' capabilities with per-program profiles. Profiles can allow capabilities like network access, raw socket access, and the permission to read, write, or execute files on matching paths. AppArmor supplements the traditional Unix discretionary access control (DAC) model by providing mandatory access control (MAC). It has been partially included in the mainline Linux kernel since version 2.6.36 and its development has been supported by Canonical since 2009.

The general idea of apparmor is wonderful as it could really strengthen system security, however it should be setup on install time and not setup on update time. For one more time I got convinced myself that upgrading from version to version to keep up to date with security is a hard task and often the results are too much unexpected and a better way to upgrade from General version to version any modern Linux / Unix distribution (and their forked mobile equivalents Android etc.) is to just make a copy of the most important configuration, setup the services on a freshly new installed machine be it virtual or a physical Server and rebuild the whole system from scratch, test and then run the system in production, substituting the old server general version with the new machine. 

The rest is leading to so much odd issues like this time with AppArmors causing distractions on the servers hosted applications.

But enough rent if you're unlucky and unwise enough to try to Upgrade Debian / Ubuntu 20, 21 / Mint 18, 19 etc. or whatever Deb distro from older general release to a newer One. Perhaps the best first thing to do onwards is stop and remove AppArmor (those who are hardcore enthusiasts could try to enable the failing services due to apparmor), by disabling the respective apparmor hardening profile but i did not have time to waste on stupid stuff and experiment so I preferred to completely stop it. 

To identify the upgrade oddities has to deal with apparmors service enabled security protections you should be able to find respective records inside /var/log/messages as well as in /var/log/audit/audit.log


# dmesg

[   64.210463] audit: type=1400 audit(1548120161.662:21): apparmor="DENIED" operation="sendmsg" info="Failed name lookup – disconnected path" error=-13 profile="/usr/sbin/mysqld" name="run/systemd/notify" pid=2527 comm="mysqld" requested_mask="w" denied_mask="w" fsuid=113 ouid=0
[  144.364055] audit: type=1400 audit(1548120241.595:22): apparmor="DENIED" operation="sendmsg" info="Failed name lookup – disconnected path" error=-13 profile="/usr/sbin/mysqld" name="run/systemd/notify" pid=2527 comm="mysqld" requested_mask="w" denied_mask="w" fsuid=113 ouid=0
[  144.465883] audit: type=1400 audit(1548120241.699:23): apparmor="DENIED" operation="sendmsg" info="Failed name lookup – disconnected path" error=-13 profile="/usr/sbin/mysqld" name="run/systemd/notify" pid=2527 comm="mysqld" requested_mask="w" denied_mask="w" fsuid=113 ouid=0
[  144.566363] audit: type=1400 audit(1548120241.799:24): apparmor="DENIED" operation="sendmsg" info="Failed name lookup – disconnected path" error=-13 profile="/usr/sbin/mysqld" name="run/systemd/notify" pid=2527 comm="mysqld" requested_mask="w" denied_mask="w" fsuid=113 ouid=0
[  144.666722] audit: type=1400 audit(1548120241.899:25): apparmor="DENIED" operation="sendmsg" info="Failed name lookup – disconnected path" error=-13 profile="/usr/sbin/mysqld" name="run/systemd/notify" pid=2527 comm="mysqld" requested_mask="w" denied_mask="w" fsuid=113 ouid=0
[  144.767069] audit: type=1400 audit(1548120241.999:26): apparmor="DENIED" operation="sendmsg" info="Failed name lookup – disconnected path" error=-13 profile="/usr/sbin/mysqld" name="run/systemd/notify" pid=2527 comm="mysqld" requested_mask="w" denied_mask="w" fsuid=113 ouid=0
[  144.867432] audit: type=1400 audit(1548120242.099:27): apparmor="DENIED" operation="sendmsg" info="Failed name lookup – disconnected path" error=-13 profile="/usr/sbin/mysqld" name="run/systemd/notify" pid=2527 comm="mysqld" requested_mask="w" denied_mask="w" fsuid=113 ouid=0


1. How to check if AppArmor is running on the system

If you have a system with enabled apparmor you should get some output like:

root@haproxy2:~# apparmor_status 
apparmor module is loaded.
5 profiles are loaded.
5 profiles are in enforce mode.
   /usr/sbin/ntpd
   lsb_release
   nvidia_modprobe
   nvidia_modprobe//kmod
   tcpdump
0 profiles are in complain mode.
1 processes have profiles defined.
1 processes are in enforce mode.
   /usr/sbin/ntpd (387) 
0 processes are in complain mode.
0 processes are unconfined but have a profile defined.


Also if you check the service you will find out that Debian's Major Release upgrade from 10 Buster to 11 BullsEye with.

apt update -y && apt upgrade -y && apt dist-update -y

automatically installed apparmor and started the service, e.g.:

# systemctl status apparmor
● apparmor.service – Load AppArmor profiles
     Loaded: loaded (/lib/systemd/system/apparmor.service; enabled; vendor pres>
     Active: active (exited) since Sat 2022-01-22 23:04:58 EET; 5 days ago
       Docs: man:apparmor(7)
             https://gitlab.com/apparmor/apparmor/wikis/home/
    Process: 205 ExecStart=/lib/apparmor/apparmor.systemd reload (code=exited, >
   Main PID: 205 (code=exited, status=0/SUCCESS)
        CPU: 43ms

яну 22 23:04:58 haproxy2 apparmor.systemd[205]: Restarting AppArmor
яну 22 23:04:58 haproxy2 apparmor.systemd[205]: Reloading AppArmor profiles
яну 22 23:04:58 haproxy2 systemd[1]: Starting Load AppArmor profiles…
яну 22 23:04:58 haproxy2 systemd[1]: Finished Load AppArmor profiles.


# dpkg -l |grep -i apparmor
ii  apparmor                          2.13.6-10                      amd64        user-space parser utility for AppArmor
ii  libapparmor1:amd64                2.13.6-10                      amd64        changehat AppArmor library
ii  libapparmor-perl:amd64               2.13.6-10


In case AppArmor is disabled, you will get something like:

root@pcfrxenweb:~# aa-status 
apparmor module is loaded.
0 profiles are loaded.
0 profiles are in enforce mode.
0 profiles are in complain mode.
0 processes have profiles defined.
0 processes are in enforce mode.
0 processes are in complain mode.
0 processes are unconfined but have a profile defined.


2. How to disable AppArmor for particular running services processes

In my case after the upgrade of a system running a MySQL Server suddenly out of nothing after reboot the Database couldn't load up properly and if I try to restart it with the usual

root@pcfrxen: /# systemctl restart mariadb

I started getting errors like:

DBI connect failed : Can't connect to local MySQL server through socket '/var/run/mysqld/mysqld.sock' (2)

To get an idea of what kind of profile definitions, could be enabled disabled on apparmor enabled system do:
 

root@pcfrxen:/var/log# ls -1 /etc/apparmor.d/
abstractions/
force-complain/
local/
lxc/
lxc-containers
samba/
system_tor
tunables/
usr.bin.freshclam
usr.bin.lxc-start
usr.bin.man
usr.bin.tcpdump
usr.lib.telepathy
usr.sbin.clamd
usr.sbin.cups-browsed
usr.sbin.cupsd
usr.sbin.ejabberdctl
usr.sbin.mariadbd
usr.sbin.mysqld
usr.sbin.named
usr.sbin.ntpd
usr.sbin.privoxy
usr.sbin.squid

Lets say you want to disable any protection AppArmor profile for MySQL you can do it with:

root@pcfrxen:/ #  ln -s /etc/apparmor.d/usr.sbin.mysqld /etc/apparmor.d/disable/
root@pcfrxen:/ # apparmor_parser -R /etc/apparmor.d/usr.sbin.mysqld 


To make the system know you have disabled a profile you should restart apparmor service:
 

root@pcfrxen:/ # systemctl restart apparmor.service


3. Disable completely AppArmor to save your time weird system behavior and hang bangs

In my opinion the best thing to do anyways, especially if you don't run Containerized applications, that runs only one single application / service at at time is to completely disable apparmor, otherwise you would have to manually check each of the running applications before the upgrade and make sure that apparmor did not bring havoc to some of it.
Hence my way was to simple get rid of apparmor by disable and remove the related package completely out of the system to do so:

root@pcfrxen:/ # systemctl stop apparmor
root@pcfrxen:/ # systemctl disable apparmor
root@pcfrxen:/ # apt-get remove -y apparmor

Once  disabled to make the system completely load out anything loaded related to apparmor loaded into system memory, you should do machine reboot.

root@pcfrxen:/ # shutdown -r now

Hopefully if you run into same issue after removal of apparmor most of the things should be working fine after the upgrade. Anyways I had to go through each and every app everywhere and make sure it is working as expected. The major release upgrade has also automatically enabled me some of the already disable services, thus if you have upgraded like me I would advice you do a close check on every enabled / running service everywhere:

root@pcfrxen:/# systemctl list-unit-files|grep -i enabled

Beware of AppArmor  !!! 🙂

CentOS disable SELinux permanently or one time on grub Linux kernel boot time

Saturday, July 24th, 2021

selinux-artistic-penguin-logo-protect-data


1. Office 365 cloud connected computer and a VirtualBox hosted machine with SELINUX preventing it to boot

At my job we're in process of migrating my old Lenovo Laptop Thinkpad model L560 Laptop to Dell Latitude 5510 wiith Intel Core i5 vPro CPU and 256 Gb SSD Hard Drive.  The new laptops are generally fiine though they're not even a middle class computers and generally I prefer thinkpads. The sad thing out of this is our employee decided to migrate to Office 365 (again perhaps another stupid managerial decision out of an excel sheet wtih a balance to save some money … 

As you can imagine Office 365 is not really PCI Standards compliant and not secure since our data is stored in Microsoft cloud and theoretically Microsoft has and owns our data or could wipe loose the data if they want to. The other obvious security downside I've noticed with the new "Secure PCI complaint laptop" is the initial PC login screen which by default offers fingerprint authentication or the even worse  and even less secure face recognition, but obviosly everyhing becomes more and more crazy and people become less and less cautious for security if that would save money or centralize the data … In the name of security we completely waste security that is very dubious paradox I don't really understand but anyways, enough rant back to the main topic of this article is how to and I had to disable selinux?

As part of Migration I've used Microsoft OneDrive to copy old files from the Thinkpad to the Latitude (as on the old machine USB's are forbidden and I cannot copy over wiith a siimple USB driive, as well as II have no right to open the laptop and copy data from the Hard driive, and even if we had this right without breaking up some crazy company policy that will not be possible as the hard drive data on old laptop is encrypted, the funny thing is that the new laptop data comes encrypted and there is no something out of the box as BitDefender or McAffee incryption (once again, obviously our data security is a victim of some managarial decisions) …
 

2. OneDrive copy problems unable to sync some of the copied files to Onedrive


Anyways as the Old Laptop's security is quite paranoid and we're like Fort Nox, only port 80 and port 443 connections to the internet can be initiated to get around this harsh restrictions it was as simple to use a Virtualbox Virtual Machine. So on old laptop I've installed a CentOS 7 image which I used so far and I used one drive to copy my vbox .vdi image on the new laptop work machine.

The first head buml was the .vdi which seems to be prohibited to be copied to OneDrive, so to work around this I had to rename the origianl CentOS7.vdi to CentOS7.vdi-renamed on old laptop and once the data is in one drive copy my Vitualbox VM/ directory from one drive to the Dell Latitude machine and rename the .vdi-named towards .vdi as well as import it from the latest installed VirtualBox on the new machine.
 

3. Disable SELINUX from initial grub boot


So far so good but as usual happens with miigrations I've struck towards another blocker, the VM image once initiated to boot from Virtualbox badly crashed with some complains that selinux cannot be loaded.
Realizing CentOS 7 has the more or less meaningless Selinux, I've took the opportunity to disable SeLinux.

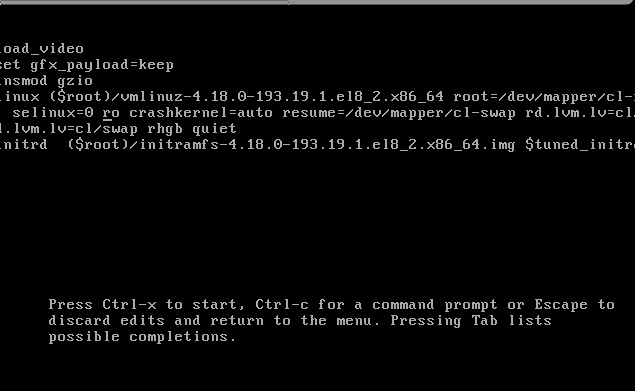
To do so I've booted the Kernel with Selinux disabled from GRUB2 loader prompt before Kernel and OS Userland boots.


I thought I need to type the information on the source in grub. What I did is very simple, on the Linux GRUB boot screen I've pressed

'e' keyboard letter

that brought the grub boot loader into edit mode.

Then I had to add selinux=0 on the edited selected kernel version, as shown in below screenshot:

selinux-disable-from-grub.png

Next to boot the Linux VM without Selinux enabled one time,  just had to press together

Ctrl+X then add selinux=0 on the edited selected kernel version, that should be added as shown in the screenshot somewhere after the line of
root=/dev/mapper/….

4. Permanently Disable Selinux on CentOS 7


Once I managed to boot Virtual Machine properly with Oracle Virtualbox, to permanently disabled selinux I had to:


Once booted into CentOS, to check the status of selinux run:


# sestatus
Copy
SELinux status:                 enabled
SELinuxfs mount:                /sys/fs/selinux
SELinux root directory:         /etc/selinux
Loaded policy name:             targeted
Current mode:                   enforcing
Mode from config file:          enforcing
Policy MLS status:              enabled
Policy deny_unknown status:     allowed
Max kernel policy version:      31


5. Disable SELinux one time with setenforce command


You can temporarily change the SELinux mode from targeted to permissive with the following command:


# setenforce 0


Next o permanently disable SELinux on your CentOS 7 next time the system boots, Open the /etc/selinux/config file and set the SELINUX mod parameter to disabled.

On CentOS 7 you can  edit the kernel parameters in /etc/default/grub (in the GRUB_CMDLINE_LINUX= key) and set selinux=0 so on next VM / PC boot we boot with a SELINUX disabled for example add   RUB_CMDLINE_LINUX=selinux=0 to the file then you have to regenerate your Grub config like this:
 

# grub2-mkconfig -o /etc/grub2.cfg
# grub2-mkconfig -o /etc/grub2-efi.cfg


Further on to disable SeLinux on OS level edit /etc/selinux
 

Default /etc/selinux/config with selinux enabled should look like so:

# This file controls the state of SELinux on the system.
# SELINUX= can take one of these three values:
#       enforcing – SELinux security policy is enforced.
#       permissive – SELinux prints warnings instead of enforcing.
#       disabled – No SELinux policy is loaded.
SELINUX=enforcing
# SELINUXTYPE= can take one of these two values:
#       targeted – Targeted processes are protected,
#       mls – Multi Level Security protection.
SELINUXTYPE=targeted


To disable SeLinux modify the file to be something like:

# This file controls the state of SELinux on the system.
# SELINUX= can take one of these three values:
#       enforcing – SELinux security policy is enforced.
#       permissive – SELinux prints warnings instead of enforcing.
#       disabled – No SELinux policy is loaded.
SELINUX=disabled
# SELINUXTYPE= can take one of these two values:
#       targeted – Targeted processes are protected,
#       mls – Multi Level Security protection.
SELINUXTYPE=targeted

6. Check SELINUX status is disabled

# sestatus

SELinux status:                 disabled

So in this article shottly was explained shortly the fake security adopted by using Microsoft Cloud environment Offiice 365, my faced OneDrive copy issues (which prevented even my old laptop Virtual Machine to boot properly and the handy trick to rename the file that is unwilling to get copied from old PC towards m$ OneDrive as well as the grub trick to disable Selinux permanently from grub2.

Create simple proxy http server with netcat ( nc ) based tiny shell script

Tuesday, January 26th, 2021

use-Netcat_proxy-picture

The need of proxy server is inevitable nowadays especially if you have servers located in a paranoid security environments. Where virtually all is being passed through some kind of a proxy server. In my work we have recently started a  CentOS Linux release 7.9.2009 on HP Proliant DL360e Gen8 (host named rhel-testing).

HP DL360e are quite old nowadays but since we have spare servers and we can refurnish them to use as a local testing internal server Hypervisor it is okay for us. The machine is attached to a Rack that is connected to a Secured Deimilitarized Zone LAN (DMZ Network) which is so much filtered that even simple access to the local company homebrew RPM repository is not accessible from the machine.
Thus to set and remove software from the machine we needed a way to make yum repositories be available, and it seems the only way was to use a proxy server (situated on another accessible server which we use as a jump host to access the testing machine).

Since opening additional firewall request was a time consuming non-sense and the machine is just for testing purposes, we had to come with a solution where we can somehow access a Local repository RPM storage server http://rpm-package-server-repo.com/ for which we have a separate /etc/yum.repos.d/custom-rpms.repo definition file created.

This is why we needed a simplistic way to run a proxy but as we did not have the easy way to install privoxy / squid / haproxy or apache webserver configured as a proxy (to install one of those of relatively giant piece of software need to copy many rpm packages and manually satisfy dependencies), we looked for a simplistic way to run a proxy server on jump-host machine host A.

A note to make here is jump-host that was about to serve as a proxy  had already HTTP access towards the RPM repositories http://rpm-package-server-repo.com and could normally fetch packages with curl or wget via it …

For to create a simple proxy server out of nothing, I've googled a bit thinking that it should be possible either with BASH's TCP/IP capabilities or some other small C written tool compiled as a static binary, just to find out that netcat swiss army knife as a proxy server bash script is capable of doing the trick.

Jump host machine which was about to be used as a proxy server for http traffic did not have enabled access to tcp/port 8888 (port's firewall policies were prohibiting access to it).Since 8888 was the port targetted to run the proxy to allow TCP/IP port 8888 accessibility from the testing RHEL machine towards jump host, we had to issue first on jump host:

[root@jump-host: ~ ]# firewall-cmd –permanent –zone=public –add-port=8888/tcp

To run the script once placed under /root/tcp-proxy.sh on jump-host we had to run a never ending loop in a GNU screen session to make sure it runs forever:

Original tcp-proxy.sh script used taken from above article is:
 

#!/bin/sh -e


if [ $# != 3 ]
then
    echo "usage: $0 <src-port> <dst-host> <dst-port>"
    exit 0
fi

TMP=`mktemp -d`
BACK=$TMP/pipe.back
SENT=$TMP/pipe.sent
RCVD=$TMP/pipe.rcvd
trap 'rm -rf "$TMP"' EXIT
mkfifo -m 0600 "$BACK" "$SENT" "$RCVD"
sed 's/^/ => /' <"$SENT" &
sed 's/^/<=  /' <"$RCVD" &
nc -l -p "$1" <"$BACK" | tee "$SENT" | nc "$2" "$3" | tee "$RCVD" >"$BACK"


Above tcp-proxy.sh script you can download here.

I've tested the script one time and it worked, the script syntax is:

 [root@jump-host: ~ ]#  sh tcp-proxy.sh
usage: tcp-proxy.sh <src-port> <dst-host> <dst-port>


To make it work for one time connection I've run it as so:


 [root@jump-host: ~ ]# sh tcp-proxy.sh 8888 rpm-package-server-repo.com 80


To make the script work all the time I had to use one small one liner infinite bash loop which goes like this:

[root@jump-host: ~ ]#  while [ 1 ]; do sh tcp-proxy.sh 8888 rpm-package-server-repo.com 80; done​

On rhel-testing we had to configure for yum and all applications to use a proxy temporary via
 

[root@rhel-tresting: ~ ]# export http_proxy=jump-host_machine_accessibleIP:8888


And then use the normal yum check-update && yum update to apply to rhel-testing machine latest RPM package security updates.

The nice stuff about the tcp-proxy.sh with netcat in a inifite loop is you will see the binary copy of traffic flowing on the script which will make you feel like in those notorious Hackers movies ! 🙂

The stupid stuff is that sometimes some connections and RPM database updates or RPMs could be cancelled due to some kind of network issues.

To make the connection issues that are occuring to the improvised proxy server go away we finally used a slightly modified version from the original netcat script, which read like this.
 

#!/bin/sh -e


if [ $# != 3 ]
then
    echo "usage: $0 <src-port> <dst-host> <dst-port>"
        exit 0
        fi

        TMP=`mktemp -d`
        BACK=$TMP/pipe.back
        SENT=$TMP/pipe.sent
        RCVD=$TMP/pipe.rcvd
        trap 'rm -rf "$TMP"' EXIT
        mkfifo -m 0600 "$BACK" "$SENT" "$RCVD"
        sed 's/^/ => /' <"$SENT" &
        sed 's/^/<=  /' <"$RCVD" &
        nc –proxy-type http -l -p "$1" <"$BACK" | tee "$SENT" | nc "$2" "$3" | tee "$RCVD" >"$BACK"


Modified version tcp-proxy1.sh with –proxy-type http argument passed to netcat script u can download here.

With –proxy-type http yum check-update works normal just like with any normal fully functional http_proxy configured.

Next step wasto make the configuration permanent you can either add to /root/.bashrc or /etc/bashrc (if you need the setting to be system wide for every user that logged in to Linux system).

[root@rhel-tresting: ~ ]#  echo "http_proxy=http://jump-host_machine_accessibleIP:8888/" > /etc/environment


If you need to set the new built netcat TCP proxy only for yum package update tool include proxy only in /etc/yum.conf:

[root@rhel-tresting: ~ ]# vi /etc/yum.conf
proxy=http_proxy=http://jump-host_machine_accessibleIP:8888/


That's all now you have a proxy out of nothing with just a simple netcat enjoy.

Improve wordpress admin password encryption authentication keys security with WordPress Unique Authentication Keys and Salts

Friday, October 9th, 2020

wordpress-improve-security-logo-linux

Having a wordpress blog or website with an admistrator and access via a Secured SSL channel is common nowadays. However there are plenty of SSL encryption leaks already out there and many of which are either slow to be patched or the hosting companies does not care enough to patch on time the libssl Linux libraries / webserver level. Taking that in consideration many websites hosted on some unmaintained one-time run not-frequently updated Linux servers are still vulneable and it might happen that, if you paid for some shared hosting in the past and someone else besides you hosted the website and forget you even your wordpress installation is still living on one of this SSL vulnerable hosts. In situations like that malicious hackers could break up the SSL security up to some level or even if the SSL is secured use MITM (MAN IN THE MIDDLE) attack to simulate your well secured and trusted SSID Name WIFi network to  redirects the network traffic you use (via an SSL transparent Proxy) to connect to WordPress Administrator Dashbiard via https://your-domain.com/wp-admin. Once your traffic is going through the malicious hax0r even if you haven't used the password to authenticate every time, e.g. you have saved the password in browser and WordPress Admin Panel authentication is achieved via a Cookie the cookies generated and used one time by Woddpress site could be easily stealed one time and later from the vicious 1337 h4x0r and reverse the hash with an interceptor Tool and login to your wordpress …

Therefore to improve the wordpress site security it very important to have configured WordPress Unique Authentication Keys and Salts (known also as the WordPress security keys).

They're used by WordPress installation to have a uniquely generated different key and Salt from the default one to the opened WordPress Blog / Site Admin session every time.

So what are the Authentication Unique Keys and Salts and why they are Used?

Like with almost any other web application, when PHP session is opened to WordPress, the code creates a number of Cookies stored locally on your computer.

Two of the cookies created are called:

 wordpress_[hash]
wordpress_logged_in_[hash]

First  cookie is used only in the admin pages (WordPress dashboard), while the second cookie is used throughout WordPress to determine if you are logged in to WordPress or not. Note: [hash] is a random hashed value typically assigned to your session, therefore in reality the cookies name would be named something like wordpress_ffc02f68bc9926448e9222893b6c29a9.

WordPress session stores your authentication details (i.e. WordPress username and password) in both of the above mentioned cookies.

The authentication details are hashed, hence it is almost impossible for anyone to reverse the hash and guess your password through a cookie should it be stolen. By almost impossible it also means that with today’s computers it is practically unfeasible to do so.

WordPress security keys are made up of four authentication keys and four hashing salts (random generated data) that when used together they add an extra layer to your cookies and passwords. 

The authentication details in these cookies are hashed using the random pattern specified in the WordPress security keys. I will not get into too much details but as you might have heard in Cryptography Salts and Keys are important – an indepth explanation on Salts Cryptography (here). A good reading for those who want to know more on how does the authentication based and salts work is on stackexchange.

How to Set up Salt and Key Authentication on WordPress
 

To be used by WP Salts and Key should be configured under wp-config.php usually they look like so:

wordpress-website-blog-salts-keys-wp-config-screenshot-linux

!!! Note !!!  that generating (manually or generated via a random generator program), the definition strings you have to use a random string value of more than 60 characters to prevent predictability 

The default on any newly installed WordPress Website is to have the 4 definitions with _KEY and the four _SALTs to be unconfigured strings looks something like:

default-WordPress-security-keys-and-salts-entries-in-wordPress-wp-config-php-file

Most people never ever take a look at wp-config.php as only the Web GUI Is used for any maintainance, tasks so there is a great chance that if you never heard specifically by some WordPress Security Expert forum or some Security plugin (such as WP Titan Anti Spam & Security) installed to report the WP KEY / SALT you might have never noticed it in the config.

There are 8 WordPress security keys in current WP Installs, but not all of them have been introduced at the same time.
Historically they were introduced in WP versions in below order:

WordPress 2.6: AUTH_KEY, SECURE_AUTH_KEY, LOGGED_IN_KEY
WordPress 2.7: NONCE_KEY
WordPress 3.0: AUTH_SALT, SECURE_AUTH_SALT, LOGGED_IN_SALT, NONCE_SALT

Setting a custom random generated values is an easy task as there is already online Wordpress Security key Random generator.
You can visit above address and you will get an automatic randomly generated values which could be straight copy / pasted to your wp-config.php.

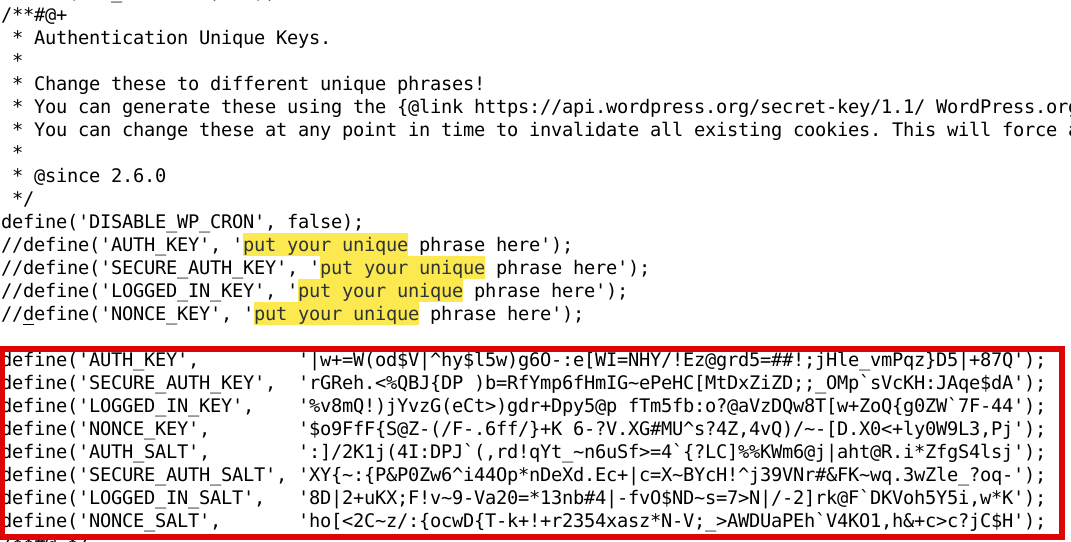
Howeever if you're a paranoic on the guessability of the random generator algorithm, I would advice you use the generator and change some random values yourself on each of the 8 line, the end result in the configuration should be something similar to:


define('AUTH_KEY',         '|w+=W(od$V|^hy$F5w)g6O-:e[WI=NHY/!Ez@grd5=##!;jHle_vFPqz}D5|+87Q');
define('SECURE_AUTH_KEY',  'rGReh.<%QBJ{DP )p=BfYmp6fHmIG~ePeHC[MtDxZiZD;;_OMp`sVcKH:JAqe$dA');
define('LOGGED_IN_KEY',    '%v8mQ!)jYvzG(eCt>)bdr+Rpy5@t fTm5fb:o?@aVzDQw8T[w+aoQ{g0ZW`7F-44');
define('NONCE_KEY',        '$o9FfF{S@Z-(/F-.6fC/}+K 6-?V.XG#MU^s?4Z,4vQ)/~-[D.X0<+ly0W9L3,Pj');
define('AUTH_SALT',        ':]/2K1j(4I:DPJ`(,rK!qYt_~n8uSf>=4`{?LC]%%KWm6@j|aht@R.i*ZfgS4lsj');
define('SECURE_AUTH_SALT', 'XY{~:{P&P0Vw6^i44Op*nDeXd.Ec+|c=S~BYcH!^j39VNr#&FK~wq.3wZle_?oq-');
define('LOGGED_IN_SALT',   '8D|2+uKX;F!v~8-Va20=*d3nb#4|-fv0$ND~s=7>N|/-2]rk@F`DKVoh5Y5i,w*K');
define('NONCE_SALT',       'ho[<2C~z/:{ocwD{T-w+!+r2394xasz*N-V;_>AWDUaPEh`V4KO1,h&+c>c?jC$H');


Wordpress-auth-key-secure-auth-salt-Linux-wordpress-admin-security-hardening

Once above defines are set, do not forget to comment or remove old AUTH_KEY / SECURE_AUTH_KEY / LOGGED_IN_KEY / AUTH_SALT / SECURE_AUTH_SALT / LOGGED_IN_SALT /NONCE_SALT keys.

The values are configured one time and never have to be changed, WordPress installation automatic updates or Installed WP Plugins will not tamper the value with time.
You should never expand or show your private generated keys to anyone otherwise this could be used to hack your website site.
It is also a good security practice to change this keys, especially if you have some suspects someone has somehow stolen your wp-onfig keys. 
 

Closure

Having AUTH KEYs and Properly configured is essential step to improve your WordPress site security. Anytime having any doubt for a browser hijacked session (or if you have logged in) to your /wp-admin via unsecured public Computer with a chance of a stolen site cookies you should reset keys / salts to a new random values. Setting the auth keys is not a panacea and frequent WP site core updates and plugins should be made to secure your install. Always do frequent audits to WP owned websites with a tool such as WPScan is essential to keep your WP Website unhacked.