Archive for the ‘PHP’ Category

How to install and use memcached on Debian GNU / Linux to share php sessions between DNS round robined Apache webservers

Monday, November 9th, 2020

apache-load-balancing-keep-persistent-php-sessions-memcached-logo

Recently I had to come up with a solution to make A bunch of websites hosted on a machine to be high available. For the task haproxy is one of logical options to use. However as I didn't wanted to set new IP addresses and play around to build a cluster. I decided the much more simplistic approach to use 2 separate Machines each running Up-to-date same version of Apache Webserver as front end and using a shared data running on Master-to-Master MySQL replication database as a backend. For the load balancing itself I've used a simple 2 multiple DNS 'A' Active records, configured via the Bind DNS name server an Round Robin DNS load balancing for each of the domains, to make them point to the the 2 Internet IP addresses (XXX.XXX.XXX.4 and YYY.YYY.YYY.5) each configured on the 2 Linux servers eth0.

So far so good, this setup worked but immediately, I've run another issue as I found out the WordPress and Joomla based websites's PHP sessions are lost, as the connectivity by the remote client browser reaches one time on XXX…4 and one time on YYY…4 configured listerner on TCP port 80 and TCP p. 443. In other words if request comes up to Front end Apache worker webserver 1 with opened channel data is sent back to Client Browser and the next request is sent due to the other IP resolved by the DNS server to come to Apache worker webserver 2 of course webserver 2 has no idea about this previous session data and it gets confused and returns soemething like a 404 or 500 or any other error … not exciting really huh …

I've thought about work around and as I didn't wanted to involve thirty party stuff as Privoxy / Squid  / Varnish / Polipo etc. just as that would add extra complexity as if I choose to use haproxy from the beginning, after short investigation came to a reason to use memcached as a central PHP sessions storage.
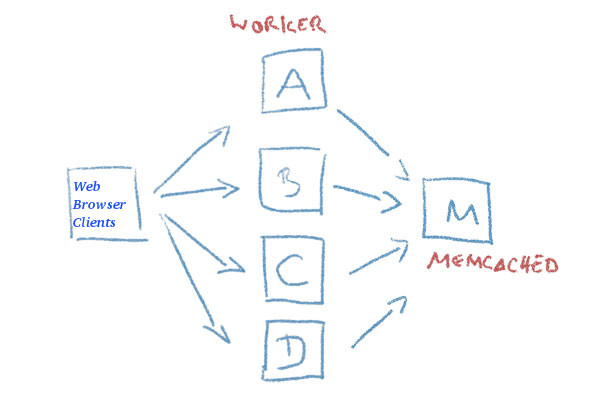
php-memcached-apache-workers-webbrowser-keep-sessions-diagram
 

Why I choose memcached ?


Well it is relatively easy to configure, it doesn't come with mambo-jambo unreadable over-complicated configuration and the time to configure everything is really little as well as the configuration is much straight forward, plus I don't need to occupy more IP addresses and I don't need to do any changes to the already running 2 WebServers on 2 separate Linux hosts configured to be reachable from the Internet.
Of course using memcached is not a rock solid and not the best solution out there, as there is risk that if a memcached dies out for some reason all sessions stored in are lost as they're stored only in volatile memory, as well as there is a drawback that if a communication was done via one of the 2 webservers and one of them goes down sessions that were known by one of Apache's workers disappears.

So let me proceed and explain you the steps to take to configure memcached as a central session storage system.
 

1. Install memcached and php-memcached packages


To enable support for memcached besides installing memcached daemon, you need to have the php-memcached which will provide the memcached.so used by Apache loaded php script interpretter module.

On a Debian / Ubuntu and other deb based GNU / Linux it should be:

webserver1:~# apt-get install memcached php-memcached

TO use php-memcached I assume Apache and its support for PHP is already installed with lets say:
 

webserver1:~# apt-get install php libapache2-mod-php php-mcrypt


On CentOS / RHEL / Fedora Linux it is a little bit more complicated as you'll need to install php-pear and compile the module with pecl


[root@centos ~]# yum install php-pear

[root@centos ~]# yum install php-pecl-memcache


Compile memcache

[root@centos ~]# pecl install memcache


2. Test if memcached is properly loaded in PHP


Once installed lets check if memcached service is running and memcached support is loaded as module into PHP core.


webserver1:~# ps -efa  | egrep memcached
nobody   14443     1  0 Oct23 ?        00:04:34 /usr/bin/memcached -v -m 64 -p 11211 -u nobody -l 127.0.0.1 -l 192.168.0.1

root@webserver1:/# php -m | egrep memcache
memcached


To get a bit more verbose information on memcache version and few of memcached variable settings:

root@webserver1:/# php -i |grep -i memcache
/etc/php/7.4/cli/conf.d/25-memcached.ini
memcached
memcached support => enabled
libmemcached version => 1.0.18
memcached.compression_factor => 1.3 => 1.3
memcached.compression_threshold => 2000 => 2000
memcached.compression_type => fastlz => fastlz
memcached.default_binary_protocol => Off => Off
memcached.default_connect_timeout => 0 => 0
memcached.default_consistent_hash => Off => Off
memcached.serializer => php => php
memcached.sess_binary_protocol => On => On
memcached.sess_connect_timeout => 0 => 0
memcached.sess_consistent_hash => On => On
memcached.sess_consistent_hash_type => ketama => ketama
memcached.sess_lock_expire => 0 => 0
memcached.sess_lock_max_wait => not set => not set
memcached.sess_lock_retries => 5 => 5
memcached.sess_lock_wait => not set => not set
memcached.sess_lock_wait_max => 150 => 150
memcached.sess_lock_wait_min => 150 => 150
memcached.sess_locking => On => On
memcached.sess_number_of_replicas => 0 => 0
memcached.sess_persistent => Off => Off
memcached.sess_prefix => memc.sess.key. => memc.sess.key.
memcached.sess_randomize_replica_read => Off => Off
memcached.sess_remove_failed_servers => Off => Off
memcached.sess_sasl_password => no value => no value
memcached.sess_sasl_username => no value => no value
memcached.sess_server_failure_limit => 0 => 0
memcached.store_retry_count => 2 => 2
Registered save handlers => files user memcached


Make sure /etc/default/memcached (on Debian is enabled) on CentOS / RHELs this should be /etc/sysconfig/memcached

webserver1:~# cat default/memcached 
# Set this to no to disable memcached.
ENABLE_MEMCACHED=yes

As assured on server1 memcached + php is ready to be used, next login to Linux server 2 and repeat the same steps install memcached and the module and check it is showing as loaded.

Next place under some of your webservers hosted websites under check_memcached.php below PHP code
 

<?php
if (class_exists('Memcache')) {
    $server = 'localhost';
    if (!empty($_REQUEST[‘server’])) {
        $server = $_REQUEST[‘server’];
    }
    $memcache = new Memcache;
    $isMemcacheAvailable = @$memcache->connect($server);

    if ($isMemcacheAvailable) {
        $aData = $memcache->get('data');
        echo '<pre>';
        if ($aData) {
            echo '<h2>Data from Cache:</h2>';
            print_r($aData);
        } else {
            $aData = array(
                'me' => 'you',
                'us' => 'them',
            );
            echo '<h2>Fresh Data:</h2>';
            print_r($aData);
            $memcache->set('data', $aData, 0, 300);
        }
        $aData = $memcache->get('data');
        if ($aData) {
            echo '<h3>Memcache seem to be working fine!</h3>';
        } else {
            echo '<h3>Memcache DOES NOT seem to be working!</h3>';
        }
        echo '</pre>';
    }
}

if (!$isMemcacheAvailable) {
    echo 'Memcache not available';
}

?>


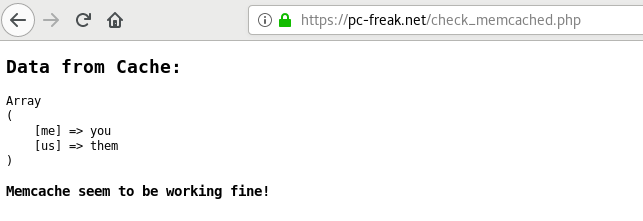
Launch in a browser https://your-dns-round-robined-domain.com/check_memcached.php, the browser output should be as on below screenshot:
check_memcached-php-script-website-screenshot

3. Configure memcached daemons on both nodes

All we need to set up is the listen IPv4 addresses

On Host Webserver1
You should have in /etc/memcached.conf

-l 127.0.0.1
-l 192.168.0.1

webserver1:~# grep -Ei '\-l' /etc/memcached.conf 
-l 127.0.0.1
-l 192.168.0.1


On Host Webserver2

-l 127.0.0.1
-l 192.168.0.200


webserver2:~# grep -Ei '\-l' /etc/memcached.conf
-l 127.0.0.1
-l 192.168.0.200


4. Configure memcached in php.ini

Edit config /etc/php.ini (on CentOS / RHEL) or on Debians / Ubuntus etc. modify /etc/php/*/apache2/php.ini (where depending on the PHP version you're using your php location could be different lets say /etc/php/5.6/apache2/php.ini):

If you wonder where is the php.ini config in your case you can usually get it from the php cli:

webserver1:~# php -i | grep "php.ini"
Configuration File (php.ini) Path => /etc/php/7.4/cli
Loaded Configuration File => /etc/php/7.4/cli/php.ini


! Note: That on on PHP-FPM installations (where FastCGI Process Manager) is handling PHP requests,path would be rather something like:
 

/etc/php5/fpm/php.ini

in php.ini you need to change as minimum below 2 variables
 

session.save_handler =
session.save_path =


By default session.save_path would be set to lets say session.save_path = "

/var/lib/php7/sessions"


To make php use a 2 central configured memcached servers on webserver1 and webserver2 or even more memcached configured machines set it to look as so:

session.save_path="192.168.0.200:11211, 192.168.0.1:11211"


Also modify set

session.save_handler = memcache


Overall changed php.ini configuration on Linux machine 1 ( webserver1 ) and Linux machine 2 ( webserver2 ) should be:

session.save_handler = memcache
session.save_path="192.168.0.200:11211, 192.168.0.1:11211"


Below is approximately how it should look on both :

webserver1: ~# grep -Ei 'session.save_handler|session.save_path' /etc/php.ini
;; session.save_handler = files
session.save_handler = memcache
;     session.save_path = "N;/path"
;     session.save_path = "N;MODE;/path"
;session.save_path = "/var/lib/php7/sessions"
session.save_path="192.168.0.200:11211, 192.168.0.1:11211"
;       (see session.save_path above), then garbage collection does *not*


webserver2: ~# grep -Ei 'session.save_handler|session.save_path' /etc/php.ini
;; session.save_handler = files
session.save_handler = memcache
;     session.save_path = "N;/path"
;     session.save_path = "N;MODE;/path"
;session.save_path = "/var/lib/php7/sessions"
session.save_path="192.168.0.200:11211, 192.168.0.1:11211"
;       (see session.save_path above), then garbage collection does *not*


As you can see I have configured memcached on webserver1 to listen on internal local LAN IP 192.168.0.200 and on Local LAN eth iface 192.168.0.1 on TCP port 11211 (this is the default memcached connections listen port), for security or obscurity reasons you might choose another empty one. Make sure to also set the proper firewalling to that port, the best is to enable connections only between 192.168.0.200 and 192.168.0.1 on each of machine 1 and machine 2.
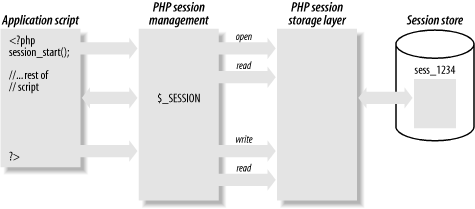
loadbalancing2-php-sessions-scheme-explained
 

5. Enable Memcached for session redundancy


Next step is to configure memcached to allow failover (e.g. use both memcached on 2 linux hosts) and configure session redundancy.
Configure /etc/php/7.3/mods-available/memcache.ini or /etc/php5/mods-available/memcache.ini or respectively to the right location depending on the PHP installed and used webservers version.
 

webserver1 :~#  vim /etc/php/7.3/mods-available/memcache.ini

; configuration for php memcached module
; priority=20
; settings to write sessions to both servers and have fail over
memcache.hash_strategy=consistent
memcache.allow_failover=1
memcache.session_redundancy=3
extension=memcached.so


webserver2 :~# vim /etc/php/7.3/mods-available/memcache.ini

; configuration for php memcached module
; priority=20
; settings to write sessions to both servers and have fail over
memcache.hash_strategy=consistent
memcache.allow_failover=1
memcache.session_redundancy=3
extension=memcached.so


memcache.session_redundancy directive must be equal to the number of memcached servers + 1 for the session information to be replicated to all the servers. This is due to a bug in PHP.
I have only 2 memcached configured that's why I set it to 3.
 

6. Restart Apache Webservers

Restart on both machines webserver1 and webserver2 Apache to make php load memcached.so
 

webserver1:~# systemctl restart httpd

webserver2:~# systemctl restart httpd


7. Restart memcached on machine 1 and 2


webserver1 :~# systemctl restart memcached

webserver2 :~# systemctl restart memcached


8. Test php sessions are working as expected with a php script

Copy to both website locations to accessible URL a file test_sessions.php:
 

<?php  
session_start();

if(isset($_SESSION[‘georgi’]))
{
echo "Sessions is ".$_SESSION[‘georgi’]."!\n";
}
else
{
echo "Session ID: ".session_id()."\n";
echo "Session Name: ".session_name()."\n";
echo "Setting 'georgi' to 'cool'\n";
$_SESSION[‘georgi’]='cool';
}
?>


Now run the test to see PHP sessions are kept persistently:
 

hipo@jeremiah:~/Desktop $ curl -vL -s https://www.pc-freak.net/session.php 2>&1 | grep 'Set-Cookie:'
< Set-Cookie: PHPSESSID=micir464cplbdfpo36n3qi9hd3; expires=Tue, 10-Nov-2020 12:14:32 GMT; Max-Age=86400; path=/

hipo@jeremiah:~/Desktop $ curl -L –cookie "PHPSESSID=micir464cplbdfpo36n3qi9hd3" http://83.228.93.76/session.php http://213.91.190.233/session.php
Session is cool!
Session is cool!


Copy to the locations that is resolving to both DNS servers some sample php script such as sessions_test.php  with below content:

<?php
    header('Content-Type: text/plain');
    session_start();
    if(!isset($_SESSION[‘visit’]))
    {
        echo "This is the first time you're visiting this server\n";
        $_SESSION[‘visit’] = 0;
    }
    else
            echo "Your number of visits: ".$_SESSION[‘visit’] . "\n";

    $_SESSION[‘visit’]++;

    echo "Server IP: ".$_SERVER[‘SERVER_ADDR’] . "\n";
    echo "Client IP: ".$_SERVER[‘REMOTE_ADDR’] . "\n";
    print_r($_COOKIE);
?>

Test in a Web Opera / Firefox / Chrome browser.

You should get an output in the browser similar to:
 

Your number of visits: 15
Server IP: 83.228.93.76
Client IP: 91.92.15.51
Array
(
    [_ga] => GA1.2.651288003.1538922937
    [__utma] => 238407297.651288003.1538922937.1601730730.1601759984.45
    [__utmz] => 238407297.1571087583.28.4.utmcsr=google|utmccn=(organic)|utmcmd=organic|utmctr=(not provided)
    [shellInABox] => 467306938:1110101010
    [fpestid] => EzkIzv_9OWmR9PxhUM8HEKoV3fbOri1iAiHesU7T4Pso4Mbi7Gtt9L1vlChtkli5GVDKtg
    [__gads] => ID=8a1e445d88889784-22302f2c01b9005b:T=1603219663:RT=1603219663:S=ALNI_MZ6L4IIaIBcwaeCk_KNwmL3df3Z2g
    [PHPSESSID] => mgpk1ivhvfc2d0daq08e0p0ec5
)

If you want to test php sessions are working with text browser or from another external script for automation use something as below PHP code:
 

<?php
// save as "session_test.php" inside your webspace  
ini_set('display_errors', 'On');
error_reporting(6143);

session_start();

$sessionSavePath = ini_get('session.save_path');

echo '<br><div style="background:#def;padding:6px">'
   , 'If a session could be started successfully <b>you should'
   , ' not see any Warning(s)</b>, otherwise check the path/folder'
   , ' mentioned in the warning(s) for proper access rights.<hr>';
echo "WebServer IP:" . $_SERVER[‘SERVER_ADDR’] . "\n<br />";
if (empty($sessionSavePath)) {
    echo 'A "<b>session.save_path</b>" is currently',
         ' <b>not</b> set.<br>Normally "<b>';
    if (isset($_ENV[‘TMP’])) {
        echo  $_ENV[‘TMP’], ‘” ($_ENV[“TMP”]) ';
    } else {
        echo '/tmp</b>" or "<b>C:\tmp</b>" (or whatever',
             ' the OS default "TMP" folder is set to)';
    }    
    echo ' is used in this case.';
} else {
    echo 'The current "session.save_path" is "<b>',
         $sessionSavePath, '</b>".';
}

echo '<br>Session file name: "<b>sess_', session_id()
   , '</b>".</div><br>';
?>

You can download the test_php_sessions.php script here.

To test with lynx:

hipo@jeremiah:~/Desktop $ lynx -source 'https://www.pc-freak.net/test_php_sessions.php'
<br><div style="background:#def;padding:6px">If a session could be started successfully <b>you should not see any Warning(s)</b>, otherwise check the path/folder mentioned in the warning(s) for proper access rights.<hr>WebServer IP:83.228.93.76
<br />The current "session.save_path" is "<b>tcp://192.168.0.200:11211, tcp://192.168.0.1:11211</b>".<br>Session file name: "<b>sess_5h18f809b88isf8vileudgrl40</b>".</div><br>

Run multiple PHP versions (PHP 5 and PHP 7) with NGINX on the same server howto

Wednesday, October 3rd, 2018

how-to-run-multiple-php-versions-on-same-Linux-server-nginx-webserver-php5-7-logo

It is common sysadmin task to have two versions of PHP running on the same physical or Virtual server to be able to run simultaneously old PHP 5.X legacy applications and PHP 7.X written websites / web applications.

In the past this task was much more complicated than today  you had to compile for example Apache and PHP modules from source and enable it through fastcgi.
Today with the raise of NGINX Web Server and its possibility to run much of the PHP Apps running on top of Apache.
For the sake of this tutorial I'll be using Debian Strecth 9.0.
The reason to use NGINX instead of Apache for this tutorial are numerous, it is light weight (uses less resources – CPU ./ Memory) it is secure smaller in size.
 

1. Install NGINX Web Server


# apt-get install –yes nginx 


2. Install PHP.7.0 FPM module


# apt-get install php7.0-cli php7.0-fpm


3. Install PHP 5.6 FPM Using external deb repository

Debian default repositories does not include support for PHP 5.6, hence we need to add the respective repositories providing PHP 5.6


# apt-get install apt-transport-https


# curl https://packages.sury.org/php/apt.gpg | apt-key add –
echo 'deb https://packages.sury.org/php/ stretch main' > /etc/apt/sources.list.d/deb.sury.org.list
apt-get update


Next install PHP 5.6 from just added repos


# apt-get install –yes php5.6-cli php5.6-fpm


4. Check Multiple PHP versions PHP 5 and PHP 7 aree properly installed 


# php7.0 -v
PHP 7.0.15-1 (cli)
# php5.6 -v


Debian has a default set-up for PHP CLI (Console Interface command) pointing to PHP 7.0, e.g.


# php -v
PHP 7.0.15-1 (cli)


If you prefer to use as prefer PHP 5.6 instead you can do it with debian update-alternative cmd:


# update-alternatives –config php


5. Configure both installed PHP -es

Edit /etc/php/7.0/fpm/pool.d/www.conf and look for the listen option. It should equal to /run/php/php7.0-fpm.sock or something alike.
Now do the same for 5.6, it should contain the same with just 5.6 instead of 7.0. Note that it could also be a bind address, i.e. IP address with port (which is performance-wise more suitable for production than sockets). 


6. Configuring NGINX webserver


Nginx configuration files are stored in /etc/nginx 

– On Debian the .deb package structure of nginx is is made that all available virtual hosts for nginx just like for Apache are stored  in sites-available directory and production enabled virtualhosts are symlinks to sites-enabled

– Shared configuration for reuse among multiple domains is stored in inside the snippets directory

– fastcgi.conf file contains FastCGI specific variables that are passed to PHP

– The snippets/fastcgi-php.conf is just a helper file to prepare configuration that is passed to PHP module

It is a good idea to remove any unnecessery configuration from /etc/nginx/sites-enabled 
 

7. Create configuration for PHP 7.0


To make simple the test the main (root) directory of nginx will be set to have a simple phpinfo(); file.
 

mkdir /var/www/site-with-php7
echo -e '<?php\nphpinfo();' > /var/www/site-with-php7/index.php 


Then create actual Nginx configuration


# vim /etc/nginx/sites-available/site-with-enabed-php7.X


server {
    listen 8770 default_server;
    listen [::]:8870 default_server;

    server_name _;
    root /var/www/site-with-php7;
    index index.php;
    location / {
        include snippets/fastcgi-php.conf;
        fastcgi_pass unix:/run/php/php7.0-fpm.sock; # adjust for the listen setting discussed above
    }


As seen from configuration PHP 7 will be serving PHP scripts written for php 7  on TCP port 8870


8. Create configuration for PHP 5.6


# mkdir /var/www/site-with-php5.6
# echo -e '<?php\nphpinfo();' > /var/www/site-with-php5.6/index.php


server {
    listen 8756 default_server;
    listen [::]:8856 default_server;

    server_name _;
    root /var/www/site-with-php5.6;
    index index.php;
    location / {
        include snippets/fastcgi-php.conf;
        fastcgi_pass unix:/run/php/php5.6-fpm.sock; # adjust for the listen setting discussed above
    }
}

As you see from configuration PHP 5.6 will be serving PHP 5.6 files on TCP port 8756

To enable both NGINX configurations to load enable both nginx vhosts as there is no a2ensite like for enabling NGINX configurations the following  cmd does it
 

# ln -s /etc/nginx/sites-available/site-with-php5.6 /etc/nginx/sites-enabled/
#  ln -s /etc/nginx/sites-available/site-with-php7.0 /etc/nginx/sites-enabled/

To load the new NGINX Virtualhost configurations, restart next:
 

# systemctl reload nginx.service


9. Testing NGINX + PHP configuration set-up on port 8870 / 8876


– Test NGINX connection on 8876
 

lynx -dump http://localhost:8870

– Test NGINX connection on 8870
 

lynx -dump http://localhost:8870

Both commands should dump you output from PHP 7 (if your server lacks lynx i warmly recommend it, though you can use wget to test).


To sum it up


Even though generally it is a bad idea to have 2 instances of application service be it NGINX / Apache from security point of view, it is sometimes a necessity especially when you
or your customers are unwilling to invest money for upgrade of their websites / application infrastructure and if the clients want to keep obsolete PHP code and mix it with a new.
Still migration will be required as you would perhaps want to have some kind of Load Balancer round robin with another NGINX / Apache or Haproxy to make different applications
open under a separate CDN hostname
.

Install and make Apache + PHP to work with PosgreSQL database server on Debian Linux and set up server Web Posgre interface Pgpadmin howto

Wednesday, June 15th, 2016

make-apache-php-work-with-postgresql-pgsql-and-install-postgresql-db-web-admin-interface

In previous article I've wrote on how to install postgresql on Debian Linux using the deb repository this was necessery to import some PostGres DBs, however this was not enough to run the posgresql php based website aimed as connection from Apache / PHP module to PostGre was failing after a bit of investigation and a check in phpinfo(); I've realized the module PHP module for postgres pgsql.so was missing, here is what I did in order to install it:
 

debian:~# apt-get install php5-pgsql phppgadmin libapache2-mod-auth-pgsql 

PHP sessions enable configuration

As it is common a common problem with PHP applications written to use PostGres is to loose sessions and by default PHP does not have configured sessions.save_path it is a very good practice to directly enable it in /etc/php5/apache2/php.ini open the file in text editor:
 

debian:~# vim /etc/php5/apache2/php.ini


Find the commented directive line:
 

;session.save_path = “/tmp”


and uncomment it, i.e.:
 

session.save_path = “/tmp”


Quit saving vim with the usual :wq!

The 3 modules provides pgsql.so for PHP and mod_auth_pgsql.so for Apache2, the 3rd packae phpgadmin provides a Web administration interface for installed PostgreSQL servers Databases, for those experienced with MySQL Database its the same as PHPMyAdmin.


 Here is quick configuration for use of PostgreAdmin interface:

By default PHPPGADMIN installation process configure the Apache2 server' /etc/phppgadmin/apache.conf  to use  /etc/apache2/conf.d/phppgadmin


Here is the default my server package instaleld  file content:


Alias /phppgadmin /usr/share/phppgadmin

<Directory /usr/share/phppgadmin>

DirectoryIndex index.php
AllowOverride None

order deny,allow
deny from all
allow from 127.0.0.0/255.0.0.0 ::1/128
# allow from all

<IfModule mod_php5.c>
  php_flag magic_quotes_gpc Off
  php_flag track_vars On
  #php_value include_path .
</IfModule>
<IfModule !mod_php5.c>
  <IfModule mod_actions.c>
    <IfModule mod_cgi.c>
      AddType application/x-httpd-php .php
      Action application/x-httpd-php /cgi-bin/php
    </IfModule>
    <IfModule mod_cgid.c>
      AddType application/x-httpd-php .php
      Action application/x-httpd-php /cgi-bin/php
    </IfModule>
  </IfModule>
</IfModule>

</Directory>

It is generally a good practice to change the default Alias location of phppgadmin, so edit the file and change it to something like:
 

Alias /phppostgresgadmin /usr/share/phppgadmin


  • Then phpPgAdmin is available at http://servername.com/phppostgresadmin (only from localhost, however in my case I wanted to be able to access it also from other hosts so allowed PostgresGadmin from every hosts, to do so, I've commented in above config


# allow from 127.0.0.0/255.0.0.0 ::1/128


and uncommented #allow from all line, e.g.:
 

allow from all


Also another thing here is in your VirtualHost whenever you plan to access the PHPPGADMIN is to include in config ( in my case this is the file /etc/apache2/sites-enabled/000-default before (</VirtualHost> end line) following Alias:
 

Alias /phpposgreadmin /usr/share/phppgadmin


Then to access PostGreSQL PHP Admin interface in Firefox / Chrome open URL:


http://your-default-domain.com/phpposgreadmin

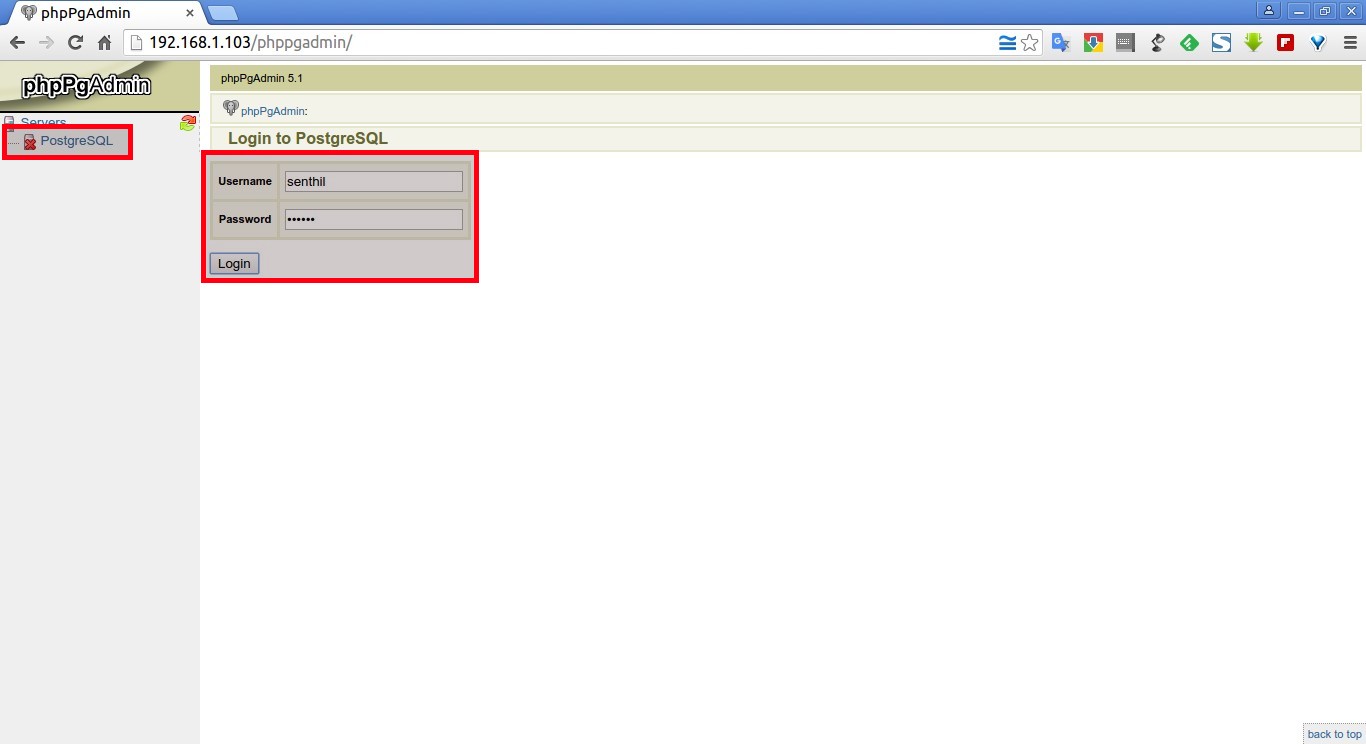
phpPgAdmin-postgresql-php-web-interface-debian-linux-screenshot


Configure access to a remote PostgreSQL Server

With PhpPgAdmin, you can manage many PostgreSQL servers locally (on the localhost) or on remote hosts.

First, you have to make sure that the distant PostgreSQL server can handle your request, that you can connect to it. You can do this by modifying the /etc/postgresql/9.5/main/filepg_hba.conf and adding a line like:

# PhpPgAdmin server access host all db_admin xx.xx.xx.xx 255.255.255.255 md5

Then, you need to add your distant PostgreSQL server into the config file for PhpPgAdmin. This file is  /etc/phppgadmin/config.inc.php the default postgresql port is 5432, however you might have configured it already to use some different port if you're not sure about the port number the postgresql is listening check it out:


debian:~# grep -i port /etc/postgresql/*/main/postgresql.conf
etc/postgresql/9.5/main/postgresql.conf:port = 5433                # (change requires restart)
/etc/postgresql/9.5/main/postgresql.conf:                    # supported by the operating system:
/etc/postgresql/9.5/main/postgresql.conf:# ERROR REPORTING AND LOGGING


To login to phppgadmin interface there is no root administrator user such as in PHP so you will need to priorly create some user and later use it for connection from Postgres Web interface.

To create from console new user in postgres:
 

debian:~# su – postgres
posgres@debian:~$ psql template1
posgres@debian:~$ psql -d template1 -U postgres


Welcome to psql 9.5, the PostgreSQL interactive terminal. Type: \copyright for distribution terms \h for help with SQL commands \? for help on internal slash commands \g or terminate with semicolon to execute query \q to quit template1=#

template1=# CREATE USER MyNewUser WITH PASSWORD 'myPassword';


To add a new database to postgres from shell:

template1=# CREATE DATABASE NewDatabase;
 

template1=# GRANT ALL PRIVILEGES ON DATABASE NewDatabase to MyNewUser;


template1=# q

Last command instructs it to quit if you want to get more info about possible commands do type instead of q ? for general help or for database / table commands only h
If you need to connect to NewDatabase just to test first it works in console before trying it from postgrepgadmin


posgres@debian:~$ psql -d NewDatabase -U MyNewUser


Tools to scan a Linux / Unix Web server for Malware and Rootkits / Lynis and ISPProtect – clean Joomla / WordPress and other CMS for malware and malicious scripts and trojan codes

Monday, March 14th, 2016

Linux-BSD-Unix-Rootkit-Malware-XSS-Injection-spammer-scripts-clean-howto-manual

If you have been hacked or have been suspicious that someone has broken up in some of the shared web hosting servers you happent o manage you already probably have tried the server with rkhuter, chroot and unhide tools which gives a general guidance where a server has been compromised

However with the evolution of hacking tools out there and the boom of Web security XSS / CSS / Database injections and PHP scripts vulnerability catching an intruder especially spammers has been becoming more and more hard to achieve.

Just lately a mail server of mine's load avarage increased about 10 times, and the CPU's and HDD I/O load jump over the sky.
I started evaluating the situation to find out what exactly went wrong with the machine, starting with a hardware analysis tools and a physical check up whether all was fine with the hardware Disks / Ram etc. just to find out the machine's hardware was working perfect.
I've also thoroughfully investigated on Logs of Apache, MySQL, TinyProxy and Tor server and bind DNS and DJBDns  which were happily living there for quite some time but didn't found anything strange.

Not on a last place I investigated TOP processes (with top command) and iostat  and realized the CPU high burst lays in exessive Input / Output of Hard Drive. Checking the Qmail Mail server logs and the queue with qmail-qstat was a real surprise for me as on the queue there were about 9800 emails hanging unsent, most of which were obviously a spam, so I realized someone was heavily spamming through the server and started more thoroughfully investigating ending up to a WordPress Blog temp folder (writtable by all system users) which was existing under a Joomla directory infrastructure, so I guess someone got hacked through the Joomla and uploaded the malicious php spammer script to the WordPress blog. I've instantly stopped and first chmod 000 to stop being execuded and after examing deleted view73.php, javascript92.php and index8239.php which were full of PHP values with binary encoded values and one was full of encoded strings which after being decoding were actually the recepient's spammed emails.
BTW, the view*.php javascript*.php and index*.php files were owned by www-data (the user with which Apache was owned), so obviously someone got hacked through some vulnerable joomla or wordpress script (as joomla there was quite obscure version 1.5 – where currently Joomla is at version branch 3.5), hence my guess is the spamming script was uploaded through Joomla XSS vulnerability).

As I was unsure wheteher the scripts were not also mirrored under other subdirectories of Joomla or WP Blog I had to scan further to check whether there are no other scripts infected with malware or trojan spammer codes, webshells, rootkits etc.
And after some investigation, I've actually caught the 3 scripts being mirrored under other webside folders with other numbering on filename view34.php javascript72.php, index8123.php  etc..

I've used 2 tools to scan and catch malware the trojan scripts and make sure no common rootkit is installed on the server.

1. Lynis (to check for rootkits)
2. ISPProtect (Proprietary but superb Website malware scanner with a free trial)

1. Lynis – Universal security auditing tool and rootkit scanner

Lynis is actually the well known rkhunter, I've used earlier to check servers BSD and Linux servers for rootkits.
To have up-to-date version of Lynis, I've installed it from source:
 

cd /tmp
wget https://cisofy.com/files/lynis-2.1.1.tar.gz
tar xvfz lynis-2.1.1.tar.gz
mv lynis /usr/local/
ln -s /usr/local/lynis/lynis /usr/local/bin/lynis


Then to scan the server for rootkits, first I had to update its malware definition database with:
 

lynis update info


Then to actually scan the system:
 

lynis audit system


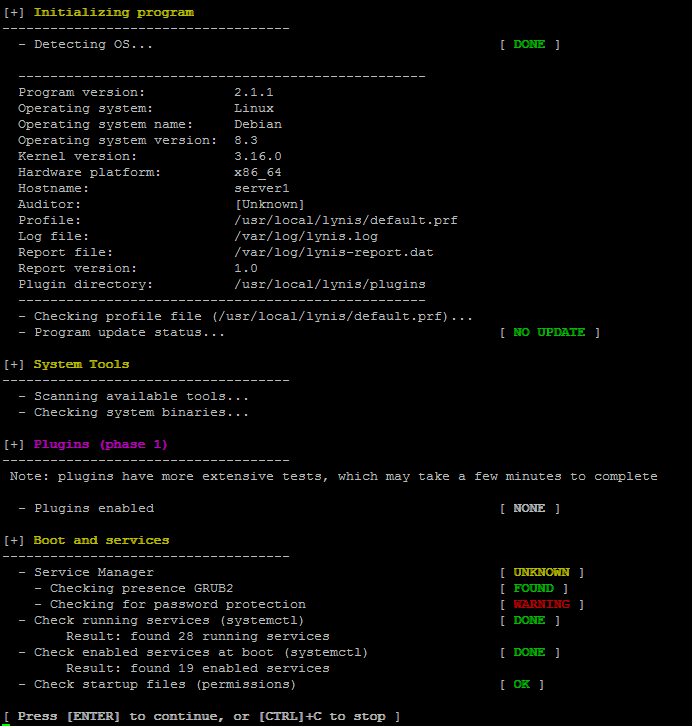
Plenty of things will be scanned but you will be asked on a multiple times whether you would like to conduct different kind fo system services and log files, loadable kernel module rootkits and  common places to check for installed rootkits or server placed backdoors. That's pretty annoying as you will have to press Enter on a multiple times.

lynis-asking-to-scan-for-rootkits-backdoors-and-malware-your-linux-freebsd-netbsd-unix-server

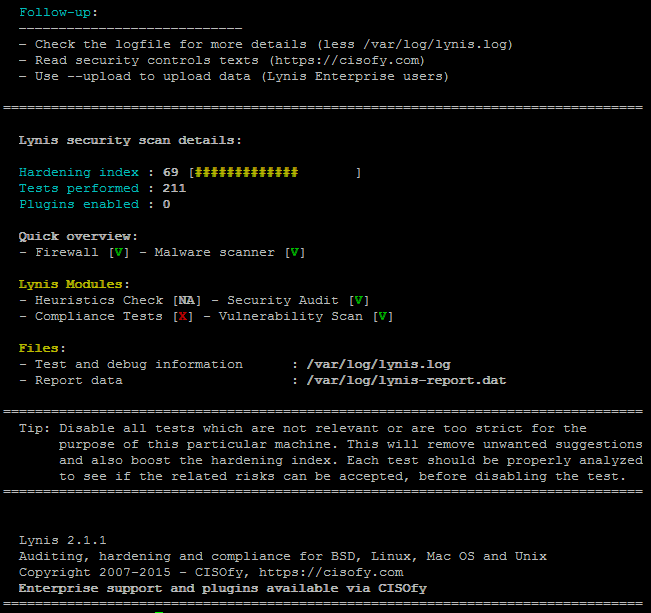
Once scan is over you will get a System Scan Summary like in below screenshot:

lynis-scanned-server-for-rootkit-summer-results-linux-check-for-backdoors-tool

Lynis suggests also a very good things that might be tampered to make the system more secure, so using some of its output when I have time I'll work out on hardening all servers.

To prevent further incidents and keep an eye on servers I've deployed Lynis scan via cron job once a month on all servers, I've placed under a root cronjob on every first dae of month in following command:


server:~# crontab -u root -e
0 3 1 * * /usr/local/bin/lynis –quick 2>&1 | mail -s "lynis output of my server" admin-mail@my-domain.com)


2. ISPProtect – Website malware scanner

ISPProtect is a malware scanner for web servers, I've used it to scan all installed  CMS systems like WordPress, Joomla, Drupal etc.
ISPProtect is great for PHP / Pyhon / Perl and other CMS based frameworks.
ISPProtect contains 3 scanning engines: a signature based malware scanner, a heuristic malware scanner, and a scanner to show the installation directories of outdated CMS systems.
Unfortunately it is not free software, but I personally used the FREE TRIAL option  which can be used without registration to test it or clean an infected system.
I first webserver first locally for the infected site and then globally for all the other shared hosting websites.

As I wanted to check also rest of hosted websites, I've run ISPProtect over the all bunch of installed websites.
Pre-requirement of ISPProtect is to have a working PHP Cli and Clamav Anti-Virus installed on the server thus on RHEL (RPM) based servers make sure you have it installed if not:
 

server:~# yum -y install php

server:~# yum -y install clamav


Debian based Linux servers web hosting  admins that doesn't have php-cli installed should run:
 

server:~# apt-get install php5-cli

server:~# apt-get install clamav


Installing ISPProtect from source is with:

mkdir -p /usr/local/ispprotect
chown -R root:root /usr/local/ispprotect
chmod -R 750 /usr/local/ispprotect
cd /usr/local/ispprotect
wget http://www.ispprotect.com/download/ispp_scan.tar.gz
tar xzf ispp_scan.tar.gz
rm -f ispp_scan.tar.gz
ln -s /usr/local/ispprotect/ispp_scan /usr/local/bin/ispp_scan


To initiate scan with ISPProtect just invoke it:
 

server:~# /usr/local/bin/ispp_scan


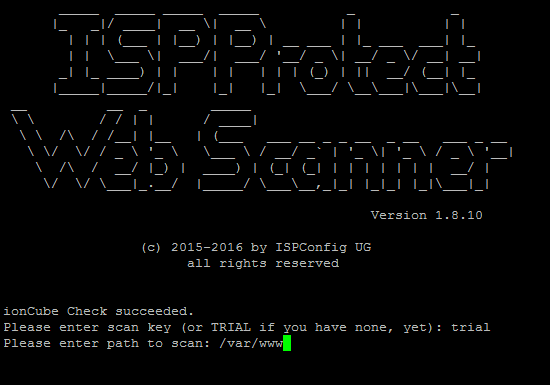
ispprotect-scan-websites-for-malware-and-infected-with-backdoors-or-spamming-software-source-code-files

I've used it as a trial

Please enter scan key:  trial
Please enter path to scan: /var/www

You will be shown the scan progress, be patient because on a multiple shared hosting servers with few hundred of websites.
The tool will take really, really long so you might need to leave it for 1 hr or even more depending on how many source files / CSS / Javascript etc. needs to be scanned.

Once scan is completed scan and infections found logs will be stored under /usr/local/ispprotect, under separate files for different Website Engines and CMSes:

After the scan is completed, you will find the results also in the following files:
 

Malware => /usr/local/ispprotect/found_malware_20161401174626.txt
Wordpress => /usr/local/ispprotect/software_wordpress_20161401174626.txt
Joomla => /usr/local/ispprotect/software_joomla_20161401174626.txt
Drupal => /usr/local/ispprotect/software_drupal_20161401174626.txt
Mediawiki => /usr/local/ispprotect/software_mediawiki_20161401174626.txt
Contao => /usr/local/ispprotect/software_contao_20161401174626.txt
Magentocommerce => /usr/local/ispprotect/software_magentocommerce_20161401174626.txt
Woltlab Burning Board => /usr/local/ispprotect/software_woltlab_burning_board_20161401174626.txt
Cms Made Simple => /usr/local/ispprotect/software_cms_made_simple_20161401174626.txt
Phpmyadmin => /usr/local/ispprotect/software_phpmyadmin_20161401174626.txt
Typo3 => /usr/local/ispprotect/software_typo3_20161401174626.txt
Roundcube => /usr/local/ispprotect/software_roundcube_20161401174626.txt


ISPProtect is really good in results is definitely the best malicious scripts / trojan / trojan / webshell / backdoor / spammer (hacking) scripts tool available so if your company could afford it you better buy a license and settle a periodic cron job scan of all your servers, like lets say:


server:~# crontab -u root -e
0 3  1 * *   /usr/local/ispprotect/ispp_scan –update && /usr/local/ispprotect/ispp_scan –path=/var/www –email-results=admin-email@your-domain.com –non-interactive –scan-key=AAA-BBB-CCC-DDD


Unfortunately ispprotect is quite expensive so I guess most small and middle sized shared hosting companies will be unable to afford it.
But even for a one time run this tools worths the try and will save you an hours if not days of system investigations.
I'll be glad to hear from readers if aware of any available free software alternatives to ISPProtect. The only one I am aware is Linux Malware Detect (LMD).
I've used LMD in the past but as of time of writting this article it doesn't seems working any more so I guess the tool is currently unsupported / obsolete.


How to Turn Off, Suppress PHP Notices and Warnings – PHP error handling levels via php.ini and PHP source code

Friday, April 25th, 2014

php-logo-disable-warnings-and-notices-in-php-through-htaccess-php-ini-and-php-code

PHP Notices are common to occur after PHP version upgrades or where an obsolete PHP code is moved from Old version PHP to new version. This is common error in web software using Frameworks which have been abandoned by developers.

Having PHP Notices to appear on a webpage is pretty ugly and give a lot of information which might be used by malicious crackers to try to break your site thus it is always a good idea to disable PHP Notices. There are plenty of ways to disable PHP Notices

The easiest way to disable it is globally in all Webserver PHP library via php.ini (/etc/php.ini) open it and make sure display_errors is disabled:

display_errors = 0

or

display_errors = Off

Note that that some claim in PHP 5.3 setting display_errors to Off will not work as expected. Anyways to make sure where your loaded PHP Version display_errors is ON or OFF use phpinfo();

It is also possible to disable PHP Notices and error reporting straight from PHP code you need code like:


<?php
// Turn off all error reporting
error_reporting(0);
?>


or through code:


ini_set('display_errors',0);


PHP has different levels of error reporting, here is complete list of possible error handling variables:


<?php
// Report simple running errors

error_reporting(E_ERROR | E_WARNING | E_PARSE);

// Reporting E_NOTICE can be good too (to report uninitialized
// variables or catch variable name misspellings …)

error_reporting(E_ERROR | E_WARNING | E_PARSE | E_NOTICE);

// Report all errors except E_NOTICE
// This is the default value set in php.ini

error_reporting(E_ALL ^ E_NOTICE);
// Report all PHP errors (see changelog)

error_reporting(E_ALL);
// Report all PHP errors error_reporting(-1);
// Same as error_reporting(E_ALL);

ini_set('error_reporting', E_ALL); ?>

The level of logging could be tuned on Debian Linux via /etc/php5/apache2/php.ini or if necessary to set PHP log level in PHP CLI through /etc/php5/cli/php.ini with:

error_reporting = E_ALL & ~E_NOTICE


If you need to remove to remove exact warning or notices from PHP without changing the way  PHPLib behaves is to set @ infront of variable or function that is causing NOTICES or WARNING:
For example:
 

@yourFunctionHere();
@var = …;


Its also possible to Disable PHP Notices and Warnings using .htaccess file (useful in shared hosting where you don't have access to global php.ini), here is how:

# PHP error handling for development servers
php_flag display_startup_errors off
php_flag display_errors off
php_flag html_errors off
php_flag log_errors on
php_flag ignore_repeated_errors off
php_flag ignore_repeated_source off
php_flag report_memleaks on
php_flag track_errors on
php_value docref_root 0
php_value docref_ext 0
php_value error_log /home/path/public_html/domain/php_errors.log
php_value error_reporting -1
php_value log_errors_max_len 0

This way though PHP Notices and Warnings will be suppressed errors will get logged into php_error.log

Make Apache webserver fix spelling mistyped URL errors and serve files case insensitive with mod_speling

Wednesday, July 16th, 2014

make_apache_fix_mistyped_spelling_urls_errors_and_serve_files_case_insensitive_mod_speling_logo
On most if not all modern GNU / Linux distributions, Apache webserver comes preinstalled with mod_speling.

What mod_speling does is it tries to find and serve files and directories for non-existing  (404 return code) urls with a similar name to passed URL. Other thing mod_speling does is it serves files case-insensitive, even though the UNIX / Linux filesystems are built to understand files case-sensitive.

mod_speling is a very useful module especially when files are being pushed (synchronized) to Apache visible from web document folder from operating systems like Windows whose filesystem doesn't store files case sensitive.

Let me give you a small example on M$ Windows a create file NewFile.html, NEWFILE.HTML, NeWfIlE.Html etc. are one and the same file newfile.html and not 3 different files like it is usually on UNIX / Linux filesystems.

If you happen to migrate old static Websites from Microsoft Internet Information Services (IIS) to UNIX / Linux based hosting. Often Html coders which create websites on Windows platform doesn't respect in website hyperlinks case-sensitive, because anyways Windows FS is case-insetive, thus moving the website to Linux host with Apache the website/s will end up with many 404 error pages, whose fixing for big static websites will be a real pain in the ass.

Also there might be need for mod_speling module enabled, for PHP / Python / Perl websites developed on MS Windows platform and tested on Windows host and then officially to be deployed on Linux.

Note that mod_speling name as a funny thing as actually the module is also converting mis-pelled / mis-typed Apache URLs:

If for example, someone tried to link to your website from a forum mistyping the URL address with mod_speling the mistyped URL could still be handled to open the real existing URL:

Lets say you have URL:
 

http://your-domain.com/files/what-Ever-fle.php


and the actual URL is:

http://your-domain.com/files/what-Ever-file.php


mod_speling will make Apache scan in /files/ for any files with similar name to what-Ever-fle.php and will open any similar matched file name, preventing you from the normal 404 error and therefore often serving exactly what it has to. Of course such a behavior could be unwanted in same cases for CMSes, which depend on 404 error code for proper operating, so be very sure when configuring mod_speling that this is exactly what you need.

mod_speling can be also useful sometimes for Search Engine Optimization – SEO, as it will show less 404 pages to Crawler search engine bots.

1. Enable mod_speling module on Debian GNU / Linux and Ubuntu

Enabling mod_speling in Apache in Debian / Ubuntu etc. debian based Linuxes is done with either creating symlink from /etc/apache2/mods-available/speling.load to /etc/apache2/mods-enabled/speling.load :
 

ln -sf /etc/apache2/mods-available/speling.load /etc/apache2/mods-enabled/speling.load

Or by using a2enmodDebian apache module enabling script:
 

a2ensite sitename


To enable mod_speling mis-speling resolve feature config directive is:


CheckSpelling on


To disable case sensitivity – as I said earlier helpful for migrations from Microsoft Windows hosts to Linux, use directive:

CheckCaseOnly on


To enable both use:

<IfModule mod_speling.c>
    CheckCaseOnly on
    CheckSpelling on
</IfModule>

Enabling mod_speling case-insensitivity and fixing mistypes in URL could be done from .htaccess, for any <Directory> (vhost) with enabled .htaccess with

AllowOverride All

To enable it for default set host in new Apache install place it in /etc/apache2/apache2.conf and /etc/apache2/sites-enabled/000-default

Then as usual to make the configuration changes take affect, restart Apache:
 

/etc/init.d/apache2 restart


2. Enablig mod_speling on CentOS, RHEL and Fedora Linux


Most of RPM based Linux distributions have already mod_speling by default in Apache, so there will be no need to explicitly enable the module within HTTPD.

To check whether mod_speling is already enabled in httpd issue:
 

/usr/sbin/httpd -M |grep -i mod_speling


If you don't get no output from command this means the module is not enabled. This is the case with CentOS Linux 6.5 for example …

To enable mod_speling on Apache level add in /etc/httpd/conf/httpd.conf

LoadModule speling_module modules/mod_speling.so

and restart webserver
 

/etc/init.d/httpd restart


If you get instead
 

/usr/sbin/httpd -M |grep -i mod_speling
speling_module (shared)


Then it is already loaded in HTTPD to enable the module for default domain add to /etc/httpd/conf/httpd.conf – within (<Directory "/var/www/html">),

<IfModule mod_speling.c>
    CheckCaseOnly on
    CheckSpelling on
</IfModule>

Or if you want to make it active for specific directories within /var/www/html/whatever-dir use either new <Directory ..> directive within Apache config, or enable .htaccess processing with AllowOverride All and place them in .htaccess . For complete mod_speling reference check on Apache's official website

Disable php notice logging / stop variable warnings in error.log on Apache / Nginx / Lighttpd

Monday, July 28th, 2014

disable_php_notice_warnings_logging_in-apache-nginx-lighttpd
At one of companies where I administrate few servers, we are in process of optimizing the server performance to stretch out the maximum out of server hardware and save money from unnecessery hardware costs and thus looking for ways to make server performance better.

On couple of web-sites hosted on few of the production servers, administrating, I've noticed dozens of PHP Notice errors, making the error.log quickly grow to Gigabytes and putting useless hard drive I/O overhead. Most of the php notice warnings are caused by unitialized php variables.

I'm aware having an unitialized values is a horrible security hole, however the websites are running fine even though the notice warnings and currently the company doesn't have the necessery programmers resource to further debug and fix all this undefined php vars, thus what happens is monthly a couple of hundreds megabytes of useless same php notice warnings are written in error.log.

That  error.log errors puts an extra hardship for awstats which is later generating server access statistics while generating the 404 errors statistics and thus awstats script has to read and analyze huge files with plenty of records which doesn't have nothing to do with 404 error

We found this PHP Notice warnings logged is one of the things we can optimize had to be disabled.

Here is how this is done:
On the servers running Debian Wheezy stable to disable php notices.

I had to change in /etc/php5/apache2/php.ini error_reporting variable.

Setting was to log everything (including PHP critical errors, warning and notices) like so:
 

vi /etc/php5/apache2/php.ini

error_reporting = E_ALL & ~E_DEPRECATED

to

error_reporting = E_COMPILE_ERROR|E_ERROR|E_CORE_ERROR


On CentOS, RHEL, SuSE based servers, edit instead /etc/php.ini.

This setting makes Apache to only log in error.log critical errors, php core dump (thread) errors and php code compilation (interpretation errors)

To make settings take affect on Debian host Apache webserver:

/etc/init.d/apache2 restart

On CentOS, RHEL Linux, had to restart Apache with:

/etc/init.d/httpd restart

For other servers running Nginx and Lighttpd webservers, after changing php.ini:

service nginx reload
service lighttpd restart

To disable php notices errors only on some websites, where .htaccess enabled, you can use also place in website DocumentRoot .htaccess:
 

php_value error_reporting 2039


Other way to disable via .htaccess is by adding to it code:
 

php_flag display_errors off


Also for hosted websites on some of the servers, where .htaccess is disabled, enabling / disabling php notices can be easily triggered by adding following php code to index.php

define('DEBUG', true);

if(DEBUG == true)
{
    ini_set('display_errors', 'On');
    error_reporting(E_ALL);
}
else
{
    ini_set('display_errors', 'Off');
    error_reporting(0);
}


Fix Apache [error] [client xx.xxx.xxx.xx] PHP Warning: Unknown: Input variables exceeded 1000. To increase the limit change max_input_vars in php.ini. in Unknown on line 0

Wednesday, August 14th, 2013

I have a busy Linux server with 24 cores each running on ..4 Ghz. Server is configured to server  Apache and MySQL queries and a dozen of high traffic websites are hosted on it. Until just recently server worked fine and since about few days I started getting SMS notifications that server is inaccessible few times a day. To check what's wrong I checked in /var/log/apache2/error.log  and there I found  following error:

[error] [client 95.107.233.2] PHP Warning:  Unknown: Input variables exceeded 1000.

To increase the limit change max_input_vars in php.ini. in Unknown on line 0 referer: http://www.site-domain-name.com/predict/2013-08-10
 

Before I check Apache error.log, I had a guess that ServerLimit of 256 (spawned servers max) is reached so solution would be raise of ServerLimit to more than MaxClients setting defined in /etc/apache2/apache2.conf. After checking /var/log/apache2/error.log I've realized problem is because the many websites hosted on server exceed maximum defined variables possible to assign by libphp in php.ini. maximum possible defined variables before PHP stops servering is set through max_input_vars variable

As I'm running a Debian Squeeze Linux server, here is what is set as default for max_input_vars in /etc/php5/apache2/php.ini:

; How many GET/POST/COOKIE input variables may be accepted
; max_input_vars = 1000

So to fix it in php.ini just raised a bit setting to 1500, i.e.:

max_input_vars = 1500

Though I hit the error on Debian I assume same error occurs on Redhat RPM based (Fedora, CentOS, RHEL Linux) servers.
Hence I assume

max_input_vars = 1500

or higher should fix on those servers too. Looking forward to hear if same error is hit on RedHats.

Enjoy 🙂